2015 MERCEDES-BENZ S-Class light
[x] Cancel search: lightPage 290 of 502

The vehicle can be driven by the electric
motor alone up to a speed of approximately
130 km/h.
The vehicle is driven by the electric motor
alone only when all conditions for the auto-
matic engine switch-off are fulfilled.
Further information on the automatic engine
switch-off (Y page 288).
Driving on inter-urban roads
The following phases are possible when driv-
ing on inter-urban roads: R rapid acceleration (boost mode)
R constant energy consumption
R energy recuperation
R electric operation mode
A great deal of recovered energy may be
available, depending on the route profile. This reduces consumption and emissions.
Highway driving
During highway driving, fuel consumption andemissions are favorably influenced in partic-
ular by reduced power losses.
The internal combustion engine will be
switched off automatically, if:
R the driver removes his foot from the accel-
erator pedal in drive program Eand a speed
of 130 km/h is not exceeded
R the driver removes his foot from the accel-
erator pedal in drive program E+and a
speed of 180 km/h is not exceeded.
Further information on the automatic engine
switch-off (Y page 288).
ECO start/stop function General notes
The ECO start/stop function switches the
internal combustion engine off automatically
when the vehicle stops moving and at high
speeds (Y
page 289).
All vehicle systems remain active, e.g. the
automatic climate control. The ECO start/stop function is only available
in drive programs Eand E+. Electric-only
operation is only possible in drive programs E
and E+. Additional information for drive pro-
grams Eand E+(Ypage 285).
Automatic engine switch-off
The engine is switched off automatically,
including when:
R the driver removes his foot from the accel-
erator in drive program Eand a speed of
130 km/h is not exceeded (Y page 289)
R the driver removes his foot from the accel-
erator in drive program E+and a speed of
180 km/h is not exceeded (Y page 289)
R the engine has reached its operating tem-
perature
R the driver’s seat belt is fastened and the
driver’s door is closed
R the driver only slightly depresses the accel-
erator pedal in order to, for example, main- tain the current speed for a limited distance
R the hood is closed and engaged properly
R the high-voltage battery is charged suffi-
ciently
R there are no malfunctions in the hybrid sys-
tem
The internal combustion engine will not be
switched off automatically, if:
R the self-diagnosis function of the engine
control unit is still active
R there is a malfunction in the hybrid system
R the climate control of the vehicle requires it
R the high-voltage battery is being charged
(Y page 282)
R automatic emissions tests are running 288
PLUG-IN HYBRID operationDriving and parking
Page 291 of 502

Automatic engine start
The automatically switched-off internal com-
bustion engine starts automatically in certain situations, if:
R the power demand from the driver via the
accelerator pedal is greater than the elec-
tric motor alone can provide
R the driver switches to drive program Sor M
R the condition of charge of the high-voltage
battery has reached the lower limit
R the settings of the automatic climate con-
trol require it, e.g. at external temperatures
above 30 †
Overrun mode
In overrun mode, the combustion engine is
switched off and is disconnected from the
drive train. The electric motor:
R generates low thrust, which corresponds to
the overrun mode of an active combustion
engine
R functions as a generator and produces the
necessary energy for the auxiliary consum-
ers and charges the high-voltage battery
Overrun mode is possible in the following
speed range:
R in drive program Ebelow 130 km/h
R in drive program E+below 180 km/h
In drive program E+, after the accelerator
pedal has been released the coasting char-
acteristics of the vehicle are adapted to the
traffic conditions. Further information about
the haptic accelerator pedal (Y page 286).
Map-based energy management For map-based energy management, the sys-
tem factors in information about the expec-
ted route when route guidance is active.
The information on the route is provided by
COMAND and includes the following:
R road categories
R speed limitations
R data on downhill gradients The use of electric energy is automatically
optimally distributed from the beginning to
the end of the journey, using information
about the route. The distribution is pre-emp-
tive and takes into consideration:
R the sections of the journey ahead
R the energy consumption on the whole route
The condition of charge of the high-voltage
battery is thus systematically controlled. In
addition, the control function takes into
account that:
R the fuel saving through the use of electrical
energy can vary, dependent on the route
(e.g. urban, interurban or highway)
R the use of electrical energy is held available
for electric driving, particularly for urban
routes
The vehicle thus automatically selects the
optimum driving mode for the respective sec- tion of the route.
Map-based energy management is available
under the following conditions:
R drive program E+is selected
R HYBRID driving mode is selected
R active route guidance is activated
R suitable map data is available
When map-based energy management is
engaged, the area in front of the vehicle in the
multifunction display will be green. Parking
X Apply the electric parking brake.
The red !indicator lamp in the instru-
ment cluster lights up.
X Use the DIRECT SELECT lever to shift the
automatic transmission to P.
X Switch the ignition off.
The READY indicator in the instrument clus-
ter goes out.
Further information on parking and switching off the internal combustion engine
(Y page 221). PLUG-IN HYBRID operation
289Driving and parking Z
Page 292 of 502

Problems with PLUG-IN HYBRID operation
Internal combustion engine Problem
Possible causes/consequences and
M
MSolutions You cannot start the
internal combustion
engine. The multifunc-
tion display shows no
display messages. The
READY indicator in the
multifunction display is
off. For example, the self-diagnosis is not yet complete or the hybrid
system is malfunctioning.
X Switch off the ignition and turn it back on.
X Try to start the internal combustion engine again.
If the internal combustion engine still does not start: X Consult a qualified specialist workshop. You wish to pull away,
but the ECO start/stop
function does not start
the internal combus-
tion engine. The READY
indicator in the multi-
function display is off. The ECO start/stop function has failed. The warning and indicator
lamps in the instrument cluster light up.
X Shift the transmission to P.
X Switch off the ignition and turn it back on.
X Start the engine. The hybrid system is malfunctioning.
X Consult a qualified specialist workshop. Recuperative Brake System
Problem
Possible causes/consequences and
M MSolutions Braking resistance is
reduced and brake
pedal travel is longer
than usual.
G
Risk of accident
The Recuperative Brake System is malfunctioning.
X Observe the additional display messages in the multifunction
display (Y page 316).
X Observe the information regarding indicator and warning lamps
in the instrument cluster (Y page 366) .290
PLUG-IN HYBRID operationDriving and parking
Page 299 of 502

HYBRID
HYBRID
Operating mode display (PLUG-IN
hybrid vehicles) (Y
page 279)
Electric range (PLUG-IN HYBRID
vehicles)
ë HOLD function (Y page 242)
j Active Parking Assist (Y page 251)
_ Adaptive Highbeam Assist Plus
(Ypage 153)
a DISTRONIC PLUS Steering Assist
and Stop&Go Pilot (Y page 240)
Additional speedometer
(Y page 313) Head-up display
General notes The head-up display projects information
from the navigation system and the driver
assistance system above the dashboard into
the driver's field of vision.
A requirement for the display of the contents
is that the following functions are available in the vehicle and are switched on:
R Cruise control
R DISTRONIC PLUS
R Navigation
The head-up display allows the driver to see
all of the information without having to take
his eyes off the road.
Important safety notes The head-up display is only an aid and is not a
substitute for attentive driving.
The visibility of the head-up display is influ-
enced by the following conditions:
R the driver's seat position
R the positioning of the display image
R the general ambient light
R sunglasses with polarization filters
R Wet roads
R blocking of sunlight by objects on the dis-
play cover In the event of extreme sunlight, sections of
the display may fade. This can be reversed by
switching the head-up display off and on
again.
i Vehicles with the head-up display are
equipped with a special windshield. Should repairs be necessary, have the windshield
replaced at a qualified specialist workshop.
Displays and operation Switching the head-up display on or off
X
Press button :.
When the head-up display is switched on,
the display appears in the driver's field of
vision.
AMG vehicles: press button :to change
from Standard on the AMG display and then press button :to turn off the head-up dis-
play. Displays and operation
297On-board computer and displays Z
Page 304 of 502

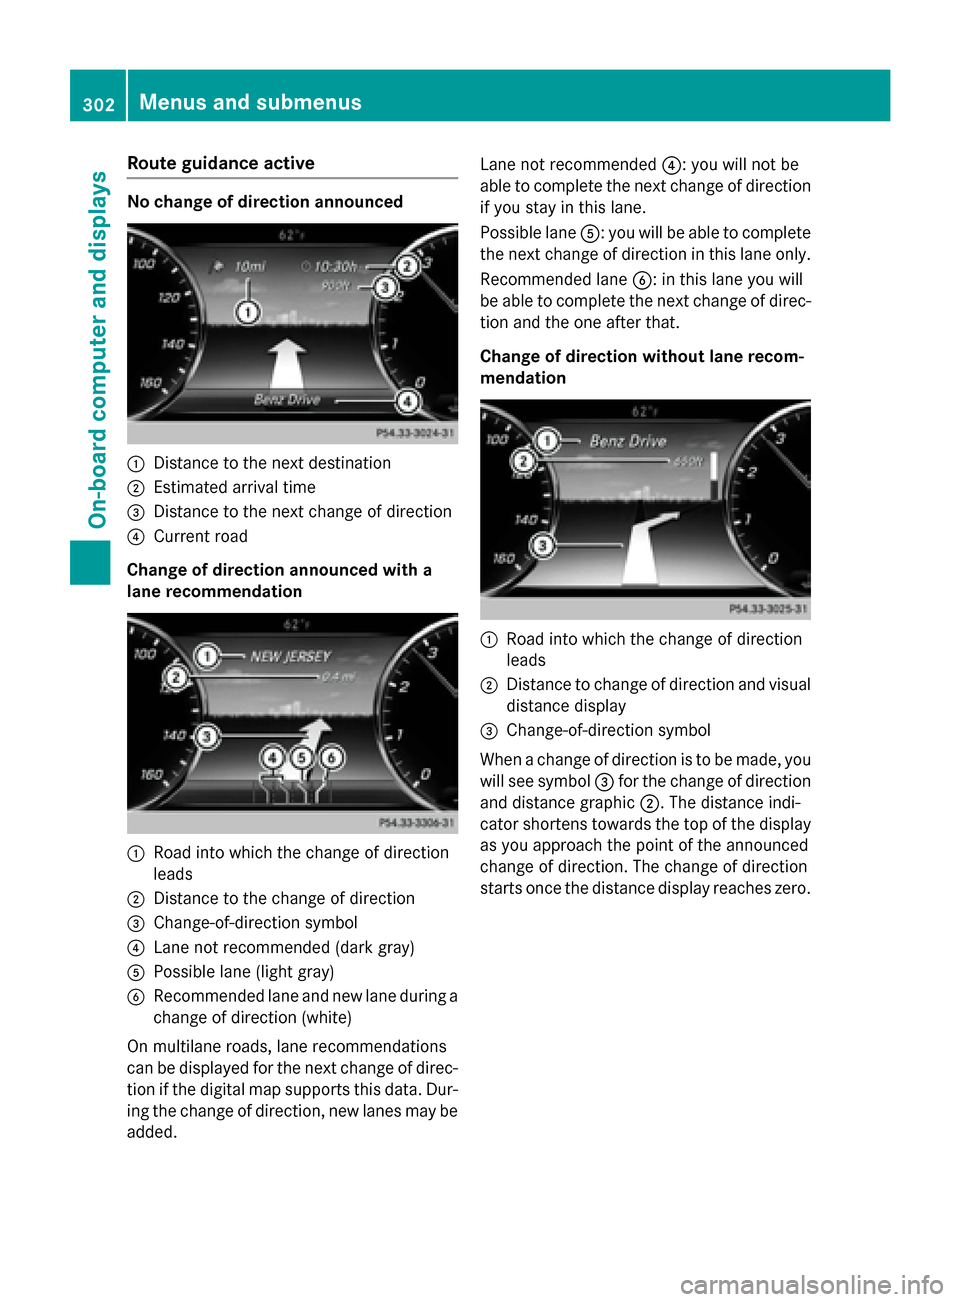
Route guidance active
No change of direction announced
:
Distance to the next destination
; Estimated arrival time
= Distance to the next change of direction
? Current road
Change of direction announced with a
lane recommendation :
Road into which the change of direction
leads
; Distance to the change of direction
= Change-of-direction symbol
? Lane not recommended (dark gray)
A Possible lane (light gray)
B Recommended lane and new lane during a
change of direction (white)
On multilane roads, lane recommendations
can be displayed for the next change of direc- tion if the digital map supports this data. Dur-
ing the change of direction, new lanes may be added. Lane not recommended
?: you will not be
able to complete the next change of direction
if you stay in this lane.
Possible lane A: you will be able to complete
the next change of direction in this lane only.
Recommended lane B: in this lane you will
be able to complete the next change of direc- tion and the one after that.
Change of direction without lane recom-
mendation :
Road into which the change of direction
leads
; Distance to change of direction and visual
distance display
= Change-of-direction symbol
When a change of direction is to be made, you will see symbol =for the change of direction
and distance graphic ;. The distance indi-
cator shortens towards the top of the display as you approach the point of the announced
change of direction. The change of direction
starts once the distance display reaches zero. 302
Menus and submenusOn-board computer and displays
Page 309 of 502

X
Press the 6button to switch to the
redial memory.
X Press the :or9 button to select the
desired name or number.
X Press the 6ora button to start dial-
ing.
or X To exit the redial memory: press the
~ or% button. Assistance graphic menu
X
Use ò on the steering wheel to call up
the list of menus.
X Press the :or9 button on the steer-
ing wheel to select the Assistance
AssistanceInfo
Info
Display
Display menu.
X Confirm by pressing aon the steering
wheel.
The multifunction display shows the
DISTRONIC PLUS distance display in the
assistance graphic.
X Press :to display the ATTEN-
TION ASSIST assessment.
The assistance graphic displays the status of and information from the following driving
systems or driving safety systems:
R DISTRONIC PLUS (Y page 237)
R Spotlight function of Night View Assist Plus
(Y page 312)
R Distance warning and the autonomous
braking function COLLISION PREVENTION
ASSIST PLUS (Y page 79)
R PRE-SAFE ®
Brake (Y page 84) R
Active Blind Spot Assist (Y page 270)
R ATTENTION ASSIST (Y page 264)
R Active Lane Keeping Assist (Y page 273) Maintenance menu
Introduction In the
Service Service menu, you have the following
options:
R Calling up display messages in message
memory (Y page 316)
R Restarting the tire pressure loss warning
system (Y page 452)
R Checking the tire pressure electronically
(Y page 449)
R Calling up the service due date
(Y page 410).
R Displaying the coolant temperature (hybrid
or PLUG-IN HYBRID vehicles)
(Y page 307)
R Checking the engine oil level using the on-
board computer (Y page 407) (S 600, S
600 MAYBACH and S 65 AMG only)
Displaying the coolant temperature The
Coolant Coolant submenu is only present on
hybrid or plug-in hybrid vehicles.
X Use ò on the steering wheel to call up
the list of menus.
X Press the :or9 button on the steer-
ing wheel to select the Service Servicemenu.
X Confirm by pressing aon the steering
wheel. Menus and submenus
307On-board computer and displays Z
Page 310 of 502

X
Use : or9 to select the Coolant
Coolant
submenu.
X Press ato confirm the selection.
The multifunction display shows the cool-
ant temperature in a bar display. Settings menu
Introduction In the
Settings
Settings menu, you have the following
options:
R Changing assistance settings
(Y page 308)
R Changing hybrid settings (PLUG-IN hybrid
vehicles) (Y page 310)
R Changing head-up display settings
(Y page 311)
R Changing the light settings (Y page 312)
R Changing the instrument cluster settings
(Y page 312)
R Restoring the factory settings
(Y page 314)
Assistance submenu Deactivating/activating ESP
®
Observe the "Important safety notes" section
in the description of ESP ®
(Y page 82). G
WARNING
If you deactivate ESP ®
, ESP ®
no longer sta-
bilizes the vehicle. There is an increased risk
of skidding and an accident. Only deactivate ESP
®
in the situations descri-
bed in the following.
It may be best to deactivate ESP ®
in the fol-
lowing situations:
R when using snow chains
R in deep snow
R on sand or gravel
For further information about ESP ®
, see
(Y page 81).
X Start the engine.
X Use ò on the steering wheel to call up
the list of menus.
X Press the :or9 button on the steer-
ing wheel to select the Settings
Settings menu.
X Confirm by pressing aon the steering
wheel.
X Use : or9 to select the DriveAs‐ DriveAs‐
sist sist submenu.
X Press ato confirm.
X Press the :or9 button to select
ESP
ESP.
X Press ato confirm.
The current selection is displayed.
X To activate/deactivate: press thea
button again.
ESP ®
is deactivated if the åwarning lamp
in the instrument cluster lights up continu-
ously when the engine is running.
If the ÷ warning lamp lights up continu-
ously, ESP ®
is not available due to a malfunc-
tion.
Observe the information on warning lamps
(Y page 360).
Observe the information on display messages
(Y page 317).
Automatic activation of Night View Assist Plus
X Use ò on the steering wheel to call up
the list of menus.
X Press the :or9 button on the steer-
ing wheel to select the Settings Settingsmenu. 308
Menus and submenusOn-board computer and displays
Page 314 of 502

X
Use the :or9 button to select the
Position
Position function.
X Press the abutton to save the setting.
X Press the :or9 button to set the
position from Level
Level +5
+5(high) to Level
Level-5
-5
(low).
X Press the aor% button to save the
setting.
Using the Memory function, you can save and
call up the position of the Head-up display as
a single memory preset (Y page 143).
Setting the brightness
The brightness of the head-up display is auto-
matically adjusted to the surrounding ambi-
ent light. You can also individually adjust the
brightness of the head-up display.
X Switch on the Head-up display
(Y page 297).
X Use ò on the steering wheel to call up
the list of menus.
X Press the :or9 button on the steer-
ing wheel to select the Settings
Settings menu.
X Confirm by pressing aon the steering
wheel.
X Use the :or9 button to select the
Head-up Display
Head-up Display submenu.
X Press ato confirm.
X Press the :or9 button to select the
Brightness
Brightness function.
X Press the abutton to save the setting.
X Press the :or9 button to set the
brightness from Level +5
Level +5 (bright) to
Level -5
Level -5 (dark).
X Press the aor% button to save the
setting.
Light submenu Switching the spotlight function on/off
X Use ò on the steering wheel to call up
the list of menus.
X Press the :or9 button on the steer-
ing wheel to select the Settings
Settings menu. X
Confirm by pressing aon the steering
wheel.
X Press the :or9 button to select the
Lights Lights submenu.
X Press ato confirm.
X Use : or9 to select the Spotlight
Spotlight
function.
X Press the abutton to save the setting.
When the spotlight function is activated,
the assistance graphic shows the pedes-
trian symbol.
Further information on the spotlight function
(Y page 268).
Switching the daytime running lamps on/
off
This function is not available in Canada.
X Use ò on the steering wheel to call up
the list of menus.
X Press the :or9 button on the steer-
ing wheel to select the Settings Settingsmenu.
X Confirm by pressing aon the steering
wheel.
X Press the :or9 button to select the
Lights
Lights submenu.
X Press ato confirm.
X Press the :or9 button to select the
Daytime Running Lights
Daytime Running Lights function.
If the Daytime Running Lights
Daytime Running Lights function
has been switched on, the cone of light and the W symbol in the multifunction dis-
play are shown in white.
X Press the abutton to save the setting.
Further information on daytime running
lamps (Y page 150).
Instrument cluster submenu Selecting the unit of measurement for dis-
tance
The Display Unit Speed-/Odometer: Display Unit Speed-/Odometer:
function allows you to choose whether cer-
tain displays appear in kilometers or miles in the multifunction display. 312
Menus and submenusOn-board computer and displays