2015 MERCEDES-BENZ S-CLASS COUPE change wheel
[x] Cancel search: change wheelPage 27 of 417

Do not install accessories such as audio
systems in these areas. Do not carry out
repairs or welding. You could impair the
operating efficiency of the restraint sys-
tems.
Have accessories retrofitted at a qualified
specialist workshop.
You could jeopardise the operating safety of
your vehicle if you use parts, tyres and wheels
as well as accessories relevant to safety
which have not been approved by Mercedes. This could lead to malfunctions in safety-rel-
evant systems, e.g. the brake system. Only
use genuine Mercedes-Benz parts or parts of
equal quality. Only use tyres, wheels and
accessories that have been specifically
approved for your vehicle.
Mercedes-Benz tests genuine parts and con-
version parts and accessories that have been specifically approved for your vehicle for their
reliability, safety and suitability. Despite
ongoing market research, Mercedes-Benz is
unable to assess other parts. Mercedes-Benz therefore accepts no responsibility for the
use of such parts in Mercedes-Benz vehicles, even if they have been officially approved or
independently approved by a testing centre.
In Germany, certain parts are only officially
approved for installation or modification if
they comply with legal requirements. This
also applies to some other countries. All gen-
uine Mercedes-Benz parts meet the approval
requirements. The use of non-approved parts may invalidate the vehicle's general operating
permit.
This is the case:
R if they cause a change of the vehicle type
from that for which the vehicle's general
operating permit was granted
R if other road users could be endangered
R if the emission or noise levels are adversely
affected
Always specify the vehicle identification num-
ber (VIN) (Y page 404) when ordering genu-
ine Mercedes-Benz parts. Owner's Manual
Vehicle equipment
This Owner's Manual describes all models
and all standard and optional equipment
available for your vehicle at the time of pub-
lication of the Owner's Manual. Country-spe- cific differences are possible. Note that your
vehicle may not be fitted with all features
described. This is also the case for systems
and functions relevant to safety. Therefore,
the equipment on your vehicle may differ from
that in the descriptions and illustrations.
The original purchase contract documenta-
tion for your vehicle contains a list of all of the
systems in your vehicle.
Should you have any questions concerning
equipment and operation, please consult a
Mercedes-Benz Service Centre.
The Owner's Manual and Service Booklet are important documents and should kept in the
vehicle. Operating safety
Important safety notes
G
WARNING
If you do not have the prescribed service/
maintenance work or necessary repairs car-
ried out, this could result in malfunctions or
system failures. There is a risk of an accident.
Always have the prescribed service/mainte-
nance work as well as necessary repairs car-
ried out at a qualified specialist workshop. G
WARNING
Flammable material such as leaves, grass or
twigs may ignite if they come into contact with hot parts of the exhaust system. There is a risk of fire.
When driving off road or on unpaved roads,
check the vehicle's underside regularly. In
particular, remove parts of plants or other
flammable materials which have become 24
Introduction
Page 28 of 417
trapped. In the case of damage, contact a
qualified specialist workshop. G
WARNING
Modifications to electronic components, their software as well as wiring could affect their
function and/or the operation of other net-
worked components. This could in particular
also be the case for systems relevant to
safety. They might not function properly any-
more and/or jeopardise the operational
safety of the vehicle. There is an increased
risk of an accident and injury.
Do not attempt to modify the wiring as well as
electronic components or their software.
Always have work on electrical and electronic components carried out at a qualified special-
ist workshop.
If you make any changes to the vehicle elec-
tronics, the general operating permit is ren-
dered invalid.
! There is a risk of damage to the vehicle if:
R the vehicle becomes stuck, e.g. on a high
kerb or an unpaved road
R you drive too fast over an obstacle, e.g. a
kerb or a pothole in the road
R a heavy object strikes the underbody or
parts of the chassis
In situations like this, the body, the under-
body, chassis parts, wheels or tyres could
be damaged without the damage being visi-
ble. Components damaged in this way can
unexpectedly fail or, in the case of an acci-
dent, no longer withstand the strain they
are designed for.
If the underbody panelling is damaged,
combustible materials such as leaves,
grass or twigs can gather between the
underbody and the underbody panelling. If
these materials come in contact with hot
parts of the exhaust system, they can catch fire.
In such situations, have the vehicle
checked and repaired immediately at a
qualified specialist workshop. If, upon con- tinuing your journey, you notice that driving
safety is impaired, pull over and stop the
vehicle immediately, paying attention to
road and traffic conditions. In such cases,
consult a qualified specialist workshop. Declarations of conformity
Wireless vehicle components The following information applies to all com-
ponents of the vehicle and the information
systems and communication devices integra-
ted into the vehicle which receive and/or
transmit radio waves:
The components of this vehicle that receive
and/or transmit radio waves are compliant
with the basic requirements and all other rel- evant conditions of Directive 1999/5/EC.
You can obtain further information from any
Mercedes-Benz Service Centre.
Electromagnetic compatibility The electromagnetic compatibility of the vehi-
cle components has been checked and certi-fied according to the currently valid version of
Regulation ECE-R 10. Diagnostics connection
The diagnostics connection is only intended
for the connection of diagnostic equipment at a qualified specialist workshop. G
WARNING
If you connect equipment to a diagnostics
connection in the vehicle, it can affect the
operation of the vehicle systems. This may
affect the operating safety of the vehicle.
There is a risk of an accident.
Do not connect any equipment to a diagnos-
tics connection in the vehicle. G
WARNING
Objects in the driver's footwell may restrict
the clearance around the pedals or block a Introduction
25 Z
Page 37 of 417
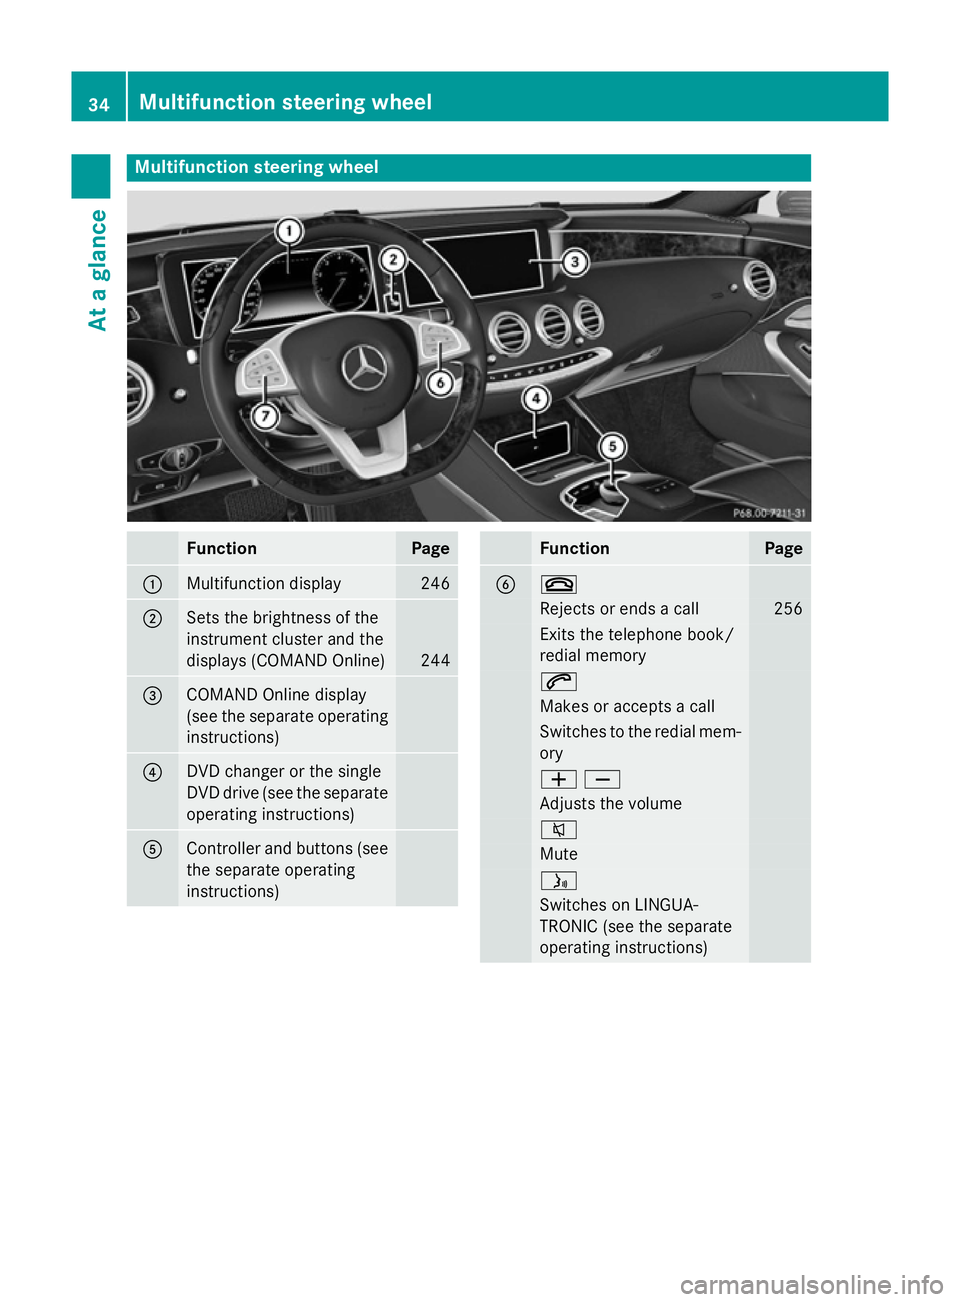
Multifunction steering wheel
Function Page
:
Multifunction display 246
;
Sets the brightness of the
instrument cluster and the
displays (COMAND Online)
244
=
COMAND Online display
(see the separate operating
instructions) ?
DVD changer or the single
DVD drive (see the separate
operating instructions) A
Controller and buttons (see
the separate operating
instructions) Function Page
B ~
Rejects or ends a call 256
Exits the telephone book/
redial memory 6
Makes or accepts a call
Switches to the redial mem-
ory WX
Adjusts the volume
8
Mute
ó
Switches on LINGUA-
TRONIC (see the separate
operating instructions) 34
Multifunction steering wheelAt a glance
Page 114 of 417
!
Do not move the front-passenger seat
fully forwards if there are objects in the
luggage net in the front-passenger footwell. The objects could otherwise be damaged.
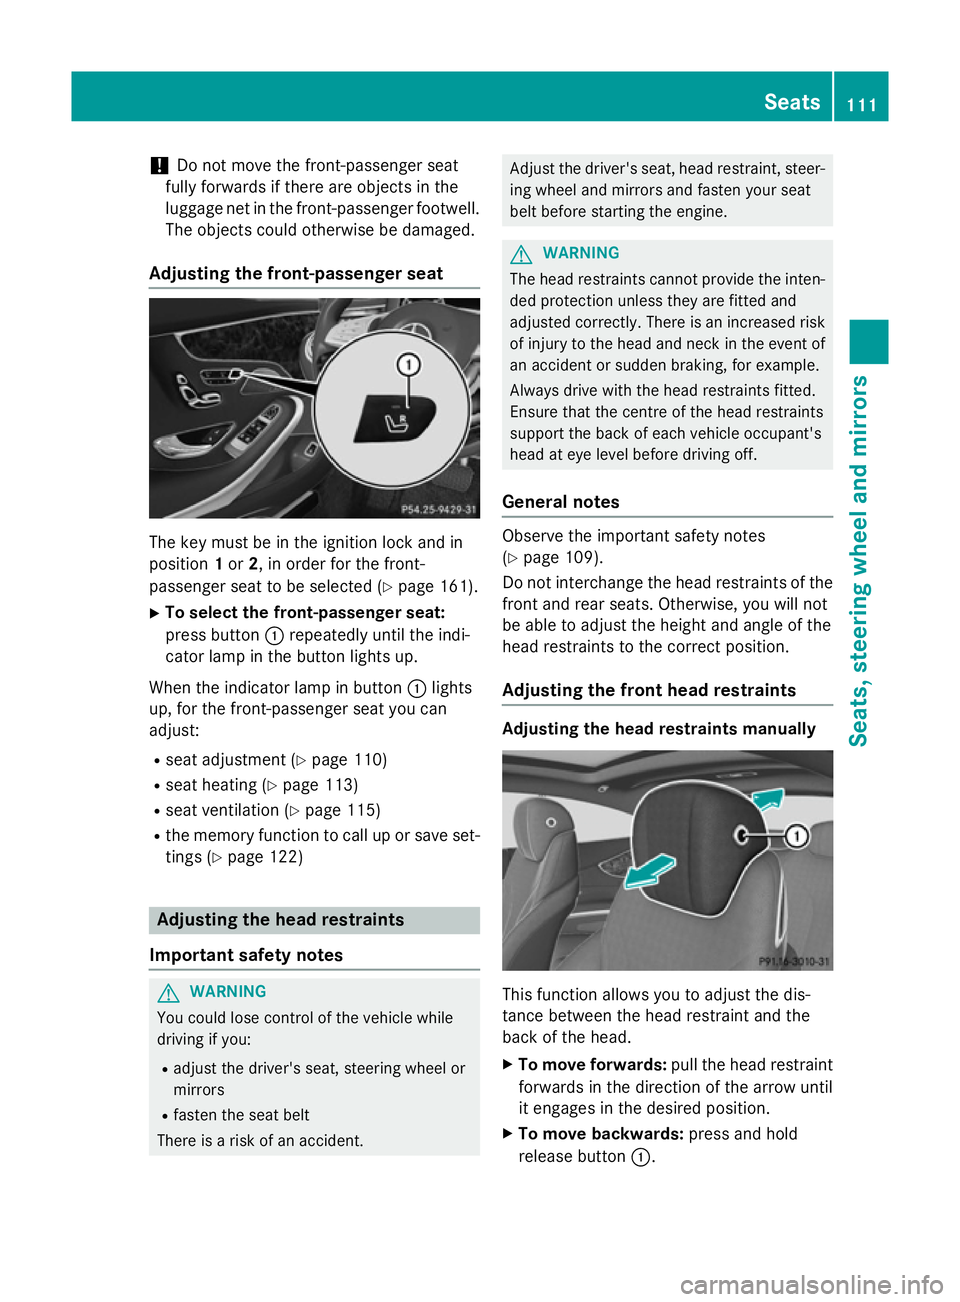
Adjusting the front-passenger seat The key must be in the ignition lock and in
position 1or 2, in order for the front-
passenger seat to be selected (Y page 161).
X To select the front-passenger seat:
press button :repeatedly until the indi-
cator lamp in the button lights up.
When the indicator lamp in button :lights
up, for the front-passenger seat you can
adjust:
R seat adjustment (Y page 110)
R seat heating (Y page 113)
R seat ventilation (Y page 115)
R the memory function to call up or save set-
tings (Y page 122) Adjusting the head restraints
Important safety notes G
WARNING
You could lose control of the vehicle while
driving if you:
R adjust the driver's seat, steering wheel or
mirrors
R fasten the seat belt
There is a risk of an accident. Adjust the driver's seat, head restraint, steer-
ing wheel and mirrors and fasten your seat
belt before starting the engine. G
WARNING
The head restraints cannot provide the inten-
ded protection unless they are fitted and
adjusted correctly. There is an increased risk of injury to the head and neck in the event of
an accident or sudden braking, for example.
Always drive with the head restraints fitted.
Ensure that the centre of the head restraints
support the back of each vehicle occupant's
head at eye level before driving off.
General notes Observe the important safety notes
(Y
page 109).
Do not interchange the head restraints of the
front and rear seats. Otherwise, you will not
be able to adjust the height and angle of the
head restraints to the correct position.
Adjusting the front head restraints Adjusting the head restraints manually
This function allows you to adjust the dis-
tance between the head restraint and the
back of the head.
X To move forwards: pull the head restraint
forwards in the direction of the arrow until
it engages in the desired position.
X To move backwards: press and hold
release button :. Seats
111Seats, steering wheel and mirrors Z
Page 124 of 417

R
the exterior mirrors fold in automatically as
soon as you lock the vehicle from the out-
side
R the exterior mirrors fold out automatically
again as soon as you unlock the vehicle
i If the exterior mirrors have been folded in
manually, they do not fold out.
Exterior mirror pushed out of position If an exterior mirror has been pushed out of
position (forwards or backwards), proceed as
follows:
X Press and hold button :until you hear a
click and the mirror engages audibly into
position (Y page 120).
The mirror housing is engaged again and
you can adjust the exterior mirrors as usual
(Y page 120). Automatic anti-dazzle mirrors
G
WARNING
Electrolyte may escape if the glass of an auto- matic anti-dazzle mirror breaks. Electrolyte is
harmful and causes irritation. It must not
come into contact with your skin, eyes, res-
piratory organs or clothing or be swallowed.
There is a risk of injury.
If you come into contact with electrolyte,
observe the following:
R immediately rinse off electrolyte from your
skin with water.
R immediately and thoroughly rinse electro-
lyte out of eyes using clean water.
R if electrolyte is swallowed, immediately
rinse out your mouth thoroughly. Do not
induce vomiting.
R if electrolyte comes into contact with skin
or eyes or is swallowed, seek medical atten-
tion immediately. R
immediately change out of clothing that has
been in contact with electrolyte.
R if an allergic reaction occurs, seek medical
attention immediately.
The rear-view mirror and the exterior mirror
on the driver's side automatically go into anti- dazzle mode if the following conditions are
met simultaneously:
R the ignition is switched on
R incident light from headlamps strikes the
sensor in the rear-view mirror
The mirrors do not dip if reverse gear is
engaged or if the interior lighting is switched
on. Parking position of the exterior mirror
on the front-passenger side
Setting and storing the parking position Using reverse gear
:
Memory button M
; Adjustment button
= Button for the exterior mirror on the front-
passenger side
? Button for the exterior mirror on the driv-
er's side
You can set the front-passenger side exterior
mirror so that you can see the rear wheel on
that side as soon as you engage reverse gear. You can store this position. Mirrors
121Seats, steering wheel and mirrors Z
Page 153 of 417
When the auxiliary heating is switched on,
make sure that:
R no flammable materials come into contact
with hot vehicle components
R the exhaust gas can escape from the
exhaust pipe unhindered
R the exhaust gas does not come into contact
with flammable materials.
The auxiliary heating and the exhaust gas out-
let are situated behind the right-hand front
wheel.
! Operating the auxiliary heating/ventila-
tion draws on the vehicle battery. After you
have heated or ventilated the vehicle a
maximum of two times, drive for a longer
distance.
Switch the auxiliary heating on regularly once
a month for about ten minutes.
The auxiliary heating heats the air in the vehi-
cle interior to the set temperature. This
occurs without using the heat of the running
engine. The auxiliary heating is operated
directly using the vehicle's fuel. For this rea-
son, the tank content must be at least at
reserve fuel level to ensure that the auxiliary
heating functions.
The auxiliary heating or auxiliary ventilation
automatically adjusts to changes in temper-
ature and weather conditions. For this rea-
son, the auxiliary heating could switch from
ventilation mode to heating mode or from
heating mode to ventilation mode.
The auxiliary heating switches off when the
engine is switched off. The auxiliary ventila-
tion switches off when you turn the key to key position 2(Y page 161).
The auxiliary heating switches off automati-
cally after 50 minutes. This time limit can be
altered. To do this, visit a qualified specialist
workshop.
You cannot use the auxiliary ventilation to
cool the vehicle interior to a temperature
lower than the outside temperature. Before switching on X
Turn the key to position 2in the ignition
lock (Y page 161).
X Set the desired temperature using the
w rocker switch on the front control
panel or using COMAND Online (see the
separate operating instructions).
If you do not alter the temperature before
switching on the auxiliary heating or auxiliary
ventilation, the last temperature setting will
be adopted.
Auxiliary heating or auxiliary ventilation can
also be switched on if the manually set cli-
mate control is activated. Optimum comfort
can be attained when the system is set to
automatic mode. Set the temperature to
22 †.
You can switch the auxiliary heating or auxil-
iary ventilation on or off:
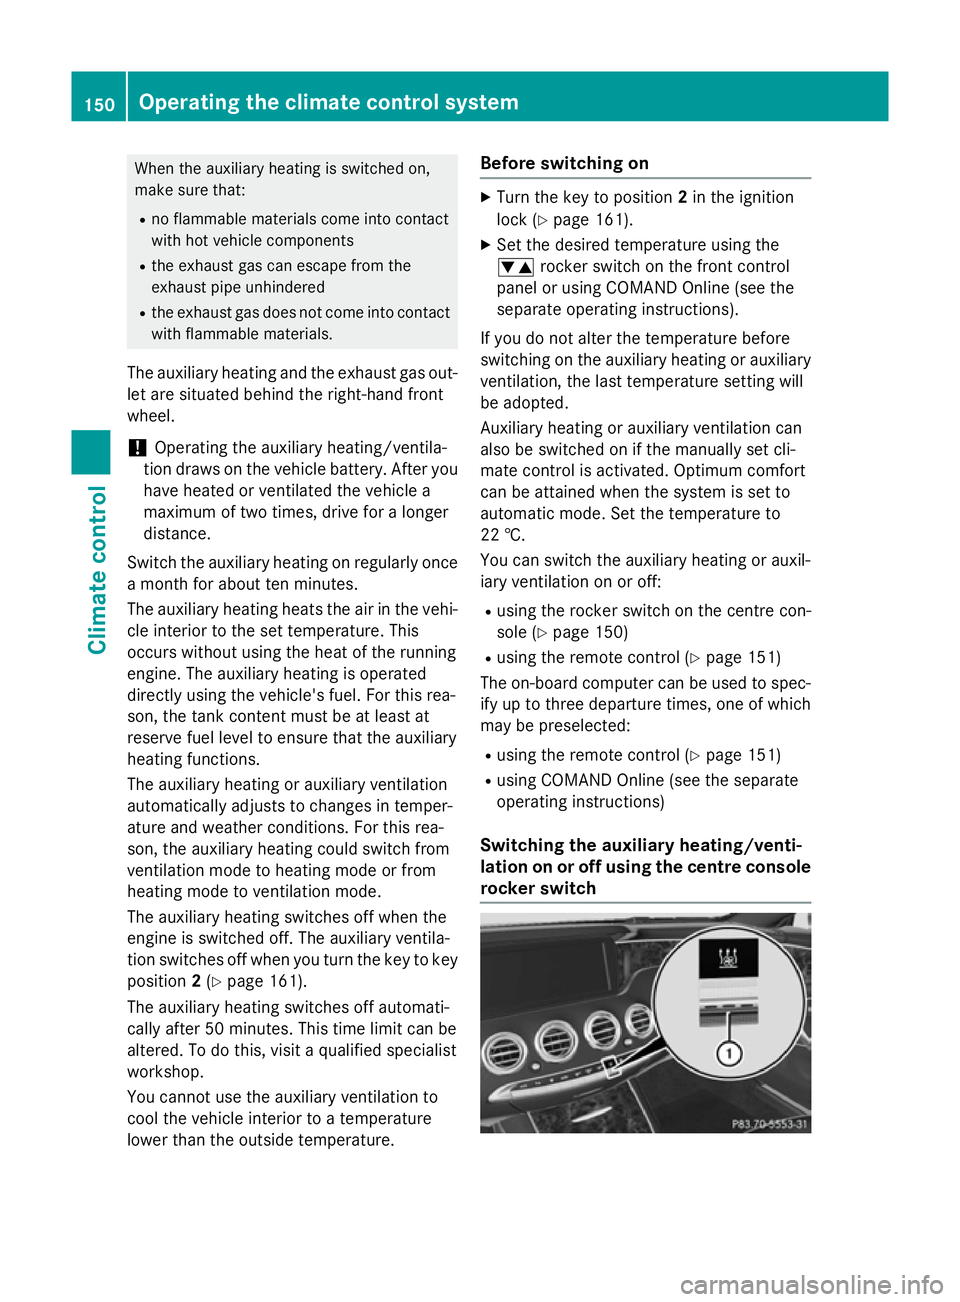
R using the rocker switch on the centre con-
sole (Y page 150)
R using the remote control (Y page 151)
The on-board computer can be used to spec-
ify up to three departure times, one of which
may be preselected:
R using the remote control (Y page 151)
R using COMAND Online (see the separate
operating instructions)
Switching the auxiliary heating/venti-
lation on or off using the centre console
rocker switch 150
Operating the climate control systemClimate control
Page 177 of 417
The program selector button influences:
R the drive program (Y page 174)
R the engine management
On Mercedes-AMG vehicles, drive program E
is called drive program C.
The automatic transmission switches to auto-
matic drive program E(drive program Cin
Mercedes-AMG vehicles).
All vehicles (except Mercedes-AMG vehi-
cles) E
Economy Comfortable, economical
driving
S
Sport Sporty driving style
You can also activate manual drive program
M
using the steering wheel gearshift paddles
(Y page 175). In manual drive program M,
you can briefly change gear yourself by using
the steering wheel gearshift paddles.
Mercedes-AMG vehicles C
Controlled
Efficiency Comfortable, economical
driving
S
Sport Sporty driving style
M
Manual Manual gearshifting
Permanent drive program
Mis only available
for Mercedes-AMG vehicles.
Further information about permanent drive
program M(Y page 176).
You can also activate manual drive program
M using the steering wheel gearshift paddles
(Y page 175). In manual drive program M,
you can briefly change gear yourself by using
the steering wheel gearshift paddles.
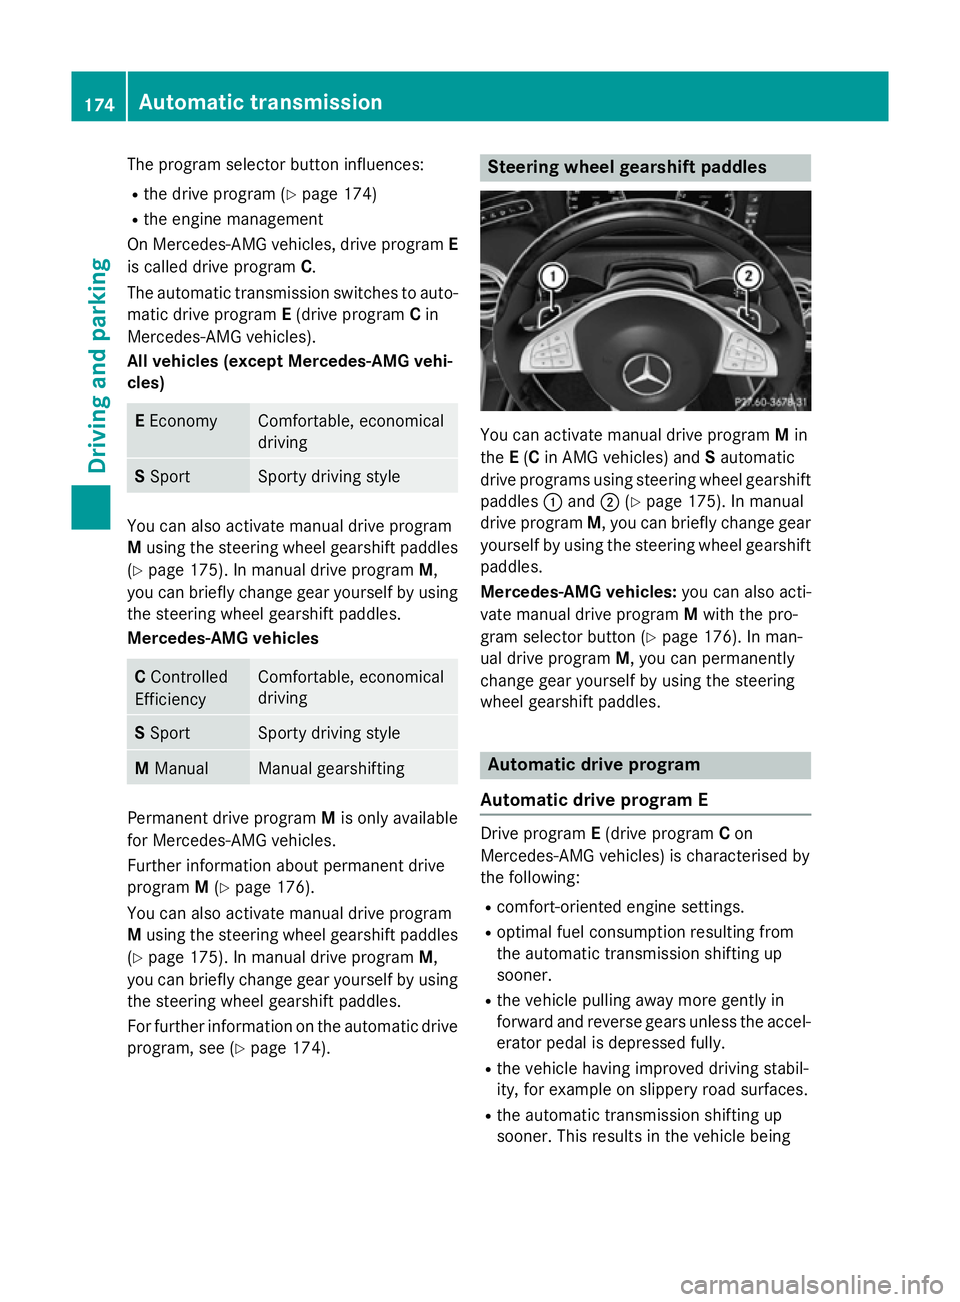
For further information on the automatic drive program, see (Y page 174). Steering wheel gearshift paddles
You can activate manual drive program
Min
the E(C in AMG vehicles) and Sautomatic
drive programs using steering wheel gearshift paddles :and ;(Ypage 175). In manual
drive program M, you can briefly change gear
yourself by using the steering wheel gearshift
paddles.
Mercedes-AMG vehicles: you can also acti-
vate manual drive program Mwith the pro-
gram selector button (Y page 176). In man-
ual drive program M, you can permanently
change gear yourself by using the steering
wheel gearshift paddles. Automatic drive program
Automatic drive program E Drive program
E(drive program Con
Mercedes-AMG vehicles) is characterised by
the following:
R comfort-oriented engine settings.
R optimal fuel consumption resulting from
the automatic transmission shifting up
sooner.
R the vehicle pulling away more gently in
forward and reverse gears unless the accel-
erator pedal is depressed fully.
R the vehicle having improved driving stabil-
ity, for example on slippery road surfaces.
R the automatic transmission shifting up
sooner. This results in the vehicle being 174
Automatic transmissionDriving and parking
Page 178 of 417
driven at lower engine speeds and the
wheels being less likely to spin.
Automatic drive program S Drive program
Sis characterised by the fol-
lowing:
R sporty engine settings
R the vehicle pulling away in first gear.
R the automatic transmission shifting up
later.
R as a result of the later automatic transmis-
sion shift points, the fuel consumption pos-sibly being higher.
Manual drive program M General notes
In this drive program, you can briefly change
gear yourself by using the steering wheel
gearshift paddles. The transmission must be
in position
D.
You can activate manual drive program Min
the E(C in Mercedes-AMG vehicles) and S
automatic drive programs.
Mercedes-AMG vehicles: as well as tempo-
rary drive program M, you can also activate
permanent drive program M. Further infor-
mation about permanent drive program M
(Y page 176).
Activating
X Shift the transmission to position D.
X Pull the left or right steering wheel gearshift
paddle (Y page 174).
Manual drive program Mis temporarily acti-
vated.
All vehicles (except Mercedes-AMG
vehicles:) M and the selected gear appear
in the multifunction display.
Shifting gears
If you pull on the left or right-hand steering
wheel gearshift paddle, the automatic trans-
mission switches to manual drive program M
for a limited amount of time. Depending on which gearshift paddle is pulled, the auto-
matic transmission immediately shifts into
the next gear up or down, if permitted.
X To shift up: pull the right-hand steering
wheel gearshift paddle (Y page 174).
The automatic transmission shifts up to the
next gear.
If the maximum engine speed on the cur-
rently engaged gear is reached and you
continue to accelerate, the automatic
transmission automatically shifts up in
order to prevent engine damage.
Mercedes-AMG vehicles: the automatic
transmission will not shift up to the next
gear when the engine speed is very low.
X To shift down: pull on the left-hand steer-
ing wheel gearshift paddle (Y page 174).
The automatic transmission shifts down to
the next gear.
If the engine exceeds the maximum engine speed when shifting down, the automatic
transmission protects against engine dam- age by not shifting down.
Automatic downshifting occurs when
coasting.
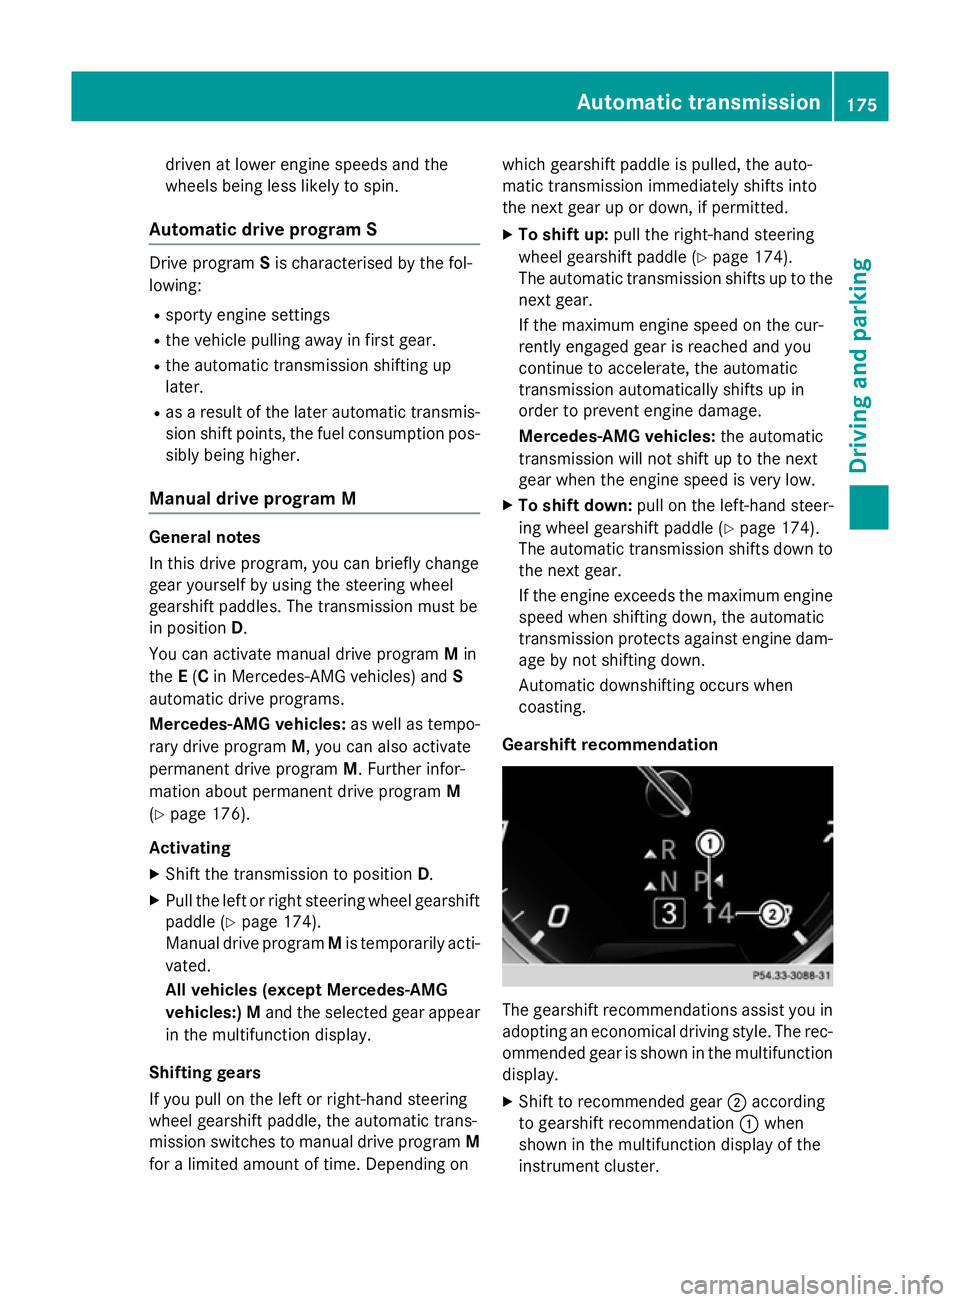
Gearshift recommendation The gearshift recommendations assist you in
adopting an economical driving style. The rec- ommended gear is shown in the multifunction
display.
X Shift to recommended gear ;according
to gearshift recommendation :when
shown in the multifunction display of the
instrument cluster. Automatic transmission
175Driving and parking Z