2015 MERCEDES-BENZ S-CLASS COUPE lock
[x] Cancel search: lockPage 125 of 417
X
Turn the key to position 2in the ignition
lock (Y page 161).
X Press button =for the exterior mirror on
the front-passenger side.
X Engage reverse gear.
The exterior mirror on the front-passenger
side moves to the preset parking position.
X Use adjustment button ;to adjust the
exterior mirror to a position that allows you to see the rear wheel and the kerb.
The parking position is stored.
i If you shift the transmission to another
position, the exterior mirror on the front-
passenger side returns to the driving posi-
tion after approximately ten seconds.
Using the memory button
You can set the front-passenger side exterior
mirror so that you can see the rear wheel on
that side as soon as you engage reverse gear. This setting can be stored using memory but-
ton M:.
X Turn the key to position 2in the ignition
lock (Y page 161).
X Press button =for the exterior mirror on
the front-passenger side.
X Use adjustment button ;to adjust the
exterior mirror to a position that allows you to see the rear wheel and the kerb.
X Press memory button M: and one of the
arrows on adjustment button ;within
three seconds.
The parking position is stored if the exterior
mirror does not move.
X If the mirror moves out of position, repeat
the steps.
Calling up a stored parking position X
Turn the key to position 2in the ignition
lock (Y page 161).
X Adjust the exterior mirror on the front-
passenger side using button =.
X Engage reverse gear.
The exterior mirror on the front-passenger
side moves to the stored parking position. The exterior mirror on the front-passenger
side moves back to its original position:
R as soon as you exceed a speed of
15 km/h
R about ten seconds after you have disen-
gaged reverse gear
R if you press button ?for the exterior mir-
ror on the driver's side Memory function
Important safety notes
G
WARNING
If you use the memory function on the driver's side while driving, the adjustments could
cause you to lose control of the vehicle. There
is a risk of an accident.
Only use the memory function on the driver's
side while the vehicle is stationary. G
WARNING
When the memory function adjusts the seat or steering wheel, you and other vehicle occu-
pants – particularly children – could become
trapped. There is a risk of injury.
While the memory function is making adjust-
ments, make sure that no one has any body
parts in the sweep of the seat or steering
wheel. If somebody becomes trapped, imme-
diately release the memory function position
button. The adjustment process is stopped. G
WARNING
If children activate the memory function, they
could become trapped, especially if they are
unattended. There is a risk of injury.
When leaving the vehicle, always take the key with you and lock the vehicle. Never leave
children unattended in the vehicle.
The memory function can be used at any time,
e.g. even when the key isn't in the ignition
lock. 122
Memory functionSeats, steering wheel and mirrors
Page 130 of 417

The exterior lighting (except the side lamps/
parking lamps) switches off automatically if
you:
R remove the key from the ignition lock
R open the driver's door with the key in posi-
tion 0
Automatic headlamp mode G
WARNING
When the light switch is set to Ã, the
dipped-beam headlamps may not be switched on automatically if there is fog, snow or othercauses of poor visibility due to the weather
conditions such as spray. There is a risk of an
accident.
In such situations, turn the light switch to
L.
The automatic headlamp feature is only an
aid. The driver is responsible for the vehicle
lighting at all times.
The daytime driving lights improve the detect- ability of your vehicle during the day.
When the side lamps and dipped-beam head-lamps are switched on, the green T(side
lamps) and L(dipped-beam headlamps)
indicator lamps in the instrument cluster light
up.
à is the preferred light switch setting. The
light setting is automatically selected accord- ing to the brightness of the ambient light
(exception: poor visibility due to weather con-
ditions such as fog, snow or spray):
R key in position 1in the ignition lock: the
side lamps are switched on or off automat- ically depending on the brightness of the
ambient light
R with the engine running: depending on the
ambient light conditions, the daytime driv-
ing lights or the parking and dipped-beam
headlamps are switched on or off automat- ically
X To switch on automatic headlamp
mode: turn the light switch to Ã.Dipped-beam headlamps
When the ignition is switched on and the light
switch is in position L, the side lamps and
dipped-beam headlamps are switched on
even if the light sensor does not sense dark
ambient light conditions. This is advanta-
geous when there is fog or rain.
X To switch on the dipped-beam head-
lamps: turn the key in the ignition lock to
position 2or start the engine.
X Turn the light switch to L.
The green Lindicator lamp in the instru-
ment cluster lights up.
Rear foglamp
The rear foglamp improves the visibility of
your vehicle in heavy fog for the following
traffic. Please observe the country-specific
laws on the use of rear foglamps.
X To switch on the rear foglamp: turn the
key in the ignition lock to position 2or start
the engine.
X Turn the light switch to LorÃ.
X Press the Rbutton.
The yellow Rindicator lamp in the
instrument cluster lights up.
X To switch off the rear foglamp: press the
R button.
The yellow Rindicator lamp in the
instrument cluster goes out.
Side lamps
! If the battery has been excessively dis-
charged, the side lamps or parking lamps
are automatically switched off to enable
the next engine start. Always park your
vehicle safely and sufficiently lit according
to legal standards. Avoid the continuous
use of the Tside lamps for several
hours. If possible, switch on the Xright
or the Wleft parking lamp.
X To switch on: turn the light switch to T.
The green Tindicator lamp in the instru-
ment cluster lights up. Exterior lighting
127Lights and windscreen wipers Z
Page 131 of 417
Parking lamps
Switching on the parking lamps ensures that
the corresponding side of the vehicle is illu-
minated.
X To switch on the parking lamps: the key
is not in the ignition lock or it is in posi-
tion 0.
X Turn the light switch to W(left-hand side
of the vehicle) or X(right-hand side of
the vehicle). Combination switch
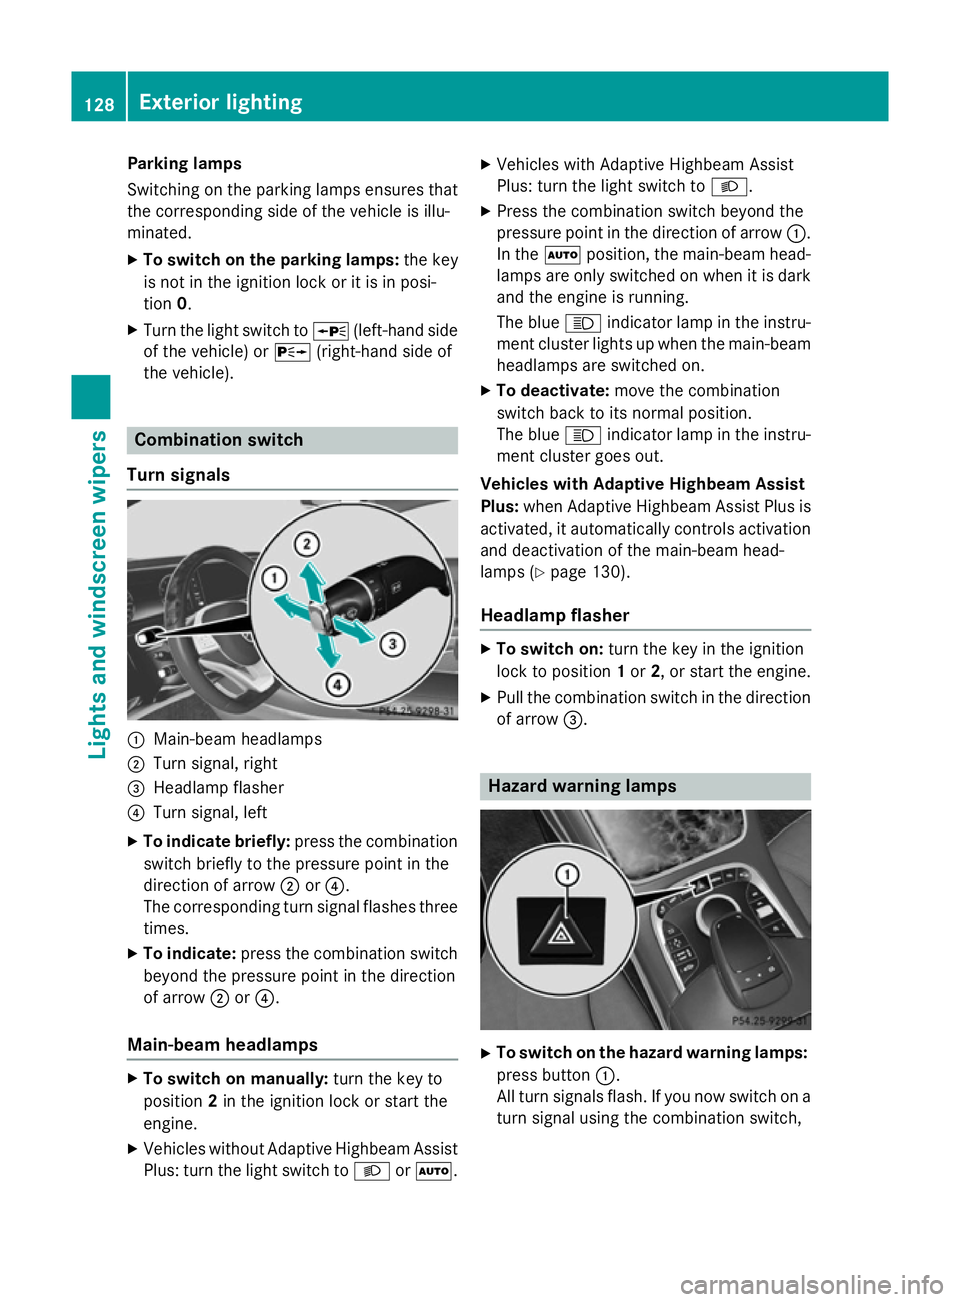
Turn signals :
Main-beam headlamps
; Turn signal, right
= Headlamp flasher
? Turn signal, left
X To indicate briefly: press the combination
switch briefly to the pressure point in the
direction of arrow ;or?.
The corresponding turn signal flashes three
times.
X To indicate: press the combination switch
beyond the pressure point in the direction
of arrow ;or?.
Main-beam headlamps X
To switch on manually: turn the key to
position 2in the ignition lock or start the
engine.
X Vehicles without Adaptive Highbeam Assist
Plus: turn the light switch to LorÃ. X
Vehicles with Adaptive Highbeam Assist
Plus: turn the light switch to L.
X Press the combination switch beyond the
pressure point in the direction of arrow :.
In the Ãposition, the main-beam head-
lamps are only switched on when it is dark
and the engine is running.
The blue Kindicator lamp in the instru-
ment cluster lights up when the main-beam
headlamps are switched on.
X To deactivate: move the combination
switch back to its normal position.
The blue Kindicator lamp in the instru-
ment cluster goes out.
Vehicles with Adaptive Highbeam Assist
Plus: when Adaptive Highbeam Assist Plus is
activated, it automatically controls activation and deactivation of the main-beam head-
lamps (Y page 130).
Headlamp flasher X
To switch on: turn the key in the ignition
lock to position 1or 2, or start the engine.
X Pull the combination switch in the direction
of arrow =. Hazard warning lamps
X
To switch on the hazard warning lamps:
press button :.
All turn signals flash. If you now switch on a turn signal using the combination switch, 128
Exterior lightingLights and windscreen wipers
Page 134 of 417

Important safety notes
G
WARNING
Adaptive Highbeam Assist Plus does not rec-
ognise road users:
R who have no lights, e.g. pedestrians
R who have poor lighting, e.g. cyclists
R whose lighting is blocked, e.g. by a barrier
In very rare cases, Adaptive Highbeam Assist
Plus may not recognise road users who do
have lights, or may recognise them too late. In this, or in similar situations, the automatic
main-beam headlamps will not be deactivated
or will be activated despite the presence of
other road users. There is a risk of an acci-
dent.
Always carefully observe the traffic conditions and switch off the main-beam headlamps in
good time.
Adaptive Highbeam Assist PLUS cannot take
into account road, weather or traffic condi-
tions. Adaptive Highbeam Assist Plus is only
an aid. You are responsible for adjusting the
vehicle's lighting to the prevailing light, visi-
bility and traffic conditions.
In particular, the detection of obstacles can
be restricted if there is:
R poor visibility, e.g. due to fog, heavy rain or
snow
R dirt on the sensors or if the sensors are
obscured Switching Adaptive Highbeam Assist
PLUS on/off :
Main-beam headlamps
; Turn signal, right
= Headlamp flasher
? Turn signal, left
X To switch on: turn the light switch to Ã.
X Press the combination switch beyond the
pressure point in the direction of arrow :.
The _ indicator lamp in the multifunc-
tion display lights up when it is dark and the light sensor switches on the dipped-beam
headlamps.
If you are driving at speeds above approx-
imately 25 km/h:
The headlamp range is set automatically
depending on the distance between the
vehicle and other road users.
If you are driving at speeds above approx-
imately 30 km/h and no other road users
have been detected:
The main-beam headlamps are switched on
automatically. The Kindicator lamp in
the instrument cluster also lights up.
If you are driving at speeds above approx-
imately 45 km/h and other road users have
been detected:
Partial main-beam is selected automati-
cally. The Kindicator lamp in the instru-
ment cluster also lights up.
If you are driving at speeds below approx-
imately 40 km/h:
The partial main-beam headlamps are
switched off automatically. If no other road Exterior lighting
131Lights and windscreen wipers Z
Page 135 of 417
users are detected, the main-beam head-
lamps are switched on.
If you are driving at speeds below approx-
imately 25 km/h or the roads are ade-
quately illuminated:
The main-beam headlamps are switched off
automatically. The Kindicator lamp in
the instrument cluster goes out. The _
indicator lamp in the multifunction display
remains lit.
X To switch off: move the combination
switch back to its normal position or move
the light switch to another position.
The _ indicator lamp in the multifunc-
tion display goes out. Headlamps misted up on the inside
Certain climatic and physical conditions may
cause moisture to form in the headlamp. This
moisture does not affect the functionality of
the headlamp. Interior lighting
Overview of interior lighting
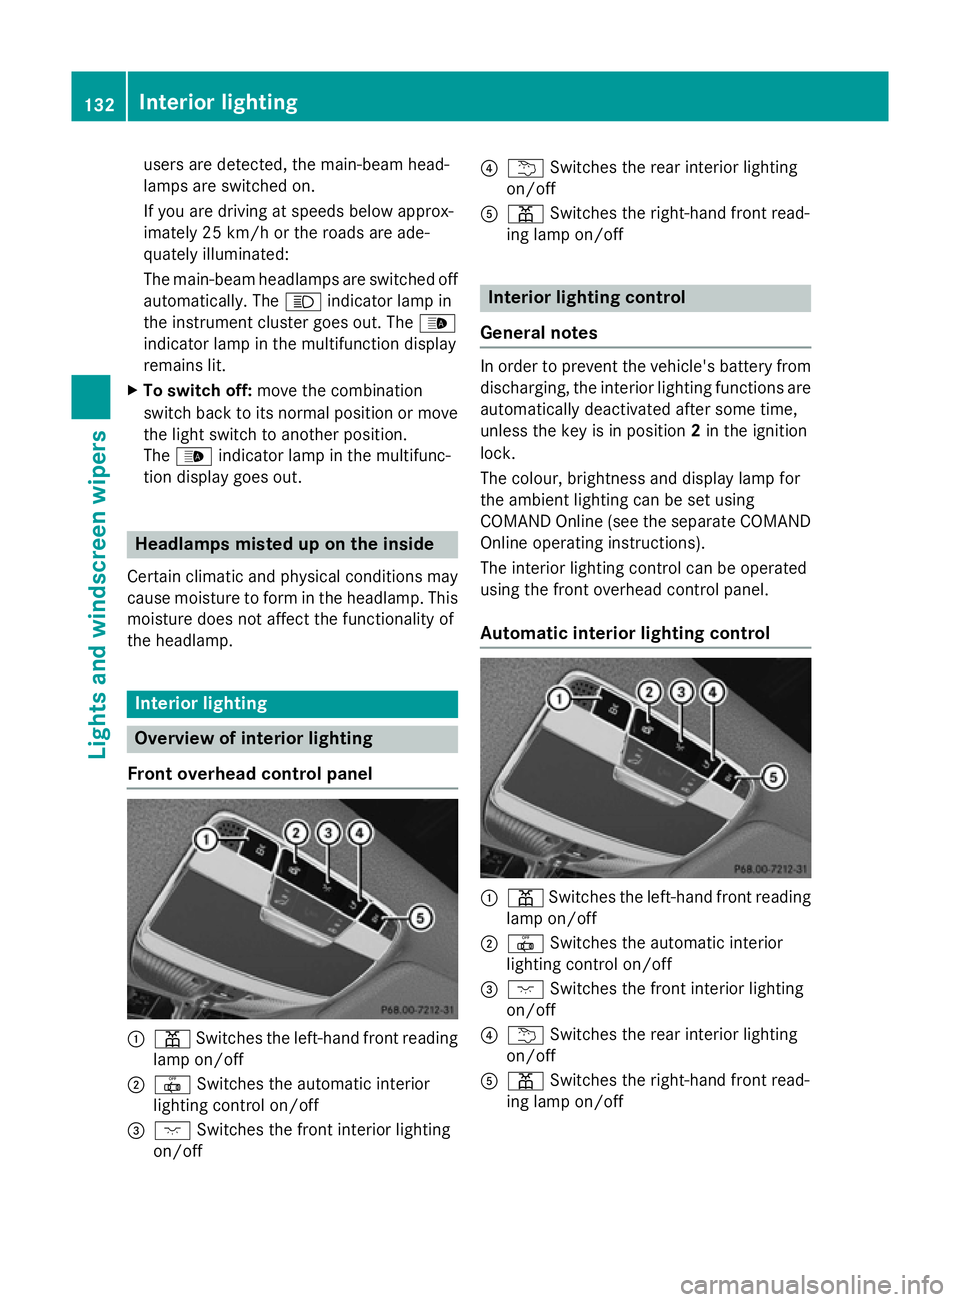
Front overhead control panel :
p Switches the left-hand front reading
lamp on/off
; | Switches the automatic interior
lighting control on/off
= c Switches the front interior lighting
on/off ?
u Switches the rear interior lighting
on/off
A p Switches the right-hand front read-
ing lamp on/off Interior lighting control
General notes In order to prevent the vehicle's battery from
discharging, the interior lighting functions are
automatically deactivated after some time,
unless the key is in position 2in the ignition
lock.
The colour, brightness and display lamp for
the ambient lighting can be set using
COMAND Online (see the separate COMAND
Online operating instructions).
The interior lighting control can be operated
using the front overhead control panel.
Automatic interior lighting control :
p Switches the left-hand front reading
lamp on/off
; | Switches the automatic interior
lighting control on/off
= c Switches the front interior lighting
on/off
? u Switches the rear interior lighting
on/off
A p Switches the right-hand front read-
ing lamp on/off 132
Interior lightingLights and windscreen wipers
Page 136 of 417
X
To switch on/off: press the|button.
When the automatic interior lighting con-
trol is activated, the button is flush with the overhead control panel.
The interior lighting automatically switches
on if you:
R unlock the vehicle
R open a door
R remove the key from the ignition lock
The interior lighting is activated for a short
time when the key is removed from the igni-
tion lock. This delayed switch-off can be
adjusted using COMAND Online (see the sep- arate COMAND Online operating instruc-
tions).
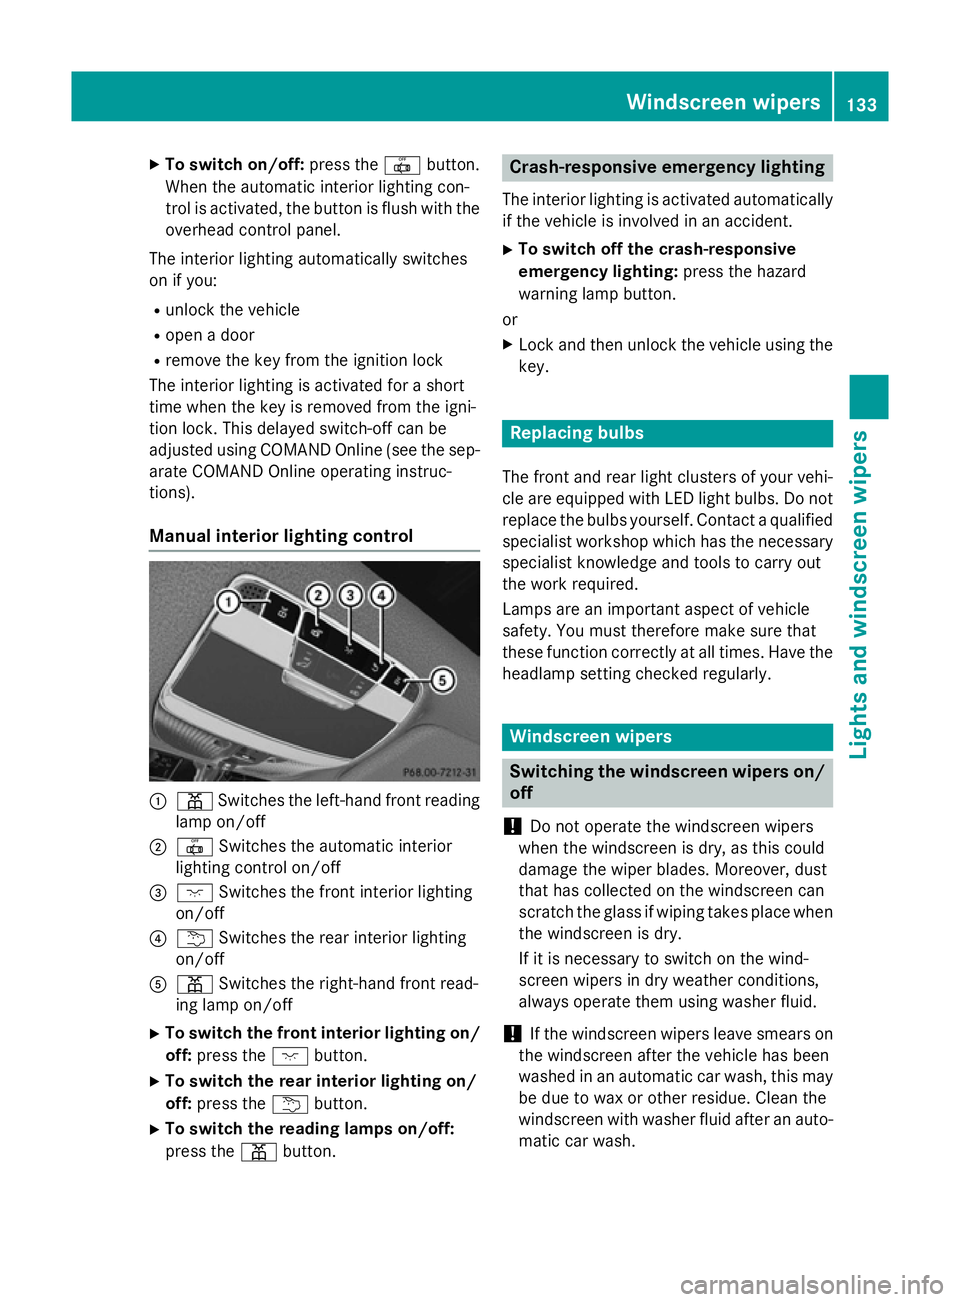
Manual interior lighting control :
p Switches the left-hand front reading
lamp on/off
; | Switches the automatic interior
lighting control on/off
= c Switches the front interior lighting
on/off
? u Switches the rear interior lighting
on/off
A p Switches the right-hand front read-
ing lamp on/off
X To switch the front interior lighting on/
off: press the cbutton.
X To switch the rear interior lighting on/
off: press the ubutton.
X To switch the reading lamps on/off:
press the pbutton. Crash-responsive emergency lighting
The interior lighting is activated automatically
if the vehicle is involved in an accident.
X To switch off the crash-responsive
emergency lighting: press the hazard
warning lamp button.
or X Lock and then unlock the vehicle using the
key. Replacing bulbs
The front and rear light clusters of your vehi-
cle are equipped with LED light bulbs. Do not replace the bulbs yourself. Contact a qualifiedspecialist workshop which has the necessaryspecialist knowledge and tools to carry out
the work required.
Lamps are an important aspect of vehicle
safety. You must therefore make sure that
these function correctly at all times. Have the
headlamp setting checked regularly. Windscreen wipers
Switching the windscreen wipers on/
off
! Do not operate the windscreen wipers
when the windscreen is dry, as this could
damage the wiper blades. Moreover, dust
that has collected on the windscreen can
scratch the glass if wiping takes place when the windscreen is dry.
If it is necessary to switch on the wind-
screen wipers in dry weather conditions,
always operate them using washer fluid.
! If the windscreen wipers leave smears on
the windscreen after the vehicle has been
washed in an automatic car wash, this may
be due to wax or other residue. Clean the
windscreen with washer fluid after an auto-
matic car wash. Windscreen wipers
133Lights andwindscreen wipers Z
Page 138 of 417
Replacing the wiper blades
Moving the wiper blades to a vertical posi-
tion
On vehicles without KEYLESS-GO:
X Turn the key to position 0in the ignition
lock (Y page 161).
X Set the windscreen wipers to the °
position.
X Turn the key to position 1in the ignition
lock (Y page 161).
X As soon as the wiper arms are vertical to
the bonnet, turn the key to position 0in the
ignition lock (Y page 161).
X Remove the key.
X Fold the wiper arms away from the wind-
screen until you feel them snap into place.
On vehicles with KEYLESS-GO: X Switch off the engine.
X Remove your foot from the brake pedal.
X Set the windscreen wipers to position
°.
X Press the Start/Stop button repeatedly
until the windscreen wipers start.
X When the wiper arms have reached the ver-
tical position, press the Start/Stop button
repeatedly until the windscreen wipers
stop.
X Fold the wiper arms away from the wind-
screen until you feel them snap into place.
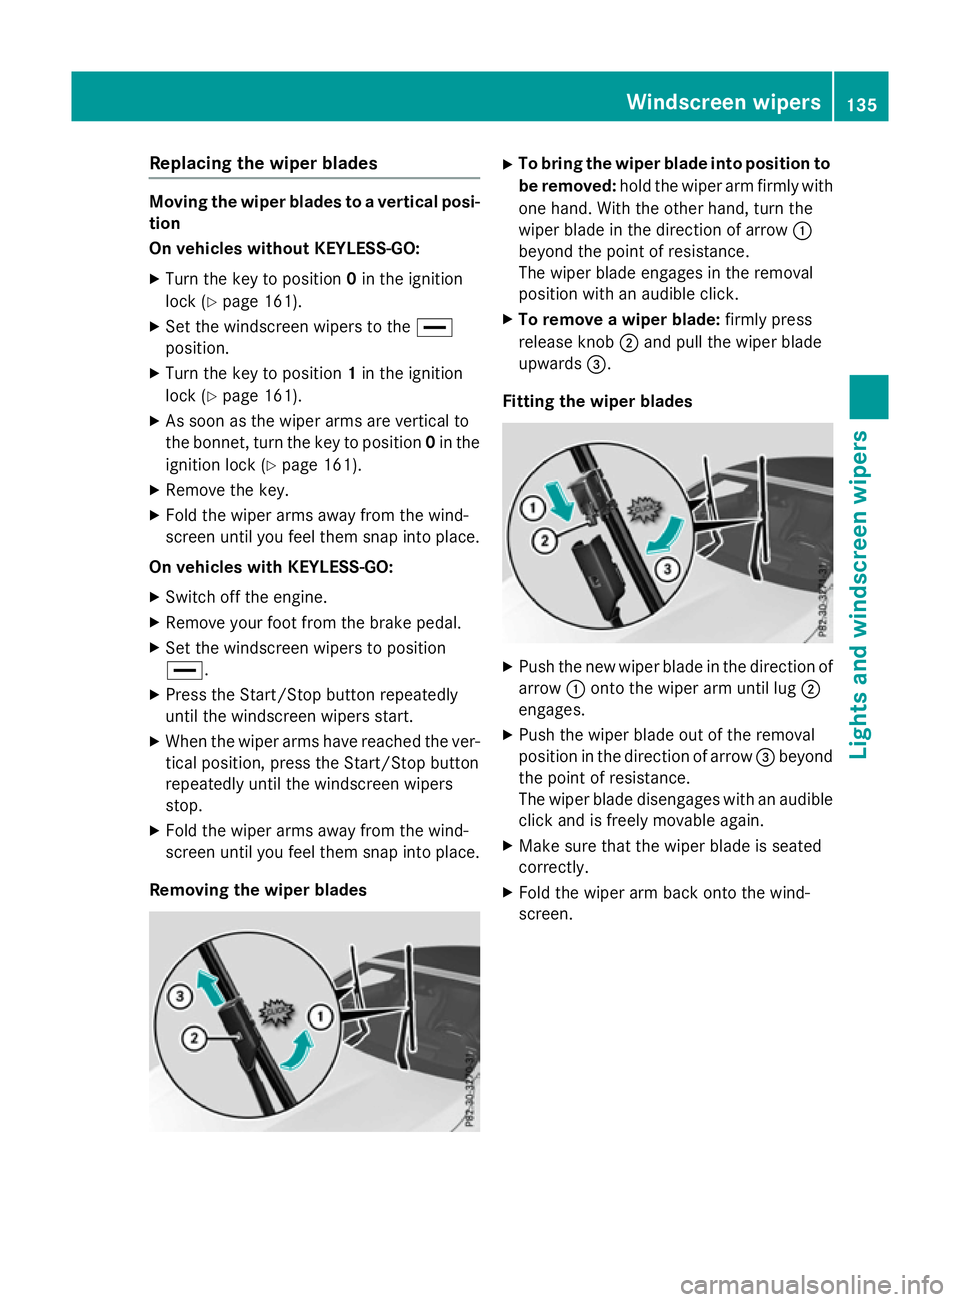
Removing the wiper blades X
To bring the wiper blade into position to
be removed: hold the wiper arm firmly with
one hand. With the other hand, turn the
wiper blade in the direction of arrow :
beyond the point of resistance.
The wiper blade engages in the removal
position with an audible click.
X To remove a wiper blade: firmly press
release knob ;and pull the wiper blade
upwards =.
Fitting the wiper blades X
Push the new wiper blade in the direction of
arrow :onto the wiper arm until lug ;
engages.
X Push the wiper blade out of the removal
position in the direction of arrow =beyond
the point of resistance.
The wiper blade disengages with an audible
click and is freely movable again.
X Make sure that the wiper blade is seated
correctly.
X Fold the wiper arm back onto the wind-
screen. Windscreen wipers
135Lights and windscreen wipers Z
Page 144 of 417
residual heat function is deactivated when
the ignition is switched on.
ECO start/stop function During automatic engine switch-off, the cli-
mate control only operates at a reduced capa- city. If you require the full climate control out-
put, you can switch off the ECO start/stop
function by pressing the ECO button
(Y page 166). Operating the climate control system
Switching the climate control on/off
General notes When the climate control is switched off, the
air supply and air circulation are also
switched off. The windows could mist up.
Therefore, only switch off climate control
briefly.
Switch on climate control primarily using theà rocker switch (Y page 142).
Activating/deactivating X
Turn the key to position 2in the ignition
lock (Y page 161).
X To activate: press thetor! rocker
switch up or down.
The COMAND Online climate control menu
opens.
X Activate climate control via the air-condi-
tioning setting bar in COMAND Online (see
the separate operating instructions).
X To deactivate: press thetor!
rocker switch up or down.
The COMAND Online climate control menu
opens.
X Deactivate climate control via the air-con-
ditioning setting bar in COMAND Online
(see the separate operating instructions). Switching cooling with air dehumidi-
fication on/off
General notes If you deactivate the "Cooling with air-dehu-
midification" function, the air inside the vehi- cle will not be cooled. The air inside the vehi-
cle will also not be dehumidified. The win-
dows can mist up more quickly. Therefore,
deactivate the "Cooling with air dehumidifi-
cation" function only briefly.
The "Cooling with air dehumidification" func-
tion is only available when the engine is run-
ning. The air inside the vehicle is cooled and
dehumidified according to the temperature
selected.
Condensation may drip from the underside of the vehicle when cooling mode is active. Thisis normal and not a sign that there is a mal-
function.
Activating/deactivating Vehicles with auxiliary heating
X Activate/deactivate the cooling with air
dehumidification function via COMAND
Online (see the separate operating instruc-
tions).
Vehicles without auxiliary heating X To activate: press theÁrocker switch
up or down.
The indicator lamp above the rocker switch lights up.
or
X Activate the "Cooling with air dehumidifi-
cation" function via COMAND Online (see
the separate operating instructions).
X To deactivate: press theÁrocker
switch up or down.
The indicator lamp above the rocker switch
goes out.
or X Deactivate the "Cooling with air dehumidi-
fication" function via COMAND Online (see
the separate operating instructions). Operating the climate control system
141Climate control