2015 MERCEDES-BENZ S-CLASS COUPE display
[x] Cancel search: displayPage 111 of 417
Useful information
i This Owner's Manual describes all mod-
els, series and optional equipment for your
vehicle that were available at the time of
going to press. National variations are pos- sible. Note that your vehicle may not be
equipped with all of the functions descri-
bed. This is also the case for systems and
functions relevant to safety.
i Read the information on qualified special-
ist workshops: (Y page 26). Correct driver's seat position
G
WARNING
You could lose control of the vehicle while
driving if you:
R adjust the driver's seat, steering wheel or
mirrors
R fasten the seat belt
There is a risk of an accident.
Adjust the driver's seat, head restraint, steer-
ing wheel and mirrors and fasten your seat
belt before starting the engine. X
Observe the safety guidelines on seat
adjustment (Y page 109).
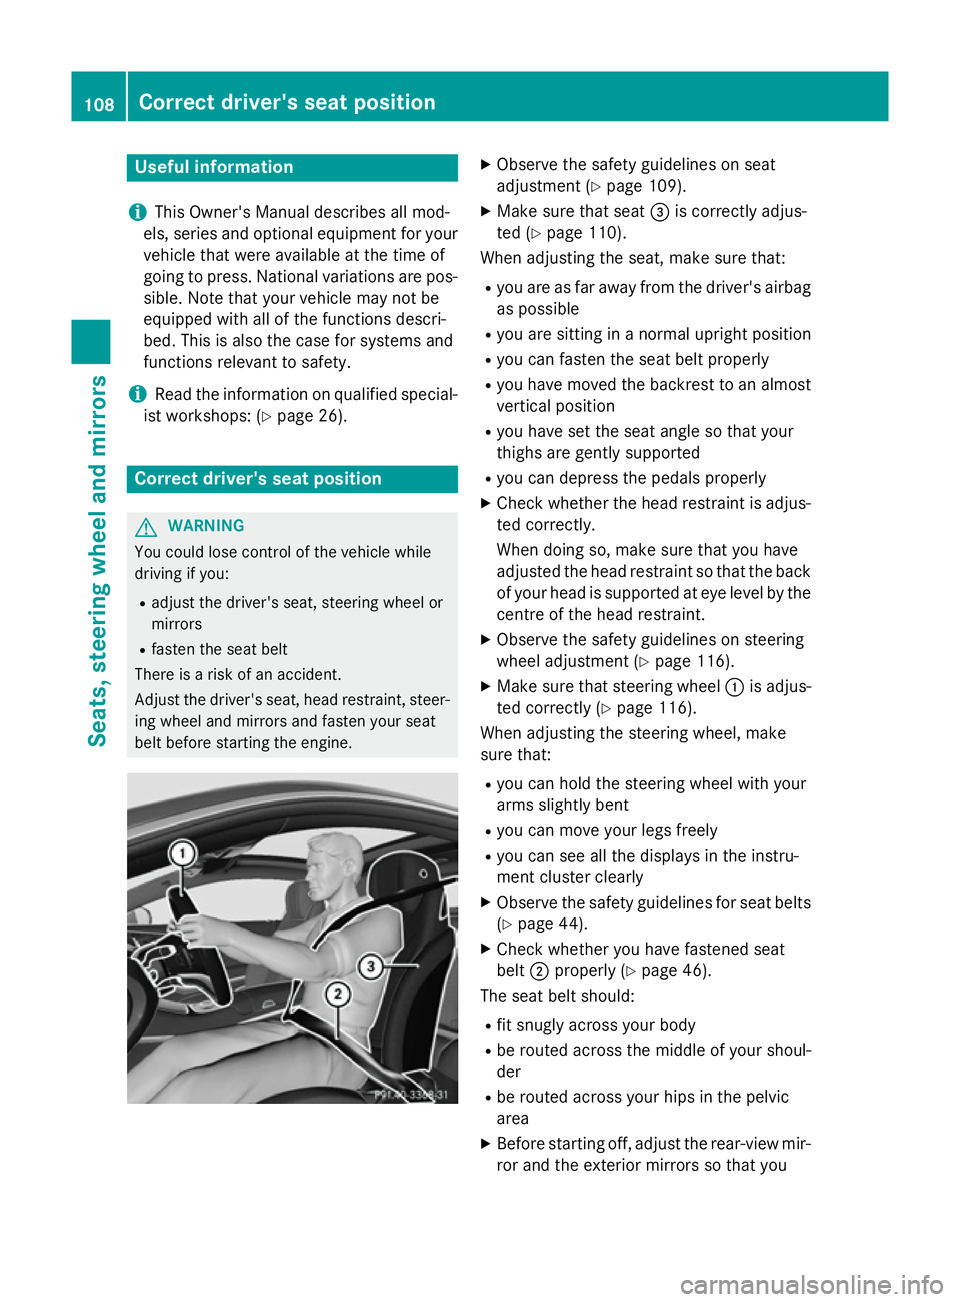
X Make sure that seat =is correctly adjus-
ted (Y page 110).
When adjusting the seat, make sure that:
R you are as far away from the driver's airbag
as possible
R you are sitting in a normal upright position
R you can fasten the seat belt properly
R you have moved the backrest to an almost
vertical position
R you have set the seat angle so that your
thighs are gently supported
R you can depress the pedals properly
X Check whether the head restraint is adjus-
ted correctly.
When doing so, make sure that you have
adjusted the head restraint so that the back
of your head is supported at eye level by the centre of the head restraint.
X Observe the safety guidelines on steering
wheel adjustment (Y page 116).
X Make sure that steering wheel :is adjus-
ted correctly (Y page 116).
When adjusting the steering wheel, make
sure that:
R you can hold the steering wheel with your
arms slightly bent
R you can move your legs freely
R you can see all the displays in the instru-
ment cluster clearly
X Observe the safety guidelines for seat belts
(Y page 44).
X Check whether you have fastened seat
belt ;properly (Y page 46).
The seat belt should:
R fit snugly across your body
R be routed across the middle of your shoul-
der
R be routed across your hips in the pelvic
area
X Before starting off, adjust the rear-view mir-
ror and the exterior mirrors so that you 108
Correct driver's seat positionSeats, steering wheel and mirrors
Page 116 of 417
Adjust the seat properly before beginning
your journey. Always ensure that the backrest
is in an almost vertical position and that the
shoulder section of your seatbelt is routed
across the centre of your shoulder. G
WARNING
When adjusting a seat, you or another vehicle occupant could become trapped by the guiderail of the seat, for instance. There is a risk of
injury.
Make sure that no one has any part of their
body within the sweep of the seat when
adjusting it.
Observe the safety notes on "Airbags"
(Y page 48) and "Children in the Vehicle"
(Y page 60).
Folding the seat backrest forwards With the EASY-ENTRY system, the seat moves
forwards as soon as you fold the backrest
forwards.
This makes it easier for passengers to get into
and out of the rear compartment. The head
restraint is lowered in the process and the
seat moves forwards. X
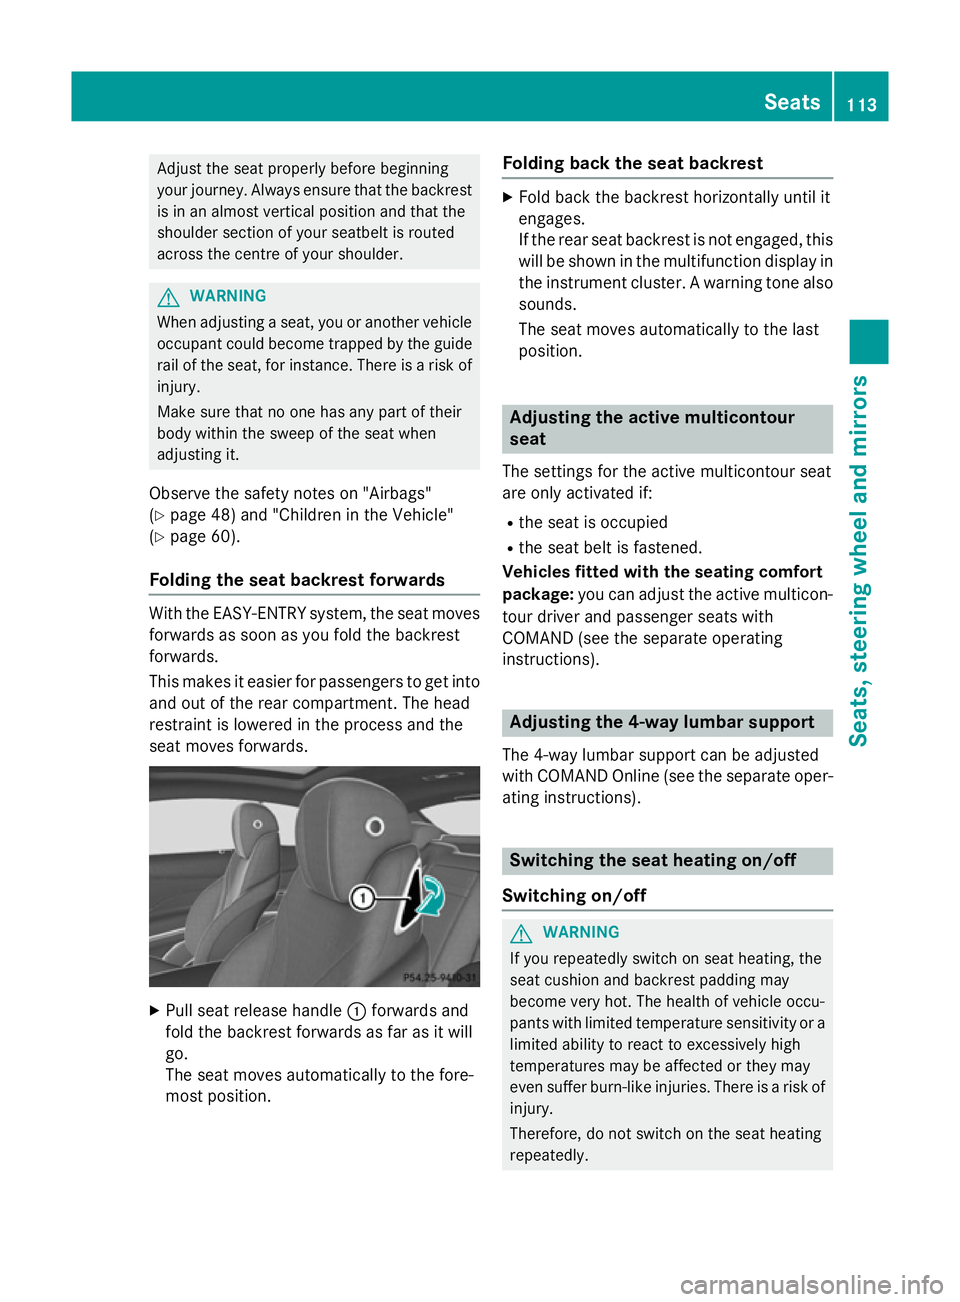
Pull seat release handle :forwards and
fold the backrest forwards as far as it will
go.
The seat moves automatically to the fore-
most position. Folding back the seat backrest X
Fold back the backrest horizontally until it
engages.
If the rear seat backrest is not engaged, this
will be shown in the multifunction display inthe instrument cluster. A warning tone also
sounds.
The seat moves automatically to the last
position. Adjusting the active multicontour
seat
The settings for the active multicontour seat
are only activated if:
R the seat is occupied
R the seat belt is fastened.
Vehicles fitted with the seating comfort
package: you can adjust the active multicon-
tour driver and passenger seats with
COMAND (see the separate operating
instructions). Adjusting the 4-way lumbar support
The 4-way lumbar support can be adjusted
with COMAND Online (see the separate oper- ating instructions). Switching the seat heating on/off
Switching on/off G
WARNING
If you repeatedly switch on seat heating, the
seat cushion and backrest padding may
become very hot. The health of vehicle occu-
pants with limited temperature sensitivity or a limited ability to react to excessively high
temperatures may be affected or they may
even suffer burn-like injuries. There is a risk of
injury.
Therefore, do not switch on the seat heating
repeatedly. Seats
113Seats, steering wheel and mirrors Z
Page 126 of 417
Storing settings
With the memory function, you can store up
to three different settings, e.g. for three dif-
ferent people.
The following settings are stored as a single
memory preset:
R seat, backrest, head restraint position and
contour of the backrest in the lumbar
region
R active multicontour seat: side bolsters of
the backrest, shoulder of the backrest, con-
tour of the backrest, dynamic function level
R seat heating: distribution of the heated sec-
tions of the seat cushion and backrest
R driver's side: position of the exterior mir-
rors on the driver's and front-passenger
sides
R position of the head-up display X
Adjust the seat accordingly (Y page 110).
X On the driver's side, adjust the steering
wheel (Y page 116) and the exterior mirrors
(Y page 120).
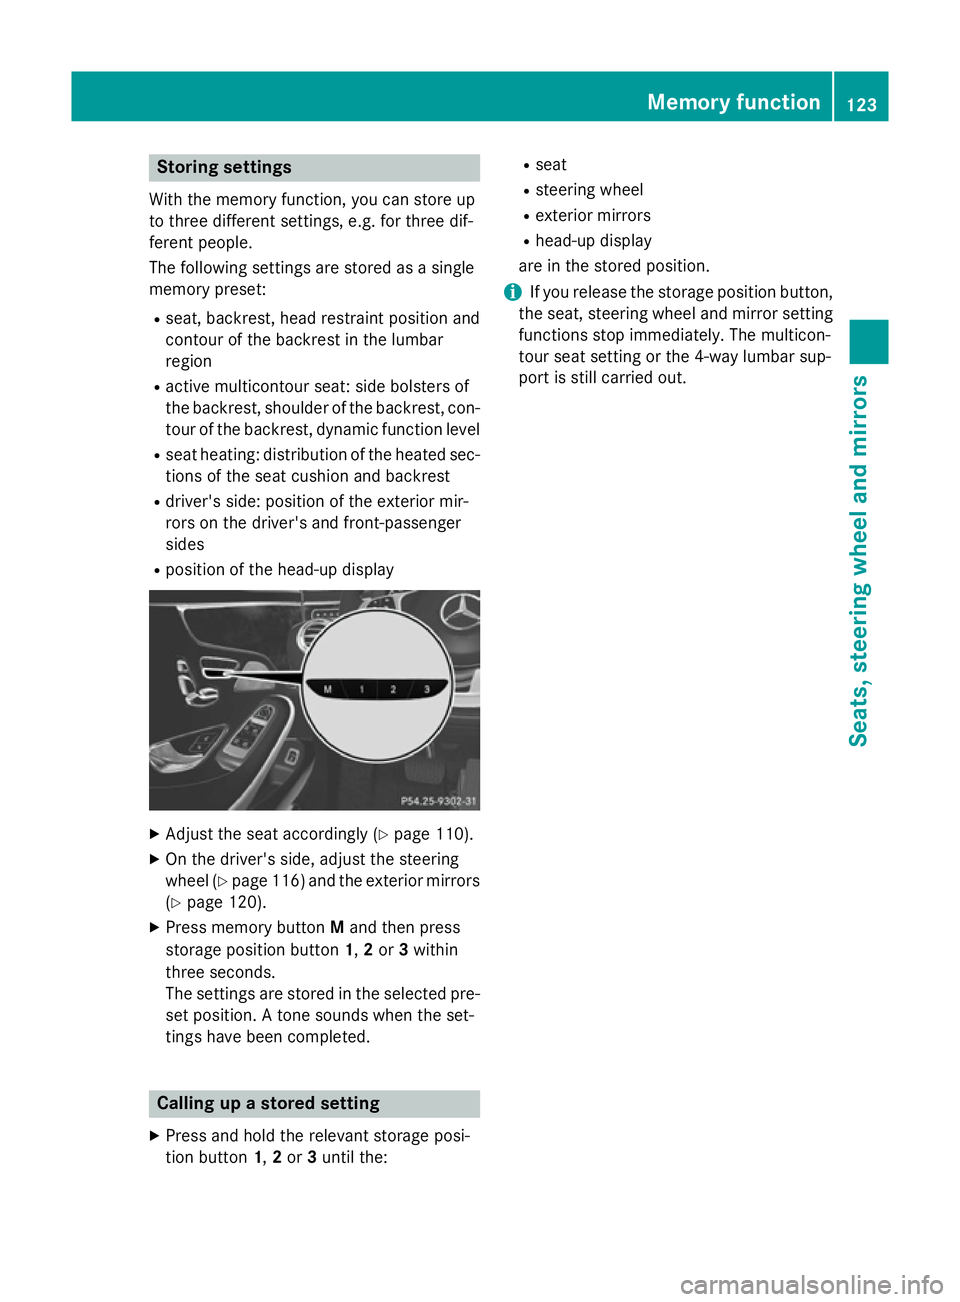
X Press memory button Mand then press
storage position button 1,2or 3within
three seconds.
The settings are stored in the selected pre- set position. A tone sounds when the set-
tings have been completed. Calling up a stored setting
X Press and hold the relevant storage posi-
tion button 1,2or 3until the: R
seat
R steering wheel
R exterior mirrors
R head-up display
are in the stored position.
i If you release the storage position button,
the seat, steering wheel and mirror setting
functions stop immediately. The multicon-
tour seat setting or the 4-way lumbar sup-
port is still carried out. Memory function
123Seats, steering wheel and mirrors Z
Page 134 of 417

Important safety notes
G
WARNING
Adaptive Highbeam Assist Plus does not rec-
ognise road users:
R who have no lights, e.g. pedestrians
R who have poor lighting, e.g. cyclists
R whose lighting is blocked, e.g. by a barrier
In very rare cases, Adaptive Highbeam Assist
Plus may not recognise road users who do
have lights, or may recognise them too late. In this, or in similar situations, the automatic
main-beam headlamps will not be deactivated
or will be activated despite the presence of
other road users. There is a risk of an acci-
dent.
Always carefully observe the traffic conditions and switch off the main-beam headlamps in
good time.
Adaptive Highbeam Assist PLUS cannot take
into account road, weather or traffic condi-
tions. Adaptive Highbeam Assist Plus is only
an aid. You are responsible for adjusting the
vehicle's lighting to the prevailing light, visi-
bility and traffic conditions.
In particular, the detection of obstacles can
be restricted if there is:
R poor visibility, e.g. due to fog, heavy rain or
snow
R dirt on the sensors or if the sensors are
obscured Switching Adaptive Highbeam Assist
PLUS on/off :
Main-beam headlamps
; Turn signal, right
= Headlamp flasher
? Turn signal, left
X To switch on: turn the light switch to Ã.
X Press the combination switch beyond the
pressure point in the direction of arrow :.
The _ indicator lamp in the multifunc-
tion display lights up when it is dark and the light sensor switches on the dipped-beam
headlamps.
If you are driving at speeds above approx-
imately 25 km/h:
The headlamp range is set automatically
depending on the distance between the
vehicle and other road users.
If you are driving at speeds above approx-
imately 30 km/h and no other road users
have been detected:
The main-beam headlamps are switched on
automatically. The Kindicator lamp in
the instrument cluster also lights up.
If you are driving at speeds above approx-
imately 45 km/h and other road users have
been detected:
Partial main-beam is selected automati-
cally. The Kindicator lamp in the instru-
ment cluster also lights up.
If you are driving at speeds below approx-
imately 40 km/h:
The partial main-beam headlamps are
switched off automatically. If no other road Exterior lighting
131Lights and windscreen wipers Z
Page 135 of 417
users are detected, the main-beam head-
lamps are switched on.
If you are driving at speeds below approx-
imately 25 km/h or the roads are ade-
quately illuminated:
The main-beam headlamps are switched off
automatically. The Kindicator lamp in
the instrument cluster goes out. The _
indicator lamp in the multifunction display
remains lit.
X To switch off: move the combination
switch back to its normal position or move
the light switch to another position.
The _ indicator lamp in the multifunc-
tion display goes out. Headlamps misted up on the inside
Certain climatic and physical conditions may
cause moisture to form in the headlamp. This
moisture does not affect the functionality of
the headlamp. Interior lighting
Overview of interior lighting
Front overhead control panel :
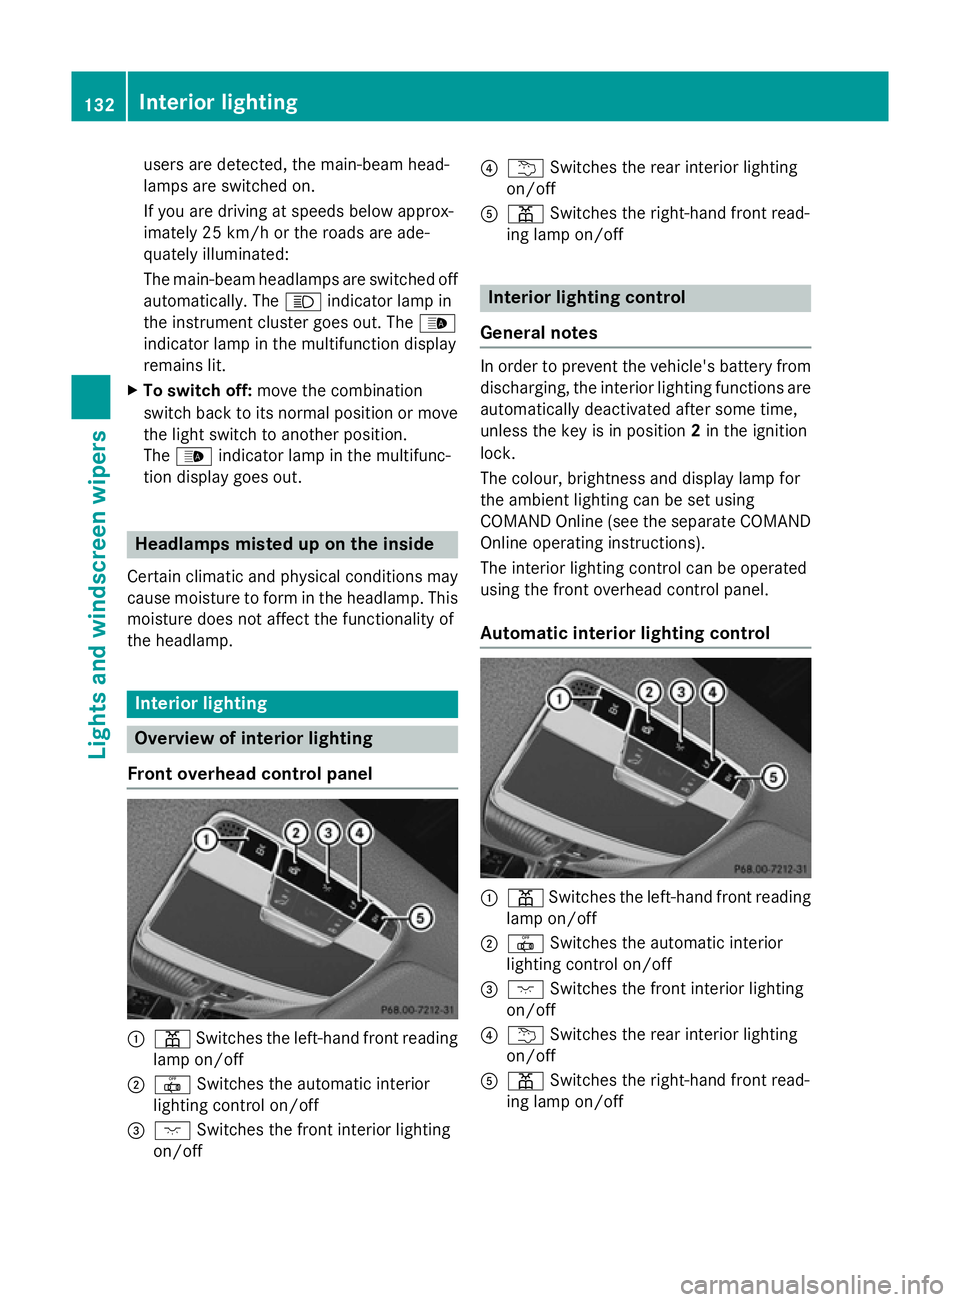
p Switches the left-hand front reading
lamp on/off
; | Switches the automatic interior
lighting control on/off
= c Switches the front interior lighting
on/off ?
u Switches the rear interior lighting
on/off
A p Switches the right-hand front read-
ing lamp on/off Interior lighting control
General notes In order to prevent the vehicle's battery from
discharging, the interior lighting functions are
automatically deactivated after some time,
unless the key is in position 2in the ignition
lock.
The colour, brightness and display lamp for
the ambient lighting can be set using
COMAND Online (see the separate COMAND
Online operating instructions).
The interior lighting control can be operated
using the front overhead control panel.
Automatic interior lighting control :
p Switches the left-hand front reading
lamp on/off
; | Switches the automatic interior
lighting control on/off
= c Switches the front interior lighting
on/off
? u Switches the rear interior lighting
on/off
A p Switches the right-hand front read-
ing lamp on/off 132
Interior lightingLights and windscreen wipers
Page 154 of 417
The colours of the indicator lamps in the
rocker switch have the following meanings:
R blue: cooling activated
R red: heating activated
R yellow: departure time is preselected
X To switch on auxiliary heating or auxili-
ary ventilation: press rocker switch :up
or down.
The red or the blue indicator lamp in rocker
switch :lights up.
X To set the temperature: switch on auxili-
ary heating or auxiliary ventilation.
COMAND Online is activated for approx-
imately one minute.
X Set the desired temperature using
COMAND Online (see the separate operat-
ing instructions).
In addition you can adjust the temperature at
any time using COMAND Online if the auxili-
ary heating/ventilation is switched on. To do so, call up COMAND Online using the qbut-
ton on the centre console.
X To switch off auxiliary heating or auxil-
iary ventilation: press rocker switch :up
or down.
The red or the blue indicator lamp in rocker
switch :goes out.
Switching the auxiliary heating/venti-
lation on or off using the remote control General notes
Your vehicle comes with one remote control.
You may use two additional remote controls
for your vehicle. For more information, please
contact a qualified specialist workshop.
Store the remote control for the auxiliary
heating so that the auxiliary heating cannot
be switched on unintentionally. In particular,
ensure that the remote control for the auxili-
ary heating is kept out of the reach of chil-
dren. The remote control has a range of approx-
imately 300 metres. This range is reduced by:
R sources of radio interference
R solid objects between the remote control
and the vehicle
R the remote control being in an unfavoura-
ble position in relation to the vehicle
R transmitting from an enclosed space
If the remote control battery is low, the bat-
tery symbol on the left of the display is shown as empty. Replace the remote control battery and observe the important safety notes when
doing so (Y page 153).
Activating/deactivating the auxiliary
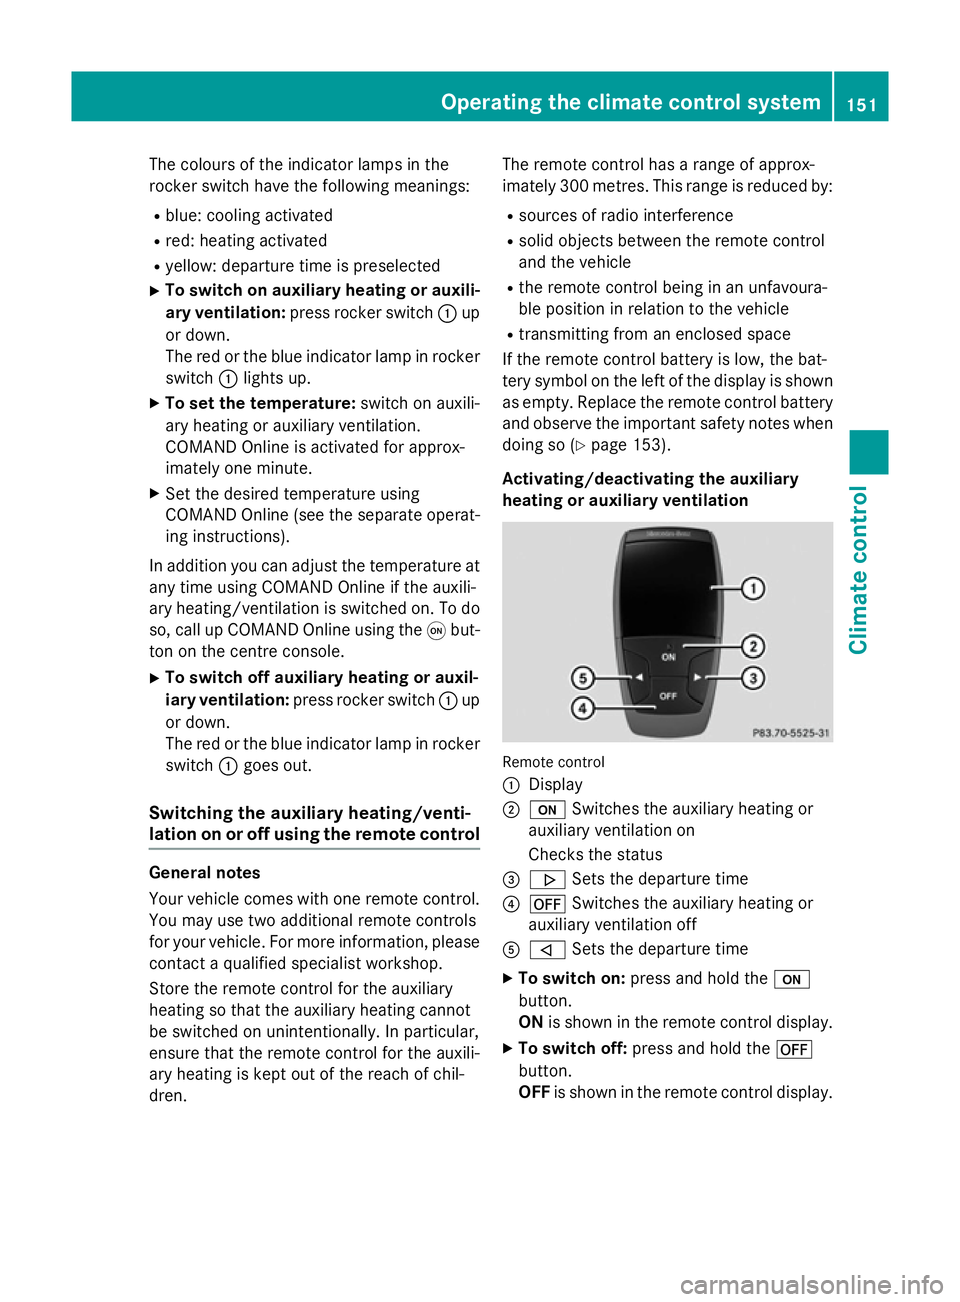
heating or auxiliary ventilation Remote control
:
Display
; u Switches the auxiliary heating or
auxiliary ventilation on
Checks the status
= . Sets the departure time
? ^ Switches the auxiliary heating or
auxiliary ventilation off
A , Sets the departure time
X To switch on: press and hold the u
button.
ON is shown in the remote control display.
X To switch off: press and hold the ^
button.
OFF is shown in the remote control display. Operating the climate control system
151Climate control Z
Page 155 of 417
Checking the status of the auxiliary heat-
ing or auxiliary ventilation
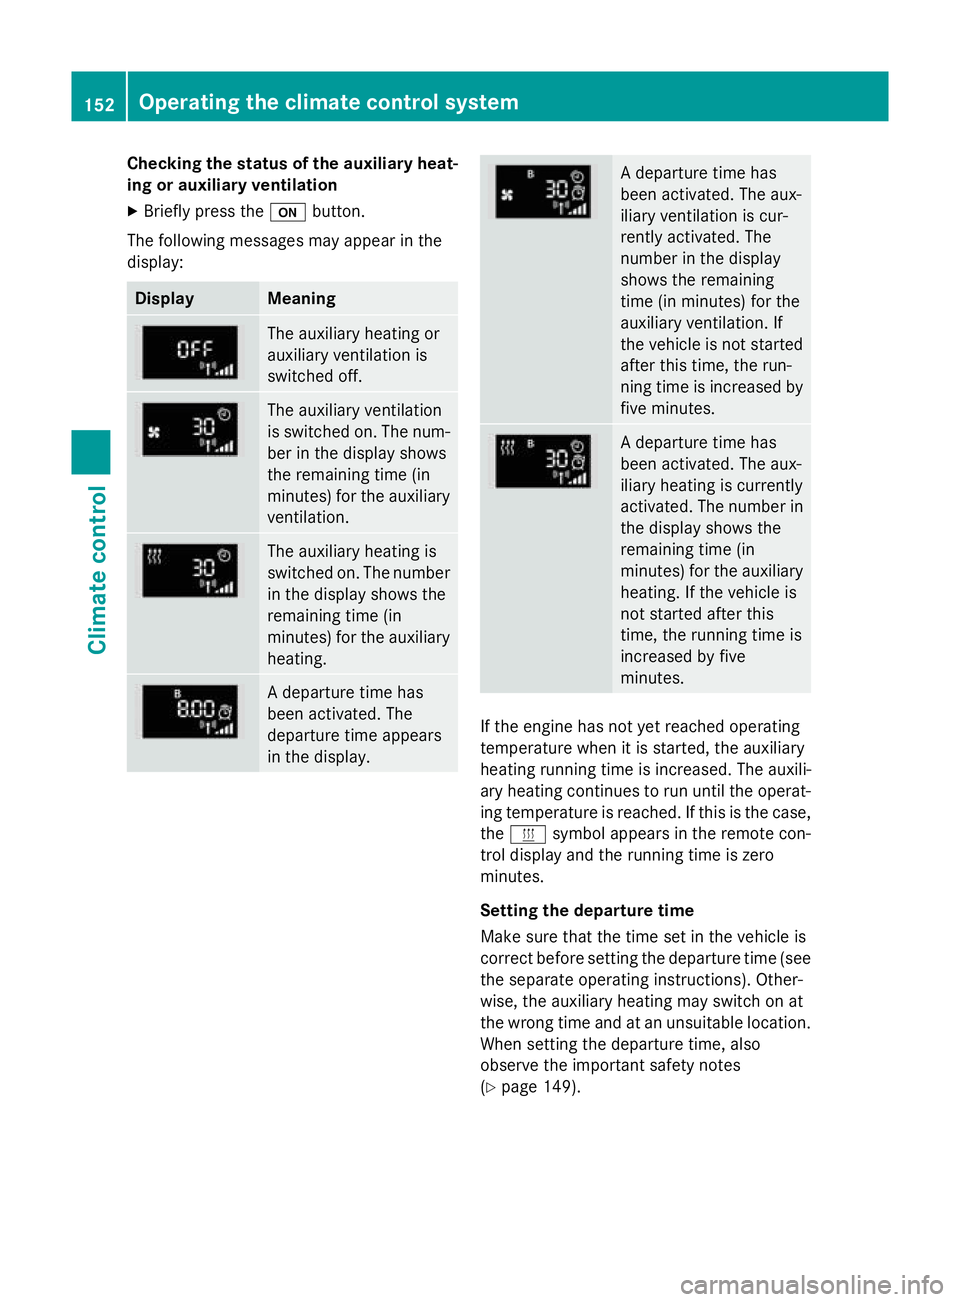
X Briefly press the ubutton.
The following messages may appear in the
display: Display Meaning
The auxiliary heating or
auxiliary ventilation is
switched off.
The auxiliary ventilation
is switched on. The num-
ber in the display shows
the remaining time (in
minutes) for the auxiliary
ventilation. The auxiliary heating is
switched on. The number
in the display shows the
remaining time (in
minutes) for the auxiliary heating. A departure time has
been activated. The
departure time appears
in the display. A departure time has
been activated. The aux-
iliary ventilation is cur-
rently activated. The
number in the display
shows the remaining
time (in minutes) for the
auxiliary ventilation. If
the vehicle is not started
after this time, the run-
ning time is increased by
five minutes. A departure time has
been activated. The aux-
iliary heating is currently
activated. The number in
the display shows the
remaining time (in
minutes) for the auxiliary heating. If the vehicle is
not started after this
time, the running time is
increased by five
minutes. If the engine has not yet reached operating
temperature when it is started, the auxiliary
heating running time is increased. The auxili-
ary heating continues to run until the operat- ing temperature is reached. If this is the case,
the y symbol appears in the remote con-
trol display and the running time is zero
minutes.
Setting the departure time
Make sure that the time set in the vehicle is
correct before setting the departure time (see the separate operating instructions). Other-
wise, the auxiliary heating may switch on at
the wrong time and at an unsuitable location.
When setting the departure time, also
observe the important safety notes
(Y page 149). 152
Operating the climate control systemClimate control
Page 156 of 417
X
Briefly press the ubutton.
X Press the ,or. button repeatedly
until the time to be changed appears in the
display.
X Press the uand^ buttons simulta-
neously.
The Îsymbol in the remote control dis-
play flashes.
X Press the ,or. button to set the
desired departure time.
i The longer you press the
,or.
button, the faster the time changes.
X Press the uand^ buttons simulta-
neously.
The new departure time is stored.
Activating the set departure time X Briefly press the ubutton.
X Press the ,or. button repeatedly
until the desired departure time appears in the display.
X Press the ubutton.
The Ísymbol, the departure time and,
depending on the selected departure time, the letter A, BorCappear in the display.
Deactivating the set departure time
X Briefly press the ubutton.
The status of the auxiliary heating is shown in the display.
X Press the .button.
The first departure time stored appears in
the display.
X Press the ^button.
OFF is shown in the remote control display.
Switching the heater booster function
on/off The heater booster function helps the engine
reach its operating temperature faster during
its warm-up phase. This helps to heat the
vehicle interior faster. The heater booster
function switches on at lower outside tem-
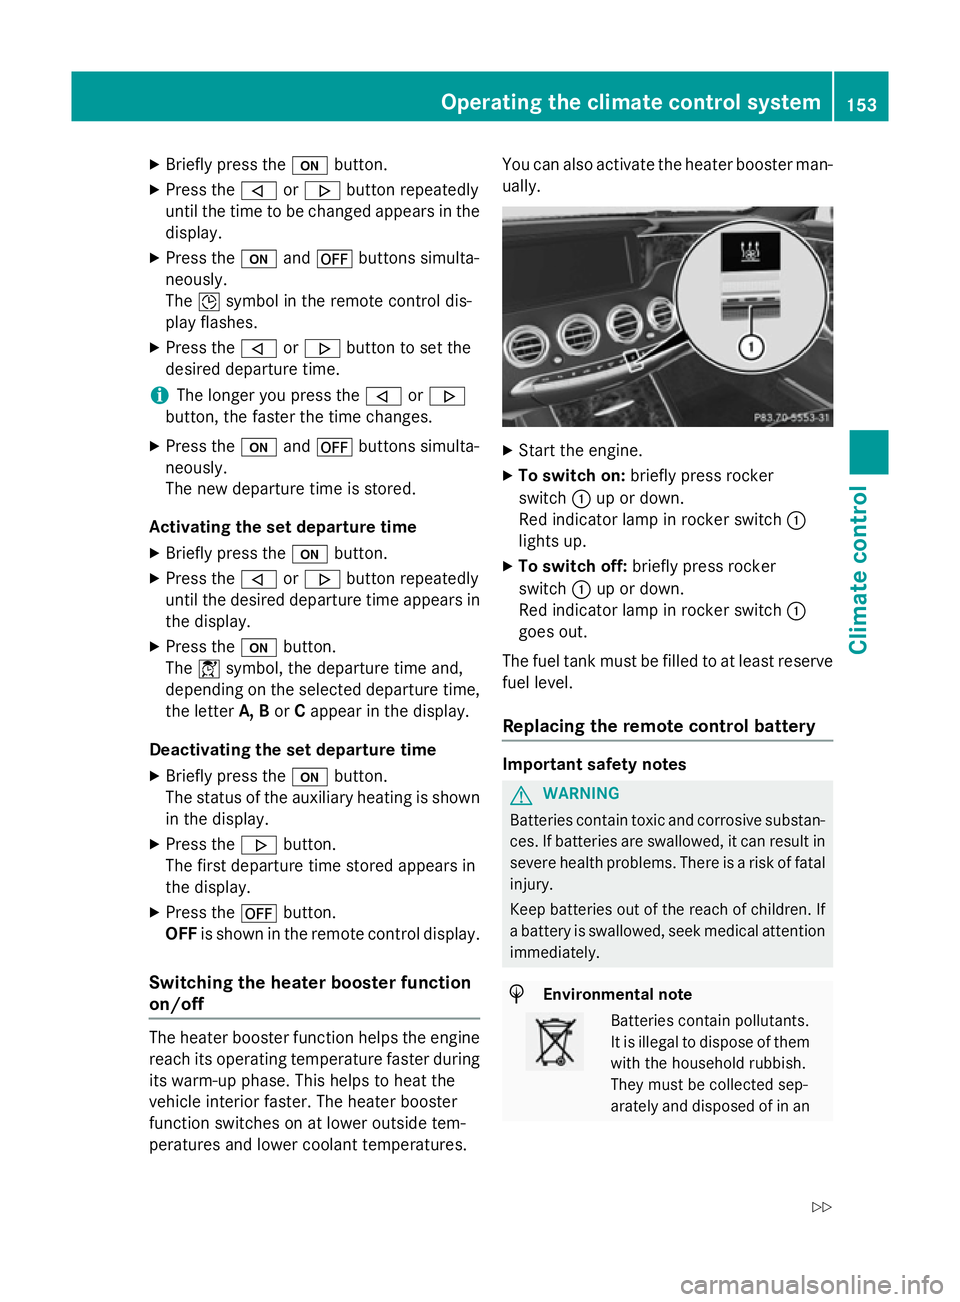
peratures and lower coolant temperatures. You can also activate the heater booster man-
ually. X
Start the engine.
X To switch on: briefly press rocker
switch :up or down.
Red indicator lamp in rocker switch :
lights up.
X To switch off: briefly press rocker
switch :up or down.
Red indicator lamp in rocker switch :
goes out.
The fuel tank must be filled to at least reserve fuel level.
Replacing the remote control battery Important safety notes
G
WARNING
Batteries contain toxic and corrosive substan- ces. If batteries are swallowed, it can result in
severe health problems. There is a risk of fatal injury.
Keep batteries out of the reach of children. If
a battery is swallowed, seek medical attention immediately. H
Environmental note Batteries contain pollutants.
It is illegal to dispose of them
with the household rubbish.
They must be collected sep-
arately and disposed of in an Operating the climate control system
153Climate control
Z