2015 MERCEDES-BENZ S-CLASS COUPE air condition
[x] Cancel search: air conditionPage 151 of 417
tally responsible recycling
system. Dispose of full perfume vials
in an environmentally
responsible manner and
take them to a special waste
collection point. :
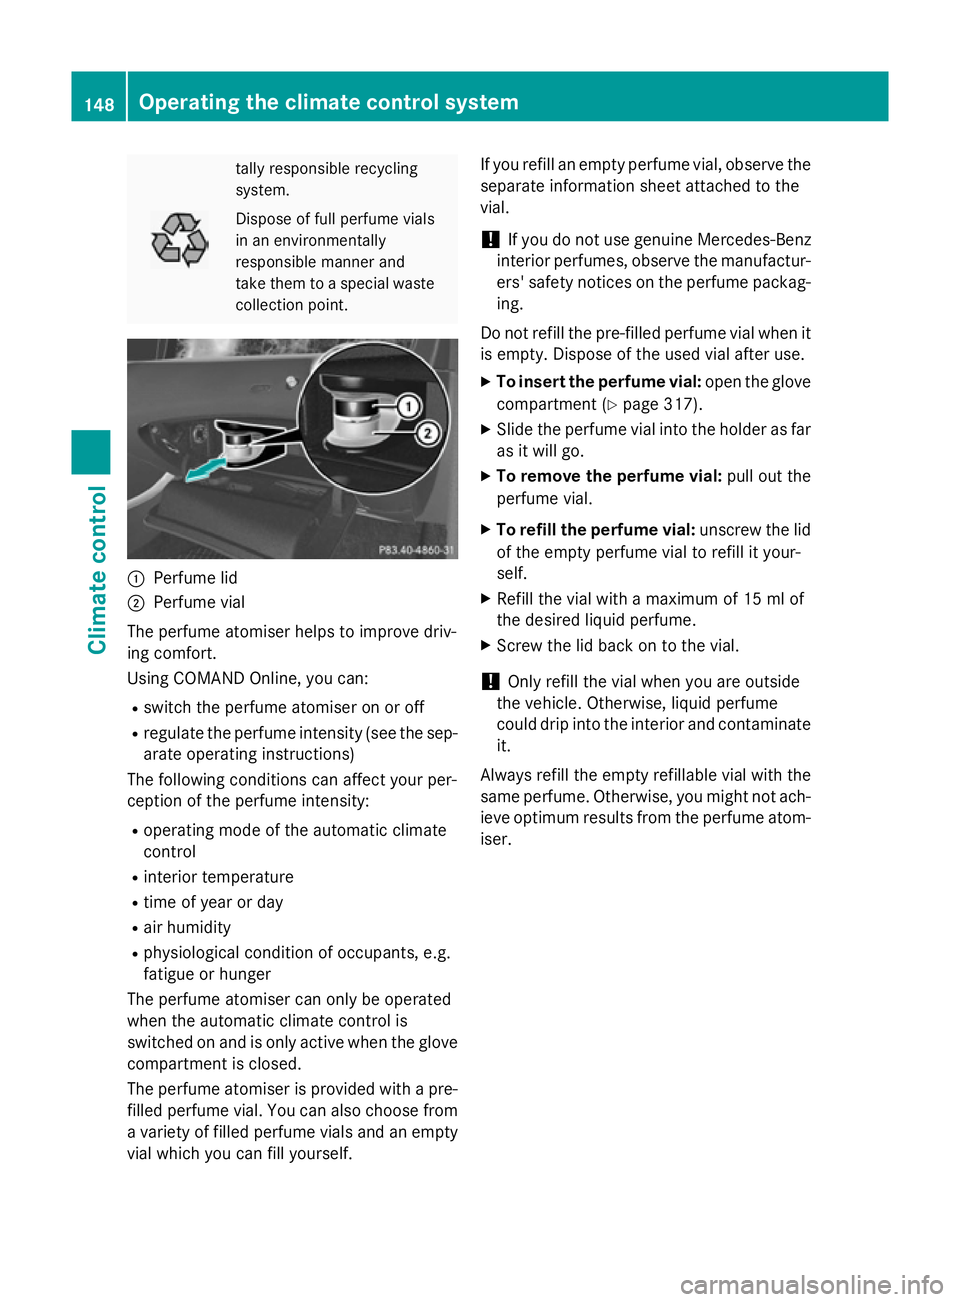
Perfume lid
; Perfume vial
The perfume atomiser helps to improve driv-
ing comfort.
Using COMAND Online, you can:
R switch the perfume atomiser on or off
R regulate the perfume intensity (see the sep-
arate operating instructions)
The following conditions can affect your per-
ception of the perfume intensity:
R operating mode of the automatic climate
control
R interior temperature
R time of year or day
R air humidity
R physiological condition of occupants, e.g.
fatigue or hunger
The perfume atomiser can only be operated
when the automatic climate control is
switched on and is only active when the glove compartment is closed.
The perfume atomiser is provided with a pre- filled perfume vial. You can also choose froma variety of filled perfume vials and an empty
vial which you can fill yourself. If you refill an empty perfume vial, observe the
separate information sheet attached to the
vial.
! If you do not use genuine Mercedes-Benz
interior perfumes, observe the manufactur-
ers' safety notices on the perfume packag-
ing.
Do not refill the pre-filled perfume vial when it is empty. Dispose of the used vial after use.
X To insert the perfume vial: open the glove
compartment (Y page 317).
X Slide the perfume vial into the holder as far
as it will go.
X To remove the perfume vial: pull out the
perfume vial.
X To refill the perfume vial: unscrew the lid
of the empty perfume vial to refill it your-
self.
X Refill the vial with a maximum of 15 ml of
the desired liquid perfume.
X Screw the lid back on to the vial.
! Only refill the vial when you are outside
the vehicle. Otherwise, liquid perfume
could drip into the interior and contaminate it.
Always refill the empty refillable vial with the
same perfume. Otherwise, you might not ach-
ieve optimum results from the perfume atom-
iser. 148
Operating the climate control systemClimate control
Page 153 of 417
When the auxiliary heating is switched on,
make sure that:
R no flammable materials come into contact
with hot vehicle components
R the exhaust gas can escape from the
exhaust pipe unhindered
R the exhaust gas does not come into contact
with flammable materials.
The auxiliary heating and the exhaust gas out-
let are situated behind the right-hand front
wheel.
! Operating the auxiliary heating/ventila-
tion draws on the vehicle battery. After you
have heated or ventilated the vehicle a
maximum of two times, drive for a longer
distance.
Switch the auxiliary heating on regularly once
a month for about ten minutes.
The auxiliary heating heats the air in the vehi-
cle interior to the set temperature. This
occurs without using the heat of the running
engine. The auxiliary heating is operated
directly using the vehicle's fuel. For this rea-
son, the tank content must be at least at
reserve fuel level to ensure that the auxiliary
heating functions.
The auxiliary heating or auxiliary ventilation
automatically adjusts to changes in temper-
ature and weather conditions. For this rea-
son, the auxiliary heating could switch from
ventilation mode to heating mode or from
heating mode to ventilation mode.
The auxiliary heating switches off when the
engine is switched off. The auxiliary ventila-
tion switches off when you turn the key to key position 2(Y page 161).
The auxiliary heating switches off automati-
cally after 50 minutes. This time limit can be
altered. To do this, visit a qualified specialist
workshop.
You cannot use the auxiliary ventilation to
cool the vehicle interior to a temperature
lower than the outside temperature. Before switching on X
Turn the key to position 2in the ignition
lock (Y page 161).
X Set the desired temperature using the
w rocker switch on the front control
panel or using COMAND Online (see the
separate operating instructions).
If you do not alter the temperature before
switching on the auxiliary heating or auxiliary
ventilation, the last temperature setting will
be adopted.
Auxiliary heating or auxiliary ventilation can
also be switched on if the manually set cli-
mate control is activated. Optimum comfort
can be attained when the system is set to
automatic mode. Set the temperature to
22 †.
You can switch the auxiliary heating or auxil-
iary ventilation on or off:
R using the rocker switch on the centre con-
sole (Y page 150)
R using the remote control (Y page 151)
The on-board computer can be used to spec-
ify up to three departure times, one of which
may be preselected:
R using the remote control (Y page 151)
R using COMAND Online (see the separate
operating instructions)
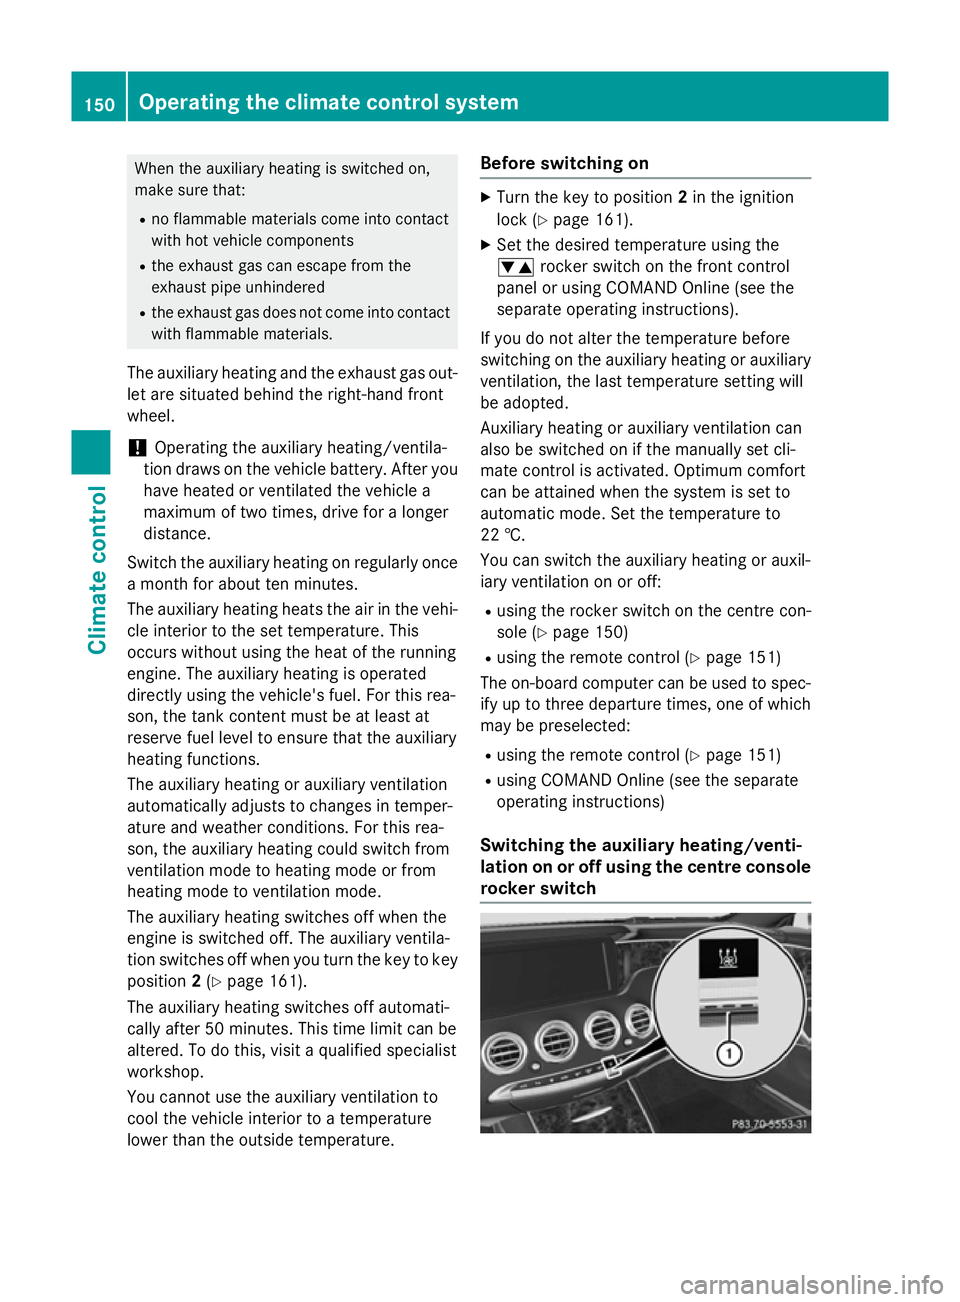
Switching the auxiliary heating/venti-
lation on or off using the centre console
rocker switch 150
Operating the climate control systemClimate control
Page 168 of 417
ECO start/stop function
Introduction The ECO start/stop function switches the
engine off automatically if the vehicle is stop-
ped under certain conditions.
When pulling away again, the engine starts
automatically. The ECO start/stop function
thereby helps you to reduce the fuel con-
sumption and emissions of your vehicle.
Important safety notes G
WARNING
If the engine is switched off automatically and you exit the vehicle, the engine is restarted
automatically. The vehicle may begin moving. There is a risk of accident and injury.
If you wish to exit the vehicle, always turn off
the ignition and secure the vehicle against
rolling away.
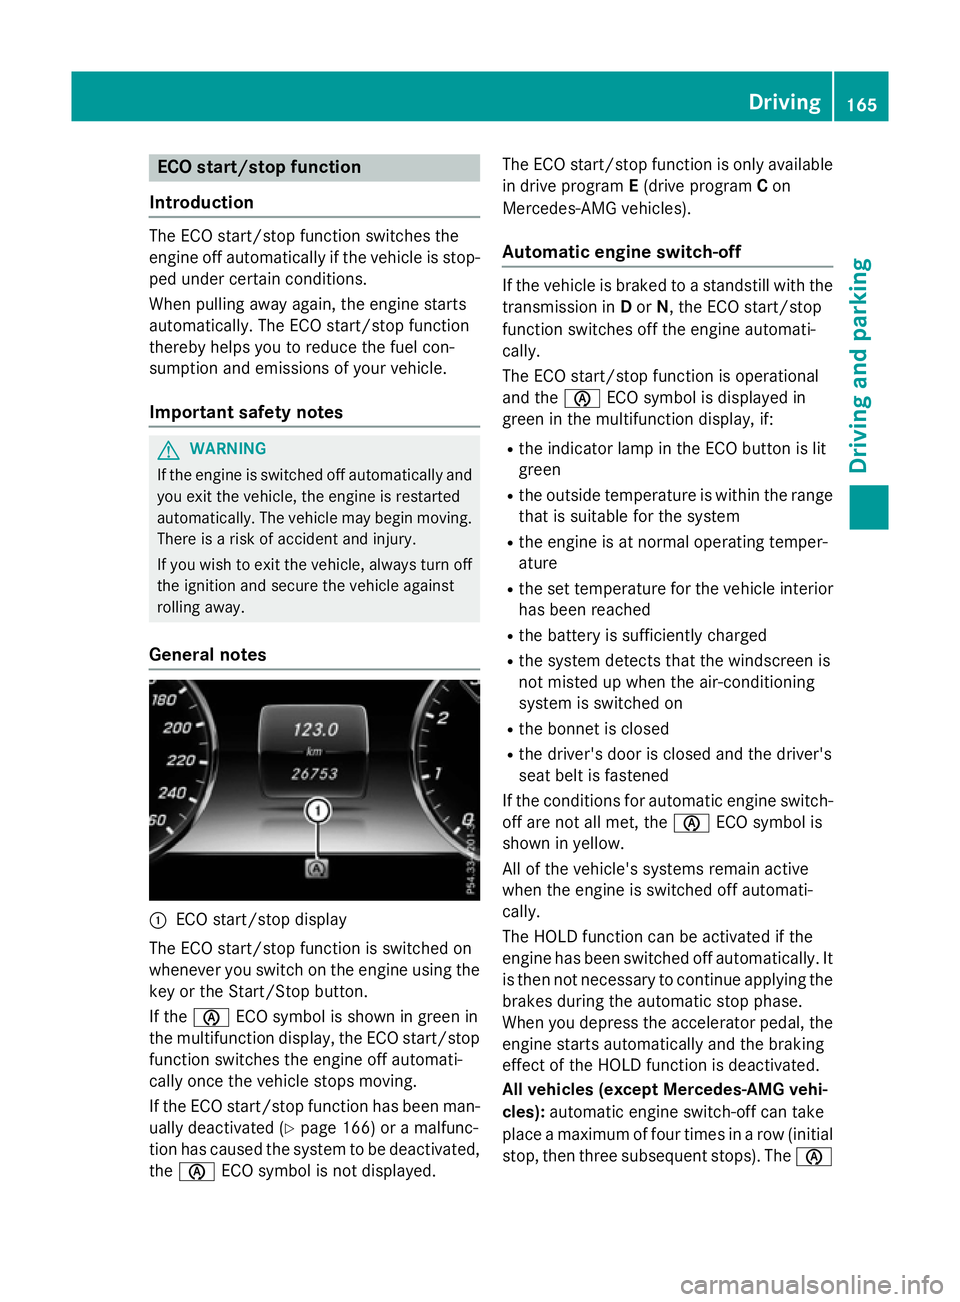
General notes :
ECO start/stop display
The ECO start/stop function is switched on
whenever you switch on the engine using the
key or the Start/Stop button.
If the è ECO symbol is shown in green in
the multifunction display, the ECO start/stop function switches the engine off automati-
cally once the vehicle stops moving.
If the ECO start/stop function has been man-
ually deactivated (Y page 166) or a malfunc-
tion has caused the system to be deactivated,
the è ECO symbol is not displayed. The ECO start/stop function is only available
in drive program E(drive program Con
Mercedes-AMG vehicles).
Automatic engine switch-off If the vehicle is braked to a standstill with the
transmission in Dor N, the ECO start/stop
function switches off the engine automati-
cally.
The ECO start/stop function is operational
and the èECO symbol is displayed in
green in the multifunction display, if:
R the indicator lamp in the ECO button is lit
green
R the outside temperature is within the range
that is suitable for the system
R the engine is at normal operating temper-
ature
R the set temperature for the vehicle interior
has been reached
R the battery is sufficiently charged
R the system detects that the windscreen is
not misted up when the air-conditioning
system is switched on
R the bonnet is closed
R the driver's door is closed and the driver's
seat belt is fastened
If the conditions for automatic engine switch- off are not all met, the èECO symbol is
shown in yellow.
All of the vehicle's systems remain active
when the engine is switched off automati-
cally.
The HOLD function can be activated if the
engine has been switched off automatically. It is then not necessary to continue applying the
brakes during the automatic stop phase.
When you depress the accelerator pedal, the engine starts automatically and the braking
effect of the HOLD function is deactivated.
All vehicles (except Mercedes-AMG vehi-
cles): automatic engine switch-off can take
place a maximum of four times in a row (initial
stop, then three subsequent stops). The è Driving
165Driving and parking Z
Page 169 of 417
ECO symbol is shown in yellow in the multi-
function display after the engine has been
started automatically for the fourth time.
When the èECO symbol is shown in green
in the multifunction display, automatic engine switch-off is again possible.
Mercedes-AMG vehicles: the number of
consecutive automatic engine stops is unlimi- ted.
Automatic engine start The engine is started automatically if:
R you switch off the ECO start/stop function
by pressing the ECO button
R you switch to drive program Sor M
R in transmission position Dor N, the brake
pedal is released and the HOLD function is
not active
R you depress the accelerator pedal
R you engage reverse gear R
R you move the transmission out of position
P
R you unfasten your seat belt or open the
driver's door
R the vehicle starts to roll
R the brake system requires this
R the temperature in the vehicle interior devi-
ates from the set range
R the system detects moisture on the wind-
screen when the air-conditioning system is
switched on
R the battery's charge status is too low
Shifting the transmission to position Pdoes
not start the engine.
If you shift the transmission from Rto D, the
ECO start/stop function is available again
once the èECO symbol reappears in
green in the multifunction display. Switching the ECO start/stop function
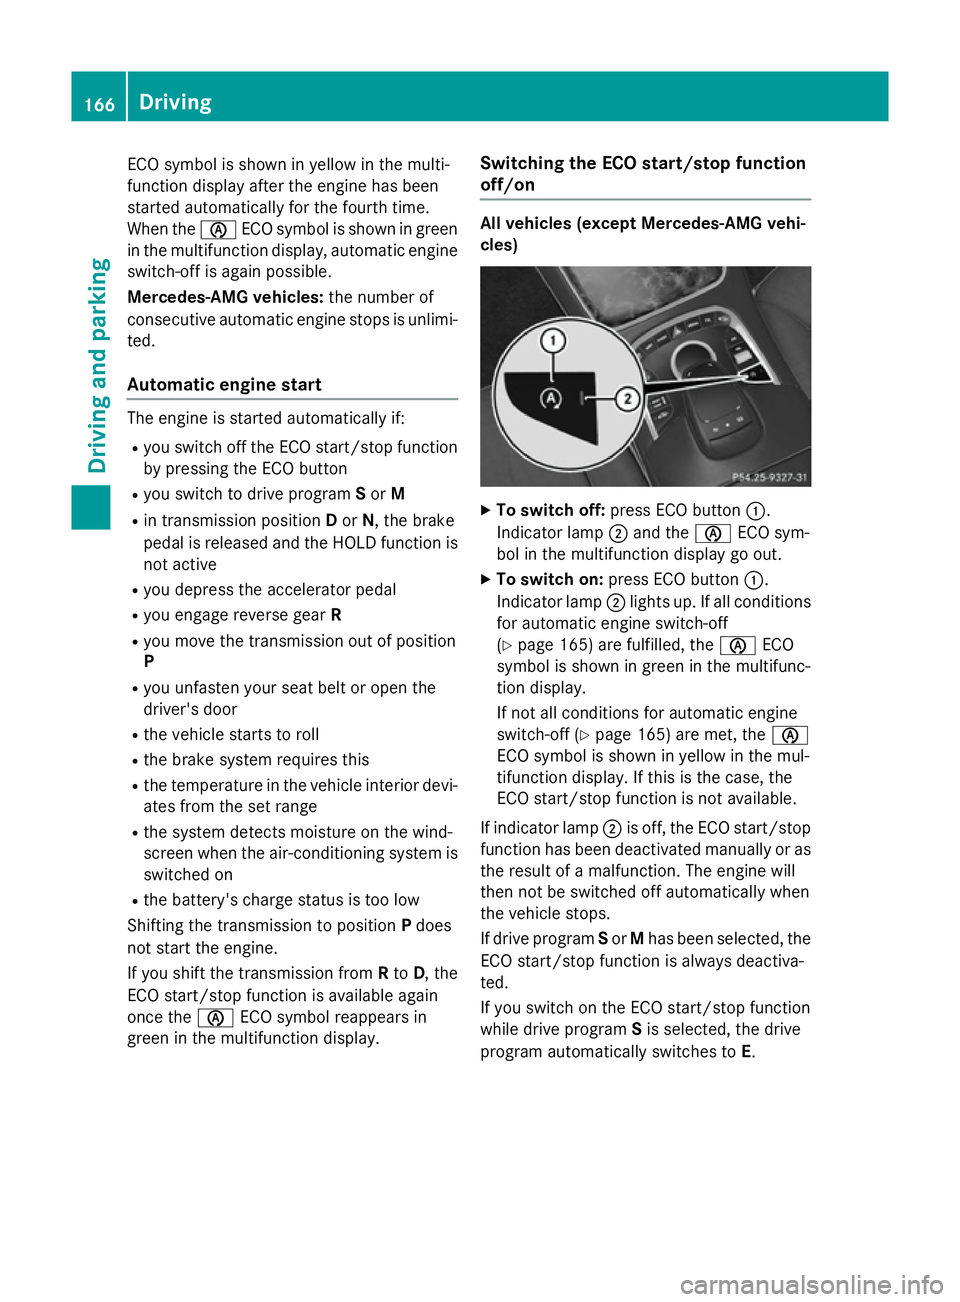
off/on All vehicles (except Mercedes-AMG vehi-
cles) X
To switch off: press ECO button :.
Indicator lamp ;and the èECO sym-
bol in the multifunction display go out.
X To switch on: press ECO button :.
Indicator lamp ;lights up. If all conditions
for automatic engine switch-off
(Y page 165) are fulfilled, the èECO
symbol is shown in green in the multifunc-
tion display.
If not all conditions for automatic engine
switch-off (Y page 165) are met, the è
ECO symbol is shown in yellow in the mul-
tifunction display. If this is the case, the
ECO start/stop function is not available.
If indicator lamp ;is off, the ECO start/stop
function has been deactivated manually or as the result of a malfunction. The engine will
then not be switched off automatically when
the vehicle stops.
If drive program Sor Mhas been selected, the
ECO start/stop function is always deactiva-
ted.
If you switch on the ECO start/stop function
while drive program Sis selected, the drive
program automatically switches to E.166
DrivingDriving an
d parking
Page 189 of 417
Brakes
Important safety notes G
WARNING
If you shift down on a slippery road surface in an attempt to increase the engine's braking
effect, the drive wheels could lose their grip.
This increases the risk of skidding and having
an accident.
Do not shift down for additional engine brak-
ing on a slippery road surface.
Downhill gradients Change into a lower gear in good time on long
and steep downhill gradients. Take particular note of this when driving a laden vehicle.
This also applies if you have activated cruise
control, SPEEDTRONIC or DISTRONIC PLUS.
This will use the braking effect of the engine,
so less braking will be required to maintain
vehicle speed. This relieves the load on the
brake system and prevents the brakes from
overheating and wearing too quickly.
Heavy and light loads G
WARNING
The braking system can overheat if you leave your foot on the brake pedal while driving.
This increases the braking distance and could
even cause the braking system to fail. There is
a risk of an accident.
Never use the brake pedal as a footrest. Do
not simultaneously depress both the brake
pedal and the accelerator pedal while driving.
! Depressing the brake pedal constantly
results in excessive and premature wear to
the brake pads.
If heavy demands are made on the brakes, do not park the vehicle immediately. Drive on for
a short while. This allows the airflow to cool
the brakes more quickly.
If the brakes have been used only moderately,
you should occasionally test their effective- ness. To do this, brake more firmly from a
higher speed while paying attention to the
traffic conditions. This improves the grip of
the brakes.
Wet road surfaces If you have driven for a long time in heavy rain
without braking, there may be a delayed reac-
tion from the brakes when braking for the first time. This may also occur after a car wash orafter driving through deep water.
You will have to depress the brake pedal more
firmly. Maintain a greater distance to the vehi-
cle in front.
After driving on a wet road or having the vehi- cle washed, brake firmly while paying atten-
tion to the traffic conditions. This will warm upthe brake discs, thereby drying them more
quickly and protecting them against corro-
sion.
Limited braking performance on salt-
treated roads If you drive on salt-treated roads, a layer of
salt may form on the brake discs and pads.
This can increase the braking distance con-
siderably.
R In order to prevent any salt build-up, apply
the brakes occasionally while paying atten-
tion to the traffic conditions.
R Carefully depress the brake pedal at the
end of the journey and when starting the
next journey.
R Maintain a much greater distance to the
vehicle in front.
New brake discs and brake pads/
linings Brake pads/linings and discs that are either
new or have been replaced only achieve opti- mum braking effect after several hundred kil-
ometres of driving. Compensate for the
reduced braking effect by applying greater
force to the brake pedal. 186
Driving tipsDriving an
d parking
Page 198 of 417

Important safety notes
G
WARNING
DISTRONIC PLUS does not react to:
R people or animals
R stationary obstacles on the road, e.g. stop-
ped or parked vehicles
R oncoming and crossing traffic
As a result, DISTRONIC PLUS may neither give
warnings nor intervene in such situations.
There is a risk of an accident.
Always pay careful attention to the traffic sit- uation and be ready to brake. G
WARNING
DISTRONIC PLUS cannot always clearly rec-
ognise other road users and complex traffic
conditions.
In such cases, DISTRONIC PLUS may:
R give an unnecessary warning and then
brake the vehicle
R neither give a warning nor intervene
R accelerate or brake unexpectedly
There is a risk of an accident.
Continue to drive carefully and be prepared to
brake, particularly if DISTRONIC PLUS warns
you. G
WARNING
DISTRONIC PLUS brakes your vehicle with up to 50 %of the maximum possible deceleration.
If this deceleration is not sufficient,
DISTRONIC PLUS alerts you with a visual and
acoustic warning. There is a risk of an acci-
dent.
Apply the brakes yourself in these situations
and try to take evasive action.
! When DISTRONIC PLUS or the HOLD
function is activated, the vehicle brakes
automatically in certain situations. To avoid damage to the vehicle, deactivate
DISTRONIC PLUS and the HOLD function in
the following or similar situations:
R when towing away
R in a car wash
If you fail to adapt your driving style,
DISTRONIC PLUS can neither reduce the risk
of an accident nor override the laws of phys-
ics. DISTRONIC PLUS cannot take road and
weather conditions or traffic conditions into
account. DISTRONIC PLUS is only an aid. You are responsible for the distance to the vehicle
in front, for vehicle speed, for braking in good time and for staying in lane.
Do not use DISTRONIC PLUS:
R in road and traffic conditions which do not
allow you to maintain a constant speed, e.g.
in heavy traffic or on winding roads
R on smooth or slippery roads. Braking or
accelerating can cause the drive wheels to lose traction and the vehicle could then
skid
R when there is poor visibility, e.g. due to fog,
heavy rain or snow
DISTRONIC PLUS may not detect narrow
vehicles driving in front, e.g. motorcycles, or
vehicles driving on a different line.
In particular, the detection of obstacles can
be impaired in the case of:
R dirt on the sensors or obscured sensors
R snow or heavy rain
R interference by other radar sources
R the possibility of strong radar reflections,
for example, in multi-storey car parks
If DISTRONIC PLUS no longer detects a vehi-
cle in front, it may unexpectedly accelerate to the speed stored. Driving systems
195Driving and parking Z
Page 207 of 417
(left and right), only focusing on the vehicle in
front if detected lane markings are not pres-
ent.
If these conditions are not present, Steering
Assist and Stop&Go Pilot cannot provide
assistance.
DISTRONIC PLUS must be active in order for
the function to be available.
Important safety notes
If you fail to adapt your driving style,
DISTRONIC PLUS with Steering Assist and
Stop&Go Pilot can neither reduce the risk of
an accident nor override the laws of physics. It cannot take into account road, weather or
traffic conditions. DISTRONIC PLUS with
Steering Assist and Stop&Go Pilot is only an
aid. You are responsible for the distance to
the vehicle in front, for vehicle speed, for
braking in good time and for staying in lane.
DISTRONIC PLUS with Steering Assist and
Stop&Go Pilot does not detect road and traf-
fic conditions and does not detect all road
users. If you are following a vehicle which is
driving towards the edge of the carriageway,
your vehicle could come into contact with the
kerb or other road boundaries. Be particularly
aware of other road users, e.g. cyclists, that
are directly next to your vehicle.
Obstacles such as traffic pylons on the lane or projecting out into the lane are not detected.
An inappropriate steering intervention, e.g.
after intentionally driving over a lane marking,
can be corrected at any time if you steer
slightly in the opposite direction.
DISTRONIC PLUS with Steering Assist and
Stop&Go Pilot cannot continuously keep your vehicle in lane. In some cases, the steering
intervention is not sufficient to bring the vehi-
cle back to the lane. In such cases, you must steer the vehicle yourself to ensure that it
does not leave the lane. The support offered by the system may be
impaired if:
R there is poor visibility, e.g. due to insuffi-
cient illumination of the road, or due to
snow, rain, fog or spray
R there is glare, e.g. from oncoming traffic,
the sun or reflection from other vehicles
(e.g. if the road surface is wet)
R the windscreen is dirty, misted up, dam-
aged or covered, for instance by a sticker,
in the vicinity of the camera
R no or several, unclear lane markings are
present for one lane, e.g. in a construction
area
R the lane markings are worn away, dark or
covered up, e.g. by dirt or snow
R the distance to the vehicle in front is too
small and the lane markings thus cannot be
detected
R the lane markings change quickly, e.g.
lanes branch off, cross one another or
merge
R the road is narrow and winding
R there are highly variable shade conditions
on the road
The system is switched to passive and no lon-
ger assists you by performing steering inter-
ventions if:
R you actively change lane
R you switch on the turn signal
R you take your hands off the steering wheel
or do not steer for a prolonged period of
time
i After you have finished changing lanes,
Steering Assist and Stop&Go Pilot are auto-
matically active again.
Steering Assist and Stop&Go Pilot cannot
provide assistance:
R on very sharp corners
R a loss of tyre pressure or a defective tyre
has been detected and displayed
Pay attention also to the important safety
notes for DISTRONIC PLUS (Y page 195).204
Driving systemsDriving and parking
Page 210 of 417
When the HOLD function is activated, the
transmission is shifted automatically to posi- tion Pif:
R the driver's seat belt is not fastened and the
driver's door is open
R the engine is switched off, unless it is auto-
matically switched off by the ECO start/
stop function
The electric parking brake secures the vehicle
automatically if the HOLD function is activa-
ted, the vehicle is stationary and:
R a system fault occurs
R the power supply is insufficient
If a malfunction in the electric parking brake
occurs, then the transmission may also be
shifted into position Pautomatically. MAGIC BODY CONTROL
General notes MAGIC BODY CONTROL consists of Active
Body Control (ABC), ROAD SURFACE SCAN,
the CURVE cornering function as well as auto-
matic vehicle stabilisation in the event of a
crosswind.
Your vehicle automatically adjusts its ride
height to reduce fuel consumption. The sus-
pension mode is adjusted according to your
selection (SPORT, COMFORT or CURVE), the
road surface conditions and the vehicle load. A multifunction camera detects bumps in the
road surface before the vehicle drives over
them. This reduces chassis movements.
Important safety notes G
WARNING
People's limbs may become trapped if they
are located underneath the vehicle or
between the vehicle body and the tyres when the vehicle is lowering. There is a danger of
injury. When lowering the vehicle, make sure no one
is underneath the vehicle or in the immediate
vicinity of the wheel arches.
Crosswind Assist The crosswind stabilisation operates by
changing wheel loads through distortion of
the ABC spring struts. It reduces impairments
in handling when driving in a straight line andassists during countersteering.
Crosswind Assist is active in the speed range
between 80 km/h and 210 km/h when driv-
ing straight ahead or cornering gently.
Active Body Control ABC Vehicle level
All vehicles except AMG vehicles:
depend-
ing on the vehicle level that has been set, the vehicle automatically adjusts its height
dependent on the current speed. The vehicle
is lowered by up to 15 mm as the speed
increases. As the speed is reduced, the vehi- cle is raised to the set vehicle height.
In the event of poor road surface conditions,
the vehicle automatically raises by up to
10 mm and harder damping is selected.
AMG vehicles: depending on the vehicle
level that has been selected, the vehicle auto-
matically adjusts its height dependent on the current speed. The vehicle is lowered by up to
10 mm below the normal level as the speed
increases. As the speed is reduced, the vehi-
cle is raised to the set vehicle height.
Select the "Normal" setting for normal road
conditions and "Raised" for driving with snow chains or on particularly poor road condi-
tions.
Your selection remains stored even if you
remove the key from the ignition lock.
The "Raised level" setting is cancelled if you:
R are driving faster than approximately
120 km/h
R drive for approximately three minutes at a
speed above 80 km/h Driving systems
207Driving and parking Z