2015 MERCEDES-BENZ S-CLASS COUPE ECO mode
[x] Cancel search: ECO modePage 210 of 417
When the HOLD function is activated, the
transmission is shifted automatically to posi- tion Pif:
R the driver's seat belt is not fastened and the
driver's door is open
R the engine is switched off, unless it is auto-
matically switched off by the ECO start/
stop function
The electric parking brake secures the vehicle
automatically if the HOLD function is activa-
ted, the vehicle is stationary and:
R a system fault occurs
R the power supply is insufficient
If a malfunction in the electric parking brake
occurs, then the transmission may also be
shifted into position Pautomatically. MAGIC BODY CONTROL
General notes MAGIC BODY CONTROL consists of Active
Body Control (ABC), ROAD SURFACE SCAN,
the CURVE cornering function as well as auto-
matic vehicle stabilisation in the event of a
crosswind.
Your vehicle automatically adjusts its ride
height to reduce fuel consumption. The sus-
pension mode is adjusted according to your
selection (SPORT, COMFORT or CURVE), the
road surface conditions and the vehicle load. A multifunction camera detects bumps in the
road surface before the vehicle drives over
them. This reduces chassis movements.
Important safety notes G
WARNING
People's limbs may become trapped if they
are located underneath the vehicle or
between the vehicle body and the tyres when the vehicle is lowering. There is a danger of
injury. When lowering the vehicle, make sure no one
is underneath the vehicle or in the immediate
vicinity of the wheel arches.
Crosswind Assist The crosswind stabilisation operates by
changing wheel loads through distortion of
the ABC spring struts. It reduces impairments
in handling when driving in a straight line andassists during countersteering.
Crosswind Assist is active in the speed range
between 80 km/h and 210 km/h when driv-
ing straight ahead or cornering gently.
Active Body Control ABC Vehicle level
All vehicles except AMG vehicles:
depend-
ing on the vehicle level that has been set, the vehicle automatically adjusts its height
dependent on the current speed. The vehicle
is lowered by up to 15 mm as the speed
increases. As the speed is reduced, the vehi- cle is raised to the set vehicle height.
In the event of poor road surface conditions,
the vehicle automatically raises by up to
10 mm and harder damping is selected.
AMG vehicles: depending on the vehicle
level that has been selected, the vehicle auto-
matically adjusts its height dependent on the current speed. The vehicle is lowered by up to
10 mm below the normal level as the speed
increases. As the speed is reduced, the vehi-
cle is raised to the set vehicle height.
Select the "Normal" setting for normal road
conditions and "Raised" for driving with snow chains or on particularly poor road condi-
tions.
Your selection remains stored even if you
remove the key from the ignition lock.
The "Raised level" setting is cancelled if you:
R are driving faster than approximately
120 km/h
R drive for approximately three minutes at a
speed above 80 km/h Driving systems
207Driving and parking Z
Page 213 of 417
are significantly reduced when driving over
bumps.
The system is deactivated when you select
the raised vehicle level, sports mode or the
dynamic cornering function.
The system may be impaired or may not func-
tion if:
R the road surface is insufficiently lit
R there is poor visibility, e.g. snow, rain, fog or
spray
R there is glare, e.g. from the sun or from
oncoming traffic
R the windscreen is dirty, misted up or cov-
ered, for instance by a sticker, in the vicinity
of the camera
R the road surface has no texture or is reflec-
tive, e.g. in the case of newly laid asphalt,
concrete slabs or puddles
R the distance to the vehicle in front is too
short
R sections of the route have a very small
radius of curvature
R you accelerate hard or brake sharply AIRMATIC
General notes AIRMATIC is an air suspension system with
variable damping for improved driving com-
fort. All-round level control ensures the best
possible suspension and constant ground
clearance, even with a laden vehicle. When
you drive fast, the vehicle is lowered auto-
matically to improve driving safety and to
reduce fuel consumption. There is also the
option to manually adjust the vehicle level.
AIRMATIC consists of level setting, level con-
trol and the Adaptive Damping System ADS
PLUS. Important safety notes G
WARNING
People's limbs may become trapped if they
are located underneath the vehicle or
between the vehicle body and the tyres when the vehicle is lowering. There is a danger of
injury.
When lowering the vehicle, make sure no one
is underneath the vehicle or in the immediate vicinity of the wheel arches.
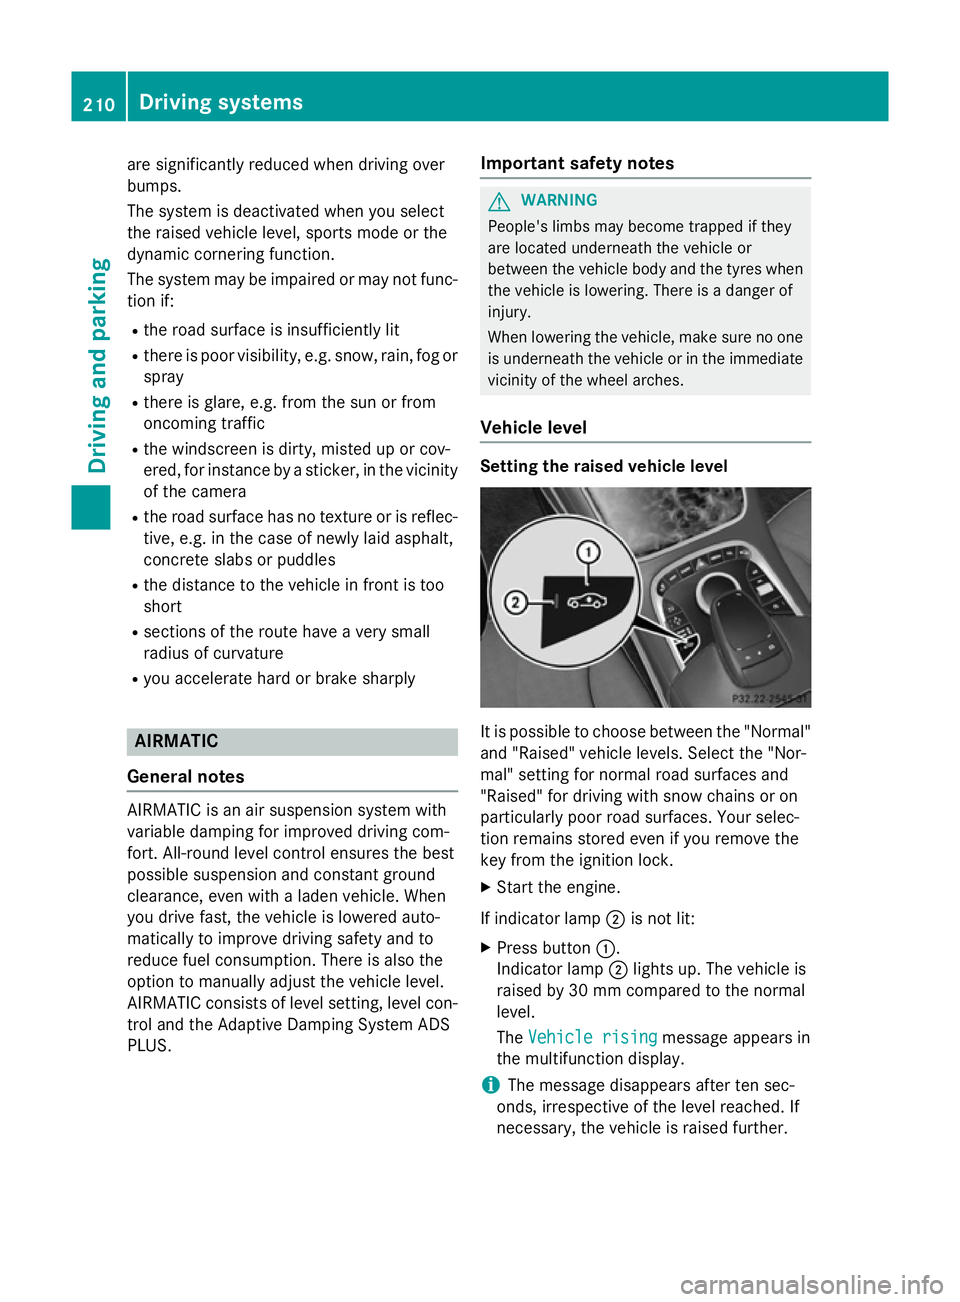
Vehicle level Setting the raised vehicle level
It is possible to choose between the "Normal"
and "Raised" vehicle levels. Select the "Nor-
mal" setting for normal road surfaces and
"Raised" for driving with snow chains or on
particularly poor road surfaces. Your selec-
tion remains stored even if you remove the
key from the ignition lock.
X Start the engine.
If indicator lamp ;is not lit:
X Press button :.
Indicator lamp ;lights up. The vehicle is
raised by 30 mm compared to the normal
level.
The Vehicle rising Vehicle rising message appears in
the multifunction display.
i The message disappears after ten sec-
onds, irrespective of the level reached. If
necessary, the vehicle is raised further. 210
Driving systemsDriving and parking
Page 253 of 417
X
Confirm by pressing aon the steering
wheel.
X Press :or9 to select the display
with approximate range :and current fuel
consumption ;.
Approximate range :that can be covered is
calculated according to your current driving
style and the amount of fuel in the tank. If
there is only a small amount of fuel left in the
fuel tank, a vehicle being refuelled C
appears instead of approximate range :.
Recuperation display =shows you if energy
has been recuperated from the kinetic energy
in overrun mode and saved in the battery.
Recuperation display =depends on the
engine installed and is therefore not available in all vehicles.
ECO display The ECO display is not available in Mercedes-
AMG vehicles.
X Press òon the steering wheel to open
the menu list.
X Press :or9 on the steering wheel
to select the Trip Tripmenu.
X Confirm by pressing aon the steering
wheel.
X Select ECO display
ECO display with: or9.
If the ignition remains switched off for longer than four hours, the ECO display will be auto-
matically reset.
Further information on the ECO display
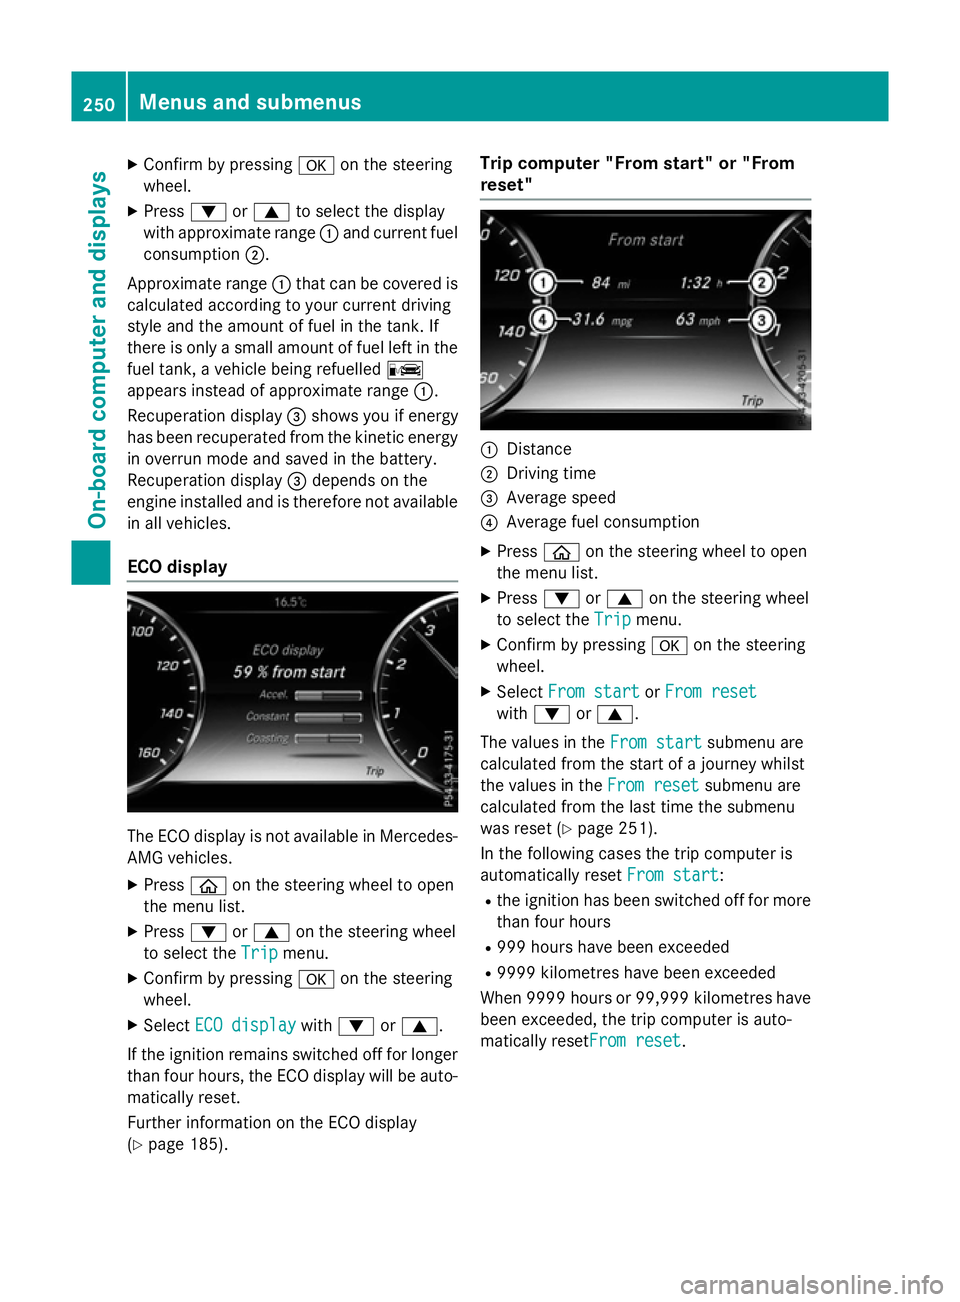
(Y page 185). Trip computer "From start" or "From
reset"
:
Distance
; Driving time
= Average speed
? Average fuel consumption
X Press òon the steering wheel to open
the menu list.
X Press :or9 on the steering wheel
to select the Trip Tripmenu.
X Confirm by pressing aon the steering
wheel.
X Select From start
From start orFrom reset
From reset
with : or9.
The values in the From start
From startsubmenu are
calculated from the start of a journey whilst
the values in the From reset From resetsubmenu are
calculated from the last time the submenu
was reset (Y page 251).
In the following cases the trip computer is
automatically reset From start From start:
R the ignition has been switched off for more
than four hours
R 999 hours have been exceeded
R 9999 kilometres have been exceeded
When 9999 hour sor 99,999 kilometres have
been exceeded, the trip computer is auto-
matically resetFrom reset From reset.250
Menus and submenusOn-board computer and displays
Page 305 of 417
Display messages
Possible causes/consequences and
M
MSolutions Because there is interference from a strong source of radio waves,
the key is not detected whilst the engine is running.
A warning tone also sounds.
X Pull over and stop the vehicle safely as soon as possible, paying
attention to road and traffic conditions.
X Secure the vehicle to prevent it from rolling away (Y page 181).
X Insert the key into the ignition lock and bring into key mode. Â
Remove starting Remove starting
button, then button, then
insert key insert key The key is continually undetected.
The key detection function has a temporary malfunction or is
faulty. A warning tone also sounds.
X Insert the key into the ignition lock and turn it to the desired
position.
X Consult a qualified specialist workshop. Warning and indicator lamps in the instrument cluster
General notes
Some systems carry out a self-diagnosis when the ignition is switched on. Several warning and indicator lamps can thereby temporarily light up or flash. This behaviour is non-critical. These
warning and indicator lamps only indicate a malfunction if they light up or flash after the engine is started or during a journey. Safety
Seat belts Warning/
indicator
lamp
N N
Signal type
Possible causes/consequences and M
MSolutions ü
N
Only for certain countries: the red seat belt warning lamp lights up for
6 seconds after the engine starts.
The seat belt warning lamp reminds the driver and front passenger to fasten
their seat belts.
X Fasten your seat belt (Y page 46).ü
N
Only for certain countries: the red seat belt warning lamp lights up after the
engine starts. In addition, a warning tone sounds for up to 6 seconds.
The driver's seat belt is not fastened.
X Fasten your seat belt (Y page 46).
The warning tone ceases. 302
Wa
rning and indi cator lamps in the instrument clusterOn-board computer and displays
Page 332 of 417

sion surrounding the possible health risk
posed by electromagnetic fields.
Mercedes-Benz recommends the use of an
approved exterior aerial. This ensures:
R optimal mobile phone reception quality in
the vehicle
R that mutual interference between the vehi-
cle electronics and mobile phones is mini-
mised
An exterior aerial has the following advan-
tages:
R it conducts the electromagnetic fields gen-
erated by a wireless device to the exterior
R the field strength in the vehicle interior is
lower than in a vehicle that does not have
an exterior aerial
Information on retrofitting two-way radios
and mobile phones (RF transmitters)
(Y page 402).
General notes Depending on the vehicle equipment, there
are various mobile phone brackets that may
be fitted in your vehicle; in some cases, these
are country-specific.
More information on suitable mobile phones,
mobile phone brackets and on connecting
Bluetooth ®
-capable mobile phones with
COMAND Online can be obtained:
R at your Mercedes-Benz Service Centre
R on the Internet at http://www.mercedes-
benz.com/connect
The functions and services available when
you use the phone depend on your mobile
phone model and service provider.
Using a mobile phone To connect a mobile phone to the exterior
aerial and charge it, insert it into the mobile
phone bracket. X
Open the telephone compartment
(Y page 318).
X Place the mobile phone bracket into the
pre-installed fitting; see the separate instal-
lation instructions for the mobile phone fit-
ting.
X Insert the mobile phone into the mobile
phone bracket; see the separate installa-
tion instructions for the mobile phone fit-
ting.
i The mobile phone can also be operated
without being in the bracket. However, the charging function and aerial function are
not available.
In order to use Bluetooth ®
(SAP profile) on
your telephone module, you must first insert
the telephone module into the pre-installed
fitting. This connects it to the exterior aerial.
If you wish to charge the mobile phone, then
you must connect it to a USB port.
Further information on the telephone module
with Bluetooth ®
(SAP profile) can be found in
the Digital Owner's Manual.
Operating the mobile phone You can operate the telephone using the
6 and~ buttons on the multifunction
steering wheel. You can operate other mobile
phone functions via the on-board computer
(Y page 256).
When you remove the key from the ignition
lock, the mobile phone is disconnected from
the vehicle. You can then no longer make calls using the hands-free system.
If a call is active and you remove the key from the ignition lock, the conversation is trans-
ferred over to the mobile phone. It is then
possible to continue the conversation on the
mobile phone. Features
329Stowing and features Z
Page 333 of 417
Garage door opener
General notes The HomeLink
®
garage door opener integra-
ted in the rear-view mirror allows you to oper- ate up to three different door and gate sys-
tems.
Once programmed, the integrated garage
door opener in the rear-view mirror will
assume the function of the garage door sys-
tem's remote control. Please also read the
operating instructions for the garage door
system.
When programming a garage door opener,
park the vehicle outside the garage. Do not
run the engine while programming.
The garage door opener is only available for
certain countries. Observe the legal require-
ments for each individual country.
The HomeLink ®
garage door opener is com-
patible with most European garage and gate
opener drives. More information on Home-
Link ®
and/or compatible products is availa-
ble:
R at a qualified specialist workshop
R via the HomeLink ®
Hotline
(0) 08000 466 354 65 or alternatively
+49 (0) 6838 907-277
R on the Internet at http://
www.homelink.com
Important safety notes G
WARNING
When you operate or program the garage door with the integrated garage door opener, per-
sons in the range of movement of the garage
door can become trapped or struck by the
garage door. There is a risk of injury.
When using the integrated garage door
opener, always make sure that nobody is
within the range of movement of the garage
door. G
WARNING
Combustion engines emit poisonous exhaust
gases such as carbon monoxide. Inhaling
these exhaust gases leads to poisoning. There is a risk of fatal injury. Therefore never leave
the engine running in enclosed spaces with-
out sufficient ventilation.
Programming Programming buttons
Pay attention to the "Important safety notes"
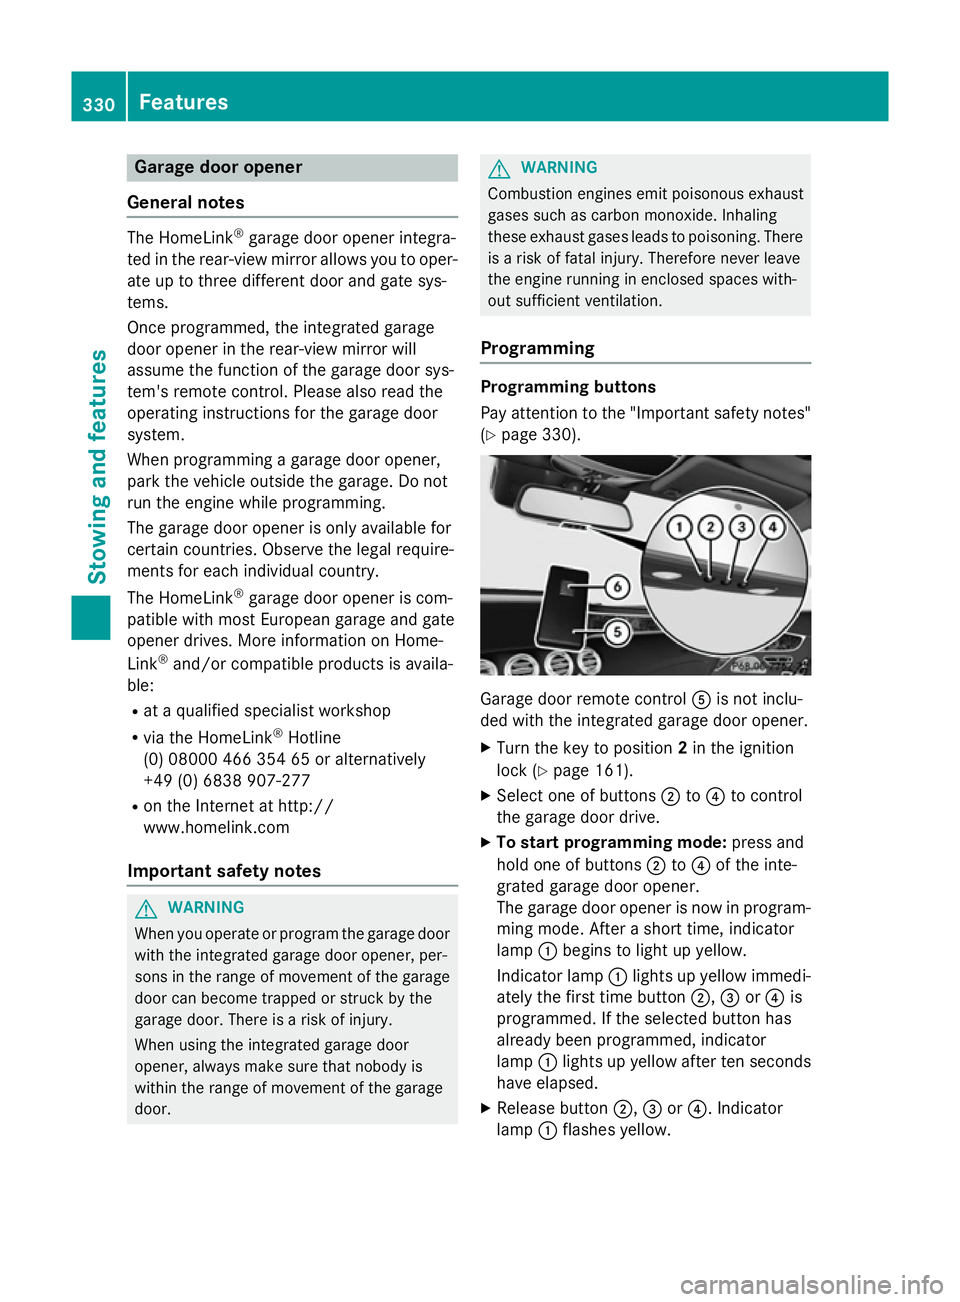
(Y page 330). Garage door remote control
Ais not inclu-
ded with the integrated garage door opener.
X Turn the key to position 2in the ignition
lock (Y page 161).
X Select one of buttons ;to? to control
the garage door drive.
X To start programming mode: press and
hold one of buttons ;to? of the inte-
grated garage door opener.
The garage door opener is now in program- ming mode. After a short time, indicator
lamp :begins to light up yellow.
Indicator lamp :lights up yellow immedi-
ately the first time button ;,=or? is
programmed. If the selected button has
already been programmed, indicator
lamp :lights up yellow after ten seconds
have elapsed.
X Release button ;,=or?. Indicator
lamp :flashes yellow. 330
FeaturesStowing and features
Page 344 of 417
Checking the oil level using the on-board computer (Mercedes-AMG S 65 models)
X
Make sure that the key is in position 2in the ignition lock.
X Use ò on the steering wheel to call up the list of menus.
X Press the :or9 button on the steering wheel to select the Service
Servicemenu.
X Confirm by pressing aon the steering wheel.
X Use : or9 to select the Engine oil level:
Engine oil level: submenu.
X Press ato confirm the selection.
The Engine
Engine oil
oillevel
level Measuring
Measuring now
nowMeasurement
Measurement accurate
accurateonly
onlyif
ifvehicle
vehicle is
is
level
level message appears in the multifunction display.
The measurement takes a few seconds. You will see one of the following messages in the
multifunction display: Display messages
Possible causes/consequences and
M
MSolutions Engine
Engine
oil
oillevel
level OK
OK The oil level is correct.
Add
Add
1
1litre
litre engine
engine
oil
oil when
when next
next refu‐
refu‐
elling
elling The oil level is too low.
X Top up 1.0 litre of engine oil. Engine oil level
Engine oil level
Reduce oil level Reduce oil level The engine oil level is too high.
X Have excess engine oil siphoned off. For engine oil
For engine oil
level level
turn
turnon
onigni‐
igni‐
tion
tion The ignition is switched off.
X Turn the key to position 2in the ignition lock. Waiting
Waiting
period
periodfor
for
engine oil level
engine oil level
not observed not observed The required waiting period was not observed.
X If the engine is at normal operating temperature: repeat the
measurement after about five minutes.
If the engine is not at normal operating temperature, e.g. if the
engine was only started briefly: repeat the measurement after
approximately 30 minutes. Engine oil level Engine oil level
Not with the Not with the
engine running engine running The engine is running; oil level measurement is not possible.
X Switch off the engine.
X If the engine is at normal operating temperature: wait about five
minutes before carrying out the measurement.
If the engine is not at normal operating temperature, e.g. if theengine was only started briefly: wait approximately 30 minutes before carrying out the measurement. Engine compartment
341Maintenance and care Z
Page 361 of 417
X
Open the boot lid.
X Lift the boot floor upwards (Y page 321) or
detach the tool bag Velcro fasteners. Flat tyre
Preparing the vehicle
Your vehicle may be equipped with: R tyres with run-flat characteristics
(MOExtended tyres) (Y page 358)
Vehicle preparation is not necessary on
vehicles with MOExtended tyres.
R a TIREFIT kit (Y page 357)
Vehicles with MOExtended tyres are not
equipped with a TIREFIT kit at the factory. It is
therefore recommended that you additionally equip your vehicle with a TIREFIT kit if you fit tyres that do not feature run-flat characteris- tics, e.g. winter tyres. A TIREFIT kit can be
obtained from a qualified specialist work-
shop.
Information on changing/fitting a wheel
(Y page 385).
X Stop the vehicle as far away as possible
from traffic on solid, non-slippery and level
ground.
X Switch on the hazard warning lamps.
X Safeguard the vehicle against rolling away
(Y page 181).
X If possible, bring the front wheels into the
straight-ahead position.
X Switch off the engine.
X Open the driver's door.
The on-board electronics now have status
0. This is the same as the key having been
removed.
X Remove the Start/Stop button from the
ignition lock (Y page 161).
or, if the key is inserted in the ignition lock: X Remove the key from the ignition lock.
X Make sure that the passengers are not
endangered as they do so. Make sure that
no one is near the danger area while a wheel is being changed. Anyone who is not
directly assisting in the wheel change
should, for example, stand behind the bar-
rier.
X Get out of the vehicle. Pay attention to traf-
fic conditions when doing so.
X Close the driver's door.
X Place the warning triangle at a suitable dis-
tance (Y page 356). Observe legal require-
ments. MOExtended tyres (tyres with run-flat
characteristics)
General notes With MOExtended tyres (tyres with run-flat
characteristics), you can continue to drive
your vehicle even if there is a total loss of
pressure in one or more tyres. The affected
tyre must not show any clearly visible dam-
age.
You can recognise MOExtended tyres by the
MOExtended marking which appears on the
tyre wall. You will find this marking next to the
tyre size designation, the load-bearing capa-
city and the speed index.
MOExtended tyres may only be used in con-
junction with an activated tyre pressure loss
warning system or tyre pressure monitor.
If a pressure loss warning message
appears in the multifunction display:
R observe the instructions in the display mes-
sages (Y page 295)
R check the tyre for damage
R if driving on, observe the following notes
The driving distance possible in run-flat mode is approximately 80 km when the vehicle is
partially laden and approximately 30 km
when the vehicle is fully laden. 358
Flat tyreBreakdown assistance