2015 MERCEDES-BENZ S-CLASS COUPE light
[x] Cancel search: lightPage 339 of 417
X
Driver's and front-passenger seat: slide
the corresponding seat backwards.
X Rear seats: slide the corresponding front
seat forwards.
X To fit: lay the floormat in the footwell.
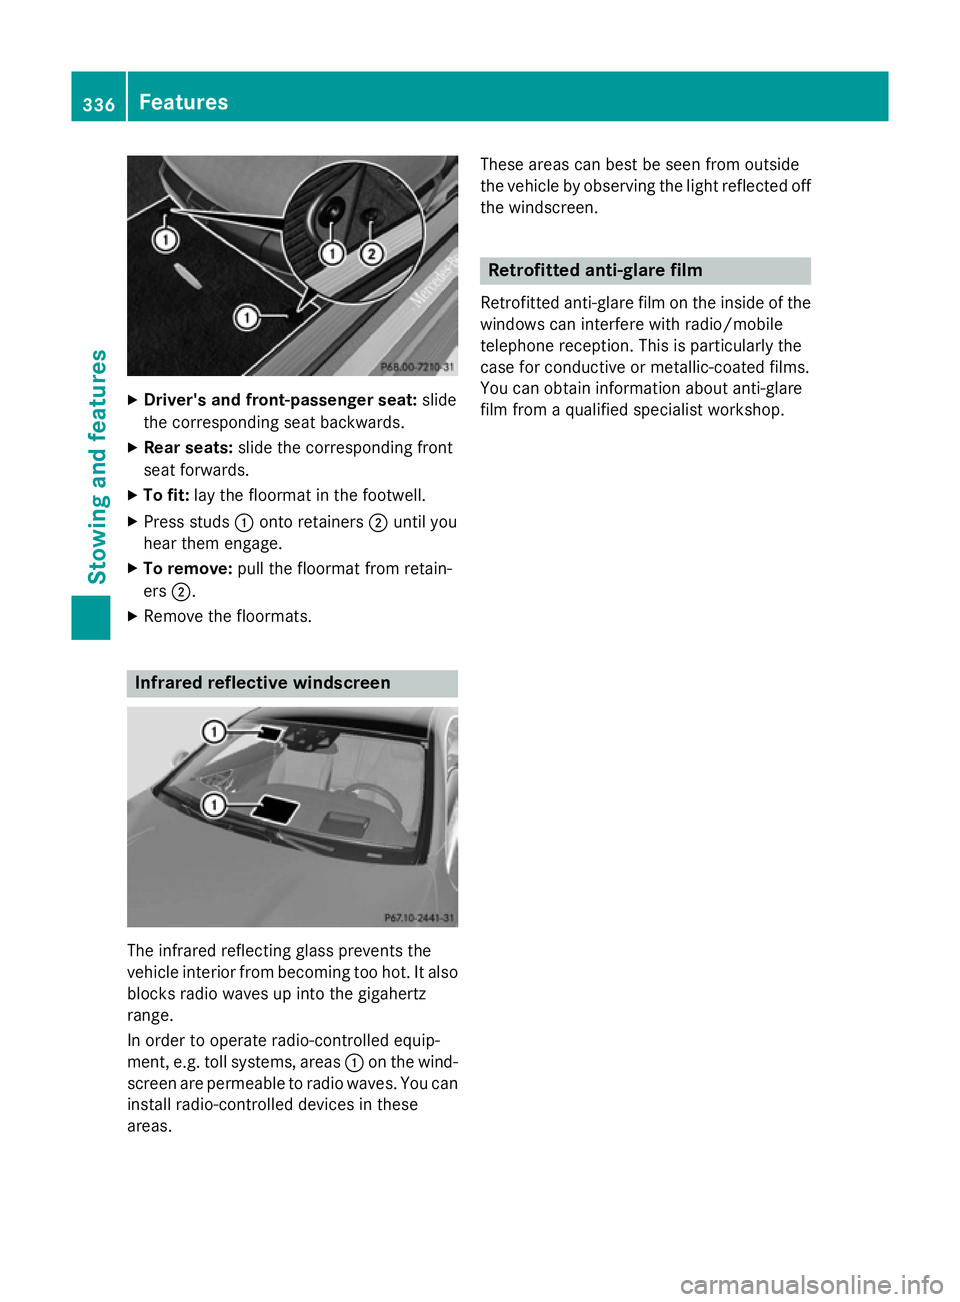
X Press studs :onto retainers ;until you
hear them engage.
X To remove: pull the floormat from retain-
ers ;.
X Remove the floormats. Infrared reflective windscreen
The infrared reflecting glass prevents the
vehicle interior from becoming too hot. It also
blocks radio waves up into the gigahertz
range.
In order to operate radio-controlled equip-
ment, e.g. toll systems, areas :on the wind-
screen are permeable to radio waves. You can install radio-controlled devices in these
areas. These areas can best be seen from outside
the vehicle by observing the light reflected off
the windscreen. Retrofitted anti-glare film
Retrofitted anti-glare film on the inside of the windows can interfere with radio/mobile
telephone reception. This is particularly the
case for conductive or metallic-coated films.
You can obtain information about anti-glare
film from a qualified specialist workshop. 336
FeaturesStowing and fea
tures
Page 343 of 417
Closing the bonnet
X
Lower the bonnet and let it fall from a
height of approximately 20 cm.
X Check that the bonnet has engaged prop-
erly.
If the bonnet can be raised slightly, it is not
properly engaged. Open it again and close
it with a little more force. Radiator
Do not cover up the radiator. Do not use ther-
mal mats, insect protection covers or any-
thing similar. Doing so can cause the Onboard Diagnostics System to display inaccurate val-
ues. Some of these values are legally required
and must always be correct. Engine oil
General notes Depending on your driving style, the vehicle
consumes up to 0.8 litres of oil per 1000 km.
The oil consumption may be higher than this
when the vehicle is new or if you frequently
drive at high engine speeds.
Depending on the engine, the oil dipstick may
be installed at a different location.
When checking the oil level:
R park the vehicle on a level surface
R the engine should be switched off for
approximately five minutes if the engine is
at normal operating temperature
R if the engine is not at normal operating
temperature, e.g. if the engine was only
started briefly, wait approximately
30 minutes before carrying out the meas-
urement Checking the oil level using the oil dip-
stick (except Mercedes-AMG S 65 mod-
els) G
WARNING
Certain components in the engine compart-
ment could be very hot, e.g. the engine, the
radiator and parts of the exhaust system.
There is a risk of injury when accessing the
engine compartment.
As far as possible, allow the engine to cool
down and only touch the components descri- bed in the following. Example
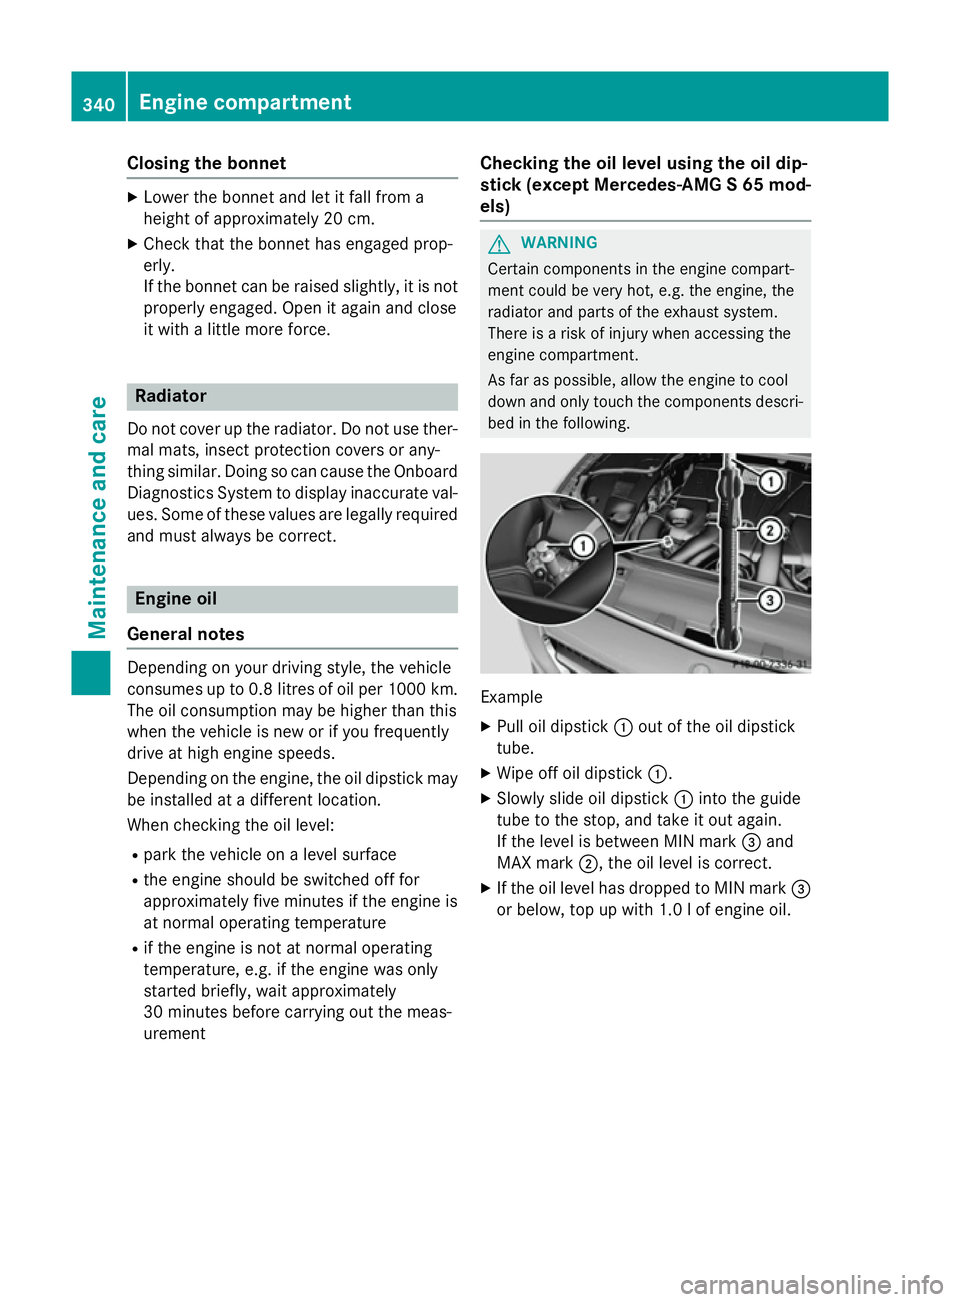
X Pull oil dipstick :out of the oil dipstick
tube.
X Wipe off oil dipstick :.
X Slowly slide oil dipstick :into the guide
tube to the stop, and take it out again.
If the level is between MIN mark =and
MAX mark ;, the oil level is correct.
X If the oil level has dropped to MIN mark =
or below, top up with 1.0 l of engine oil. 340
Engine compartmentMaintenance and care
Page 350 of 417
Wash off excess dirt before cleaning the vehi-
cle in an automatic car wash.
After using an automatic car wash, wipe off
wax from the windscreen and the wiper
blades. This will prevent smears and reduce
wiping noises caused by residue on the wind- screen.
Washing by hand In some countries, washing by hand is only
allowed at specially equipped washing bays.
Observe the legal requirements for each indi- vidual country.
X Do not use hot water and do not wash the
vehicle in direct sunlight.
X Use a soft sponge to clean.
X Use a mild cleaning agent, such as a car
shampoo approved by Mercedes-Benz.
X Thoroughly hose down the vehicle with a
gentle jet of water.
X Do not point the water jet directly towards
the air inlet.
X Use plenty of water and rinse out the
sponge frequently.
X Rinse the vehicle with clean water and dry
thoroughly with a chamois.
X Do not let the cleaning agent dry on the
paintwork.
When using the vehicle in winter, remove all
traces of road salt deposits carefully and as
soon as possible.
High-pressure cleaning equipment G
WARNING
The water jet of circular-jet nozzles (dirt grind- ers) can cause damage not visible from the
outside to tyres or chassis components. Com-
ponents damaged in this way can unexpect-
edly fail. There is a risk of an accident.
Do not use high-pressure cleaners with circu-
lar-jet nozzles to clean the vehicle. Have dam- aged tyres or chassis components replaced
immediately. !
Always maintain a distance of at least
30 cm between the vehicle and the high-
pressure cleaner nozzle. Information about
the correct distance is available from the
equipment manufacturer.
Move the high-pressure cleaner nozzle
around when cleaning your vehicle.
Do not aim directly at any of the following:
R tyres
R door gaps, roof gaps, joints etc.
R electrical components
R battery
R connectors
R lights
R seals
R trim elements
R ventilation slots
Damaged seals or electrical components
can lead to leaks or failures.
! If the key is within the rear detection
range of KEYLESS-GO, the following situa-
tions, for example, could lead to the boot lid opening unintentionally:
R using a car wash
R using a high-pressure cleaner
Make sure that the key is at least 3 m away
from the vehicle.
Cleaning the paintwork !
Do not affix:
R stickers
R films
R magnetic plates or similar items
to painted surfaces. You could otherwise
damage the paintwork.
Scratches, corrosive deposits, areas affected by corrosion and damage caused by inade-
quate care cannot always be completely
repaired. In such cases, visit a qualified spe-
cialist workshop. Care
347Maintenance and care Z
Page 351 of 417
X
Remove impurities immediately, where
possible, whilst avoiding rubbing too hard.
X Soak insect remains with insect remover
and rinse off the treated areas afterwards.
X Soak bird droppings with water and rinse
off the treated areas afterwards.
X Remove coolant, brake fluid, tree resin,
oils, fuels and greases by rubbing gently
with a cloth soaked in petroleum ether or
lighter fluid.
X Use tar remover to remove tar stains.
X Use silicone remover to remove wax.
Care and treatment of matt paintwork !
Never polish the vehicle or the light alloy
wheels. Polishing makes the paintwork
shiny.
! The following may cause the paint to
become shiny and thus reduce the matt
effect:
R vigorous rubbing with unsuitable materi-
als
R frequent use of car washes
R washing the vehicle in direct sunlight
! Never use paint cleaner, buffing or pol-
ishing products, or gloss preserver, e.g.
wax. These products are only suitable for
high-gloss surfaces. Their use on vehicles
with matt finish leads to considerable sur-
face damage (shiny, spotted areas).
Always have paintwork repairs carried out
at a qualified specialist workshop.
! Do not use wash programs with a hot wax
treatment under any circumstances.
Observe these notes if your vehicle has a
clear matt finish. This will help you to avoid
damage to the paintwork due to incorrect
treatment.
These notes also apply to light-alloy wheels
with a clear matt finish.
The vehicle should preferably be washed by
hand using a soft sponge, car shampoo and
plenty of water. Use only insect remover and car shampoo
from the range of approved Mercedes-Benz
care products. Cleaning vehicle parts
Cleaning the wheels G
WARNING
The water jet of circular-jet nozzles (dirt grind- ers) can cause damage not visible from the
outside to tyres or chassis components. Com-
ponents damaged in this way can unexpect-
edly fail. There is a risk of an accident.
Do not use high-pressure cleaners with circu-
lar-jet nozzles to clean the vehicle. Have dam- aged tyres or chassis components replaced
immediately.
! Do not use acidic wheel cleaning products
to remove brake dust. This could damage
wheel bolts and brake components.
! Do not park up the vehicle for an extended
period straight after cleaning it, particularly after having cleaned the wheels with wheel cleaner. Wheel cleaners could cause
increased corrosion of the brake discs and
brake pads/linings. For this reason, you
should drive for a few minutes after clean-
ing. Braking heats the brake discs and the
brake pads/linings, thus drying them. The
vehicle can then be parked up.
Cleaning the windows G
WARNING
If the windscreen wipers are set in motion
when cleaning the windscreen or wiper
blades, you could become trapped. There is a danger of injury.
Always switch off the windscreen wipers and
the ignition before cleaning the windscreen orwiper blades.
! Do not use dry cloths, abrasive products,
solvents or cleaning agents containing sol- vents to clean the inside of the windows. Do 348
CareMaintenance and care
Page 352 of 417

not touch the insides of the windows with
hard objects, e.g. an ice scraper or ring.
There is otherwise a risk of damaging the
windows.
! Clean the water drainage channels of the
windscreen and the rear window at regular
intervals. Deposits such as leaves, petals
and pollen may under certain circumstan-
ces prevent water from draining away. This
can lead to corrosion damage and damage to electronic components.
X Clean the inside and outside of the win-
dows with a damp cloth and a cleaning
agent that is recommended and approved
by Mercedes-Benz.
Cleaning the wiper blades G
WARNING
If the windscreen wipers are set in motion
when cleaning the windscreen or wiper
blades, you could become trapped. There is a danger of injury.
Always switch off the windscreen wipers and
the ignition before cleaning the windscreen or wiper blades.
! Do not pull on the wiper blade. Otherwise,
the wiper blade could be damaged.
! Do not clean wiper blades too often and
do not rub them too hard. Otherwise, the
graphite coating could be damaged. This
could cause wiper noise.
! Hold the wiper arm securely when folding
back. The windscreen could be damaged if
the wiper arm hits against it suddenly.
X Fold the wiper arms away from the wind-
screen (Y page 134).
X Clean the wiper blades carefully using a
damp cloth.
X Fold the windscreen wipers back again
before switching on the ignition. Cleaning the exterior lighting !
Only use cleaning agents or cleaning
cloths that are suitable for plastic lenses.
Unsuitable cleaning agents or cleaning
cloths could scratch or damage the plastic lenses of the exterior lighting.
X Clean the plastic lenses of the exterior
lighting using a wet sponge and a mild
cleaning agent, e.g. Mercedes-Benz car
shampoo or cleaning cloths.
Mirror turn signals !
Only use cleaning agents or cleaning
cloths that are suitable for plastic lenses.
Unsuitable cleaning agents or cleaning
cloths could scratch or damage the plastic lenses of the mirror turn signals.
X Clean the plastic lenses of the mirror turn
signals in the exterior mirror housing using
a wet sponge and mild cleaning agent, e.g.
Mercedes-Benz car shampoo or cleaning
cloths.
Cleaning the sensors !
If you clean the sensors with a high-pres-
sure cleaner, make sure that you keep a
distance of at least 30 cm between the
vehicle and the high-pressure cleaner noz-
zle. Information about the correct distance is available from the equipment manufac-
turer. Care
349Maintenance and care Z
Page 356 of 417
Leather is a natural product.
It has natural surface properties, e.g.:
R unevenness in structure
R marks caused by growth and injury
R subtle colour differences
These are characteristics of leather and not
material faults.
Seat covers from other materials
! Observe the following when cleaning:
R clean artificial leather covers with a cloth
moistened with a solution containing 1%
detergent (e.g. washing-up liquid).
R clean cloth covers with a microfibre cloth
moistened with a solution containing 1%
detergent (e.g. washing-up liquid). Rub
carefully, and always wipe entire seat
sections to avoid leaving visible lines.
Leave the seat to dry afterwards. Clean-
ing results depend on the type of dirt and how long it has been there.
R Clean DINAMICA covers with a damp
cloth. Make sure that you wipe entire
seat sections to avoid leaving visible
lines.
Cleaning the seat belts G
WARNING
Seat belts may be severely weakened if
bleached or coloured. This may lead to the
seat belts, for example, tearing or failing in an accident. There is an increased risk of injury,
possibly even fatal.
Never bleach or colour seat belts.
! Do not clean the seat belts using chemical
cleaning agents. Do not dry the seat belts at
temperatures above 80 † or in direct sun-
light.
X Use clean, lukewarm water and soap solu-
tion. Cleaning the roof lining and carpets X
Roof lining: if it is very dirty, use a soft
brush or dry shampoo.
X Carpets: use the carpet and textile clean-
ing agents recommended and approved by
Mercedes-Benz. Care
353Maintenance and care Z
Page 365 of 417
G
WARNING
If the required tyre pressure is not reached
after driving for a short period, the tyre is too badly damaged. The tyre sealant cannot
repair the tyre in this instance. Damaged tyres and a tyre pressure that is too low can signif-
icantly impair the vehicle's braking and driv-
ing characteristics. There is a risk of accident.
Do not continue driving. Contact a qualified
specialist workshop.
i In your vehicle, you will find a sticker with
the Mercedes-Benz Service24h telephone
number, e.g. on the B-pillar on the driver's
side.
X Correct the tyre pressure if it is still at least
130 kPa (1.3 bar/19 psi). See the tyre
pressure table in the fuel filler flap for val-
ues.
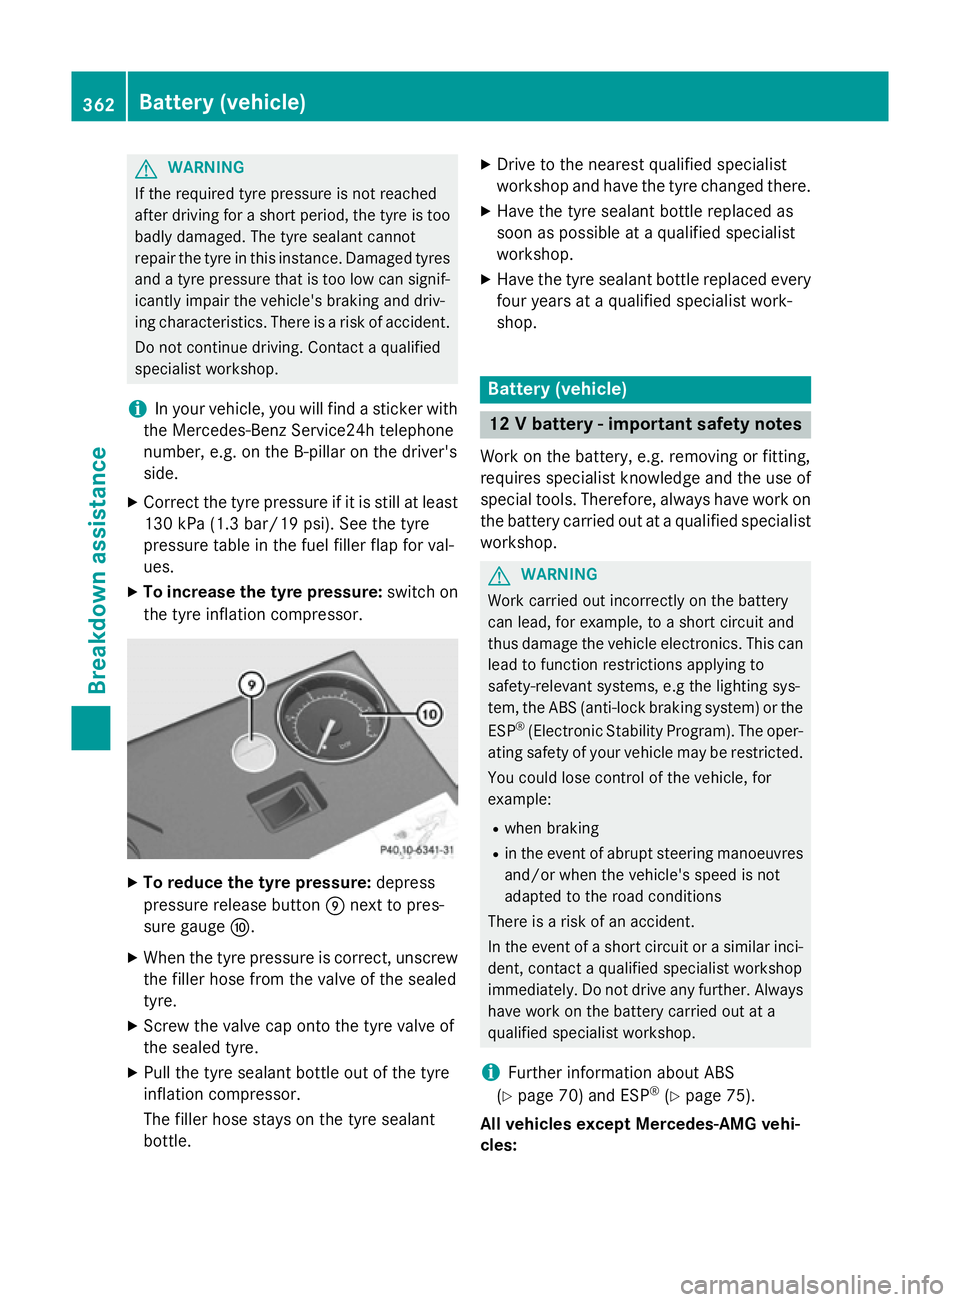
X To increase the tyre pressure: switch on
the tyre inflation compressor. X
To reduce the tyre pressure: depress
pressure release button Enext to pres-
sure gauge F.
X When the tyre pressure is correct, unscrew
the filler hose from the valve of the sealed
tyre.
X Screw the valve cap onto the tyre valve of
the sealed tyre.
X Pull the tyre sealant bottle out of the tyre
inflation compressor.
The filler hose stays on the tyre sealant
bottle. X
Drive to the nearest qualified specialist
workshop and have the tyre changed there.
X Have the tyre sealant bottle replaced as
soon as possible at a qualified specialist
workshop.
X Have the tyre sealant bottle replaced every
four years at a qualified specialist work-
shop. Battery (vehicle)
12 V battery - important safety notes
Work on the battery, e.g. removing or fitting,
requires specialist knowledge and the use of
special tools. Therefore, always have work on the battery carried out at a qualified specialist workshop. G
WARNING
Work carried out incorrectly on the battery
can lead, for example, to a short circuit and
thus damage the vehicle electronics. This can lead to function restrictions applying to
safety-relevant systems, e.g the lighting sys-
tem, the ABS (anti-lock braking system) or the
ESP ®
(Electronic Stability Program). The oper-
ating safety of your vehicle may be restricted.
You could lose control of the vehicle, for
example:
R when braking
R in the event of abrupt steering manoeuvres
and/or when the vehicle's speed is not
adapted to the road conditions
There is a risk of an accident.
In the event of a short circuit or a similar inci- dent, contact a qualified specialist workshop
immediately. Do not drive any further. Always have work on the battery carried out at a
qualified specialist workshop.
i Further information about ABS
(Y page 70) and ESP ®
(Y page 75).
All vehicles except Mercedes-AMG vehi-
cles: 362
Battery (vehicle)Breakdown assistance
Page 368 of 417
lean over the battery. Keep the batteries out
of the reach of children. Immediately rinse off
battery acid thoroughly with plenty of clean
water and seek medical attention at once. G
WARNING
A discharged battery can freeze at tempera-
tures below freezing point. When jump-start-
ing the vehicle or charging the battery, gases can escape from the battery. There is a risk of
an explosion.
Allow the frozen battery to thaw out before
charging it or jump-starting.
! Only use battery chargers with a maxi-
mum charging voltage of 14.8 V.
All vehicles:
! Only charge the battery using the jump-
start connection point.
The jump-starting connection point is in the
engine compartment (Y page 366).
X Open the bonnet.
X Connect the battery charger to the positive
terminal and earth point in the same order
as when connecting the donor battery in
the jump-starting procedure (Y page 366).
Keep away from fire and open flames. Do not lean over the battery. Never charge the bat-
tery if it is still fitted to the vehicle, unless you
use a battery charger which has been tested
and approved by Mercedes-Benz. A battery
charger unit specially adapted for Mercedes- Benz vehicles and tested and approved by
Mercedes-Benz is available as an accessory.
This device permits charging of the battery in position. Contact a Mercedes-Benz Service
Centre for information and availability. Read
the battery charger's operating instructions
before charging the battery.
All vehicles except Mercedes-AMG vehi-
cles: if the indicator/warning lamps in the
instrument cluster do not light up at low tem-
peratures, it is very likely that the discharged
battery has frozen. In this case you may nei-
ther jump-start the vehicle nor charge the battery. The service life of a battery that has
been thawed may be reduced. The starting
characteristics may be impaired, especially at
low temperatures. Have the thawed battery
checked at a qualified specialist workshop.
Mercedes-AMG vehicles: at low tempera-
tures, do not charge a battery which has been
removed using a battery charger. Allow the
battery to warm up gently first, if necessary.
Otherwise, the service life can be shortened
and the starting characteristics impaired,
especially at low temperatures. Battery (vehicle)
365Breakdown assistance Z