2015 MERCEDES-BENZ S-CLASS COUPE height
[x] Cancel search: heightPage 210 of 417
When the HOLD function is activated, the
transmission is shifted automatically to posi- tion Pif:
R the driver's seat belt is not fastened and the
driver's door is open
R the engine is switched off, unless it is auto-
matically switched off by the ECO start/
stop function
The electric parking brake secures the vehicle
automatically if the HOLD function is activa-
ted, the vehicle is stationary and:
R a system fault occurs
R the power supply is insufficient
If a malfunction in the electric parking brake
occurs, then the transmission may also be
shifted into position Pautomatically. MAGIC BODY CONTROL
General notes MAGIC BODY CONTROL consists of Active
Body Control (ABC), ROAD SURFACE SCAN,
the CURVE cornering function as well as auto-
matic vehicle stabilisation in the event of a
crosswind.
Your vehicle automatically adjusts its ride
height to reduce fuel consumption. The sus-
pension mode is adjusted according to your
selection (SPORT, COMFORT or CURVE), the
road surface conditions and the vehicle load. A multifunction camera detects bumps in the
road surface before the vehicle drives over
them. This reduces chassis movements.
Important safety notes G
WARNING
People's limbs may become trapped if they
are located underneath the vehicle or
between the vehicle body and the tyres when the vehicle is lowering. There is a danger of
injury. When lowering the vehicle, make sure no one
is underneath the vehicle or in the immediate
vicinity of the wheel arches.
Crosswind Assist The crosswind stabilisation operates by
changing wheel loads through distortion of
the ABC spring struts. It reduces impairments
in handling when driving in a straight line andassists during countersteering.
Crosswind Assist is active in the speed range
between 80 km/h and 210 km/h when driv-
ing straight ahead or cornering gently.
Active Body Control ABC Vehicle level
All vehicles except AMG vehicles:
depend-
ing on the vehicle level that has been set, the vehicle automatically adjusts its height
dependent on the current speed. The vehicle
is lowered by up to 15 mm as the speed
increases. As the speed is reduced, the vehi- cle is raised to the set vehicle height.
In the event of poor road surface conditions,
the vehicle automatically raises by up to
10 mm and harder damping is selected.
AMG vehicles: depending on the vehicle
level that has been selected, the vehicle auto-
matically adjusts its height dependent on the current speed. The vehicle is lowered by up to
10 mm below the normal level as the speed
increases. As the speed is reduced, the vehi-
cle is raised to the set vehicle height.
Select the "Normal" setting for normal road
conditions and "Raised" for driving with snow chains or on particularly poor road condi-
tions.
Your selection remains stored even if you
remove the key from the ignition lock.
The "Raised level" setting is cancelled if you:
R are driving faster than approximately
120 km/h
R drive for approximately three minutes at a
speed above 80 km/h Driving systems
207Driving and parking Z
Page 211 of 417
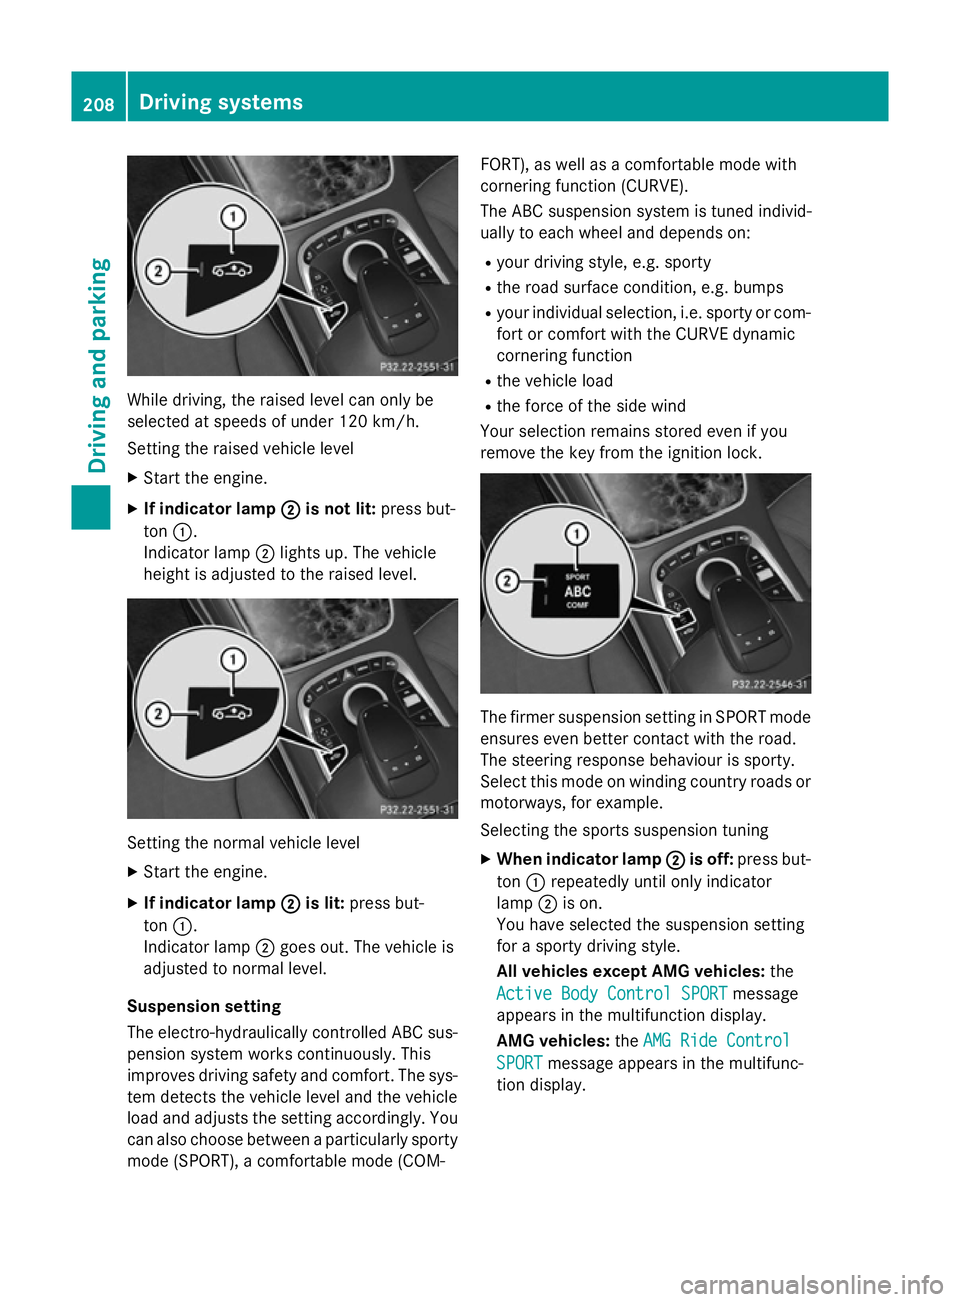
While driving, the raised level can only be
selected at speeds of under 120 km/h.
Setting the raised vehicle level
X Start the engine.
X If indicator lamp ;
; is not lit: press but-
ton :.
Indicator lamp ;lights up. The vehicle
height is adjusted to the raised level. Setting the normal vehicle level
X Start the engine.
X If indicator lamp ;
;is lit: press but-
ton :.
Indicator lamp ;goes out. The vehicle is
adjusted to normal level.
Suspension setting
The electro-hydraulically controlled ABC sus- pension system works continuously. This
improves driving safety and comfort. The sys- tem detects the vehicle level and the vehicle
load and adjusts the setting accordingly. You
can also choose between a particularly sporty
mode (SPORT), a comfortable mode (COM- FORT), as well as a comfortable mode with
cornering function (CURVE).
The ABC suspension system is tuned individ-
ually to each wheel and depends on:
R your driving style, e.g. sporty
R the road surface condition, e.g. bumps
R your individual selection, i.e. sporty or com-
fort or comfort with the CURVE dynamic
cornering function
R the vehicle load
R the force of the side wind
Your selection remains stored even if you
remove the key from the ignition lock. The firmer suspension setting in SPORT mode
ensures even better contact with the road.
The steering response behaviour is sporty.
Select this mode on winding country roads or
motorways, for example.
Selecting the sports suspension tuning
X When indicator lamp ;
; is off: press but-
ton :repeatedly until only indicator
lamp ;is on.
You have selected the suspension setting
for a sporty driving style.
All vehicles except AMG vehicles: the
Active Body Control SPORT Active Body Control SPORT message
appears in the multifunction display.
AMG vehicles: theAMG Ride Control
AMG Ride Control
SPORT
SPORT message appears in the multifunc-
tion display. 208
Driving systemsDriving and parking
Page 219 of 417
Parking tips:
R on narrow roads, drive as closely as possi-
ble past the parking space.
R parking spaces that are littered or over-
grown might be identified or measured
incorrectly.
R parking spaces that are partially occupied
by trailer drawbars might not be identified
as such or be measured incorrectly.
R snowfall or heavy rain may lead to a parking
space being measured inaccurately.
R pay attention to the PARKTRONIC
(Y page 214) warning messages during the
parking procedure.
R you can intervene in the steering procedure
to correct it at any time. Active Parking
Assist will then be cancelled.
R when transporting a load which protrudes
from your vehicle, you should not use
Active Parking Assist.
R never use Active Parking Assist when snow
chains are fitted.
R make sure that the tyre pressures are
always correct. This has a direct influence
on the parking characteristics of the vehi-
cle.
Use Active Parking Assist for parking spaces
that are:
R parallel or at right angles to the direction of
travel
R on straight roads, not bends.
R on the same level as the road, e.g. not on
the pavement.
Detecting parking spaces Objects located above the height range of
Active Parking Assist will not be detected
when the parking space is measured. These
are not taken into account when the parking
procedure is calculated, e.g. overhanging
loads, tail sections or loading ramps of goods vehicles. G
WARNING
If there are objects above the detection range:
R Active Park Assist may steer too early
R the vehicle may not stop in front of these
objects
This could cause a collision. There is a risk of
an accident.
If objects are located above the detection
range, stop and deactivate Active Parking
Assist.
For further information on the detection
range (Y page 213).
Active Parking Assist does not assist you
parking in spaces at right angles to the direc-
tion of travel if:
R two parking spaces are located directly
next to one another
R the parking space is directly next to a low
obstacle such as a low kerb
R you forward park
Active Parking Assist does not assist you
parking in spaces that are parallel or at right
angles to the direction of travel if:
R the parking space is on a kerb
R the system reads the parking space as
being blocked, for example by foliage or
grass paving blocks
R the area is too small for the vehicle to
manoeuvre into
R the parking space is bordered by an obsta-
cle, e.g. a tree, a post or a trailer 216
Driving systemsDriving and parking
Page 228 of 417
The 360° camera will not function or will
function only in a limited manner:
R if the doors are open
R if the exterior mirrors are folded in
R if the boot lid is open
R in heavy rain, snow or fog
R at night or in very dark places
R if the cameras are exposed to very bright
light
R if the area is lit by fluorescent bulbs or LED
lighting (the display may flicker)
R if the camera lenses mist up, e.g. when
driving into a heated garage in winter, caus-
ing a rapid change in temperature
R if the camera lenses are dirty or covered.
Observe the notes on cleaning
(Y page 350)
R if the vehicle components in which the
cameras are fitted are damaged. In this
event, have the camera position and setting
checked at a qualified specialist workshop.
Do not use the 360° under such circumstan-
ces. You could otherwise injure others or
damage objects when parking the vehicle.
The guide lines in the COMAND display show
the distances to your vehicle. The distances
only apply to road level.
i The camera in the rear area is protected
from raindrops and dust by means of a flap.
This flap opens when the 360° camera is
activated.
The flap closes again when:
R you have finished the manoeuvring proc-
ess
R you switch off the engine
R you open the boot
See the notes on cleaning (Y page 350).
For technical reasons, the flap may remain
open briefly after the 360° camera has
been deactivated. On vehicles with height-adjustable chassis,
depending on technical conditions, leaving
the standard height can result in:
R inaccuracies in the guide lines
R inaccuracies in the display of generated
images (top view)
Activation conditions The 360° camera image can be displayed if:
R COMAND Online is switched on (see the
separate operating instructions)
R the 360° camera 360° camera function is switched on
i If the 360° camera is activated at speeds
above approximately 30 km/h, a warning
message appears.
The warning message disappears if:
R the vehicle's speed falls below approx-
imately 30 km/h. The 360° camera is
then activated.
R the message is confirmed with the %
button.
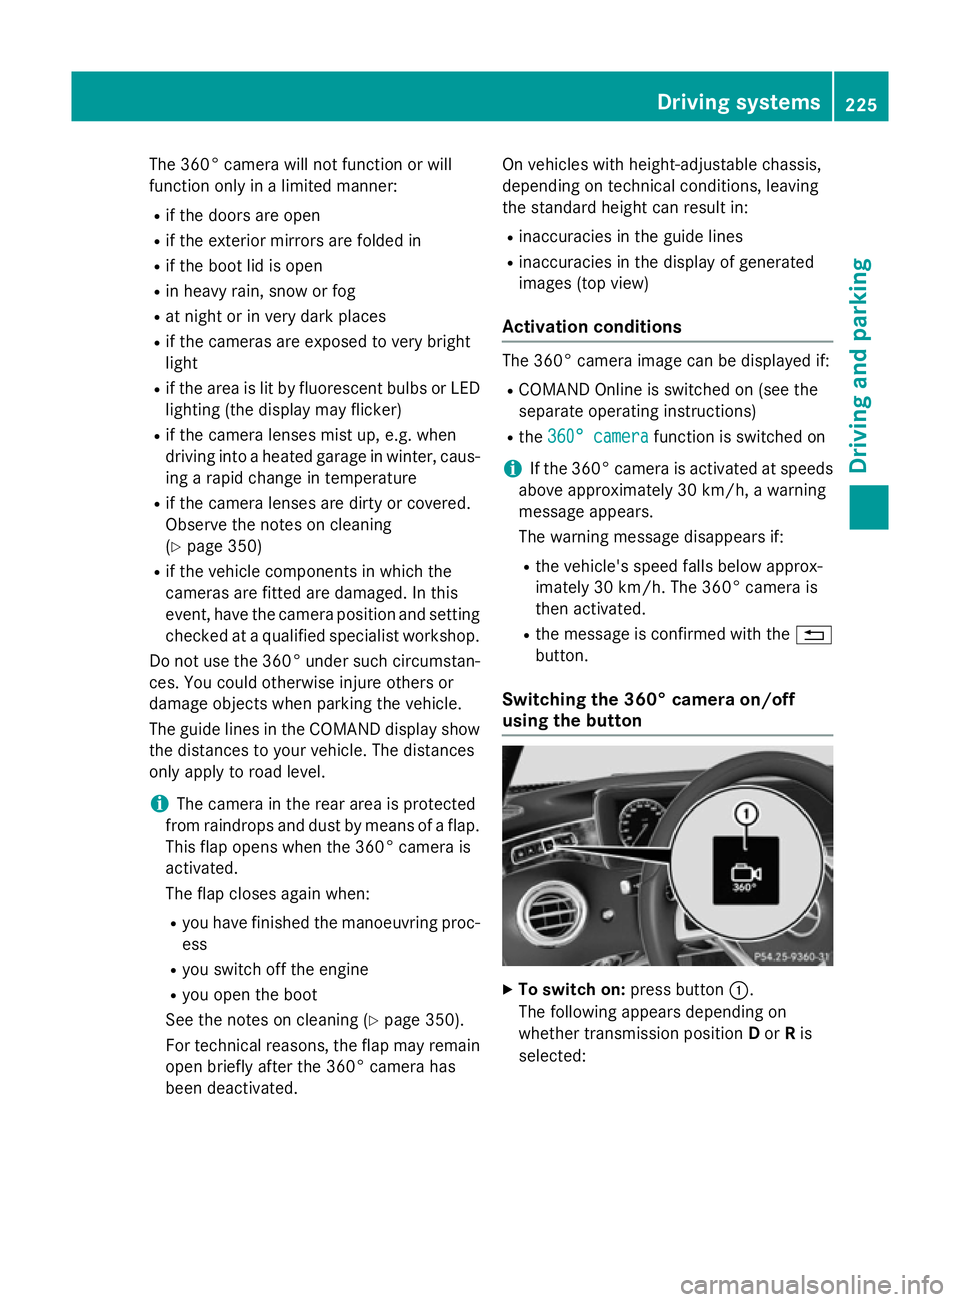
Switching the 360° camera on/off
using the button X
To switch on: press button:.
The following appears depending on
whether transmission position Dor Ris
selected: Driving systems
225Driving and parking Z
Page 265 of 417
Further information on navigation can be
found on COMAND Online (see the separate
operating instructions).
Further information about Traffic Sign Assist
(Y page 230).
Setting the position
You can adjust the position of the head-up
display on the windscreen. You can compen-
sate for height differences if the seat posi-
tions are changed, for example.
X Switch on the head-up display
(Y page 247).
X Press òon the steering wheel to open
the menu list.
X Press the :or9 button on the steer-
ing wheel to select the Settings
Settings menu.
X Confirm by pressing aon the steering
wheel.
X Press :or9 to select the Head-up Head-up
display
display submenu.
X Press ato confirm.
X Press the :or9 button to select the
Position
Position function.
X Press ato save the setting.
X Press :or9 to adjust the position
to a level from Level +5
Level +5 toLevel -5
Level -5.
X Press aor% to save the setting.
Using the Memory function, you can save and
call up the set position of the head-up display as a single memory preset (Y page 122).
Adjusting the brightness
The brightness of the head-up display is auto-
matically adjusted to the surrounding light
conditions. You can also individually adjust
the brightness of the head-up display.
X Switch on the head-up display
(Y page 247).
X Press òon the steering wheel to open
the menu list.
X Press the :or9 button on the steer-
ing wheel to select the Settings
Settings menu.
X Confirm by pressing aon the steering
wheel. X
Use : or9 to select the Head-up
Head-up
display display submenu.
X Press ato confirm.
X Press the :or9 button to select the
Brightness
Brightness function.
X Press the abutton to save the setting.
X Press :or9 to adjust the bright-
ness to a level from Level +5
Level +5 (bright) to
Level -5
Level -5 (dark).
X Press the aor% button to save the
setting.
Light submenu Switching the Intelligent Light System
on/off
X Press òon the steering wheel to open
the menu list.
X Press :or9 on the steering wheel
to select the Settings Settingsmenu.
X Confirm by pressing aon the steering
wheel.
X Use : or9 to select the Lights
Lights
submenu.
X Press ato confirm.
X Press the :or9 button to select the
Intelligent Light System
Intelligent Light System function.
If the Intelligent Light System
Intelligent Light System func-
tion has been switched on, the cone of light and the Lsymbol in the multifunction
display are shown in white.
X Press the abutton to save the setting.
If you switch on the Intelligent Light
Intelligent Light
System
System function, the following functions are
activated:
R Motorway mode
R Active light function
R Cornering light function
R Extended range foglamps
If you set the dipped-beam headlamps for
driving on the right/left, the multifunction
display shows the Inactive for left-
Inactive for left-
side traffic side traffic orInactive for right-
Inactive for right-
side traffic
side traffic display message in the262
Menus and submenusOn-board computer and displays
Page 343 of 417
Closing the bonnet
X
Lower the bonnet and let it fall from a
height of approximately 20 cm.
X Check that the bonnet has engaged prop-
erly.
If the bonnet can be raised slightly, it is not
properly engaged. Open it again and close
it with a little more force. Radiator
Do not cover up the radiator. Do not use ther-
mal mats, insect protection covers or any-
thing similar. Doing so can cause the Onboard Diagnostics System to display inaccurate val-
ues. Some of these values are legally required
and must always be correct. Engine oil
General notes Depending on your driving style, the vehicle
consumes up to 0.8 litres of oil per 1000 km.
The oil consumption may be higher than this
when the vehicle is new or if you frequently
drive at high engine speeds.
Depending on the engine, the oil dipstick may
be installed at a different location.
When checking the oil level:
R park the vehicle on a level surface
R the engine should be switched off for
approximately five minutes if the engine is
at normal operating temperature
R if the engine is not at normal operating
temperature, e.g. if the engine was only
started briefly, wait approximately
30 minutes before carrying out the meas-
urement Checking the oil level using the oil dip-
stick (except Mercedes-AMG S 65 mod-
els) G
WARNING
Certain components in the engine compart-
ment could be very hot, e.g. the engine, the
radiator and parts of the exhaust system.
There is a risk of injury when accessing the
engine compartment.
As far as possible, allow the engine to cool
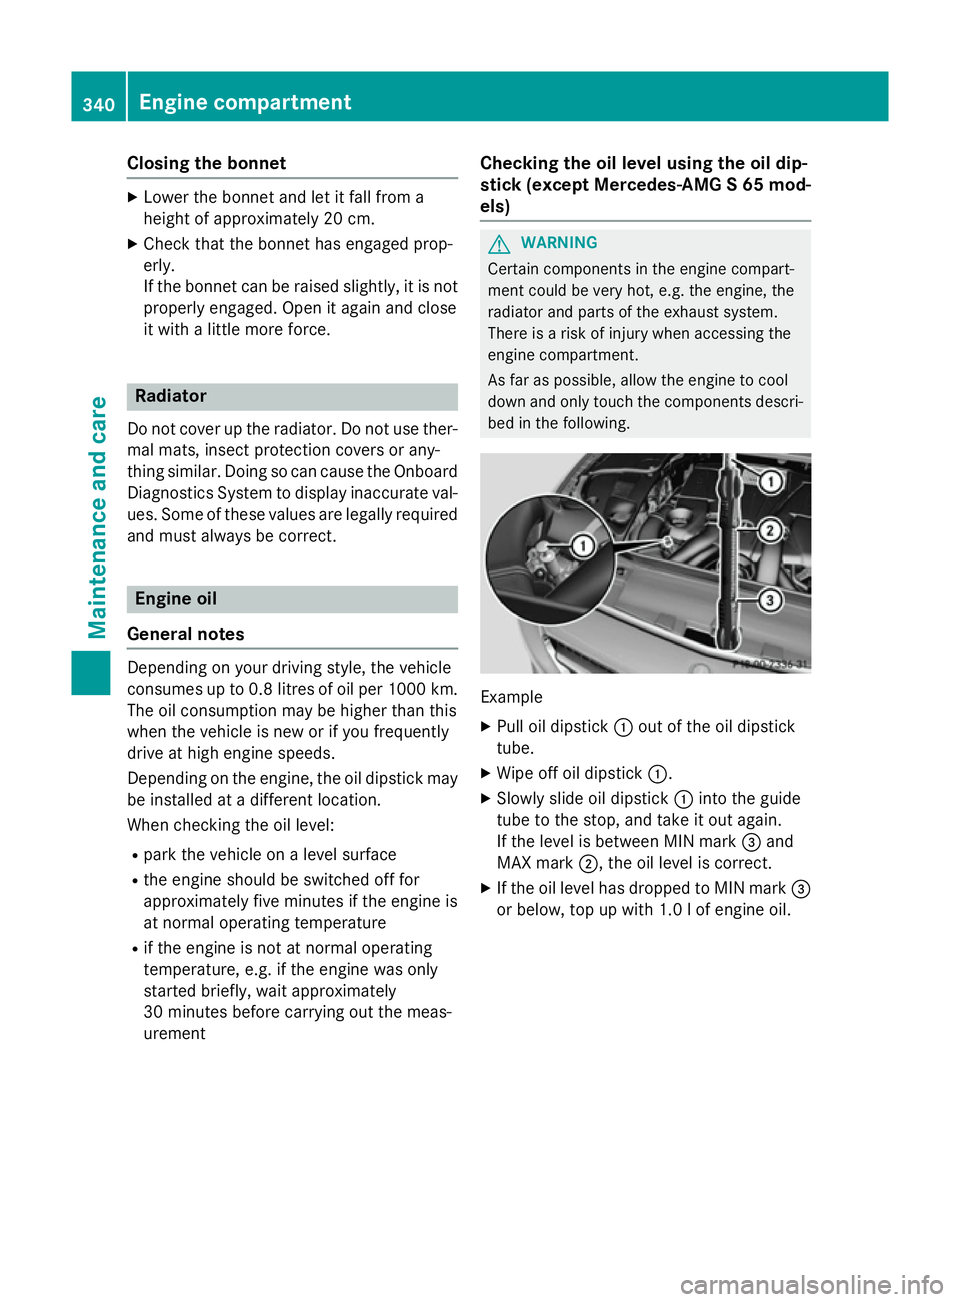
down and only touch the components descri- bed in the following. Example
X Pull oil dipstick :out of the oil dipstick
tube.
X Wipe off oil dipstick :.
X Slowly slide oil dipstick :into the guide
tube to the stop, and take it out again.
If the level is between MIN mark =and
MAX mark ;, the oil level is correct.
X If the oil level has dropped to MIN mark =
or below, top up with 1.0 l of engine oil. 340
Engine compartmentMaintenance and care
Page 391 of 417
used incorrectly, it could tip over while the
vehicle is raised.
R the jack is designed only to raise and hold
the vehicle for a short time while a wheel
is being changed. It is not suitable for per-
forming maintenance work under the vehi-
cle.
R avoid changing the wheel on uphill and
downhill slopes.
R before raising the vehicle, safeguard it from
rolling away by applying the parking brake
and positioning wheel chocks. Do not
release the parking brake while the vehicle is raised.
R the jack must be placed on a firm, flat and
non-slip surface. On a loose surface, a
large, flat load-bearing underlay must be
used. On a slippery surface, a non-slip
underlay must be used, e.g. rubber mats.
R do not use wooden blocks or similar
objects as a jack underlay. Otherwise, the
jack will not be able to achieve its load-
bearing capacity due to the restricted
height.
R make sure that the distance between the
underside of the tyres and the ground does not exceed 3 cm.
R never place your hands or feet under the
raised vehicle.
R do not lie under the vehicle.
R do not start the engine when the vehicle is
raised.
R do not open or close a door or the boot lid
when the vehicle is raised.
R make sure that no persons are present in
the vehicle when the vehicle is raised.
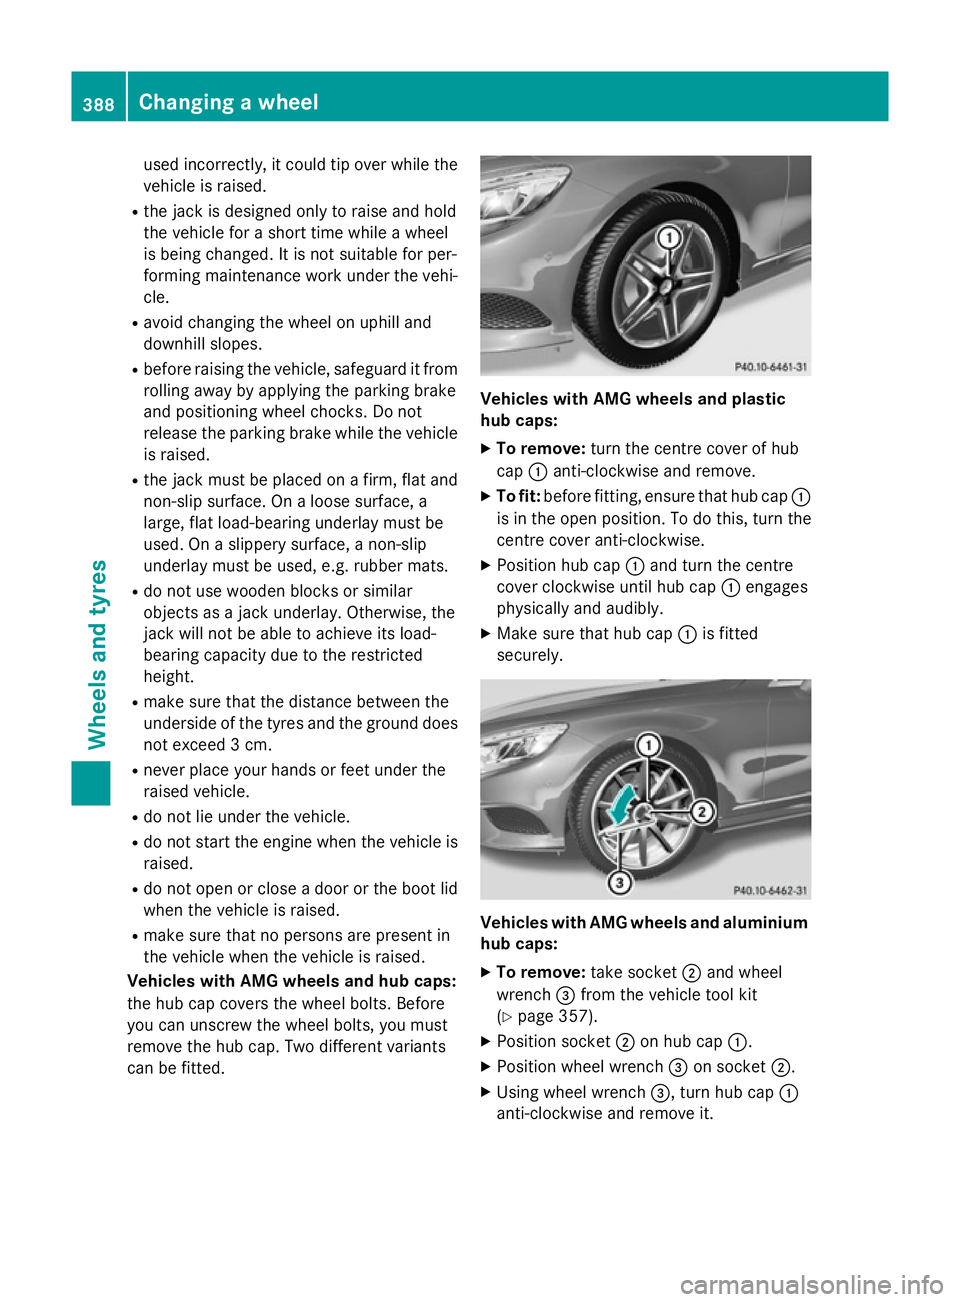
Vehicles with AMG wheels and hub caps:
the hub cap covers the wheel bolts. Before
you can unscrew the wheel bolts, you must
remove the hub cap. Two different variants
can be fitted. Vehicles with AMG wheels and plastic
hub caps:
X To remove: turn the centre cover of hub
cap :anti-clockwise and remove.
X To fit: before fitting, ensure that hub cap :
is in the open position. To do this, turn the
centre cover anti-clockwise.
X Position hub cap :and turn the centre
cover clockwise until hub cap :engages
physically and audibly.
X Make sure that hub cap :is fitted
securely. Vehicles with AMG wheels and aluminium
hub caps:
X To remove: take socket;and wheel
wrench =from the vehicle tool kit
(Y page 357).
X Position socket ;on hub cap :.
X Position wheel wrench =on socket ;.
X Using wheel wrench =, turn hub cap:
anti-clockwise and remove it. 388
Changing a wheelWheels and ty
res
Page 413 of 417

!
Do not use distilled or de-ionised water in
the washer fluid reservoir. Otherwise, the
level sensor may be damaged.
! Only the washer fluids SummerFit and
WinterFit can be mixed. Otherwise, the
spraying nozzles could become blocked.
At temperatures above freezing:
X Fill the washer fluid reservoir with a mixture
of water and washer fluid, e.g. MB Sum-
merFit.
Mix 1 part MB SummerFit to 100 parts water.
At temperatures below freezing:
X Fill the washer fluid reservoir with a mixture
of water and washer fluid, e.g. MB Winter-
Fit.
The correct mixing ratio can be taken from
the information on the antifreeze protec-
tion container.
i Add washer fluid concentrate, e.g. MB
SummerFit or MB WinterFit, to the washer
fluid all year round. Vehicle data
General notes
Please note that for the specified vehicle
data: R the heights specified may vary as a result
of:
- tyres
- load
- condition of the suspension
- optional equipment
R optional equipment reduces the maximum
payload
R vehicle-specific weight information can be
found on the vehicle identification plate
(Y page 404).
R only for certain countries: you can find vehi-
cle-specific vehicle data in the COC docu-
ments (CERTIFICATE OF CONFORMITY). These documents are delivered with your
vehicle. Dimensions and weights
Model
: :
Opening height Mercedes‑AMG
vehicles
1755 mm
All other models
1746 mm
Mercedes‑AMG vehicles
Vehicle length
5044 mm
Vehicle width including
exterior mirrors
2108 mm
Vehicle width excluding
exterior mirrors
1913 mm
Vehicle height
1422 mm
Wheelbase
2945 mm
Maximum boot load
100 kg
All other models
Vehicle length
5027 mm
Vehicle width including
exterior mirrors
2108 mm
Vehicle width excluding
exterior mirrors
1899 mm
Vehicle height
1411 mm410
Vehicle dataTechnical data