2015 MERCEDES-BENZ S-CLASS COUPE check engine
[x] Cancel search: check enginePage 80 of 417
Characteristics when ESP
®
is deactivated
If ESP ®
is deactivated and one or more wheels
start to spin, the ÷ESP®
warning lamp in
the instrument cluster flashes. In such situa-
tions, ESP ®
will not stabilise the vehicle.
If you deactivate ESP ®
:
R ESP ®
no longer improves driving stability
R engine torque is no longer limited and the
drive wheels are able to spin
The spinning of the wheels results in a cut- ting action for better traction on loose sur-faces.
R traction control is still activated
R ESP ®
still provides support when you brake
firmly
Crosswind Assist (vehicles without
MAGIC BODY CONTROL) General notes
Vehicles with MAGIC BODY CONTROL: infor-
mation on stabilising the vehicle in the event
of crosswind (Y page 207).
Strong crosswind gusts can impair the road-
holding of your vehicle when driving straight
ahead. The crosswind driving assistance
function integrated in ESP ®
noticeably
reduces these impairments.
Depending on the direction and intensity of
the side wind, ESP ®
is activated automati-
cally.
ESP ®
intervenes with stabilising braking to
assist you in keeping the vehicle in the lane.
Crosswind Assist is active at vehicle speeds
above 80 km/h when driving straight ahead
or cornering gently.
Important safety notes
Crosswind Assist does not work if ESP ®
is
deactivated or disabled because of a mal-
function. EBD (electronic brake force distribu-
tion)
General notes EBD monitors and controls the brake pres-
sure on the rear wheels to improve driving
stability while braking.
Important safety notes i
Observe the "Important safety notes" sec-
tion (Y page 69). G
WARNING
If EBD is malfunctioning, the rear wheels can
lock, e.g. under full braking. This increases the risk of skidding and an accident.
You should therefore adapt your driving style
to the different handling characteristics. Have the brake system checked at a qualified spe-
cialist workshop.
Observe information regarding indicator and
warning lamps (Y page 305) as well as dis-
play messages (Y page 270). ADAPTIVE BRAKE
ADAPTIVE BRAKE enhances braking safety
and offers increased braking comfort. In addi- tion to the braking function, ADAPTIVE BRAKE
also has the HOLD function (Y page 205) and
hill start assist (Y page 164). PRE-SAFE
®
Brake
General notes PRE-SAFE
®
Brake can help you to minimise
the risk of a collision with a vehicle ahead or a pedestrian, and reduce the effects of such a
collision. If PRE-SAFE ®
Brake has detected a
risk of collision, you will be warned visually
and acoustically as well as by automatic brak- ing. Driving safety systems
77Safety Z
Page 88 of 417

the boot. Otherwise, the key may not be
detected, e.g. when starting the engine using
the Start/Stop button.
A check which periodically establishes a radio
connection between the vehicle and the key
determines whether a valid key is in the vehi- cle. This occurs, for example:
R when starting the engine
R whilst driving
R when using HANDS-FREE ACCESS
R when the external door handles are
touched
R during convenience closing Key functions
:
& Locks the vehicle
; F Opens/closes the boot lid
= % Unlocks the vehicle
X To unlock centrally: press button=.
If you do not open the vehicle within
approximately 40 second s of unlocking:
R the vehicle is locked again
R the anti-theft alarm system is primed
again
X To lock centrally: press button:.
The key centrally locks and unlocks the fol-
lowing components:
R the doors
R the boot lid
R the fuel filler flap When unlocking, the turn signals flash once.
When locking, they flash three times.
You can also set an audible signal to confirm
that the vehicle has been locked. The audible
signal can be activated and deactivated using COMAND Online (see the separate operating
instructions).
Only when all the components have been
locked, does the optical or acoustic locking
confirmation sound.
When the surround lighting is activated in
COMAND Online, it comes on when it is dark after the vehicle is unlocked using the remotecontrol. Information on activating and deac-
tivating the surround lighting can be found in
the separate operating instructions.
X To open the boot lid automatically from
outside the vehicle: press and hold but-
ton ;until the boot lid opens. KEYLESS-GO
General notes Bear in mind that the engine can be started by
any of the vehicle occupants if there is a key
in the vehicle.
Locking and unlocking centrally You can start, lock or unlock the vehicle using
KEYLESS-GO. To do this, you only need carry
the key with you. You can combine the KEY-
LESS-GO functions with the functions of a
conventional key. Unlock the vehicle by using KEYLESS-GO, for instance, and lock it using
the & button on the key.
The driver's door and the door at which the
handle is used, must both be closed. The key
must be outside the vehicle. When locking or unlocking with KEYLESS-GO, the distance
between the key and the corresponding door
handle must not be greater than 1 m. Key
85Opening and closing Z
Page 89 of 417

A check which periodically establishes a radio
connection between the vehicle and the key
determines whether a valid key is in the vehi- cle. This occurs, for example:
R when starting the engine
R whilst driving
R when using HANDS-FREE ACCESS
R when the external door handles are
touched
R during convenience closing X
To unlock the vehicle: touch the inner
surface of the door handle.
X To lock the vehicle: touch sensor sur-
face :or;.
Make sure that you do not touch the inner
surface of the door handle.
X Convenience closing feature: touch
recessed sensor surface ;for an exten-
ded period.
For further information on the convenience closing feature (Y page 101).
Deactivating If you do not intend to use a key for an exten-
ded period of time, you can deactivate the
KEYLESS-GO function of the key. The key will
then use very little power, thereby conserving battery power. For the purposes of activa-
tion/deactivation, the vehicle does not have
to be nearby. X
To deactivate: press the&button on
the key twice in rapid succession.
The battery check lamp of the key flashes
twice briefly and lights up once, then KEY-
LESS-GO is deactivated .
X To activate: press any button on the key or
insert the key into the ignition lock.
KEYLESS-GO and all of its associated fea-
tures are available again. KEYLESS-GO start function
Bear in mind that the engine can be started by any of the vehicle occupants if there is a key
in the vehicle. Changing the settings of the locking
system
You can change the settings of the locking
system. This means that only the driver's door and the fuel filler flap are unlocked when the
vehicle is unlocked. This is useful if you fre-
quently travel alone.
X To change the setting: press and hold
down the %and& buttons simulta-
neously for about six seconds until the bat- tery indicator lamp flashes twice
(Y page 88).
i If the setting of the locking system is
changed within the signal range of the vehi- cle, pressing the &or% button:
R locks or
R unlocks the vehicle
The key now functions as follows:
X To unlock the driver's door: press the
% button once.
X To unlock centrally: press the%but-
ton twice.
X To lock centrally: press the&button. 86
KeyOpening and closing
Page 93 of 417

Problem
Possible causes/consequences and
M
MSolutions The engine cannot be
started using the key. the on-board voltage is too low
X Switch off non-essential consumers, e.g. seat heating or interior
lighting, and try to start the engine again.
If this does not work: X Check the starter battery and charge it if necessary
(Y page 364).
or
X Jump-start the vehicle (Y page 366).
or
X Consult a qualified specialist workshop. The engine cannot be
started using the Start/
Stop button. The key is
in the vehicle. The vehicle is locked.
X Unlock the vehicle and try to start the vehicle again. The key battery is discharged or nearly discharged.
X Check the key battery (Y page 88) and replace it if necessary
(Y page 88).
If this does not work: X Start your vehicle with the key in the ignition lock. There is interference from a powerful source of radio waves.
X Start your vehicle with the key in the ignition lock. You have lost a key. X
Have the key deactivated at a qualified specialist workshop.
X Report the loss immediately to the vehicle insurers.
X If necessary, have the locks changed as well. You have lost the emer-
gency key element. X
Report the loss immediately to the vehicle insurers.
X If necessary, have the locks changed as well. Doors
Important safety notes
United Kingdom only: G
WARNING
When the double locks are activated, the
doors can no longer be opened from the
inside. People in the vehicle can no longer get out, e.g. in hazardous situations. There is a
risk of injury. Therefore, do not leave any people unsuper-
vised in the vehicle, particularly children, eld- erly people or people in need of special assis-
tance. Do not activate the double lock when
people are in the vehicle.
If the vehicle has been locked from the out-
side, the double lock function is activated as
standard. It is then not possible to open the
doors from inside the vehicle. You can deac-
tivate the double lock function by deactivat-
ing the interior motion sensor (Y page 82).90
DoorsOpening and closing
Page 103 of 417
G
WARNING
The reversing function does not react:
R to soft, light and thin objects, e.g. small fin-
gers
R while resetting
This means that the reversing feature cannot
prevent someone being trapped in these sit-
uations. There is a risk of injury.
When closing, make sure that no parts of the
body are in the closing area. If someone
becomes trapped, press the switch to open
the side window again. Opening and closing the side win-
dows
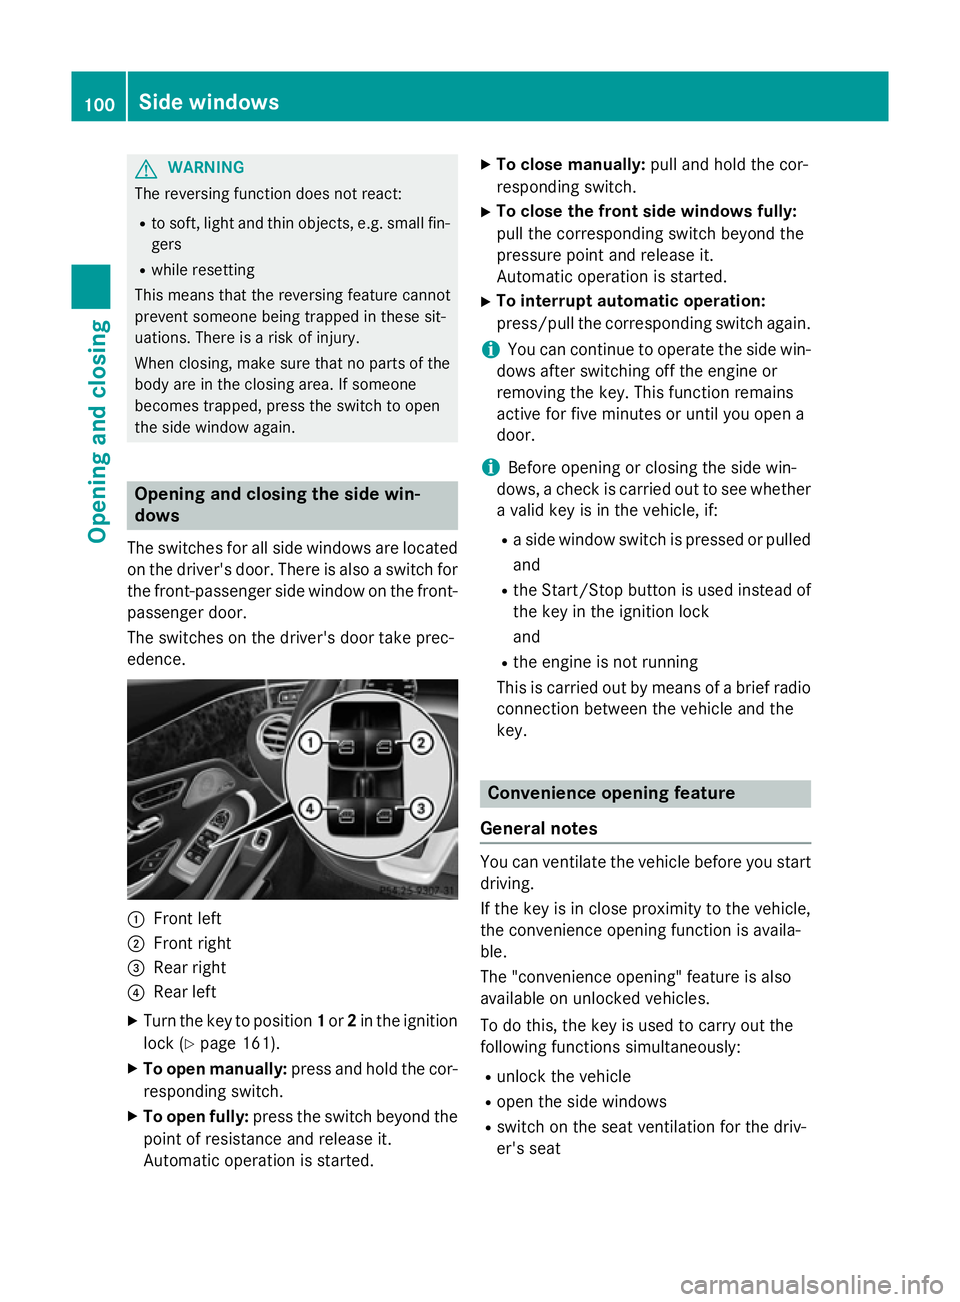
The switches for all side windows are located
on the driver's door. There is also a switch for
the front-passenger side window on the front- passenger door.
The switches on the driver's door take prec-
edence. :
Front left
; Front right
= Rear right
? Rear left
X Turn the key to position 1or 2in the ignition
lock (Y page 161).
X To open manually: press and hold the cor-
responding switch.
X To open fully: press the switch beyond the
point of resistance and release it.
Automatic operation is started. X
To close manually: pull and hold the cor-
responding switch.
X To close the front side windows fully:
pull the corresponding switch beyond the
pressure point and release it.
Automatic operation is started.
X To interrupt automatic operation:
press/pull the corresponding switch again.
i You can continue to operate the side win-
dows after switching off the engine or
removing the key. This function remains
active for five minutes or until you open a
door.
i Before opening or closing the side win-
dows, a check is carried out to see whether a valid key is in the vehicle, if:
R a side window switch is pressed or pulled
and
R the Start/Stop button is used instead of
the key in the ignition lock
and
R the engine is not running
This is carried out by means of a brief radio
connection between the vehicle and the
key. Convenience opening feature
General notes You can ventilate the vehicle before you start
driving.
If the key is in close proximity to the vehicle,
the convenience opening function is availa-
ble.
The "convenience opening" feature is also
available on unlocked vehicles.
To do this, the key is used to carry out the
following functions simultaneously:
R unlock the vehicle
R open the side windows
R switch on the seat ventilation for the driv-
er's seat 100
Side windowsOpening and closing
Page 111 of 417
Useful information
i This Owner's Manual describes all mod-
els, series and optional equipment for your
vehicle that were available at the time of
going to press. National variations are pos- sible. Note that your vehicle may not be
equipped with all of the functions descri-
bed. This is also the case for systems and
functions relevant to safety.
i Read the information on qualified special-
ist workshops: (Y page 26). Correct driver's seat position
G
WARNING
You could lose control of the vehicle while
driving if you:
R adjust the driver's seat, steering wheel or
mirrors
R fasten the seat belt
There is a risk of an accident.
Adjust the driver's seat, head restraint, steer-
ing wheel and mirrors and fasten your seat
belt before starting the engine. X
Observe the safety guidelines on seat
adjustment (Y page 109).
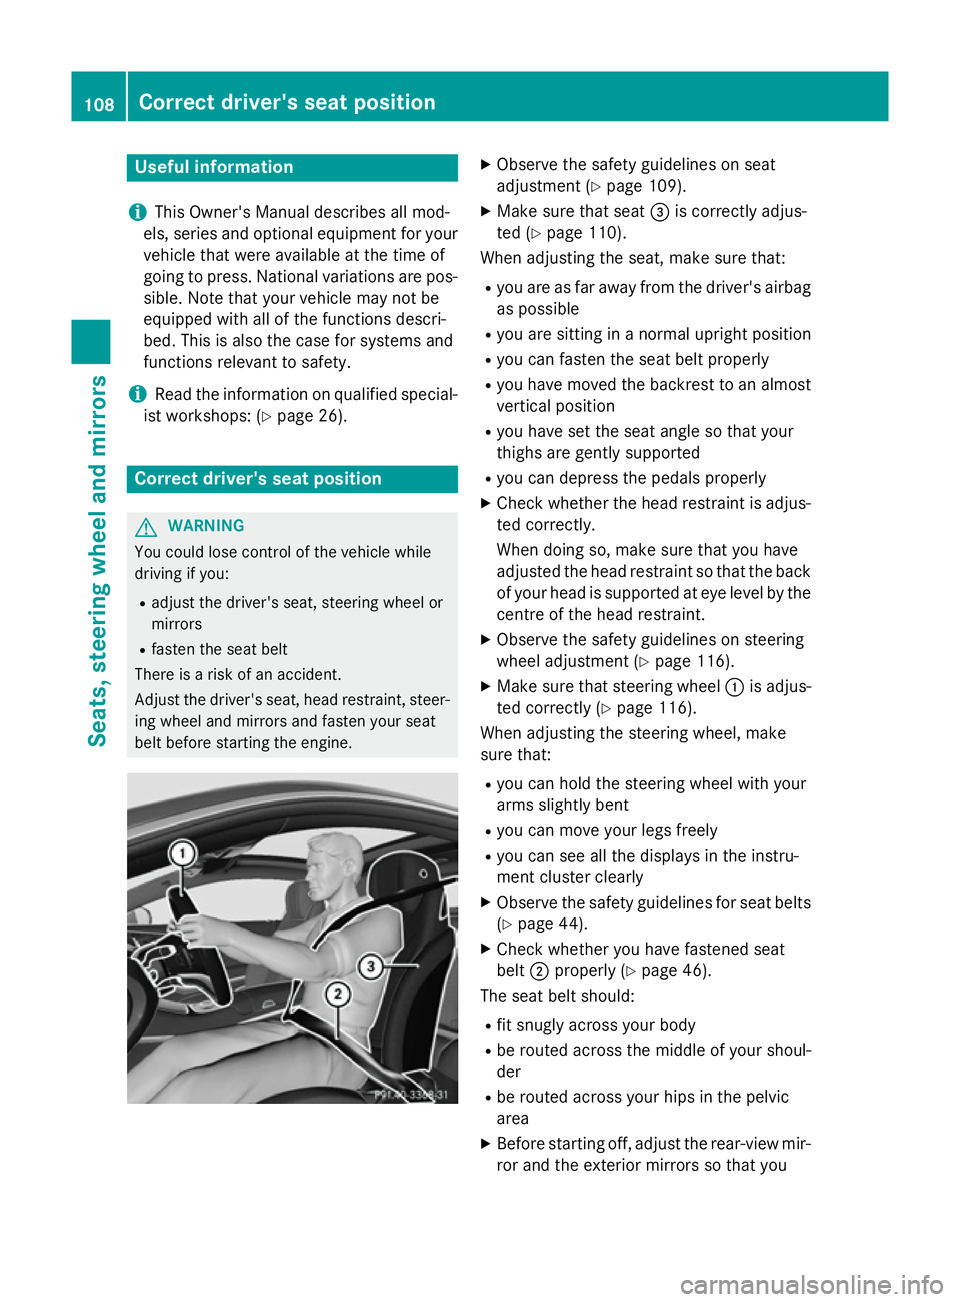
X Make sure that seat =is correctly adjus-
ted (Y page 110).
When adjusting the seat, make sure that:
R you are as far away from the driver's airbag
as possible
R you are sitting in a normal upright position
R you can fasten the seat belt properly
R you have moved the backrest to an almost
vertical position
R you have set the seat angle so that your
thighs are gently supported
R you can depress the pedals properly
X Check whether the head restraint is adjus-
ted correctly.
When doing so, make sure that you have
adjusted the head restraint so that the back
of your head is supported at eye level by the centre of the head restraint.
X Observe the safety guidelines on steering
wheel adjustment (Y page 116).
X Make sure that steering wheel :is adjus-
ted correctly (Y page 116).
When adjusting the steering wheel, make
sure that:
R you can hold the steering wheel with your
arms slightly bent
R you can move your legs freely
R you can see all the displays in the instru-
ment cluster clearly
X Observe the safety guidelines for seat belts
(Y page 44).
X Check whether you have fastened seat
belt ;properly (Y page 46).
The seat belt should:
R fit snugly across your body
R be routed across the middle of your shoul-
der
R be routed across your hips in the pelvic
area
X Before starting off, adjust the rear-view mir-
ror and the exterior mirrors so that you 108
Correct driver's seat positionSeats, steering wheel and mirrors
Page 139 of 417
Problems with the windscreen wipers
Problem
Possible causes/consequences and
M
MSolutions The windscreen wipers
are jammed. Leaves or snow, for example, may be obstructing windscreen
wiper movement. The wiper motor has been deactivated.
X Switch off the engine using the Start/Stop button and open the
driver's door.
X Remove the cause of the obstruction.
X Switch the windscreen wipers back on. The windscreen wipers
fail completely. The windscreen wiper drive is malfunctioning.
X Select another wiper speed on the combination switch.
X Have the windscreen wipers checked at a qualified specialist
workshop. The wiper motor has been deactivated.
X Switch off the engine using the Start/Stop button and open the
driver's door.
X Remove the cause of the obstruction.
X Switch the windscreen wipers back on. 136
Windscreen wipersLights and windscreen wipers
Page 155 of 417
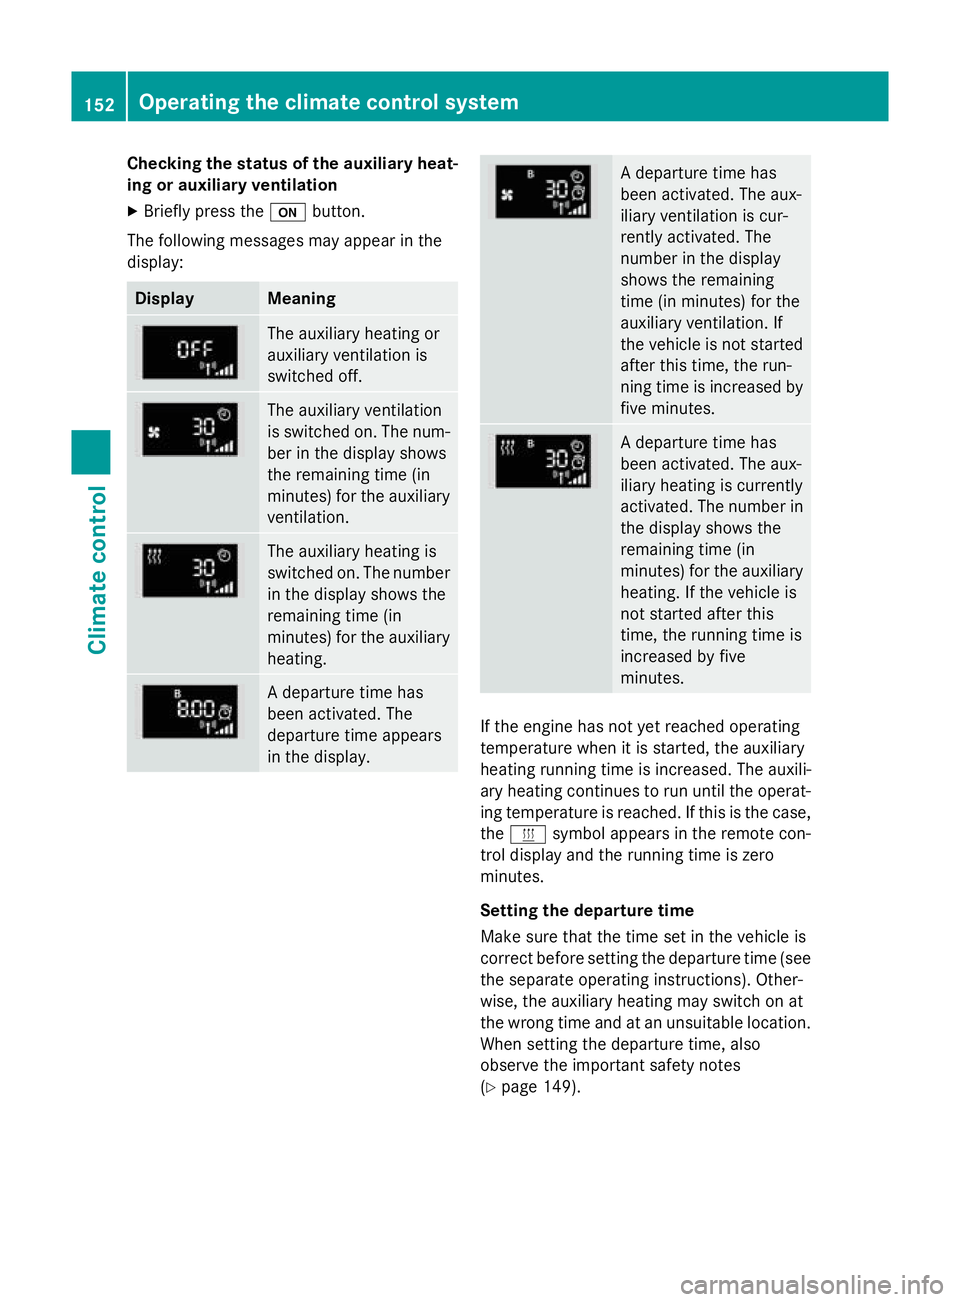
Checking the status of the auxiliary heat-
ing or auxiliary ventilation
X Briefly press the ubutton.
The following messages may appear in the
display: Display Meaning
The auxiliary heating or
auxiliary ventilation is
switched off.
The auxiliary ventilation
is switched on. The num-
ber in the display shows
the remaining time (in
minutes) for the auxiliary
ventilation. The auxiliary heating is
switched on. The number
in the display shows the
remaining time (in
minutes) for the auxiliary heating. A departure time has
been activated. The
departure time appears
in the display. A departure time has
been activated. The aux-
iliary ventilation is cur-
rently activated. The
number in the display
shows the remaining
time (in minutes) for the
auxiliary ventilation. If
the vehicle is not started
after this time, the run-
ning time is increased by
five minutes. A departure time has
been activated. The aux-
iliary heating is currently
activated. The number in
the display shows the
remaining time (in
minutes) for the auxiliary heating. If the vehicle is
not started after this
time, the running time is
increased by five
minutes. If the engine has not yet reached operating
temperature when it is started, the auxiliary
heating running time is increased. The auxili-
ary heating continues to run until the operat- ing temperature is reached. If this is the case,
the y symbol appears in the remote con-
trol display and the running time is zero
minutes.
Setting the departure time
Make sure that the time set in the vehicle is
correct before setting the departure time (see the separate operating instructions). Other-
wise, the auxiliary heating may switch on at
the wrong time and at an unsuitable location.
When setting the departure time, also
observe the important safety notes
(Y page 149). 152
Operating the climate control systemClimate control