2015 MERCEDES-BENZ S-CLASS COUPE auxiliary battery
[x] Cancel search: auxiliary batteryPage 20 of 417
Rear-view mirror
Anti-dazzle mode (automatic) ........ 121
Dipping (manual) ........................... 119
Refuelling
Fuel gaug e....................................... 32
Important safety notes .................. 178
Notes for Mercedes‑ AMG vehi-
cles ................................................ 406
Refuelling process ......................... 179
see Fuel
Remote control
Auxiliary heating/ventilation .......... 151
Changing the batteries (auxiliary
heating) ......................................... 153
Garage door opener ....................... 330
Programming (garage door
opener) .......................................... 330
Replacing bulbs
General notes ................................ 133
Replacing the battery (auxiliary
heating remote control) .................... 153
Rescue card ......................................... 27
Reserve (fuel tank)
see Fuel
Reserve fuel
Display message ............................ 286
Warning lamp ................................. 310
Residual heat (climate control) ........ 147
Restraint system
Display message ............................ 276
Introduction ..................................... 42
Warning lamp ................................. 309
Warning lamp (function) ................... 43
Rev counter ........................................ 244
Reversing camera
Cleaning instructions ..................... 350
Displays in the COMAND display ... 221
Function/note s............................. 220
Reversing feature
Side windows ................................... 99
Reversing function
Boot lid ............................................ 94
Roller sunblind ............................... 103
Reversing lamp (display message) .. 282
ROAD SURFACE SCAN ....................... 209
Roller sunblind
Panorama roof ............................... 103 Rear window .................................. 324
Roller sunblind of the panorama
roof
Opening and closing ...................... 104
Operating ....................................... 103
Resetting ....................................... 104
Roof lining and carpets (cleaning
instructions) ...................................... 353
Roof load (maximum) ........................ 410 S
Safety Children in the vehicle ..................... 60
see Occupant safety
see Operating safety
Safety system
see Driving safety systems
SD memory card
Selecting ........................................ 254
Seat
Adjusting the front-passenger
seat from the driver's seat ............. 110
Seat backrest display message ..... 299
Seat belt
Correct usage .................................. 45
Seat belts
Adjusting the driver's and front-
passenger seat belt ......................... 47
Cleaning ......................................... 353
Display message ............................ 275
Fastening ......................................... 46
Important safety guidelines ............. 44
Introduction ..................................... 44
Rear seat belt status indicator ......... 48
Releasing ......................................... 47
Warning lamp ................................. 302
Warning lamp (function) ................... 48
Seating
Seating comfort packag e............... 113
Seating comfort package ................. 113
Seats
Active multicontour seat ................ 113
Adjusting (electrically) ................... 110
Adjusting the 4-way lumbar sup-
port ................................................ 113
Adjusting the head restraint .......... 111 Index
17
Page 148 of 417
function via COMAND Online (see the sep-
arate operating instructions).
X Vehicles without auxiliary heating: acti-
vate the "Cooling with air dehumidification" function with the Árocker switch.
or
X Activate the "Cooling with air dehumidifi-
cation" function via COMAND Online (see
the separate operating instructions).
X Switch on automatic mode using the Ã
rocker switch.
X If the windows continue to mist up, activate
the windscreen demisting function using
the ¬ rocker switch. The windscreen
heating is switched on.
i You should only select this setting until
the windscreen is clear again.
Windows misted up on the outside X
Activate the windscreen wipers.
X Switch on automatic mode using the Ã
rocker switch.
i If you clean the windows regularly, they
do not mist up so quickly. Rear window heating
General notes The rear window heating has a high current
draw. You should therefore switch it off as
soon as the window is clear. It otherwise
switches off automatically after several
minutes.
If the battery voltage is too low, the rear win-
dow heating may switch off.
Activating/deactivating X
Turn the key to position 2in the ignition
lock (Y page 161).
X Press the ¤rocker switch up or down.
The indicator lamp in the ¤rocker
switch lights up or goes out. Operating the climate control system
145Climate control
Page 150 of 417
tinue closing the side window, pull on the
W switch.
X Convenience closing feature: press and
hold the grocker switch up or down
until the side windows are completely
closed.
The indicator lamp in the grocker
switch lights up. Air-recirculation mode is
activated.
If parts of the body are in the closing area
during convenience closing, proceed as fol-
lows: X Release the grocker switch.
The side windows stop.
X Press the Wbutton to open or close the
side windows.
Observe the notes on the automatic reversing
feature for the side windows (Y page 99).
X Convenience opening feature: press and
hold the grocker switch up or down
until the side windows are fully opened.
The indicator lamp the grocker switch
goes out. Air-recirculation mode is deacti-
vated. Switching the residual heat on/off
General notes Once the engine is switched off, it is possible
to make use of the residual heat of the engine to continue heating or ventilating the front
compartment of the vehicle for approximately
30 minutes.
The heating or ventilation time depends on
the temperature that has been set. Activating/deactivating X
Turn the key to position 0in the ignition
lock or remove it (Y page 161).
X To activate: press the!orÁ rocker
switch up or down.
The indicator lamp in the !orÁ
rocker switch lights up.
The blower will run at a low speed regardless of the airflow setting.
If you activate the residual heat function at
high temperatures, only the ventilation will be activated. The blower runs at medium speed.
X To deactivate: press the!orÁ
rocker switch up or down.
The indicator lamp in the !orÁ
rocker switch goes out.
Residual heat is deactivated automatically:
R after approximately 30 minutes
R when the ignition is switched on
R if the battery voltage drops
R when the auxiliary heating is switched on Perfume atomiser
Operating the perfume atomiser G
WARNING
If children open the perfume vial, they could
drink the perfume or it could come into con-
tact with their eyes. There is a risk of injury. Do not leave children unsupervised in the vehicle.
If the perfume liquid has been drunk, consult
a doctor. If perfume comes into contact with
your eyes or skin, rinse the eyes with clean
water. If you continue to experience difficul-
ties, consult a doctor. H
Environmental note Full perfume vials must not
be disposed of with house-
hold rubbish. They must be
collected separately and dis-
posed of in an environmen- Operating the climate control system
147Climate control
Z
Page 153 of 417
When the auxiliary heating is switched on,
make sure that:
R no flammable materials come into contact
with hot vehicle components
R the exhaust gas can escape from the
exhaust pipe unhindered
R the exhaust gas does not come into contact
with flammable materials.
The auxiliary heating and the exhaust gas out-
let are situated behind the right-hand front
wheel.
! Operating the auxiliary heating/ventila-
tion draws on the vehicle battery. After you
have heated or ventilated the vehicle a
maximum of two times, drive for a longer
distance.
Switch the auxiliary heating on regularly once
a month for about ten minutes.
The auxiliary heating heats the air in the vehi-
cle interior to the set temperature. This
occurs without using the heat of the running
engine. The auxiliary heating is operated
directly using the vehicle's fuel. For this rea-
son, the tank content must be at least at
reserve fuel level to ensure that the auxiliary
heating functions.
The auxiliary heating or auxiliary ventilation
automatically adjusts to changes in temper-
ature and weather conditions. For this rea-
son, the auxiliary heating could switch from
ventilation mode to heating mode or from
heating mode to ventilation mode.
The auxiliary heating switches off when the
engine is switched off. The auxiliary ventila-
tion switches off when you turn the key to key position 2(Y page 161).
The auxiliary heating switches off automati-
cally after 50 minutes. This time limit can be
altered. To do this, visit a qualified specialist
workshop.
You cannot use the auxiliary ventilation to
cool the vehicle interior to a temperature
lower than the outside temperature. Before switching on X
Turn the key to position 2in the ignition
lock (Y page 161).
X Set the desired temperature using the
w rocker switch on the front control
panel or using COMAND Online (see the
separate operating instructions).
If you do not alter the temperature before
switching on the auxiliary heating or auxiliary
ventilation, the last temperature setting will
be adopted.
Auxiliary heating or auxiliary ventilation can
also be switched on if the manually set cli-
mate control is activated. Optimum comfort
can be attained when the system is set to
automatic mode. Set the temperature to
22 †.
You can switch the auxiliary heating or auxil-
iary ventilation on or off:
R using the rocker switch on the centre con-
sole (Y page 150)
R using the remote control (Y page 151)
The on-board computer can be used to spec-
ify up to three departure times, one of which
may be preselected:
R using the remote control (Y page 151)
R using COMAND Online (see the separate
operating instructions)
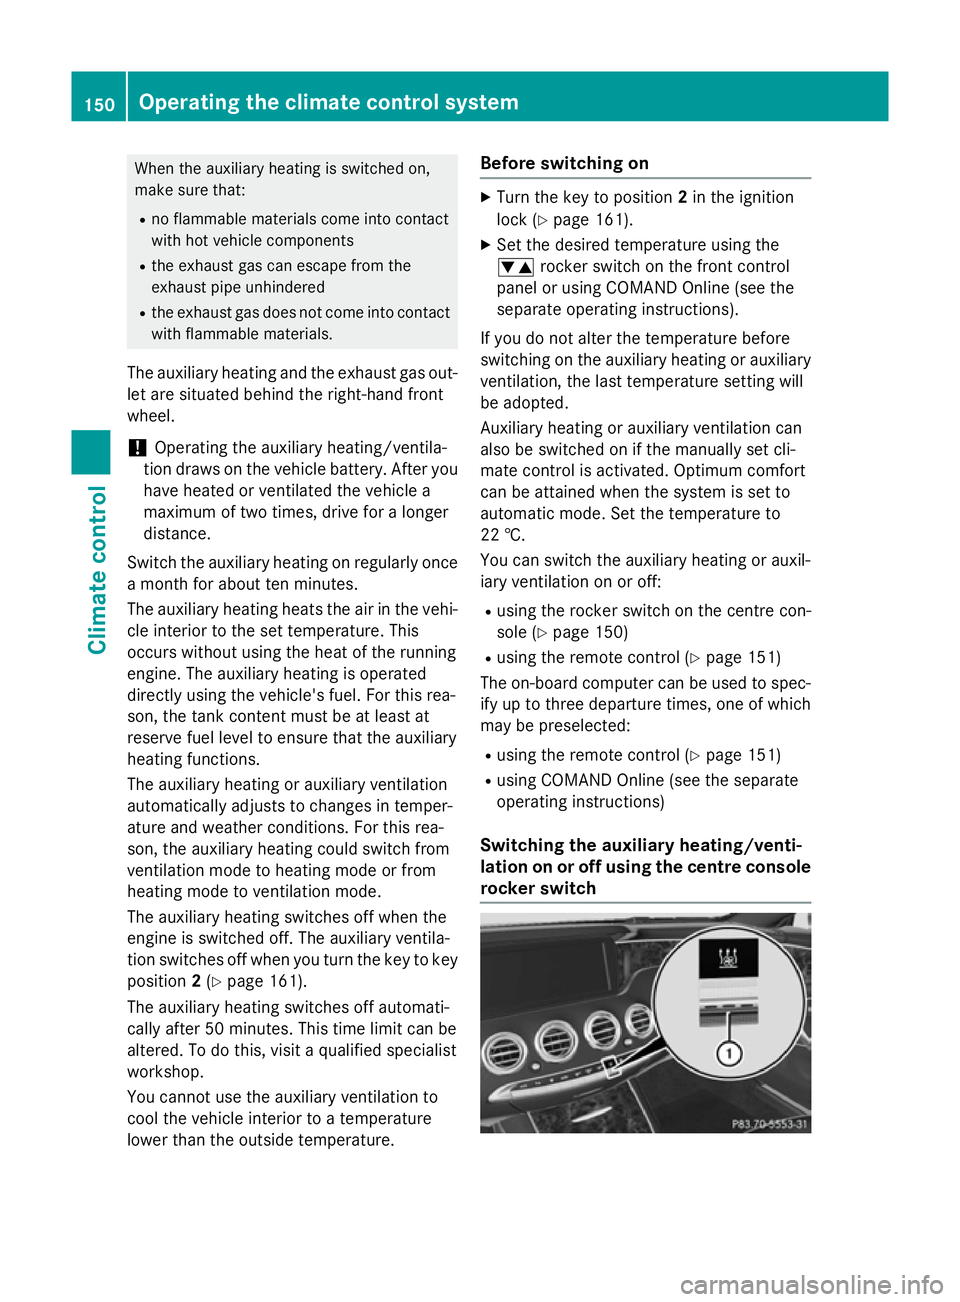
Switching the auxiliary heating/venti-
lation on or off using the centre console
rocker switch 150
Operating the climate control systemClimate control
Page 154 of 417
The colours of the indicator lamps in the
rocker switch have the following meanings:
R blue: cooling activated
R red: heating activated
R yellow: departure time is preselected
X To switch on auxiliary heating or auxili-
ary ventilation: press rocker switch :up
or down.
The red or the blue indicator lamp in rocker
switch :lights up.
X To set the temperature: switch on auxili-
ary heating or auxiliary ventilation.
COMAND Online is activated for approx-
imately one minute.
X Set the desired temperature using
COMAND Online (see the separate operat-
ing instructions).
In addition you can adjust the temperature at
any time using COMAND Online if the auxili-
ary heating/ventilation is switched on. To do so, call up COMAND Online using the qbut-
ton on the centre console.
X To switch off auxiliary heating or auxil-
iary ventilation: press rocker switch :up
or down.
The red or the blue indicator lamp in rocker
switch :goes out.
Switching the auxiliary heating/venti-
lation on or off using the remote control General notes
Your vehicle comes with one remote control.
You may use two additional remote controls
for your vehicle. For more information, please
contact a qualified specialist workshop.
Store the remote control for the auxiliary
heating so that the auxiliary heating cannot
be switched on unintentionally. In particular,
ensure that the remote control for the auxili-
ary heating is kept out of the reach of chil-
dren. The remote control has a range of approx-
imately 300 metres. This range is reduced by:
R sources of radio interference
R solid objects between the remote control
and the vehicle
R the remote control being in an unfavoura-
ble position in relation to the vehicle
R transmitting from an enclosed space
If the remote control battery is low, the bat-
tery symbol on the left of the display is shown as empty. Replace the remote control battery and observe the important safety notes when
doing so (Y page 153).
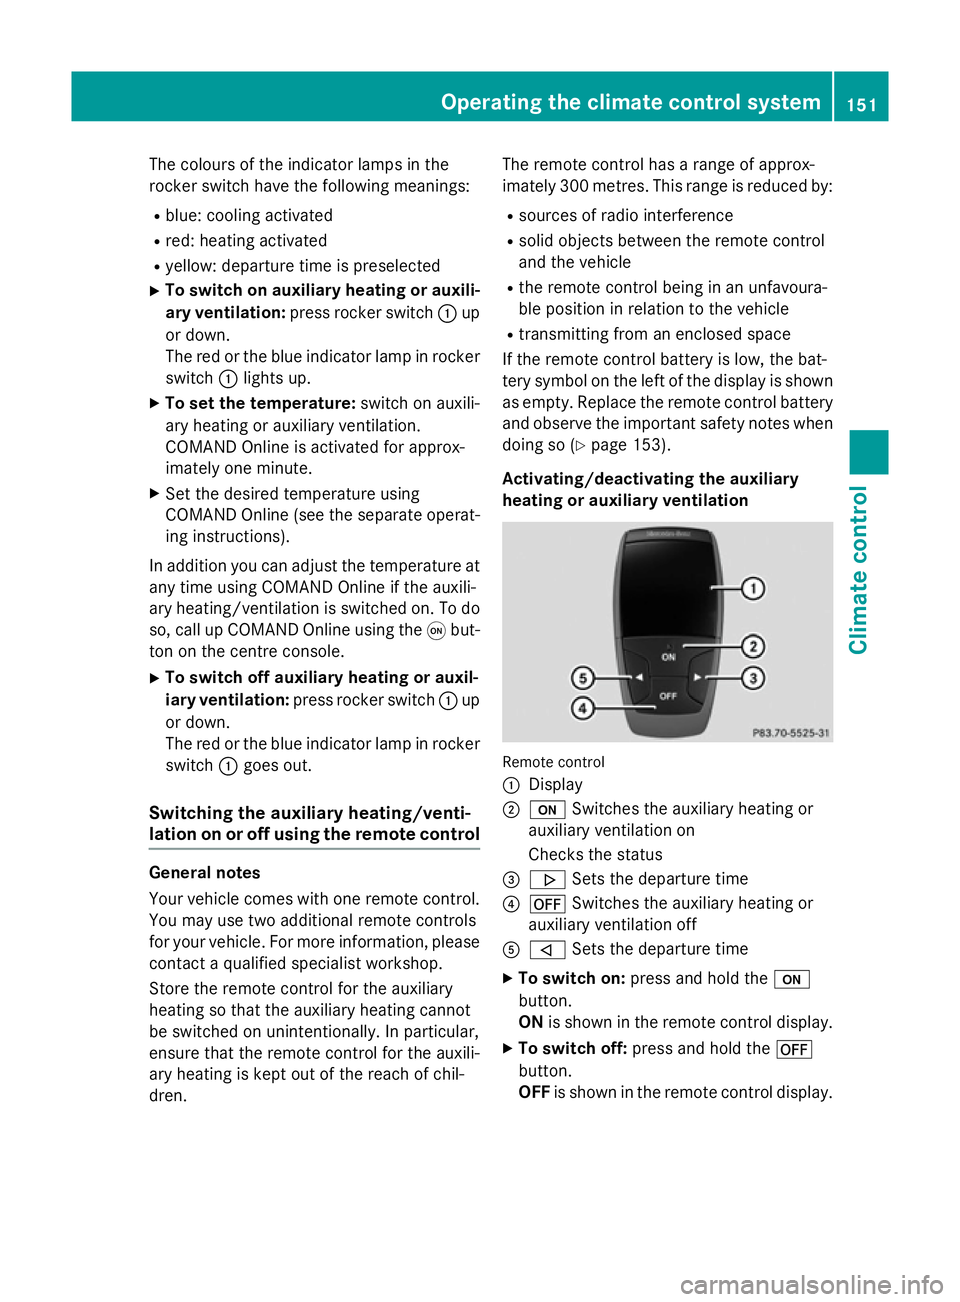
Activating/deactivating the auxiliary
heating or auxiliary ventilation Remote control
:
Display
; u Switches the auxiliary heating or
auxiliary ventilation on
Checks the status
= . Sets the departure time
? ^ Switches the auxiliary heating or
auxiliary ventilation off
A , Sets the departure time
X To switch on: press and hold the u
button.
ON is shown in the remote control display.
X To switch off: press and hold the ^
button.
OFF is shown in the remote control display. Operating the climate control system
151Climate control Z
Page 156 of 417
X
Briefly press the ubutton.
X Press the ,or. button repeatedly
until the time to be changed appears in the
display.
X Press the uand^ buttons simulta-
neously.
The Îsymbol in the remote control dis-
play flashes.
X Press the ,or. button to set the
desired departure time.
i The longer you press the
,or.
button, the faster the time changes.
X Press the uand^ buttons simulta-
neously.
The new departure time is stored.
Activating the set departure time X Briefly press the ubutton.
X Press the ,or. button repeatedly
until the desired departure time appears in the display.
X Press the ubutton.
The Ísymbol, the departure time and,
depending on the selected departure time, the letter A, BorCappear in the display.
Deactivating the set departure time
X Briefly press the ubutton.
The status of the auxiliary heating is shown in the display.
X Press the .button.
The first departure time stored appears in
the display.
X Press the ^button.
OFF is shown in the remote control display.
Switching the heater booster function
on/off The heater booster function helps the engine
reach its operating temperature faster during
its warm-up phase. This helps to heat the
vehicle interior faster. The heater booster
function switches on at lower outside tem-
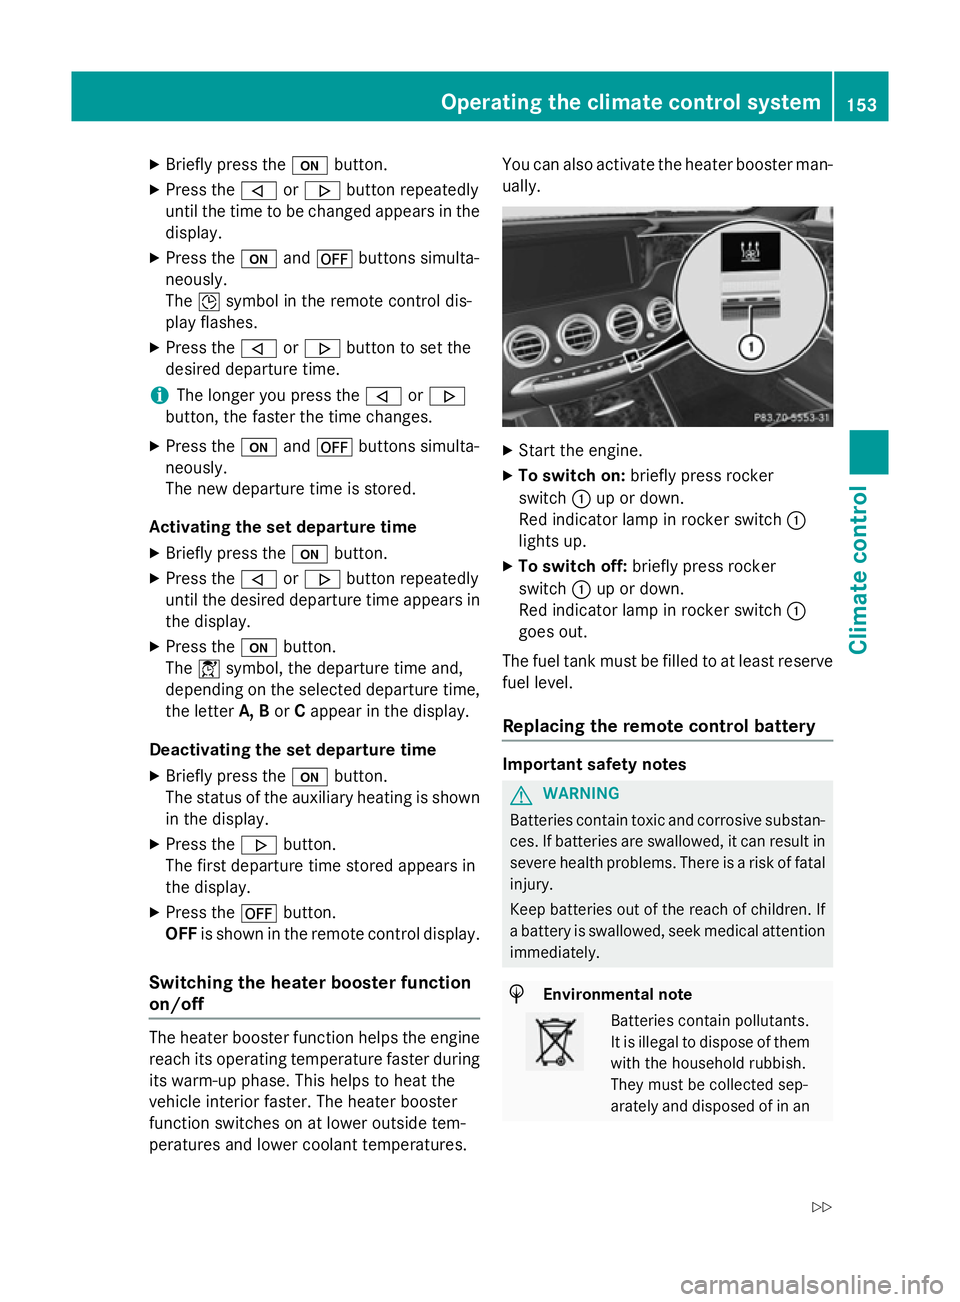
peratures and lower coolant temperatures. You can also activate the heater booster man-
ually. X
Start the engine.
X To switch on: briefly press rocker
switch :up or down.
Red indicator lamp in rocker switch :
lights up.
X To switch off: briefly press rocker
switch :up or down.
Red indicator lamp in rocker switch :
goes out.
The fuel tank must be filled to at least reserve fuel level.
Replacing the remote control battery Important safety notes
G
WARNING
Batteries contain toxic and corrosive substan- ces. If batteries are swallowed, it can result in
severe health problems. There is a risk of fatal injury.
Keep batteries out of the reach of children. If
a battery is swallowed, seek medical attention immediately. H
Environmental note Batteries contain pollutants.
It is illegal to dispose of them
with the household rubbish.
They must be collected sep-
arately and disposed of in an Operating the climate control system
153Climate control
Z
Page 157 of 417
environmentally responsible
recycling system. Dispose of batteries in an
environmentally responsible
manner. Take discharged
batteries to a qualified spe-
cialist workshop or to a col-
lection point for used batter-
ies.
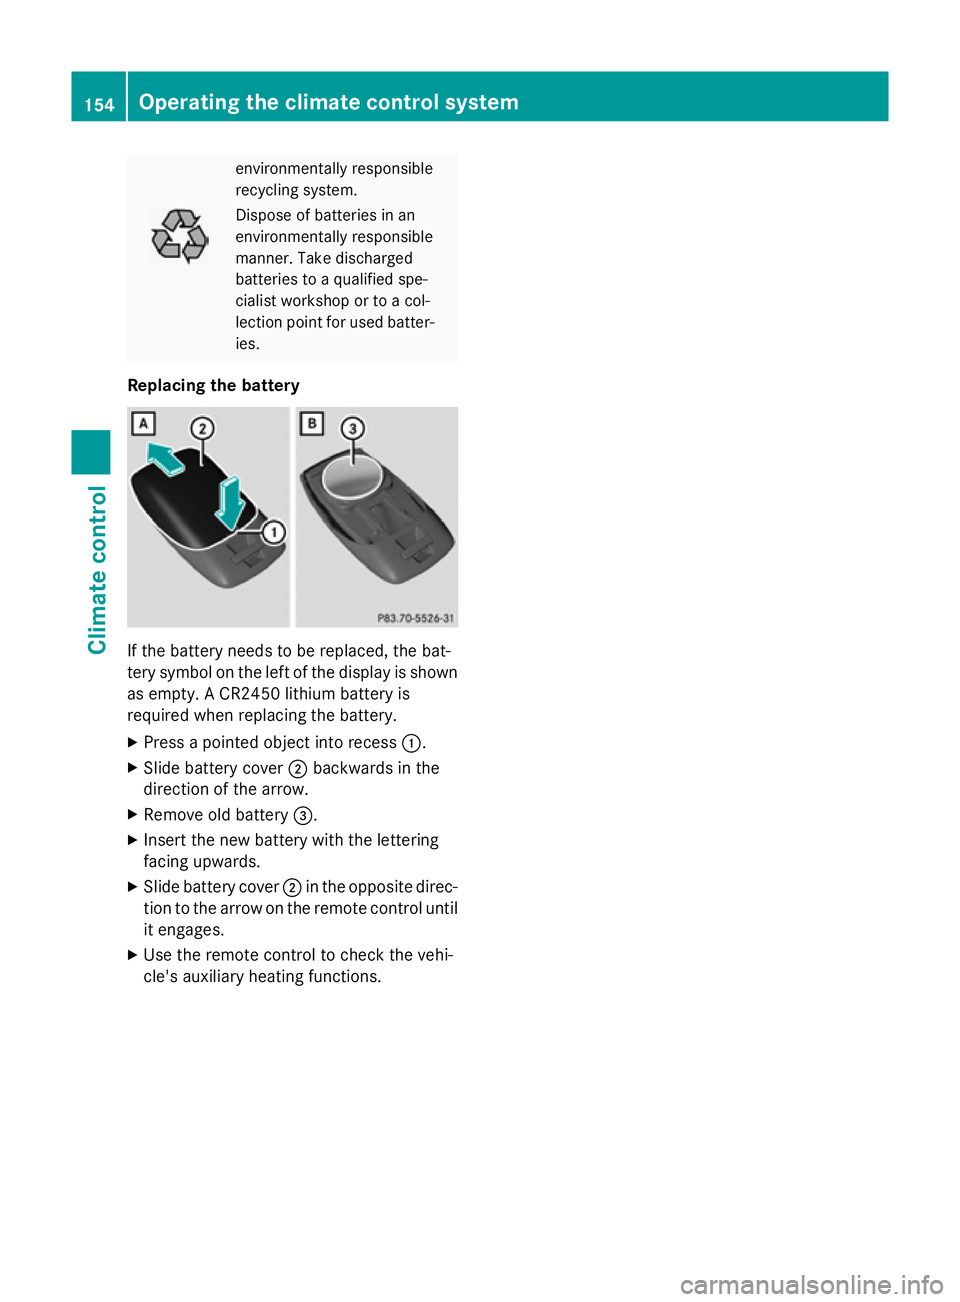
Replacing the battery If the battery needs to be replaced, the bat-
tery symbol on the left of the display is shown as empty. A CR2450 lithium battery is
required when replacing the battery.
X Press a pointed object into recess :.
X Slide battery cover ;backwards in the
direction of the arrow.
X Remove old battery =.
X Insert the new battery with the lettering
facing upwards.
X Slide battery cover ;in the opposite direc-
tion to the arrow on the remote control until
it engages.
X Use the remote control to check the vehi-
cle's auxiliary heating functions. 154
Operating the climate control systemClimate control
Page 158 of 417
Problems with the auxiliary heating/ventilation
Display messages
Possible causes/consequences and
M
MSolutions FAIL¨ The signal transmission between the transmitter and the vehicle is
faulty.
X Change your position in relation to the vehicle, moving closer if
necessary.
X Make another attempt to switch the auxiliary heating or auxiliary
ventilation on or off using the remote control. FAIL The auxiliary heating cannot be switched on or has switched itself
off.
The starter battery is not sufficiently charged.
X Charge the starter battery.
X Make another attempt to switch on the auxiliary heating or aux-
iliary ventilation using the remote control. The auxiliary heating cannot be switched on or has switched itself
off.
The fuel tank content is below the reserve fuel level.
X Refuel at the nearest filling station.
X Make another attempt to switch on the auxiliary heating using
the remote control. FAIL¯ The auxiliary heating or auxiliary ventilation cannot be switched on
or has switched itself off.
The auxiliary heating or auxiliary ventilation is faulty.
X Have the auxiliary heating or auxiliary ventilation checked at a
qualified specialist workshop. Adjusting the air vents
Important safety notes
G
WARNING
Very hot or very cold air can flow from the air vents. This could result in burns or frostbite in the immediate vicinity of the air vents. There
is a risk of injury.
Make sure that all vehicle occupants always
maintain a sufficient distance to the air out-
lets. If necessary, redirect the airflow to
another area of the vehicle interior. In order to ensure the direct flow of fresh air
through the air vents into the vehicle interior,
please observe the following notes:
R keep the air inlet between the windscreen
and the bonnet free of blockages, such as
ice, snow or leaves
R never cover the vents or ventilation grilles
in the vehicle interior Adjusting the air vents
155Climate control Z