2015 MERCEDES-BENZ M-Class fold seats
[x] Cancel search: fold seatsPage 20 of 466

Important safety guidelines .............46
Introduction .....................................46
Releasin g......................................... 49
Switching belt adjustment on/off
(on-board computer) ...................... 280
Warning lamp ................................. 318
Warning lamp (function) ................... 49
Seats
Adjusting (electrically) ................... 106
Adjusting the head restraint .......... 106
Cleaning the cover ......................... 378
Correct driver's seat position ........ 104
Folding the rear bench seat for-
wards/back ................................... 337
Important safety notes .................. 105
Overview ........................................ 105
Seat heating problem .................... 110
Seat ventilation problem ................ 111
Storing settings (memory func-
tion) ............................................... 116
Switching seat heating on/of f....... 109
Switching seat ventilation on/of f.. 110
Securing hooks .................................. 340
Selector lever Cleaning ......................................... 378
Sensors (cleaning instructions) ....... 375
Service menu (on-board com-
puter) .................................................. 276
Service products Brake fluid ..................................... 453
Coolant (engine) ............................ 453
DEF special additives ..................... 451
Engine oil ....................................... 452
Fuel ................................................ 448
Important safety notes .................. 447
Refrigerant (air-conditioning sys-
tem) ............................................... 455
Washer fluid ................................... 454
Settings
Factory (on-board computer) ......... 281
On-board computer ....................... 277
Setting the air distribution ............... 148
Setting the airflow ............................ 148
SETUP (on-board computer) ............. 281
Side impact air bag ............................. 52
Side marker lamp (display mes-
sage) ................................................... 299 Side marker lamps (changing
bulbs)
................................................. 131
Side windows Cleaning ......................................... 375
Convenience closing feature ............ 95
Convenience opening feature .......... 95
Important safety information ........... 93
Opening/closing .............................. 94
Overview .......................................... 93
Problem (malfunction) ..................... 97
Resetting ......................................... 96
Sliding sunroof
Important safety notes .................... 97
Opening/closing .............................. 98
Problem (malfunction) ................... 101
Resetting ......................................... 98
see Panorama roof with power
tilt/sliding panel
SmartKey
Changing the battery ....................... 83
Changing the programming ............. 81
Checking the battery ....................... 83
Convenience closing feature ............ 95
Convenience opening feature .......... 95
Display message ............................ 317
Door central locking/unlocking ....... 80
Important safety notes .................... 80
Loss ................................................. 85
Mechanical key ................................ 82
Overview .......................................... 80
Positions (ignition lock) ................. 157
Problem (malfunction) ..................... 85
Starting the engine ........................ 160
Snow chains
Information .................................... 403
Snow drive program ....................... 248
Sockets
Center console .............................. 349
General notes ................................ 349
Luggage compartment ................... 350
Rear compartment ......................... 350
Specialist workshop ............................ 29
Special seat belt retractor .................. 61
Speed, controlling see Cruise control
Speedometer
Digital ............................................ 270 18
Index
Page 44 of 466

Door control panel
Function Page
0043
Opens the door 87
0044
00360037Unlocks/locks
the vehicle 87
0087
008D
00370038
Stores settings for the seat, exterior mirrors and steer-
ing wheel (memory func-
tion) 116
0085
Adjusting the seats 105
0083
0062007000F50071
Adjusts and folds the exte-
rior mirrors in/out electri-
cally
114 Function Page
0084
0062
Opens/closes the
side windows 94
006B
008C
Opens/closes the
tailgate 92
006C
0089
Activates/deacti-
vates the override feature
for the side windows in the
rear compartment 6742
Door control panelAt a glance
Page 66 of 466

ISOFIX is a standardized securing system for
specially designed child restraint systems on
the rear seats. LATCH-type (ISOFIX) securing rings 0043for two LATCH-type (ISOFIX) child
restraint systems are installed on the left and
right rear seats.
Non-LATCH-type (ISOFIX) child seats may
also be used and can be installed using the
vehicle's seat belt system. Install child seats
according to the manufacturer's instructions. Top Tether
Introduction Top Tether provides an additional connection
between a child restraint system, secured
with a LATCH-type (ISOFIX) child seat mount,and the rear seat. This helps reduce the risk of
injury even further. If the child restraint sys-
tem has a Top Tether belt, this should be used at all times.
Important safety notes G
WARNING
If the rear seats or the rear seat backrests are not locked, they could fold forwards in the
event of an accident, heavy braking or sudden changes of direction. As a result, child
restraint systems cannot perform their inten-
ded protective function. Rear seats and rear
seat backrests that are not locked can also
cause additional injuries, e.g. in the event of
an accident. This poses an increased risk of
injury or even fatal injury.
Always lock the rear seats and rear seat
backrests after installing a Top Tether belt.
Observe the lock verification indicator. Adjust the rear seat backrests so that they are in an
upright position. Top Tether anchorage points
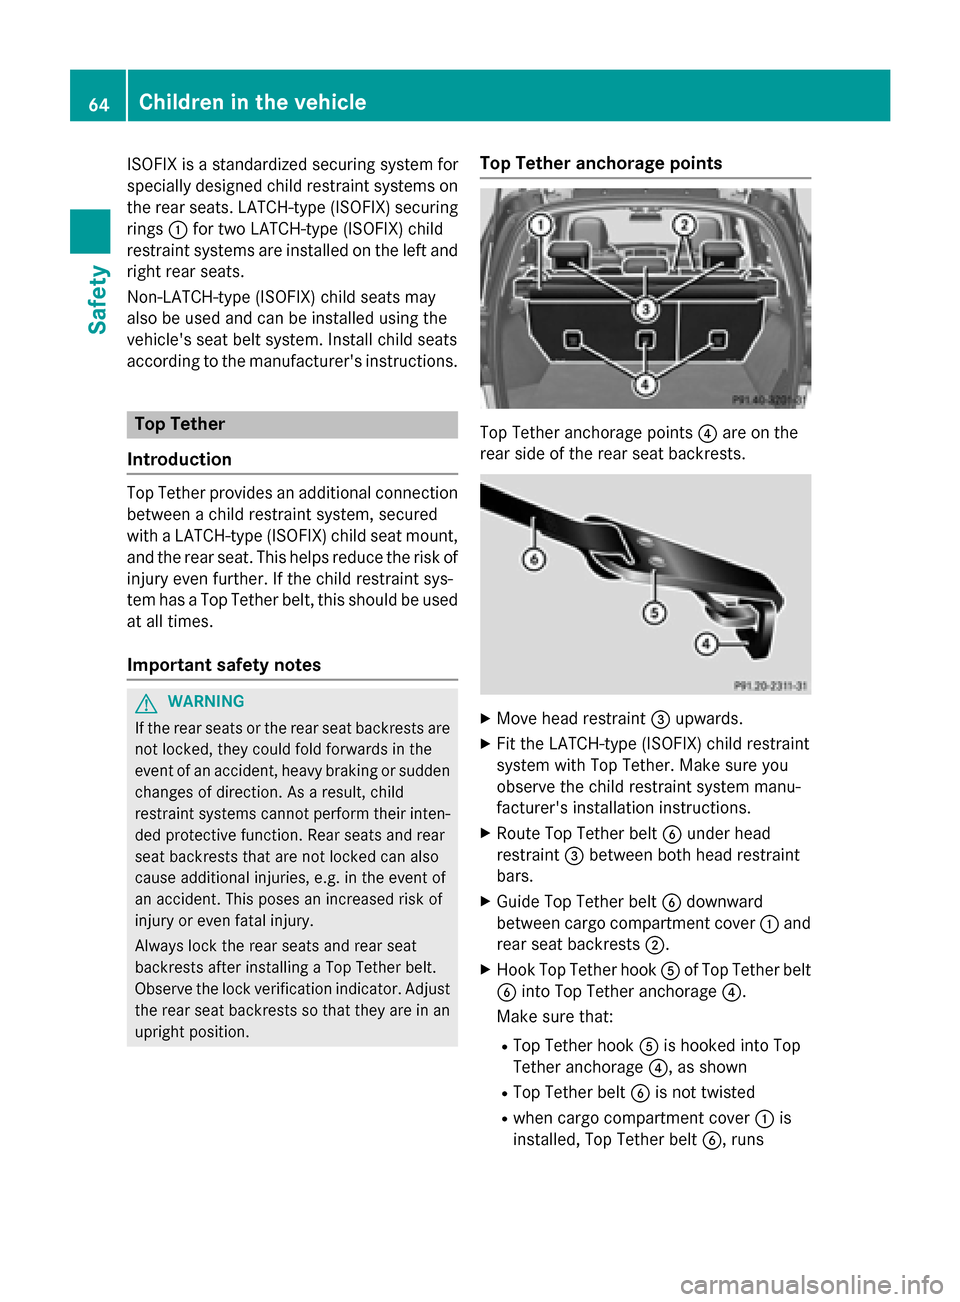
Top Tether anchorage points
0085are on the
rear side of the rear seat backrests. X
Move head restraint 0087upwards.
X Fit the LATCH-type (ISOFIX) child restraint
system with Top Tether. Make sure you
observe the child restraint system manu-
facturer's installation instructions.
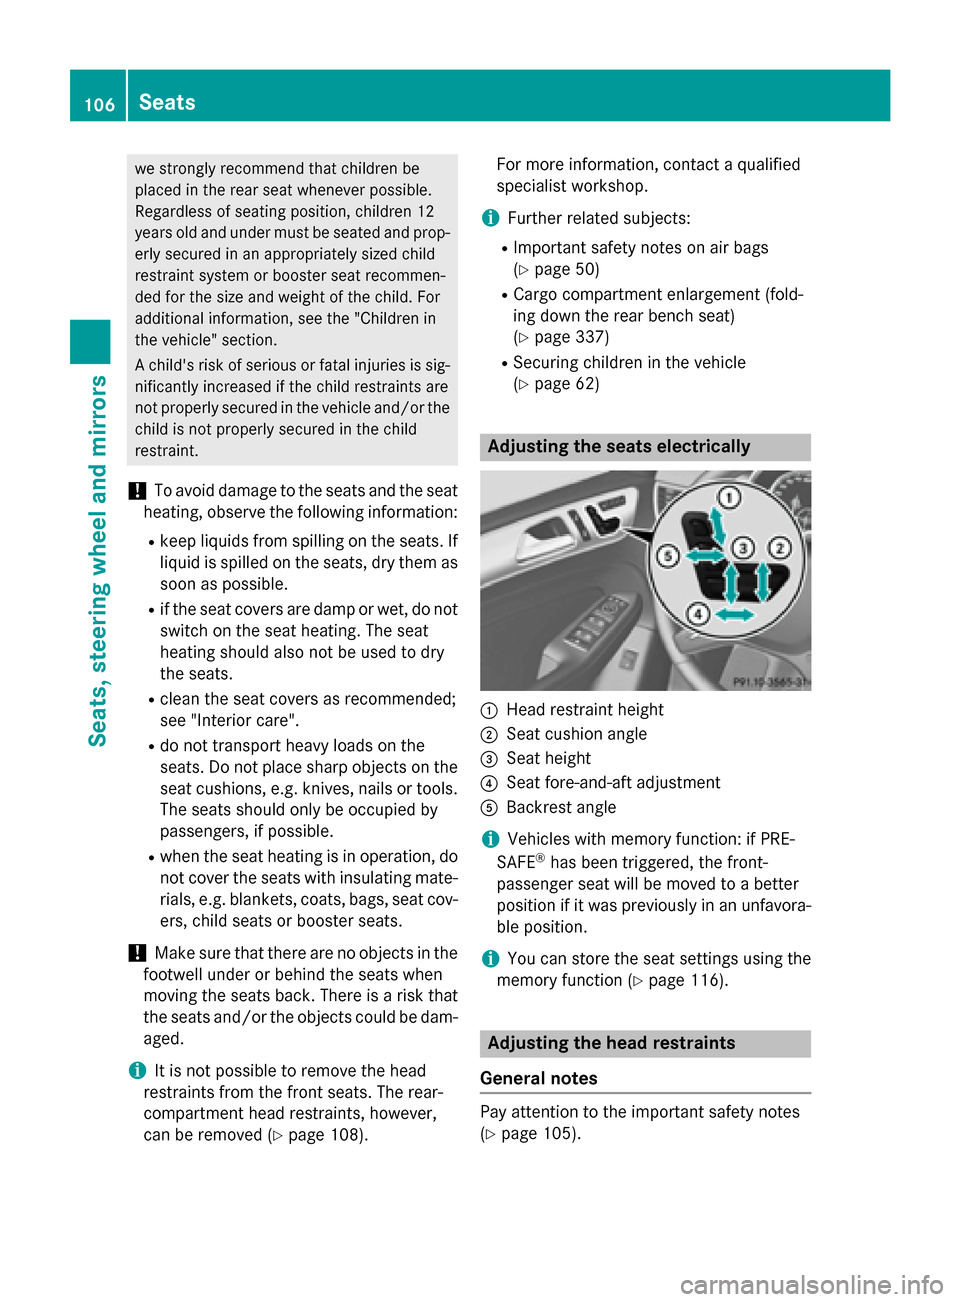
X Route Top Tether belt 0084under head
restraint 0087between both head restraint
bars.
X Guide Top Tether belt 0084downward
between cargo compartment cover 0043and
rear seat backrests 0044.
X Hook Top Tether hook 0083of Top Tether belt
0084 into Top Tether anchorage 0085.
Make sure that:
R Top Tether hook 0083is hooked into Top
Tether anchorage 0085, as shown
R Top Tether belt 0084is not twisted
R when cargo compartment cover 0043is
installed, Top Tether belt 0084, runs64
Children in the vehicleSafety
Page 108 of 466

we strongly recommend that children be
placed in the rear seat whenever possible.
Regardless of seating position, children 12
years old and under must be seated and prop- erly secured in an appropriately sized child
restraint system or booster seat recommen-
ded for the size and weight of the child. For
additional information, see the "Children in
the vehicle" section.
A child's risk of serious or fatal injuries is sig- nificantly increased if the child restraints are
not properly secured in the vehicle and/or thechild is not properly secured in the child
restraint.
! To avoid damage to the seats and the seat
heating, observe the following information:
R keep liquids from spilling on the seats. If
liquid is spilled on the seats, dry them as soon as possible.
R if the seat covers are damp or wet, do not
switch on the seat heating. The seat
heating should also not be used to dry
the seats.
R clean the seat covers as recommended;
see "Interior care".
R do not transport heavy loads on the
seats. Do not place sharp objects on the seat cushions, e.g. knives, nails or tools. The seats should only be occupied by
passengers, if possible.
R when the seat heating is in operation, do
not cover the seats with insulating mate-
rials, e.g. blankets, coats, bags, seat cov- ers, child seats or booster seats.
! Make sure that there are no objects in the
footwell under or behind the seats when
moving the seats back. There is a risk that
the seats and/or the objects could be dam- aged.
i It is not possible to remove the head
restraints from the front seats. The rear-
compartment head restraints, however,
can be removed (Y page 108). For more information, contact a qualified
specialist workshop.
i Further related subjects:
R Important safety notes on air bags
(Y page 50)
R Cargo compartment enlargement (fold-
ing down the rear bench seat)
(Y page 337)
R Securing children in the vehicle
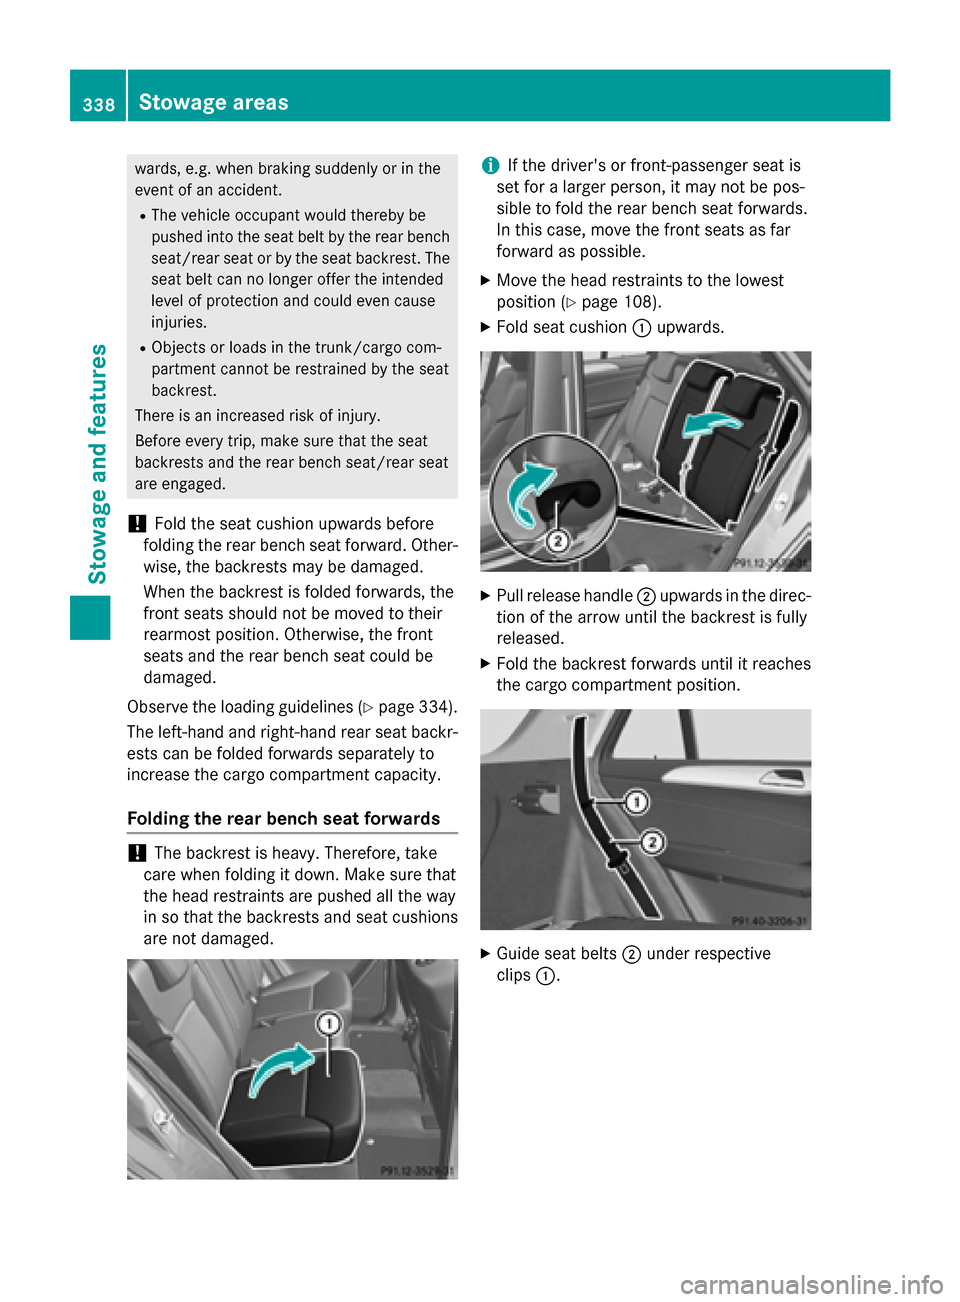
(Y page 62) Adjusting the seats electrically
0043
Head restraint height
0044 Seat cushion angle
0087 Seat height
0085 Seat fore-and-aft adjustment
0083 Backrest angle
i Vehicles with memory function: if PRE-
SAFE ®
has been triggered, the front-
passenger seat will be moved to a better
position if it was previously in an unfavora- ble position.
i You can store the seat settings using the
memory function (Y page 116). Adjusting the head restraints
General notes Pay attention to the important safety notes
(Y
page 105). 106
SeatsSeats, steering wheel and mirrors
Page 117 of 466

Folding the exterior mirrors in or out
electrically X
Turn the SmartKey to position 1or 2in the
ignition lock (Y page 157).
X Briefly press button 0043.
Both exterior mirrors fold in or out.
i Make sure that the exterior mirrors are
always folded out fully while driving. They
could otherwise vibrate.
i If you are driving faster than 30 mph
(47 km/h), you can no longer fold in the
exterior mirrors.
Setting the exterior mirrors If the battery has been disconnected or com-
pletely discharged, the exterior mirrors must
be reset. The exterior mirrors will otherwise
not fold in when you select the "Fold in mir-
rors when locking" function in the on-board
computer (Y page 280).
X Turn the SmartKey to position 1in the igni-
tion lock (Y page 157).
X Briefly press button 0043.
Folding the exterior mirrors in or out
automatically If the "Fold in mirrors when locking" function
is activated in the on-board computer:
(Y page 280) R
the exterior mirrors fold in automatically as
soon as you lock the vehicle from the out-
side.
R the exterior mirrors fold out again automat-
ically as soon as you unlock the vehicle and
then open the driver's or front-passenger
door.
Exterior mirror pushed out of position If an exterior mirror has been pushed out of
position, proceed as follows:
X Vehicles without electrically folding
exterior mirrors: move the exterior mirror
into the correct position manually.
X Vehicles with electrically folding exte-
rior mirrors: press and hold button for
folding the mirrors 0043(Ypage 115) until
you hear a click and then the mirror engage
in position.
The mirror housing is engaged again and
you can adjust the exterior mirrors as usual
(Y page 114). Automatic anti-glare mirrors
The rear-view mirror and the exterior mirror
on the driver's side automatically go into anti- glare mode if the following conditions are met simultaneously:
R the ignition is switched on and
R incident light from headlamps strikes the
sensor in the rear-view mirror.
i The mirrors do not go into anti-glare mode
if reverse gear is engaged or if the interior
lighting is switched on. Mirrors
115Seats, steering wheel and mirrors Z
Page 339 of 466

i
Depending on the vehicle's equipment,
there may be open stowage spaces above
and below the stowage compartment. Stowage net
G
WARNING
Vehicles with the Occupant Classification
System (OCS):
If the gross weight of the objects in the stow- age net on the back of the front-passenger
seat is greater than 4.4 lb (2 kg), OCS cannot
correctly assess the occupant's weight cate-
gory. The front-passenger front air bag could
deploy without cause, or may fail to deploy in
the event of an accident. This poses an
increased risk of injury or even fatal injury.
Never exceed the permissible gross weight of 4.4 lb (2 kg). Stow and secure heavy objects inthe cargo compartment.
Stowage nets are located in the front-
passenger footwell and on the back of the
driver's and the front-passenger seat.
Observe the loading guidelines (Y page 334)
and the safety notes regarding stowage
spaces (Y page 335). Through-loading facility in the rear
If objects or loads are not secured when being
transported in the through-loading facility,
they could slip or be thrown around and
thereby hit vehicle occupants.
Observe the loading guidelines (Y page 334)
and the safety notes regarding stowage
spaces (Y page 335). The through-loading facility is opened from
the cargo compartment.
X Release the seat backrests in the second
row of seats and tilt them in the cargo/load
position (Y page 108).
X Fold down the rear seat armrest.
X Pull the center head restraint on the rear
bench seat into the uppermost position
(Y page 106).
X Slide release catch 0043to the left and swing
flap 0044to the left until it is lying on the rear
side of the rear bench seat. X
Push cover 0087forward until it is lying on the
rear seat armrest. Cargo compartment enlargement
Important safety notes G
WARNING
If the rear bench seat/rear seat and seat
backrest are not engaged they could fold for- Sto
wage areas
337Stowage and features
Z
Page 340 of 466

wards, e.g. when braking suddenly or in the
event of an accident.
R The vehicle occupant would thereby be
pushed into the seat belt by the rear bench
seat/rear seat or by the seat backrest. The
seat belt can no longer offer the intended
level of protection and could even cause
injuries.
R Objects or loads in the trunk/cargo com-
partment cannot be restrained by the seat
backrest.
There is an increased risk of injury.
Before every trip, make sure that the seat
backrests and the rear bench seat/rear seat
are engaged.
! Fold the seat cushion upwards before
folding the rear bench seat forward. Other-
wise, the backrests may be damaged.
When the backrest is folded forwards, the
front seats should not be moved to their
rearmost position. Otherwise, the front
seats and the rear bench seat could be
damaged.
Observe the loading guidelines (Y page 334).
The left-hand and right-hand rear seat backr- ests can be folded forwards separately to
increase the cargo compartment capacity.
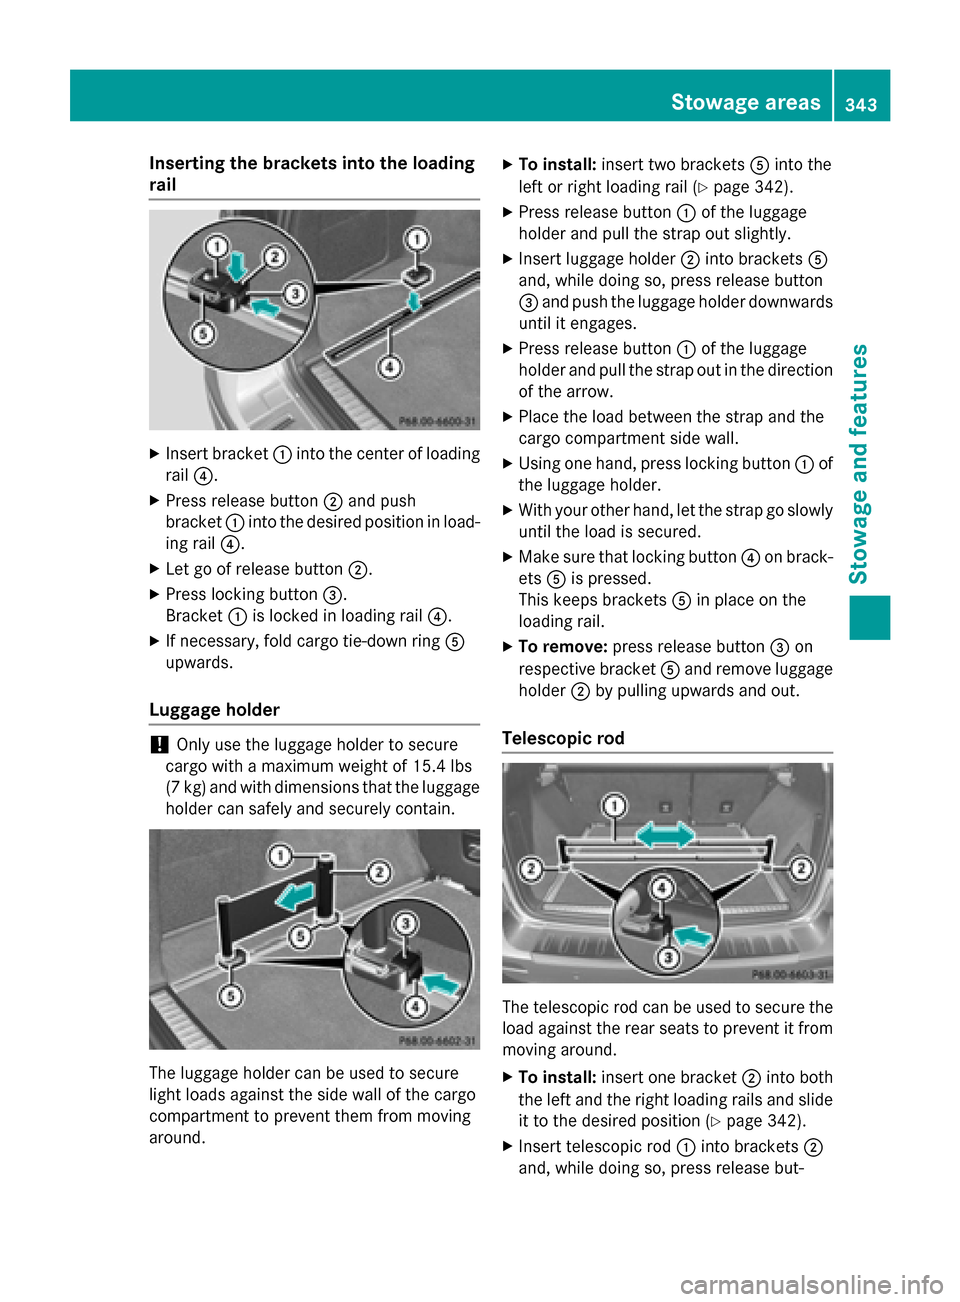
Folding the rear bench seat forwards !
The backrest is heavy. Therefore, take
care when folding it down. Make sure that
the head restraints are pushed all the way
in so that the backrests and seat cushions
are not damaged. i
If the driver's or front-passenger seat is
set for a larger person, it may not be pos-
sible to fold the rear bench seat forwards.
In this case, move the front seats as far
forward as possible.
X Move the head restraints to the lowest
position (Y page 108).
X Fold seat cushion 0043upwards. X
Pull release handle 0044upwards in the direc-
tion of the arrow until the backrest is fully
released.
X Fold the backrest forwards until it reaches
the cargo compartment position. X
Guide seat belts 0044under respective
clips 0043. 338
Stowage areasStowage and features
Page 345 of 466

Inserting the brackets into the loading
rail X
Insert bracket 0043into the center of loading
rail 0085.
X Press release button 0044and push
bracket 0043into the desired position in load-
ing rail 0085.
X Let go of release button 0044.
X Press locking button 0087.
Bracket 0043is locked in loading rail 0085.
X If necessary, fold cargo tie-down ring 0083
upwards.
Luggage holder !
Only use the luggage holder to secure
cargo with a maximum weight of 15.4 lbs
(7 kg) and with dimensions that the luggage holder can safely and securely contain. The luggage holder can be used to secure
light loads against the side wall of the cargo
compartment to prevent them from moving
around. X
To install: insert two brackets 0083into the
left or right loading rail (Y page 342).
X Press release button 0043of the luggage
holder and pull the strap out slightly.
X Insert luggage holder 0044into brackets 0083
and, while doing so, press release button
0087 and push the luggage holder downwards
until it engages.
X Press release button 0043of the luggage
holder and pull the strap out in the direction
of the arrow.
X Place the load between the strap and the
cargo compartment side wall.
X Using one hand, press locking button 0043of
the luggage holder.
X With your other hand, let the strap go slowly
until the load is secured.
X Make sure that locking button 0085on brack-
ets 0083is pressed.
This keeps brackets 0083in place on the
loading rail.
X To remove: press release button 0087on
respective bracket 0083and remove luggage
holder 0044by pulling upwards and out.
Telescopic rod The telescopic rod can be used to secure the
load against the rear seats to prevent it from
moving around.
X To install: insert one bracket 0044into both
the left and the right loading rails and slide it to the desired position (Y page 342).
X Insert telescopic rod 0043into brackets 0044
and, while doing so, press release but- Stowage areas
343Stowage and featu res Z