2015 MERCEDES-BENZ M-Class drive
[x] Cancel search: drivePage 118 of 466

Parking position for the exterior mir-
ror on the front-passenger side
Setting and storing the parking position Using reverse gear
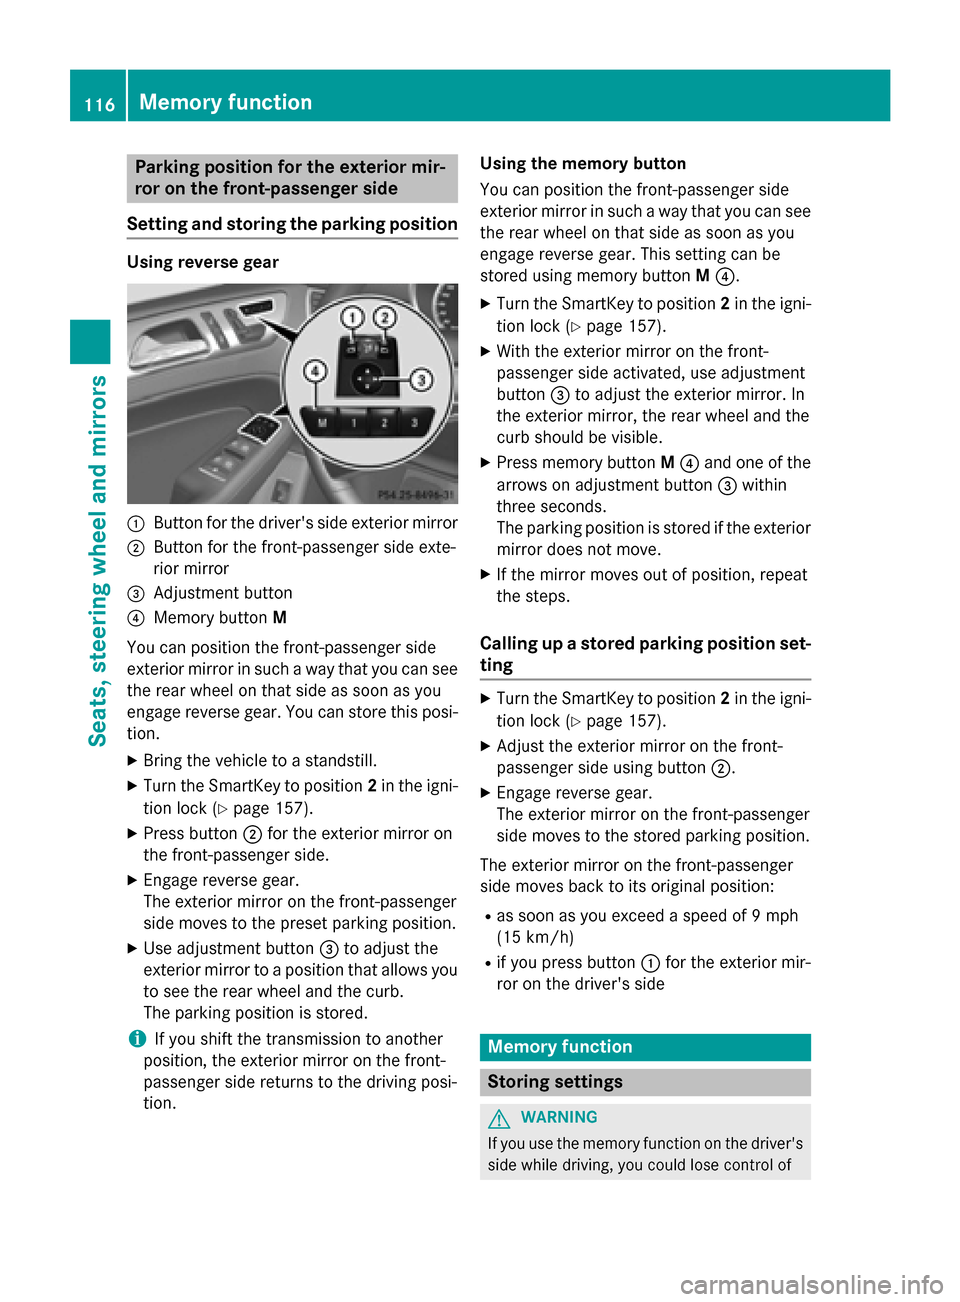
0043
Button for the driver's side exterior mirror
0044 Button for the front-passenger side exte-
rior mirror
0087 Adjustment button
0085 Memory button M
You can position the front-passenger side
exterior mirror in such a way that you can see
the rear wheel on that side as soon as you
engage reverse gear. You can store this posi-
tion.
X Bring the vehicle to a standstill.
X Turn the SmartKey to position 2in the igni-
tion lock (Y page 157).
X Press button 0044for the exterior mirror on
the front-passenger side.
X Engage reverse gear.
The exterior mirror on the front-passenger
side moves to the preset parking position.
X Use adjustment button 0087to adjust the
exterior mirror to a position that allows you
to see the rear wheel and the curb.
The parking position is stored.
i If you shift the transmission to another
position, the exterior mirror on the front-
passenger side returns to the driving posi-
tion. Using the memory button
You can position the front-passenger side
exterior mirror in such a way that you can see
the rear wheel on that side as soon as you
engage reverse gear. This setting can be
stored using memory button M0085.
X Turn the SmartKey to position 2in the igni-
tion lock (Y page 157).
X With the exterior mirror on the front-
passenger side activated, use adjustment
button 0087to adjust the exterior mirror. In
the exterior mirror, the rear wheel and the
curb should be visible.
X Press memory button M0085 and one of the
arrows on adjustment button 0087within
three seconds.
The parking position is stored if the exterior
mirror does not move.
X If the mirror moves out of position, repeat
the steps.
Calling up a stored parking position set- ting X
Turn the SmartKey to position 2in the igni-
tion lock (Y page 157).
X Adjust the exterior mirror on the front-
passenger side using button 0044.
X Engage reverse gear.
The exterior mirror on the front-passenger
side moves to the stored parking position.
The exterior mirror on the front-passenger
side moves back to its original position: R as soon as you exceed a speed of 9 mph
(15 km/h)
R if you press button 0043for the exterior mir-
ror on the driver's side Memory function
Storing settings
G
WARNING
If you use the memory function on the driver's side while driving, you could lose control of 116
Memory functionSeats, steering wheel and mirrors
Page 119 of 466

the vehicle as a result of the adjustments
being made. There is a risk of an accident.
Only use the memory function on the driver's side when the vehicle is stationary. G
WARNING
When the memory function adjusts the seat or steering wheel, you and other vehicle occu-
pants – particularly children – could become
trapped. There is a risk of injury.
While the memory function is making adjust-
ments, make sure that no one has any body
parts in the sweep of the seat or steering
wheel. If somebody becomes trapped, imme-
diately release the memory function position
button. The adjustment process is stopped. G
WARNING
Children could become trapped if they acti-
vate the memory function, particularly when
unattended. There is a risk of injury.
When leaving the vehicle, always take the
SmartKey with you and lock the vehicle. Never leave children unsupervised in the vehicle.
With the memory function, you can store up
to three different settings, e.g. for three dif-
ferent people.
The following settings are stored as a single
memory preset:
R position of the seat, backrest and head
restraint
R driver's side: steering wheel position
R driver's side: position of the exterior mir-
rors on the driver's and front-passenger
sides X
Adjust the seat (Y page 106).
X On the driver's side, adjust the steering
wheel (Y page 112 )and the exterior mirrors
(Y page 114).
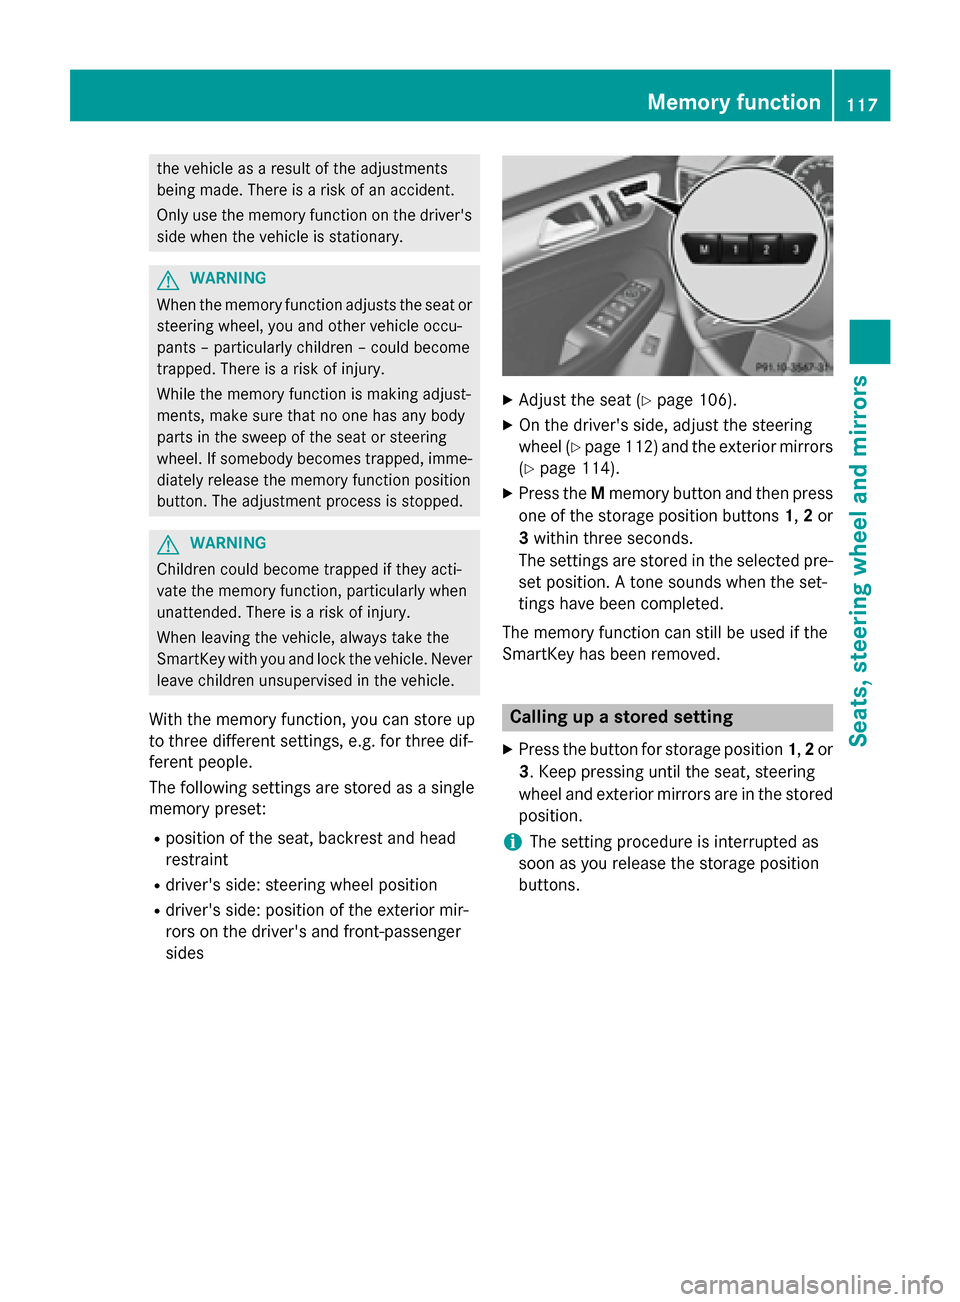
X Press the Mmemory button and then press
one of the storage position buttons 1,2or
3 within three seconds.
The settings are stored in the selected pre-
set position. A tone sounds when the set-
tings have been completed.
The memory function can still be used if the
SmartKey has been removed. Calling up a stored setting
X Press the button for storage position 1,2or
3. Keep pressing until the seat, steering
wheel and exterior mirrors are in the stored
position.
i The setting procedure is interrupted as
soon as you release the storage position
buttons. Memory function
117Seats, steeringwheel and mirrors Z
Page 122 of 466

Useful information
i This Operator's Manual describes all
models and all standard and optional equip- ment of your vehicle available at the time of
publication of the Operator's Manual.
Country-specific differences are possible.
Please note that your vehicle may not be
equipped with all features described. This
also applies to safety-related systems and
functions.
i Read the information on qualified special-
ist workshops (Y page 29). Exterior lighting
General notes
For reasons of safety, Mercedes-Benz recom- mends that you drive with the lights switchedon even during the daytime. In some coun-
tries, operation of the headlamps varies due
to legal requirements and self-imposed obli-
gations. Driving abroad
Conversion to symmetrical low beam Switch the headlamps to symmetrical low
beam in countries in which traffic drives on
the opposite side of the road from the country
where the vehicle is registered. This prevents glare to oncoming traffic. When using sym-
metrical lights, the edge of the road is not lit
as widely and as far ahead as normal.
Have the headlamps converted at a qualified
specialist workshop as close to the border as
possible before driving in these countries.
Conversion to asymmetrical low beam
after returning Have the headlamps converted back to asym-
metrical low-beam headlamps at a qualified
specialist workshop as soon as possible after crossing the border again. Setting the exterior lighting
Setting options Exterior lighting can be set using:
R the light switch
R the combination switch (Y page 123)
R the on-board computer (Y page 277)
Light switch Operation
0047
0063
Left-hand standing lamps
0048 0064
Right-hand standing lamps
0049 0060
Parking lamps, license plate and
instrument cluster lighting
004A 0058
Automatic headlamp mode, control-
led by the light sensor
004B 0058
Low-beam/high-beam headlamps
0084 005E
Rear fog lamp
If you hear a warning tone when you leave the
vehicle, the lights may still be switched on.
X Turn the light switch to 0058.
The exterior lighting (except the parking/
standing lamps) switches off automatically if
you: R remove the SmartKey from the ignition lock
R open the driver's door with the SmartKey in
position 0.
Automatic headlamp mode G
WARNING
When the light switch is set to 0058, the low-
beam headlamps may not be switched on 120
Exterior lightingLights and windshield wipers
Page 123 of 466

automatically if there is fog, snow or other
causes of poor visibility due to the weather
conditions such as spray. There is a risk of an
accident.
In such situations, turn the light switch to
0058.
The automatic headlamp feature is only an
aid. The driver is responsible for the vehicle's lighting at all times. 0047
0063
Left-hand standing lamps
0048 0064
Right-hand standing lamps
0049 0060
Parking lamps, license plate and
instrument cluster lighting
004A 0058
Automatic headlamp mode, control-
led by the light sensor
004B 0058
Low-beam/high-beam headlamps
0084 005E
Rear fog lamp
0058 is the favored light switch setting. The
light setting is automatically selected accord- ing to the brightness of the ambient light
(exception: poor visibility due to weather con-
ditions such as fog, snow or spray):
R SmartKey in position 1in the ignition lock:
the parking lamps are switched on or off
automatically depending on the brightness of the ambient light.
R With the engine running: if you have acti-
vated the daytime running lamps function
via the on-board computer, the daytime
running lamps or the low-beam headlamps and parking lamps are switched on or off
automatically depending on the brightnessof the ambient light. X
To switch on automatic headlamp
mode: turn the light switch to 0058.
Only for Canada:
The daytime running lamps improve the visi-
bility of your vehicle during the day. The day- time running lamps function is required by lawin Canada. It cannot therefore be deactivated.
When the engine is running and the vehicle is
stationary: if you move the selector lever from a drive position to P, the daytime running
lamps/low-beam headlamps go out after
three minutes.
When the engine is running, the vehicle is
stationary and in bright ambient light: if you
turn the light switch to 0060, the daytime
running lamps and parking lamps switch on.
If the engine is running and you turn the light
switch to 0058, the manual settings take
precedence over the daytime running lamps.
USA only:
The daytime running lamps improve the visi-
bility of your vehicle during the day. To do this,
the daytime running lamps function must be
switched on using the on-board computer
(Y page 277).
If the engine is running and you turn the light
switch to 0060or0058, the manual settings
take precedence over the daytime running
lamps.
i In the USA, the daytime running lamps are
deactivated upon delivery from the factory.
Low-beam headlamps G
WARNING
When the light switch is set to 0058, the low-
beam headlamps may not be switched on
automatically if there is fog, snow or other
causes of poor visibility due to the weather
conditions such as spray. There is a risk of an
accident.
In such situations, turn the light switch to
0058. Exterior lighting
121Lights and windshield wipers Z
Page 134 of 466

Changing the rear bulbs
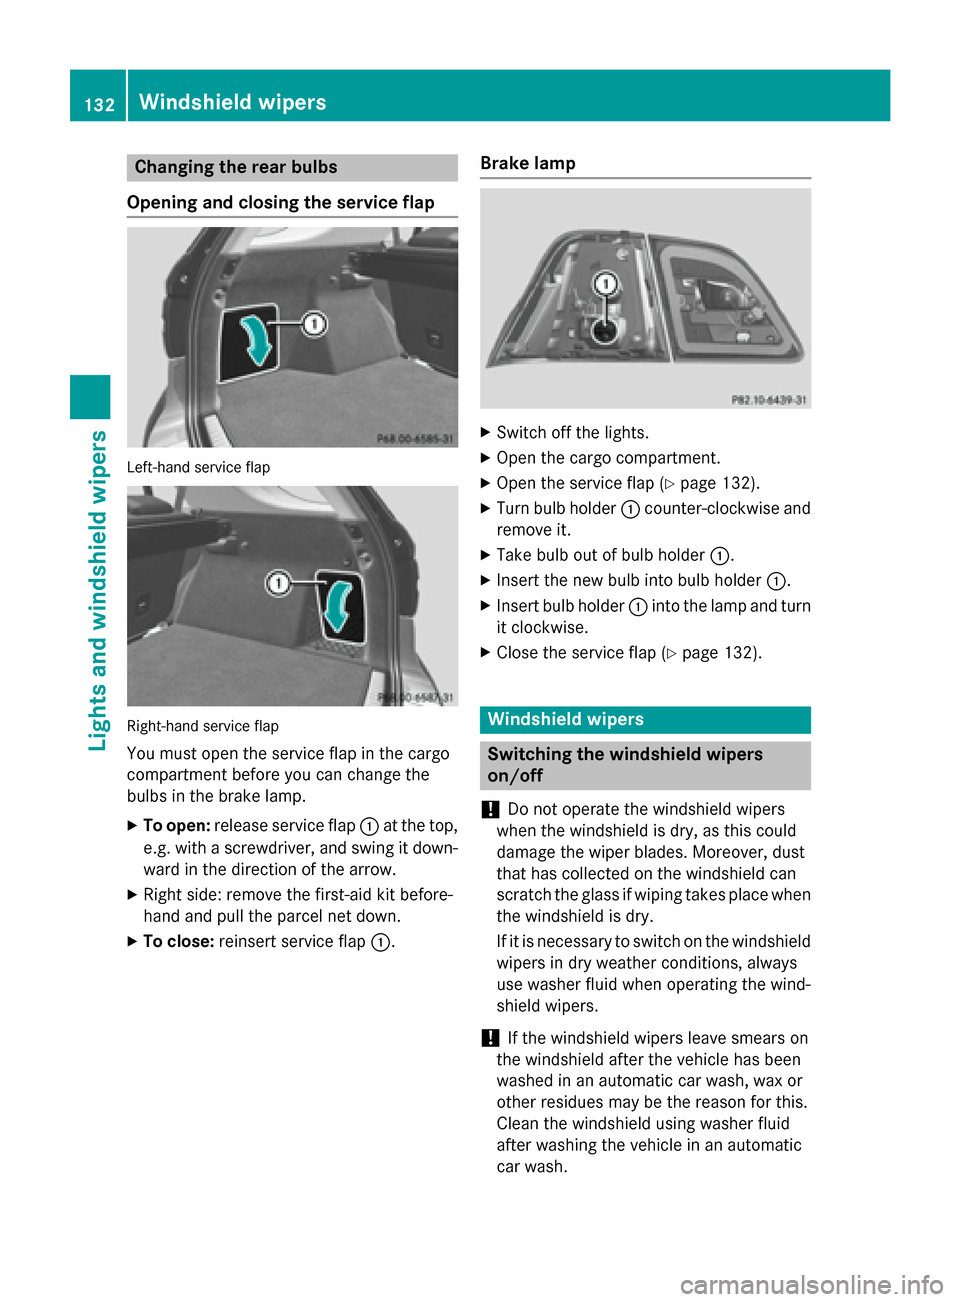
Opening and closing the service flap Left-hand service flap
Right-hand service flap
You must open the service flap in the cargo
compartment before you can change the
bulbs in the brake lamp.
X To open: release service flap 0043at the top,
e.g. with a screwdriver, and swing it down- ward in the direction of the arrow.
X Right side: remove the first-aid kit before-
hand and pull the parcel net down.
X To close: reinsert service flap 0043.Brake lamp X
Switch off the lights.
X Open the cargo compartment.
X Open the service flap (Y page 132).
X Turn bulb holder 0043counter-clockwise and
remove it.
X Take bulb out of bulb holder 0043.
X Insert the new bulb into bulb holder 0043.
X Insert bulb holder 0043into the lamp and turn
it clockwise.
X Close the service flap (Y page 132). Windshield wipers
Switching the windshield wipers
on/off
! Do not operate the windshield wipers
when the windshield is dry, as this could
damage the wiper blades. Moreover, dust
that has collected on the windshield can
scratch the glass if wiping takes place when the windshield is dry.
If it is necessary to switch on the windshield wipers in dry weather conditions, always
use washer fluid when operating the wind-
shield wipers.
! If the windshield wipers leave smears on
the windshield after the vehicle has been
washed in an automatic car wash, wax or
other residues may be the reason for this.
Clean the windshield using washer fluid
after washing the vehicle in an automatic
car wash. 132
Windshield wipersLights and windshield wipers
Page 138 of 466

Problems with the windshield wipers
Problem
Possible causes/consequences and
0050
0050Solutions The windshield wipers
are jammed. Leaves or snow, for example, may be obstructing the windshield
wiper movement. The wiper motor has been deactivated.
X For safety reasons, you should remove the SmartKey from the
ignition lock.
or X Switch off the engine using the Start/Stop button and open the
driver's door.
X Remove the cause of the obstruction.
X Switch the windshield wipers back on. The windshield wipers
fail completely. The windshield wiper drive is malfunctioning.
X Select another wiper speed on the combination switch.
X Have the windshield wipers checked at a qualified specialist
workshop. 136
Windshield wipersLights and windshield wipers
Page 143 of 466

0087
To direct the airflow through the rear air vents
0085 To direct the airflow through the footwell vents Optimum use of dual-zone automatic
climate control
The following contains notes and recommen-
dations on optimum use of the dual-zone
automatic climate control.
R Activate climate control using the 0058and
005A/0056 buttons. The indicator lamps in
the 0058 and005A/0056 buttons light up.
R Set the temperature to 72 ‡ (22 †).
R Only use the "Windshield defrosting" func-
tion briefly until the windshield is clear
again.
R Only use air-recirculation mode briefly, e.g.
if there are unpleasant outside odors or
when in a tunnel. The windows could oth-
erwise fog up, since no fresh air is drawn
into the vehicle in air-recirculation mode.
R Use the ZONE function to adopt the tem-
perature settings on the driver's side for
the front-passenger side as well. The indi-
cator lamp above the 00D6button goes
out.
R Vehicles with COMAND: if you change the
settings of the climate control system, the
climate status display appears for approx-
imately three seconds at the bottom of the
screen in the COMAND display. See also
the separate COMAND operating instruc-
tions. You will see the current settings of
the various climate control functions.
During automatic engine switch-off, the cli-
mate control system only operates at a
reduced capacity. If you require the full cli-
mate control output, you can switch off the
ECO start/stop function by pressing the ECO
button (Y page 163). Overview of climate control systems
141Climate control
Page 146 of 466

Optimum use of 3-zone automatic cli-
mate control
The following contains instructions and rec-
ommendations to enable you to get the most
out of your 3-zone automatic climate control.
R Activate climate control using the 0058and
005A buttons. The indicator lamps above
the 0058 and005A buttons light up.
R In automatic mode, you can also use the
00F0 button to set a climate mode
(FOCUS/MEDIUM/DIFFUSE). The
MEDIUM level is recommended.
R Set the temperature to 72 ‡ (22 †).
R Only use the "Windshield defrosting" func-
tion briefly until the windshield is clear
again.
R Only use air-recirculation mode briefly, e.g.
if there are unpleasant outside odors or
when in a tunnel. The windows could oth-
erwise fog up, since no fresh air is drawn
into the vehicle in air-recirculation mode.
R Use the ZONE function to adopt the tem-
perature settings on the driver's side for
the front-passenger side and the rear com- partment as well. The indicator lamp above
the 00D6 button goes out.
R Use the residual heat function if you want to
heat or ventilate the vehicle interior when
the ignition is switched off. The residual
heat function can only be activated or deac- tivated with the ignition switched off.
R Vehicles with COMAND: if you change the
settings of the climate control system, the
climate status display appears for approx-
imately three seconds at the bottom of the
screen in the COMAND display. See also
the separate COMAND operating instruc-
tions. You will see the current settings of
the various climate control functions.
During automatic engine switch-off, the cli-
mate control system only operates at a
reduced capacity. If you require the full cli-
mate control output, you can switch off the
ECO start/stop function by pressing the ECO button (Y page 163). Operating the climate control sys-
tems
Switching climate control on/off
General notes When the climate control is switched off, the
air supply and air circulation are also
switched off. The windows could fog up.
Therefore, switch off climate control only
briefly
i Switch on climate control primarily using
the 0058 button (Y page 146).
In the rear compartment, you can also switch
climate control on and off using the 0058and
0078 buttons.
Activating/deactivating X
Turn the SmartKey to position 2in the igni-
tion lock (Y page 157).
X To activate: press the0058button.
The indicator lamp in the 0058button lights
up. Airflow and air distribution are set to
automatic mode.
or
X Press the 0078button.
The indicator lamp in the 0078button goes
out. The previously selected settings are
restored.
X To deactivate: press the0078button.
The indicator lamp in the 0078button lights
up. Activating/deactivating cooling with
air dehumidification
General notes If you deactivate the "Cooling with air-dehu-
midification" function, the air inside the vehi-
cle will not be cooled. The air inside the vehi-
cle will also not be dehumidified. The win-
dows can fog up more quickly. Therefore, only deactivate the "Cooling with air-dehumidifi-
cation" function briefly. 144
Operating the climate control systemsClimate control