2015 MERCEDES-BENZ M-Class drive
[x] Cancel search: drivePage 177 of 466

X
AMG vehicles: press the program selector
button (Y page 172) until Mappears in the
multifunction display.
X Vehicles with the ON&OFFROAD pack-
age: press the program selector button
(Y page 172).
The letter Mappears in the multifunction
display.
Shifting up (all vehicles except AMG
vehicles) X
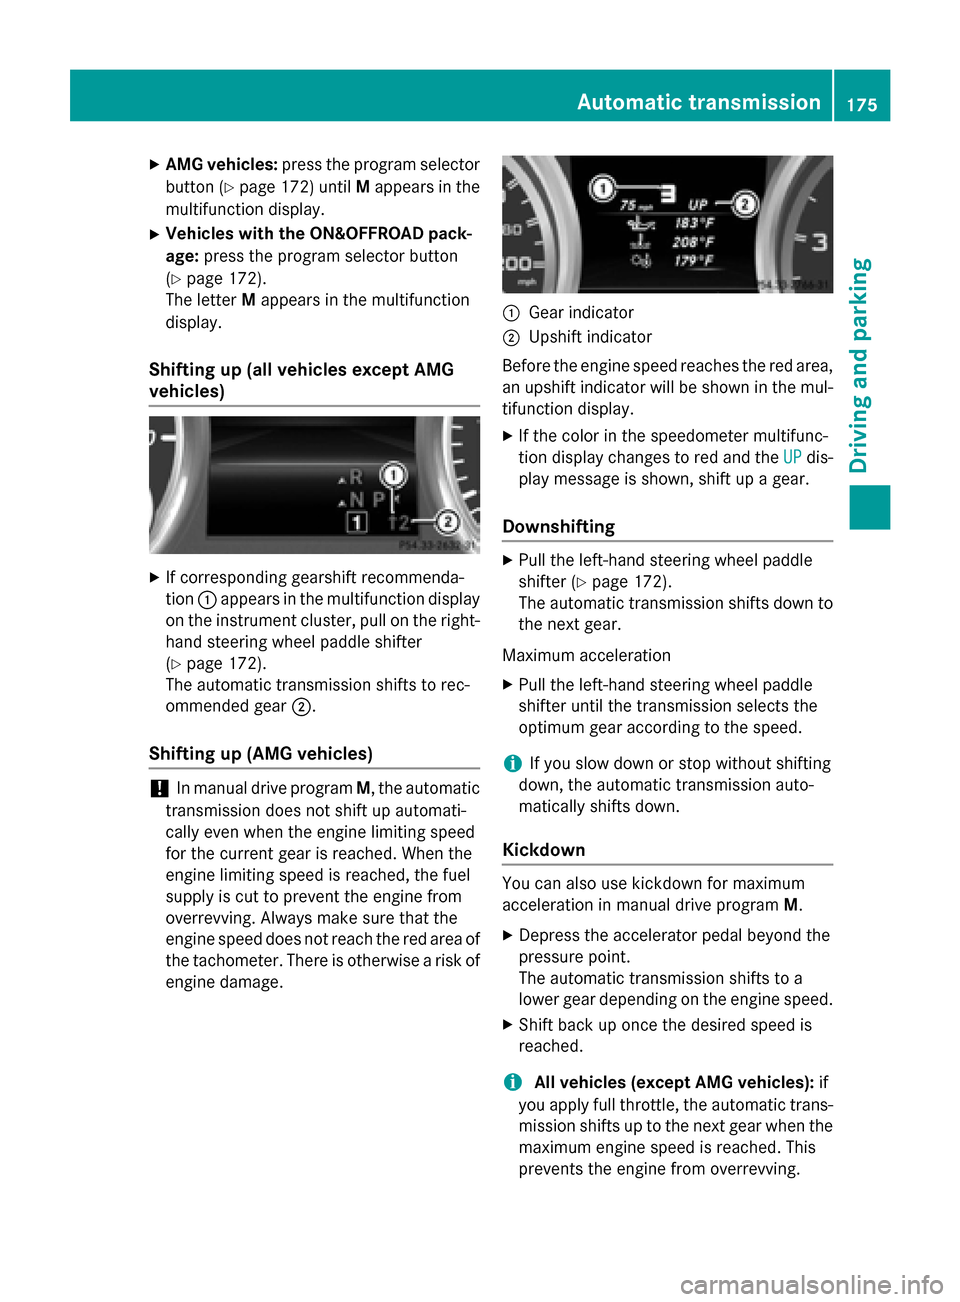
If corresponding gearshift recommenda-
tion 0043appears in the multifunction display
on the instrument cluster, pull on the right- hand steering wheel paddle shifter
(Y page 172).
The automatic transmission shifts to rec-
ommended gear 0044.
Shifting up (AMG vehicles) !
In manual drive program
M, the automatic
transmission does not shift up automati-
cally even when the engine limiting speed
for the current gear is reached. When the
engine limiting speed is reached, the fuel
supply is cut to prevent the engine from
overrevving. Always make sure that the
engine speed does not reach the red area of
the tachometer. There is otherwise a risk of
engine damage. 0043
Gear indicator
0044 Upshift indicator
Before the engine speed reaches the red area, an upshift indicator will be shown in the mul-
tifunction display.
X If the color in the speedometer multifunc-
tion display changes to red and the UP UPdis-
play message is shown, shift up a gear.
Downshifting X
Pull the left-hand steering wheel paddle
shifter (Y page 172).
The automatic transmission shifts down to
the next gear.
Maximum acceleration X Pull the left-hand steering wheel paddle
shifter until the transmission selects the
optimum gear according to the speed.
i If you slow down or stop without shifting
down, the automatic transmission auto-
matically shifts down.
Kickdown You can also use kickdown for maximum
acceleration in manual drive program
M.
X Depress the accelerator pedal beyond the
pressure point.
The automatic transmission shifts to a
lower gear depending on the engine speed.
X Shift back up once the desired speed is
reached.
i All vehicles (except AMG vehicles):
if
you apply full throttle, the automatic trans- mission shifts up to the next gear when the
maximum engine speed is reached. This
prevents the engine from overrevving. Automatic transmission
175Driving and parking Z
Page 178 of 466

i
AMG vehicles:
it is not possible to use
kickdown in manual drive program M.
Switching off the manual drive program X
Vehicles with the ON&OFFROAD pack-
age: press the program selector button
(Y page 172).
The Mmessage in the multifunction display
goes out.
X AMG vehicles: press the program selector
button (Y page 172) repeatedly until Cor S
appears in the multifunction display. 176
Automatic transmissionDriving and pa
rking
Page 179 of 466

Problems with the transmission
Problem
Possible causes/consequences and
0050
0050Solutions The transmission has
problems shifting gear. The transmission is losing oil.
X Have the transmission checked at a qualified specialist work-
shop immediately. The acceleration ability
is deteriorating.
The transmission no
longer changes gear. The transmission is in emergency mode.
It is only possible to shift into
secondgear and reverse gear.
X Stop the vehicle.
X Shift the transmission to position P.
X Switch off the engine.
X Wait at least ten seconds before restarting the engine.
X Shift the transmission to position Dor R.
If D is selected, the transmission shifts into secondgear; ifRis
selected, the transmission shifts into reverse gear.
X Have the transmission checked at a qualified specialist work-
shop immediately. Transfer case
! Performance tests may only be carried
out on a 2-axle dynamometer. The brake
system or transfer case could otherwise be
damaged. Contact a qualified specialist
workshop for a performance test.
! Because ESP ®
is an automatic system,
the engine and ignition must be switched
off (SmartKey in position 0or 1or Start/
Stop button in position 0or 1) when the
electric parking brake is being tested on a
brake dynamometer (maximum
10 seconds).
Braking triggered automatically by ESP ®
may seriously damage the brake system.
! Vehicles with 4MATIC must not be towed
with either the front or the rear axle raised,
as doing so will damage the transmission.
This section is only valid for vehicles with 4-
wheel drive (4MATIC). Power is always trans- mitted to both axles. Refueling
Important safety notes
G
WARNING
Fuel is highly flammable. If you handle fuel
incorrectly, there is a risk of fire and explo-
sion.
You must avoid fire, open flames, creating
sparks and smoking. Switch off the engine
and, if applicable, the auxiliary heating before refueling. G
WARNING
Fuel is poisonous and hazardous to health.
There is a risk of injury.
You must make sure that fuel does not come into contact with your skin, eyes or clothing
and that it is not swallowed. Do not inhale fuel
vapors. Keep fuel away from children. Refueling
177Driving and parking
Z
Page 181 of 466

Opening the fuel filler flap
0043
To open the fuel filler flap
0044 To insert the fuel filler cap
0087 Fuel type to be used
0085 Tire pressure table
X Switch the engine off.
X Remove the SmartKey from the ignition
lock.
X KEYLESS-GO: open the driver’s door.
This corresponds to key position 0: "key
removed".
The driver’s door can be closed again.
X Press the fuel filler flap in the direction of
arrow 0043.
The fuel filler flap swings up.
X Turn the fuel filler flap counter-clockwise
and remove it.
X Insert the fuel filler cap into the holder
bracket on the inside of filler flap 0044.
X Completely insert the filler neck of the fuel
pump nozzle into the tank, hook in place
and refuel.
X Only fill the tank until the pump nozzle
switches off.
i Vehicles with a diesel engine: the filler
neck is designed for refueling at diesel fill-
ing pumps.
i Do not add any more fuel after the pump
stops filling for the first time. Otherwise,
fuel may leak out. Closing the fuel filler flap X
Replace the cap on the filler neck and turn
clockwise until it engages audibly.
X Close the fuel filler flap.
i Close the fuel filler flap before locking the
vehicle.
i If you are driving with the fuel filler cap
open, the 00B6reserve fuel warning lamp
flashes.
In addition, the 00B9Check Engine warning
lamp may light up (Y page 327).
A message appears in the multifunction
display (Y page 302).
For further information on warning and indi-
cator lamps in the instrument cluster, see
(Y page 327). Refueling
179Driving and parking Z
Page 182 of 466

Problems with fuel and the fuel tank
This section provides descriptions of and solutions to safety-relevant problems. Descriptions
of and solutions to further problems can be found in the Digital Operator's Manual. Problem
Possible causes/consequences and
0050
0050Solutions Fuel is leaking from the
vehicle. The fuel line or the fuel tank is faulty.
G WARNING
Risk of explosion or fire. X Turn the SmartKey to position 0in the ignition lock and remove
it immediately (Y page 157).
X Do not restart the engine under any circumstances.
X Consult a qualified specialist workshop. DEF (BlueTEC vehicles only)
Important notes on use To function properly, BlueTEC exhaust gas
aftertreatment must be operated with the
reducing agent DEF. Adding DEF is one of the
tasks performed during maintenance. Under
normal operating conditions, a tank of DEF
lasts until the next service due date.
When the supply of DEF is almost used up, the
Check
Check Additive
Additive See SeeOperator's
Operator's Manual
Manual
message is shown in the multifunction dis-
play.
If you drive the vehicle faster than 10 mph
(16 km/h), the Check
Check Additive Additive See
SeeOper‐
Oper‐
ator's Manual
ator's Manual message goes out after
approximately one minute.
When the supply of DEF is down to a reserve
of approximately 1 gal (3.8 l) the Refill Refill
AdBlue/DEF
AdBlue/DEF See
SeeOperator's
Operator's Manual
Manualmes-
sage is shown in the multifunction display.
When the DEF supply drops to a minimum, the Remaining Starts: 16
Remaining Starts: 16 message is shown
in the multifunction display.
If the Refill AdBlue/DEF No Start in Refill AdBlue/DEF No Start in
XXXX km XXXX km message is shown in the multifunc-
tion display, you can still drive the vehicle
over the distance shown. If DEF is not refilled,
you will subsequently be unable to start the
engine. If the Refill AdBlue/DEF Eng.
Refill AdBlue/DEF Eng. Start Not Poss Start Not Poss
message appears in the
multifunction display and the engine does not
start, you must add DEF.
X Add at least 1 gal (3.8 l)of DEF.
X Switch on the ignition for at least 60 sec-
onds.
X Start the engine.
i Have the DEF tank refilled at a qualified
specialist workshop.
Use the special DEF refill bottle when adding DEF between maintenance intervals. Contact
an authorized Mercedes-Benz Center with
any questions or, if necessary, contact Road-
side Assistance (Y page 26).
If the outside temperature is below 12 ‡
(00F811 †) it may be difficult to top up. If DEF is
frozen and there is an active warning indica-
tor, it may not be possible to add DEF. Park
the vehicle in a warmer place, e.g. in a garage,
until DEF has become fluid again. It will then
be possible to add DEF again. Alternatively,
have the DEF tank refilled at a qualified spe-
cialist workshop.
Further information about BlueTEC exhaust
gas aftertreatment and DEF is available at any
authorized Mercedes-Benz Center. 180
RefuelingDriving and parking
Page 184 of 466

DEF refill bottle
!
Only screw on the DEF refill bottle hand-
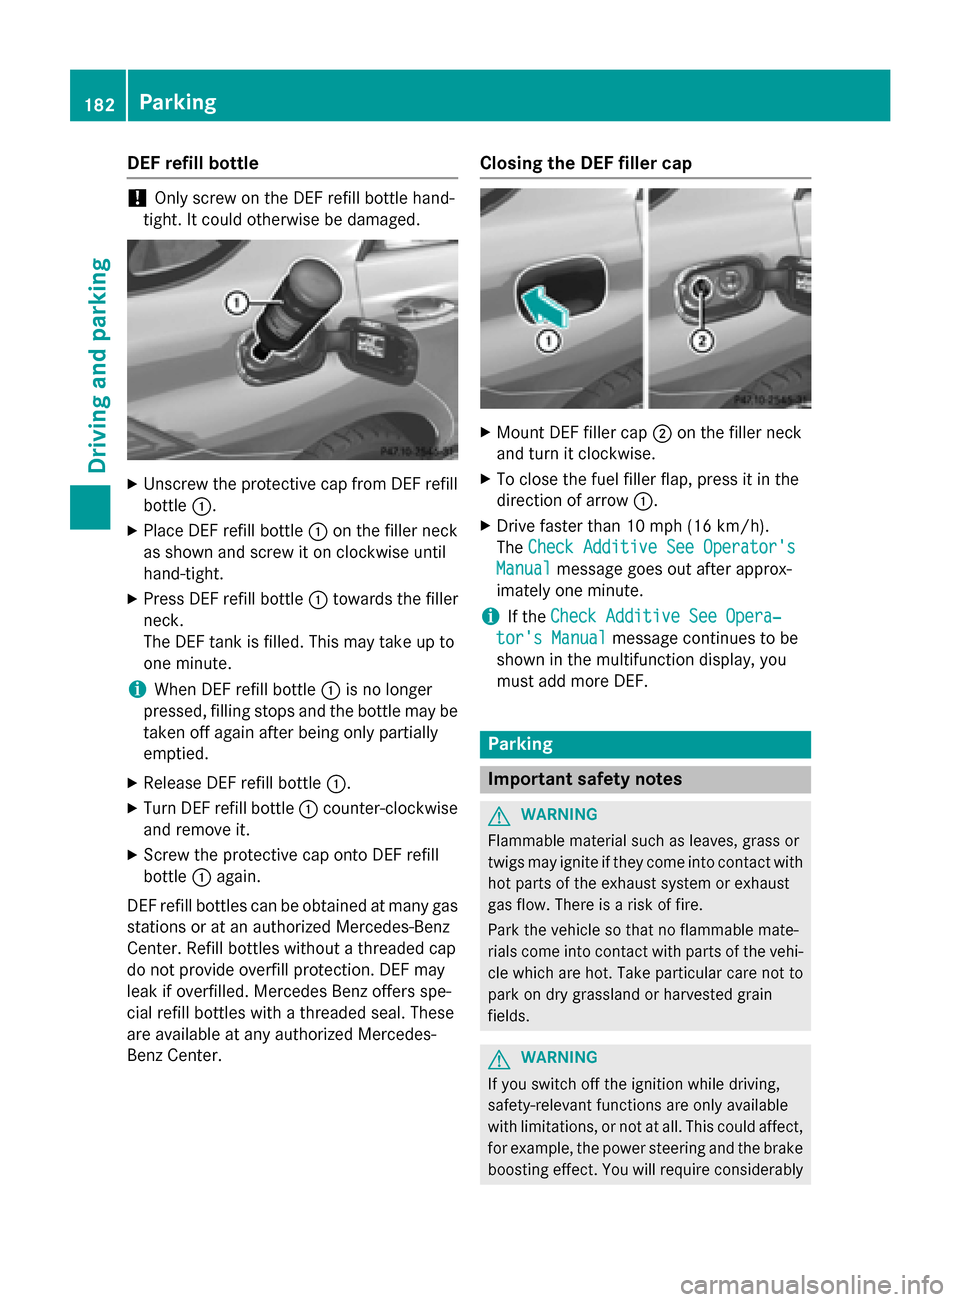
tight. It could otherwise be damaged. X
Unscrew the protective cap from DEF refill
bottle 0043.
X Place DEF refill bottle 0043on the filler neck
as shown and screw it on clockwise until
hand-tight.
X Press DEF refill bottle 0043towards the filler
neck.
The DEF tank is filled. This may take up to
one minute.
i When DEF refill bottle
0043is no longer
pressed, filling stops and the bottle may be
taken off again after being only partially
emptied.
X Release DEF refill bottle 0043.
X Turn DEF refill bottle 0043counter-clockwise
and remove it.
X Screw the protective cap onto DEF refill
bottle 0043again.
DEF refill bottles can be obtained at many gas
stations or at an authorized Mercedes-Benz
Center. Refill bottles without a threaded cap
do not provide overfill protection. DEF may
leak if overfilled. Mercedes Benz offers spe-
cial refill bottles with a threaded seal. These
are available at any authorized Mercedes-
Benz Center. Closing the DEF filler cap
X
Mount DEF filler cap 0044on the filler neck
and turn it clockwise.
X To close the fuel filler flap, press it in the
direction of arrow 0043.
X Drive faster than 10 mph (16 km/h).
The Check Additive See Operator's
Check Additive See Operator's
Manual Manual message goes out after approx-
imately one minute.
i If the
Check Additive See Opera‐
Check Additive See Opera‐
tor's Manual
tor's Manual message continues to be
shown in the multifunction display, you
must add more DEF. Parking
Important safety notes
G
WARNING
Flammable material such as leaves, grass or
twigs may ignite if they come into contact with hot parts of the exhaust system or exhaust
gas flow. There is a risk of fire.
Park the vehicle so that no flammable mate-
rials come into contact with parts of the vehi-cle which are hot. Take particular care not to
park on dry grassland or harvested grain
fields. G
WARNING
If you switch off the ignition while driving,
safety-relevant functions are only available
with limitations, or not at all. This could affect, for example, the power steering and the brake
boosting effect. You will require considerably 182
Pa
rkingDriving an d parking
Page 185 of 466

more effort to steer and brake. There is a risk
of an accident.
Do not switch off the ignition while driving. G
WARNING
If you leave children unsupervised in the vehi- cle, they could set it in motion by, for example:
R release the parking brake.
R shift the automatic transmission out of the
parking position P.
R start the engine.
In addition, they may operate vehicle equip-
ment and become trapped. There is a risk of
an accident and injury.
When leaving the vehicle, always take the
SmartKey with you and lock the vehicle. Never
leave children unsupervised in the vehicle.
! Always secure the vehicle correctly
against rolling away. Otherwise, the vehicle
or its drivetrain could be damaged.
To ensure that the vehicle is secured against rolling away unintentionally:
R the electric parking brake must be applied.
R the transmission must be in position Pand
the SmartKey must be removed from the
ignition lock.
R the front wheels must be turned towards
the curb on steep uphill or downhill gradi-
ents.
R the empty vehicle must be secured at the
front axle with a wheel chock or similar, for
example, on uphill or downhill gradients.
R a laden vehicle must also be secured at the
rear axle with a wheel chock or similar, for
example, on uphill or downhill gradients. Switching off the engine
Important safety notes G
WARNING
The automatic transmission switches to neu-
tral position Nwhen you switch off the engine. The vehicle may roll away. There is a risk of an
accident.
After switching off the engine, always switch
to parking position P. Prevent the parked vehi-
cle from rolling away by applying the parking
brake.
Using the SmartKey X
Apply the electric parking brake.
X Shift the transmission to position P.
X Turn the SmartKey to position 0in the igni-
tion lock and remove it.
The immobilizer is activated.
i If you turn off the engine with the Smart-
Key and then remove it from the ignition
lock or open a front door, the automatic
transmission shifts to Pautomatically.
Using KEYLESS-GO X
Apply the electric parking brake.
X Shift the transmission to position P.
X Press the Start/Stop button (Y page 158).
The engine stops and all the indicator
lamps in the instrument cluster go out.
i If you turn off the engine with the Start/
Stop button, the automatic transmission
shifts to N. If you then open one of the front
doors, the automatic transmission shifts to P.
i In the event of an emergency, the engine
can be turned off while the vehicle is in
motion by pressing and holding the Start/
Stop button for three seconds. Parking
183Driving and parking Z
Page 187 of 466

In addition, at least one of the following con-
ditions must be fulfilled:
R the engine is switched off.
R the driver's door is open and the seat belt is
not fastened.
R the vehicle is stationary for a lengthy
period.
The red 0049(USA only) or 0024(Canada
only) indicator lamp in the instrument cluster
lights up.
i The electric parking brake is not automat-
ically engaged if the engine is switched off
by the ECO start/stop function.
Releasing automatically The electric parking brake is released auto-
matically when all of the following conditions
are fulfilled:
R the engine is running.
R the transmission is in position Dor R.
R the seat belt has been fastened.
R you depress the accelerator pedal.
If the transmission is in position R, the trunk
lid must be closed.
If your seat belt is not fastened, the following conditions must be fulfilled to automatically
release the electric parking brake:
R the driver's door is closed.
R you have shifted out of transmission posi-
tion Por you have previously driven faster
than 2 mph (3 km/h).
i Ensure that you do not depress the accel-
erator pedal unintentionally. Otherwise the
parking brake will be released and the vehi-
cle will start to move. Emergency braking X
While driving, push handle 0043of the electric
parking brake.
The vehicle can also be braked during an
emergency by using the electric parking
brake.
i The vehicle is braked for as long as the
handle of the electric parking brake is
pressed. The longer the electric parking
brake handle is depressed, the greater the
braking force.
During braking:
R a warning tone sounds
R the Release Park. Brake Release Park. Brake message
appears
R the red 0049(USA only) or 0024(Canada
only) indicator lamp in the instrument clus- ter flashes
When the vehicle has been braked to a stand-
still, the electric parking brake is engaged. Parking the vehicle for a long period
If you leave the vehicle parked for longer than
four weeks, the battery may be damaged by
exhaustive discharging.
X Connecting a trickle charger.
i You can obtain information about trickle
chargers from a qualified specialist work-
shop.
If you leave the vehicle parked for longer than
six weeks, the vehicle may suffer damage as a result of lack of use. Parking
185Driving and parking Z