2015 MERCEDES-BENZ M-Class fuel
[x] Cancel search: fuelPage 272 of 466
calculated from the last time the submenu
was reset (Y page 270).
The From Start
From Start trip computer is automati-
cally reset when:
R the ignition has been switched off for more
than four hours.
R 999 hours have been exceeded.
R 9,999 miles have been exceeded.
The From Reset
From Reset trip computer is automati-
cally reset if the value exceeds 9,999 hours or 99,999 miles.
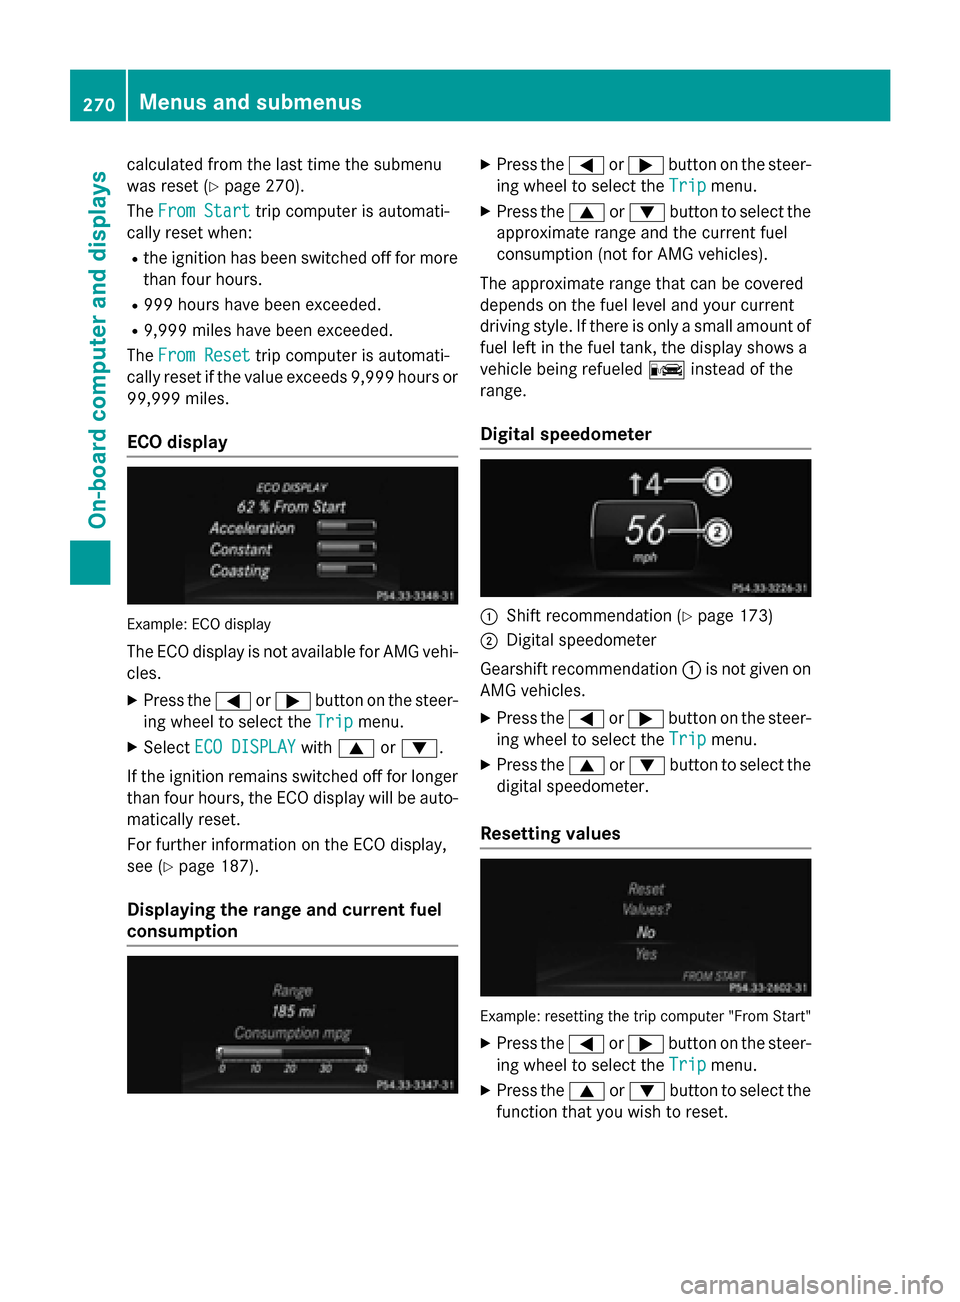
ECO display Example: ECO display
The ECO display is not available for AMG vehi- cles.
X Press the 0059or0065 button on the steer-
ing wheel to select the Trip
Trip menu.
X Select ECO DISPLAY
ECO DISPLAY with0063 or0064.
If the ignition remains switched off for longer than four hours, the ECO display will be auto-
matically reset.
For further information on the ECO display,
see (Y page 187).
Displaying the range and current fuel
consumption X
Press the 0059or0065 button on the steer-
ing wheel to select the Trip Tripmenu.
X Press the 0063or0064 button to select the
approximate range and the current fuel
consumption (not for AMG vehicles).
The approximate range that can be covered
depends on the fuel level and your current
driving style. If there is only a small amount of
fuel left in the fuel tank, the display shows a
vehicle being refueled 00A8instead of the
range.
Digital speedometer 0043
Shift recommendation (Y page 173)
0044 Digital speedometer
Gearshift recommendation 0043is not given on
AMG vehicles.
X Press the 0059or0065 button on the steer-
ing wheel to select the Trip Tripmenu.
X Press the 0063or0064 button to select the
digital speedometer.
Resetting values Example: resetting the trip computer "From Start"
X Press the 0059or0065 button on the steer-
ing wheel to select the Trip
Tripmenu.
X Press the 0063or0064 button to select the
function that you wish to reset. 270
Menus and submenusOn-board computer and displays
Page 304 of 466

Display messages
Possible causes/consequences and
0050
0050Solutions 003D
Stop Vehicle See Stop Vehicle See
Operator's Manual Operator's Manual The battery is no longer being charged and the battery charge level
is too low.
A warning tone also sounds.
X Pull over and stop the vehicle safely and switch off the engine,
paying attention to road and traffic conditions.
X Secure the vehicle against rolling away (Y page 182).
X Observe the instructions in the display message 003DSee See
Operator's Manual
Operator's Manual .
X Consult a qualified specialist workshop. 00B2
Check Engine Oil Check Engine Oil
At Next Refueling At Next Refueling The engine oil level has dropped to the minimum level.
A warning tone also sounds.
X Check the oil level when next refueling, at the latest
(Y page 367).
X If necessary, add engine oil (Y page 368).
X Have the engine checked at a qualified specialist workshop if the
engine oil needs topping up more often than usual.
! Avoid long journeys with too little engine oil. The engine will
otherwise be damaged.
Information on approved engine oils can be obtained from any
qualified specialist workshop or on the Internet at http://
bevo.mercedes-benz.co m.00B2
Check Engine Oil Check Engine Oil
Level Level
(Add
(Add1
1quart)
quart) AMG vehicles: the engine oil level is too low.
X Check the oil level when next refueling, at the latest
(Y page 367).
X If necessary, add engine oil (Y page 368).
X Have the engine checked at a qualified specialist workshop if the
engine oil needs topping up more often than usual.
! Avoid long journeys with too little engine oil. The engine will
otherwise be damaged.
Information on approved engine oils can be obtained from any
qualified specialist workshop or on the Internet at http://
bevo.mercedes-benz.com. 00B6
Fuel Level Low Fuel Level Low The fuel level has dropped into the reserve range.
X Refuel at the nearest gas station. 00A8 There is only a very small amount of fuel in the fuel tank.
X Refuel at the nearest gas station without fail. 302
Display messagesOn-board computer and displays
Page 305 of 466

Display messages
Possible causes/consequences and
0050
0050Solutions 00B6
Gas Cap Loose Gas Cap Loose The fuel system pressure is too low. The fuel filler cap is not closed
correctly or the fuel system is leaking.
X Check that the fuel filler cap is correctly closed.
If the fuel filler cap is not correctly closed: X Close the fuel filler cap.
If the fuel filler cap is correctly closed: X Visit a qualified specialist workshop. 00B6
Ultra Low-sulfur Ultra Low-sulfur
Diesel Fuel Only Diesel Fuel Only Vehicles with a diesel engine: the fuel level has fallen below the
reserve range.
X Refuel at the nearest gas station.
X Only use commercially available vehicular ULTRA-LOW SULFUR
HIGHWAY DIESEL FUEL (ULSD, 15 ppm sulfur MAXIMUM). 009E
Replace Air Filter Replace Air Filter Vehicles with a diesel engine: the engine air filter is dirty and must
be replaced.
X Visit a qualified specialist workshop. 003A
Check Fuel Filter Check Fuel Filter Vehicles with a diesel engine: there is water in the fuel filter. The
water must be drained off.
X Visit a qualified specialist workshop. 00C8
Check Check
Additive
Additive See
See
Operator's Manual
Operator's Manual The DEF tank is almost empty.
X Have the DEF tank filled as soon as possible at a qualified spe-
cialist workshop (Y page 180). 00C8
Remaining Starts: Remaining Starts:
16 16 The DEF level has fallen to a minimum. You can start the engine a
further 16 times.
X Have the DEF tank filled immediately at a qualified specialist
workshop (Y page 180).
i You can start the engine a further 16 times. If DEF is not added,
it will then not be possible to restart the engine. Refill the DEF
tank with approximately 1 gal (3.8l)DEF (Y page 180). Display
messages
303On-board computer and displays Z
Page 329 of 466

Engine
Problem
Possible causes/consequences and
0050
0050Solutions 00B9
The yellow Check
Engine warning lamp
lights up while the
engine is running.
There may be a malfunction, for example:
R in the engine management
R in the fuel injection system
R in the exhaust system
R in the ignition system (for vehicles with gasoline engines)
R in the fuel system
The emission limit values may be exceeded and the engine may be
in emergency mode.
X Have the vehicle checked as soon as possible at a qualified
specialist workshop.
i In some states, you must immediately visit a qualified special-
ist workshop as soon as the yellow Check Engine warning lamp
lights up. This is due to the legal requirements in effect in these
states. If in doubt, check whether such legal regulations apply in the state in which you are currently driving. Vehicles with a diesel engine: the fuel tank has been run dry
(Y
page 180).
X Start the engine three to four times after refueling.
If the yellow Check Engine warning lamp goes out, emergency
running mode is canceled. The vehicle need not be checked. 00B6
The yellow reserve fuel
warning lamp lights up
while the engine is run-
ning.
The fuel level has dropped into the reserve range.
X Refuel at the nearest gas station. 00B6
The yellow reserve fuel
warning lamp flashes
while the vehicle is in
motion.
In addition, the
00B9
Check Engine warning
lamp may light up. The fuel system pressure is too low. The fuel filler cap is not closed
correctly or the fuel system is leaking.
X Check that the fuel filler cap is correctly closed.
X If the fuel filler cap is not correctly closed: close the fuel filler
cap.
X If the fuel filler cap is closed: visit a qualified specialist work-
shop. Warning and indicator lamps in the instrument cluster
327On-board computer and displays Z
Page 336 of 466
Useful information
i This Operator's Manual describes all
models and all standard and optional equip- ment of your vehicle available at the time of
publication of the Operator's Manual.
Country-specific differences are possible.
Please note that your vehicle may not be
equipped with all features described. This
also applies to safety-related systems and
functions.
i Read the information on qualified special-
ist workshops (Y page 29). Stowage areas
Loading guidelines
G
WARNING
If objects, luggage or loads are not secured or not secured sufficiently, they could slip, tip
over or be flung around and thereby hit vehicle
occupants. There is a risk of injury, particu-
larly in the event of sudden braking or a sud-
den change in direction.
Always store objects so that they cannot be
flung around. Secure objects, luggage or
loads against slipping or tipping before the
journey. G
WARNING
Combustion engines emit poisonous exhaust
gases such as carbon monoxide. If the tailgate is open when the engine is running, particu-
larly if the vehicle is moving, exhaust fumes
could enter the passenger compartment.
There is a risk of poisoning.
Turn off the engine before opening the tail-
gate. Never drive with the tailgate open. G
WARNING
The exhaust tail pipe and tail pipe trim can
become very hot. If you come into contact
with these parts of the vehicle, you could burn
yourself. There is a risk of injury. Always be particularly careful around the
exhaust tail pipe and the tail pipe trim. Allow
these components to cool down before touch-
ing them.
The gross vehicle weight (GVW) is the vehicle
weight including fuel, vehicle tool kit, spare
wheel, installed accessories, vehicle occu-
pants and luggage/cargo.
The gross load limit and the gross vehicle
weight rating (GVWR) for your vehicle must
never be exceeded. The gross load limit and
the GVWR are specified on the vehicle iden-
tification plate on the B-pillar of the driver's
door (Y page 412).
The load must also be distributed so that the
weight on each axle never exceeds the gross axle weight rating (GAWR) for the front and
rear axles. The specifications for GVWR and
GAWR are on the vehicle identification plate
on the B-pillar of the driver's door
(Y page 412).
Observe the notes on loading the vehicle
(Y page 412).
The handling characteristics of a laden vehi-
cle are dependent on the distribution of the
load within the vehicle. For this reason, you
should observe the following notes when
transporting a load:
R Never exceed the maximum permissible
gross vehicle weight or the gross axle
weight rating of the vehicle (including occu-
pants).
R The cargo compartment is the preferred
place to carry objects.
R Position heavy loads as far forwards as pos-
sible and as low down in the cargo com-
partment as possible.
R The load must not protrude above the
upper edge of the seat backrests.
R Always place the load against the rear or
front seat backrests. Make sure that the
seat backrests are securely locked into
place.
R Always place the load behind unoccupied
seats if possible. 334
Stowage areasStowage and features
Page 368 of 466
Useful information
i This Operator's Manual describes all
models and all standard and optional equip- ment of your vehicle available at the time of
publication of the Operator's Manual.
Country-specific differences are possible.
Please note that your vehicle may not be
equipped with all features described. This
also applies to safety-related systems and
functions.
i Read the information on qualified special-
ist workshops (Y page 29). Engine compartment
Hood
Important safety notes G
WARNING
If the hood is unlatched, it may open up when the vehicle is in motion and block your view.
There is a risk of an accident.
Never unlatch the hood while driving. G
WARNING
When opening and closing the hood, it may
suddenly fall into the closed position. There is a risk of injury to persons within range of
movement of the hood.
Open and close the hood only when no one is
within its range of movement. G
WARNING
Opening the hood when the engine is over-
heated or when there is a fire in the engine
compartment could expose you to hot gases
or other service products. There is a risk of
injury.
Let an overheated engine cool down before
opening the hood. If there is a fire in the
engine compartment, keep the hood closed
and contact the fire department. G
WARNING
The engine compartment contains moving
components. Certain components, such as
the radiator fan, may continue to run or start
again suddenly when the ignition is off. There is a risk of injury.
If you need to do any work inside the engine
compartment:
R switch off the ignition
R never reach into the area where there is a
risk of danger from moving components,
such as the fan rotation area
R remove jewelry and watches
R keep items of clothing and hair, for exam-
ple, away from moving parts G
WARNING
The ignition system and the fuel injection sys- tem work under high voltage. If you touch
components which are under voltage, you
could get an electric shock. There is a risk of
injury.
Never touch components of the ignition sys-
tem or fuel injection system when the ignition is switched on.
Opening the hood G
WARNING
Certain components in the engine compart-
ment, such as the engine, radiator and parts
of the exhaust system, can become very hot.
Working in the engine compartment poses a
risk of injury.
Where possible, let the engine cool down and touch only the components described in the
following. G
WARNING
When the hood is open and the windshield
wipers are set in motion, you can be injured by the wiper linkage. There is a risk of injury.
Always switch off the windshield wipers and
the ignition before opening the hood. 366
Engine compartmentMaintenance and care
Page 376 of 466
Scratches, corrosive deposits, areas affected
by corrosion and damage caused by inade-
quate care cannot always be completely
repaired. In such cases, visit a qualified spe-
cialist workshop.
X Remove dirt immediately, where possible,
while avoiding rubbing too hard.
X Soak insect remains with insect remover
and rinse off the treated areas afterwards.
X Soak bird droppings with water and rinse
off the treated areas afterwards.
X Remove coolant, brake fluid, tree resin,
oils, fuels and greases by rubbing gently
with a cloth soaked in petroleum ether or
lighter fluid.
X Use tar remover to remove tar stains.
X Use silicone remover to remove wax.
If water no longer forms "beads" on the paint
surface, use the paint care products recom-
mended and approved by Mercedes-Benz.
This is the case approximately every three to
five months, depending on the climate con-
ditions and the care product used.
If dirt has penetrated the paint surface or if
the paint has become dull, the paint cleaner
recommended and approved by Mercedes-
Benz should be used.
Do not use these care products in the sun or
on the hood while the hood is hot.
X Use a suitable touch-up stick, e.g. MB
Touch-Up Stick, to repair slight damage to
the paintwork quickly and provisionally.
Matte finish care !
Never polish the vehicle or the light alloy
wheels. Polishing causes the finish to
shine. !
The following may cause the paint to
become shiny and thus reduce the matte
effect:
R Vigorous rubbing with unsuitable mate-
rials.
R Frequent use of car washes.
R Washing the vehicle in direct sunlight.
! Never use paint cleaner, buffing or pol-
ishing products, or gloss preserver, e.g.
wax. These products are only suitable for
high-gloss surfaces. Their use on vehicles
with matte finish leads to considerable sur- face damage (shiny, spotted areas).
Always have paintwork repairs carried out
at a qualified specialist workshop.
! Do not use wash programs with a hot wax
treatment under any circumstances.
Observe these notes if your vehicle has a
clear matte finish. This will help you to avoid
damage to the paintwork due to incorrect
treatment.
These notes also apply to light alloy wheels
with a clear matte finish.
i The vehicle should preferably be washed
by hand using a soft sponge, car shampoo
and plenty of water.
i Use only insect remover and car shampoo
from the range of recommended and
approved Mercedes-Benz care products. Cleaning the vehicle parts
Cleaning the wheels !
Do not use acidic wheel cleaning products
to remove brake dust. This could damage
wheel bolts and brake components.
! Do not park the vehicle for an extended
period straight after cleaning it, particularly after having cleaned the wheels with wheel cleaner. Wheel cleaners could cause
increased corrosion of the brake discs and
brake pads/linings. For this reason, you 374
CareMaintenance and care
Page 389 of 466
G
WARNING
If the required tire pressure is not reached
after driving for a short period, the tire is too
badly damaged. The tire sealant cannot repair the tire in this instance. Damaged tires and a
tire pressure that is too low can significantly
impair the vehicle's braking and driving char-
acteristics. There is a risk of accident.
Do not continue driving. Contact a qualified
specialist workshop.
i In cases such as the one mentioned
above, contact an authorized Mercedes-
Benz Center. Or call 1-800-FOR-MERCedes
(in the USA) or 1-800-387-0100 (in Can-
ada).
X Correct the tire pressure if it is still at least
130 kPa (1.3 bar/19 psi). See the Tire and
Loading Information placard on the driver's side B-pillar or the tire pressure table in the fuel filler flap for values.
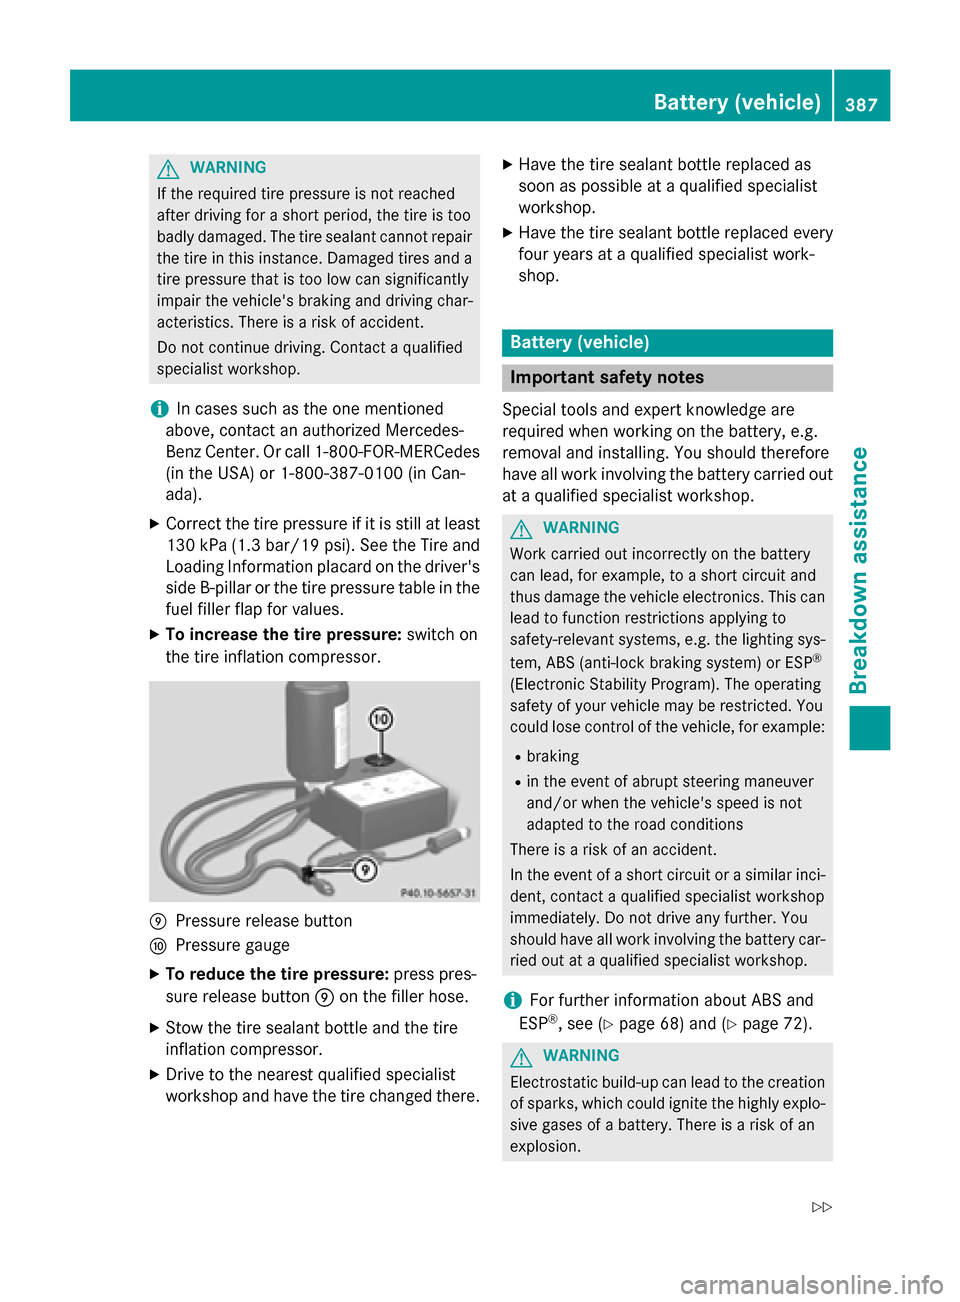
X To increase the tire pressure: switch on
the tire inflation compressor. 006D
Pressure release button
006E Pressure gauge
X To reduce the tire pressure: press pres-
sure release button 006Don the filler hose.
X Stow the tire sealant bottle and the tire
inflation compressor.
X Drive to the nearest qualified specialist
workshop and have the tire changed there. X
Have the tire sealant bottle replaced as
soon as possible at a qualified specialist
workshop.
X Have the tire sealant bottle replaced every
four years at a qualified specialist work-
shop. Battery (vehicle)
Important safety notes
Special tools and expert knowledge are
required when working on the battery, e.g.
removal and installing. You should therefore
have all work involving the battery carried out
at a qualified specialist workshop. G
WARNING
Work carried out incorrectly on the battery
can lead, for example, to a short circuit and
thus damage the vehicle electronics. This can lead to function restrictions applying to
safety-relevant systems, e.g. the lighting sys-
tem, ABS (anti-lock braking system) or ESP ®
(Electronic Stability Program). The operating
safety of your vehicle may be restricted. You
could lose control of the vehicle, for example:
R braking
R in the event of abrupt steering maneuver
and/or when the vehicle's speed is not
adapted to the road conditions
There is a risk of an accident.
In the event of a short circuit or a similar inci- dent, contact a qualified specialist workshop
immediately. Do not drive any further. You
should have all work involving the battery car-
ried out at a qualified specialist workshop.
i For further information about ABS and
ESP ®
, see (Y page 68) and (Y page 72). G
WARNING
Electrostatic build-up can lead to the creation of sparks, which could ignite the highly explo-
sive gases of a battery. There is a risk of an
explosion. Battery (vehicle)
387Breakdown assistance
Z