2015 MERCEDES-BENZ M-Class fuel
[x] Cancel search: fuelPage 215 of 466
Level control
Important safety notes
G
WARNING
When the vehicle is being lowered, people
could become trapped if their limbs are
between the vehicle body and the wheels or
underneath the vehicle. There is a risk of
injury.
Make sure no one is underneath the vehicle or in the immediate vicinity of the wheel arches
when the vehicle is being lowered. G
WARNING
When you drive with the vehicle raised, the
driving characteristics could be impaired by
the vehicle's raised center of gravity. The vehi- cle could rollover more easily, for example on
a bend. There is a risk of an accident.
Always select as low a vehicle level as possi-
ble and adjust your driving style. G
WARNING
When you drive with the chassis lowered or
raised, the vehicle's braking and driving char-
acteristics can be significantly impaired. You
could also exceed the permissible vehicle
height if the chassis is raised. There is a risk of an accident.
Adjust the vehicle level before pulling away. G
WARNING
Due to the high center of gravity, the vehicle
may start to skid and roll over in the event of
an abrupt steering maneuver and/or when
the vehicle's speed is not adapted to the road conditions. There is a risk of an accident.
Always adapt your speed and driving style to
the vehicle's driving characteristics and to the prevailing road and weather conditions.
! When driving on extremely rough terrain,
select a high vehicle level in good time.
Make sure there is always sufficient ground
clearance. You will otherwise damage the
vehicle. !
When you raise the vehicle in such a way
that not all wheels have contact with the
ground, remove the SmartKey from the
ignition lock.
R Utility vehicles have a significantly higher
rollover rate than other types of vehicles.
Failure to operate this vehicle safely may
result in an accident, rollover of the vehicle, and severe or fatal injury.
R In a rollover crash, an unbelted person is
significantly more likely to die than a per-
son wearing a seat belt.
You and all vehicle occupants should
always wear your seat belts.
General notes
Further information about "Driving off-road"
(Y page 191).
Level control adapts the vehicle level auto-
matically to the current operating and driving situation. This results in reduced fuel con-
sumption and improved handling.
If you select ADS comfort mode (Y page 212),
the vehicle is lowered to high-speed level as
the speed increases. As the vehicle speed
decreases, the vehicle is raised back up to
highway level.
If you select ADS sport mode (Y page 212),
the vehicle skips highway level and lowers
directly to high-speed level depending on the
basic setting (Y page 214).
Make changes to the vehicle level while the
vehicle is in motion. This enables the vehicle
to adjust to the new level as quickly as pos-
sible.
The vehicle level may change visibly if you
park the vehicle and the outside temperature
changes. If the temperature drops, the vehi-
cle level is lower; with an increase in temper- ature, the vehicle level rises.
If you unlock the vehicle or open a door, the
vehicle begins to compensate for load dis-
crepancies while still parked. However, for
significant level changes, such as after the
vehicle has been stationary for a long period,
the engine must be on. For safety reasons, Driving systems
213Driving and parking Z
Page 216 of 466
the vehicle is only lowered when the doors are
closed. Lowering is interrupted if a door is
opened, and it continues once the door has
been closed.
Basic settings (excluding AMG vehicles)
The extent to which the vehicle is raised or
lowered depends on the basic setting selec-
ted. Select raised level for off-road driving or
highway/high-speed level for normal roads.
The individual vehicle levels differ from high-
way level as follows:
R highway level: +/–0 in (+/–0 mm)
R high-speed level: –0.6 in (–15 mm)
R raised level: +2.3 in (+60 mm)
Basic settings for AMG vehicles
The extent to which the vehicle is raised or
lowered depends on the AMG adaptive sport
suspension setting selected. Select the
raised level for off-road driving or highway/
high-speed level for normal roads.
The raised level corresponds to a vehicle level
raised by 50 mm when compared with high-
way level in comfort mode.
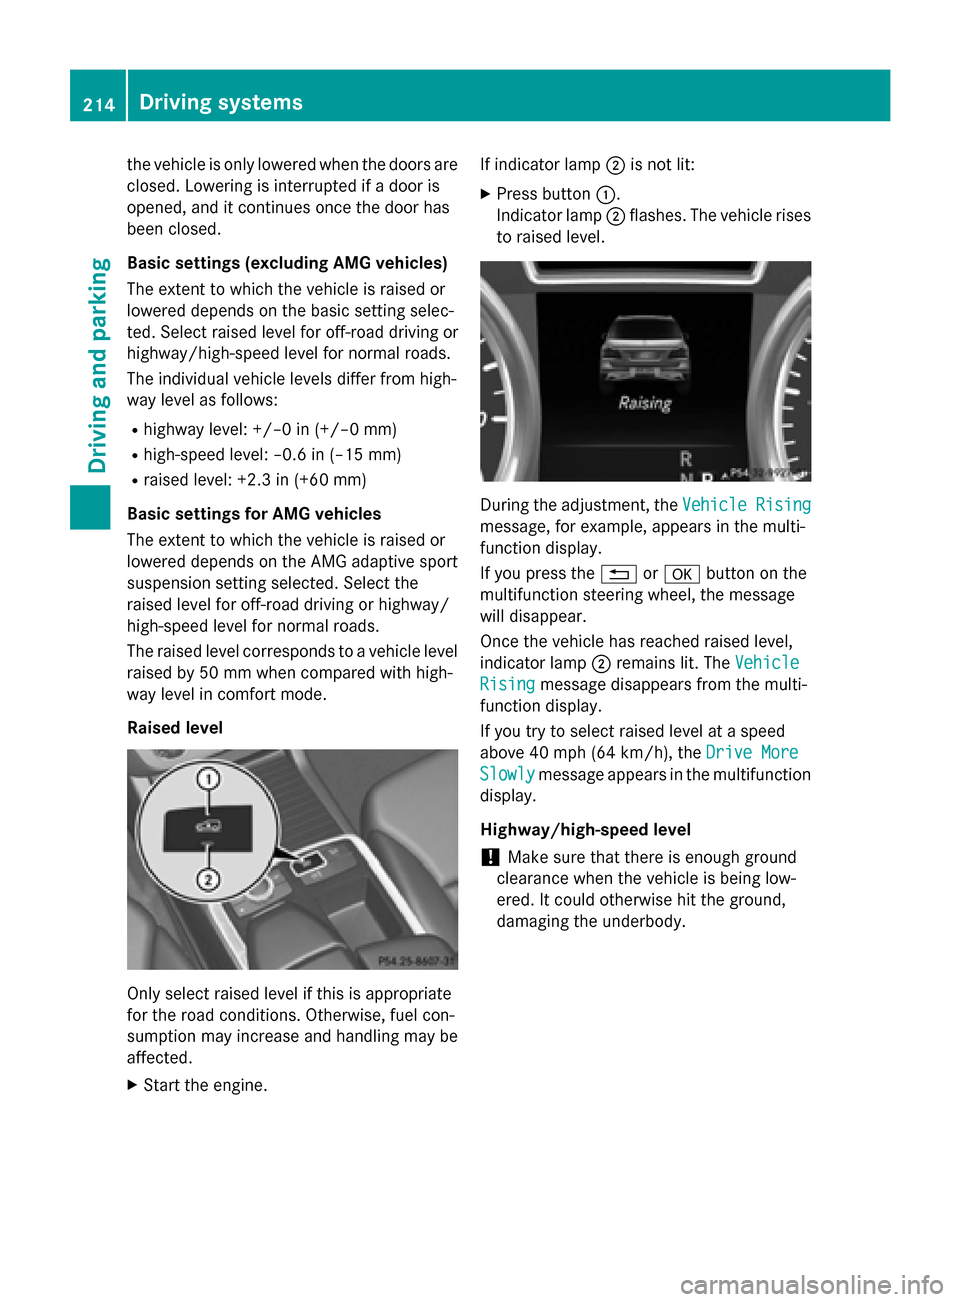
Raised level Only select raised level if this is appropriate
for the road conditions. Otherwise, fuel con-
sumption may increase and handling may be
affected.
X Start the engine. If indicator lamp
0044is not lit:
X Press button 0043.
Indicator lamp 0044flashes. The vehicle rises
to raised level. During the adjustment, the
Vehicle Rising Vehicle Rising
message, for example, appears in the multi-
function display.
If you press the 0038or0076 button on the
multifunction steering wheel, the message
will disappear.
Once the vehicle has reached raised level,
indicator lamp 0044remains lit. The Vehicle
Vehicle
Rising Rising message disappears from the multi-
function display.
If you try to select raised level at a speed
above 40 mph (64 km/h), the Drive More Drive More
Slowly Slowly message appears in the multifunction
display.
Highway/high-speed level
! Make sure that there is enough ground
clearance when the vehicle is being low-
ered. It could otherwise hit the ground,
damaging the underbody. 214
Driving systemsDriving an
d parking
Page 218 of 466

Vehicle level
Level control adapts the vehicle level auto-
matically to the current operating and driving
situation. Level control ensures the best pos-
sible suspension and constant ground clear-
ance, even with a laden vehicle. This improves
driving safety and fuel consumption.
The AIRMATIC package and ACTIVE CURVE
SYSTEM are always components of AMG
adaptive suspension system (Y page 211).
Due to the sportier suspension settings com- pared to standard vehicles, the levels and
speed thresholds for sinking and raising the
vehicle are different.
In Comfort and Sport driving modes, after
locking the vehicle it lowers to the Sport+
level. When locking the vehicle at the raised
level, the vehicle does not lower.
The settings will remain stored after you
switch off the engine. When starting the
engine, the selected setting, e.g. AMG adap-
tive suspension system Comfort, is restored.
i The vehicle level may change visibly if you
park the vehicle and the outside tempera-
ture changes. If the temperature drops, the vehicle level lowers; with an increase in
temperature, the vehicle level rises.
Suspension tuning General notes
The electronically controlled damping system
works continuously. This improves driving
safety and ride comfort.
The damping is tuned individually to each
wheel and depends on:
R your driving style
R the road surface conditions
R your individual selection of Sport, Sport +
or Comfort
Your selection remains stored even if you
remove the SmartKey from the ignition lock. Sport mode
The firmer suspension tuning in Sport mode
ensures even better contact with the road.
Select this mode when employing a sporty
driving style, e.g. on winding country roads.
X Press button 0043once.
Indicator lamp 0044lights up. You have selec-
ted Sport mode.
The AMG
AMG Suspension Suspension System
SystemSPORT
SPORTmes-
sage appears in the multifunction display.
Sport + mode
The very firm setting of the suspension tuning in Sport + mode ensures the best possible
contact with the road. Select this mode pref-
erably when driving on race circuits.
If indicator lamps 0087and 0044are off:
X Press button 0043twice.
Indicator lamps 0087and 0044light up. You
have selected Sport + mode. The vehicle is
lowered by 10 mm.
The AMG Suspension System SPORT + AMG Suspension System SPORT +
message appears in the multifunction dis-
play.
If indicator lamp 0044lights up:
X Press button 0043once.
Second indicator lamp 0087lights up. You
have selected Sport + mode. The vehicle is
lowered by 10 mm.
The AMG Suspension System SPORT + AMG Suspension System SPORT +
message appears in the multifunction dis-
play. 216
Driving systemsDriving an
d parking
Page 249 of 466
R
you switch on the turn signals. In this
event, the warnings are suppressed for a
certain period of time.
R a driving safety system intervenes, e.g.
ABS, BAS or ESP ®
.
R you accelerate hard, e.g. kickdown.
R you brake hard.
R you steer actively, e.g. swerve to avoid an
obstacle or change lanes quickly.
R you cut the corner on a sharp bend.
Towing a trailer
When you attach a trailer, make sure you have correctly established the electrical connec-
tion. This can be accomplished by checking
the trailer lighting. On-road programs (vehicles with the
ON&OFFROAD package)
General notes The on-road programs assist you during on-
road driving and the off-road programs when
driving off-road (Y page 251).
The following program messages remain in
the multifunction display until the corre-
sponding vehicle level has been set. Up to off-
road level 2, you can hide the program mes-
sages using the 0038or0076 button on the
multifunction steering wheel. AUTO program
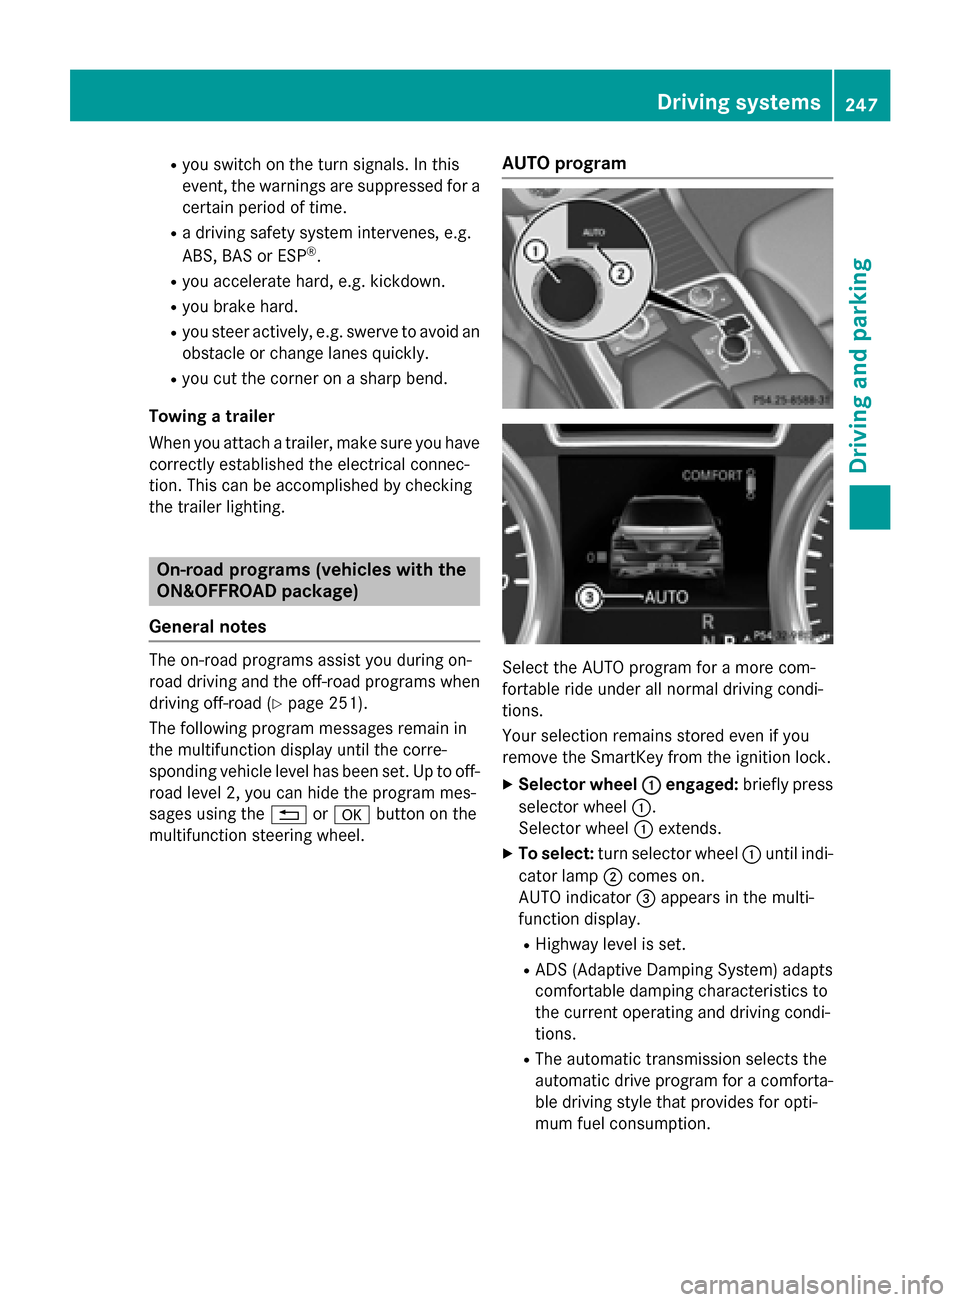
Select the AUTO program for a more com-
fortable ride under all normal driving condi-
tions.
Your selection remains stored even if you
remove the SmartKey from the ignition lock.
X Selector wheel 0043 0043engaged: briefly press
selector wheel 0043.
Selector wheel 0043extends.
X To select: turn selector wheel 0043until indi-
cator lamp 0044comes on.
AUTO indicator 0087appears in the multi-
function display.
R Highway level is set.
R ADS (Adaptive Damping System) adapts
comfortable damping characteristics to
the current operating and driving condi-
tions.
R The automatic transmission selects the
automatic drive program for a comforta-
ble driving style that provides for opti-
mum fuel consumption. Driving syste
ms
247Driving an d parking Z
Page 251 of 466
R
Highway level is set.
R ADS (Adaptive Damping System) adapts
comfortable damping characteristics to
the current operating and driving condi-
tions.
R 4ETS and the differential lock are adap-
ted for driving on snow-covered roads.
R The automatic transmission selects the
automatic drive program for a comforta-
ble driving style that provides for opti-
mum fuel consumption.
R The soft accelerator pedal curve is selec-
ted, e.g. the accelerator pedal must be
pressed significantly further to acceler-
ate.
R The optimum gear for pulling away is
engaged.
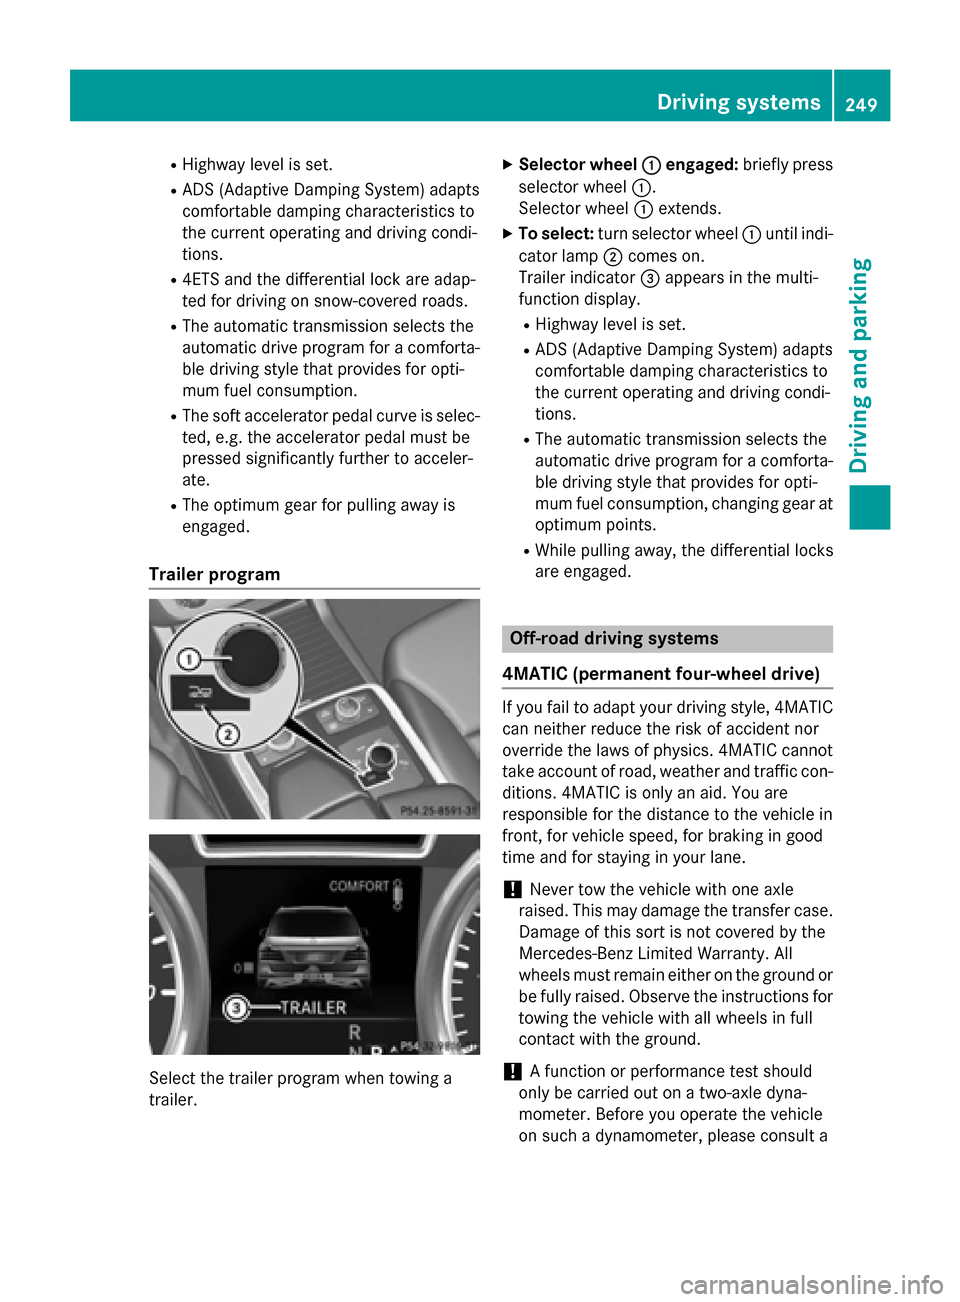
Trailer program Select the trailer program when towing a
trailer. X
Selector wheel 0043 0043engaged: briefly press
selector wheel 0043.
Selector wheel 0043extends.
X To select: turn selector wheel 0043until indi-
cator lamp 0044comes on.
Trailer indicator 0087appears in the multi-
function display.
R Highway level is set.
R ADS (Adaptive Damping System) adapts
comfortable damping characteristics to
the current operating and driving condi-
tions.
R The automatic transmission selects the
automatic drive program for a comforta-
ble driving style that provides for opti-
mum fuel consumption, changing gear at optimum points.
R While pulling away, the differential locks
are engaged. Off-road driving systems
4MATIC (permanent four-wheel drive) If you fail to adapt your driving style, 4MATIC
can neither reduce the risk of accident nor
override the laws of physics. 4MATIC cannot
take account of road, weather and traffic con-
ditions. 4MATIC is only an aid. You are
responsible for the distance to the vehicle in
front, for vehicle speed, for braking in good
time and for staying in your lane.
! Never tow the vehicle with one axle
raised. This may damage the transfer case. Damage of this sort is not covered by the
Mercedes-Benz Limited Warranty. All
wheels must remain either on the ground or
be fully raised. Observe the instructions for
towing the vehicle with all wheels in full
contact with the ground.
! A function or performance test should
only be carried out on a two-axle dyna-
mometer. Before you operate the vehicle
on such a dynamometer, please consult a Driving systems
249Driving and parking Z
Page 259 of 466

When towing a trailer, your vehicle's handling
characteristics will be different in comparison with when driving without a trailer.
The vehicle/trailer combination:
R is heavier
R is restricted in its acceleration and gradi-
ent-climbing capability
R has an increased braking distance
R is affected more by strong crosswinds
R demands more sensitive steering
R has a larger turning radius
This could impair the handling characteris-
tics.
When towing a trailer, always adjust your
speed to the current road and weather con-
ditions. Do not exceed the maximum permis- sible speed for your vehicle/trailer combina-
tion. Notes on towing a trailer
General notes R
Do not exceed the legally prescribed max-
imum speed for vehicle/trailer combina-
tions in the relevant country.
This lowers the risk of an accident.
R Only install an approved trailer coupling on
your vehicle.
Further information on availability and on
installation is available from any authorized
Mercedes-Benz Center.
R The bumpers of your vehicle are not suita-
ble for installing detachable trailer cou-
plings.
R Do not install hired trailer couplings or
other detachable trailer couplings on the
bumpers of your vehicle.
R If you no longer need the ball coupling,
remove it from the ball coupling recess.
This will reduce the risk of damage to the
ball coupling.
i When towing a trailer, set the tire pres-
sure on the rear axle of the towing vehicle for a maximum load; see the tire pressure
table in the fuel filler flap (Y
page 421).
Please note that when towing a trailer, PARK-
TRONIC (Y page 217) and Blind Spot Assist
(Y page 237) are only available with limita-
tions, or not at all.
i On vehicles without level control, the
height of the ball coupling will alter accord-
ing to the load placed on the vehicle. If nec- essary, use a trailer with a height-adjusta-
ble drawbar.
You will find installing dimensions and loads
under "Technical data" (Y page 459).
Driving tips i
Observe the information on ESP ®
trailer
stabilization (Y page 74) and on pulling
away with a trailer (Y page 161).
The maximum permissible speed for vehicle/ trailer combinations depends on the type of
trailer. Before beginning the journey, check
the trailer's documents to see what the max-imum permissible speed is. Observe the
legally prescribed maximum speed in the rel-
evant country.
For certain Mercedes-Benz vehicles, the max- imum permissible rear axle load is increased
when towing a trailer. See "Technical data" to
find out whether this applies to your vehicle
(Y page 460). If you utilize any of the added
maximum rear axle load when towing a trailer, the vehicle/trailer combination may not
exceed a maximum speed of 60 mph
(100 km/h) for reasons concerning the oper-ating permit. This also applies in countries in
which the permissible maximum speed for
vehicle/trailer combinations is above 60 mph
(100 km/h).
When towing a trailer, your vehicle's handling
characteristics will be different in comparison with when driving without a trailer.
Use the left-hand paddle shifter to shift into a
lower gear in good time on long and steep
downhill gradients. Towing a trailer
257Driving and parking Z
Page 269 of 466
The coolant temperature gauge is in the
instrument cluster on the right-hand side
(Y page 35).
Under normal operating conditions and with
the specified coolant level, the coolant tem-
perature may rise to 248 ‡ (120 †). Tachometer
! Do not drive in the overrevving range, as
this could damage the engine.
The red band in the tachometer indicates the
engine's overrevving range.
The fuel supply is interrupted to protect the
engine when the red band is reached. Outside temperature display
You should pay special attention to road con-
ditions when temperatures are around freez-
ing point.
Bear in mind that the outside temperature
display indicates the temperature measured
and does not record the road temperature.
The outside temperature display is in the mul- tifunction display (Y page 268).
Changes in the outside temperature are dis-
played after a short delay. Speedometer with segments
The segments in the speedometer indicate
which speed range is available.
R Cruise control activated (Y page 195):
The segments light up from the stored
speed to the maximum speed.
R DISTRONIC PLUS activated (Y page 198):
One or two segments in the set speed
range light up.
R DISTRONIC PLUS detects a vehicle in front:
The segments between the speed of the
vehicle in front and the stored speed light
up. Operating the on-board computer
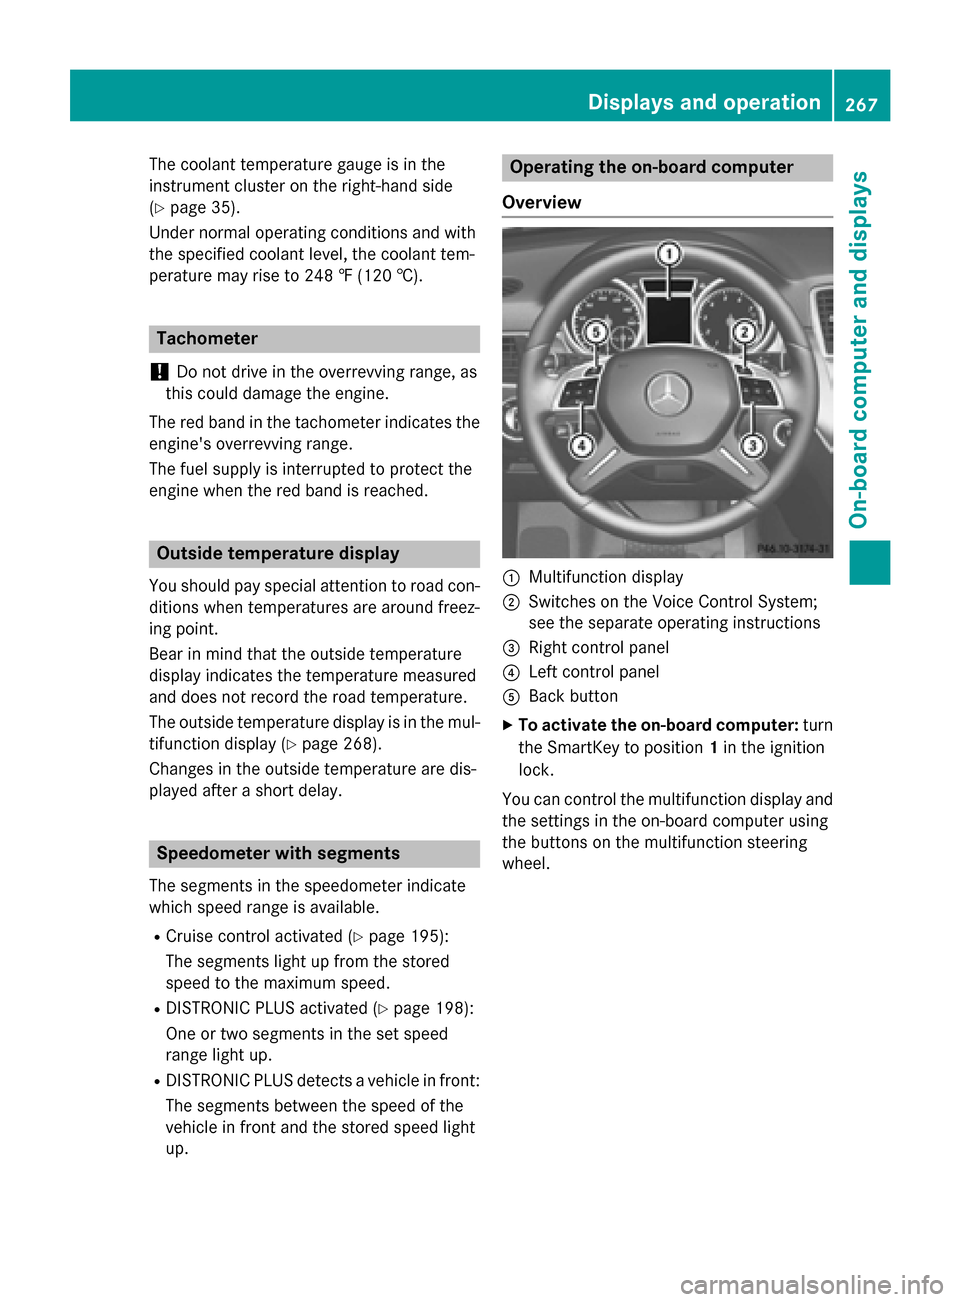
Overview 0043
Multifunction display
0044 Switches on the Voice Control System;
see the separate operating instructions
0087 Right control panel
0085 Left control panel
0083 Back button
X To activate the on-board computer: turn
the SmartKey to position 1in the ignition
lock.
You can control the multifunction display and
the settings in the on-board computer using
the buttons on the multifunction steering
wheel. Displays and operation
267On-board computer and displays Z
Page 271 of 466

0083
Drive program (Y page 168)
0084 Transmission position (Y page 168)
X To show menu bar 0085:press the 0059
or 0065 button on the steering wheel.
Menu bar 0085disappears after a few seconds.
Text field 0087shows the selected menu or
submenu as well as display messages.
i You can set the time using the audio sys-
tem or COMAND; see the separate operat-
ing instructions.
The following messages may appear in the
multifunction display:
0097 Gearshift recommendation, when
shifting manually (Y page 173)
0095005D0096 Active Parking Assist
(Ypage 220)
CRUISE
CRUISE Cruise control (Y
page 195)
LOW
LOW
RANGE RANGE LOW RANGE off-road gear
(Y
page 253)
00CE Adaptive Highbeam Assist
(Ypage 126)
00A7 ECO start/stop function
(Ypage 162)
00D9 HOLD function (Y page 210) Menus and submenus
Menu overview
Press the 0059or0065 button on the steer-
ing wheel to call up the menu bar and select a
menu.
Operating the on-board computer
(Y page 267).
Depending on the equipment installed in the
vehicle, you can call up the following menus:
R Trip Trip menu (Y page 269)
R Navi
Navi menu (navigation instructions)
(Y page 271)
R Audio
Audio menu (Y page 272)
R Tel
Tel menu (telephone) (Y page 273)R
DriveAssist
DriveAssist menu (assistance)
(Y page 275)
R Serv
Serv menu (Y page 276)
R Sett
Sett menu (settings) (Y page 277)
R ON&OFFROAD
ON&OFFROAD menu (Ypage 281)
R AMG
AMG menu in AMG vehicles (Y page 281) Trip menu
Standard display X
Press and hold the 0038button on the
steering wheel until the Trip
Tripmenu with
trip odometer 0043and odometer 0044is
shown.
Trip computer "From Start" or "From
Reset" Example: trip computer "From Start"
0043
Distance
0044 Time
0087 Average speed
0085 Average fuel consumption
X Press the 0059or0065 button on the steer-
ing wheel to select the Trip Tripmenu.
X Press 0063or0064 to select From Start
From Start
or From Reset
From Reset.
The values in the From Start
From Startsubmenu are
calculated from the start of a journey, while
the values in the From Reset
From Resetsubmenu are Menus and submenus
269On-board computer and displays Z