2015 MERCEDES-BENZ M-Class weight
[x] Cancel search: weightPage 337 of 466

R
Use the cargo tie-down rings and the parcel
nets to transport loads and luggage.
R Use cargo tie-down rings and fastening
materials appropriate for the weight and
size of the load.
R Hook in the cargo net when loading.
R Secure the load with sufficiently strong and
wear-resistant tie-downs. Pad sharp edges
for protection. Stowage space
Important safety notes G
WARNING
If objects in the passenger compartment are
stowed incorrectly, they can slide or be
thrown around and hit vehicle occupants.
There is a risk of injury, particularly in the
event of sudden braking or a sudden change
in direction.
R Always stow objects so that they cannot be
thrown around in such situations.
R Always make sure that objects do not pro-
trude from stowage spaces, parcel nets or
stowage nets.
R Close the lockable stowage spaces while
driving.
R Stow and secure objects that are heavy,
hard, pointy, sharp-edged, fragile or too
large in the cargo compartment.
Observe the loading guidelines (Y page 334).
Glove box X
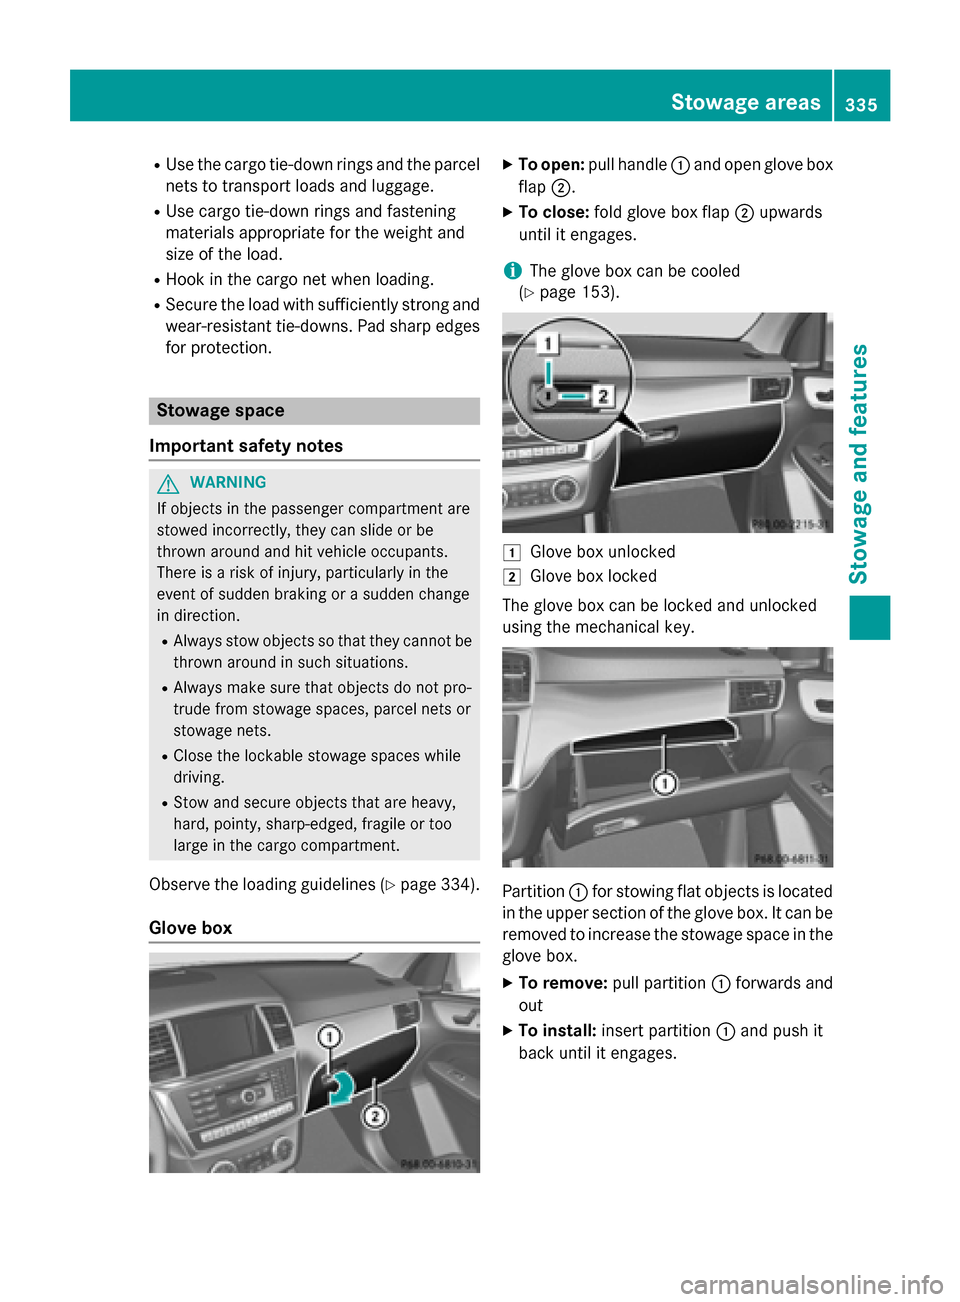
To open: pull handle 0043and open glove box
flap 0044.
X To close: fold glove box flap 0044upwards
until it engages.
i The glove box can be cooled
(Y page 153). 0047
Glove box unlocked
0048 Glove box locked
The glove box can be locked and unlocked
using the mechanical key. Partition
0043for stowing flat objects is located
in the upper section of the glove box. It can be
removed to increase the stowage space in the
glove box.
X To remove: pull partition 0043forwards and
out
X To install: insert partition 0043and push it
back until it engages. Stowage areas
335Stowage and features Z
Page 339 of 466

i
Depending on the vehicle's equipment,
there may be open stowage spaces above
and below the stowage compartment. Stowage net
G
WARNING
Vehicles with the Occupant Classification
System (OCS):
If the gross weight of the objects in the stow- age net on the back of the front-passenger
seat is greater than 4.4 lb (2 kg), OCS cannot
correctly assess the occupant's weight cate-
gory. The front-passenger front air bag could
deploy without cause, or may fail to deploy in
the event of an accident. This poses an
increased risk of injury or even fatal injury.
Never exceed the permissible gross weight of 4.4 lb (2 kg). Stow and secure heavy objects inthe cargo compartment.
Stowage nets are located in the front-
passenger footwell and on the back of the
driver's and the front-passenger seat.
Observe the loading guidelines (Y page 334)
and the safety notes regarding stowage
spaces (Y page 335). Through-loading facility in the rear
If objects or loads are not secured when being
transported in the through-loading facility,
they could slip or be thrown around and
thereby hit vehicle occupants.
Observe the loading guidelines (Y page 334)
and the safety notes regarding stowage
spaces (Y page 335). The through-loading facility is opened from
the cargo compartment.
X Release the seat backrests in the second
row of seats and tilt them in the cargo/load
position (Y page 108).
X Fold down the rear seat armrest.
X Pull the center head restraint on the rear
bench seat into the uppermost position
(Y page 106).
X Slide release catch 0043to the left and swing
flap 0044to the left until it is lying on the rear
side of the rear bench seat. X
Push cover 0087forward until it is lying on the
rear seat armrest. Cargo compartment enlargement
Important safety notes G
WARNING
If the rear bench seat/rear seat and seat
backrest are not engaged they could fold for- Sto
wage areas
337Stowage and features
Z
Page 342 of 466

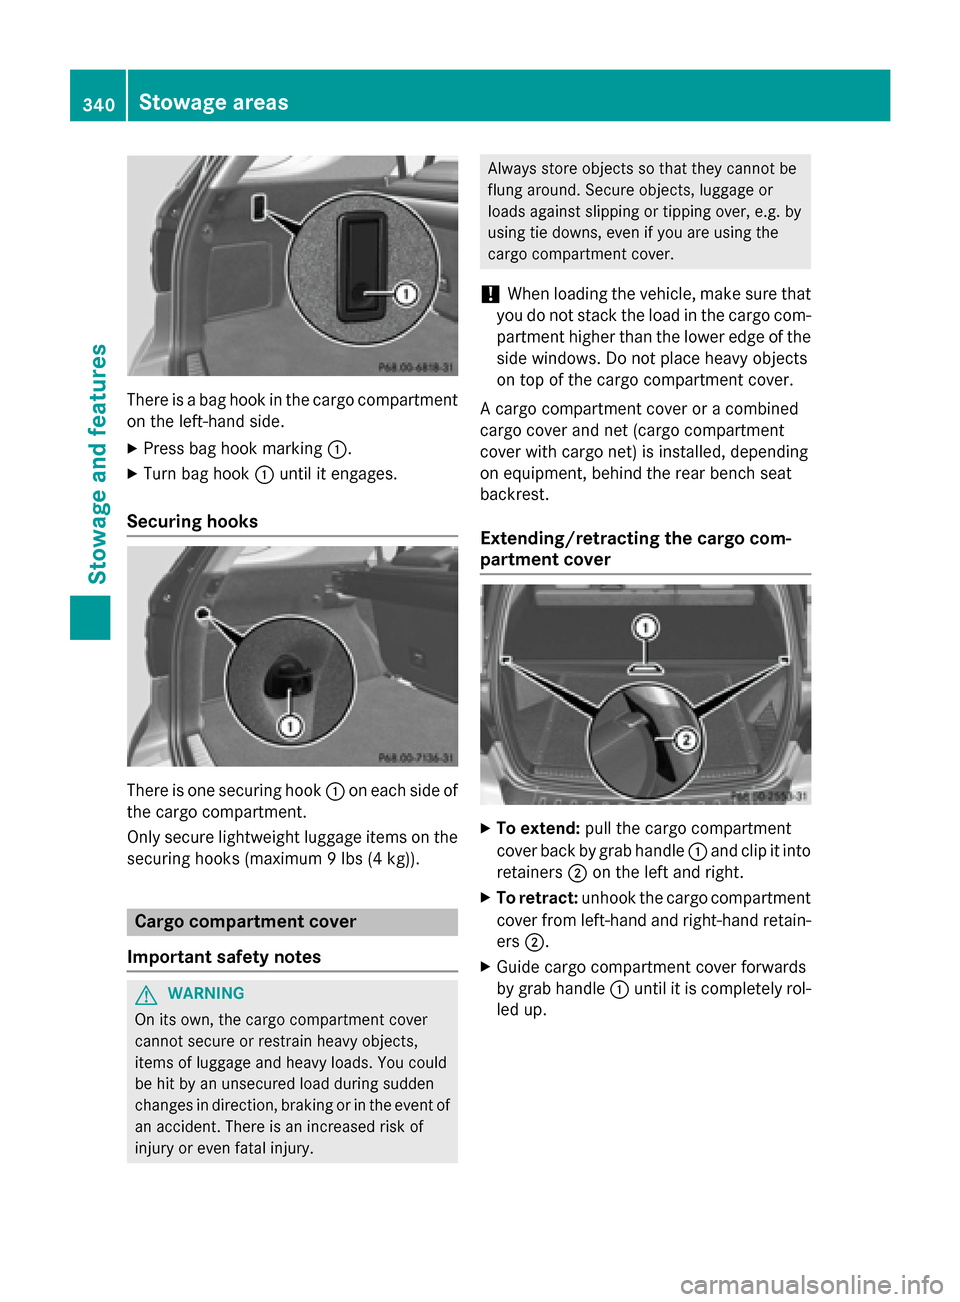
There is a bag hook in the cargo compartment
on the left-hand side.
X Press bag hook marking 0043.
X Turn bag hook 0043until it engages.
Securing hooks There is one securing hook
0043on each side of
the cargo compartment.
Only secure lightweight luggage items on the securing hooks (maximum 9 lbs (4 kg)). Cargo compartment cover
Important safety notes G
WARNING
On its own, the cargo compartment cover
cannot secure or restrain heavy objects,
items of luggage and heavy loads. You could
be hit by an unsecured load during sudden
changes in direction, braking or in the event of an accident. There is an increased risk of
injury or even fatal injury. Always store objects so that they cannot be
flung around. Secure objects, luggage or
loads against slipping or tipping over, e.g. by
using tie downs, even if you are using the
cargo compartment cover.
! When loading the vehicle, make sure that
you do not stack the load in the cargo com- partment higher than the lower edge of the
side windows. Do not place heavy objects
on top of the cargo compartment cover.
A cargo compartment cover or a combined
cargo cover and net (cargo compartment
cover with cargo net) is installed, depending
on equipment, behind the rear bench seat
backrest.
Extending/retracting the cargo com-
partment cover X
To extend: pull the cargo compartment
cover back by grab handle 0043and clip it into
retainers 0044on the left and right.
X To retract: unhook the cargo compartment
cover from left-hand and right-hand retain-
ers 0044.
X Guide cargo compartment cover forwards
by grab handle 0043until it is completely rol-
led up. 340
Stowage areasStowage and features
Page 345 of 466

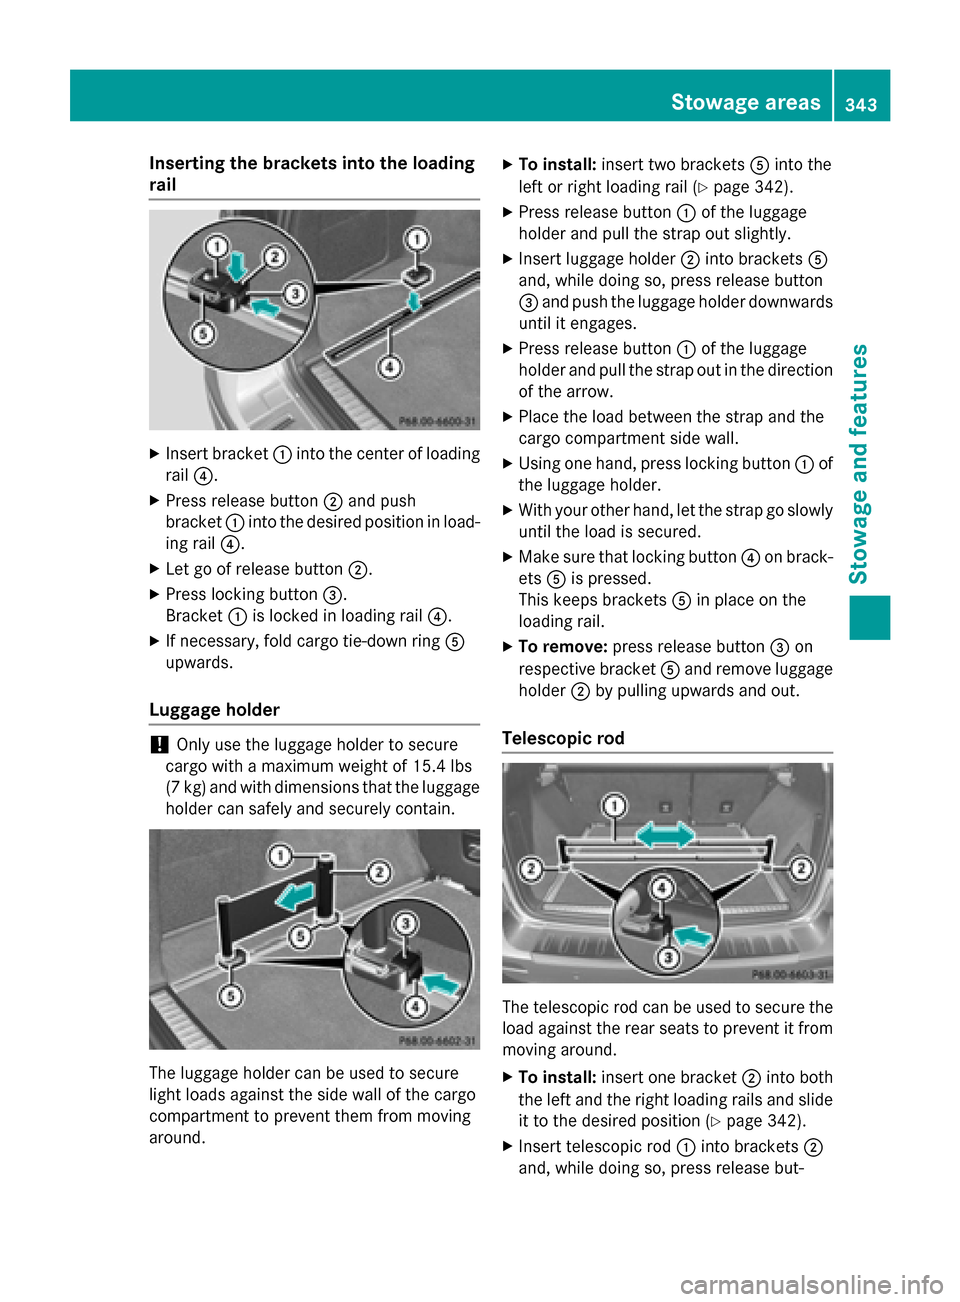
Inserting the brackets into the loading
rail X
Insert bracket 0043into the center of loading
rail 0085.
X Press release button 0044and push
bracket 0043into the desired position in load-
ing rail 0085.
X Let go of release button 0044.
X Press locking button 0087.
Bracket 0043is locked in loading rail 0085.
X If necessary, fold cargo tie-down ring 0083
upwards.
Luggage holder !
Only use the luggage holder to secure
cargo with a maximum weight of 15.4 lbs
(7 kg) and with dimensions that the luggage holder can safely and securely contain. The luggage holder can be used to secure
light loads against the side wall of the cargo
compartment to prevent them from moving
around. X
To install: insert two brackets 0083into the
left or right loading rail (Y page 342).
X Press release button 0043of the luggage
holder and pull the strap out slightly.
X Insert luggage holder 0044into brackets 0083
and, while doing so, press release button
0087 and push the luggage holder downwards
until it engages.
X Press release button 0043of the luggage
holder and pull the strap out in the direction
of the arrow.
X Place the load between the strap and the
cargo compartment side wall.
X Using one hand, press locking button 0043of
the luggage holder.
X With your other hand, let the strap go slowly
until the load is secured.
X Make sure that locking button 0085on brack-
ets 0083is pressed.
This keeps brackets 0083in place on the
loading rail.
X To remove: press release button 0087on
respective bracket 0083and remove luggage
holder 0044by pulling upwards and out.
Telescopic rod The telescopic rod can be used to secure the
load against the rear seats to prevent it from
moving around.
X To install: insert one bracket 0044into both
the left and the right loading rails and slide it to the desired position (Y page 342).
X Insert telescopic rod 0043into brackets 0044
and, while doing so, press release but- Stowage areas
343Stowage and featu res Z
Page 348 of 466

Cup holder in the front-compartment
center console 0043
Cup holder
0044 Cover
X To open: slide cover 0044to its foremost
position.
X To close: pull cover 0044back as far as it will
go.
You can remove the cup holder's rubber mat
for cleaning. Clean with clear, lukewarm
water only.
Temperature-controlled cup holder in
the front-compartment center console 0043
Cup holder
0044 Residual heat indicator lamp
0087 Switch
The temperature-controlled cup holder can
be used to keep cold drinks cool and warm
drinks warm. X
Turn the SmartKey to position 2in the igni-
tion lock.
X To switch on the cooling function: press
and hold button 0087until the blue indicator
lamp on the button lights up.
X To switch on the heating function: press
and hold button 0087until the red indicator
lamp on the button lights up.
X To switch off the function: press and hold
button 0087until the indicator lamp on the
button goes out.
When the heating function is used, the metal insert of the cup holder is heated. Once a cer-
tain temperature is reached, residual heat
indicator lamp 0044lights up. This means that
the metal insert of the cup holder is hot. For
this reason, you must not reach into the cup
holder metal insert.
Do not use hard or sharp objects to clean the cup holder. Use only a soft cloth to clean it.
Cup holder in the rear seat armrest !
Do not sit on or support your body weight
on the rear seat armrest when it is folded
down, as you could otherwise damage it. X
Fold down the rear seat armrest.
Cup holder 0043is located in the rear seat
armrest. 346
FeaturesStowage and features
Page 395 of 466

Position number
0084identifies the charged battery of the other vehicle or an equivalent jump-
starting device.
X Slide cover 0043of positive terminal 0044in the direction of the arrow.
X Connect positive terminal 0044on your vehicle to positive terminal 0087of donor battery 0084
using the jumper cable, always begin with positive terminal 0044on your own vehicle first.
X Start the engine of the donor vehicle and run it at idling speed.
X Connect negative terminal 0085of donor battery 0084to ground point 0083of your vehicle using
the jumper cable, connecting the jumper cable to battery of other vehicle 0084first.
X Start the engine.
X Before disconnecting the jumper cables, let the engine run for several minutes.
X First, remove the jumper cables from ground point 0083and negative terminal 0085, then from
positive clamp 0044and positive terminal 0087. Begin each time at the contacts on your own
vehicle first.
X Close cover 0043of positive terminal 0044after removing the jumper cables.
X Have the battery checked at a qualified specialist workshop.
i Jump-starting is not considered to be a normal operating condition.
i Jumper cables and further information regarding jump-starting can be obtained at any
qualified specialist workshop. Towing and tow-starting
Important safety notes
G
WARNING
Functions relevant to safety are restricted or
no longer available if:
R the engine is not running.
R the brake system or the power steering is
malfunctioning.
R there is a malfunction in the voltage supply
or the vehicle's electrical system.
If your vehicle is being towed, much more
force may be necessary to steer or brake.
There is a risk of an accident.
In such cases, use a tow bar. Before towing,
make sure that the steering moves freely. G
WARNING
If the weight of the vehicle to be towed or tow- started is greater than the permissible gross
weight of your vehicle:
R the towing eye could detach itself
R the vehicle/trailer combination could roll-
over.
There is a risk of an accident.
When towing or tow-starting another vehicle,
its weight should not be greater than the per-
missible gross weight of your vehicle.
! If DISTRONIC PLUS or the HOLD function
is activated, the vehicle brakes automati-
cally in certain situations. To prevent dam-
age to the vehicle, deactivate DISTRONIC
PLUS and the HOLD function in the follow- ing or other similar situations:
R when towing the vehicle
R in the car wash
! Make sure that the electric parking brake
is released. If the electric parking brake is
faulty, visit a qualified specialist workshop. Towing and tow-starting
393Breakdown assistance Z
Page 396 of 466

!
Only secure the tow rope or tow bar at the
towing eyes. Otherwise, the vehicle could
be damaged.
! Do not use the trailer tow hitch for recov-
ery or towing. Do not use the towing eye for
recovery. this could damage the vehicle. If
in doubt, have the vehicle recovered using
a crane.
! When towing, pull away slowly and
smoothly. Pull the towed vehicle as straight
as possible and not at an acute angle.
Excessive tractive power could damage the
vehicles.
i When towing, it is preferable to use a rigid
towing bar as opposed to a tow rope. A rigid
towing bar helps to keep the tractive power low.
! When towing vehicles with KEYLESS-GO,
use the key instead of the Start/Stop but-
ton. Otherwise, the automatic transmission
may shift to position Pwhen the driver's or
front-passenger door are opened, which
could lead to damage to the transmission.
! Do not tow with sling-type equipment.
This could damage the vehicle.
! Vehicles with differential locks: make
sure the differential locks are in automatic
mode. When towing, the differential locks
must not be switched on. The transmission
may otherwise be damaged.
! The vehicle can be towed a maximum of
30 miles (50km). The towing speed of
30 mph (50 km/h) must not be exceeded.
If the vehicle has to be towed more than
30 miles (50km), the entire vehicle must be
raised and transported.
! If you tow or tow-start another vehicle, its
weight must not exceed the maximum per- missible gross vehicle weight of your vehi-
cle.
i Information on your vehicle's gross vehi-
cle weight rating can be found on the vehi-
cle identification plate (Y page 446).It is better to have the vehicle transported
than to have it towed.
If the vehicle has suffered transmission dam-
age, have it transported on a transporter or
trailer.
The automatic transmission must be in posi-
tion Nwhen the vehicle is being towed.
The battery must be connected and charged.
Otherwise, you:
R cannot turn the SmartKey to position 2in
the ignition lock
R cannot release the electric parking brake
R cannot shift the automatic transmission to
position N
i Disarm the automatic locking feature
before the vehicle is towed (Y page 279).
You could otherwise be locked out when
pushing or towing the vehicle. Installing/removing the towing eye
Installing the towing eye Example: towing eye mounting covers
0043 Front cover
0044 Back cover
The brackets for the screw-in towing eyes are
located in the bumpers. They are at the front and at the rear, behind the covers. 394
Towing and tow-startingBreakdown assistance
Page 414 of 466

Loading the vehicle
Instruction labels for tires and loads
G
WARNING
Overloaded tires can overheat, causing a
blowout. Overloaded tires can also impair the steering and driving characteristics and lead
to brake failure. There is a risk of accident.
Observe the load rating of the tires. The load
rating must be at least half of the GAWR of
your vehicle. Never overload the tires by
exceeding the maximum load.
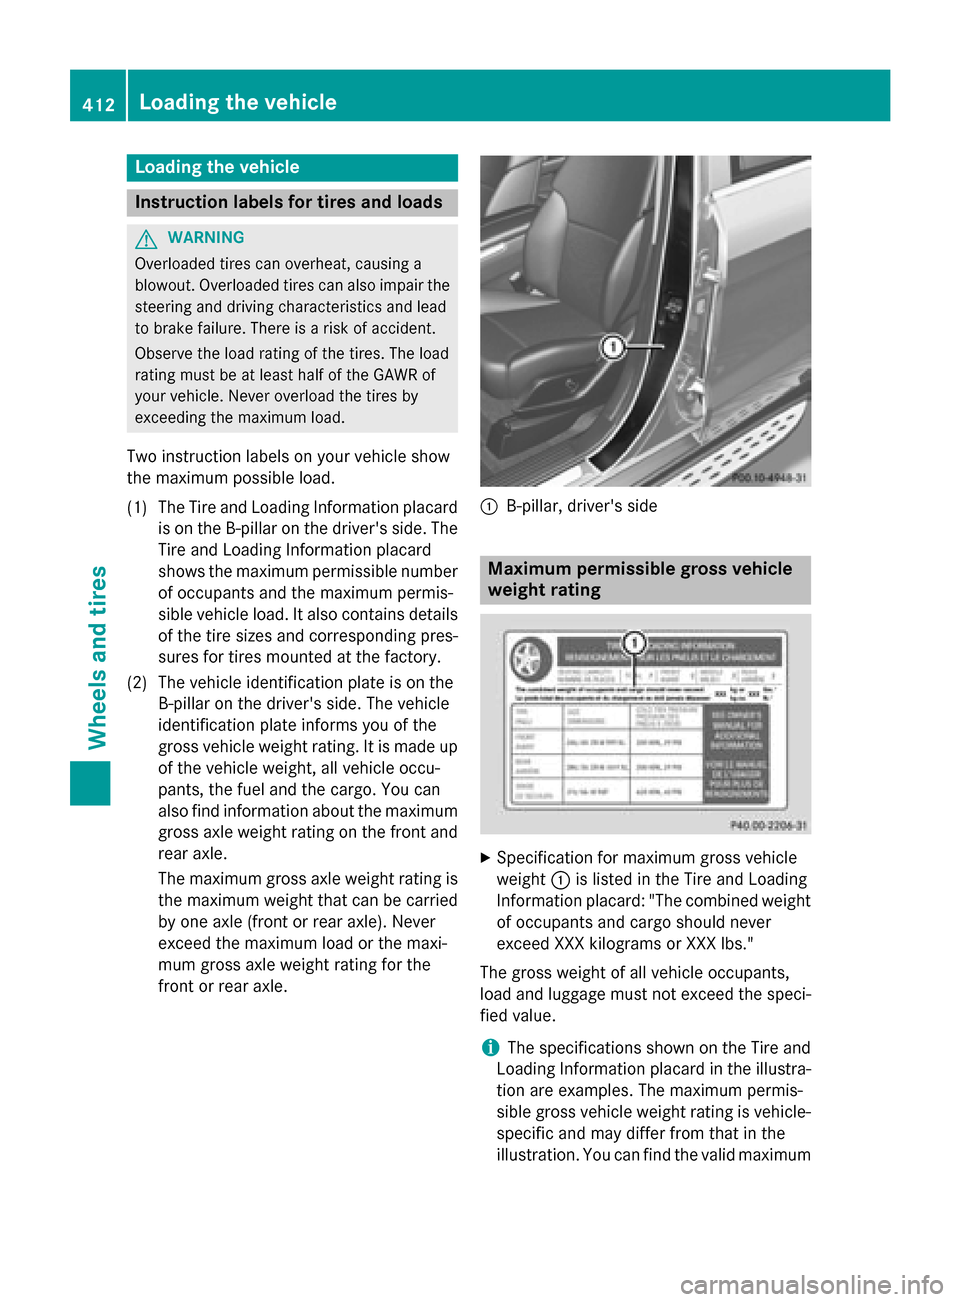
Two instruction labels on your vehicle show
the maximum possible load.
(1) The Tire and Loading Information placard is on the B-pillar on the driver's side. The
Tire and Loading Information placard
shows the maximum permissible number
of occupants and the maximum permis-
sible vehicle load. It also contains details
of the tire sizes and corresponding pres-
sures for tires mounted at the factory.
(2) The vehicle identification plate is on the B-pillar on the driver's side. The vehicle
identification plate informs you of the
gross vehicle weight rating. It is made up
of the vehicle weight, all vehicle occu-
pants, the fuel and the cargo. You can
also find information about the maximum gross axle weight rating on the front and
rear axle.
The maximum gross axle weight rating is the maximum weight that can be carried
by one axle (front or rear axle). Never
exceed the maximum load or the maxi-
mum gross axle weight rating for the
front or rear axle. 0043
B-pillar, driver's side Maximum permissible gross vehicle
weight rating
X
Specification for maximum gross vehicle
weight 0043is listed in the Tire and Loading
Information placard: "The combined weight of occupants and cargo should never
exceed XXX kilograms or XXX lbs."
The gross weight of all vehicle occupants,
load and luggage must not exceed the speci-
fied value.
i The specifications shown on the Tire and
Loading Information placard in the illustra-
tion are examples. The maximum permis-
sible gross vehicle weight rating is vehicle- specific and may differ from that in the
illustration. You can find the valid maximum 412
Loading the vehicleWheels and tires