2015 MERCEDES-BENZ M-Class Socket
[x] Cancel search: SocketPage 6 of 466

1, 2, 3 ...
115 V socket ...................................... 350
12 V socket see Sockets
360° camera
Cleaning .........................................3 76
Function/notes ............................ .229
4ETS
see ETS/4ETS (Electronic Trac-
tion System)
4MATIC (permanent four-wheel
drive) ................................................. .249 A
ABS (Anti-lock Braking System) Display message ............................ 285
Function/notes ................................ 68
Important safety notes .................... 68
Warning lamp ................................. 321
Accident
Automatic measures after an acci-
dent ................................................. 60
Activating/deactivating cooling
with air dehumidification ................. 144
Active Blind Spot Assist Activating/deactivating (on-
board computer) ............................ 276
Display message ............................ 308
Function/informatio n.................... 241
Trailer towing ................................. 244
Active Curve System
Display message ............................ 305
Function/note s............................. 212
Active Driving Assistance package .. 241
Active Lane Keeping Assist Activating/deactivating (on-
board computer) ............................ 276
Display message ............................ 307
Function/information .................... 244
Trailer towing ................................. 247
Active light function ......................... 125
Active Parking Assist Display message ............................ 308
Exiting a parking space .................. 223
Function/note s............................. 220
Important safety notes .................. 220 Parking .......................................... 222
Towing a trailer .............................. 224
ADAPTIVE BRAKE ................................. 75
Adaptive Brake Assist Display message ............................ 292
Function/note s................................ 71
Adaptive damping system
see ADS (Adaptive Damping System)
Adaptive Highbeam Assist
Display message ............................ 300
Function/note s............................. 126
Switching on/of f........................... 126
Additives (engine oil) ........................ 453
ADS (Adaptive Damping System) Function/note s............................. 212
Air bags
Deployment ..................................... 58
Display message ............................ 295
Front air bag (driver, front
passenger) ....................................... 51
Important safety notes .................... 50
Introduction ..................................... 50
Knee bag .......................................... 52
PASSENGER AIR BAG OFF indica-
tor lamp ........................................... 45
Side impact air bag .......................... 52
Window curtain air bag .................... 52
Air-conditioning system
see Climate control
Air filter (display message) .............. 303
AIR FLOW ........................................... 147
AIRMATIC package ADS (Adaptive Damping System) ... 212
Function/note s............................. 211
Level control .................................. 213
Air vents
Glove box ....................................... 153
Important safety notes .................. 152
Rear ............................................... 153
Setting ........................................... 152
Setting the center air vents ........... 152
Setting the side air vents ............... 153
Alarm
ATA (Anti-Theft Alarm system )......... 77
Switching off (ATA) .......................... 77
Switching the function on/off
(ATA) ................................................ 77 4
Index
Page 20 of 466

Important safety guidelines .............46
Introduction .....................................46
Releasin g......................................... 49
Switching belt adjustment on/off
(on-board computer) ...................... 280
Warning lamp ................................. 318
Warning lamp (function) ................... 49
Seats
Adjusting (electrically) ................... 106
Adjusting the head restraint .......... 106
Cleaning the cover ......................... 378
Correct driver's seat position ........ 104
Folding the rear bench seat for-
wards/back ................................... 337
Important safety notes .................. 105
Overview ........................................ 105
Seat heating problem .................... 110
Seat ventilation problem ................ 111
Storing settings (memory func-
tion) ............................................... 116
Switching seat heating on/of f....... 109
Switching seat ventilation on/of f.. 110
Securing hooks .................................. 340
Selector lever Cleaning ......................................... 378
Sensors (cleaning instructions) ....... 375
Service menu (on-board com-
puter) .................................................. 276
Service products Brake fluid ..................................... 453
Coolant (engine) ............................ 453
DEF special additives ..................... 451
Engine oil ....................................... 452
Fuel ................................................ 448
Important safety notes .................. 447
Refrigerant (air-conditioning sys-
tem) ............................................... 455
Washer fluid ................................... 454
Settings
Factory (on-board computer) ......... 281
On-board computer ....................... 277
Setting the air distribution ............... 148
Setting the airflow ............................ 148
SETUP (on-board computer) ............. 281
Side impact air bag ............................. 52
Side marker lamp (display mes-
sage) ................................................... 299 Side marker lamps (changing
bulbs)
................................................. 131
Side windows Cleaning ......................................... 375
Convenience closing feature ............ 95
Convenience opening feature .......... 95
Important safety information ........... 93
Opening/closing .............................. 94
Overview .......................................... 93
Problem (malfunction) ..................... 97
Resetting ......................................... 96
Sliding sunroof
Important safety notes .................... 97
Opening/closing .............................. 98
Problem (malfunction) ................... 101
Resetting ......................................... 98
see Panorama roof with power
tilt/sliding panel
SmartKey
Changing the battery ....................... 83
Changing the programming ............. 81
Checking the battery ....................... 83
Convenience closing feature ............ 95
Convenience opening feature .......... 95
Display message ............................ 317
Door central locking/unlocking ....... 80
Important safety notes .................... 80
Loss ................................................. 85
Mechanical key ................................ 82
Overview .......................................... 80
Positions (ignition lock) ................. 157
Problem (malfunction) ..................... 85
Starting the engine ........................ 160
Snow chains
Information .................................... 403
Snow drive program ....................... 248
Sockets
Center console .............................. 349
General notes ................................ 349
Luggage compartment ................... 350
Rear compartment ......................... 350
Specialist workshop ............................ 29
Special seat belt retractor .................. 61
Speed, controlling see Cruise control
Speedometer
Digital ............................................ 270 18
Index
Page 41 of 466
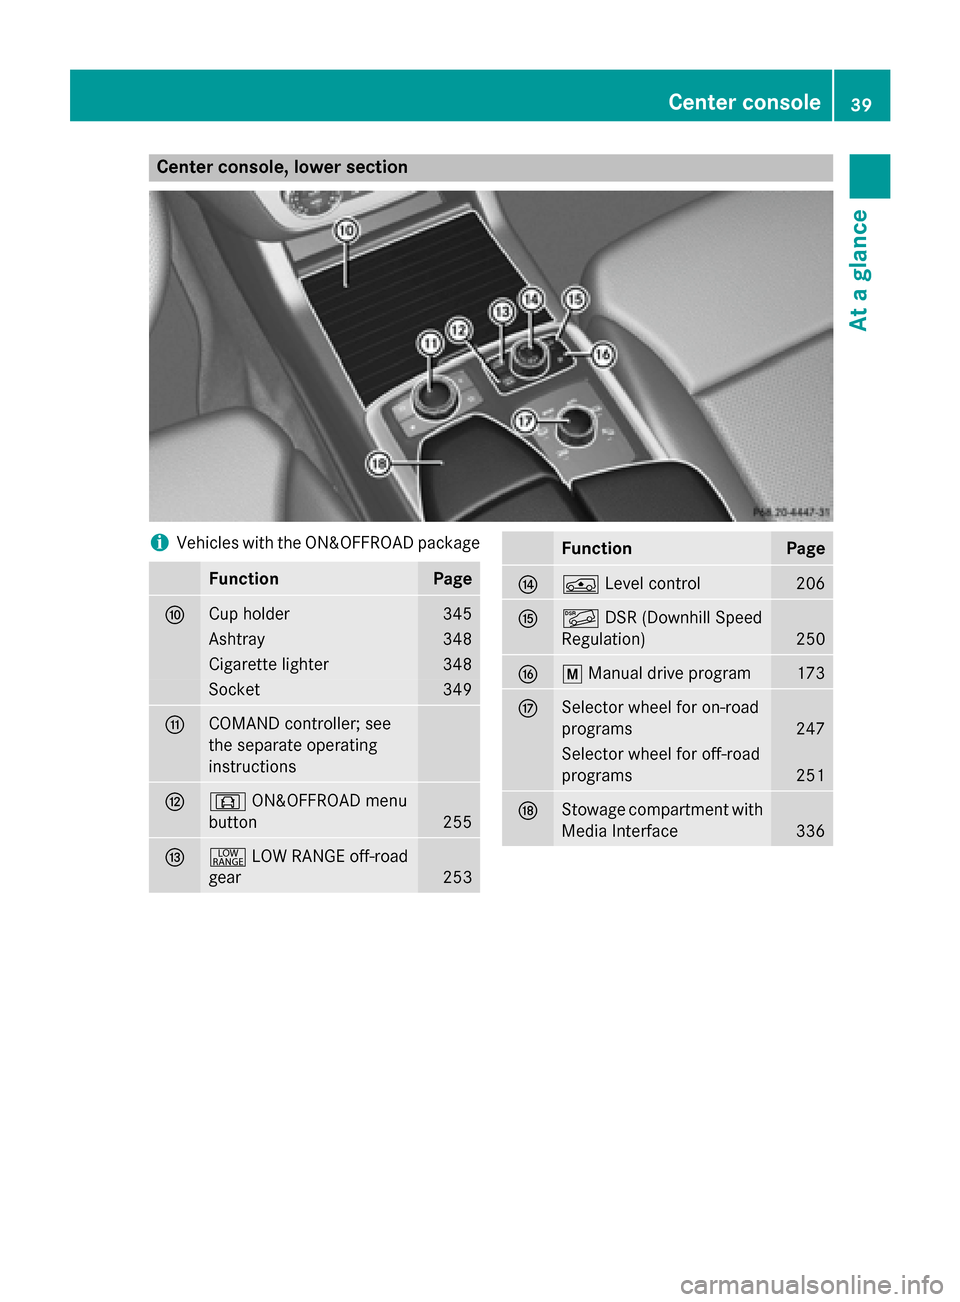
Center console, lower section
i
Vehicles with the ON&OFFROAD package Function Page
006E
Cup holder 345
Ashtray 348
Cigarette lighter 348
Socket 349
006F
COMAND controller; see
the separate operating
instructions
0070
0090
ON&OFFROAD menu
button 255
0071
002E
LOW RANGE off-road
gear 253 Function Page
0072
00C4
Level control 206
0073
00C6
DSR (Downhill Speed
Regulation) 250
0074
0063
Manual drive program 173
0075
Selector wheel for on-road
programs
247
Selector wheel for off-road
programs
251
0076
Stowage compartment with
Media Interface 336Center console
39At a glance
Page 42 of 466
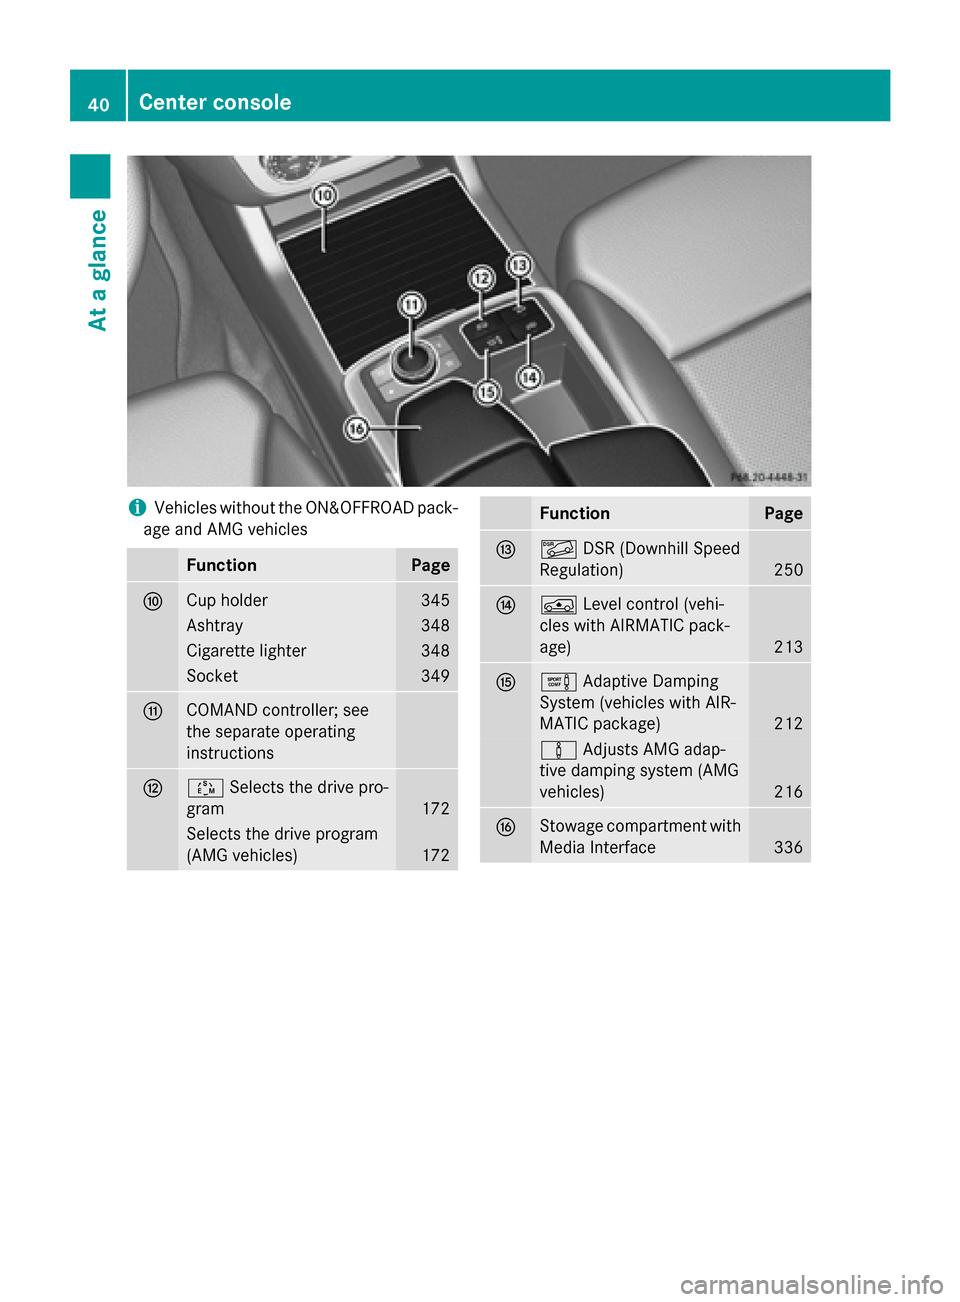
i
Vehicles without the ON&OFFROAD pack-
age and AMG vehicles Function Page
006E
Cup holder 345
Ashtray 348
Cigarette lighter 348
Socket 349
006F
COMAND controller; see
the separate operating
instructions
0070
00C8
Selects the drive pro-
gram 172
Selects the drive program
(AMG vehicles)
172 Function Page
0071
00C6
DSR (Downhill Speed
Regulation) 250
0072
00C4
Level control (vehi-
cles with AIRMATIC pack-
age) 213
0073
0091
Adaptive Damping
System (vehicles with AIR-
MATIC package) 212
00CC
Adjusts AMG adap-
tive damping system (AMG
vehicles) 216
0074
Stowage compartment with
Media Interface 33640
Center consoleAt a glance
Page 262 of 466

of the towing vehicle, as the latter is equip-
ped with an anti-lock brake system. Doing
so will result in a loss of function of the
brake systems of both the vehicle and the
trailer.
X Make sure that the automatic transmission
is set to position P.
X Apply the vehicle's electric parking brake.
X Start the engine.
X Vehicles with the AIRMATIC package:
select highway level.
X Vehicles with ADS: set ADS toAUTOor
COMF.
X Switch off the engine.
X Close all doors and the tailgate.
X Couple up the trailer.
X Establish all electrical connections.
X Check that the trailer lighting system is
working.
i Vehicles with the AIRMATIC package:
with a trailer attached, the vehicle will
always remain at highway level. When cou-
pling up a trailer, please observe the fol-
lowing:
R Unless highway level has been set man-
ually, the vehicle is automatically low-
ered to highway level. This is the case if a
speed of 5 mph (8 km/h) is reached.
R High-speed level is not available.
These restrictions apply to all accessories
powered through a connection to the trailer power socket of your vehicle, e.g. a bicycle
carrier.
Observe the maximum permissible trailer
dimensions (width and length).
Most U.S. states and all Canadian provinces
require by law:
R Safety chains between the towing vehicle
and the trailer. The chains should be cross-
wound under the trailer drawbar. They must be fastened to the vehicle's trailer cou-
pling, not to the bumper or the axle. Leave enough play in the chains to make
tight cornering possible.
R A separate brake system for certain types
of trailer.
R A safety switch for braked trailers. Check
the specific legal requirements applicable
to your state.
If the trailer detaches from the towing vehi- cle, the safety switch applies the trailer's
brakes. Towing a trailer
There are numerous legal requirements con-
cerning the towing of a trailer, e.g. speed
restrictions. Make sure that your car/trailer
combination complies with the local regula-
tions: R in your place of residence
R in the location to which you are driving
The police and local authorities can provide
reliable information.
Observe the following when towing a trailer:
R To gain driving experience and to become
accustomed to the new handling charac-
teristics, you should practice the following
in a traffic-free location:
- cornering
- stopping
- backing up
R Before driving, check:
- trailer tow hitch
- safety switch for braked trailers
- safety chains
- electrical connections
- lights
- wheels
R Adjust the exterior mirrors to provide an
unobstructed view of the rear section of the trailer.
R If the trailer has electronically controlled
brakes, pull away carefully. Brake manually 260
Towing a trailerDriving and parking
Page 265 of 466
R
brake sharply
R change direction suddenly
R are involved in an accident Trailer power supply
! You can connect accessories with a max-
imum power consumption of 240 W to the
permanent power supply.
You must not charge a trailer battery using
the power supply.
The trailer socket of your vehicle is equipped at the factory with a permanent power supply.
The permanent power supply is supplied via
trailer socket pin 4.
The trailer's permanent power supply is
switched off in the event of low vehicle supply
voltage and after six hours at the latest.
A qualified specialist workshop can provide
more information about installing the trailer
electrics. Towing a trailer
263Driving and parking Z
Page 306 of 466
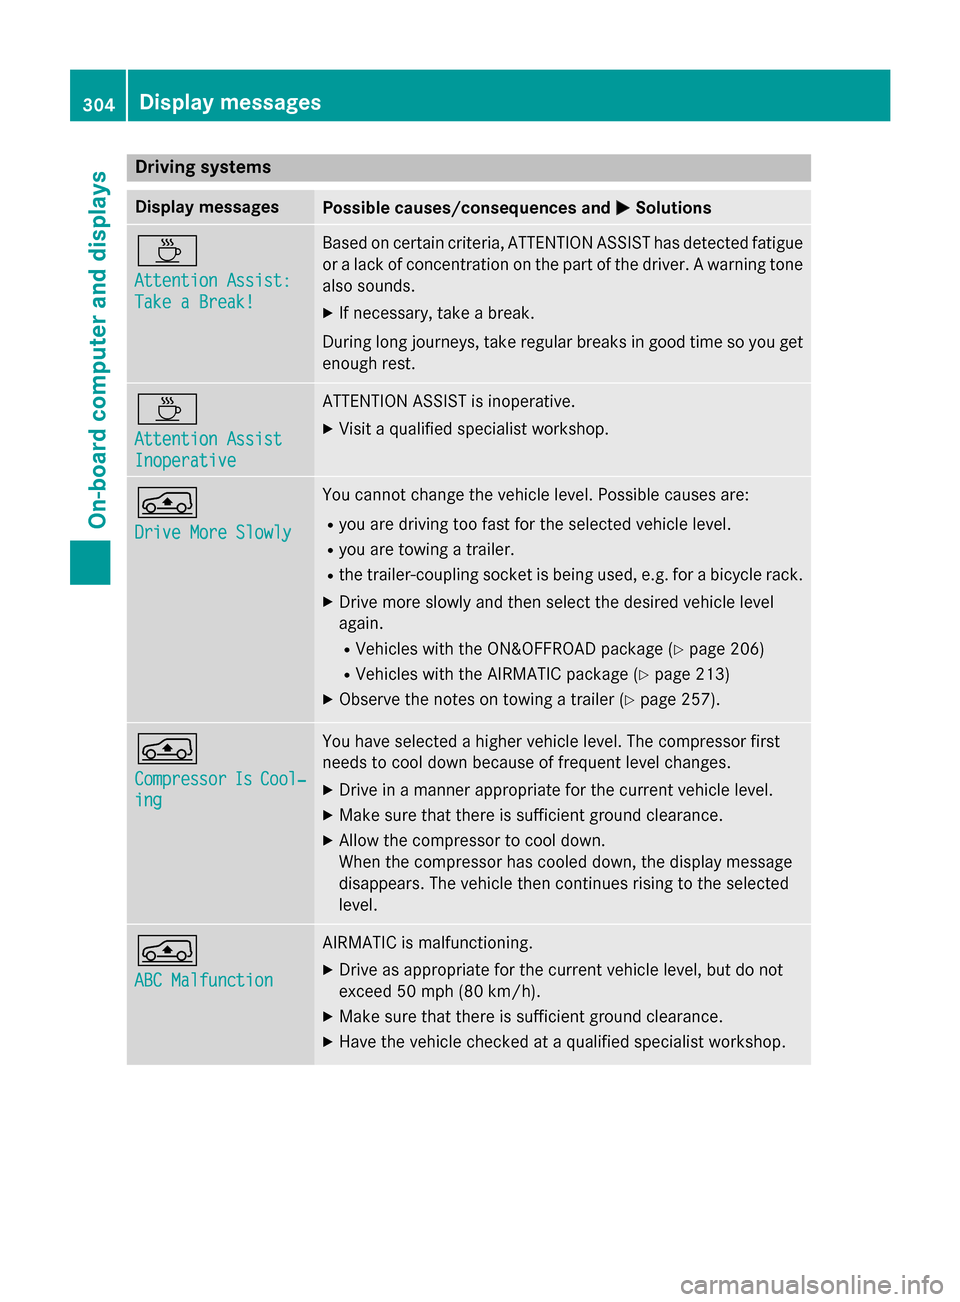
Driving systems
Display messages
Possible causes/consequences and
0050
0050Solutions 00AD
Attention Assist: Attention Assist:
Take a Break! Take a Break! Based on certain criteria, ATTENTION ASSIST has detected fatigue
or a lack of concentration on the part of the driver. A warning tone also sounds.
X If necessary, take a break.
During long journeys, take regular breaks in good time so you get enough rest. 00AD
Attention Assist Attention Assist
Inoperative Inoperative ATTENTION ASSIST is inoperative.
X Visit a qualified specialist workshop. 00C4
Drive More Slowly Drive More Slowly You cannot change the vehicle level. Possible causes are:
R you are driving too fast for the selected vehicle level.
R you are towing a trailer.
R the trailer-coupling socket is being used, e.g. for a bicycle rack.
X Drive more slowly and then select the desired vehicle level
again.
R Vehicles with the ON&OFFROAD package (Y page 206)
R Vehicles with the AIRMATIC package (Y page 213)
X Observe the notes on towing a trailer (Y page 257).00C4
Compressor Compressor
Is
IsCool‐
Cool‐
ing
ing You have selected a higher vehicle level. The compressor first
needs to cool down because of frequent level changes.
X Drive in a manner appropriate for the current vehicle level.
X Make sure that there is sufficient ground clearance.
X Allow the compressor to cool down.
When the compressor has cooled down, the display message
disappears. The vehicle then continues rising to the selected
level. 00C4
ABC Malfunction ABC Malfunction AIRMATIC is malfunctioning.
X
Drive as appropriate for the current vehicle level, but do not
exceed 50 mph (80 km/h).
X Make sure that there is sufficient ground clearance.
X Have the vehicle checked at a qualified specialist workshop. 304
Display
messagesOn-board computer and displays
Page 350 of 466
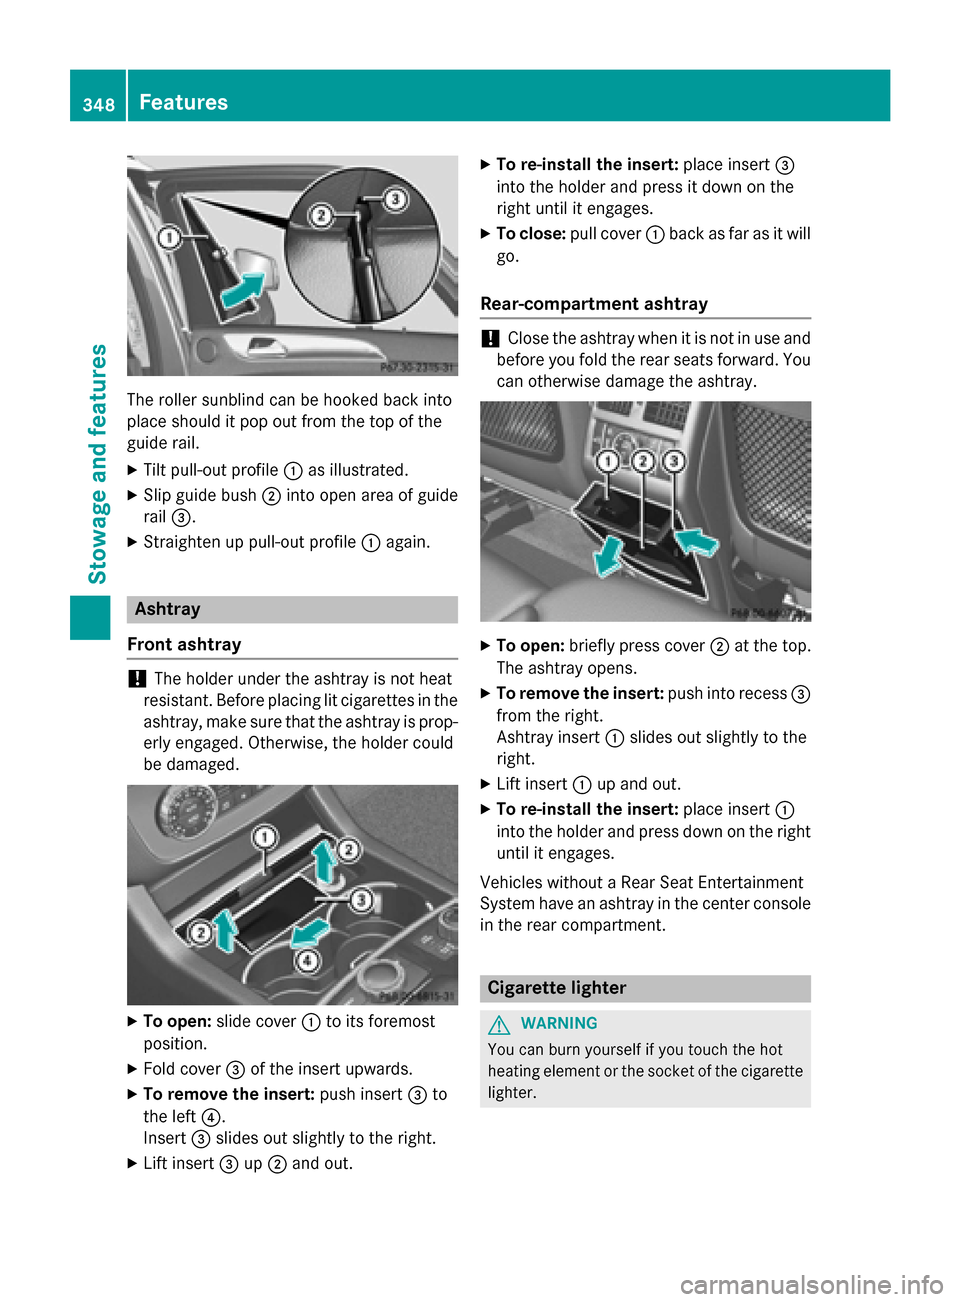
The roller sunblind can be hooked back into
place should it pop out from the top of the
guide rail.
X Tilt pull-out profile 0043as illustrated.
X Slip guide bush 0044into open area of guide
rail 0087.
X Straighten up pull-out profile 0043again. Ashtray
Front ashtray !
The holder under the ashtray is not heat
resistant. Before placing lit cigarettes in the
ashtray, make sure that the ashtray is prop- erly engaged. Otherwise, the holder could
be damaged. X
To open: slide cover 0043to its foremost
position.
X Fold cover 0087of the insert upwards.
X To remove the insert: push insert0087to
the left 0085.
Insert 0087slides out slightly to the right.
X Lift insert 0087up0044 and out. X
To re-install the insert: place insert0087
into the holder and press it down on the
right until it engages.
X To close: pull cover 0043back as far as it will
go.
Rear-compartment ashtray !
Close the ashtray when it is not in use and
before you fold the rear seats forward. You can otherwise damage the ashtray. X
To open: briefly press cover 0044at the top.
The ashtray opens.
X To remove the insert: push into recess0087
from the right.
Ashtray insert 0043slides out slightly to the
right.
X Lift insert 0043up and out.
X To re-install the insert: place insert0043
into the holder and press down on the right until it engages.
Vehicles without a Rear Seat Entertainment
System have an ashtray in the center console
in the rear compartment. Cigarette lighter
G
WARNING
You can burn yourself if you touch the hot
heating element or the socket of the cigarette lighter. 348
FeaturesStowage and features