2015 MERCEDES-BENZ M-Class remove seats
[x] Cancel search: remove seatsPage 26 of 466

Protection of the environment
General notes
H
Environmental note
Daimler's declared policy is one of compre-
hensive environmental protection.
The objectives are for the natural resources
that form the basis of our existence on this
planet to be used sparingly and in a manner
that takes the requirements of both nature
and humanity into account.
You too can help to protect the environment
by operating your vehicle in an environmen-
tally responsible manner.
Fuel consumption and the rate of engine,
transmission, brake and tire wear are affected by these factors:
R operating conditions of your vehicle
R your personal driving style
You can influence both factors. You should
bear the following in mind:
Operating conditions:
R avoid short trips as these increase fuel con-
sumption.
R always make sure that the tire pressures
are correct.
R do not carry any unnecessary weight.
R remove roof racks once you no longer need
them.
R a regularly serviced vehicle will contribute
to environmental protection. You should
therefore adhere to the service intervals.
R always have service work carried out at a
qualified specialist workshop.
Personal driving style:
R do not depress the accelerator pedal when
starting the engine.
R do not warm up the engine when the vehicle
is stationary.
R drive carefully and maintain a safe distance
from the vehicle in front.
R avoid frequent, sudden acceleration and
braking. R
change gear in good time and use each gear
only up to 00C3of its maximum engine speed.
R switch off the engine in stationary traffic.
R keep an eye on the vehicle's fuel consump-
tion. Environmental concerns and recom-
mendations
Wherever the operating instructions require
you to dispose of materials, first try to regen-
erate or re-use them. Observe the relevant
environmental rules and regulations when
disposing of materials. In this way you will
help to protect the environment. Genuine Mercedes-Benz parts
H
Environmental note
Daimler AG also supplies reconditioned major
assemblies and parts which are of the same
quality as new parts. They are covered by the same Limited Warranty entitlements as new
parts.
! Air bags and Emergency Tensioning Devi-
ces, as well as control units and sensors for these restraint systems, may be installed inthe following areas of your vehicle:
R doors
R door pillars
R door sills
R seats
R cockpit
R instrument cluster
R center console
Do not install accessories such as audio
systems in these areas. Do not carry out
repairs or welding. You could impair the
operating efficiency of the restraint sys-
tems.
Have aftermarket accessories installed at a qualified specialist workshop. 24
Introduction
Page 108 of 466
we strongly recommend that children be
placed in the rear seat whenever possible.
Regardless of seating position, children 12
years old and under must be seated and prop- erly secured in an appropriately sized child
restraint system or booster seat recommen-
ded for the size and weight of the child. For
additional information, see the "Children in
the vehicle" section.
A child's risk of serious or fatal injuries is sig- nificantly increased if the child restraints are
not properly secured in the vehicle and/or thechild is not properly secured in the child
restraint.
! To avoid damage to the seats and the seat
heating, observe the following information:
R keep liquids from spilling on the seats. If
liquid is spilled on the seats, dry them as soon as possible.
R if the seat covers are damp or wet, do not
switch on the seat heating. The seat
heating should also not be used to dry
the seats.
R clean the seat covers as recommended;
see "Interior care".
R do not transport heavy loads on the
seats. Do not place sharp objects on the seat cushions, e.g. knives, nails or tools. The seats should only be occupied by
passengers, if possible.
R when the seat heating is in operation, do
not cover the seats with insulating mate-
rials, e.g. blankets, coats, bags, seat cov- ers, child seats or booster seats.
! Make sure that there are no objects in the
footwell under or behind the seats when
moving the seats back. There is a risk that
the seats and/or the objects could be dam- aged.
i It is not possible to remove the head
restraints from the front seats. The rear-
compartment head restraints, however,
can be removed (Y page 108). For more information, contact a qualified
specialist workshop.
i Further related subjects:
R Important safety notes on air bags
(Y page 50)
R Cargo compartment enlargement (fold-
ing down the rear bench seat)
(Y page 337)
R Securing children in the vehicle
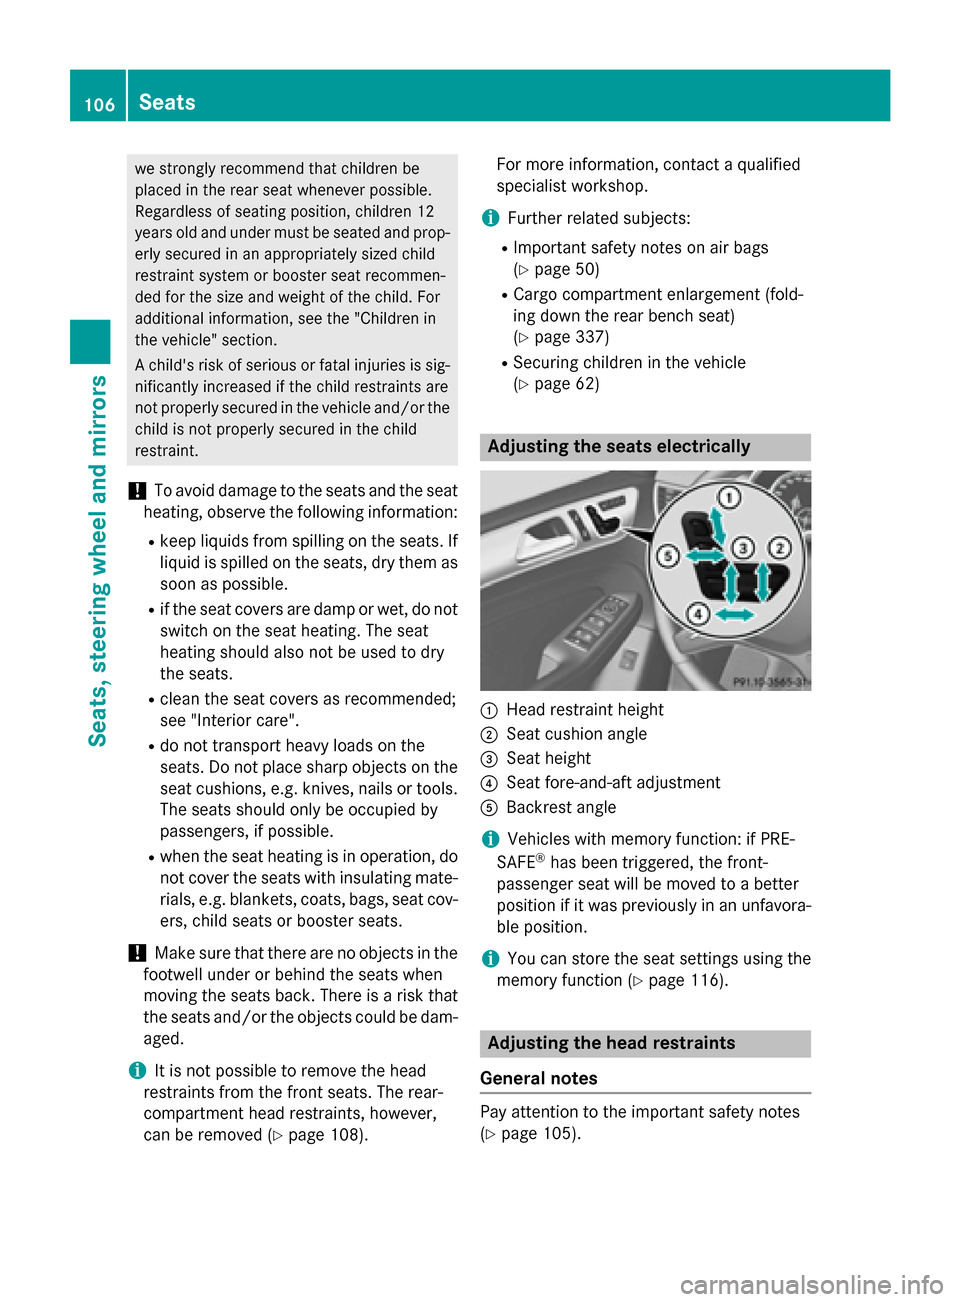
(Y page 62) Adjusting the seats electrically
0043
Head restraint height
0044 Seat cushion angle
0087 Seat height
0085 Seat fore-and-aft adjustment
0083 Backrest angle
i Vehicles with memory function: if PRE-
SAFE ®
has been triggered, the front-
passenger seat will be moved to a better
position if it was previously in an unfavora- ble position.
i You can store the seat settings using the
memory function (Y page 116). Adjusting the head restraints
General notes Pay attention to the important safety notes
(Y
page 105). 106
SeatsSeats, steering wheel and mirrors
Page 110 of 466
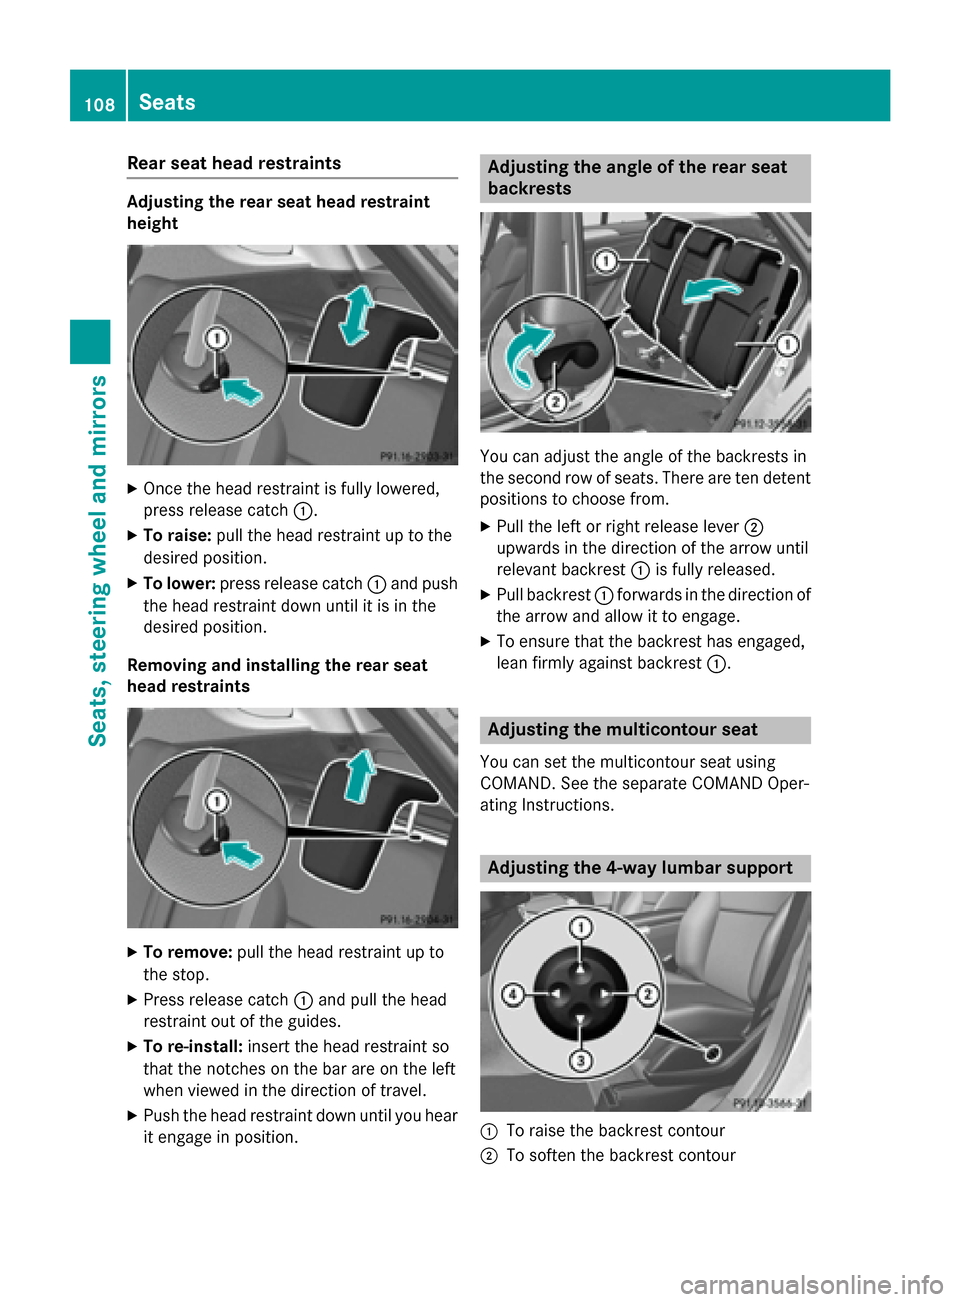
Rear seat head restraints
Adjusting the rear seat head restraint
height
X
Once the head restraint is fully lowered,
press release catch 0043.
X To raise: pull the head restraint up to the
desired position.
X To lower: press release catch 0043and push
the head restraint down until it is in the
desired position.
Removing and installing the rear seat
head restraints X
To remove: pull the head restraint up to
the stop.
X Press release catch 0043and pull the head
restraint out of the guides.
X To re-install: insert the head restraint so
that the notches on the bar are on the left
when viewed in the direction of travel.
X Push the head restraint down until you hear
it engage in position. Adjusting the angle of the rear seat
backrests
You can adjust the angle of the backrests in
the second row of seats. There are ten detent
positions to choose from.
X Pull the left or right release lever 0044
upwards in the direction of the arrow until
relevant backrest 0043is fully released.
X Pull backrest 0043forwards in the direction of
the arrow and allow it to engage.
X To ensure that the backrest has engaged,
lean firmly against backrest 0043. Adjusting the multicontour seat
You can set the multicontour seat using
COMAND. See the separate COMAND Oper-
ating Instructions. Adjusting the 4-way lumbar support
0043
To raise the backrest contour
0044 To soften the backrest contour 108
SeatsSeats, steering wheel and mirrors
Page 114 of 466
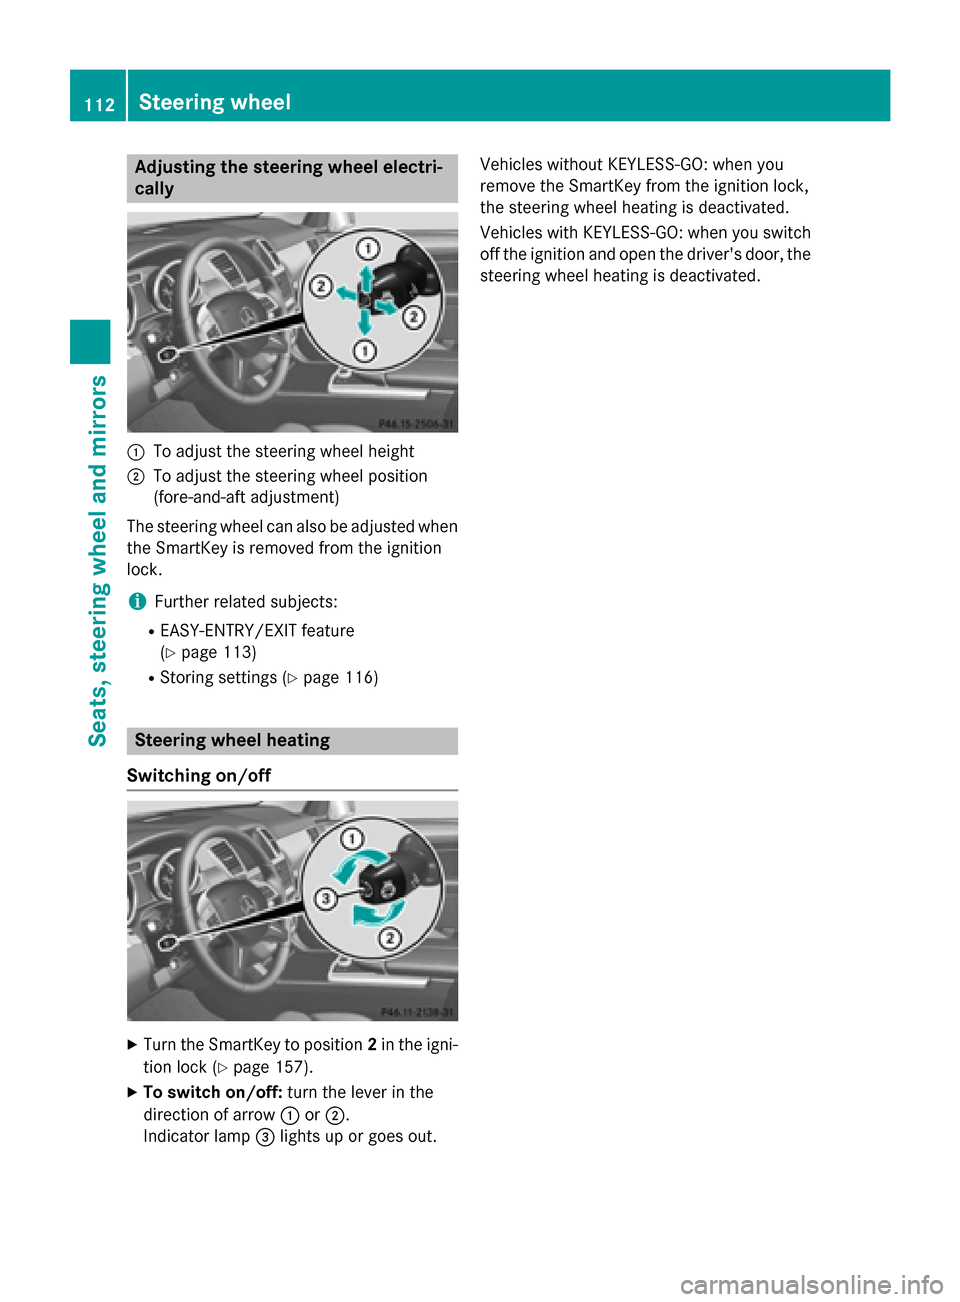
Adjusting the steering wheel electri-
cally 0043
To adjust the steering wheel height
0044 To adjust the steering wheel position
(fore-and-aft adjustment)
The steering wheel can also be adjusted when the SmartKey is removed from the ignition
lock.
i Further related subjects:
R EASY-ENTRY/EXIT feature
(Y page 113)
R Storing settings (Y page 116)Steering wheel heating
Switching on/off X
Turn the SmartKey to position 2in the igni-
tion lock (Y page 157).
X To switch on/off: turn the lever in the
direction of arrow 0043or0044.
Indicator lamp 0087lights up or goes out. Vehicles without KEYLESS-GO: when you
remove the SmartKey from the ignition lock,
the steering wheel heating is deactivated.
Vehicles with KEYLESS-GO: when you switch
off the ignition and open the driver's door, the steering wheel heating is deactivated. 112
Steering wheelSeats
, steering wheel and mirrors
Page 115 of 466

Problems with the steering wheel heating
Problem
Possible causes/consequences and
0050
0050Solutions The steering wheel
heating has switched
off prematurely or can-
not be switched on. The on-board voltage is too low because too many electrical con-
sumers are switched on.
X Switch off electrical consumers that you do not need, such as
the rear window defroster or interior lighting. EASY-ENTRY/EXIT feature
Important safety notes G
WARNING
When the EASY-ENTRY/EXIT feature adjusts
the steering wheel, you and other vehicle
occupants – particularly children – could
become trapped. There is a risk of injury.
While the EASY-ENTRY/EXIT feature is mak-
ing adjustments, make sure that no one has
any body parts in the sweep of the steering
wheel.
Move the steering wheel adjustment lever if
there is a risk of entrapment by the steering
wheel. The adjustment process is stopped.
Press one of the memory function position
buttons. This function is only available on
vehicles with memory function. G
WARNING
If children activate the EASY-ENTRY/EXIT fea- ture, they can become trapped, particularly
when unattended. There is a risk of injury.
When leaving the vehicle, always take the
SmartKey with you and lock the vehicle. Never leave children unsupervised in the vehicle. G
WARNING
If you drive off while the EASY-ENTRY/EXIT
feature is making adjustments, you could lose
control of the vehicle. There is a risk of an
accident.
Always wait until the adjustment process is
complete before driving off. The EASY-ENTRY/EXIT feature makes getting
in and out of your vehicle easier.
You can activate and deactivate the EASY-
ENTRY/EXIT feature in the on-board com-
puter (Y page 279).
Position of the steering wheel when the
EASY-ENTRY/EXIT feature is active The steering wheel swings upwards when
you:
R remove the SmartKey from the ignition lock
R open the driver's door with KEYLESS-GO in
position 1
R open the driver's door and the SmartKey is
in position 0or 1in the ignition lock
i The steering wheel only moves upwards if
it has not already reached the upper stop.
Position of the steering wheel for driv-
ing The steering wheel is moved to the last selec-
ted position when:
R the driver's door is closed
R you insert the SmartKey into the ignition
lock
or
R you press the Start/Stop button once on
vehicles with KEYLESS-GO
When you close the driver's door with the
ignition switched on, the steering wheel is
also automatically moved to the previously
set position.
The last position of the steering wheel is
stored when you switch off the ignition or Steering wheel
113Seats, steering wheel and mirrors Z
Page 119 of 466
the vehicle as a result of the adjustments
being made. There is a risk of an accident.
Only use the memory function on the driver's side when the vehicle is stationary. G
WARNING
When the memory function adjusts the seat or steering wheel, you and other vehicle occu-
pants – particularly children – could become
trapped. There is a risk of injury.
While the memory function is making adjust-
ments, make sure that no one has any body
parts in the sweep of the seat or steering
wheel. If somebody becomes trapped, imme-
diately release the memory function position
button. The adjustment process is stopped. G
WARNING
Children could become trapped if they acti-
vate the memory function, particularly when
unattended. There is a risk of injury.
When leaving the vehicle, always take the
SmartKey with you and lock the vehicle. Never leave children unsupervised in the vehicle.
With the memory function, you can store up
to three different settings, e.g. for three dif-
ferent people.
The following settings are stored as a single
memory preset:
R position of the seat, backrest and head
restraint
R driver's side: steering wheel position
R driver's side: position of the exterior mir-
rors on the driver's and front-passenger
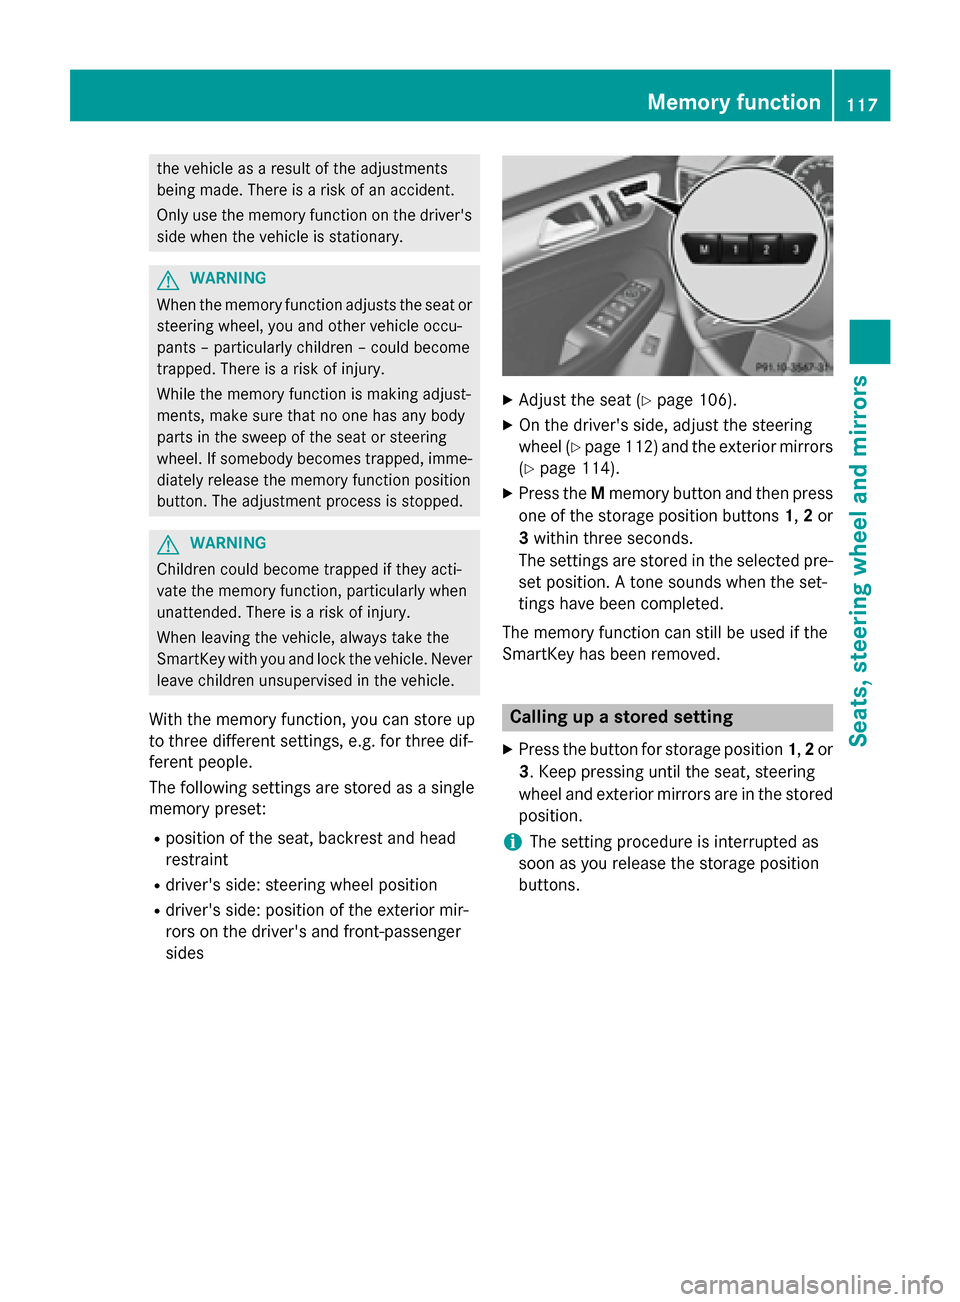
sides X
Adjust the seat (Y page 106).
X On the driver's side, adjust the steering
wheel (Y page 112 )and the exterior mirrors
(Y page 114).
X Press the Mmemory button and then press
one of the storage position buttons 1,2or
3 within three seconds.
The settings are stored in the selected pre-
set position. A tone sounds when the set-
tings have been completed.
The memory function can still be used if the
SmartKey has been removed. Calling up a stored setting
X Press the button for storage position 1,2or
3. Keep pressing until the seat, steering
wheel and exterior mirrors are in the stored
position.
i The setting procedure is interrupted as
soon as you release the storage position
buttons. Memory function
117Seats, steeringwheel and mirrors Z
Page 345 of 466
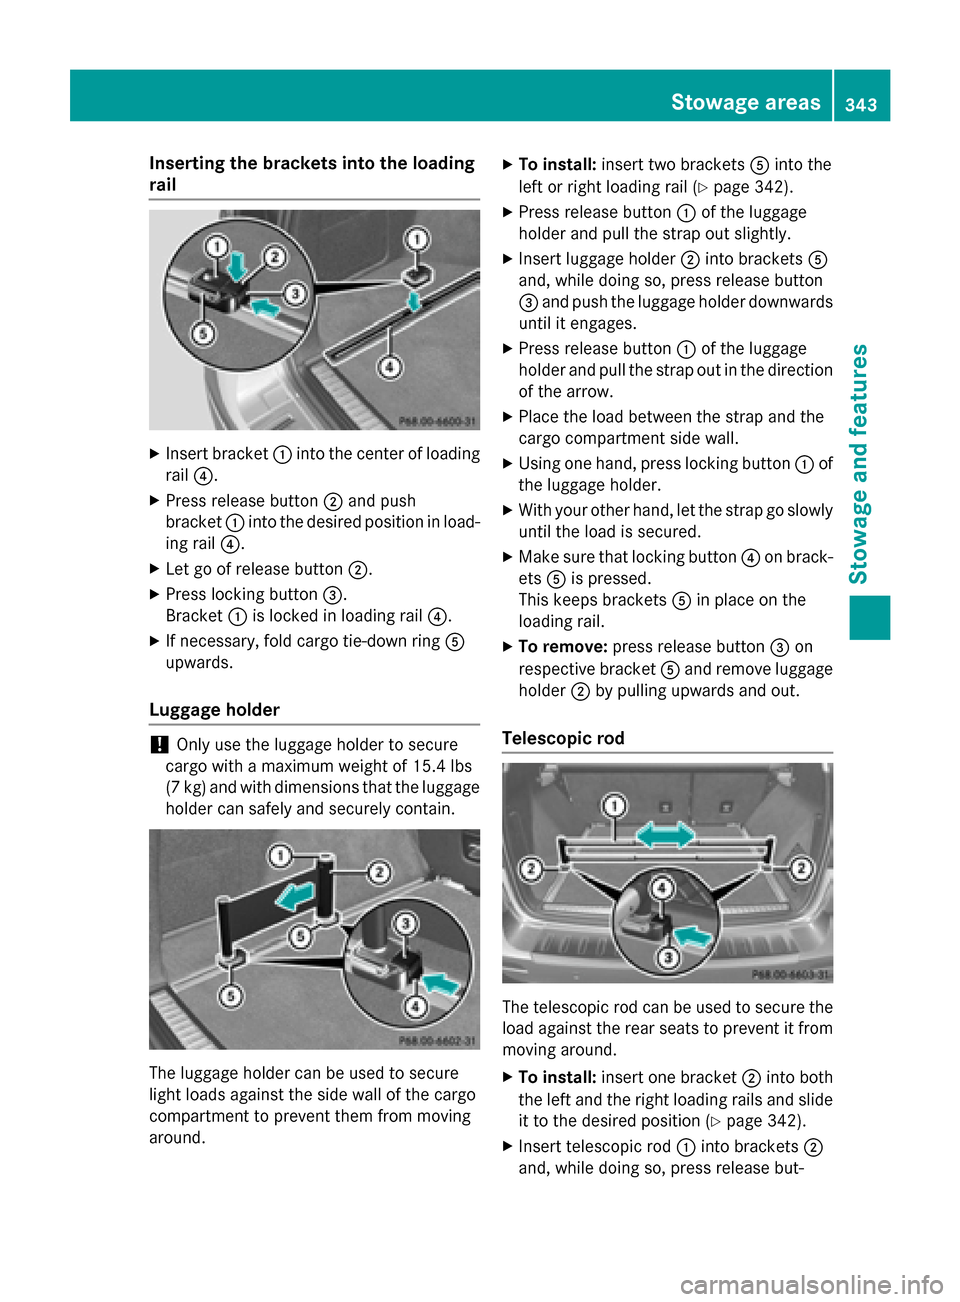
Inserting the brackets into the loading
rail X
Insert bracket 0043into the center of loading
rail 0085.
X Press release button 0044and push
bracket 0043into the desired position in load-
ing rail 0085.
X Let go of release button 0044.
X Press locking button 0087.
Bracket 0043is locked in loading rail 0085.
X If necessary, fold cargo tie-down ring 0083
upwards.
Luggage holder !
Only use the luggage holder to secure
cargo with a maximum weight of 15.4 lbs
(7 kg) and with dimensions that the luggage holder can safely and securely contain. The luggage holder can be used to secure
light loads against the side wall of the cargo
compartment to prevent them from moving
around. X
To install: insert two brackets 0083into the
left or right loading rail (Y page 342).
X Press release button 0043of the luggage
holder and pull the strap out slightly.
X Insert luggage holder 0044into brackets 0083
and, while doing so, press release button
0087 and push the luggage holder downwards
until it engages.
X Press release button 0043of the luggage
holder and pull the strap out in the direction
of the arrow.
X Place the load between the strap and the
cargo compartment side wall.
X Using one hand, press locking button 0043of
the luggage holder.
X With your other hand, let the strap go slowly
until the load is secured.
X Make sure that locking button 0085on brack-
ets 0083is pressed.
This keeps brackets 0083in place on the
loading rail.
X To remove: press release button 0087on
respective bracket 0083and remove luggage
holder 0044by pulling upwards and out.
Telescopic rod The telescopic rod can be used to secure the
load against the rear seats to prevent it from
moving around.
X To install: insert one bracket 0044into both
the left and the right loading rails and slide it to the desired position (Y page 342).
X Insert telescopic rod 0043into brackets 0044
and, while doing so, press release but- Stowage areas
343Stowage and featu res Z
Page 350 of 466
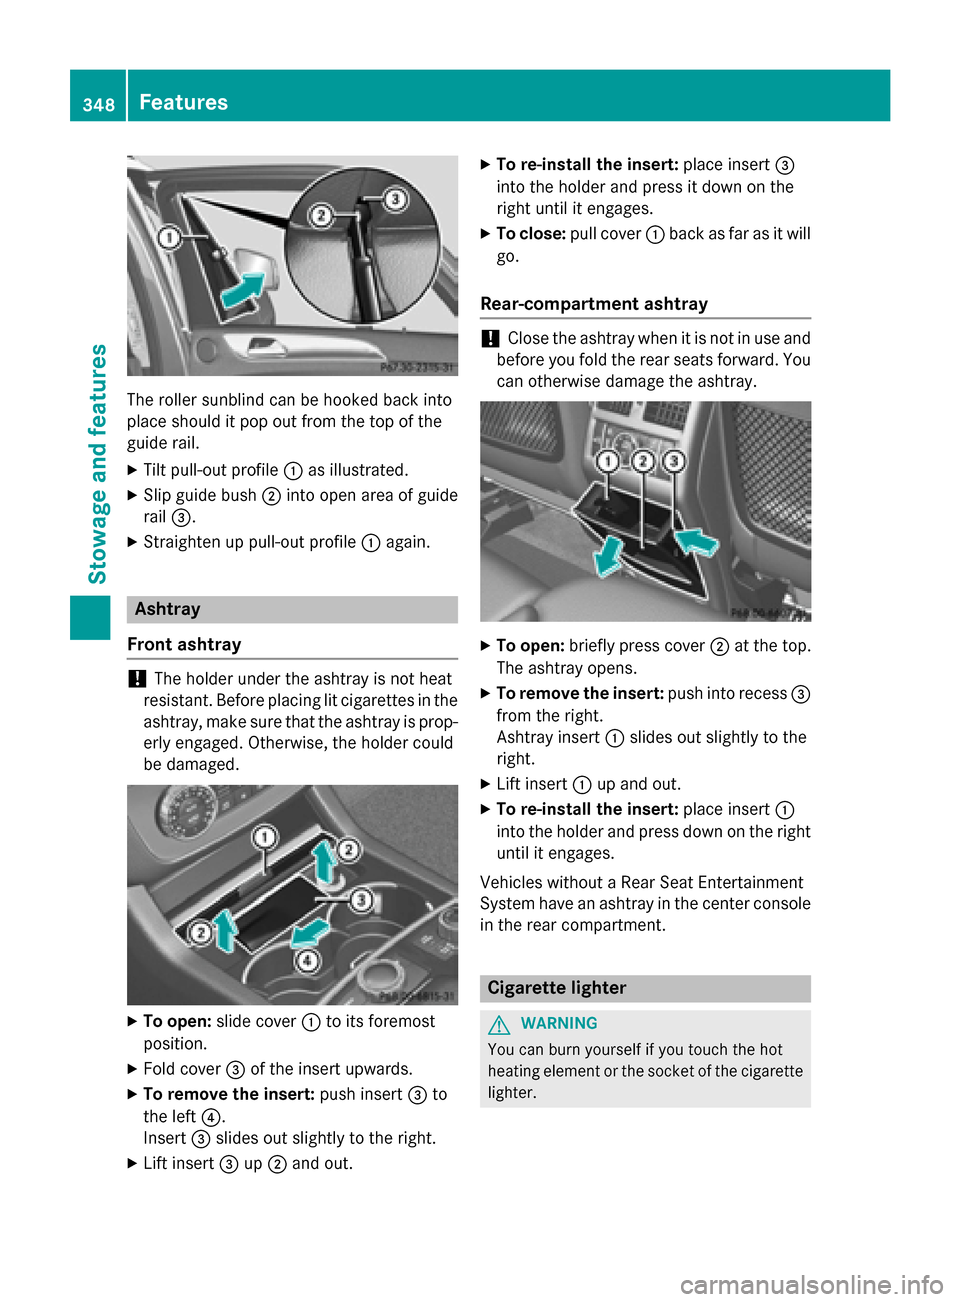
The roller sunblind can be hooked back into
place should it pop out from the top of the
guide rail.
X Tilt pull-out profile 0043as illustrated.
X Slip guide bush 0044into open area of guide
rail 0087.
X Straighten up pull-out profile 0043again. Ashtray
Front ashtray !
The holder under the ashtray is not heat
resistant. Before placing lit cigarettes in the
ashtray, make sure that the ashtray is prop- erly engaged. Otherwise, the holder could
be damaged. X
To open: slide cover 0043to its foremost
position.
X Fold cover 0087of the insert upwards.
X To remove the insert: push insert0087to
the left 0085.
Insert 0087slides out slightly to the right.
X Lift insert 0087up0044 and out. X
To re-install the insert: place insert0087
into the holder and press it down on the
right until it engages.
X To close: pull cover 0043back as far as it will
go.
Rear-compartment ashtray !
Close the ashtray when it is not in use and
before you fold the rear seats forward. You can otherwise damage the ashtray. X
To open: briefly press cover 0044at the top.
The ashtray opens.
X To remove the insert: push into recess0087
from the right.
Ashtray insert 0043slides out slightly to the
right.
X Lift insert 0043up and out.
X To re-install the insert: place insert0043
into the holder and press down on the right until it engages.
Vehicles without a Rear Seat Entertainment
System have an ashtray in the center console
in the rear compartment. Cigarette lighter
G
WARNING
You can burn yourself if you touch the hot
heating element or the socket of the cigarette lighter. 348
FeaturesStowage and features