2015 MERCEDES-BENZ M-Class Console
[x] Cancel search: ConsolePage 42 of 466

i
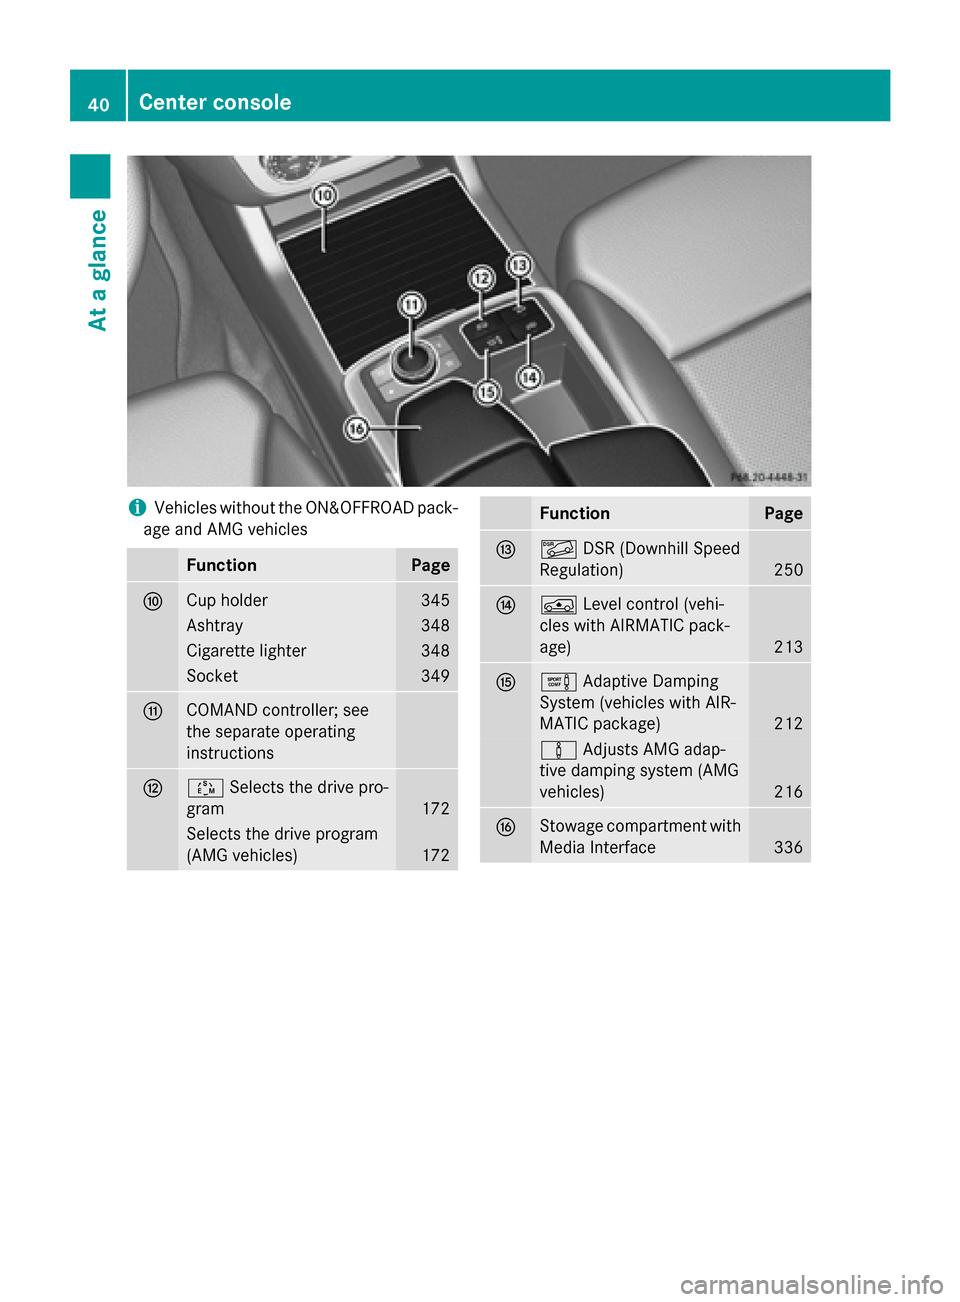
Vehicles without the ON&OFFROAD pack-
age and AMG vehicles Function Page
006E
Cup holder 345
Ashtray 348
Cigarette lighter 348
Socket 349
006F
COMAND controller; see
the separate operating
instructions
0070
00C8
Selects the drive pro-
gram 172
Selects the drive program
(AMG vehicles)
172 Function Page
0071
00C6
DSR (Downhill Speed
Regulation) 250
0072
00C4
Level control (vehi-
cles with AIRMATIC pack-
age) 213
0073
0091
Adaptive Damping
System (vehicles with AIR-
MATIC package) 212
00CC
Adjusts AMG adap-
tive damping system (AMG
vehicles) 216
0074
Stowage compartment with
Media Interface 33640
Center consoleAt a glance
Page 193 of 466

Do not shift down for additional engine brak-
ing on a slippery road surface. G
DANGER
If the exhaust pipe is blocked or adequate
ventilation is not possible, poisonous gases
such as carbon monoxide (CO) may enter the vehicle. This is the case, e.g. if the vehicle
becomes trapped in snow. There is a risk of
fatal injury.
If you leave the engine or the auxiliary heating
running, make sure the exhaust pipe and area
around the vehicle are clear of snow. To
ensure an adequate supply of fresh air, open a window on the side of the vehicle that is not
facing into the wind.
Have your vehicle winter-proofed at a quali-
fied specialist workshop at the onset of win-
ter.
Drive particularly carefully on slippery road
surfaces. Avoid sudden acceleration, steering and braking maneuvers. Do not use the cruise
control or DISTRONIC PLUS.
If the vehicle threatens to skid or cannot be
stopped when moving at low speed:
X Shift the transmission to position N.
Vehicles with the ON&OFFROAD package:
if driving in snow or with snow chains, select
the snow program (Y page 248) with the off-
road program selector wheel in the center
console.
i Vehicles with a diesel engine:
do not
cover the radiator, e.g. with a protective
cover. The measuring function of the
onboard diagnosis system may otherwise
provide inaccurate values. Some of these
values are required by law and must there-
fore always be accurate.
The outside temperature indicator is not
designed to serve as an ice-warning device
and is therefore unsuitable for that purpose.
Changes in the outside temperature are dis-
played after a short delay. Indicated temperatures just above the freez-
ing point do not guarantee that the road sur-
face is free of ice. The road may still be icy,
especially in wooded areas or on bridges. You
should pay special attention to road condi-
tions when temperatures are around the
freezing point.
For more information on driving with snow
chains, see (Y page 403).
For more information on driving with summer
tires, see (Y page 402).
Observe the notes in the "Winter operation"
section (Y page 402). Off-road driving
Important safety notes G
WARNING
If you drive on a steep incline at an angle or
turn when driving on an incline, the vehicle
could slip sideways, tip and rollover. There is a risk of an accident.
Always drive on a steep incline in the line of
fall (straight up or down) and do not turn the
vehicle. G
WARNING
If the vehicle level is high, the vehicle center of gravity is raised. This could cause the vehicleto tip over more easily on uphill or downhill
gradients. There is a risk of an accident.
Select the lowest possible vehicle level.
When driving off-road, sand, mud and water,
possibly mixed with oil, for example, could get
into the brakes. This could result in a reduced braking effect or in total brake failure and also
in increased wear and tear. The braking char- acteristics change depending on the materialingressing the brakes. Clean the brakes after
driving off-road. If you detect a reduced brak- ing effect or grinding noises, have the brake
system checked in a qualified specialist work-shop as soon as possible. Adapt your driving
style to the different braking characteristics. Driving
tips
191Driving an d parking Z
Page 226 of 466

the
Park Assist Finished
Park Assist Finished message
appears in the multifunction display. You will
then have to steer and merge into traffic on
your own. PARKTRONIC is still available. You
can take over the steering, before the vehicle has exited the parking space completely. This
is useful, for example when you recognize
that it is already possible to pull out of the
parking space.
Canceling Active Parking Assist X
Stop the movement of the multifunction
steering wheel or steer yourself.
Active Parking Assist will be canceled at
once. The Park Assist Canceled
Park Assist Canceled mes-
sage appears in the multifunction display.
or X Press the PARKTRONIC button on the cen-
ter console (Y page 219).
PARKTRONIC is switched off and Active
Parking Assist is immediately canceled.
The Park Assist Canceled Park Assist Canceled message
appears in the multifunction display.
Active Parking Assist is canceled automati-
cally if: R the electric parking brake is engaged
R transmission position Pis selected
R parking using Active Parking Assist is no
longer possible
R you are driving faster than 6 mph (10 km/h)
R a wheel spins, ESP ®
intervenes or fails. The
00E5 warning lamp lights up in the instru-
ment cluster.
A warning tone sounds. The parking symbol
goes out and the Park Assist Canceled
Park Assist Canceled
message appears in the multifunction dis-
play.
If Active Parking Assist is canceled, you must
steer again yourself.
Towing a trailer For vehicles with a trailer tow hitch, the min-
imum length for parking spaces is slightly
increased. If you have attached a trailer to your vehicle,
you should not use Active Parking Assist.
Once the electrical connection is established
between your vehicle and the trailer, Active
Parking Assist is no longer available. PARK-
TRONIC is deactivated for the rear area. Rear view camera
General notes Rear view camera
0043is in the handle on the
tailgate.
Rear view camera 0043is an optical parking and
maneuvering aid. It shows the area behind
your vehicle with guide lines in the COMAND display.
The area behind the vehicle is displayed as a
mirror image, as in the rear view mirror.
i The text of messages shown in the
COMAND display depends on the language
setting. The following are examples of rear view camera messages in the COMAND
display.
Important safety notes The rear view camera is only an aid. It is not a
replacement for your attention to your imme- diate surroundings. You are always responsi-
ble for safe maneuvering and parking. When
maneuvering or parking, make sure that there are no persons, animals or objects in the area
in which you are maneuvering. 224
Driving systemsDriving an
d parking
Page 257 of 466

Messages in the multifunction display
If a gear change process has not been successful, the following messages may be displayed in
the multifunction display: Display messages
Possible causes/consequences and
0050 0050Solutions LOW RANGE Max.
LOW RANGE Max.
Speed 40 km/h Speed 40 km/h You have been driving faster than 40 km/h. Additionally, the indi-
cator lamp on the button in the center console blinks.
X Drive more slowly to carry out the gear change process. LOW
LOW
RANGE
RANGE Shift
Shiftto
to
Position N Briefly
Position N Briefly The transmission is in position
Dand you are driving at below
40 km/h.
X Shift the transmission to Nto complete the gear change proc-
ess. LOW
LOW
RANGE
RANGE Shifting
Shifting
Canceled Please
Canceled Please
Reactivate Reactivate The gear change process was not carried out.
X Ensure that all gear change conditions are fulfilled and carry out
the gear change process again. LOW RANGE Stop
LOW RANGE Stop
Apply Apply
Parking
Parking Brake
Brake A warning tone also sounds. The gear change process has not been
completed. LOW RANGE is in the neutral position. There is no
connection between the engine and the drive wheels.
! Do not drive any further. You could otherwise damage the
vehicle's drive train.
X Stop the vehicle. Take into account the road and traffic condi-
tions when doing this.
X Depress the electric parking brake (Y page 184).
X Carry out the gear change process again.
If the gear change process has been carried out, the LOW LOWRANGE
RANGE
Stop Apply Parking Brake
Stop Apply Parking Brake message disappears.ON&OFFROAD menu in the COMAND
display (vehicles with the ON&OFF-
ROAD package) You can display some driving systems, driving
programs and additional information in the
COMAND display.
X Make sure that the SmartKey is in position
2 in the ignition lock.
X Make sure that COMAND is activated, see
the separate COMAND operating instruc-
tions.
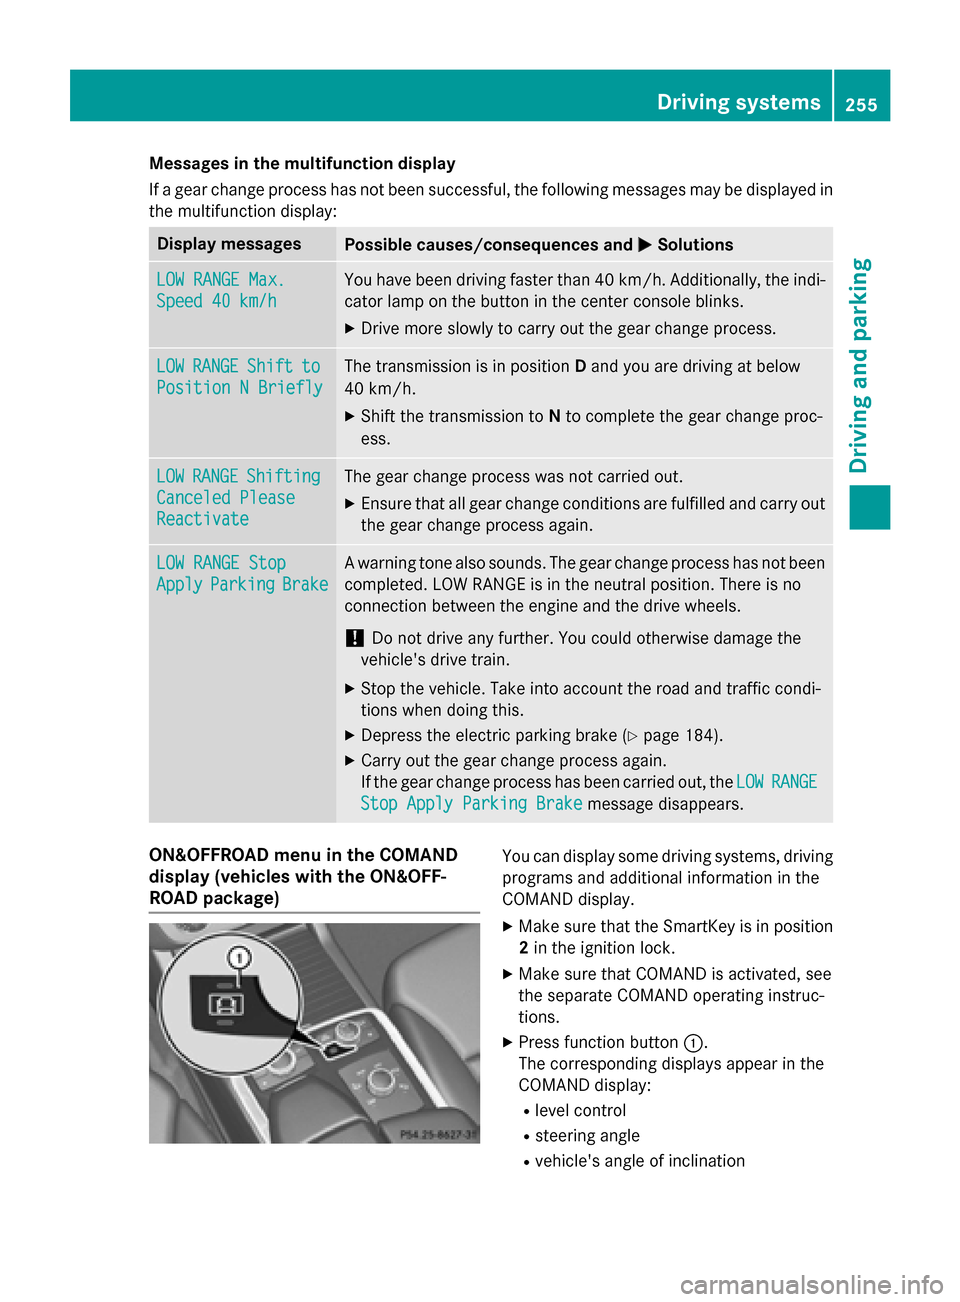
X Press function button 0043.
The corresponding displays appear in the
COMAND display:
R level control
R steering angle
R vehicle's angle of inclination Driving systems
255Driving and parking Z
Page 297 of 466

Display messages
Possible causes/consequences and
0050
0050Solutions Front Passenger
Front Passenger
Airbag Disabled Airbag Disabled
See See
Operator's
Operator's Man‐
Man‐
ual
ual The front-passenger air bag is deactivated during the journey, even
though:
R an adult
or
R a person larger than a certain size is occupying the front-
passenger seat
If additional forces are applied to the seat, the system may inter-
pret the occupant's weight as lower than it actually is.
G WARNING
The front-passenger air bag does not deploy during an accident.
There is an increased risk of injury. X Pull over and stop the vehicle safely as soon as possible, paying
attention to road and traffic conditions.
X Secure the vehicle against rolling away (Y page 182).
X Switch the ignition off.
X Have the occupant get out of the vehicle.
X Keep the seat unoccupied, close the front-passenger door and
switch on the ignition.
X Observe the PASSENGER AIR BAG OFF indicator lamp in the
center console and the multifunction display and check the fol-
lowing:
Seat unoccupied and ignition switched on:
R the PASSENGER AIR BAG OFF indicator lamp must light up and
remain lit. If the indicator lamp is on, OCS has deactivated the
front-passenger air bag (Y page 53).
R the Front Passenger Airbag Enabled See Operator's
Front Passenger Airbag Enabled See Operator's
Manual Manual orFront Passenger Airbag Disabled See Oper‐
Front Passenger Airbag Disabled See Oper‐
ator's Manual
ator's Manual display messages must not be shown in the
multifunction display.
X Wait for a period of at least 60 seconds until the necessary sys-
tem checks have been completed.
X Make sure that the display messages do not appear in the mul-
tifunction display.
If these conditions are fulfilled, the front-passenger seat can be
occupied again. Whether the PASSENGER AIR BAG OFF indicator
lamp remains lit or goes out depends on how OCS classifies the
occupant.
If the conditions are not fulfilled, the system is not operating cor- rectly.
X Visit a qualified specialist workshop immediately. Display
messages
295On-board computer and displays Z
Page 298 of 466

Display messages
Possible causes/consequences and
0050
0050Solutions Front Passenger
Front Passenger
Airbag Enabled Airbag Enabled
See See
Operator's
Operator's Man‐
Man‐
ual
ual The front-passenger air bag is enabled during the journey, even
though:
R a child, a small adult or an object weighing less than the sys-
tem's weight threshold is located on the front-passenger seat
or
R the front-passenger seat is unoccupied
The system may detect objects or forces applying additional
weight on the seat.
G WARNING
The air bag may deploy unintentionally.
There is an increased risk of injury. X Pull over and stop the vehicle safely as soon as possible, paying
attention to road and traffic conditions.
X Secure the vehicle against rolling away (Y page 182).
X Switch the ignition off.
X Open the front-passenger door.
X Remove the child and the child restraint system from the front-
passenger seat.
X Make sure that there are no objects on the seat adding to the
weight.
The system may otherwise detect the additional weight and
interpret the seat occupant's weight as greater than it actually
is.
X Keep the seat unoccupied, close the front-passenger door and
switch on the ignition.
X Observe the PASSENGER AIR BAG OFF indicator lamp in the
center console and the multifunction display and check the fol-
lowing:
Seat unoccupied and ignition switched on:
R the PASSENGER AIR BAG OFF indicator lamp must light up and
remain lit. When the indicator lamp is on, OCS (Occupant Clas-
sification System) has disabled the front-passenger air bag
(Y page 53).
R the Front Passenger Airbag Enabled See Operator's Front Passenger Airbag Enabled See Operator's
Manual
Manual orFront Passenger Airbag Disabled See Oper‐
Front Passenger Airbag Disabled See Oper‐
ator's Manual
ator's Manual display messages must not be shown in the
multifunction display.
X Wait for a period of at least 60 seconds until the necessary sys-
tem checks have been completed.
X Make sure that the display messages do not appear in the mul-
tifunction display. 296
Display
messagesOn-board computer and displays
Page 338 of 466

Stowage compartment under the arm-
rest X
To open: pull handle 0043up.
The armrest folds out.
In the stowage compartment, there is a stow-
age tray.
i Depending on the vehicle equipment, a
USB connection or a Media Interface is
installed in the stowage compartment.
A Media Interface is a universal interface
for mobile audio equipment, e.g. for an
iPod ®
or MP3 player (see the separate
COMAND Operating Instructions).
i There is a removable stowage tray in the
storage compartment, in which objects
such as an iPod ®
can be stored.
Eyeglasses compartment X
To open: press marking 0043.
The eyeglasses compartment opens down-
wards.
X To close: press marking 0043again and the
eyeglasses compartment returns upwards
and engages.
Make sure that the eyeglasses compartment
is always closed while the vehicle is in motion.
Stowage compartment in the front cen- ter console X
To open: slide cover 0043forwards.
Stowage compartment 0044appears.
X To close: pull cover 0043back as far as it will
go.
Stowage compartment in the rear cen-
ter console X
To open: briefly press the stowage com-
partment marking.
The stowage compartment opens. 336
Stowage areasStowage and features
Page 348 of 466

Cup holder in the front-compartment
center console 0043
Cup holder
0044 Cover
X To open: slide cover 0044to its foremost
position.
X To close: pull cover 0044back as far as it will
go.
You can remove the cup holder's rubber mat
for cleaning. Clean with clear, lukewarm
water only.
Temperature-controlled cup holder in
the front-compartment center console 0043
Cup holder
0044 Residual heat indicator lamp
0087 Switch
The temperature-controlled cup holder can
be used to keep cold drinks cool and warm
drinks warm. X
Turn the SmartKey to position 2in the igni-
tion lock.
X To switch on the cooling function: press
and hold button 0087until the blue indicator
lamp on the button lights up.
X To switch on the heating function: press
and hold button 0087until the red indicator
lamp on the button lights up.
X To switch off the function: press and hold
button 0087until the indicator lamp on the
button goes out.
When the heating function is used, the metal insert of the cup holder is heated. Once a cer-
tain temperature is reached, residual heat
indicator lamp 0044lights up. This means that
the metal insert of the cup holder is hot. For
this reason, you must not reach into the cup
holder metal insert.
Do not use hard or sharp objects to clean the cup holder. Use only a soft cloth to clean it.
Cup holder in the rear seat armrest !
Do not sit on or support your body weight
on the rear seat armrest when it is folded
down, as you could otherwise damage it. X
Fold down the rear seat armrest.
Cup holder 0043is located in the rear seat
armrest. 346
FeaturesStowage and features