2015 MERCEDES-BENZ GLK-CLASS SUV transmission
[x] Cancel search: transmissionPage 299 of 386
law, some U.S. garage door openers also fea-ture a "break".
Proceed as follows:
R if you live in Canada
R if you have difficulties programming the
garage door opener (regardless of where
you live) when using the programming
steps
X Press and hold one of buttons ; to ? on
the integrated garage door opener.
After a short time, indicator lamp : lights
up yellow.
X Release the button.
Indicator lamp : flashes yellow.
X Press button B of garage door remote
control A for two seconds, then release it
for two seconds.
X Press button B again for two seconds.
X Repeat this sequence on button B of
remote control A until indicator lamp :
lights up green.
When indicator lamp : lights up green:
programming is finished.
When indicator lamp : flashes green: pro-
gramming was successful. The next step is to synchronize the rolling code.
X Release button B of remote control A of
the garage door drive.
If indicator lamp : lights up red: repeat the
programming process for the correspond-
ing button on the rear-view mirror. When
doing so, vary the distance between remote
control A and the rear-view mirror.
The required distance between remote
control A and the integrated garage door
opener depends on the garage door drive
system. Several attempts might be neces-
sary. You should test every position for at
least 25 seconds before trying another
position. Problems when programming
If you are experiencing problems programing
the integrated garage door opener on the
rear-view mirror, take note of the following
instructions:
R Check the transmitter frequency used by
garage door drive remote control A and
whether it is supported. The transmitter
frequency can usually be found on the back
of the garage door drive remote control.
The integrated garage door opener is com- patible with devices that have units which
operate in the frequency range of 280 to
433 MHz.
R Replace the batteries in garage door
remote control A. This increases the like-
lihood that garage door remote control A
will transmit a strong and precise signal to
the integrated garage door opener.
R When programming, hold remote controlA at varying distances and angles from the
button which you are programming. Try var-
ious angles at a distance between 2and
12 inches (5to 30 cm) or at the same angle
but at varying distances.
R If another remote control is available for the
same garage door drive, repeat the same
programming steps with this remote con-
trol. Before performing these steps, make
sure that new batteries have been installed in garage door drive remote control A.
R Note that some remote controls only trans-
mit for a limited amount of time (the indi-
cator lamp on the remote control goes out).
Press button B on remote control A again
before transmission ends.
R Align the antenna cable of the garage door
opener unit. This can improve signal recep-tion/transmission.
Opening/closing the garage door
After it has been programmed, the integrated
garage door opener performs the function of
the garage door system remote control.
Features297
Stowage and features
Z
Page 308 of 386
should drive for a few minutes after clean-
ing. Braking heats the brake discs and the
brake pads/linings, thus drying them. The
vehicle can then be parked.
Regular care of your vehicle is a condition for
retaining the quality in the long term.
Use care products and cleaning agents rec-
ommended and approved by Mercedes-Benz.
Exterior care
Automatic car wash
GWARNING
Braking efficiency is reduced after washing
the vehicle. There is a risk of an accident.
After the vehicle has been washed, brake
carefully while paying attention to the traffic
conditions until full braking power is restored.
! If DISTRONIC PLUS or the HOLD function
is activated, the vehicle brakes automati-
cally in certain situations. To prevent dam-
age to the vehicle, deactivate DISTRONIC
PLUS and the HOLD function in the follow-
ing or other similar situations:
R when towing the vehicle
R in the car wash
! Never clean your vehicle in a Touchless
Automatic Car Wash as these use special
cleaning agents. These cleaning agents can
damage the paintwork or plastic parts.
! Make sure that the automatic transmis-
sion is in position N when washing your
vehicle in a tow-through car wash. The vehi-
cle could be damaged if the transmission is
in another position.
! Make sure that:
R the side windows and the sliding sunroof
are fully closed.
R the ventilation/heating is switched off
(the OFF button has been pressed).
R the windshield wiper switch is in position
0 . Otherwise, the vehicle might be damaged.
You can wash the vehicle in an automatic car wash from the very start.
If the vehicle is very dirty, pre-wash it before
cleaning it in an automatic car wash.
After using an automatic car wash, wipe off
wax from the windshield and the wiper
blades. This will prevent smears and reduce
wiping noises caused by residue on the wind-shield.
Washing by hand
In some countries, washing by hand is only
allowed at specially equipped washing bays.
Observe the legal requirements in all coun-
tries concerned.
X Do not use hot water and do not wash the
vehicle in direct sunlight.
X Use a soft sponge to clean.
X Use a mild cleaning agent, such as a car
shampoo approved by Mercedes-Benz.
X Thoroughly hose down the vehicle with a
gentle jet of water.
X Do not point the water jet directly towards
the air inlet.
X Use plenty of water and rinse out the
sponge frequently.
X Rinse the vehicle with clean water and dry
thoroughly with a chamois.
X Do not let the cleaning agent dry on the
paintwork.
When using the vehicle in winter, remove all
traces of road salt deposits carefully and as
soon as possible.
Power washers
GWARNING
The water jet from a circular jet nozzle (dirt
blasters) can cause invisible exterior damage to the tires or chassis components. Compo-
nents damaged in this way may fail unexpect- edly. There is a risk of an accident.
306Care
Maintenance and care
Page 323 of 386

Otherwise, the vehicle's electronic sys-
tem may be damaged.
R the transmission is locked in position P
after disconnecting the battery. The vehi-
cle is secured against rolling away. You
can then no longer move the vehicle.
The battery and the cover of the positive
terminal clamp must be installed securely
during operation.
Comply with safety precautions and take pro-
tective measures when handling batteries.
Risk of explosion.
Fire, open flames and smoking are
prohibited when handling the bat-
tery. Avoid creating sparks.
Battery acid is caustic. Avoid con-
tact with skin, eyes or clothing.
Wear suitable protective clothing,
especially gloves, apron and face-
guard.
Rinse any acid spills immediately
with clear water. Contact a physi-
cian if necessary.
Wear eye protection.
Keep children away.
Observe this Operator's Manual.
In order for the battery to achieve the maxi-
mum possible service life, it must always be
sufficiently charged.
Have the battery condition of charge checked
more frequently if you use the vehicle mainly for short trips or if you leave it standing idle
for a lengthy period. Consult a qualified spe- cialist workshop if you wish to leave your
vehicle parked for a long period of time.
Like other batteries, the vehicle battery may
discharge over time if you do not use the
vehicle. In this case, have the battery discon-
nected at a qualified specialist workshop. You can also charge the battery with a charger
recommended by Mercedes-Benz. Contact a
qualified specialist workshop for further infor-
mation.
iRemove the SmartKey if you park the
vehicle and do not require any electrical
consumers. The vehicle will then use very
little energy, thus conserving battery
power.
iIf the power supply has been interrupted,
e.g. if you reconnect the battery, you will
have to:
R set the clock; see the separate operating
instructions.
On vehicles with COMAND and a naviga- tion system, the clock is set automati-
cally.
R reset the panorama roof with power tilt/
sliding panel. ( Y page 97)
R reset the function for folding the exterior
mirrors in/out automatically by folding
the mirrors out once ( Y page 110) 12
.
Charging the battery
GWARNING
During charging and jump-starting, explosive
gases can escape from the battery. There is a
risk of an explosion.
Particularly avoid fire, open flames, creating
sparks and smoking. Ensure there is sufficient
ventilation while charging and jump-starting.
Do not lean over a battery.
GWARNING
Battery acid is caustic. There is a risk of injury.
12 This function is only available in vehicles for Canada.
Battery (vehicle)321
Roadside Assistance
Z
Page 326 of 386
ROnly use jumper cables which have a sufficient cross-section and insulated terminal clamps.
R If the battery is fully discharged, leave the battery tha t is being used to jump-start connected
for a few minutes before attempting to start. This charges the batter y slightly.
R Make sure that the two vehicles do not touch.
Make sure that:
R the jumper cables are not damaged.
R bare parts of the terminal clamp do not come into con tact with other metal parts while the
jumper cables are connected to the battery.
R the jumper cables cannot come into contact with parts su ch as the V-belt pulley or the fan.
These parts move when the engine is started and while it is running.
X Apply the parking brake firmly.
X Shift the automatic transmission to position P.
X Switch off all electrical consumers, e.g. rear window defroster , lighting, etc.
X Open the hood.
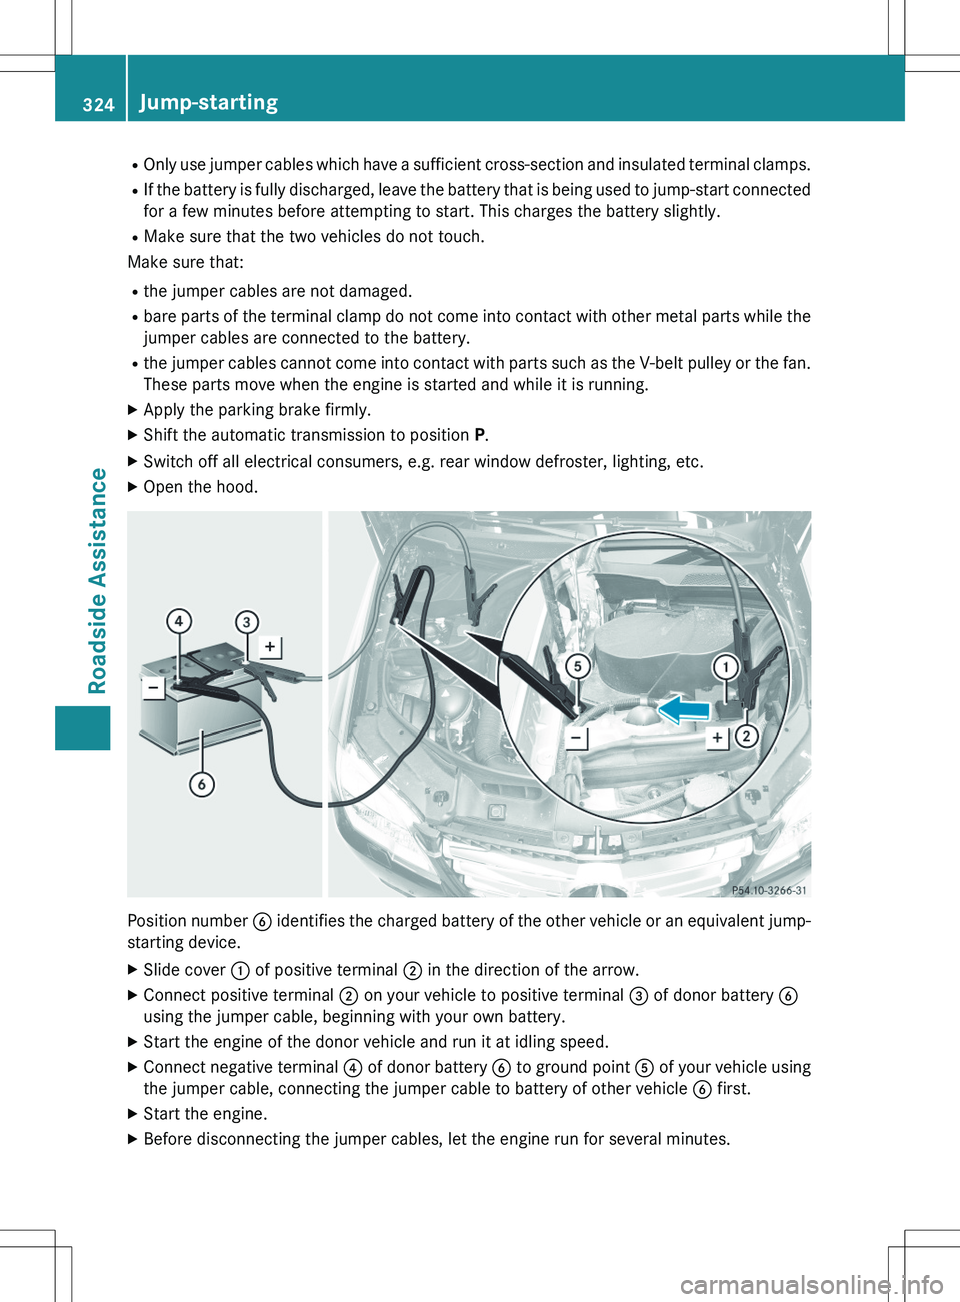
Position number B identifies the charged battery of the other vehicle or a n equivalent jump-
starting device.
X Slide cover : of positive terminal ; in the direction of the arrow.
X Connect positive terminal ; on your vehicle to positive terminal = of donor battery B
using the jumper cable, beginning with your own battery.
X Start the engine of the donor vehicle and run it at idling speed.
X Connect negative terminal ? of donor battery B to ground point A of your vehicle using
the jumper cable, connecting the jumper cable to battery of othe r vehicle B first.
X Start the engine.
X Before disconnecting the jumper cables, let the engine run for sev eral minutes.
324Jump-starting
Roadside Assistance
Page 328 of 386
The automatic transmission must be in posi-
tion N when the vehicle is being towed.
The battery must be connected and charged.
Otherwise, you:
R cannot turn the SmartKey to position 2 in
the ignition lock
R cannot shift the automatic transmission to
position N
iDisarm the automatic locking feature
before the vehicle is towed ( Y page 86). You
could otherwise be locked out when push-
ing or towing the vehicle.
Installing/removing the towing eye
Installing the towing eye
GWARNING
The exhaust tail pipe may be very hot. There is
a risk of burns when removing the rear cover.
Do not touch the exhaust pipe. Take particular
care when removing the rear cover.
Vehicles with a trailer tow hitch: if you intend to use the vehicle for towing, install the ball
coupling and connect the towbar to it
( Y page 214).
X Remove the towing eye from the vehicle
tool kit ( Y page 314).
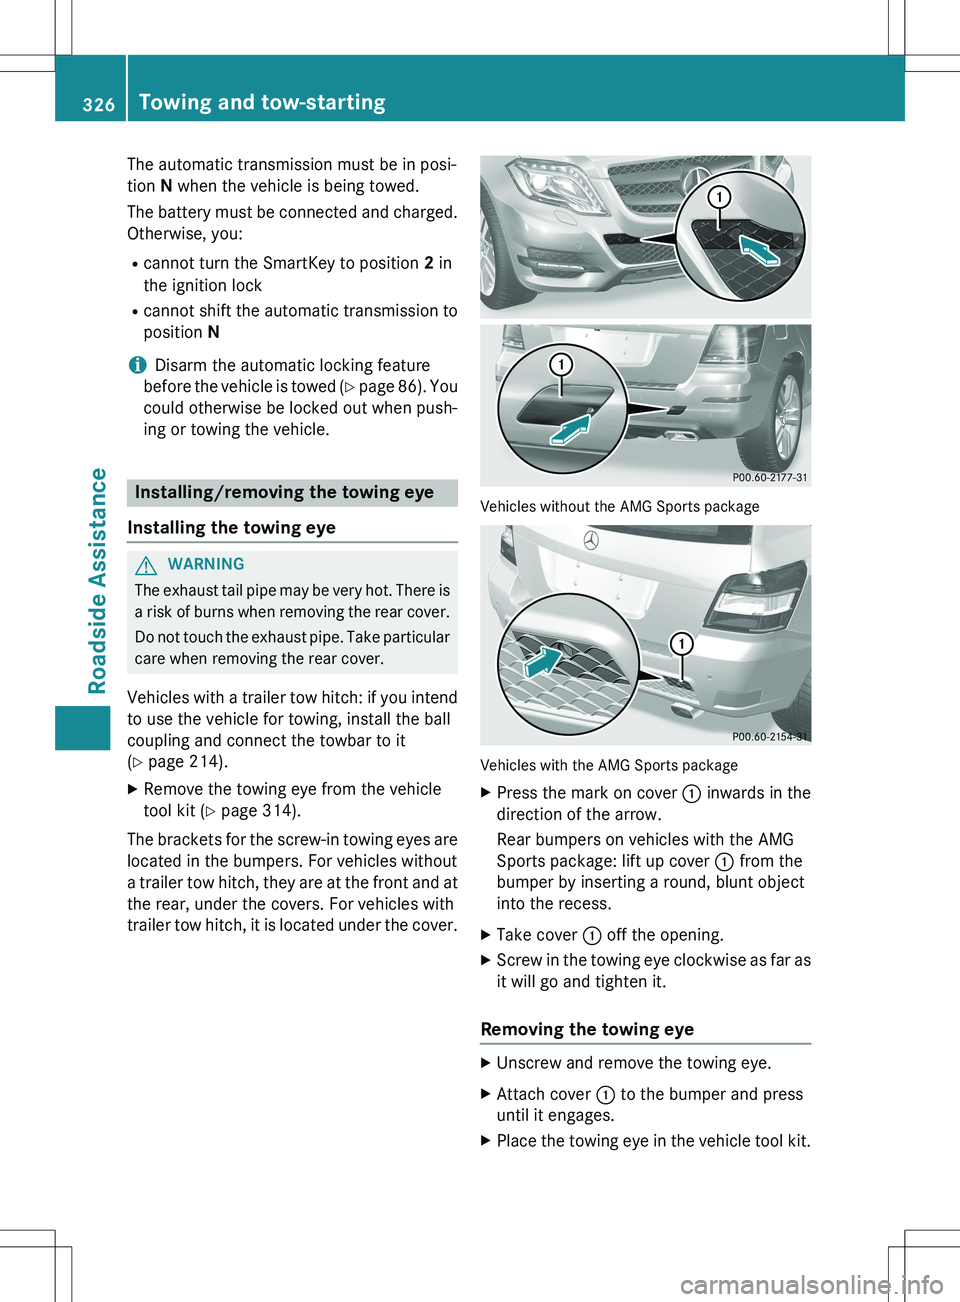
The brackets for the screw-in towing eyes are
located in the bumpers. For vehicles without
a trailer tow hitch, they are at the front and at
the rear, under the covers. For vehicles with
trailer tow hitch, it is located under the cover.
Vehicles without the AMG Sports package
Vehicles with the AMG Sports package
X Press the mark on cover : inwards in the
direction of the arrow.
Rear bumpers on vehicles with the AMG
Sports package: lift up cover : from the
bumper by inserting a round, blunt object
into the recess.
X Take cover : off the opening.
X Screw in the towing eye clockwise as far as
it will go and tighten it.
Removing the towing eye
XUnscrew and remove the towing eye.
X Attach cover : to the bumper and press
until it engages.
X Place the towing eye in the vehicle tool kit.
326Towing and tow-starting
Roadside Assistance
Page 329 of 386
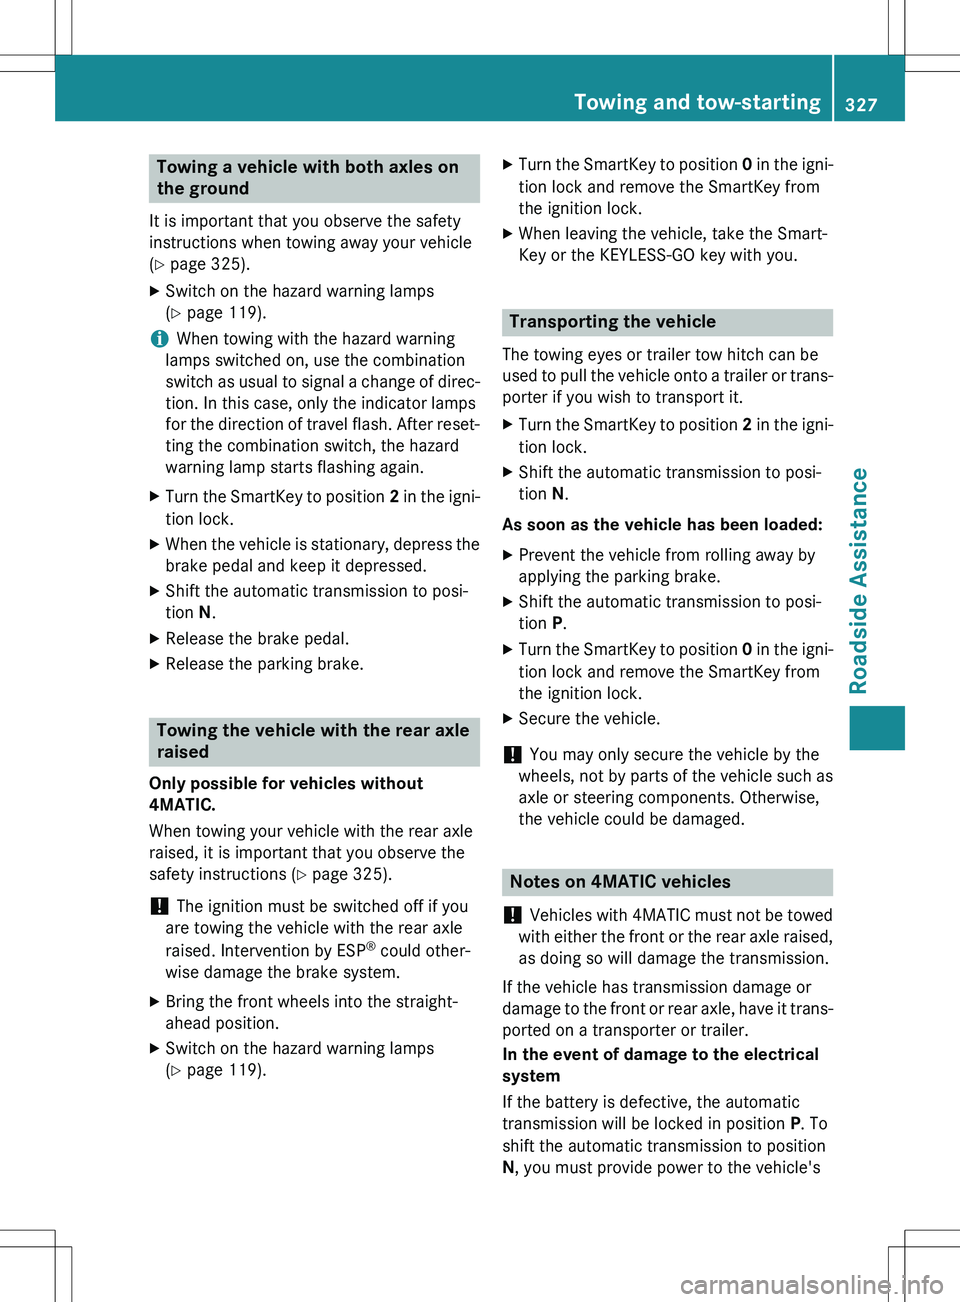
Towing a vehicle with both axles on
the ground
It is important that you observe the safety
instructions when towing away your vehicle
(Y page 325).
X Switch on the hazard warning lamps
(Y page 119).
iWhen towing with the hazard warning
lamps switched on, use the combination
switch as usual to signal a change of direc- tion. In this case, only the indicator lamps
for the direction of travel flash. After reset- ting the combination switch, the hazard
warning lamp starts flashing again.
X Turn the SmartKey to position 2 in the igni-
tion lock.
X When the vehicle is stationary, depress the
brake pedal and keep it depressed.
X Shift the automatic transmission to posi-
tion N.
X Release the brake pedal.
X Release the parking brake.
Towing the vehicle with the rear axle
raised
Only possible for vehicles without
4MATIC.
When towing your vehicle with the rear axle
raised, it is important that you observe the
safety instructions ( Y page 325).
! The ignition must be switched off if you
are towing the vehicle with the rear axle
raised. Intervention by ESP ®
could other-
wise damage the brake system.
X Bring the front wheels into the straight-
ahead position.
X Switch on the hazard warning lamps
(Y page 119). X
Turn the SmartKey to position 0 in the igni-
tion lock and remove the SmartKey from
the ignition lock.
X When leaving the vehicle, take the Smart-
Key or the KEYLESS-GO key with you.
Transporting the vehicle
The towing eyes or trailer tow hitch can be
used to pull the vehicle onto a trailer or trans-
porter if you wish to transport it.
X Turn the SmartKey to position 2 in the igni-
tion lock.
X Shift the automatic transmission to posi-
tion N.
As soon as the vehicle has been loaded:
X Prevent the vehicle from rolling away by
applying the parking brake.
X Shift the automatic transmission to posi-
tion P.
X Turn the SmartKey to position 0 in the igni-
tion lock and remove the SmartKey from
the ignition lock.
X Secure the vehicle.
! You may only secure the vehicle by the
wheels, not by parts of the vehicle such as
axle or steering components. Otherwise,
the vehicle could be damaged.
Notes on 4MATIC vehicles
!
Vehicles with 4MATIC must not be towed
with either the front or the rear axle raised, as doing so will damage the transmission.
If the vehicle has transmission damage or
damage to the front or rear axle, have it trans-
ported on a transporter or trailer.
In the event of damage to the electrical
system
If the battery is defective, the automatic
transmission will be locked in position P. To
shift the automatic transmission to position
N , you must provide power to the vehicle's
Towing and tow-starting327
Roadside Assistance
Z
Page 330 of 386
electrical system in the same way as when
jump-starting (Y page 323).
Have the vehicle transported on a transporter or trailer.
Tow-starting (emergency engine
starting)
!
Vehicles with automatic transmission
must not be started by tow-starting. This
could otherwise damage the transmission.
You can find information on "Jump-starting" at
( Y page 323).
Fuses
Important safety notes
GWARNING
If you manipulate or bridge a faulty fuse or if
you replace it with a fuse with a higher amper-
age, the electric cables could be overloaded.
This could result in a fire. There is a risk of an
accident and injury.
Always replace faulty fuses with the specified
new fuses having the correct amperage.
! Only use fuses that have been approved
for Mercedes-Benz vehicles and which
have the correct fuse rating for the system concerned. Otherwise, components or sys-
tems could be damaged.
The fuses in your vehicle serve to close down faulty circuits. If a fuse blows, all the compo- nents on the circuit and their functions stop
operating.
Blown fuses must be replaced with fuses of
the same rating, which you can recognize by
the color and value. The fuse ratings are listedin the fuse allocation chart.
If a newly inserted fuse also blows, have the
cause traced and rectified at a qualified spe-
cialist workshop, e.g. an authorized
Mercedes-Benz Center.
Before changing a fuse
X Secure the vehicle against rolling away
(Y page 168).
X Switch off all electrical consumers.
X Turn the SmartKey to position 0 in the igni-
tion lock and remove it ( Y page 149).
or
X On vehicles with KEYLESS-GO, make sure
the ignition is switched off ( Y page 149).
All indicator lamps in the instrument cluster
must be off.
The fuses are located in various fuse boxes:
R Fuse box on the driver's side of the dash-
board
R Fuse box in the engine compartment on the
left-hand side of the vehicle, when viewed
in the direction of travel
R Fuse box in the stowage well under the
cargo compartment floor on the right-hand
side of the vehicle, when viewed in the
direction of travel
The fuse allocation chart is in the vehicle tool kit which is located in the stowage compart-
ment under the cargo compartment floor
( Y page 314).
Dashboard fuse box
!
Do not use a pointed object such as a
screwdriver to open the cover in the dash-
board. You could damage the dashboard or
the cover.
! Make sure that no moisture can enter the
fuse box when the cover is open.
! When closing the cover, make sure that it
is lying correctly on the fuse box. Moisture seeping in or dirt could otherwise impair
the operation of the fuses.
328Fuses
Roadside Assistance
Page 375 of 386

XSlide the right-hand front seat to its rear-
most position.
X Fold floor covering : upwards.
You will see VIN ;.
The VIN can also be found in the following
locations: R on the lower edge of the windshield
(Y page 373)
R on the vehicle identification plate
(Y page 372)
Engine number
:Emission control information plate,
including the certification of both federal
and Californian emissions standards
;Engine number (stamped into the crank-
case)
=VIN (on the lower edge of the windshield)
Service products and filling capaci-
ties
Important safety notes
GWARNING
Service products may be poisonous and haz-
ardous to health. There is a risk of injury.
Comply with instructions on the use, storage
and disposal of service products on the labels
of the respective original containers. Always
store service products sealed in their original containers. Always keep service products out
of the reach of children.
HEnvironmental note
Dispose of service products in an environ-
mentally responsible manner.
Service products include the following: R Fuels (e.g. gasoline, diesel)
R Exhaust gas aftertreatment additives, e.g.
DEF
R Lubricants (e.g. engine oil, transmission oil)
R Coolant
R Brake fluid
R Windshield washer fluid
R Climate control system refrigerant
Comply with all valid regulations with respect to handling, storing, and disposing of service
fluids.
Components and service products must be
matched. You should therefore only use prod- ucts that have been tested and approved by
Mercedes-Benz.
Information about tested and approved prod- ucts can be obtained from an authorized
Mercedes-Benz Center or on the Internet at
http://bevo.mercedes-benz.com.
You can recognize service products approved
by Mercedes-Benz by the following inscrip-
tion on the containers:
R MB-Freigabe (e.g. MB-Freigabe 229.51)
R MB Approval (e.g. MB Approval 229.51)
Other designations or recommendations indi- cate a level of quality or a specification in
accordance with an MB Sheet Number (e.g.
MB 229.5). They have not necessarily been
approved by Mercedes-Benz.
Fuel
Important safety notes
GWARNING
Fuel is highly flammable. If you handle fuel
incorrectly, there is a risk of fire and explo-
sion.
Service products and filling capacities373
Technical data
Z