2015 MERCEDES-BENZ GLK-CLASS SUV battery
[x] Cancel search: batteryPage 7 of 386

Resetting the service interval dis-
play ................................................ 305
Service message ............................ 304
Special service requirements ......... 305
ATA (Anti-Theft Alarm system)
Activating/deactivating ................... 75
Function ........................................... 75
Switching off the alarm .................... 75
ATTENTION ASSIST
Activating/deactivating ................. 229
Display message ............................ 250
Function/notes ............................. 202
Audio menu (on-board com-
puter) .................................................. 2 26
Audio system
see separate operating instructions
Authorized Mercedes-Benz Center
see Qualified specialist workshop
Authorized workshop
see Qualified specialist workshop
AUTO lights
Display message ............................ 246
see Lights
Automatic car wash (care) ............... 306
Automatic engine start (ECO start/
stop function) .................................... 153
Automatic engine switch-off (ECO
start/stop function) .......................... 153
Automatic headlamp mode .............. 116
Automatic transmission
Accelerator pedal position ............. 159
Automatic drive program ............... 160
Changing gear ............................... 159
DIRECT SELECT lever ..................... 156
Display message ............................ 257
Driving tips .................................... 159
Emergency running mode .............. 162
Engaging drive position .................. 158
Engaging neutral ............................ 157
Engaging park position automati-
cally .............................................. . 157
Engaging reverse gear ................... 157
Engaging the park position ............ 157
Kickdown ....................................... 159
Manual drive program .................... 160
Overview ........................................ 156
Problem (malfunction) ................... 162 Program selector button ................ 159
Pulling away ................................... 152
Starting the engine ........................ 151
Steering wheel paddle shifters ...... 160
Trailer towing ................................. 159
Transmission position display ........ 157
Transmission positions .................. 158
Automatic transmission emer-
gency mode ....................................... 162
B
Backup lamp
Changing bulbs .............................. 125
Display message ............................ 245
Bag hook ............................................ 278
Ball coupling
Installing ........................................ 21 4
Removing ....................................... 217
Storing ........................................... 2 17
BAS (Brake Assist System) ................. 69
BAS PLUS (Brake Assist System
PLUS) ................................................... . 69
Battery (SmartKey)
Checking .......................................... 81
Important safety notes .................... 81
Replacing ......................................... 8 1
Battery (vehicle)
Charging ........................................ 321
Display message ............................ 248
Important safety notes .................. 319
Jump starting ................................. 323
Belt
see Seat belts
Belt force limiter
Activation ......................................... 60
Function ........................................... 60
Blind Spot Assist
Activating/deactivating ................. 229
Display message ............................ 252
Notes/function .............................. 203
Trailer towing ................................. 205
see Active Blind Spot Assist
BlueTEC (DEF) .................................... 376
BlueTEC ®
Adding DEF .................................... 165
Brake Assist
see BAS (Brake Assist System)
Index5
Page 18 of 386

Safety systemsee Driving safety systems
Seat belts
Adjusting the driver's and front-
passenger seat belt ......................... 59
Adjusting the height ......................... 59
Belt force limiters ............................ 60
center rear-compartment seat ......... 59
Cleaning ......................................... 31 2
Correct usage .................................. 57
Emergency Tensioning Devices ........ 60
Fastening ......................................... 58
Important safety guidelines ............. 56
Releasing ......................................... 59
Safety guidelines ............................. 43
Switching belt adjustment on/off
(on-board computer) ...................... 233
Warning lamp ................................. 260
Warning lamp (function) ................... 60
Seats
Adjusting (electrically) ................... 101
Adjusting lumbar support .............. 104
Adjusting the 4-way lumbar sup-
port ............................................... . 104
Adjusting the head restraint .......... 102
Cleaning the cover ......................... 311
Correct driver's seat position ........ 100
Folding the backrest (rear com-
partment) forwards/back .............. 276
Folding the rear bench seat for-
wards/back ................................... 276
Important safety notes .................. 101
Seat heating problem .................... 106
Storing settings (memory func-
tion) .............................................. . 112
Switching seat heating on/off ....... 105
Sensors (cleaning instructions) ....... 309
Service menu (on-board com-
puter) .................................................. 2 30
Service products
Brake fluid ..................................... 377
Coolant (engine) ............................ 378
DEF special additives ..................... 376
Engine oil ....................................... 377
Fuel ............................................... . 373
Important safety notes .................. 373
Refrigerant (air-conditioning sys-
tem) ............................................... 379Washer fluid ................................... 379
Setting the air distribution ............... 140
Setting the airflow ............................ 141
Settings
Factory (on-board computer) ......... 234
On-board computer ....................... 230
Side impact air bag ............................. 47
Side marker lamp (display mes-
sage) ................................................... 245
Side windows
Cleaning ......................................... 30 8
Convenience closing feature ............ 93
Convenience opening feature .......... 93
Important safety information ........... 91
Opening/closing .............................. 92
Problem (malfunction) ..................... 94
Resetting ......................................... 94
Sliding sunroof
see Panorama roof with power
tilt/sliding panel
SmartKey
Changing the battery ....................... 81
Changing the programming ............. 80
Checking the battery ....................... 81
Convenience closing feature ............ 93
Convenience opening feature .......... 93
Display message ............................ 258
Door central locking/unlocking ....... 78
Important safety notes .................... 78
Loss ................................................. 83
Mechanical key ................................ 80
Positions (ignition lock) ................. 149
Problem (malfunction) ..................... 83
Starting the engine ........................ 151
Snow chains ...................................... 335
Sockets
Center console .............................. 285
General notes ................................ 284
Rear compartment ......................... 285
Special seat belt retractor .................. 64
Specialist workshop ............................ 27
Speed, controlling
see Cruise control
Speedometer
Digital ............................................ 224
In the Instrument cluster ................. 33
Segments ...................................... 221
16Index
Page 29 of 386

the driver's footwell. Install the floormats
securely and as specified in order to ensure
sufficient clearance for the pedals. Do not useloose floormats and do not place floormats ontop of one another.
! If the engine is switched off and equip-
ment on the diagnostics connection is
used, the starter battery may discharge.
Connecting equipment to the diagnostics
connection can lead to emissions monitoring information being reset, for example. This
may lead to the vehicle failing to meet the
requirements of the next emissions test dur-
ing the main inspection.
Qualified specialist workshop
An authorized Mercedes-Benz Center is a
qualified specialist workshop. It has the nec-
essary specialist knowledge, tools and quali-
fications to correctly carry out the work
required on your vehicle. This is especially the
case for work relevant to safety.
Observe the notes in the Maintenance Book-
let.
Always have the following work carried out at an authorized Mercedes-Benz Center:
R work relevant to safety
R service and maintenance work
R repair work
R alterations, installation work and modifica-
tions
R work on electronic components
Correct use
If you remove any warning stickers, you or
others could fail to recognize certain dangers.
Leave warning stickers in position.
Observe the following information when driv- ing your vehicle: R the safety notes in this manual
R the vehicle technical data R
traffic rules and regulations
R laws and safety standards pertaining to
motor vehicles
Problems with your vehicle
If you should experience a problem with your
vehicle, particularly one that you believe may affect its safe operation, we urge you to con-
tact an authorized Mercedes-Benz Center
immediately to have the problem diagnosed
and rectified. If the problem is not resolved to
your satisfaction, please discuss the problem
again with a Mercedes-Benz Center or con-
tact us at one of the following addresses.
In the USA
Customer Assistance Center
Mercedes-Benz USA, LLC
One Mercedes Drive
Montvale, NJ 07645-0350
In Canada
Customer Relations Department
Mercedes-Benz Canada, Inc.
98 Vanderhoof Avenue
Toronto, Ontario M4G 4C9
Reporting safety defects
USA only:
The following text is published as required of manufacturers under Title 49, Code of U.S.
Federal Regulations, Part 575 pursuant to the
"National Traffic and Motor Vehicle Safety Act of 1966".
If you believe that your vehicle has a defect
which could cause a crash or could cause
injury or death, you should immediately
inform the National Highway Traffic Safety
Administration (NHTSA) in addition to notify-
ing Mercedes-Benz USA, LLC.
If NHTSA receives similar complaints, it may
open an investigation, and if it finds that a
safety defect exists in a group of vehicles, it
may order a recall and remedy campaign.
Introduction27
Z
Page 77 of 386

When leaving the vehicle, always take the
SmartKey with you and lock the vehicle. The
engine can be started by anyone with a valid
SmartKey that is left inside the vehicle.
iThe immobilizer is always deactivated
when you start the engine.
In the event that the engine cannot be star-
ted (yet the vehicle's battery is charged),
the system is not operational. Contact an
authorized Mercedes-Benz Center or call
1-800-FOR-MERCedes (in the USA) or
1-800-387-0100 (in Canada).
ATA (anti-theft alarm system)
A visual and audible alarm is triggered if the
alarm system is armed and you open: R a door
R the vehicle with the mechanical key
R the tailgate
R the hood
The alarm is not switched off, even if you
close the open door that triggered it, for
example.
iIf the alarm continues for more than
30 seconds, the mbrace emergency call
system automatically notifies the Cus-
tomer Assistance Center. This is done
either by text message or data connection. The emergency call system sends the mes-sage or data provided that:
R you have subscribed to the mbrace ser-
vice.
R the mbrace service has been activated
properly.
R the necessary mobile phone network is
available.
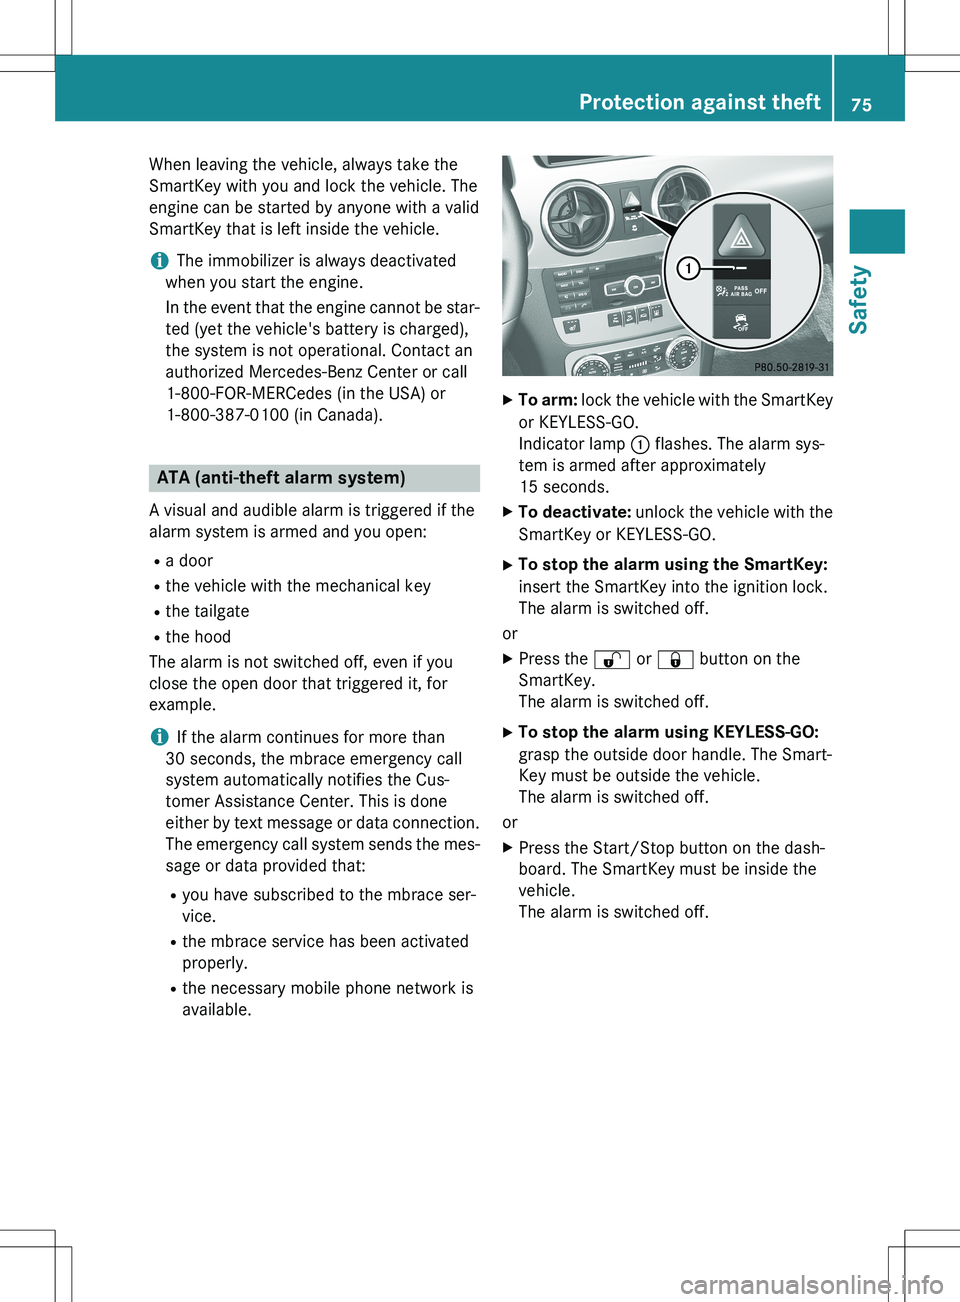
XTo arm: lock the vehicle with the SmartKey
or KEYLESS-GO.
Indicator lamp : flashes. The alarm sys-
tem is armed after approximately
15 seconds.
X To deactivate: unlock the vehicle with the
SmartKey or KEYLESS-GO.
X To stop the alarm using the SmartKey:
insert the SmartKey into the ignition lock.
The alarm is switched off.
or X Press the % or & button on the
SmartKey.
The alarm is switched off.
X To stop the alarm using KEYLESS-GO:
grasp the outside door handle. The Smart-
Key must be outside the vehicle.
The alarm is switched off.
or X Press the Start/Stop button on the dash-
board. The SmartKey must be inside the
vehicle.
The alarm is switched off.
Protection against theft75
Safety
Z
Page 81 of 386

The turn signals flash once when unlocking
and three times when locking.
When it is dark, the surround lighting also
comes on if it is activated in the on-board
computer (Y page 231).
You can also set an audible signal to confirm that the vehicle has been locked. The audiblesignal can be activated and deactivated using
the on-board computer ( Y page 232).
X To unlock centrally: press the % but-
ton.
If you do not open the vehicle within approx-
imately 40 seconds of unlocking:
R the vehicle is locked again
R protection against theft is reactivated.
X To lock centrally: press the & button.
KEYLESS-GO
General notes
Bear in mind that the engine can be started by any of the vehicle occupants if there is a KEY-LESS-GO key in the vehicle.
Locking/unlocking centrally
You can start, lock or unlock the vehicle using
KEYLESS-GO. To do this, you only need carry the SmartKey with you. You can combine the
functions of KEYLESS-GO with those of a con- ventional SmartKey. Unlock the vehicle by
using KEYLESS-GO, for instance, and lock it
using the & button on the SmartKey.
When locking or unlocking with KEYLESS-GO,
the distance between the SmartKey and the
corresponding door handle must not be
greater than 3 ft (1 m). KEYLESS-GO checks whether a valid Smart-
Key is in the vehicle by periodically establish-
ing a radio connection between the vehicle
and the SmartKey. This happens:
R when the external door handles are
touched
R when starting the engine
R while the vehicle is in motion
X To unlock the vehicle: touch the inner
surface of the door handle.
X To lock the vehicle: touch sensor sur-
face :.
X Convenience closing feature: touch
recessed sensor surface ; for an exten-
ded period.
Further information on the convenience clos-
ing feature ( Y page 94).
If you pull on the handle of the tailgate, only
the cargo compartment of the vehicle is
unlocked.
Deactivating and activating
If you do not intend to use the vehicle for a
longer period of time, you can deactivate KEY-
LESS-GO. The SmartKey will then use very lit-
tle power, thereby conserving battery power.
For the purposes of activation/deactivation,
the vehicle must not be nearby.
SmartKey79
Opening and closing
Z
Page 82 of 386

XTo deactivate: press the & button on
the SmartKey twice in rapid succession.
The battery check lamp of the SmartKey
( Y page 81) lights up twice briefly and
KEYLESS-GO is deactivated.
X To activate: press any button on the
SmartKey or insert the SmartKey into the
ignition lock.
KEYLESS-GO and all of its associated fea-
tures are available again.
Changing the settings of the locking
system
You can change the settings of the locking
system. This means that only the driver's door
and the fuel filler flap are unlocked when the
vehicle is unlocked. This is useful if you fre-
quently travel on your own.
X To change the setting: press and hold
down the % and & buttons simulta-
neously for approximately six seconds until
the battery check lamp ( Y page 81)
flashes twice.
iIf the setting of the locking system is
changed within the signal range of the vehi- cle, pressing the & or % button:
R locks or
R unlocks the vehicle
The SmartKey now functions as follows:
X To unlock the driver's door: press the
% button once.
X To unlock centrally: press the % but-
ton twice.
X To lock centrally: press the & button.
The KEYLESS-GO function is changed as fol-
lows:
X To unlock the driver's door: touch the
inner surface of the door handle on the
driver's door.
X To unlock centrally: touch the inner sur-
face of the door handle on the front-
passenger door or the rear door. X
To lock centrally: touch the outer sensor
surface on one of the door handles
( Y page 79).
X To restore the factory settings: press
and hold down the % and & buttons
simultaneously for approximately six sec-
onds until the battery check lamp flashes
twice.
Mechanical key
General notes
If the vehicle can no longer be locked or
unlocked with the SmartKey or the KEYLESS- GO key, use the mechanical key.
If you use the mechanical key to unlock and
open the driver's door, the anti-theft alarm
system will be triggered ( Y page 75).
X To end the alarm: insert the SmartKey into
the ignition lock.
iWith KEYLESS-GO: remove the Start/
Stop button from the ignition lock before-
hand.
If you unlock the vehicle using the mechanical key, the fuel filler flap will not be unlocked
automatically.
Removing the mechanical key
X Push release catch : in the direction of
the arrow and at the same time remove
mechanical key ; from the SmartKey.
80SmartKey
Opening and closing
Page 83 of 386

Inserting the mechanical key
XPush mechanical key ; completely into
the SmartKey until it engages, and release
catch : is back in its basic position.
SmartKey battery
Important safety notes
Mercedes-Benz recommends that you have
the batteries replaced at a qualified specialist workshop.
GWARNING
Batteries contain toxic and corrosive substan- ces. If batteries are swallowed, it can result in
severe health problems. There is a risk of fatal injury.
Keep batteries out of the reach of children. If
a battery is swallowed, seek medical attention immediately.
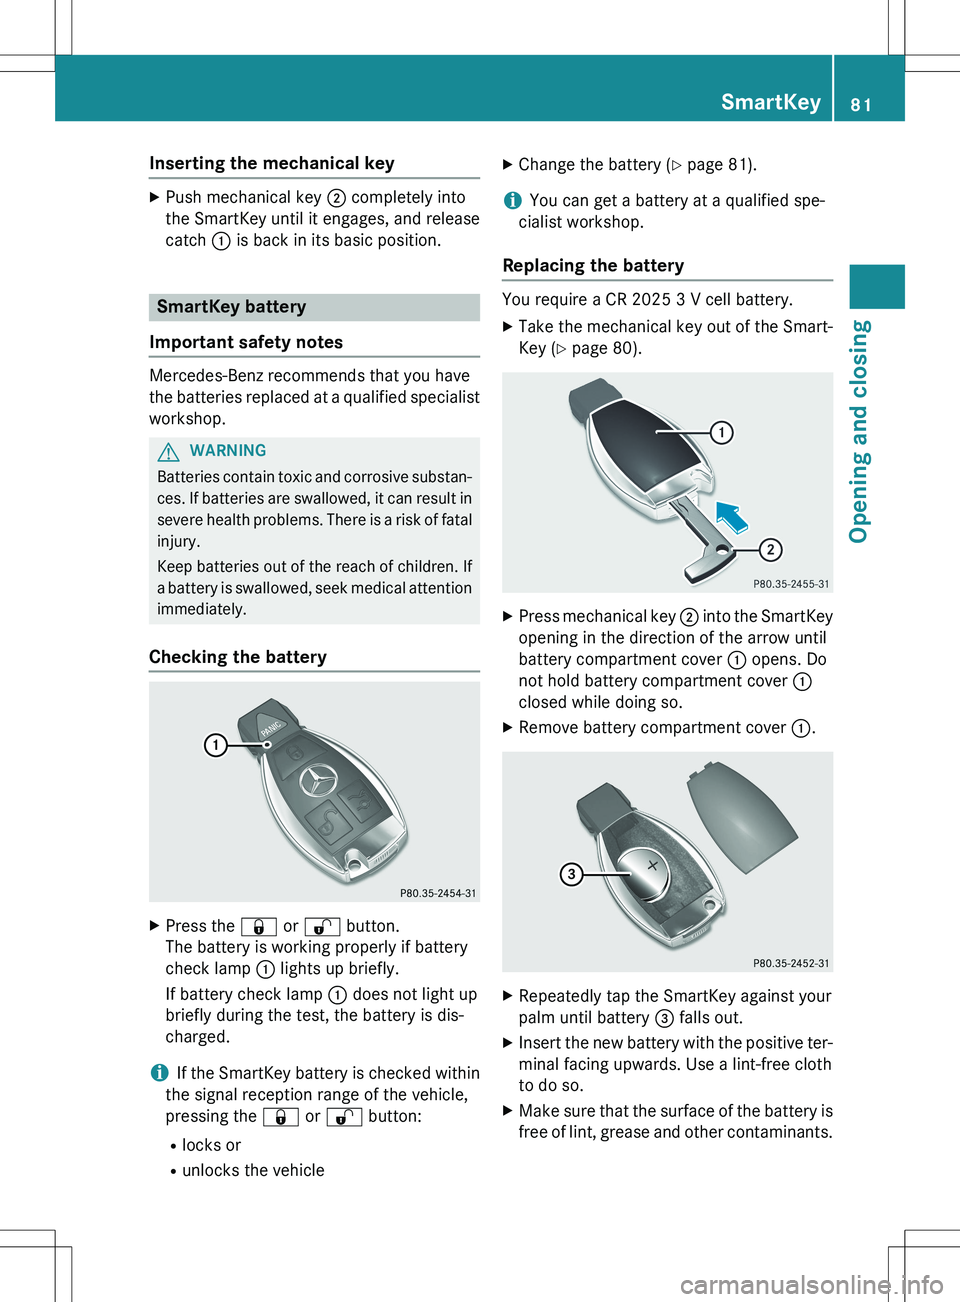
Checking the battery
X Press the & or % button.
The battery is working properly if battery
check lamp : lights up briefly.
If battery check lamp : does not light up
briefly during the test, the battery is dis-
charged.
iIf the SmartKey battery is checked within
the signal reception range of the vehicle,
pressing the & or % button:
R locks or
R unlocks the vehicle X
Change the battery ( Y page 81).
iYou can get a battery at a qualified spe-
cialist workshop.
Replacing the battery
You require a CR 2025 3 V cell battery.
X Take the mechanical key out of the Smart-
Key ( Y page 80).
X
Press mechanical key ; into the SmartKey
opening in the direction of the arrow until
battery compartment cover : opens. Do
not hold battery compartment cover :
closed while doing so.
X Remove battery compartment cover :.
X
Repeatedly tap the SmartKey against your
palm until battery = falls out.
X Insert the new battery with the positive ter-
minal facing upwards. Use a lint-free cloth
to do so.
X Make sure that the surface of the battery is
free of lint, grease and other contaminants.
SmartKey81
Opening and closing
Z
Page 84 of 386

XInsert the front tabs of battery compart-
ment cover : into the housing first and
then press to close it.
X Insert mechanical key ; into the Smart-
Key ( Y page 80).
X Check the function of all SmartKey buttons
on the vehicle.
82SmartKey
Opening and closing