2015 MERCEDES-BENZ GLE SUV stop start
[x] Cancel search: stop startPage 175 of 453
Sport drive program
The
Sport drive program has the following char-
acteristics:
R sporty engine and transmission settings.
R the automatic transmission shifting up later.
As a result of the later automatic transmission
shift points, the fuel consumption possibly
being higher.
R the suspension exhibits sporty damping (vehi-
cles with AIRMATIC).
Drive program Sport Plus (Mercedes-
AMG vehicles) The
Sport Plus drive program has the following
characteristics:
R the vehicle exhibits particularly sporty driving
characteristics.
R the vehicle pulling away in first gear.
R the automatic transmission shifting up later.
As a result of the later automatic transmission
shift points, the fuel consumption possibly
being higher.
R the suspension exhibits particularly firm
springing and damping settings (vehicles with
AIRMATIC).
R the ECO start/stop function is deactivated, it
can, however, be activated again using the
ECO button (Y page 163).
Individual drive program In the
Individual drive program, the following
properties of the drive program can be selected:
R the drive (engine and transmission manage-
ment)
R the transmission
R the suspension
R all vehicles (except Mercedes-AMG vehicles):
the steering
R all vehicles (except Mercedes-AMG vehicles):
availability of the ECO start/stop function
To select the gears in the Individualdrive pro-
gram permanently using the steering wheel pad- dles, select the permanent manual gearshift
program.
Information about configuring the Individual
drive program with the multimedia system can
be found in the Digital Owner's Manual. Manual gearshifting
General notes You can change gear yourself using the steering
wheel gearshift paddles. The transmission must be in position D.
Depending on which gearshift paddle is pulled,
the automatic transmission immediately shifts
into the next gear up or down, if permitted.
To use manual shifting, you have two options:
R temporary setting
R permanent setting
If you activate manual gearshifting, the multi-
function display will show the current gear
instead of transmission position D.
If manual gearshifting is deactivated, the gears
will be selected automatically.
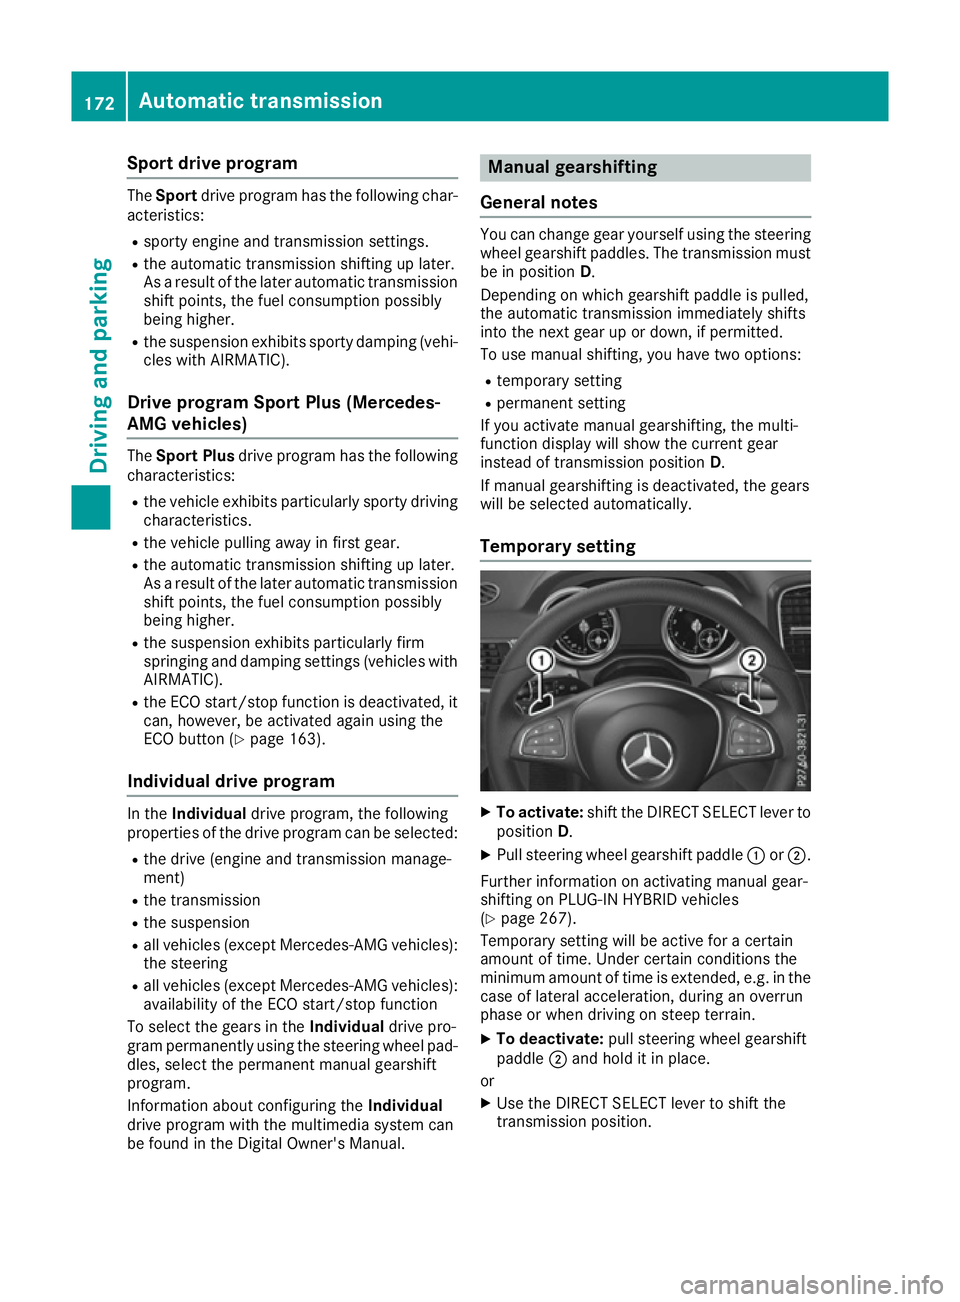
Temporary setting X
To activate: shift the DIRECT SELECT lever to
position D.
X Pull steering wheel gearshift paddle :or;.
Further information on activating manual gear-
shifting on PLUG-IN HYBRID vehicles
(Y page 267).
Temporary setting will be active for a certain
amount of time. Under certain conditions the
minimum amount of time is extended, e.g. in the case of lateral acceleration, during an overrun
phase or when driving on steep terrain.
X To deactivate: pull steering wheel gearshift
paddle ;and hold it in place.
or X Use the DIRECT SELECT lever to shift the
transmission position. 172
Automatic transmissionDriving and parking
Page 178 of 453
Problems with the transmission
Problem
Possible causes/consequences and
M
MSolutions The transmission has
problems shifting gear. The transmission is losing oil.
X Have the transmission checked at a qualified specialist workshop
immediately. 7G-TRONIC:
The acceleration ability
is deteriorating.
The transmission no lon-
ger changes gear. The transmission is in emergency mode.
It is only possible to shift into
secondgear and reverse gear.
X Stop.
X Shift the transmission to position P.
X Switch off the engine.
X Wait at least ten seconds before restarting the engine.
X Shift the transmission to position Dor R.
If D is selected, the transmission shifts into secondgear; ifRis
selected, the transmission shifts into reverse gear.
X Have the transmission checked at a qualified specialist workshop
immediately. 9G-TRONIC:
The acceleration ability
is deteriorating.
The transmission no lon-
ger changes gear. The transmission is in emergency mode.
It is only partly possible to engage the gears or the transmission is in
position N.
X Stop.
X Shift the transmission to position P.
X Switch off the engine.
X Wait at least ten seconds before restarting the engine.
X Shift the transmission to position Dor R.
X Have the transmission checked at a qualified specialist workshop
immediately. Problems with PLUG-IN HYBRID operation (Y
page 271).Refuelling
Important safety notes
G
WARNING
Fuel is highly flammable. If you handle fuel
incorrectly, there is a risk of fire and explo-
sion.
You must avoid fire, naked flames, creating
sparks and smoking. Switch off the engine
and, if applicable, the auxiliary heating before refuelling. G
WARNING
Fuels are poisonous and hazardous to health. There is a danger of injury.
Do not swallow fuel or let it come into contact
with skin, eyes or clothing. Do not inhale fuel
vapours. Keep fuels out of the reach of chil-
dren. Refuelling
175Driving and parking
Z
Page 191 of 453
i
If the indicator lamps are off, lock or unlock
the vehicle. The indicator lamps will then dis- play the current status of the charging proc-
ess again.
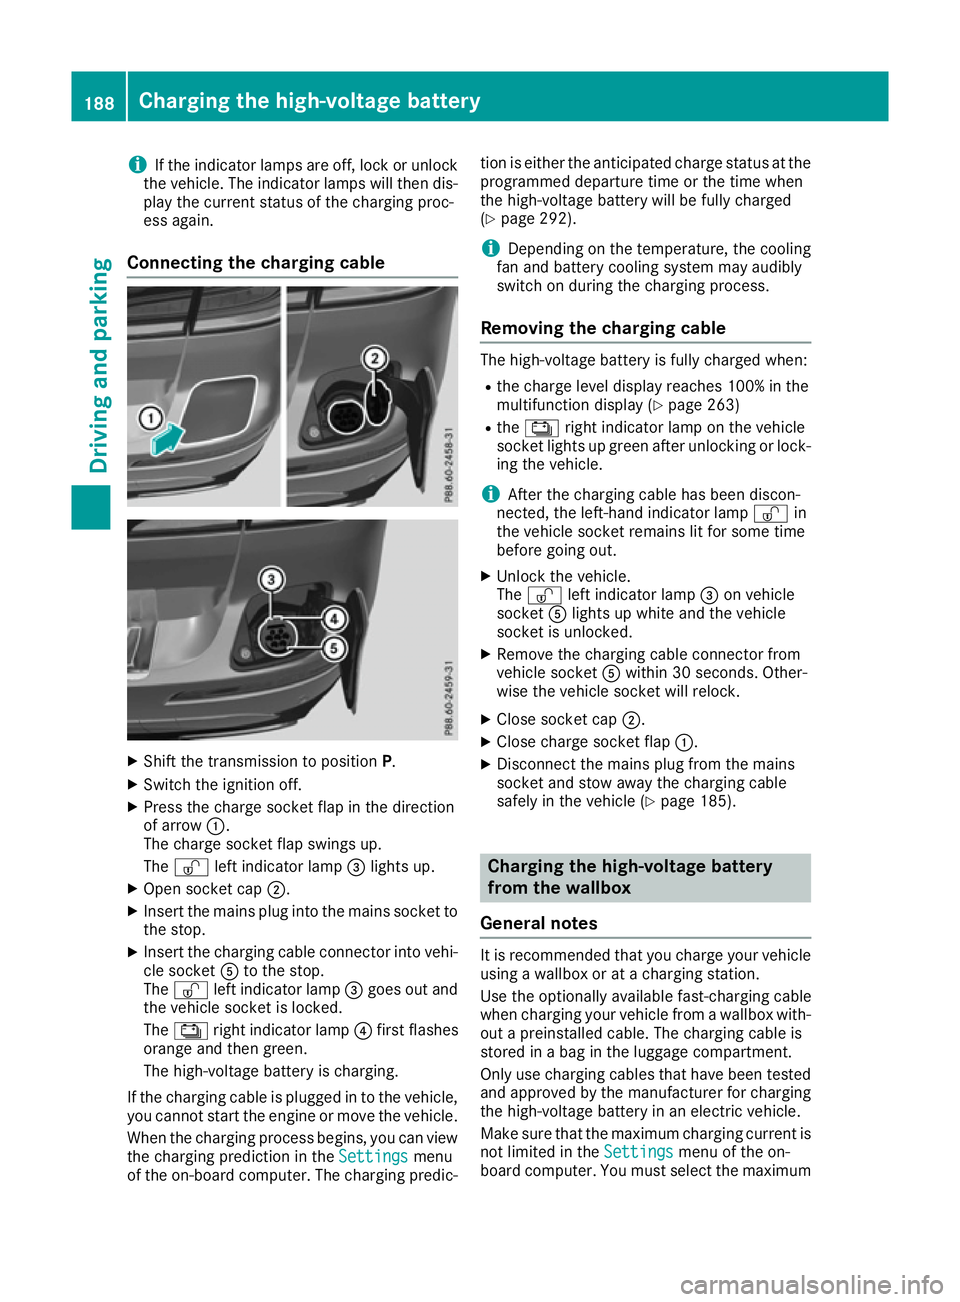
Connecting the charging cable X
Shift the transmission to position P.
X Switch the ignition off.
X Press the charge socket flap in the direction
of arrow :.
The charge socket flap swings up.
The Ì left indicator lamp =lights up.
X Open socket cap ;.
X Insert the mains plug into the mains socket to
the stop.
X Insert the charging cable connector into vehi-
cle socket Ato the stop.
The Ì left indicator lamp =goes out and
the vehicle socket is locked.
The Ý right indicator lamp ?first flashes
orange and then green.
The high-voltage battery is charging.
If the charging cable is plugged in to the vehicle,
you cannot start the engine or move the vehicle.
When the charging process begins, you can viewthe charging prediction in the Settings
Settings menu
of the on-board computer. The charging predic- tion is either the anticipated charge status at the
programmed departure time or the time when
the high-voltage battery will be fully charged
(Y page 292).
i Depending on the temperature, the cooling
fan and battery cooling system may audibly
switch on during the charging process.
Removing the charging cable The high-voltage battery is fully charged when:
R
the charge level display reaches 100% in the
multifunction display (Y page 263)
R the Ý right indicator lamp on the vehicle
socket lights up green after unlocking or lock-
ing the vehicle.
i After the charging cable has been discon-
nected, the left-hand indicator lamp Ìin
the vehicle socket remains lit for some time
before going out.
X Unlock the vehicle.
The Ì left indicator lamp =on vehicle
socket Alights up white and the vehicle
socket is unlocked.
X Remove the charging cable connector from
vehicle socket Awithin 30 seconds. Other-
wise the vehicle socket will relock.
X Close socket cap ;.
X Close charge socket flap :.
X Disconnect the mains plug from the mains
socket and stow away the charging cable
safely in the vehicle (Y page 185). Charging the high-voltage battery
from the wallbox
General notes It is recommended that you charge your vehicle
using a wallbox or at a charging station.
Use the optionally available fast-charging cable
when charging your vehicle from a wallbox with- out a preinstalled cable. The charging cable is
stored in a bag in the luggage compartment.
Only use charging cables that have been tested
and approved by the manufacturer for charging
the high-voltage battery in an electric vehicle.
Make sure that the maximum charging current is
not limited in the Settings Settingsmenu of the on-
board computer. You must select the maximum 188
Charging the high-voltage batteryDriving and parking
Page 192 of 453
value if charging at a wallbox or a charging sta-
tion (Y page 292).
Observe the "Important safety notes"
(Y page 182).
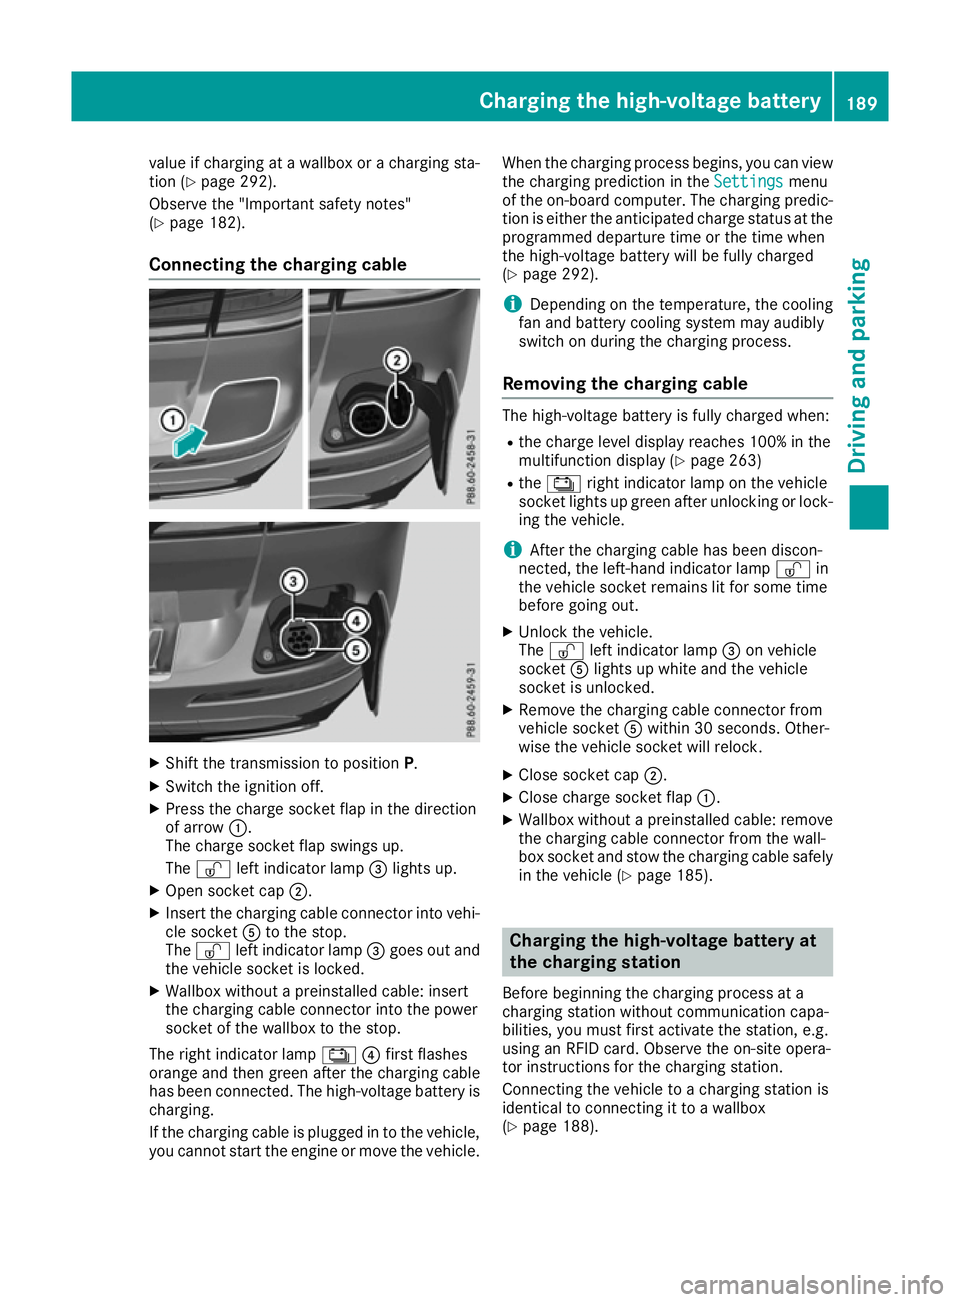
Connecting the charging cable X
Shift the transmission to position P.
X Switch the ignition off.
X Press the charge socket flap in the direction
of arrow :.
The charge socket flap swings up.
The Ì left indicator lamp =lights up.
X Open socket cap ;.
X Insert the charging cable connector into vehi-
cle socket Ato the stop.
The Ì left indicator lamp =goes out and
the vehicle socket is locked.
X Wallbox without a preinstalled cable: insert
the charging cable connector into the power
socket of the wallbox to the stop.
The right indicator lamp Ý?first flashes
orange and then green after the charging cable
has been connected. The high-voltage battery is charging.
If the charging cable is plugged in to the vehicle,
you cannot start the engine or move the vehicle. When the charging process begins, you can view
the charging prediction in the Settings
Settings menu
of the on-board computer. The charging predic-
tion is either the anticipated charge status at the
programmed departure time or the time when
the high-voltage battery will be fully charged
(Y page 292).
i Depending on the temperature, the cooling
fan and battery cooling system may audibly
switch on during the charging process.
Removing the charging cable The high-voltage battery is fully charged when:
R
the charge level display reaches 100% in the
multifunction display (Y page 263)
R the Ý right indicator lamp on the vehicle
socket lights up green after unlocking or lock-
ing the vehicle.
i After the charging cable has been discon-
nected, the left-hand indicator lamp Ìin
the vehicle socket remains lit for some time
before going out.
X Unlock the vehicle.
The Ì left indicator lamp =on vehicle
socket Alights up white and the vehicle
socket is unlocked.
X Remove the charging cable connector from
vehicle socket Awithin 30 seconds. Other-
wise the vehicle socket will relock.
X Close socket cap ;.
X Close charge socket flap :.
X Wallbox without a preinstalled cable: remove
the charging cable connector from the wall-
box socket and stow the charging cable safely in the vehicle (Y page 185). Charging the high-voltage battery at
the charging station
Before beginning the charging process at a
charging station without communication capa-
bilities, you must first activate the station, e.g.
using an RFID card. Observe the on-site opera-
tor instructions for the charging station.
Connecting the vehicle to a charging station is
identical to connecting it to a wallbox
(Y page 188). Charging the high-voltage battery
189Driving and parking Z
Page 195 of 453
Using the key
X
Apply the electric parking brake.
X Shift the transmission to position P.
X Turn the key to position 0in the ignition lock
and remove it.
The immobiliser is activated.
If you switch the engine off with the transmis-
sion in position Ror D, the automatic transmis-
sion shifts to Nautomatically.
If you then open the driver's door or the front-
passenger door or remove the key from the igni- tion, the automatic transmission shifts to P.
If you want the automatic transmission to
remain in neutral N, e.g. when having the vehicle
cleaned in an automatic car wash with a towing
system:
X Switch the ignition on.
X Depress the brake pedal and keep it
depressed.
X Shift to neutral N.
X Release the brake pedal.
X Release the electric parking brake.
X Switch off the ignition and leave the key in the
ignition lock.
Using KEYLESS-GO X
Apply the electric parking brake.
X Shift the transmission to position P.
X Press the Start/Stop button (Y page 158).
The engine stops and all the indicator lamps in the instrument cluster go out.
If you switch the engine off with the transmis-
sion in position Ror D, the automatic transmis-
sion shifts to Nautomatically.
If you then open the driver's or front-passenger door, the automatic transmission shifts to P.
If you want the automatic transmission to
remain in neutral N, e.g. when having the vehicle
cleaned in an automatic car wash with a towing
system:
X Remove the Start/Stop button from the igni-
tion lock.
X Insert the key into the ignition lock.
X Switch the ignition on.
X Depress the brake pedal and keep it
depressed.
X Shift to neutral N. X
Release the brake pedal.
X Release the electric parking brake.
X Switch off the ignition and leave the key in the
ignition lock.
i The engine can be switched off while the
vehicle is in motion by pressing and holding
the Start/Stop button for about three sec-
onds. This function operates independently of
the ECO start/stop automatic engine switch-
off function. Electric parking brake
General notes G
WARNING
If you leave children unattended in the vehi-
cle, they may be able to set the vehicle in
motion if, for example, they:
R release the parking brake
R shift the automatic transmission out of park
position P
R start the engine
In addition, they may operate vehicle equip-
ment and become trapped. There is a risk of
an accident and injury.
When leaving the vehicle, always take the key
with you and lock the vehicle. Never leave
children unattended in the vehicle.
The function of the electric parking brake is
dependent on the on-board voltage. If the on-
board voltage is low or if there is a malfunction
in the system, it may not be possible to apply the
released parking brake.
X If this is the case, only park the vehicle on
level ground and secure it to prevent it from
rolling away.
X Shift the automatic transmission to position
P.
It may not be possible to release an applied
parking brake if the on-board voltage is low or if there is a malfunction in the system. Contact a
qualified specialist workshop.
i The electric parking brake carries out a func-
tion check at regular intervals when the 192
ParkingDriving and parking
Page 196 of 453
engine is switched off. Noises that occur are
normal.
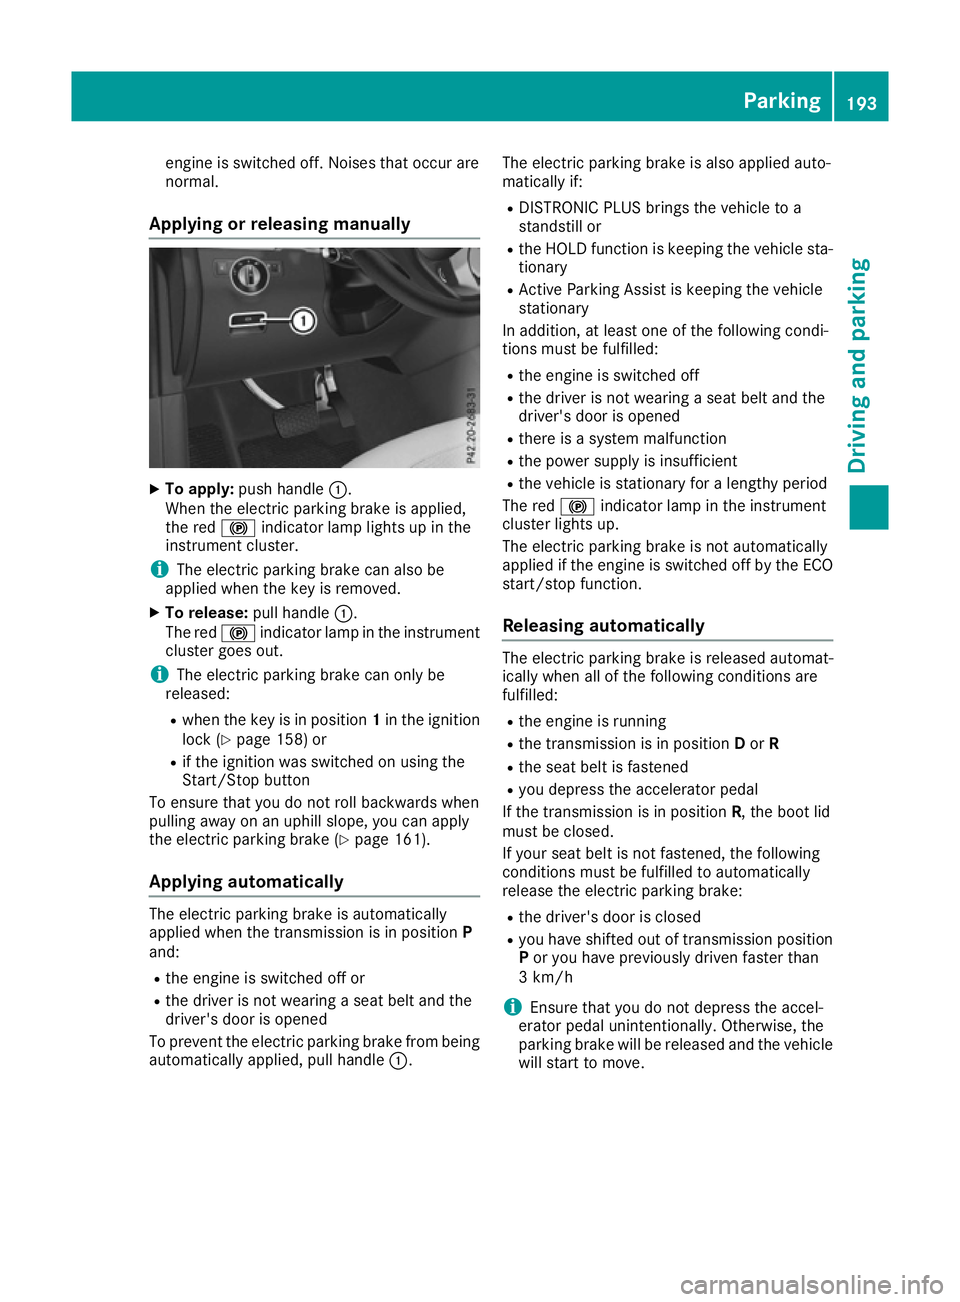
Applying or releasing manually X
To apply: push handle :.
When the electric parking brake is applied,
the red !indicator lamp lights up in the
instrument cluster.
i The electric parking brake can also be
applied when the key is removed.
X To release: pull handle:.
The red !indicator lamp in the instrument
cluster goes out.
i The electric parking brake can only be
released:
R when the key is in position 1in the ignition
lock (Y page 158) or
R if the ignition was switched on using the
Start/Stop button
To ensure that you do not roll backwards when
pulling away on an uphill slope, you can apply
the electric parking brake (Y page 161).
Applying automatically The electric parking brake is automatically
applied when the transmission is in position
P
and:
R the engine is switched off or
R the driver is not wearing a seat belt and the
driver's door is opened
To prevent the electric parking brake from being
automatically applied, pull handle :.The electric parking brake is also applied auto-
matically if:
R
DISTRONIC PLUS brings the vehicle to a
standstill or
R the HOLD function is keeping the vehicle sta-
tionary
R Active Parking Assist is keeping the vehicle
stationary
In addition, at least one of the following condi-
tions must be fulfilled:
R the engine is switched off
R the driver is not wearing a seat belt and the
driver's door is opened
R there is a system malfunction
R the power supply is insufficient
R the vehicle is stationary for a lengthy period
The red !indicator lamp in the instrument
cluster lights up.
The electric parking brake is not automatically
applied if the engine is switched off by the ECO
start/stop function.
Releasing automatically The electric parking brake is released automat-
ically when all of the following conditions are
fulfilled:
R
the engine is running
R the transmission is in position Dor R
R the seat belt is fastened
R you depress the accelerator pedal
If the transmission is in position R, the boot lid
must be closed.
If your seat belt is not fastened, the following
conditions must be fulfilled to automatically
release the electric parking brake:
R the driver's door is closed
R you have shifted out of transmission position
P or you have previously driven faster than
3 km/h
i Ensure that you do not depress the accel-
erator pedal unintentionally. Otherwise, the
parking brake will be released and the vehicle will start to move. Parking
193Driving and parking Z
Page 197 of 453
Emergency braking
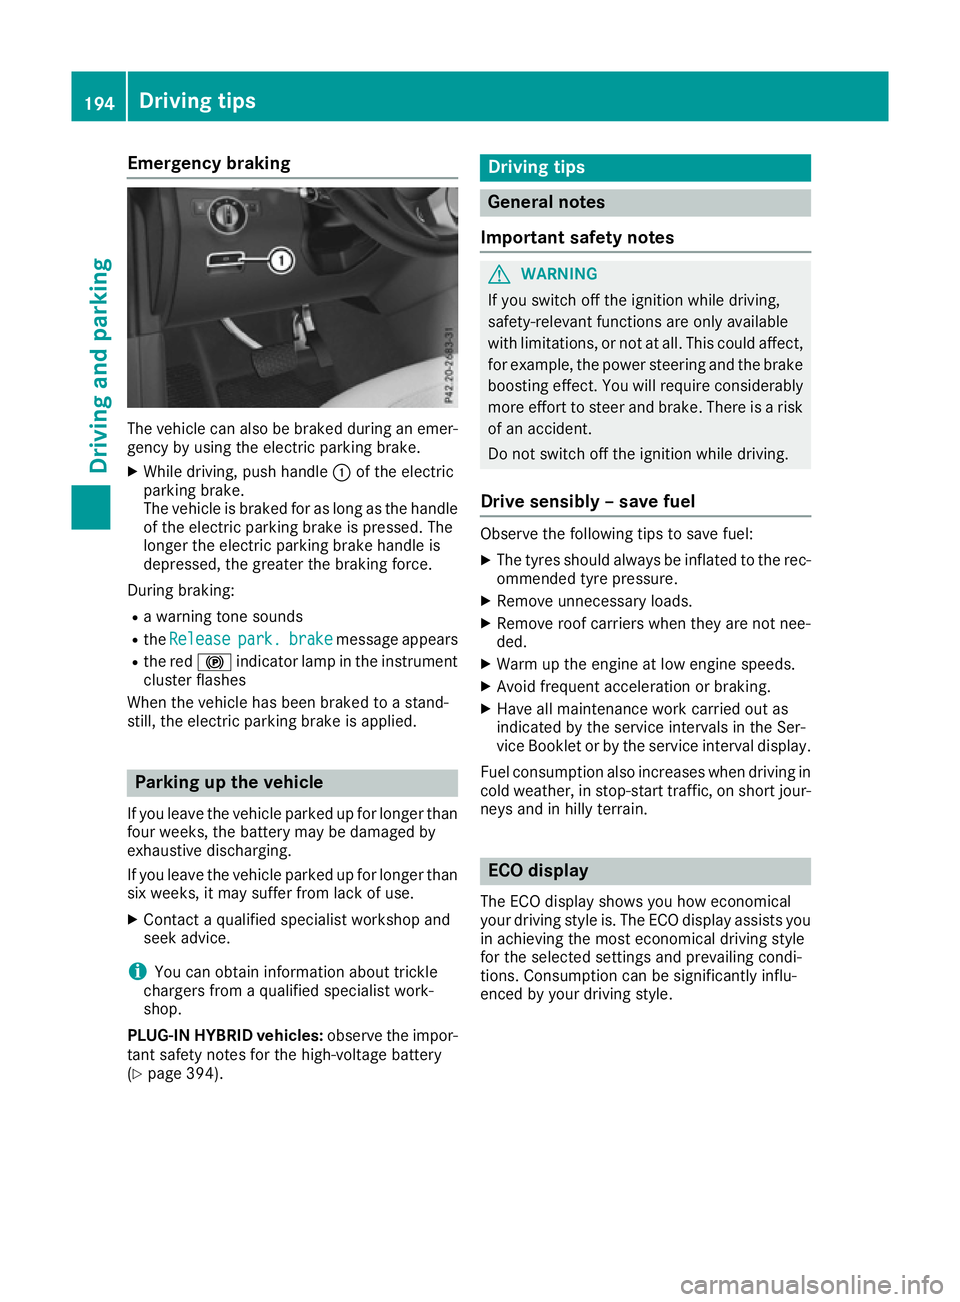
The vehicle can also be braked during an emer-
gency by using the electric parking brake.
X While driving, push handle :of the electric
parking brake.
The vehicle is braked for as long as the handle of the electric parking brake is pressed. The
longer the electric parking brake handle is
depressed, the greater the braking force.
During braking:
R a warning tone sounds
R the Release
Release park. park.brake
brakemessage appears
R the red !indicator lamp in the instrument
cluster flashes
When the vehicle has been braked to a stand-
still, the electric parking brake is applied. Parking up the vehicle
If you leave the vehicle parked up for longer than
four weeks, the battery may be damaged by
exhaustive discharging.
If you leave the vehicle parked up for longer than
six weeks, it may suffer from lack of use.
X Contact a qualified specialist workshop and
seek advice.
i You can obtain information about trickle
chargers from a qualified specialist work-
shop.
PLUG-IN HYBRID vehicles: observe the impor-
tant safety notes for the high-voltage battery
(Y page 394). Driving tips
General notes
Important safety notes G
WARNING
If you switch off the ignition while driving,
safety-relevant functions are only available
with limitations, or not at all. This could affect, for example, the power steering and the brake
boosting effect. You will require considerably
more effort to steer and brake. There is a risk of an accident.
Do not switch off the ignition while driving.
Drive sensibly – save fuel Observe the following tips to save fuel:
X The tyres should always be inflated to the rec-
ommended tyre pressure.
X Remove unnecessary loads.
X Remove roof carriers when they are not nee-
ded.
X Warm up the engine at low engine speeds.
X Avoid frequent acceleration or braking.
X Have all maintenance work carried out as
indicated by the service intervals in the Ser-
vice Booklet or by the service interval display.
Fuel consumption also increases when driving in
cold weather, in stop-start traffic, on short jour- neys and in hilly terrain. ECO display
The ECO display shows you how economical
your driving style is. The ECO display assists you in achieving the most economical driving style
for the selected settings and prevailing condi-
tions. Consumption can be significantly influ-
enced by your driving style. 194
Driving tipsDriving and parking
Page 213 of 453
Selecting the drive program
DISTRONIC PLUS supports a sporty driving style
if you have selected the SportorSport Plus
drive program (Y page 171). Acceleration
behind the vehicle in front or to the set speed is then noticeably more dynamic. If you have
selected the Comfortdrive program, the vehicle
accelerates more gently. This setting is recom-
mended in stop-start traffic.
Changing lanes If you change to the overtaking lane, DISTRONIC
PLUS supports you if:
R you are driving faster than 70 km/h
R you switch on the respective turn signal
R DISTRONIC PLUS does not detect a danger of
collision
If these conditions are met, your vehicle is accel- erated. Acceleration will be interrupted if chang-
ing lanes takes too long or if the distance
between your vehicle and the vehicle in front
becomes too small.
i Vehicles with COMAND Online:
when you
change lanes, DISTRONIC PLUS monitors the right lane in the case of left-side traffic or the
left lane in the case of right-side traffic.
Vehicles with Audio 20: when you change
lanes, DISTRONIC PLUS monitors the left lane on left-hand-drive vehicles or the right lane onright-hand-drive vehicles.
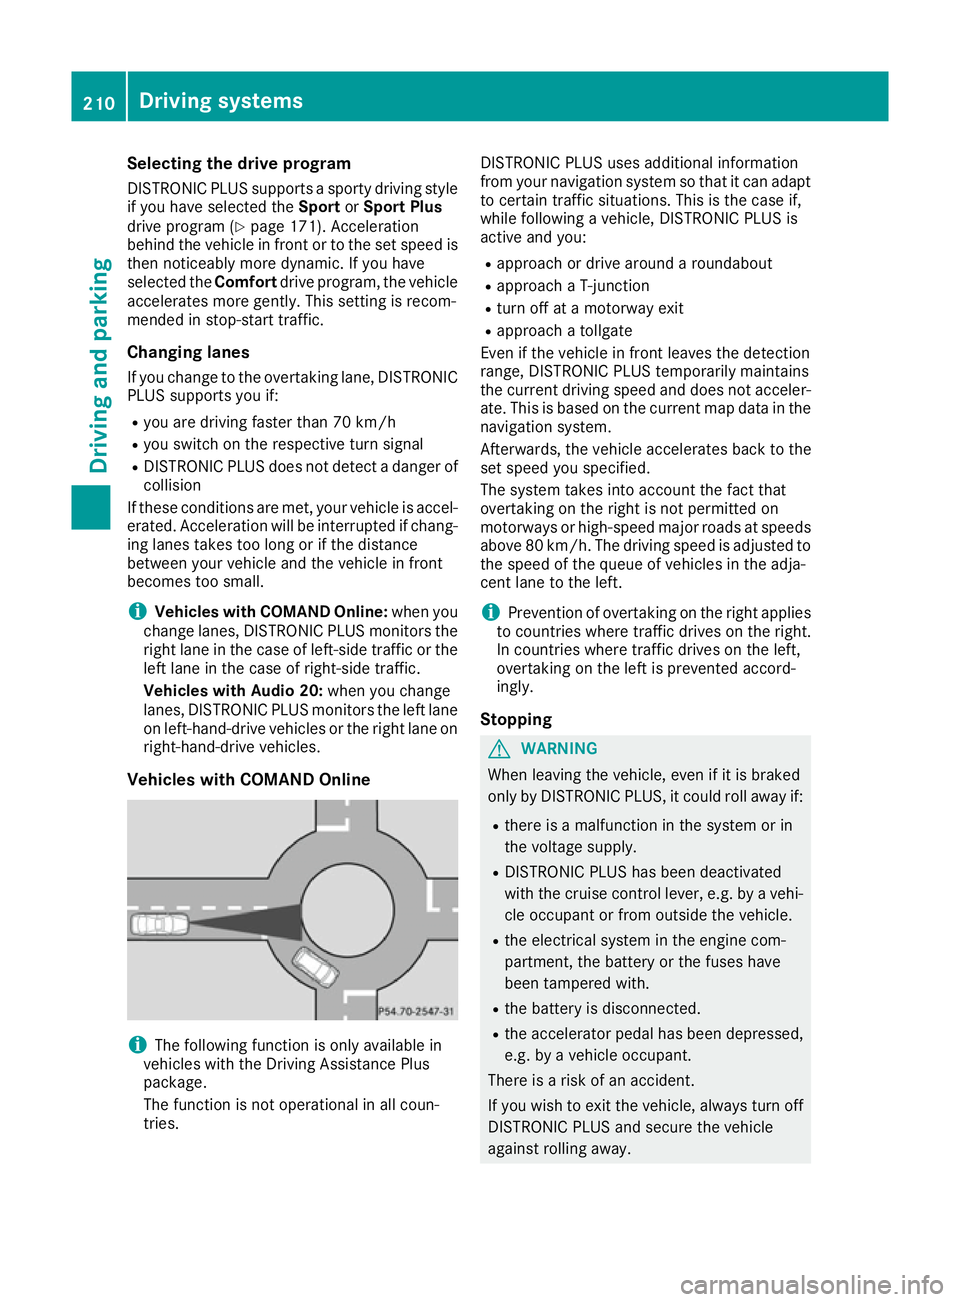
Vehicles with COMAND Online i
The following function is only available in
vehicles with the Driving Assistance Plus
package.
The function is not operational in all coun-
tries. DISTRONIC PLUS uses additional information
from your navigation system so that it can adapt
to certain traffic situations. This is the case if,
while following a vehicle, DISTRONIC PLUS is
active and you:
R approach or drive around a roundabout
R approach a T-junction
R turn off at a motorway exit
R approach a tollgate
Even if the vehicle in front leaves the detection
range, DISTRONIC PLUS temporarily maintains
the current driving speed and does not acceler- ate. This is based on the current map data in the
navigation system.
Afterwards, the vehicle accelerates back to the
set speed you specified.
The system takes into account the fact that
overtaking on the right is not permitted on
motorways or high-speed major roads at speeds
above 80 km/h. The driving speed is adjusted to the speed of the queue of vehicles in the adja-
cent lane to the left.
i Prevention of overtaking on the right applies
to countries where traffic drives on the right.
In countries where traffic drives on the left,
overtaking on the left is prevented accord-
ingly.
Stopping G
WARNING
When leaving the vehicle, even if it is braked
only by DISTRONIC PLUS, it could roll away if:
R there is a malfunction in the system or in
the voltage supply.
R DISTRONIC PLUS has been deactivated
with the cruise control lever, e.g. by a vehi- cle occupant or from outside the vehicle.
R the electrical system in the engine com-
partment, the battery or the fuses have
been tampered with.
R the battery is disconnected.
R the accelerator pedal has been depressed,
e.g. by a vehicle occupant.
There is a risk of an accident.
If you wish to exit the vehicle, always turn off
DISTRONIC PLUS and secure the vehicle
against rolling away. 210
Driving systemsDriving and parking