2015 MERCEDES-BENZ GLE SUV weight
[x] Cancel search: weightPage 70 of 453
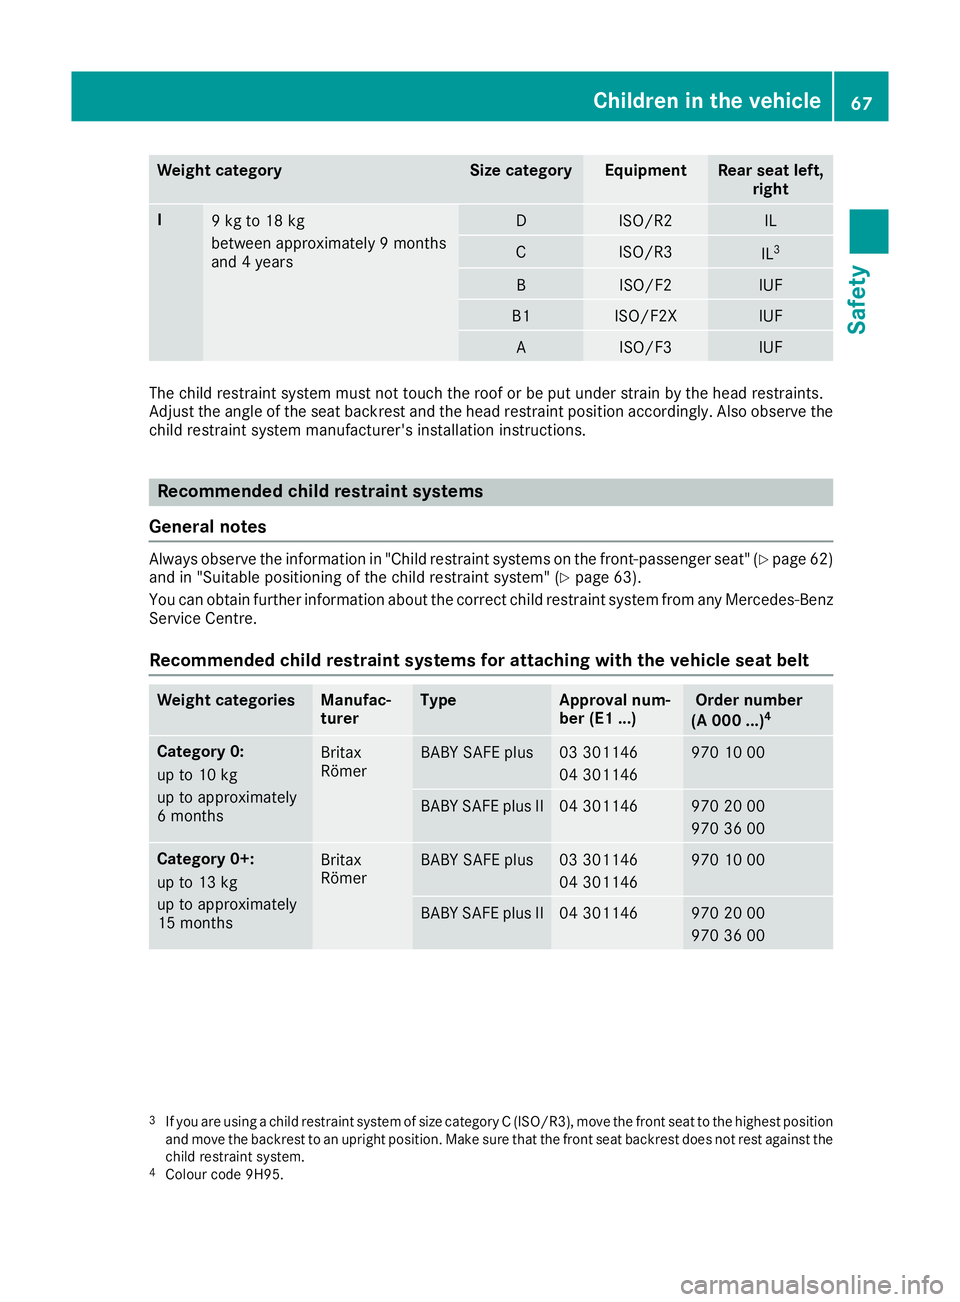
Weight category Size category Equipment Rear seat left,
right I
9 kg to 18 kg
between approximately 9 months
and 4 years D ISO/R2 IL
C ISO/R3
IL
3 B ISO/F2 IUF
B1 ISO/F2X IUF
A ISO/F3 IUF
The child restraint system must not touch the roof or be put under strain by the head restraints.
Adjust the angle of the seat backrest and the head restraint position accordingly. Also observe the
child restraint system manufacturer's installation instructions. Recommended child restraint systems
General notes Always observe the information in "Child restraint systems on the front-passenger seat" (Y
page 62)
and in "Suitable positioning of the child restraint system" (Y page 63).
You can obtain further information about the correct child restraint system from any Mercedes-Benz
Service Centre.
Recommended child restraint systems for attaching with the vehicle seat belt Weight categories Manufac-
turer Type Approval num-
ber (E1 ...) Order number
(A 000 ...) 4 Category 0:
up to 10 kg
up to approximately
6 months
Britax
Römer BABY SAFE plus 03 301146
04 301146 970 10 00
BABY SAFE plus II 04 301146 970 20 00
970 36 00
Category 0+:
up to 13 kg
up to approximately
15 months
Britax
Römer BABY SAFE plus 03 301146
04 301146 970 10 00
BABY SAFE plus II 04 301146 970 20 00
970 36 00
3
If you are using a child restraint system of size category C (ISO/R3), move the front seat to the highest position
and move the backrest to an upright position. Make sure that the front seat backrest does not rest against the
child restraint system.
4 Colour code 9H95. Children in the vehicle
67Safety Z
Page 71 of 453
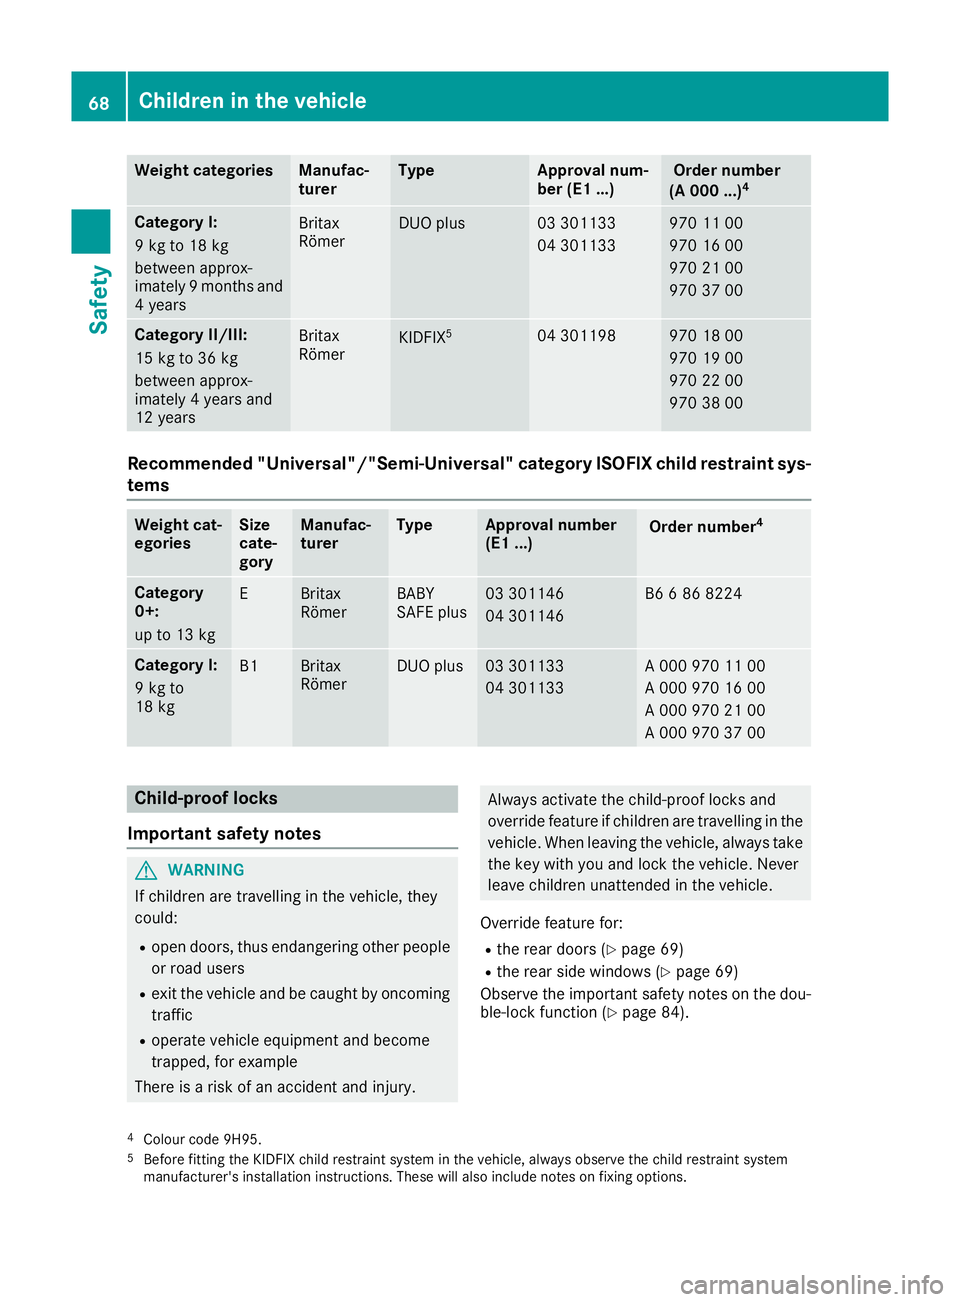
Weight categories Manufac-
turer Type Approval num-
ber (E1 ...) Order number
(A 000 ...) 4 Category I:
9 kg to 18 kg
between approx-
imately 9 months and
4 years Britax
Römer DUO plus 03 301133
04 301133 970 11 00
970 16 00
970 21 00
970 37 00
Category II/III:
15 kg to 36 kg
between approx-
imately 4 years and
12 years Britax
Römer
KIDFIX
5 04 301198 970 18 00
970 19 00
970 22 00
970 38 00
Recommended "Universal"/"Semi-Universal" category ISOFIX child restraint sys-
tems Weight cat-
egories Size
cate-
gory Manufac-
turer Type Approval number
(E1 ...)
Order number
4 Category
0+:
up to 13 kg
E Britax
Römer BABY
SAFE plus 03 301146
04 301146 B6 6 86 8224
Category I:
9 kg to
18 kg
B1 Britax
Römer DUO plus 03 301133
04 301133 A 000 970 11 00
A 000 970 16 00
A 000 970 21 00
A 000 970 37 00
Child-proof locks
Important safety notes G
WARNING
If children are travelling in the vehicle, they
could:
R open doors, thus endangering other people
or road users
R exit the vehicle and be caught by oncoming
traffic
R operate vehicle equipment and become
trapped, for example
There is a risk of an accident and injury. Always activate the child-proof locks and
override feature if children are travelling in the vehicle. When leaving the vehicle, always take the key with you and lock the vehicle. Never
leave children unattended in the vehicle.
Override feature for:
R the rear doors (Y page 69)
R the rear side windows (Y page 69)
Observe the important safety notes on the dou- ble-lock function (Y page 84).
4 Colour code 9H95.
5 Before fitting the KIDFIX child restraint system in the vehicle, always observe the child restraint system
manufacturer's installation instructions. These will also include notes on fixing options. 68
Children in the vehicleSafety
Page 275 of 453
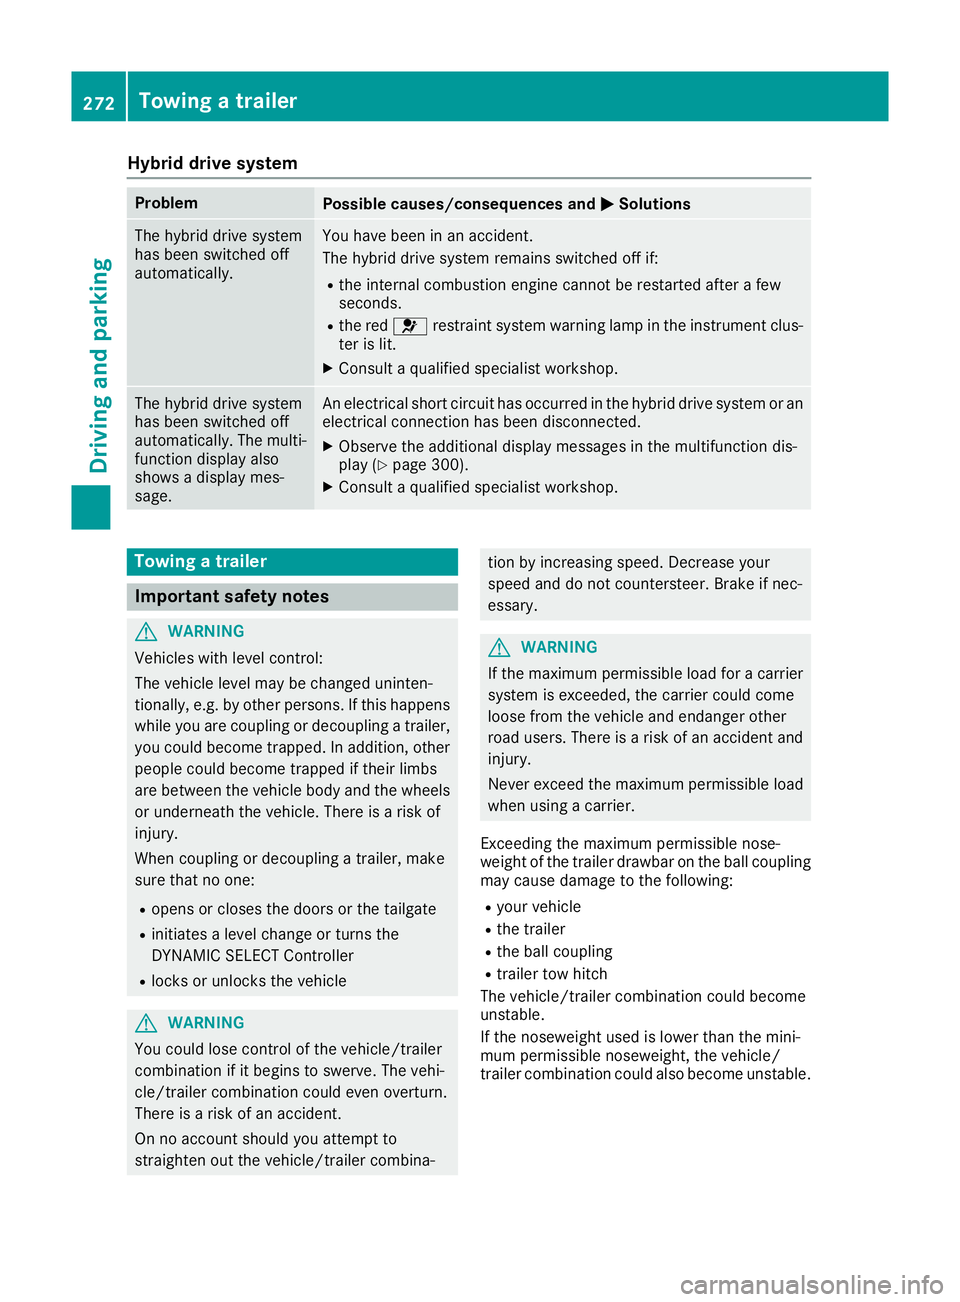
Hybrid drive system
Problem
Possible causes/consequences and
M
MSolutions The hybrid drive system
has been switched off
automatically. You have been in an accident.
The hybrid drive system remains switched off if:
R the internal combustion engine cannot be restarted after a few
seconds.
R the red 6restraint system warning lamp in the instrument clus-
ter is lit.
X Consult a qualified specialist workshop. The hybrid drive system
has been switched off
automatically. The multi-
function display also
shows a display mes-
sage. An electrical short circuit has occurred in the hybrid drive system or an
electrical connection has been disconnected.
X Observe the additional display messages in the multifunction dis-
play (Y page 300).
X Consult a qualified specialist workshop. Towing a trailer
Important safety notes
G
WARNING
Vehicles with level control:
The vehicle level may be changed uninten-
tionally, e.g. by other persons. If this happens while you are coupling or decoupling a trailer,
you could become trapped. In addition, other
people could become trapped if their limbs
are between the vehicle body and the wheels or underneath the vehicle. There is a risk of
injury.
When coupling or decoupling a trailer, make
sure that no one:
R opens or closes the doors or the tailgate
R initiates a level change or turns the
DYNAMIC SELECT Controller
R locks or unlocks the vehicle G
WARNING
You could lose control of the vehicle/trailer
combination if it begins to swerve. The vehi-
cle/trailer combination could even overturn.
There is a risk of an accident.
On no account should you attempt to
straighten out the vehicle/trailer combina- tion by increasing speed. Decrease your
speed and do not countersteer. Brake if nec-
essary. G
WARNING
If the maximum permissible load for a carrier system is exceeded, the carrier could come
loose from the vehicle and endanger other
road users. There is a risk of an accident and injury.
Never exceed the maximum permissible load
when using a carrier.
Exceeding the maximum permissible nose-
weight of the trailer drawbar on the ball coupling
may cause damage to the following:
R your vehicle
R the trailer
R the ball coupling
R trailer tow hitch
The vehicle/trailer combination could become
unstable.
If the noseweight used is lower than the mini-
mum permissible noseweight, the vehicle/
trailer combination could also become unstable. 272
Towing a trailerDriving and parking
Page 276 of 453
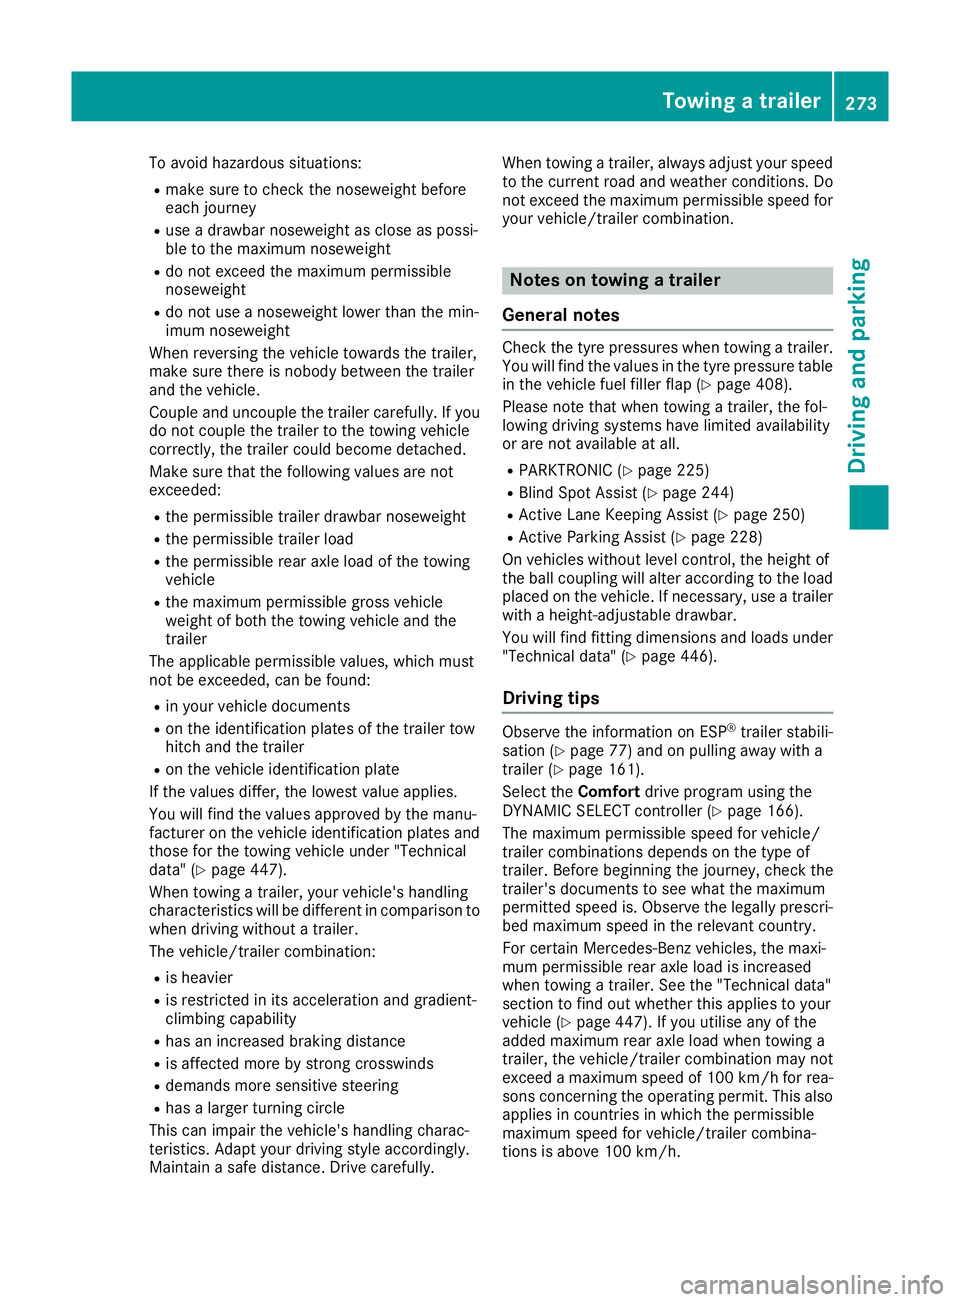
To avoid hazardous situations:
R make sure to check the noseweight before
each journey
R use a drawbar noseweight as close as possi-
ble to the maximum noseweight
R do not exceed the maximum permissible
noseweight
R do not use a noseweight lower than the min-
imum noseweight
When reversing the vehicle towards the trailer,
make sure there is nobody between the trailer
and the vehicle.
Couple and uncouple the trailer carefully. If you do not couple the trailer to the towing vehicle
correctly, the trailer could become detached.
Make sure that the following values are not
exceeded:
R the permissible trailer drawbar noseweight
R the permissible trailer load
R the permissible rear axle load of the towing
vehicle
R the maximum permissible gross vehicle
weight of both the towing vehicle and the
trailer
The applicable permissible values, which must
not be exceeded, can be found:
R in your vehicle documents
R on the identification plates of the trailer tow
hitch and the trailer
R on the vehicle identification plate
If the values differ, the lowest value applies.
You will find the values approved by the manu-
facturer on the vehicle identification plates and
those for the towing vehicle under "Technical
data" (Y page 447).
When towing a trailer, your vehicle's handling
characteristics will be different in comparison to
when driving without a trailer.
The vehicle/trailer combination:
R is heavier
R is restricted in its acceleration and gradient-
climbing capability
R has an increased braking distance
R is affected more by strong crosswinds
R demands more sensitive steering
R has a larger turning circle
This can impair the vehicle's handling charac-
teristics. Adapt your driving style accordingly.
Maintain a safe distance. Drive carefully. When towing a trailer, always adjust your speed
to the current road and weather conditions. Do
not exceed the maximum permissible speed for
your vehicle/trailer combination. Notes on towing a trailer
General notes Check the tyre pressures when towing a trailer.
You will find the values in the tyre pressure table in the vehicle fuel filler flap (Y page 408).
Please note that when towing a trailer, the fol-
lowing driving systems have limited availability
or are not available at all.
R PARKTRONIC (Y page 225)
R Blind Spot Assist (Y page 244)
R Active Lane Keeping Assist (Y page 250)
R Active Parking Assist (Y page 228)
On vehicles without level control, the height of
the ball coupling will alter according to the load
placed on the vehicle. If necessary, use a trailer with a height-adjustable drawbar.
You will find fitting dimensions and loads under
"Technical data" (Y page 446).
Driving tips Observe the information on ESP
®
trailer stabili-
sation (Y page 77) and on pulling away with a
trailer (Y page 161).
Select the Comfortdrive program using the
DYNAMIC SELECT controller (Y page 166).
The maximum permissible speed for vehicle/
trailer combinations depends on the type of
trailer. Before beginning the journey, check the
trailer's documents to see what the maximum
permitted speed is. Observe the legally prescri-
bed maximum speed in the relevant country.
For certain Mercedes-Benz vehicles, the maxi-
mum permissible rear axle load is increased
when towing a trailer. See the "Technical data"
section to find out whether this applies to your
vehicle (Y page 447). If you utilise any of the
added maximum rear axle load when towing a
trailer, the vehicle/trailer combination may not
exceed a maximum speed of 100 km/hf or rea-
sons concerning the operating permit. This also
applies in countries in which the permissible
maximum speed for vehicle/trailer combina-
tions is above 100 km/h. Towing a trailer
273Driving and parking Z
Page 314 of 453
Display messages
Possible causes/consequences and
M
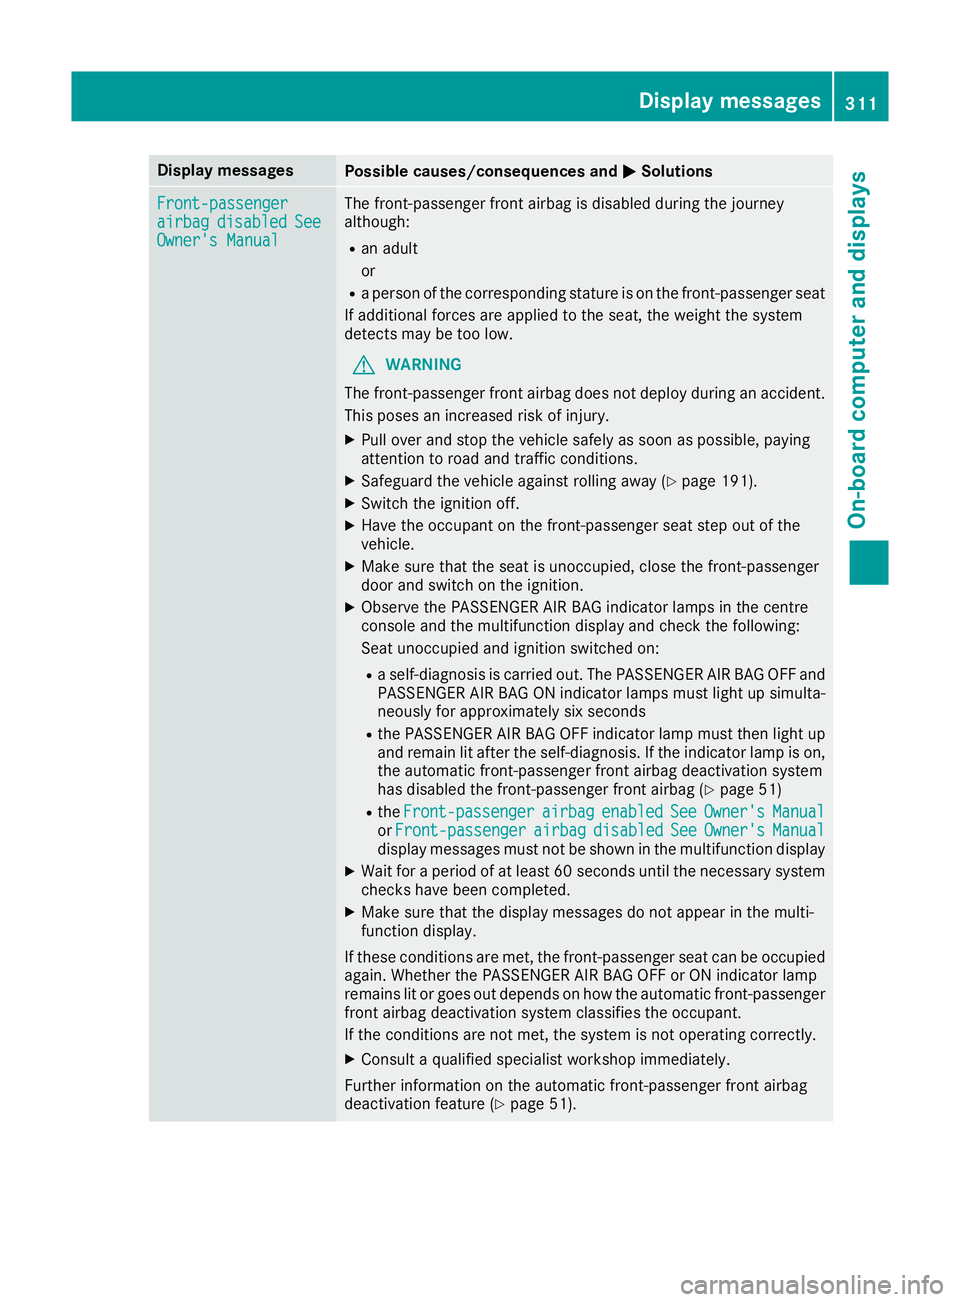
MSolutions Front-passenger
Front-passenger
airbag airbag
disabled
disabled See
See
Owner's Manual
Owner's Manual The front-passenger front airbag is disabled during the journey
although:
R an adult
or
R a person of the corresponding stature is on the front-passenger seat
If additional forces are applied to the seat, the weight the system
detects may be too low.
G WARNING
The front-passenger front airbag does not deploy during an accident.
This poses an increased risk of injury.
X Pull over and stop the vehicle safely as soon as possible, paying
attention to road and traffic conditions.
X Safeguard the vehicle against rolling away (Y page 191).
X Switch the ignition off.
X Have the occupant on the front-passenger seat step out of the
vehicle.
X Make sure that the seat is unoccupied, close the front-passenger
door and switch on the ignition.
X Observe the PASSENGER AIR BAG indicator lamps in the centre
console and the multifunction display and check the following:
Seat unoccupied and ignition switched on:
R a self-diagnosis is carried out. The PASSENGER AIR BAG OFF and
PASSENGER AIR BAG ON indicator lamps must light up simulta-
neously for approximately six seconds
R the PASSENGER AIR BAG OFF indicator lamp must then light up
and remain lit after the self-diagnosis. If the indicator lamp is on, the automatic front-passenger front airbag deactivation system
has disabled the front-passenger front airbag (Y page 51)
R the Front-passenger
Front-passenger airbag airbagenabled
enabled See
SeeOwner's
Owner's Manual
Manual
or Front-passenger
Front-passenger airbag
airbagdisabled
disabled See
SeeOwner's
Owner's Manual
Manual
display messages must not be shown in the multifunction display
X Wait for a period of at least 60 seconds until the necessary system
checks have been completed.
X Make sure that the display messages do not appear in the multi-
function display.
If these conditions are met, the front-passenger seat can be occupied again. Whether the PASSENGER AIR BAG OFF or ON indicator lamp
remains lit or goes out depends on how the automatic front-passenger
front airbag deactivation system classifies the occupant.
If the conditions are not met, the system is not operating correctly.
X Consult a qualified specialist workshop immediately.
Further information on the automatic front-passenger front airbag
deactivation feature (Y page 51). Display
messages
311On-board computer and displays Z
Page 315 of 453
Display messages
Possible causes/consequences and
M
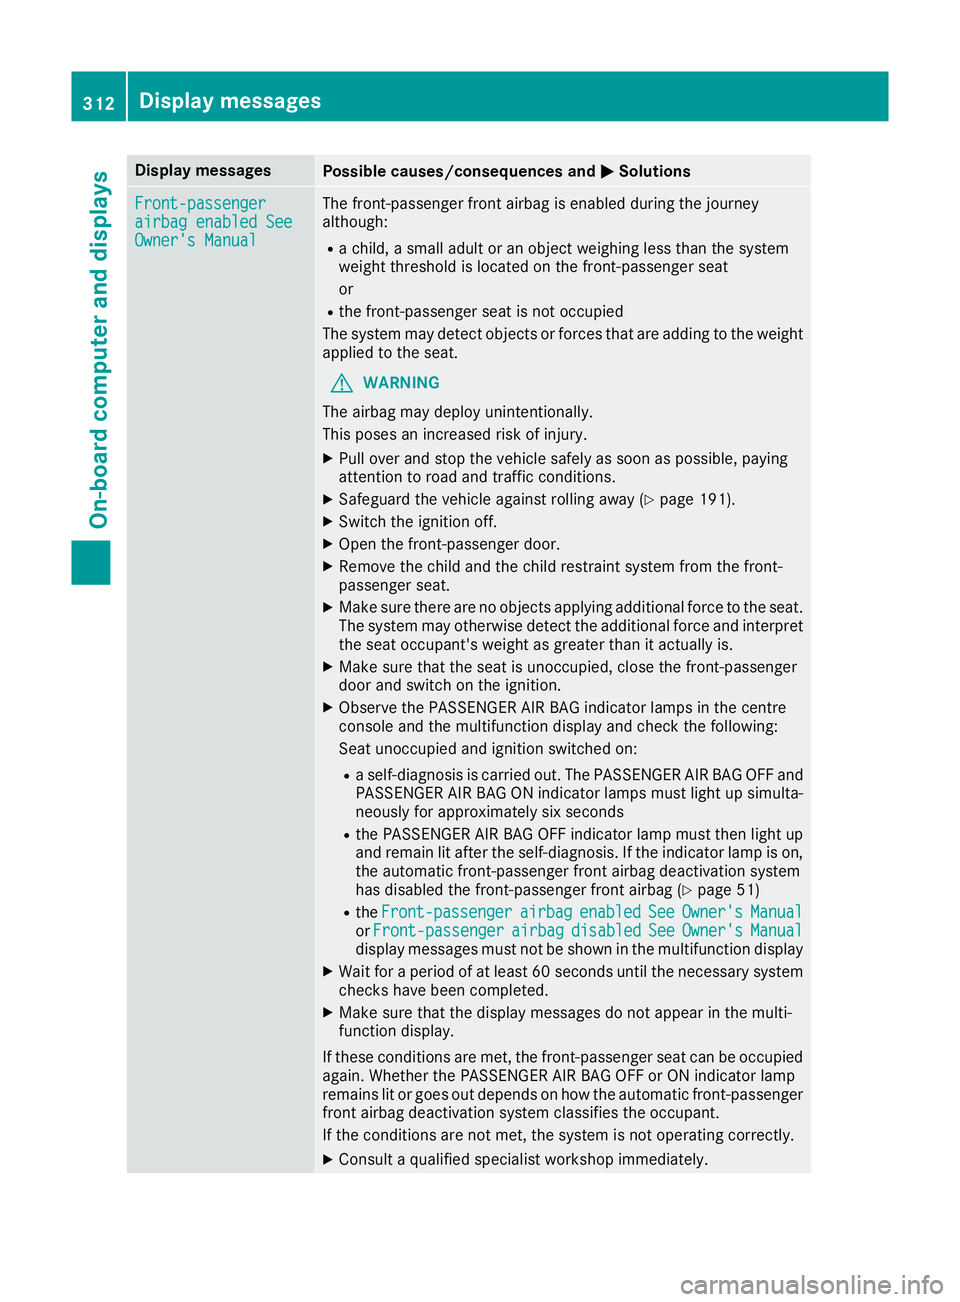
MSolutions Front-passenger
Front-passenger
airbag enabled See airbag enabled See
Owner's Manual Owner's Manual The front-passenger front airbag is enabled during the journey
although:
R a child, a small adult or an object weighing less than the system
weight threshold is located on the front-passenger seat
or
R the front-passenger seat is not occupied
The system may detect objects or forces that are adding to the weight
applied to the seat.
G WARNING
The airbag may deploy unintentionally.
This poses an increased risk of injury. X Pull over and stop the vehicle safely as soon as possible, paying
attention to road and traffic conditions.
X Safeguard the vehicle against rolling away (Y page 191).
X Switch the ignition off.
X Open the front-passenger door.
X Remove the child and the child restraint system from the front-
passenger seat.
X Make sure there are no objects applying additional force to the seat.
The system may otherwise detect the additional force and interpret the seat occupant's weight as greater than it actually is.
X Make sure that the seat is unoccupied, close the front-passenger
door and switch on the ignition.
X Observe the PASSENGER AIR BAG indicator lamps in the centre
console and the multifunction display and check the following:
Seat unoccupied and ignition switched on:
R a self-diagnosis is carried out. The PASSENGER AIR BAG OFF and
PASSENGER AIR BAG ON indicator lamps must light up simulta-
neously for approximately six seconds
R the PASSENGER AIR BAG OFF indicator lamp must then light up
and remain lit after the self-diagnosis. If the indicator lamp is on,
the automatic front-passenger front airbag deactivation system
has disabled the front-passenger front airbag (Y page 51)
R the Front-passenger Front-passenger airbag
airbagenabled
enabled See
SeeOwner's
Owner's Manual
Manual
or Front-passenger
Front-passenger airbag
airbagdisabled
disabled See
SeeOwner's
Owner's Manual
Manual
display messages must not be shown in the multifunction display
X Wait for a period of at least 60 seconds until the necessary system
checks have been completed.
X Make sure that the display messages do not appear in the multi-
function display.
If these conditions are met, the front-passenger seat can be occupied again. Whether the PASSENGER AIR BAG OFF or ON indicator lamp
remains lit or goes out depends on how the automatic front-passenger
front airbag deactivation system classifies the occupant.
If the conditions are not met, the system is not operating correctly.
X Consult a qualified specialist workshop immediately. 312
Display
messagesOn-board computer and displays
Page 354 of 453
Useful information
i This Owner's Manual describes all models,
series and optional equipment for your vehi-
cle that were available at the time of going to
press. National variations are possible. Note
that your vehicle may not be equipped with all
of the functions described. This is also the
case for systems and functions relevant to
safety.
i Read the information on qualified specialist
workshops: (Y page 28). Stowage areas
Loading guidelines
G
WARNING
If objects, luggage or loads are not secured or not secured sufficiently, they could slip, tip
over or be flung around and thereby hit vehicle
occupants. There is a risk of injury, especially when braking or abruptly changing directions.
Always store objects so that they cannot be
flung around. Secure objects, luggage or
loads against slipping or tipping before the
journey. G
WARNING
Combustion engines emit poisonous exhaust
gases such as carbon monoxide. If the tailgate is open when the engine is running, particu-
larly if the vehicle is moving, exhaust fumes
could enter the passenger compartment.
There is a risk of poisoning.
Turn off the engine before opening the tail-
gate. Never drive with the tailgate open. G
WARNING
The exhaust tail pipe and tail pipe trim can
become very hot. If you come into contact
with these parts of the vehicle, you could burn
yourself. There is a risk of injury.
Always be particularly careful around the
exhaust tail pipe and the tail pipe trim. Allow
these components to cool down before touch-
ing them. The handling characteristics of a laden vehicle
are dependent on the distribution of the load
within the vehicle. For this reason, you should
observe the following notes when transporting a
load:
R never exceed the maximum permissible gross
vehicle weight or the permissible axle loads
for the vehicle (including occupants).
R the luggage compartment is the preferred
place to store objects.
R position heavy loads as far forwards as pos-
sible and as low down in the load compart-
ment as possible.
R the load must not protrude above the upper
edge of the seat backrests.
R always place the load against the rear or front
seat backrests. Make sure that the seat
backrests are securely locked into place.
R always place the load behind unoccupied
seats if possible.
R use the lashing eyelets and the luggage nets
to transport loads and luggage.
R only use lashing eyelets and fastening com-
ponents that are suitable for the weight and
size of the load.
R hook in the safety net when loading.
R secure the load with sufficiently strong and
wear-resistant lashing material. pad sharp
edges for protection.
i Load restraints are available at any qualified
specialist workshop, e.g. a Mercedes-Benz
Service Centre. Stowage compartments
Important safety notes G
WARNING
If you do not correctly store objects in the
vehicle interior, they can slip or be flung
around, thus striking vehicle occupants.
There is a risk of injury, especially when brak- ing or abruptly changing directions. Stowage areas
351Stowing and features
Z
Page 359 of 453
Only use the lashing eyelets when securing a
load.
Observe the following notes on securing loads: R secure the load using the lashing eyelets.
R distribute the load on the lashing eyelets
evenly.
R do not use elastic straps or nets to secure a
load. These are only intended as an anti-slip
protection for light loads.
R do not route lashing materials across sharp
edges or corners.
R pad sharp edges for protection.
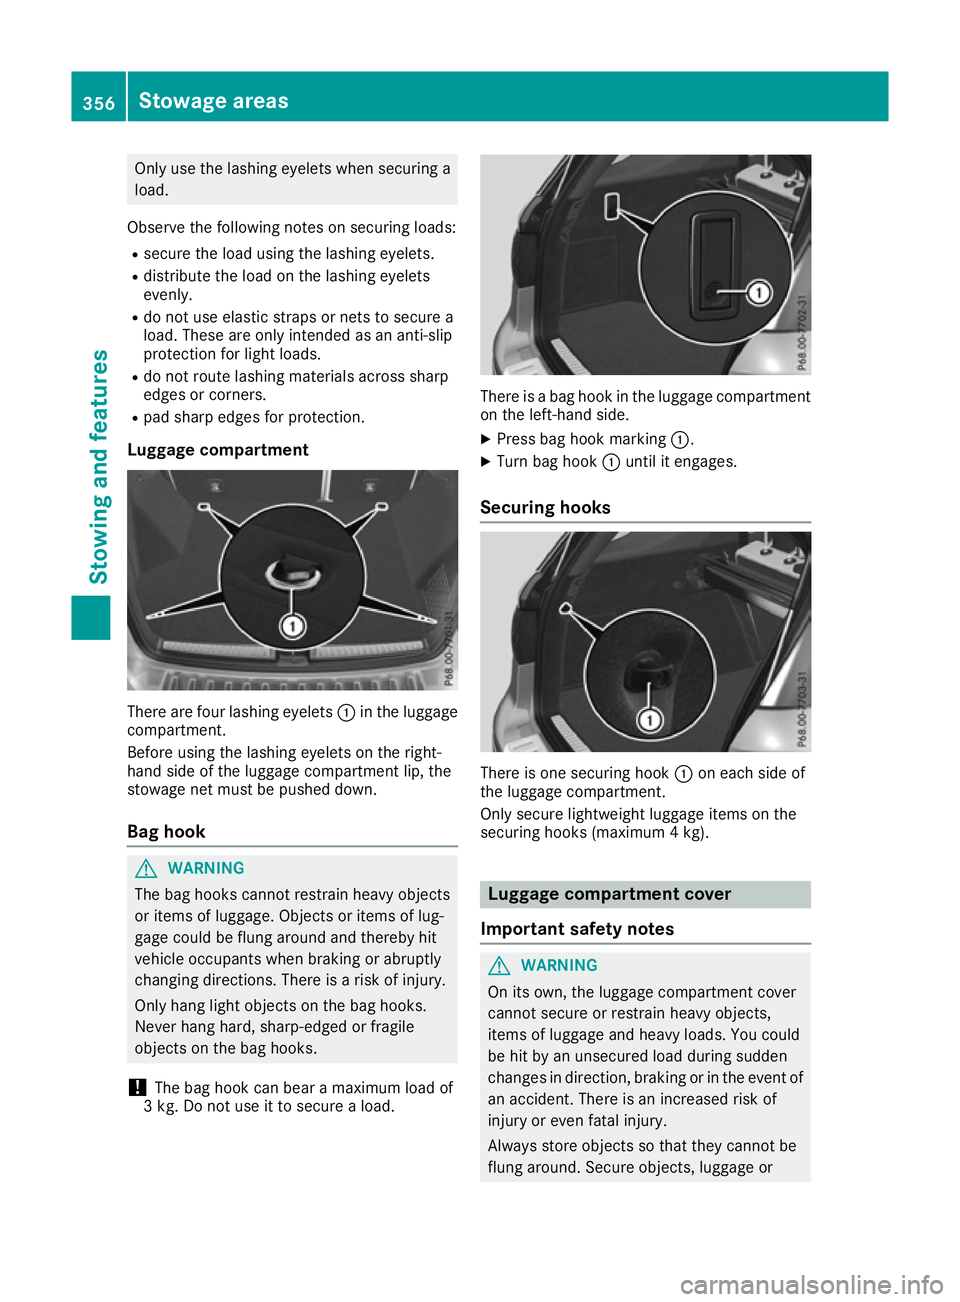
Luggage compartment There are four lashing eyelets
:in the luggage
compartment.
Before using the lashing eyelets on the right-
hand side of the luggage compartment lip, the
stowage net must be pushed down.
Bag hook G
WARNING
The bag hooks cannot restrain heavy objects
or items of luggage. Objects or items of lug-
gage could be flung around and thereby hit
vehicle occupants when braking or abruptly
changing directions. There is a risk of injury.
Only hang light objects on the bag hooks.
Never hang hard, sharp-edged or fragile
objects on the bag hooks.
! The bag hook can bear a maximum load of
3 kg. Do not use it to secure a load. There is a bag hook in the luggage compartment
on the left-hand side.
X Press bag hook marking :.
X Turn bag hook :until it engages.
Securing hooks There is one securing hook
:on each side of
the luggage compartment.
Only secure lightweight luggage items on the
securing hooks (maximum 4 kg). Luggage compartment cover
Important safety notes G
WARNING
On its own, the luggage compartment cover
cannot secure or restrain heavy objects,
items of luggage and heavy loads. You could
be hit by an unsecured load during sudden
changes in direction, braking or in the event of an accident. There is an increased risk of
injury or even fatal injury.
Always store objects so that they cannot be
flung around. Secure objects, luggage or 356
Stowage areasStowing and features