2015 MERCEDES-BENZ GLE SUV instrument cluster
[x] Cancel search: instrument clusterPage 25 of 453
With both axles on the ground .......4
01
Towing eye ......................................... 387
Traffic Sign Assist
Activating/deactivating the warn-ing function ................................... .290
Display message ............................ 325
Function/notes ............................ .242
Important safety notes .................. 242
Instrument cluster display ............. 243
Trailer coupling
see Towing a trailer
Trailer towing
7-pin connector ............................ .278
Blind Spot Assist ............................ 246
Cleaning the trailer tow hitch ......... 383
Coupling up a trailer ..................... .275
Decoupling a trailer ....................... 276
Driving tips ................................... .273
Important safety notes .................. 272
Lights display message .................. 313
Mounting dimensions .................... 446
Parktronic ...................................... 225
Power supply ................................. 277
Problem (fault) ............................... 279
Trailer loads ................................... 447
Transmission
see Automatic transmission
Transmission position display ......... 168
Transmission position display
(DIRECT SELECT lever) ......................168
Transporting the vehicle .................. 401
Travelling uphill
Brow of hill ..................................... 202
Driving downhill ............................ .202
Maximum gradient-climbing capa-
bility ............................................... 202
Trim pieces (cleaning instruc-
tions) ................................................. .384
Trip computer (on-board com-
puter) ................................................. .284
Trip meter
Calling up ....................................... 284
Resetting (on-board computer) ...... 285
Turn signals
Changing bulbs (front) ................... 130
Switching on/off ........................... 123 TV
Operating (on-board computer) ..... 288
see Separate operating instructions
Two-way radio
Frequencies ................................... 433
Installation ..................................... 433
Transmission output (maximum ).... 433
Type identification plate
see Vehicle identification plate
Tyre inflation compressor
see TIREFIT kit
Tyre pressure
Calling up (on-board computer) ..... 411
Display message ............................ 330
Not reached (TIREFIT) .................... 391
Reached (TIREFIT) .......................... 391
Recommended ............................... 408
Tyre pressure loss warning
General notes ................................ 410
Important safety notes .................. 410
Restarting ...................................... 410
Tyre pressure monitor
Checking the tyre pressure elec-
tronically ........................................ 411
Function/note s............................. 411
General notes ................................ 411
Important safety notes .................. 411
Radio type approval for the tyre
pressure monitor ........................... 413
Restarting ...................................... 412
Warning lamp ................................. 350
Warning message .......................... 412
Tyres
Changing a whee l.......................... 413
Checking ........................................ 406
Direction of rotation ...................... 414
Display message ............................ 330
General notes ................................ 418
Important safety notes .................. 405
Information on driving .................... 405
M+S tyres ...................................... 407
MOExtended tyre s......................... 407
Replacing ....................................... 413
Service life ..................................... 406
Storing ........................................... 414
Tyre size (data ).............................. 418
Tyre tread ...................................... 406
Wheel and tyre combinations ........ 419 22
Index
Page 28 of 453
Protection of the environment
General notes
H
Environmental note
Daimler's declared policy is one of compre-
hensive environmental protection.
Our objectives are to use the natural resour-
ces which form the basis of our existence on
this planet sparingly and in a manner which
takes the requirements of both nature and
humanity into consideration.
You too can help to protect the environment
by operating your vehicle in an environmen-
tally-responsible manner.
Fuel consumption and the rate of engine,
transmission, brake and tyre wear depend on
the following factors:
R operating conditions of your vehicle
R your personal driving style
You can influence both factors. Therefore,
please bear the following in mind:
Operating conditions:
R avoid short trips, as these increase fuel
consumption.
R observe the correct tyre pressure.
R do not carry any unnecessary weight in the
vehicle.
R remove the roof rack once you no longer
need it.
R a regularly serviced vehicle will contribute
to environmental protection. You should
therefore adhere to the service intervals.
R all maintenance work should be carried out
at a qualified specialist workshop.
Personal driving style:
R do not depress the accelerator pedal when
starting the engine.
R do not warm up the engine when the vehicle
is stationary.
R drive carefully and maintain a safe distance
from the vehicle in front.
R avoid frequent, sudden acceleration and
braking. R
change gear in good time and use each gear
only up to Ôof its maximum engine speed.
R switch off the engine in stationary traffic.
R monitor the vehicle's fuel consumption. Returning an end-of-life vehicle
EU countries only:
Mercedes-Benz will take back your old vehicle to
dispose of it in an environmentally-responsible
manner in accordance with the European Union (EU) End of Life Vehicles Directive.
There is a network of return points and disas-
sembly plants available. You can return your
vehicle to these plants free of charge. This
makes a valuable contribution to the recycling
process and the conservation of resources.
For further information on recycling old vehi-
cles, recovery and the terms of the policy, visit
the Mercedes-Benz homepage. Genuine Mercedes-Benz parts
H
Environmental note
Daimler AG also supplies reconditioned
assemblies and parts which are of the same
quality as new parts. For these, the same war-
ranty applies as for new parts.
! Airbags and seat belt tensioners, as well as
control units and sensors for these restraint
systems, may be installed in the following
areas of your vehicle:
R doors
R door pillars
R door sills
R seats
R dashboard
R instrument cluster
R centre console
Do not install accessories such as audio sys-
tems in these areas. Do not carry out repairs
or welding. You could impair the operating
efficiency of the restraint systems.
Have accessories retrofitted at a qualified
specialist workshop. Introduction
25 Z
Page 33 of 453
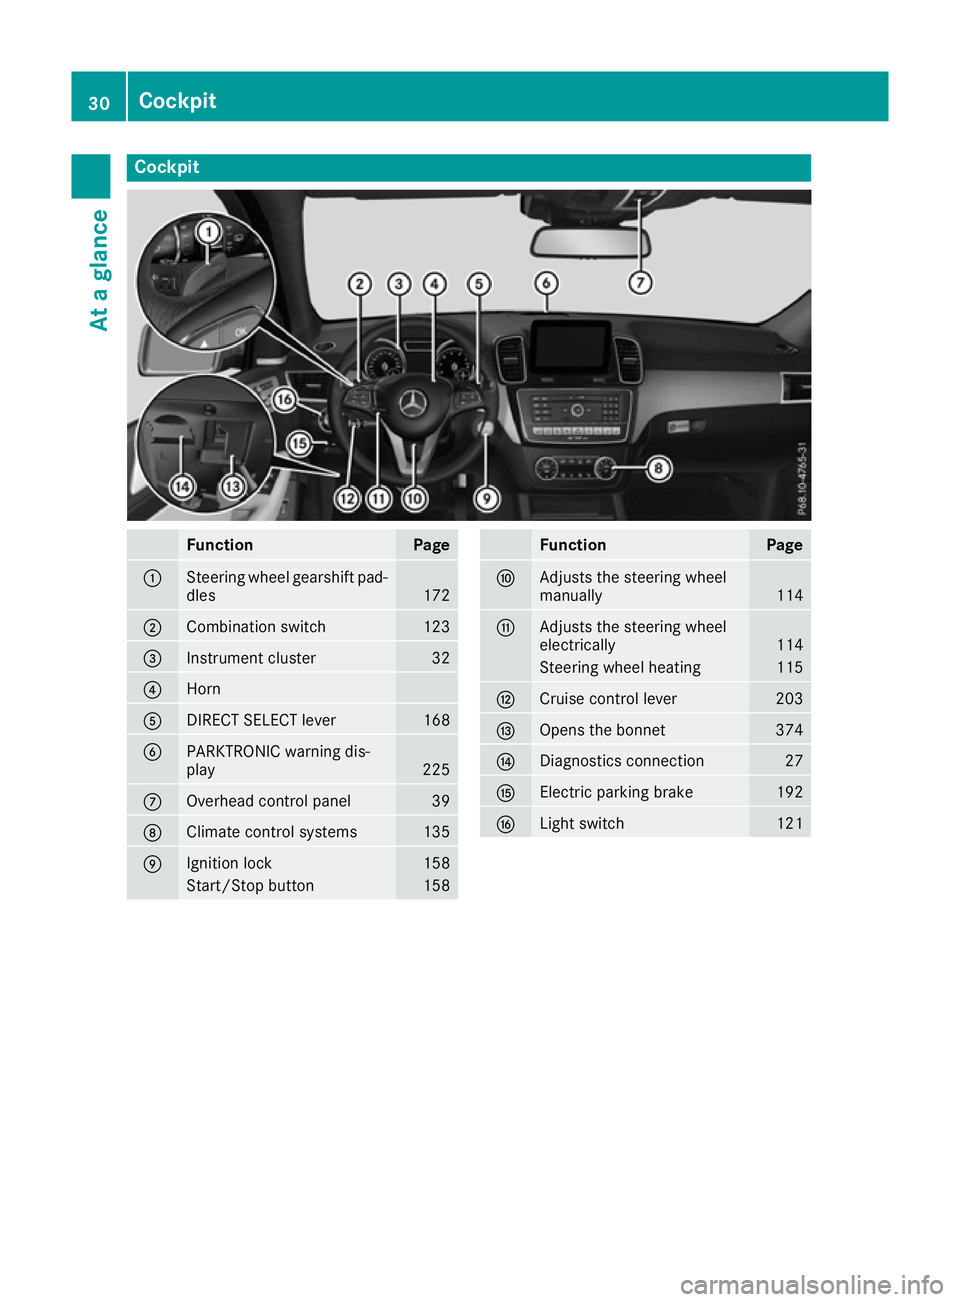
Cockpit
Function Page
:
Steering wheel gearshift pad-
dles 172
;
Combination switch 123
=
Instrument cluster 32
?
Horn
A
DIRECT SELECT lever 168
B
PARKTRONIC warning dis-
play
225
C
Overhead control panel 39
D
Climate control systems 135
E
Ignition lock 158
Start/Stop button 158 Function Page
F
Adjusts the steering wheel
manually
114
G
Adjusts the steering wheel
electrically
114
Steering wheel heating 115
H
Cruise control lever 203
I
Opens the bonnet 374
J
Diagnostics connection 27
K
Electric parking brake 192
L
Light switch 12130
CockpitAt a glance
Page 34 of 453
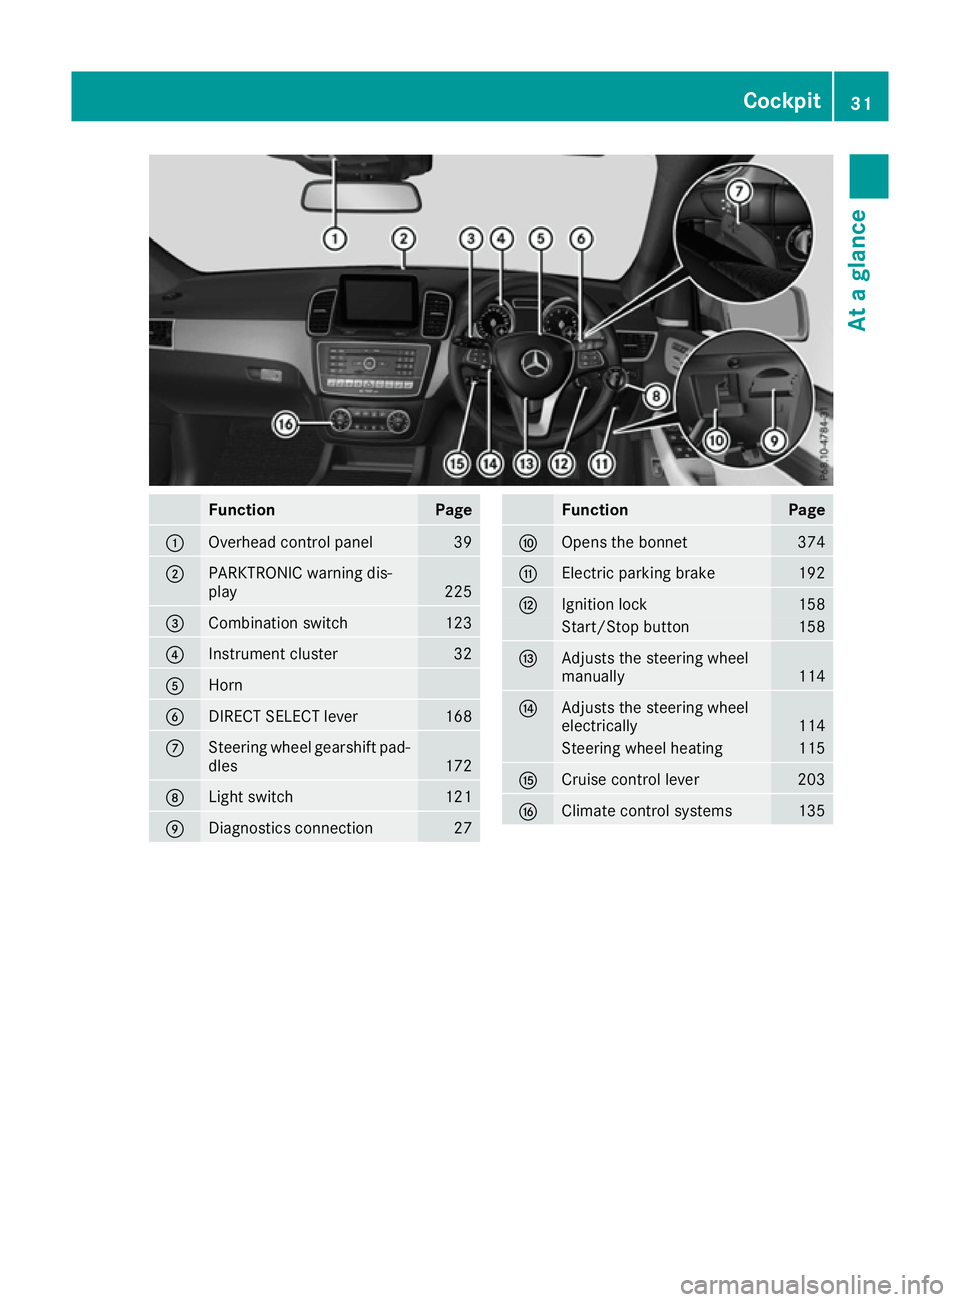
Function Page
:
Overhead control panel 39
;
PARKTRONIC warning dis-
play
225
=
Combination switch 123
?
Instrument cluster 32
A
Horn
B
DIRECT SELECT lever 168
C
Steering wheel gearshift pad-
dles 172
D
Light switch 121
E
Diagnostics connection 27 Function Page
F
Opens the bonnet 374
G
Electric parking brake 192
H
Ignition lock 158
Start/Stop button 158
I
Adjusts the steering wheel
manually
114
J
Adjusts the steering wheel
electrically
114
Steering wheel heating 115
K
Cruise control lever 203
L
Climate control systems 135Cockpit
31At a glance
Page 35 of 453
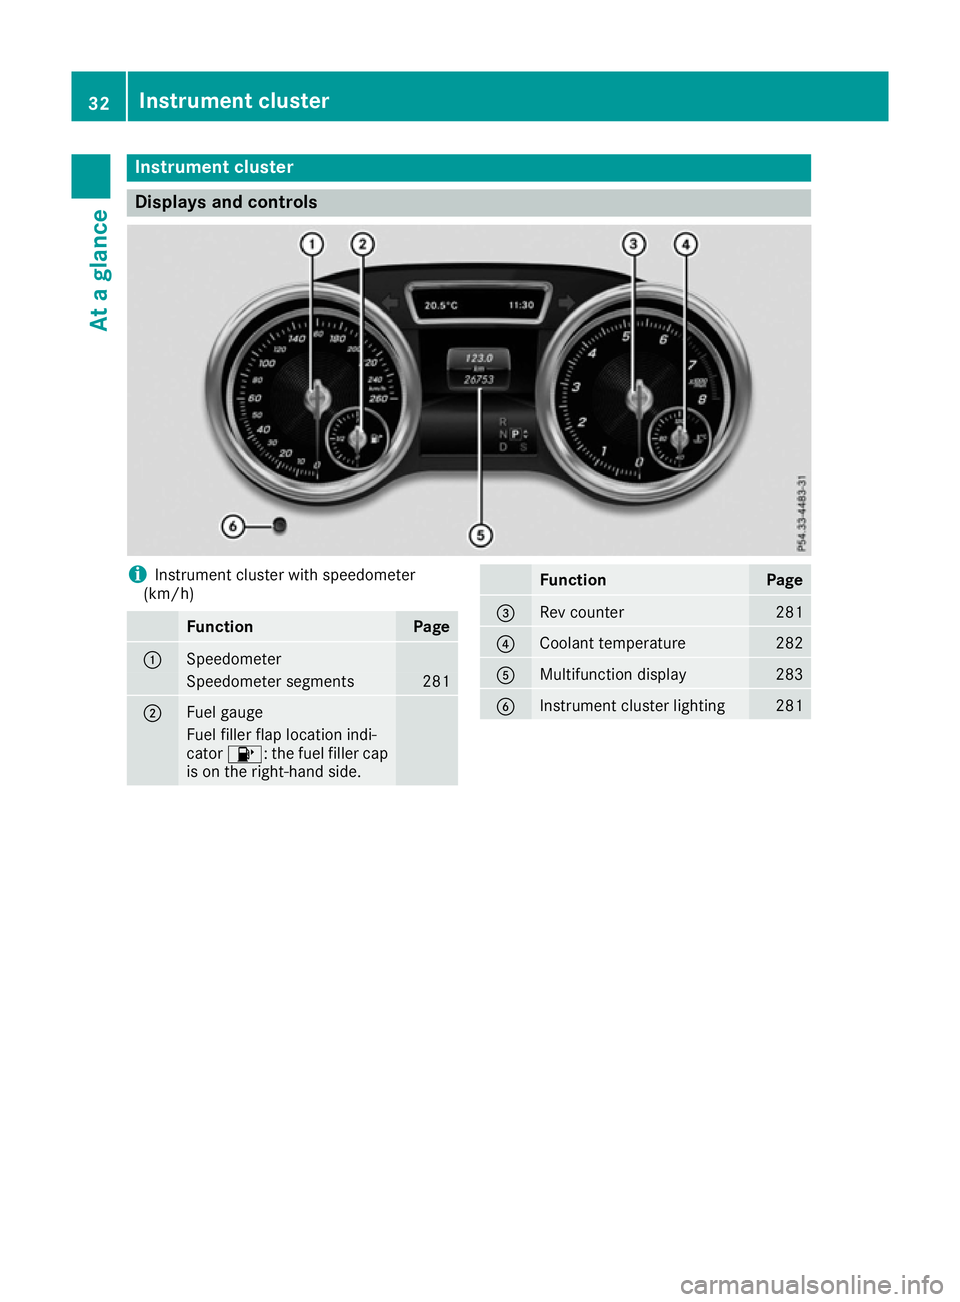
Instrument cluster
Displays and controls
i
Instrument cluster with speedometer
(km/h) Function Page
:
Speedometer
Speedometer segments 281
;
Fuel gauge
Fuel filler flap location indi-
cator
8: the fuel filler cap
is on the right-hand side. Function Page
=
Rev counter 281
?
Coolant temperature 282
A
Multifunction display 283
B
Instrument cluster lighting 28132
Instrument clusterAt a glance
Page 36 of 453
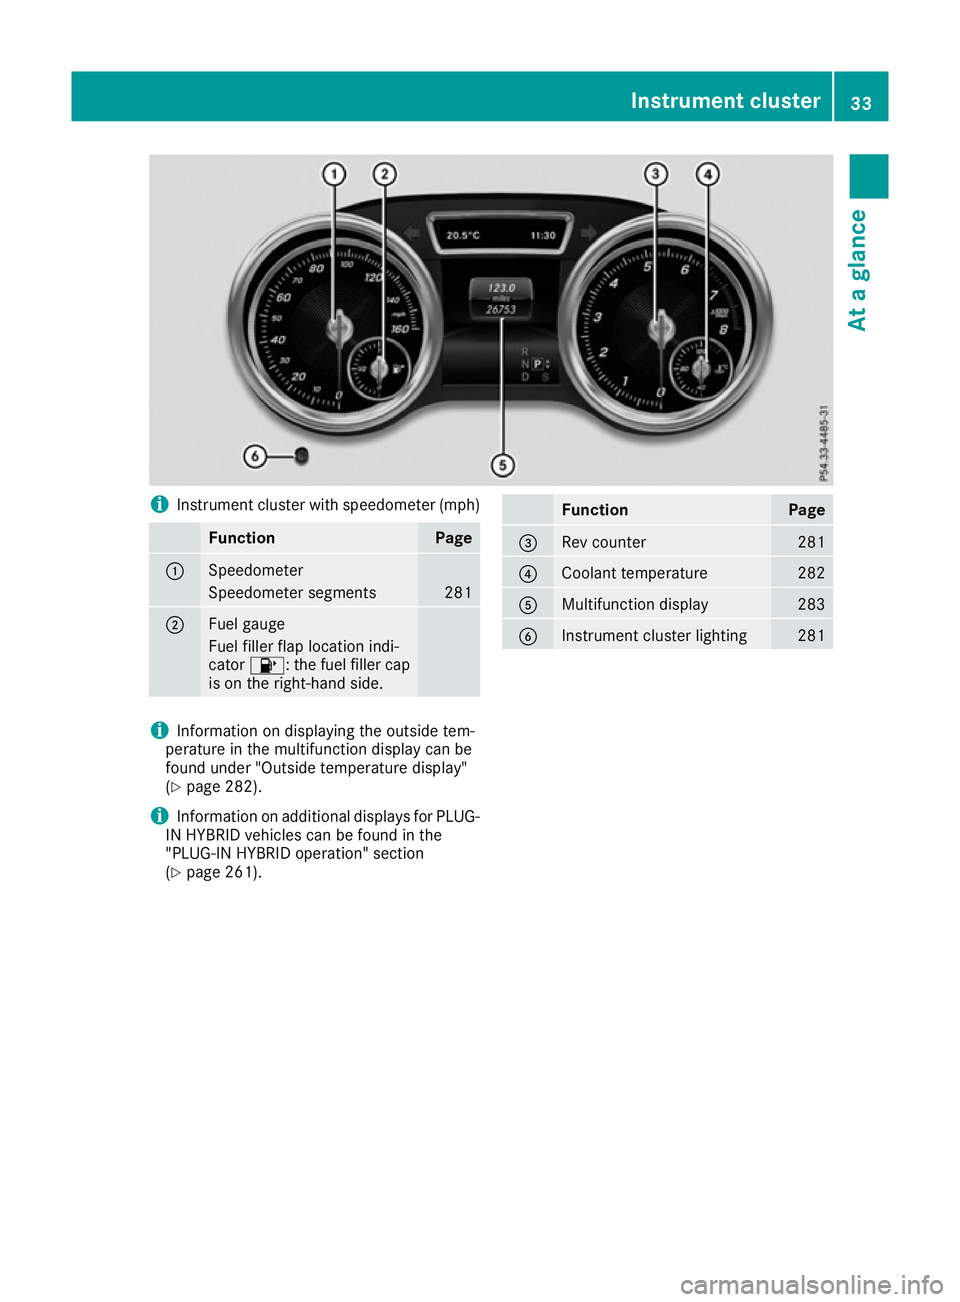
i
Instrument cluster with speedometer (mph) Function Page
:
Speedometer
Speedometer segments 281
;
Fuel gauge
Fuel filler flap location indi-
cator
8: the fuel filler cap
is on the right-hand side. Function Page
=
Rev counter 281
?
Coolant temperature 282
A
Multifunction display 283
B
Instrument cluster lighting 281
i
Information on displaying the outside tem-
perature in the multifunction display can be
found under "Outside temperature display"
(Y page 282).
i Information on additional displays for PLUG-
IN HYBRID vehicles can be found in the
"PLUG-IN HYBRID operation" section
(Y page 261). Instrument cluster
33At a glance
Page 37 of 453
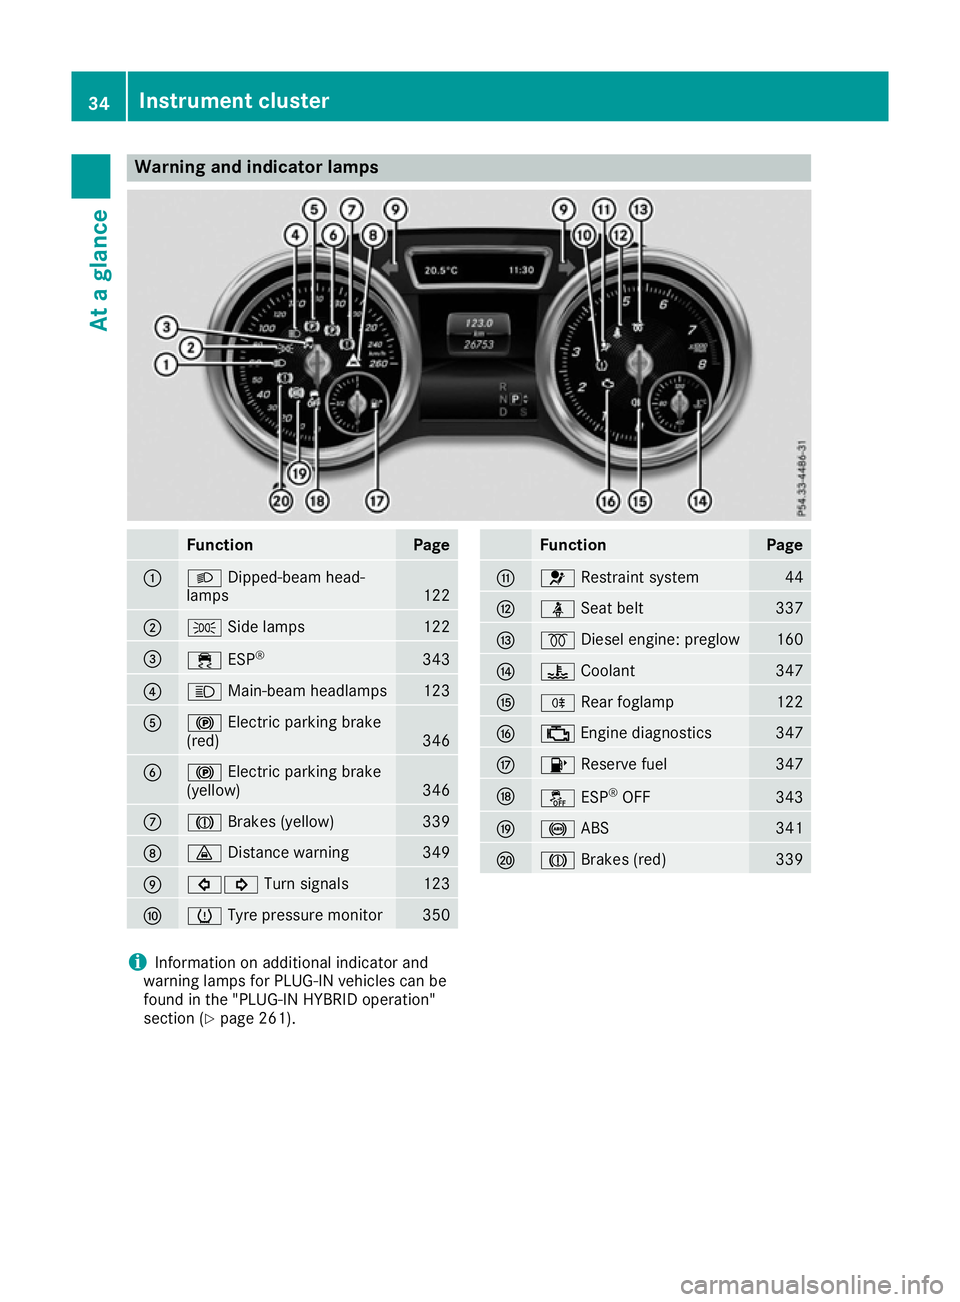
Warning and indicator lamps
Function Page
:
L
Dipped-beam head-
lamps 122
;
T
Side lamps 122
=
÷
ESP® 343
?
K
Main-beam headlamps 123
A
!
Electric parking brake
(red) 346
B
!
Electric parking brake
(yellow) 346
C
J
Brakes (yellow) 339
D
·
Distance warning 349
E
#!
Turn signals 123
F
h
Tyre pressure monitor 350 Function Page
G
6
Restraint system 44
H
ü
Seat belt 337
I
%
Diesel engine: preglow 160
J
?
Coolant 347
K
R
Rear foglamp 122
L
;
Engine diagnostics 347
M
8
Reserve fuel 347
N
å
ESP®
OFF 343
O
!
ABS 341
P
J
Brakes (red) 339
i
Information on additional indicator and
warning lamps for PLUG-IN vehicles can be
found in the "PLUG-IN HYBRID operation"
section (Y page 261). 34
Instrument clusterAt a glance
Page 45 of 453
Deactivate the hybrid system manually if:
R the 6 restraint system warning lamp in the
instrument cluster lights up after an accident
R the vehicle is badly damaged, e.g. after an
accident, and the restraint system compo-
nents were not activated
R the vehicle is badly damaged and has to be
towed or transported
X If possible, move the vehicle out of the
danger zone:
shift the automatic transmis-
sion into position N.
X Release the electric parking brake.
X Roll the vehicle to a safe place and park it
safely.
Get assistance from others if necessary.
The vehicle is locked automatically when the
ignition is switched on and the wheels are turn-
ing. There is therefore a risk of being locked out
if the vehicle is being pushed or tested on a
dynamometer.
X Switch the ignition off.
X Shift the automatic transmission to park posi-
tion P.
Apply the electric parking brake
(Y page 192).
Secure the vehicle against rolling away
(Y page 414).
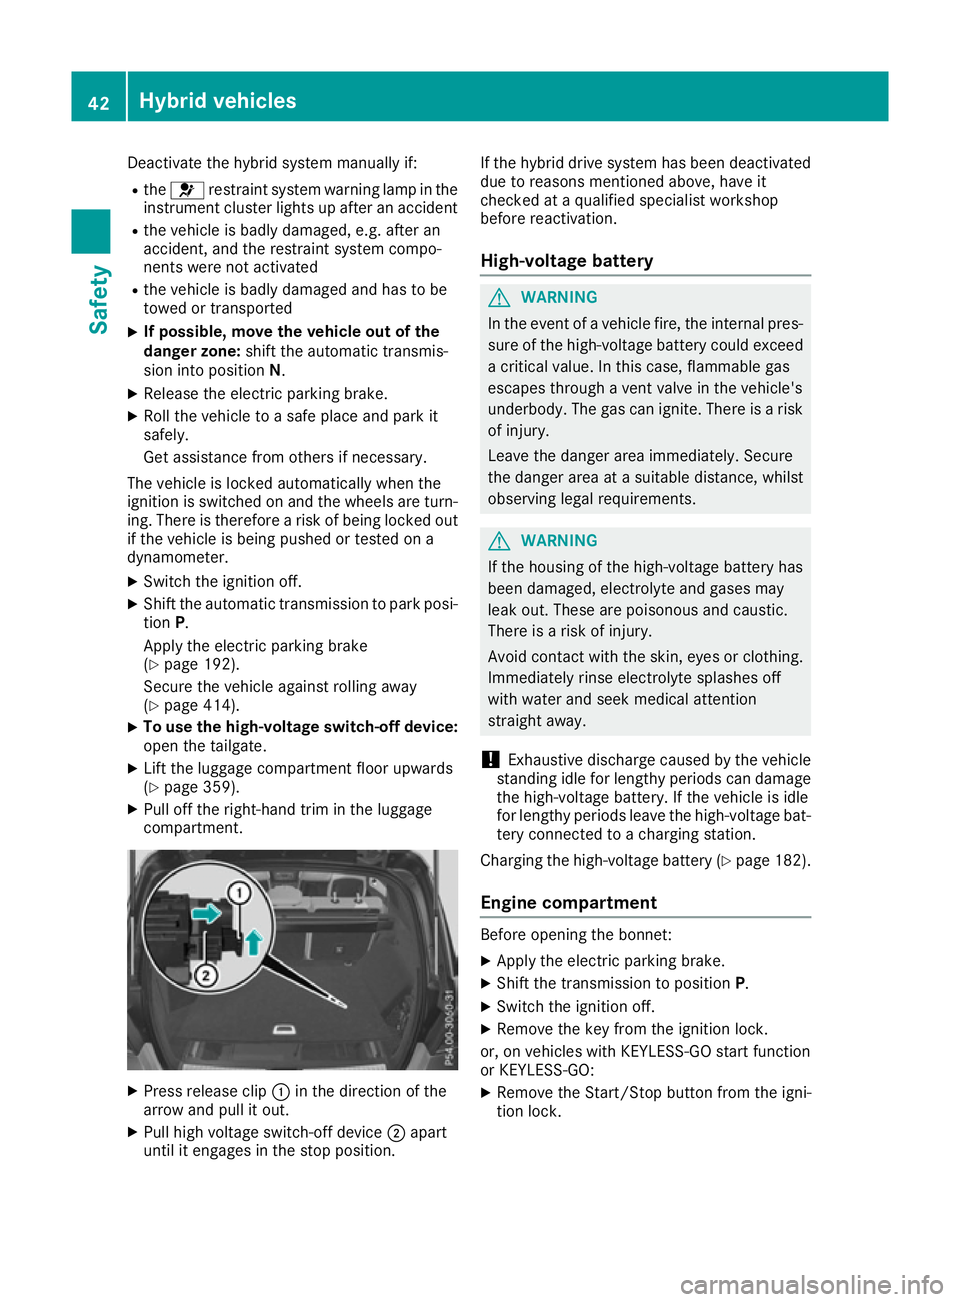
X To use the high-voltage switch-off device:
open the tailgate.
X Lift the luggage compartment floor upwards
(Y page 359).
X Pull off the right-hand trim in the luggage
compartment. X
Press release clip :in the direction of the
arrow and pull it out.
X Pull high voltage switch-off device ;apart
until it engages in the stop position. If the hybrid drive system has been deactivated
due to reasons mentioned above, have it
checked at a qualified specialist workshop
before reactivation.
High-voltage battery G
WARNING
In the event of a vehicle fire, the internal pres- sure of the high-voltage battery could exceeda critical value. In this case, flammable gas
escapes through a vent valve in the vehicle's
underbody. The gas can ignite. There is a risk
of injury.
Leave the danger area immediately. Secure
the danger area at a suitable distance, whilst
observing legal requirements. G
WARNING
If the housing of the high-voltage battery has
been damaged, electrolyte and gases may
leak out. These are poisonous and caustic.
There is a risk of injury.
Avoid contact with the skin, eyes or clothing. Immediately rinse electrolyte splashes off
with water and seek medical attention
straight away.
! Exhaustive discharge caused by the vehicle
standing idle for lengthy periods can damage
the high-voltage battery. If the vehicle is idle
for lengthy periods leave the high-voltage bat- tery connected to a charging station.
Charging the high-voltage battery (Y page 182).
Engine compartment Before opening the bonnet:
X Apply the electric parking brake.
X Shift the transmission to position P.
X Switch the ignition off.
X Remove the key from the ignition lock.
or, on vehicles with KEYLESS-GO start function
or KEYLESS ‑GO:
X Remove the Start/Stop button from the igni-
tion lock. 42
Hybrid vehiclesSafety