2015 MERCEDES-BENZ GLE SUV instrument cluster
[x] Cancel search: instrument clusterPage 393 of 453
If you come into contact with the tyre sealant,
observe the following:
R Rinse off the tyre sealant from your skin
immediately with water.
R If the tyre sealant comes into contact with
your eyes, immediately rinse them thor-
oughly with clean water.
R If tyre sealant is swallowed, immediately
rinse your mouth out thoroughly and drink
plenty of water. Do not induce vomiting,
and seek medical attention immediately.
R Immediately change out of clothing which
has come into contact with tyre sealant.
R If an allergic reaction occurs, seek medical
attention immediately.
! Do not operate the tyre inflation compres-
sor for longer than eight minutes at a time
without a break. It may otherwise overheat.
The tyre inflation compressor can be oper-
ated again once it has cooled down.
Comply with the manufacturer's safety instruc-
tions on the sticker on the tyre inflation com-
pressor.
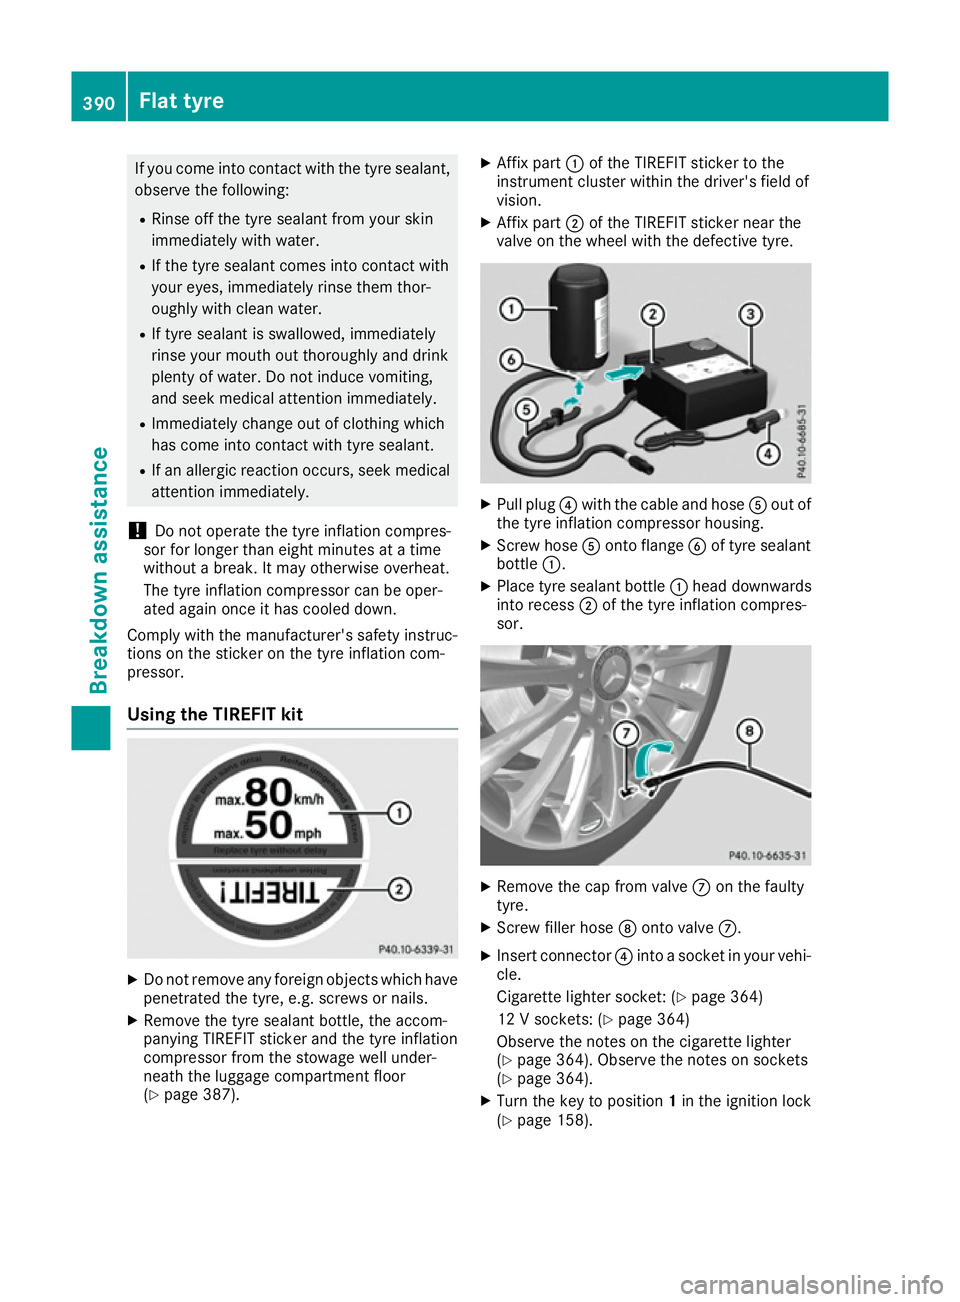
Using the TIREFIT kit X
Do not remove any foreign objects which have
penetrated the tyre, e.g. screws or nails.
X Remove the tyre sealant bottle, the accom-
panying TIREFIT sticker and the tyre inflation
compressor from the stowage well under-
neath the luggage compartment floor
(Y page 387). X
Affix part :of the TIREFIT sticker to the
instrument cluster within the driver's field of
vision.
X Affix part ;of the TIREFIT sticker near the
valve on the wheel with the defective tyre. X
Pull plug ?with the cable and hose Aout of
the tyre inflation compressor housing.
X Screw hose Aonto flange Bof tyre sealant
bottle :.
X Place tyre sealant bottle :head downwards
into recess ;of the tyre inflation compres-
sor. X
Remove the cap from valve Con the faulty
tyre.
X Screw filler hose Donto valve C.
X Insert connector ?into a socket in your vehi-
cle.
Cigarette lighter socket: (Y page 364)
12 V sockets: (Y page 364)
Observe the notes on the cigarette lighter
(Y page 364). Observe the notes on sockets
(Y page 364).
X Turn the key to position 1in the ignition lock
(Y page 158). 390
Flat tyreBreakdown assistance
Page 394 of 453
X
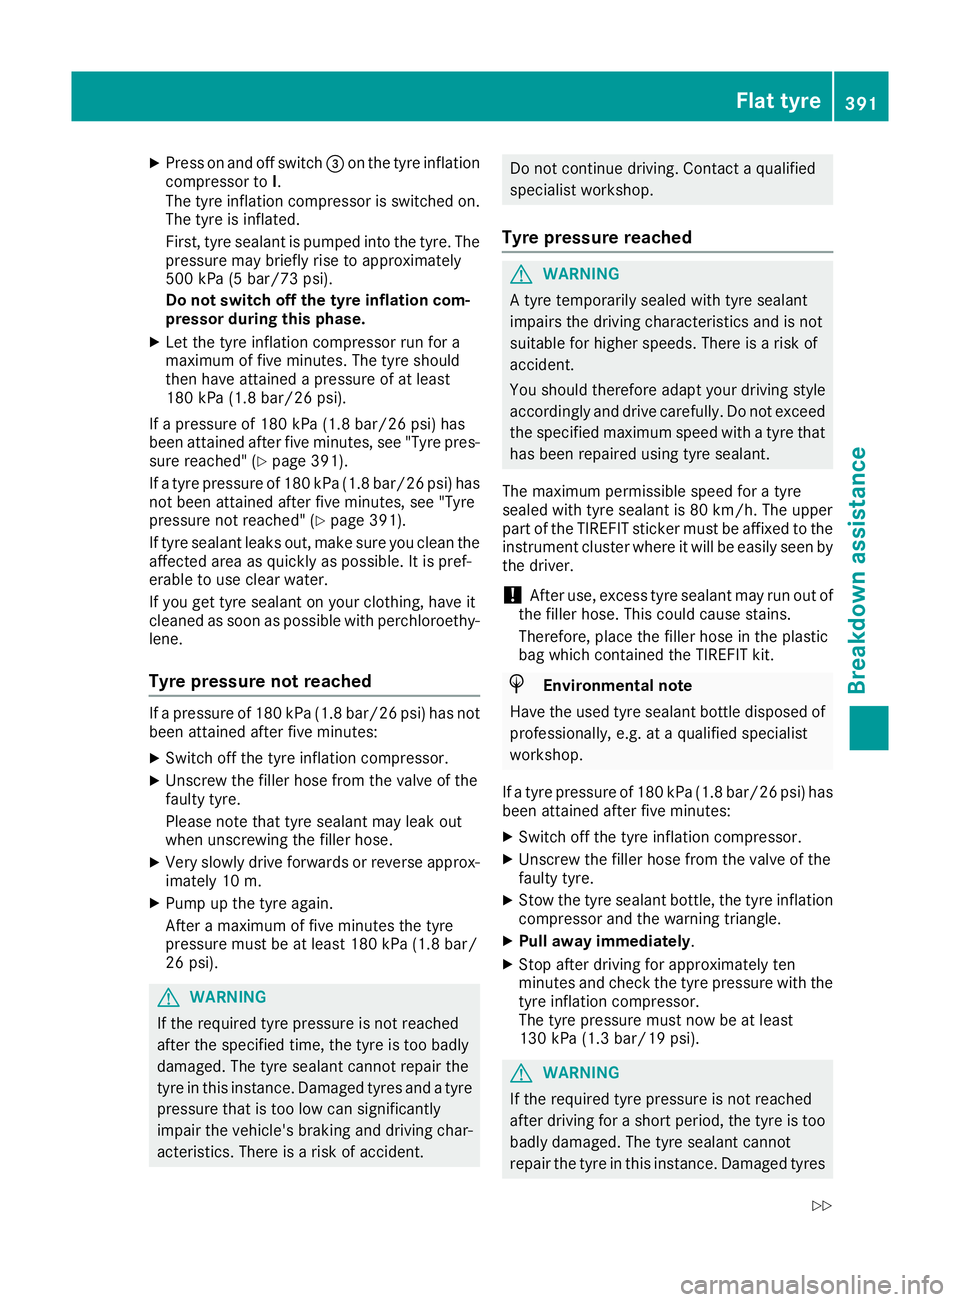
Press on and off switch =on the tyre inflation
compressor to I.
The tyre inflation compressor is switched on.
The tyre is inflated.
First, tyre sealant is pumped into the tyre. The pressure may briefly rise to approximately
500 kPa (5 bar/73 psi).
Do not switch off the tyre inflation com-
pressor during this phase.
X Let the tyre inflation compressor run for a
maximum of five minutes. The tyre should
then have attained a pressure of at least
180 kPa (1.8 bar/26 psi).
If a pressure of 180 kPa (1.8 bar/26 psi) has
been attained after five minutes, see "Tyre pres-
sure reached" (Y page 391).
If a tyre pressure of 180 kPa (1.8 bar/26 psi) has not been attained after five minutes, see "Tyre
pressure not reached" (Y page 391).
If tyre sealant leaks out, make sure you clean the
affected area as quickly as possible. It is pref-
erable to use clear water.
If you get tyre sealant on your clothing, have it
cleaned as soon as possible with perchloroethy- lene.
Tyre pressure not reached If a pressure of 180 kPa (1.8 bar/26 psi) has not
been attained after five minutes:
X Switch off the tyre inflation compressor.
X Unscrew the filler hose from the valve of the
faulty tyre.
Please note that tyre sealant may leak out
when unscrewing the filler hose.
X Very slowly drive forwards or reverse approx-
imately 10 m.
X Pump up the tyre again.
After a maximum of five minutes the tyre
pressure must be at least 180 kPa (1.8 bar/
26 psi). G
WARNING
If the required tyre pressure is not reached
after the specified time, the tyre is too badly
damaged. The tyre sealant cannot repair the
tyre in this instance. Damaged tyres and a tyre pressure that is too low can significantly
impair the vehicle's braking and driving char-
acteristics. There is a risk of accident. Do not continue driving. Contact a qualified
specialist workshop.
Tyre pressure reached G
WARNING
A tyre temporarily sealed with tyre sealant
impairs the driving characteristics and is not
suitable for higher speeds. There is a risk of
accident.
You should therefore adapt your driving style
accordingly and drive carefully. Do not exceed the specified maximum speed with a tyre that
has been repaired using tyre sealant.
The maximum permissible speed for a tyre
sealed with tyre sealant is 80 km/h. The upper
part of the TIREFIT sticker must be affixed to the
instrument cluster where it will be easily seen by
the driver.
! After use, excess tyre sealant may run out of
the filler hose. This could cause stains.
Therefore, place the filler hose in the plastic
bag which contained the TIREFIT kit. H
Environmental note
Have the used tyre sealant bottle disposed of
professionally, e.g. at a qualified specialist
workshop.
If a tyre pressure of 180 kPa (1.8 bar/26 psi) has
been attained after five minutes:
X Switch off the tyre inflation compressor.
X Unscrew the filler hose from the valve of the
faulty tyre.
X Stow the tyre sealant bottle, the tyre inflation
compressor and the warning triangle.
X Pull away immediately.
X Stop after driving for approximately ten
minutes and check the tyre pressure with the
tyre inflation compressor.
The tyre pressure must now be at least
130 kPa (1.3 bar/19 psi). G
WARNING
If the required tyre pressure is not reached
after driving for a short period, the tyre is too badly damaged. The tyre sealant cannot
repair the tyre in this instance. Damaged tyres Flat tyre
391Breakdown assistance
Z
Page 401 of 453
Do not use a rapid charging device to start the vehicle. If your vehicle's battery is discharged, the
engine can be jump-started from another vehicle or from a second battery using jump leads.
Observe the following points:
R The battery is not accessible in all vehicles. If the other vehicle's battery is not accessible, jump-
start the vehicle using a second battery or a jump-starting device.
R Vehicles with a petrol engine: only jump-start the vehicle when the engine and exhaust system
are cold.
R Do not start the engine if the battery is frozen. Let the battery thaw first.
R Jump-starting may only be performed using batteries with a nominal voltage of 12 V.
R Only use jump leads that have a sufficient cross-section and insulated terminal clamps.
R If the battery is fully discharged, leave the battery that is being used to jump-start connected for
a few minutes before attempting to start. This charges the empty battery a little.
R Make sure that the two vehicles do not touch.
Make sure that:
R The jump leads are not damaged,
R Non-insulated parts of the terminal clamps do not come into contact with other metal parts while
the jump leads are connected to the battery.
R The jump leads cannot come into contact with parts which can move when the engine is running,
such as the V-belt pulley or the fan.
X Secure the vehicle by applying the electric parking brake.
X Shift the transmission to position P.
X Make sure that the ignition is switched off . All indicator lamps in the instrument cluster must be
off. When using the key, turn the key to position 0in the ignition lock and remove it (Y page 158).
X Switch off all electrical consumers, e.g. rear window heating, lighting etc.
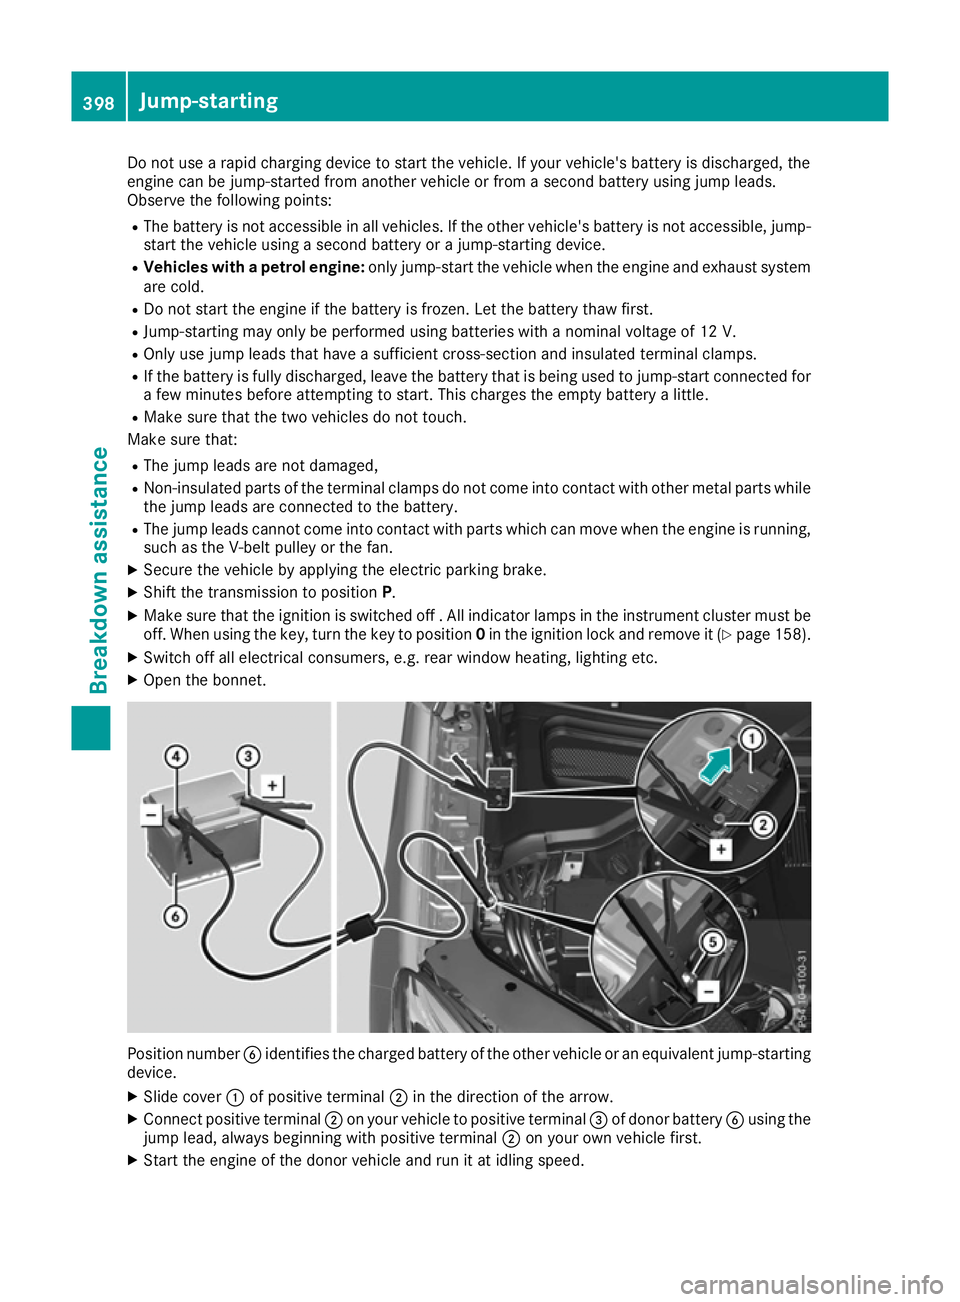
X Open the bonnet. Position number
Bidentifies the charged battery of the other vehicle or an equivalent jump-starting
device.
X Slide cover :of positive terminal ;in the direction of the arrow.
X Connect positive terminal ;on your vehicle to positive terminal =of donor battery Busing the
jump lead, always beginning with positive terminal ;on your own vehicle first.
X Start the engine of the donor vehicle and run it at idling speed. 398
Jump-startingBreakdown assistance
Page 405 of 453
Information for 4MATIC vehicles
! Vehicles with 4MATIC must not be towed
with the front or rear axle raised; otherwise,
the transmission may be damaged.
Vehicles with 4MATIC may either be towed away
with both axles on the ground or be loaded up
and transported.
If the vehicle has transmission damage or dam- age to the front or rear axle, have it transportedon a transporter or trailer.
In the event of damage to the electrical sys-
tem: if the battery is defective, the automatic
transmission will be locked in position P. To shift
the automatic transmission to position N, you
must provide power to the vehicle's on-board
electrical system in the same way as when jump- starting (Y page 397).
Have the vehicle transported on a transporter or trailer. Tow-starting (emergency engine
starting)
! Do not tow-start vehicles with automatic
transmission. You could otherwise damage
the automatic transmission.
You can find information on "Jump-starting"
under (Y page 397). Electrical fuses
Important safety notes
G
WARNING
If you manipulate, bridge or replace a faulty
fuse with a fuse of a higher amperage, the
electric cables could be overloaded. This may result in a fire. There is a risk of an accident
and injury.
Always replace faulty fuses with specified new fuses of the correct amperage.
! Only use fuses marked with an "S" for the
fuse box in the engine compartment and
under the rear bench seat. Components or
systems could otherwise be damaged. The fuses in your vehicle disconnect faulty cir-
cuits. If a fuse blows, all the components on the
circuit and their functions will fail.
Blown fuses must be replaced with fuses of the same rating, which you can recognise by the
colour and fuse rating. The fuse ratings are listed
in the fuse allocation chart.
The fuse allocation chart is located in the fuse
box under the rear bench seat (Y page 403).
If the newly inserted fuse also blows, have the
cause traced and rectified at a qualified special-
ist workshop, e.g. a Mercedes-Benz Service
Centre. Before replacing a fuse
Observe the important safety notes
(Y page 402)
X Secure the vehicle against rolling away
(Y page 191).
X Switch off the engine.
X Switch off all electrical consumers.
X Remove the key from the ignition lock.
or, on vehicles with KEYLESS-GO start function
or KEYLESS‑GO: X Open the driver's door.
The on-board electronics now have status 0.
This is the same as the key having been
removed.
The driver's door can be closed again.
All indicator lamps in the instrument cluster
must be off.
The fuses are located in various fuse boxes: R Fuse box on the front-passenger side of the
dashboard
R Fuse box in the engine compartment on the
right-hand side of the vehicle, when viewed in
the direction of travel
R Fuse box under the rear bench seat Dashboard fuse box
Observe the important safety notes
(Y page 402).
! Do not use a pointed object such as a screw-
driver to open the cover in the dashboard. You
could damage the dashboard or the cover. 402
Electrical fusesBreakdown assistance
Page 414 of 453
X
Press the abutton.
The tyre pressure values stored at the last
restart will continue to be monitored. Tyre pressure monitor
General notes If a tyre pressure monitor system is fitted, the
vehicle's wheels have sensors fitted that moni-
tor the tyre pressures in all four tyres. The tyre
pressure monitor warns you if the pressure
drops in one or more of the tyres. The tyre pres- sure monitor only functions if the corresponding
sensors are fitted to all wheels.
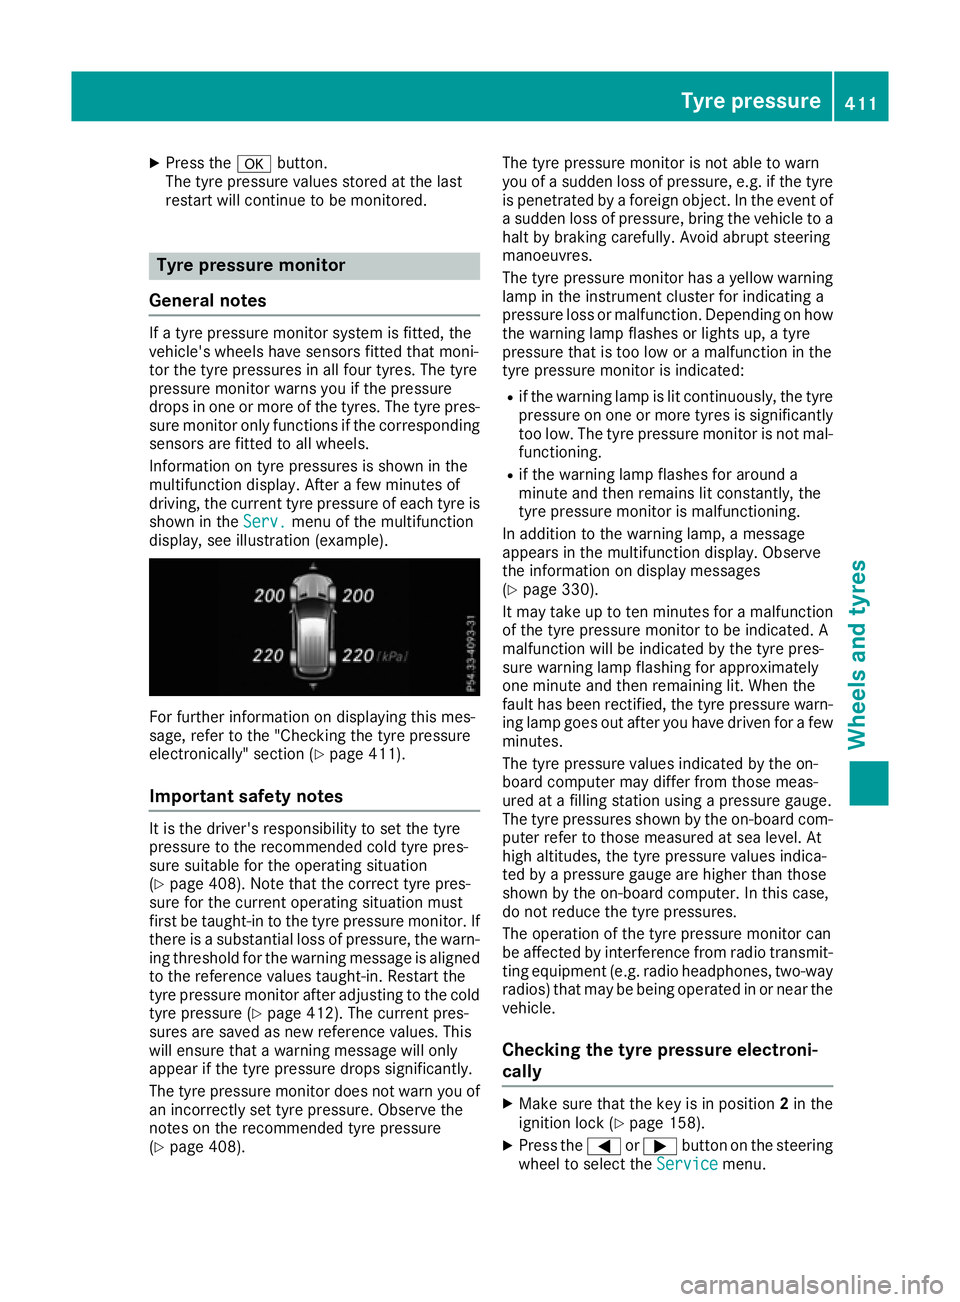
Information on tyre pressures is shown in the
multifunction display. After a few minutes of
driving, the current tyre pressure of each tyre is
shown in the Serv. Serv.menu of the multifunction
display, see illustration (example). For further information on displaying this mes-
sage, refer to the "Checking the tyre pressure
electronically" section (Y page 411).
Important safety notes It is the driver's responsibility to set the tyre
pressure to the recommended cold tyre pres-
sure suitable for the operating situation
(Y page 408). Note that the correct tyre pres-
sure for the current operating situation must
first be taught-in to the tyre pressure monitor. If
there is a substantial loss of pressure, the warn- ing threshold for the warning message is aligned
to the reference values taught-in. Restart the
tyre pressure monitor after adjusting to the cold tyre pressure (Y page 412). The current pres-
sures are saved as new reference values. This
will ensure that a warning message will only
appear if the tyre pressure drops significantly.
The tyre pressure monitor does not warn you of
an incorrectly set tyre pressure. Observe the
notes on the recommended tyre pressure
(Y page 408). The tyre pressure monitor is not able to warn
you of a sudden loss of pressure, e.g. if the tyre
is penetrated by a foreign object. In the event of
a sudden loss of pressure, bring the vehicle to a halt by braking carefully. Avoid abrupt steering
manoeuvres.
The tyre pressure monitor has a yellow warning
lamp in the instrument cluster for indicating a
pressure loss or malfunction. Depending on how
the warning lamp flashes or lights up, a tyre
pressure that is too low or a malfunction in the
tyre pressure monitor is indicated:
R if the warning lamp is lit continuously, the tyre
pressure on one or more tyres is significantly
too low. The tyre pressure monitor is not mal- functioning.
R if the warning lamp flashes for around a
minute and then remains lit constantly, the
tyre pressure monitor is malfunctioning.
In addition to the warning lamp, a message
appears in the multifunction display. Observe
the information on display messages
(Y page 330).
It may take up to ten minutes for a malfunction
of the tyre pressure monitor to be indicated. A
malfunction will be indicated by the tyre pres-
sure warning lamp flashing for approximately
one minute and then remaining lit. When the
fault has been rectified, the tyre pressure warn- ing lamp goes out after you have driven for a few
minutes.
The tyre pressure values indicated by the on-
board computer may differ from those meas-
ured at a filling station using a pressure gauge.
The tyre pressures shown by the on-board com- puter refer to those measured at sea level. At
high altitudes, the tyre pressure values indica-
ted by a pressure gauge are higher than those
shown by the on-board computer. In this case,
do not reduce the tyre pressures.
The operation of the tyre pressure monitor can
be affected by interference from radio transmit-
ting equipment (e.g. radio headphones, two-way radios) that may be being operated in or near the vehicle.
Checking the tyre pressure electroni-
cally X
Make sure that the key is in position 2in the
ignition lock (Y page 158).
X Press the =or; button on the steering
wheel to select the Service
Service menu. Tyre pressure
411Wheels and tyres Z