2015 MERCEDES-BENZ GLE SUV height
[x] Cancel search: heightPage 117 of 453
Problems with the seat ventilation
Problem
Possible causes/consequences and
M
MSolutions The seat ventilation has
switched off prematurely
or cannot be switched
on. The on-board voltage is too low because too many electrical consum-
ers are switched on.
X Switch off electrical consumers that you do not need, such as the
rear window heating or interior lighting.
Once the battery is sufficiently charged, the seat ventilation will
switch back on automatically. Steering wheel
Important safety notes
G
WARNING
You could lose control of the vehicle while
driving if you:
R adjust the driver's seat, steering wheel or
mirrors
R fasten the seat belt
There is a risk of an accident.
Adjust the driver's seat, head restraint, steer-
ing wheel and mirrors and fasten your seat
belt before starting the engine. G
WARNING
Children could become trapped by the steer-
ing wheel if they adjust it. There is a risk of
injury.
When leaving the vehicle, always take the key with you and lock the vehicle. Never leave
children unattended in the vehicle.
The electrically adjustable steering wheel can
still be adjusted when there is no key in the igni-
tion lock. Adjusting the steering wheel man-
ually
G
WARNING
The steering wheel may move unexpectedly if you adjust it while driving. This could cause
you to lose control of the vehicle. There is a
risk of an accident. Make sure that the steering wheel is locked
before driving off. Never unlock the steering
wheel when the vehicle is in motion. :
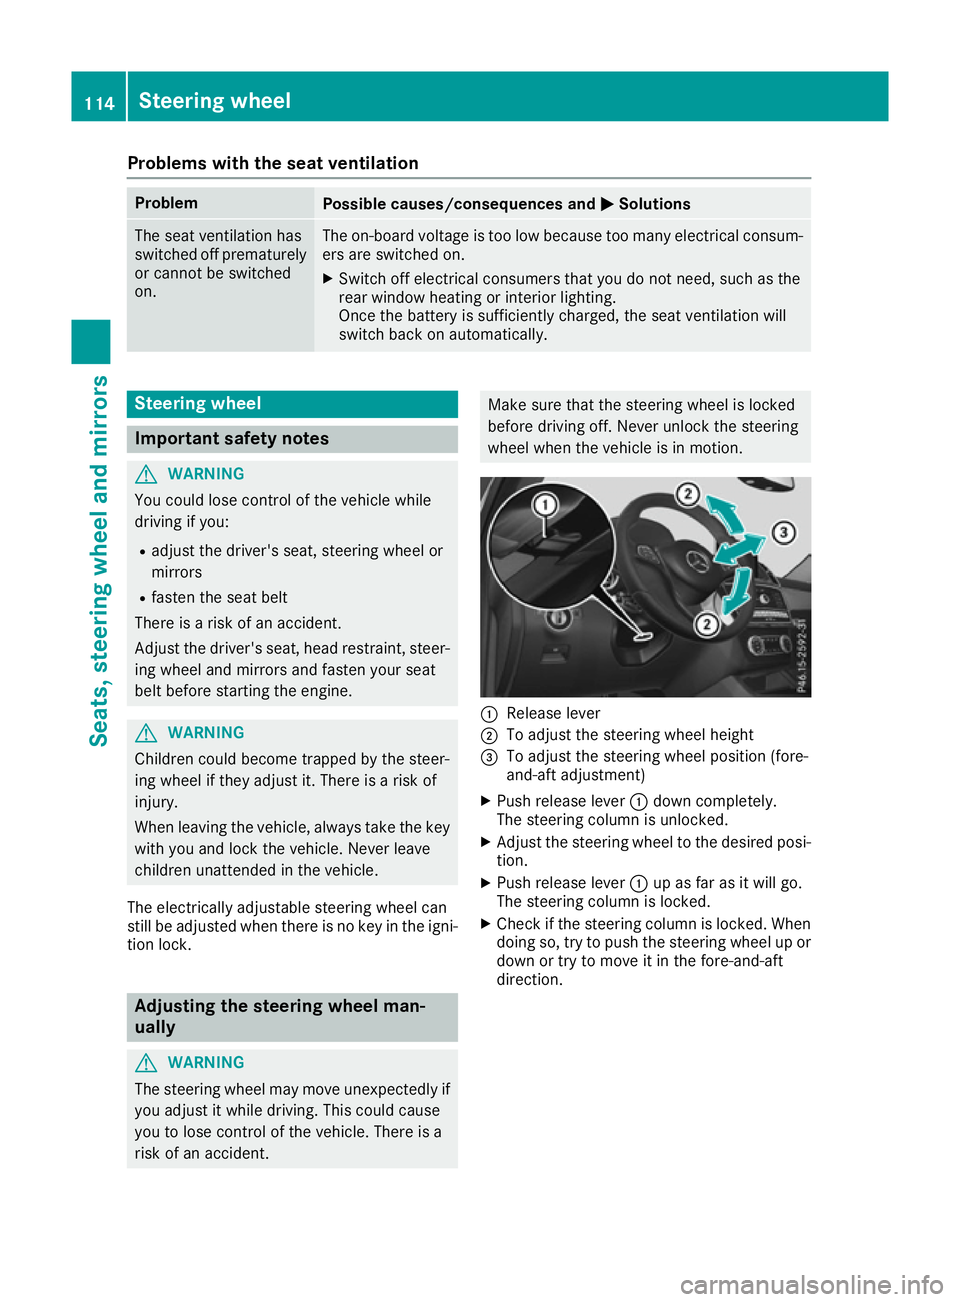
Release lever
; To adjust the steering wheel height
= To adjust the steering wheel position (fore-
and-aft adjustment)
X Push release lever :down completely.
The steering column is unlocked.
X Adjust the steering wheel to the desired posi-
tion.
X Push release lever :up as far as it will go.
The steering column is locked.
X Check if the steering column is locked. When
doing so, try to push the steering wheel up or
down or try to move it in the fore-and-aft
direction. 114
Steering wheelSeats, steering wheel and mirrors
Page 118 of 453
Adjusting the steering wheel electri-
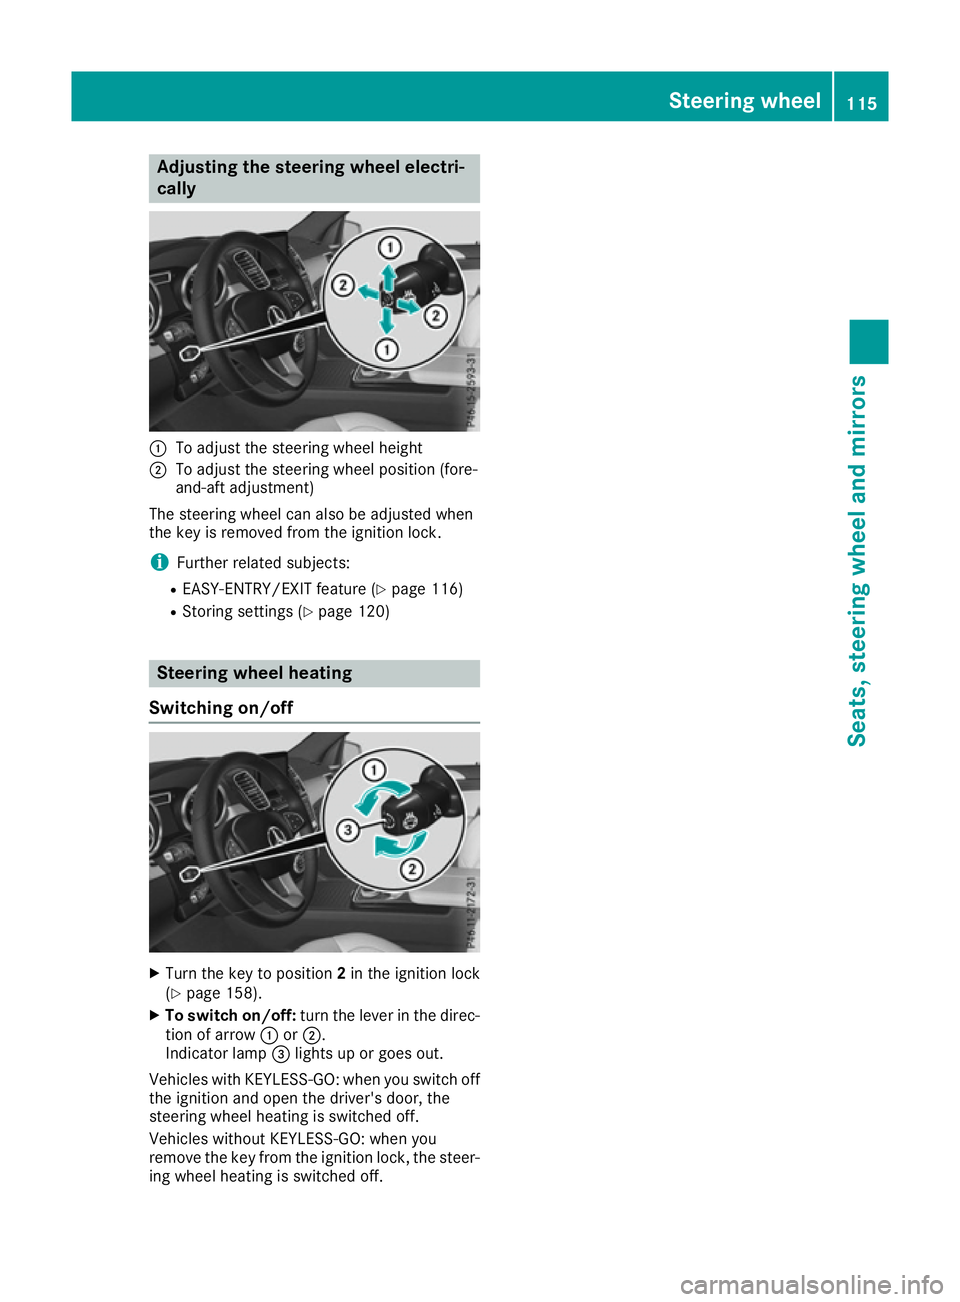
cally :
To adjust the steering wheel height
; To adjust the steering wheel position (fore-
and-aft adjustment)
The steering wheel can also be adjusted when
the key is removed from the ignition lock.
i Further related subjects:
R EASY-ENTRY/EXIT feature (Y page 116)
R Storing settings (Y page 120) Steering wheel heating
Switching on/off X
Turn the key to position 2in the ignition lock
(Y page 158).
X To switch on/off: turn the lever in the direc-
tion of arrow :or;.
Indicator lamp =lights up or goes out.
Vehicles with KEYLESS-GO: when you switch off the ignition and open the driver's door, the
steering wheel heating is switched off.
Vehicles without KEYLESS-GO: when you
remove the key from the ignition lock, the steer-
ing wheel heating is switched off. Steering wheel
115Seats, steering wheel and mirrors Z
Page 219 of 453
Activating Steering Assist and Stop&Go
Pilot
X Activate the DISTRONIC PLUS with Steering
Assist and Stop&Go Pilot function using the
on-board computer (Y page 290).
The DTR+: steering assistant On
DTR+: steering assistant On mes-
sage appears in the multifunction display.
Steering Assist and Stop&Go Pilot are active.
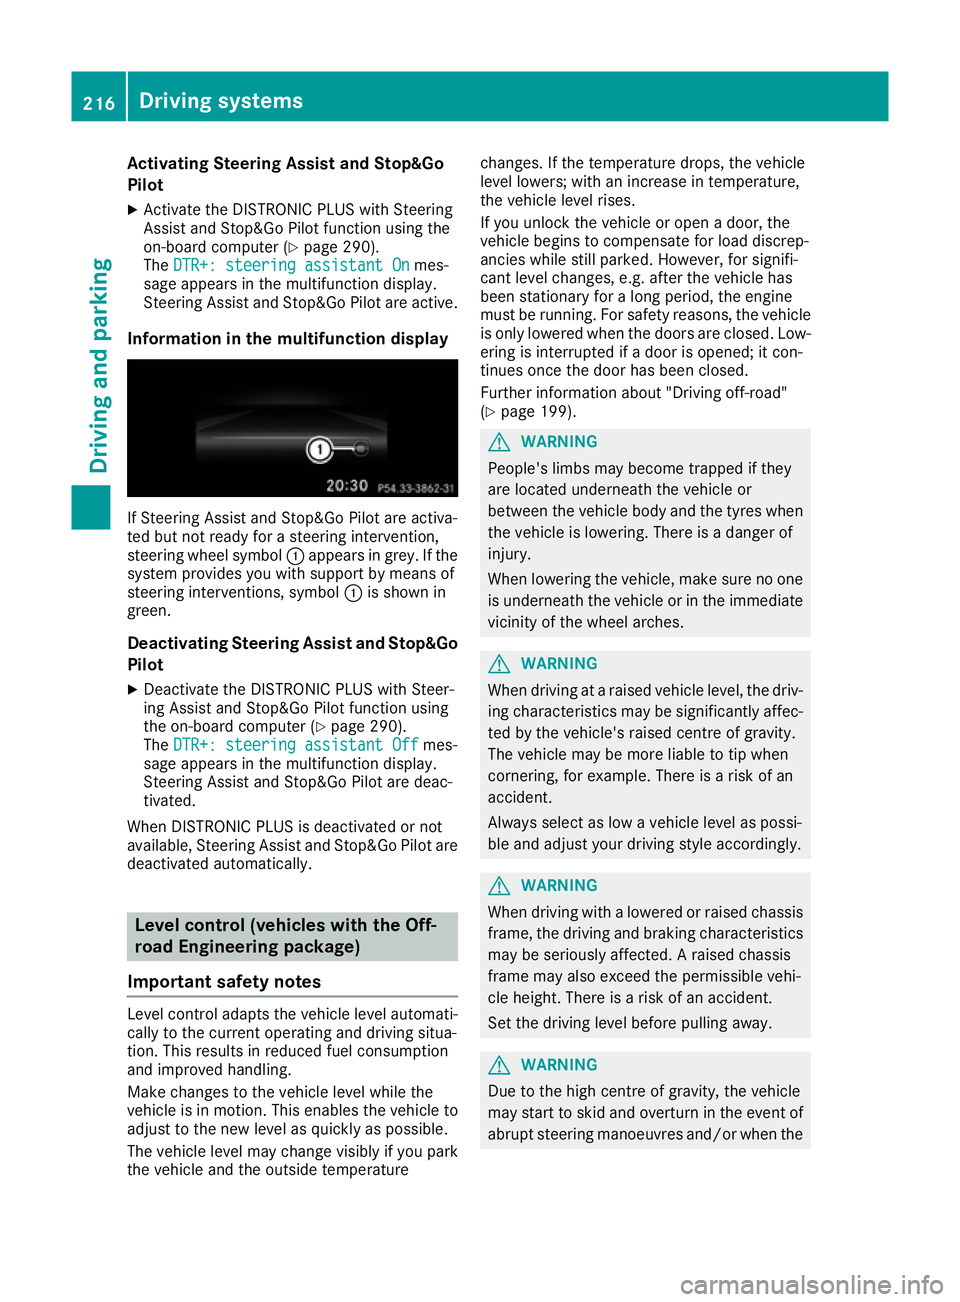
Information in the multifunction display If Steering Assist and Stop&Go Pilot are activa-
ted but not ready for a steering intervention,
steering wheel symbol :appears in grey. If the
system provides you with support by means of
steering interventions, symbol :is shown in
green.
Deactivating Steering Assist and Stop&Go
Pilot
X Deactivate the DISTRONIC PLUS with Steer-
ing Assist and Stop&Go Pilot function using
the on-board computer (Y page 290).
The DTR+: steering assistant Off
DTR+: steering assistant Off mes-
sage appears in the multifunction display.
Steering Assist and Stop&Go Pilot are deac-
tivated.
When DISTRONIC PLUS is deactivated or not
available, Steering Assist and Stop&Go Pilot are deactivated automatically. Level control (vehicles with the Off-
road Engineering package)
Important safety notes Level control adapts the vehicle level automati-
cally to the current operating and driving situa-
tion. This results in reduced fuel consumption
and improved handling.
Make changes to the vehicle level while the
vehicle is in motion. This enables the vehicle to adjust to the new level as quickly as possible.
The vehicle level may change visibly if you park
the vehicle and the outside temperature changes. If the temperature drops, the vehicle
level lowers; with an increase in temperature,
the vehicle level rises.
If you unlock the vehicle or open a door, the
vehicle begins to compensate for load discrep-
ancies while still parked. However, for signifi-
cant level changes, e.g. after the vehicle has
been stationary for a long period, the engine
must be running. For safety reasons, the vehicle
is only lowered when the doors are closed. Low-
ering is interrupted if a door is opened; it con-
tinues once the door has been closed.
Further information about "Driving off-road"
(Y page 199). G
WARNING
People's limbs may become trapped if they
are located underneath the vehicle or
between the vehicle body and the tyres when the vehicle is lowering. There is a danger of
injury.
When lowering the vehicle, make sure no one
is underneath the vehicle or in the immediate vicinity of the wheel arches. G
WARNING
When driving at a raised vehicle level, the driv- ing characteristics may be significantly affec-ted by the vehicle's raised centre of gravity.
The vehicle may be more liable to tip when
cornering, for example. There is a risk of an
accident.
Always select as low a vehicle level as possi-
ble and adjust your driving style accordingly. G
WARNING
When driving with a lowered or raised chassis frame, the driving and braking characteristics
may be seriously affected. A raised chassis
frame may also exceed the permissible vehi-
cle height. There is a risk of an accident.
Set the driving level before pulling away. G
WARNING
Due to the high centre of gravity, the vehicle
may start to skid and overturn in the event of abrupt steering manoeuvres and/or when the 216
Driving systemsDriving and pa
rking
Page 225 of 453
Selecting Sport Plus tuning (Mercedes-
AMG vehicles) The very firm setting of the suspension setting in
the Sport Plus drive program ensures the best
possible contact with the road. Select this mode
when employing a sporty driving style, e.g. on
winding country roads or, ideally, when driving
on closed race circuits.
DSR is not available in the Sport Plusdrive pro-
gram. Further information on DSR
(Y page 252).
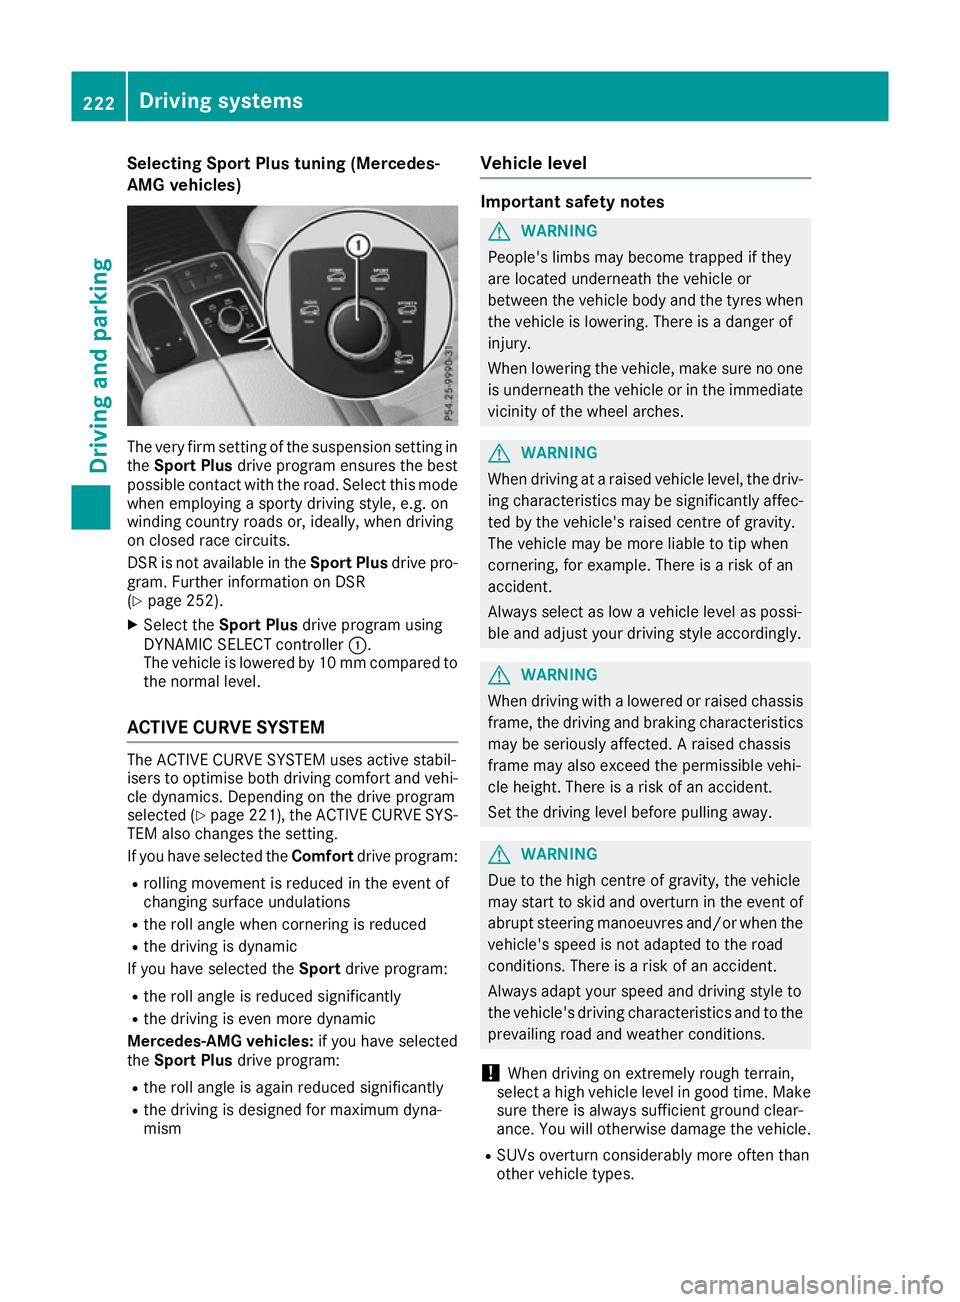
X Select the Sport Plus drive program using
DYNAMIC SELECT controller :.
The vehicle is lowered by 10 mm compared to
the normal level.
ACTIVE CURVE SYSTEM The ACTIVE CURVE SYSTEM uses active stabil-
isers to optimise both driving comfort and vehi- cle dynamics. Depending on the drive program
selected (Y page 221), the ACTIVE CURVE SYS-
TEM also changes the setting.
If you have selected the Comfortdrive program:
R rolling movement is reduced in the event of
changing surface undulations
R the roll angle when cornering is reduced
R the driving is dynamic
If you have selected the Sportdrive program:
R the roll angle is reduced significantly
R the driving is even more dynamic
Mercedes-AMG vehicles: if you have selected
the Sport Plus drive program:
R the roll angle is again reduced significantly
R the driving is designed for maximum dyna-
mism Vehicle level Important safety notes
G
WARNING
People's limbs may become trapped if they
are located underneath the vehicle or
between the vehicle body and the tyres when the vehicle is lowering. There is a danger of
injury.
When lowering the vehicle, make sure no one
is underneath the vehicle or in the immediate vicinity of the wheel arches. G
WARNING
When driving at a raised vehicle level, the driv- ing characteristics may be significantly affec-ted by the vehicle's raised centre of gravity.
The vehicle may be more liable to tip when
cornering, for example. There is a risk of an
accident.
Always select as low a vehicle level as possi-
ble and adjust your driving style accordingly. G
WARNING
When driving with a lowered or raised chassis frame, the driving and braking characteristics
may be seriously affected. A raised chassis
frame may also exceed the permissible vehi-
cle height. There is a risk of an accident.
Set the driving level before pulling away. G
WARNING
Due to the high centre of gravity, the vehicle
may start to skid and overturn in the event of abrupt steering manoeuvres and/or when the
vehicle's speed is not adapted to the road
conditions. There is a risk of an accident.
Always adapt your speed and driving style to
the vehicle's driving characteristics and to the prevailing road and weather conditions.
! When driving on extremely rough terrain,
select a high vehicle level in good time. Make
sure there is always sufficient ground clear-
ance. You will otherwise damage the vehicle.
R SUVs overturn considerably more often than
other vehicle types. 222
Driving systemsDriving and parking
Page 227 of 453
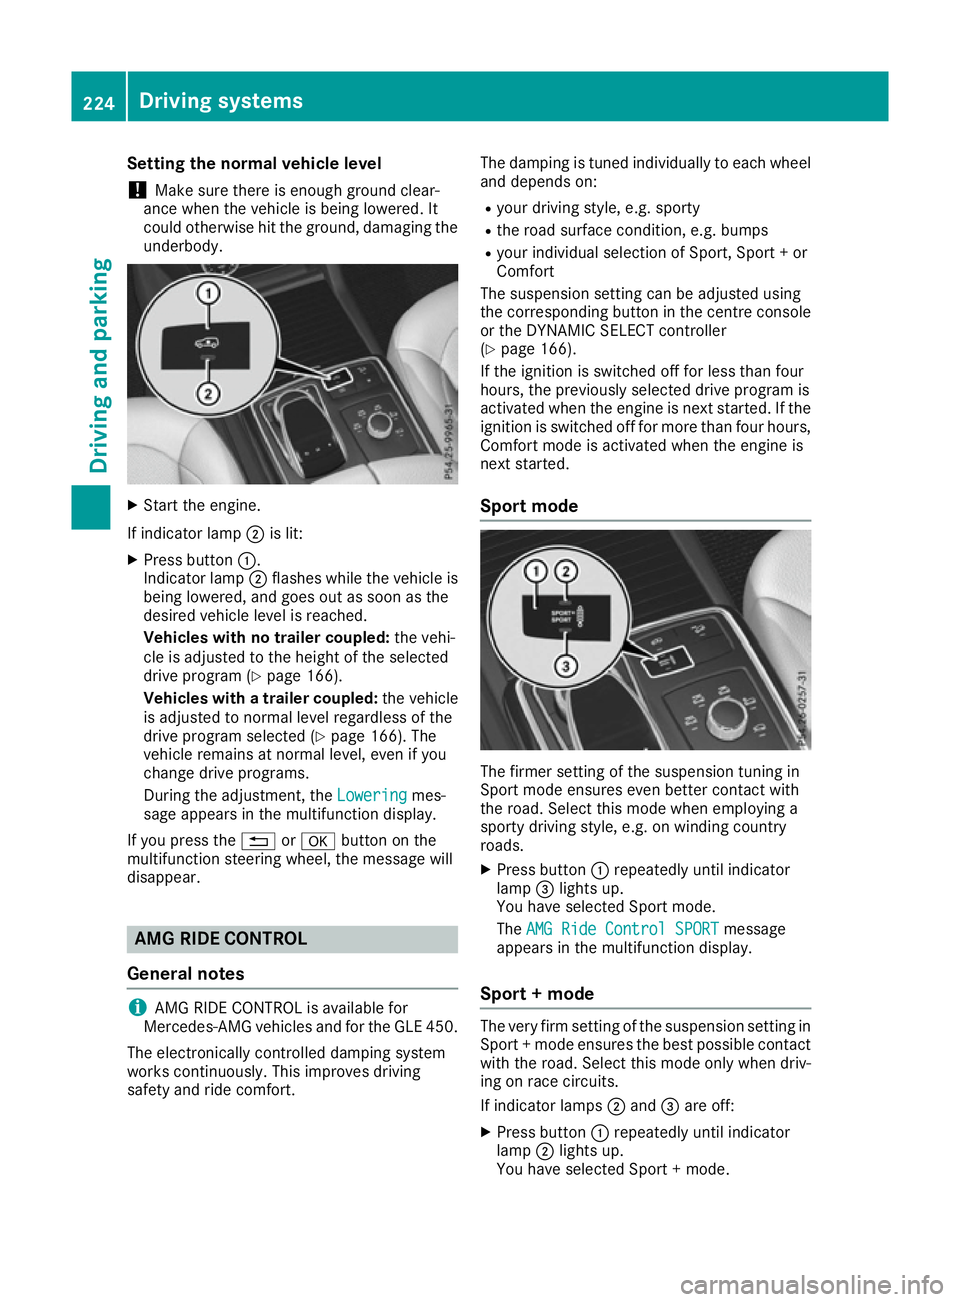
Setting the normal vehicle level
! Make sure there is enough ground clear-
ance when the vehicle is being lowered. It
could otherwise hit the ground, damaging the
underbody. X
Start the engine.
If indicator lamp ;is lit:
X Press button :.
Indicator lamp ;flashes while the vehicle is
being lowered, and goes out as soon as the
desired vehicle level is reached.
Vehicles with no trailer coupled: the vehi-
cle is adjusted to the height of the selected
drive program (Y page 166).
Vehicles with a trailer coupled: the vehicle
is adjusted to normal level regardless of the
drive program selected (Y page 166). The
vehicle remains at normal level, even if you
change drive programs.
During the adjustment, the Lowering Loweringmes-
sage appears in the multifunction display.
If you press the %ora button on the
multifunction steering wheel, the message will
disappear. AMG RIDE CONTROL
General notes i
AMG RIDE CONTROL is available for
Mercedes-AMG vehicles and for the GLE 450.
The electronically controlled damping system
works continuously. This improves driving
safety and ride comfort. The damping is tuned individually to each wheel
and depends on:
R your driving style, e.g. sporty
R the road surface condition, e.g. bumps
R your individual selection of Sport, Sport + or
Comfort
The suspension setting can be adjusted using
the corresponding button in the centre console
or the DYNAMIC SELECT controller
(Y page 166).
If the ignition is switched off for less than four
hours, the previously selected drive program is
activated when the engine is next started. If the ignition is switched off for more than four hours,
Comfort mode is activated when the engine is
next started.
Sport mode The firmer setting of the suspension tuning in
Sport mode ensures even better contact with
the road. Select this mode when employing a
sporty driving style, e.g. on winding country
roads.
X Press button :repeatedly until indicator
lamp =lights up.
You have selected Sport mode.
The AMG Ride Control SPORT AMG Ride Control SPORT message
appears in the multifunction display.
Sport + mode The very firm setting of the suspension setting in
Sport + mode ensures the best possible contact
with the road. Select this mode only when driv-
ing on race circuits.
If indicator lamps ;and =are off:
X Press button :repeatedly until indicator
lamp ;lights up.
You have selected Sport + mode. 224
Driving systemsDriving and parking
Page 232 of 453
R
snowfall or heavy rain may lead to a parking
space being measured inaccurately
R pay attention to the PARKTRONIC
(Y page 226) warning messages during the
parking procedure
R at any time, you can intervene in the steering
procedure to correct it. Active Parking Assist will then be cancelled.
R when transporting a load which protrudes
from your vehicle, you should not use Active
Parking Assist.
R never use Active Parking Assist when snow
chains are fitted.
R make sure that the tyre pressures are always
correct. This has a direct influence on the
parking characteristics of the vehicle.
Use Active Parking Assist for parking spaces
that are:
R parallel or at right angles to the direction of
travel
R on straight roads, not bends
R on the same level as the road, e.g. not on the
pavement
Detecting parking spaces Objects located above the height range of Active
Parking Assist will not be detected when the
parking space is measured. These are not taken into account when the parking procedure is cal-culated, e.g. overhanging loads, tail sections or
loading ramps of goods vehicles. G
WARNING
If there are objects above the detection range:
R Active Park Assist may steer too early
R the vehicle may not stop in front of these
objects
This could cause a collision. There is a risk of
an accident.
If objects are located above the detection
range, stop and deactivate Active Parking
Assist.
For further information on the detection range
(Y page 225). Active Parking Assist does not assist you park-
ing in spaces at right angles to the direction of
travel if:
R two parking spaces are located directly next
to one another
R the parking space is directly next to a low
obstacle such as a low kerb
R you forward park
Active Parking Assist does not assist you park-
ing in spaces that are parallel or at right angles
to the direction of travel if:
R the parking space is on a kerb
R the system reads the parking space as being
blocked, for example by foliage or grass pav-
ing blocks
R the area is too small for the vehicle to
manoeuvre into
R the parking space is bordered by an obstacle,
e.g. a tree, a post or a trailer :
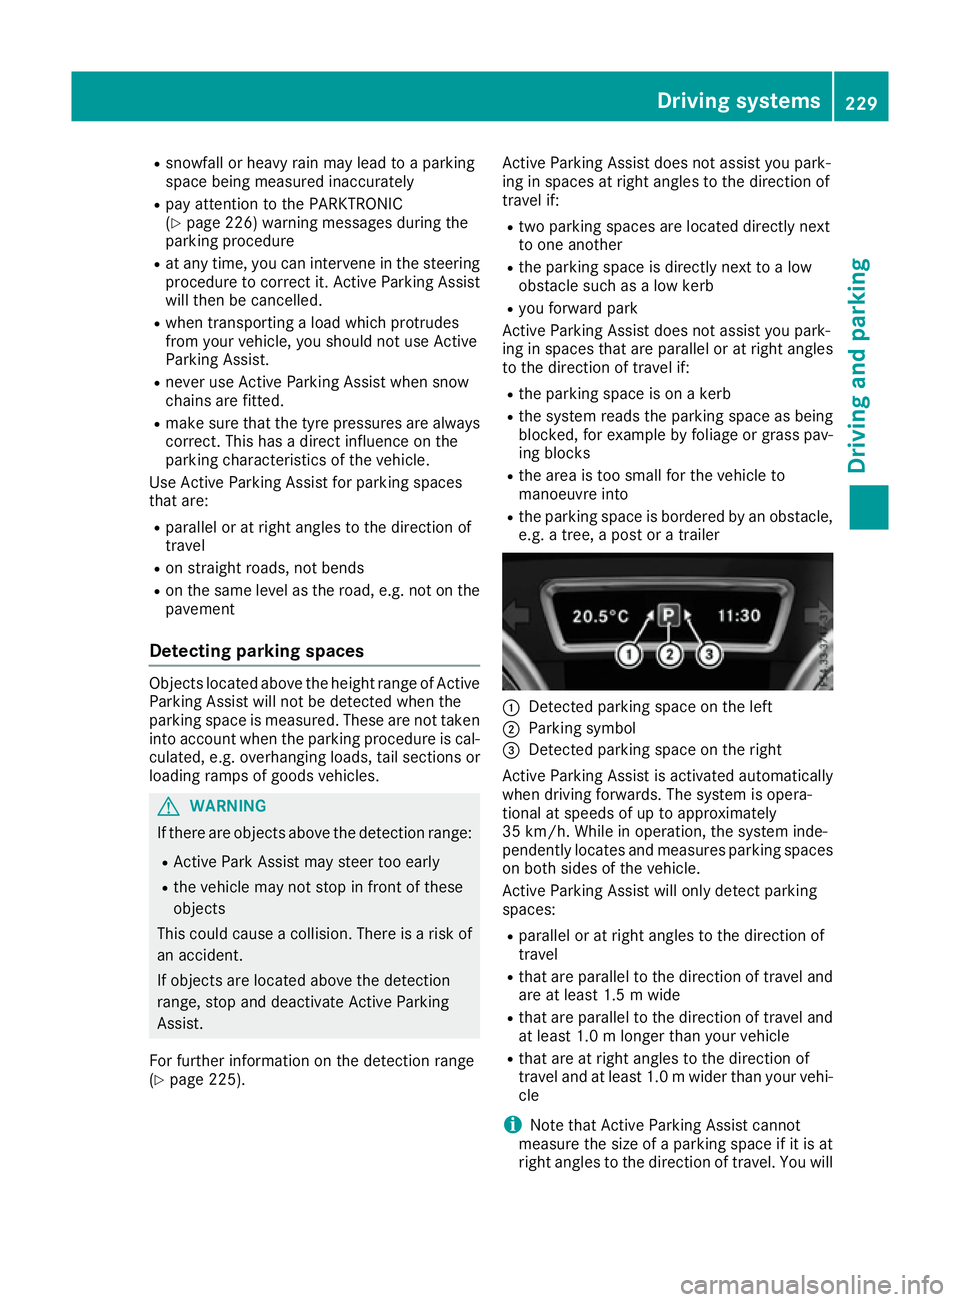
Detected parking space on the left
; Parking symbol
= Detected parking space on the right
Active Parking Assist is activated automatically
when driving forwards. The system is opera-
tional at speeds of up to approximately
35 km/h. While in operation, the system inde-
pendently locates and measures parking spaces on both sides of the vehicle.
Active Parking Assist will only detect parking
spaces:
R parallel or at right angles to the direction of
travel
R that are parallel to the direction of travel and
are at least 1.5 m wide
R that are parallel to the direction of travel and
at least 1.0 m longer than your vehicle
R that are at right angles to the direction of
travel and at least 1.0 mwider than your vehi-
cle
i Note that Active Parking Assist cannot
measure the size of a parking space if it is at
right angles to the direction of travel. You will Driving systems
229Driving and parking Z
Page 235 of 453
Cancelling Active Parking Assist
X
Stop the movement of the multifunction
steering wheel or steer yourself.
Active Parking Assist will be cancelled at
once. The Park Assist cancelled
Park Assist cancelled mes-
sage appears in the multifunction display.
or X Press the PARKTRONIC button (Y page 227).
PARKTRONIC is switched off and Active Park-
ing Assist is immediately cancelled. The
Park Assist cancelled Park Assist cancelled message appears
in the multifunction display.
Active Parking Assist is cancelled automatically if:
R the electric parking brake is applied
R transmission position Pis selected
R parking using Active Parking Assist is no lon-
ger possible
R you are driving faster than 10 km/h
R a wheel spins and ESP ®
intervenes or fails.
The ÷ warning lamp lights up in the instru-
ment cluster.
A warning tone sounds. The parking symbol dis-
appears and the multifunction display shows the
Park Assist cancelled
Park Assist cancelled message.
When Active Parking Assist is cancelled, you
must steer and brake again yourself.
If a system malfunction occurs, the vehicle is
braked to a standstill. To drive on, depress the
accelerator pedal again. Reversing camera
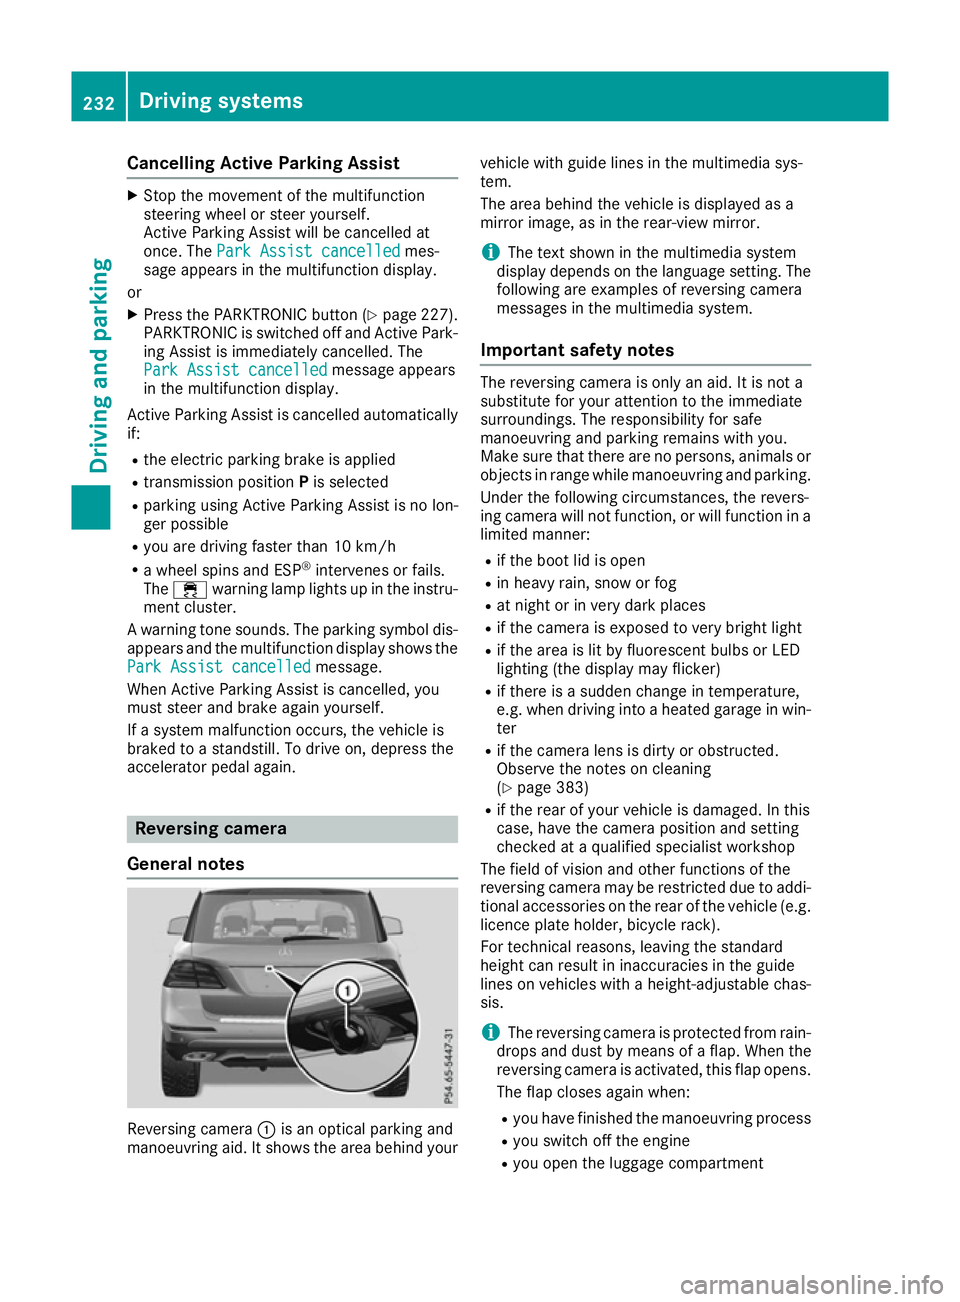
General notes Reversing camera
:is an optical parking and
manoeuvring aid. It shows the area behind your vehicle with guide lines in the multimedia sys-
tem.
The area behind the vehicle is displayed as a
mirror image, as in the rear-view mirror.
i The text shown in the multimedia system
display depends on the language setting. The
following are examples of reversing camera
messages in the multimedia system.
Important safety notes The reversing camera is only an aid. It is not a
substitute for your attention to the immediate
surroundings. The responsibility for safe
manoeuvring and parking remains with you.
Make sure that there are no persons, animals or
objects in range while manoeuvring and parking.
Under the following circumstances, the revers-
ing camera will not function, or will function in a limited manner:
R if the boot lid is open
R in heavy rain, snow or fog
R at night or in very dark places
R if the camera is exposed to very bright light
R if the area is lit by fluorescent bulbs or LED
lighting (the display may flicker)
R if there is a sudden change in temperature,
e.g. when driving into a heated garage in win-
ter
R if the camera lens is dirty or obstructed.
Observe the notes on cleaning
(Y page 383)
R if the rear of your vehicle is damaged. In this
case, have the camera position and setting
checked at a qualified specialist workshop
The field of vision and other functions of the
reversing camera may be restricted due to addi-
tional accessories on the rear of the vehicle (e.g. licence plate holder, bicycle rack).
For technical reasons, leaving the standard
height can result in inaccuracies in the guide
lines on vehicles with a height-adjustable chas-
sis.
i The reversing camera is protected from rain-
drops and dust by means of a flap. When the
reversing camera is activated, this flap opens.
The flap closes again when:
R you have finished the manoeuvring process
R you switch off the engine
R you open the luggage compartment 232
Driving systemsDriving and parking
Page 238 of 453
:
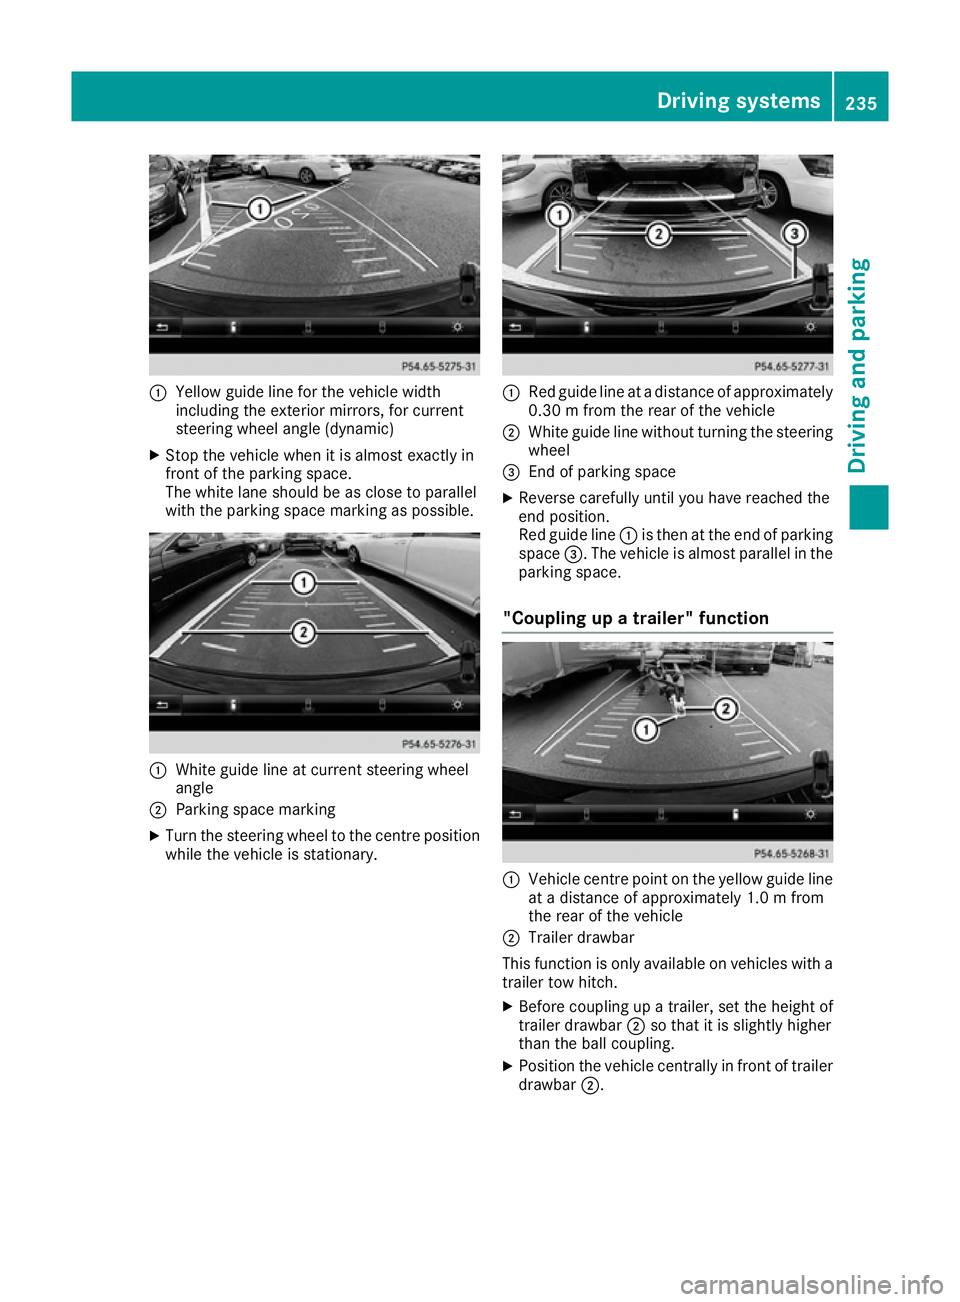
Yellow guide line for the vehicle width
including the exterior mirrors, for current
steering wheel angle (dynamic)
X Stop the vehicle when it is almost exactly in
front of the parking space.
The white lane should be as close to parallel
with the parking space marking as possible. :
White guide line at current steering wheel
angle
; Parking space marking
X Turn the steering wheel to the centre position
while the vehicle is stationary. :
Red guide line at a distance of approximately
0.30 m from the rear of the vehicle
; White guide line without turning the steering
wheel
= End of parking space
X Reverse carefully until you have reached the
end position.
Red guide line :is then at the end of parking
space =. The vehicle is almost parallel in the
parking space.
"Coupling up a trailer" function :
Vehicle centre point on the yellow guide line
at a distance of approximately 1.0 m from
the rear of the vehicle
; Trailer drawbar
This function is only available on vehicles with a
trailer tow hitch.
X Before coupling up a trailer, set the height of
trailer drawbar ;so that it is slightly higher
than the ball coupling.
X Position the vehicle centrally in front of trailer
drawbar ;. Driving systems
235Driving and parking Z