2015 MERCEDES-BENZ GLE SUV bonnet
[x] Cancel search: bonnetPage 133 of 453
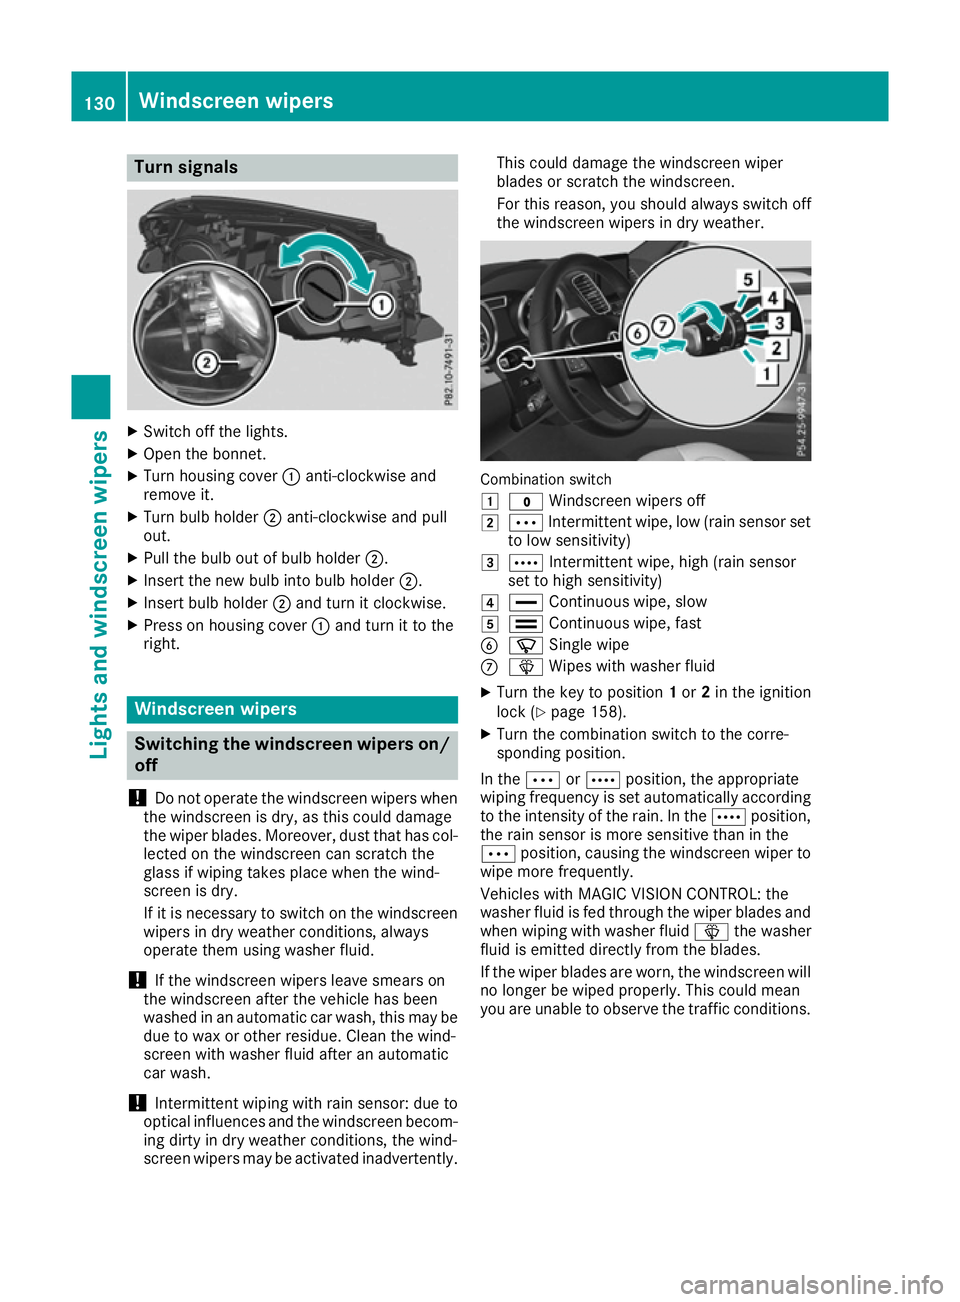
Turn signals
X
Switch off the lights.
X Open the bonnet.
X Turn housing cover :anti-clockwise and
remove it.
X Turn bulb holder ;anti-clockwise and pull
out.
X Pull the bulb out of bulb holder ;.
X Insert the new bulb into bulb holder ;.
X Insert bulb holder ;and turn it clockwise.
X Press on housing cover :and turn it to the
right. Windscreen wipers
Switching the windscreen wipers on/
off
! Do not operate the windscreen wipers when
the windscreen is dry, as this could damage
the wiper blades. Moreover, dust that has col-
lected on the windscreen can scratch the
glass if wiping takes place when the wind-
screen is dry.
If it is necessary to switch on the windscreen wipers in dry weather conditions, always
operate them using washer fluid.
! If the windscreen wipers leave smears on
the windscreen after the vehicle has been
washed in an automatic car wash, this may be
due to wax or other residue. Clean the wind-
screen with washer fluid after an automatic
car wash.
! Intermittent wiping with rain sensor: due to
optical influences and the windscreen becom-
ing dirty in dry weather conditions, the wind-
screen wipers may be activated inadvertently. This could damage the windscreen wiper
blades or scratch the windscreen.
For this reason, you should always switch off
the windscreen wipers in dry weather. Combination switch
1
$ Windscreen wipers off
2 Ä Intermittent wipe, low (rain sensor set
to low sensitivity)
3 Å Intermittent wipe, high (rain sensor
set to high sensitivity)
4 ° Continuous wipe, slow
5 ¯ Continuous wipe, fast
B í Single wipe
C î Wipes with washer fluid
X Turn the key to position 1or 2in the ignition
lock (Y page 158).
X Turn the combination switch to the corre-
sponding position.
In the ÄorÅ position, the appropriate
wiping frequency is set automatically according to the intensity of the rain. In the Åposition,
the rain sensor is more sensitive than in the
Ä position, causing the windscreen wiper to
wipe more frequently.
Vehicles with MAGIC VISION CONTROL: the
washer fluid is fed through the wiper blades and when wiping with washer fluid îthe washer
fluid is emitted directly from the blades.
If the wiper blades are worn, the windscreen will
no longer be wiped properly. This could mean
you are unable to observe the traffic conditions. 130
Windscreen
wipersLights and windscreen wipers
Page 134 of 453
Switching the rear window wiper on/
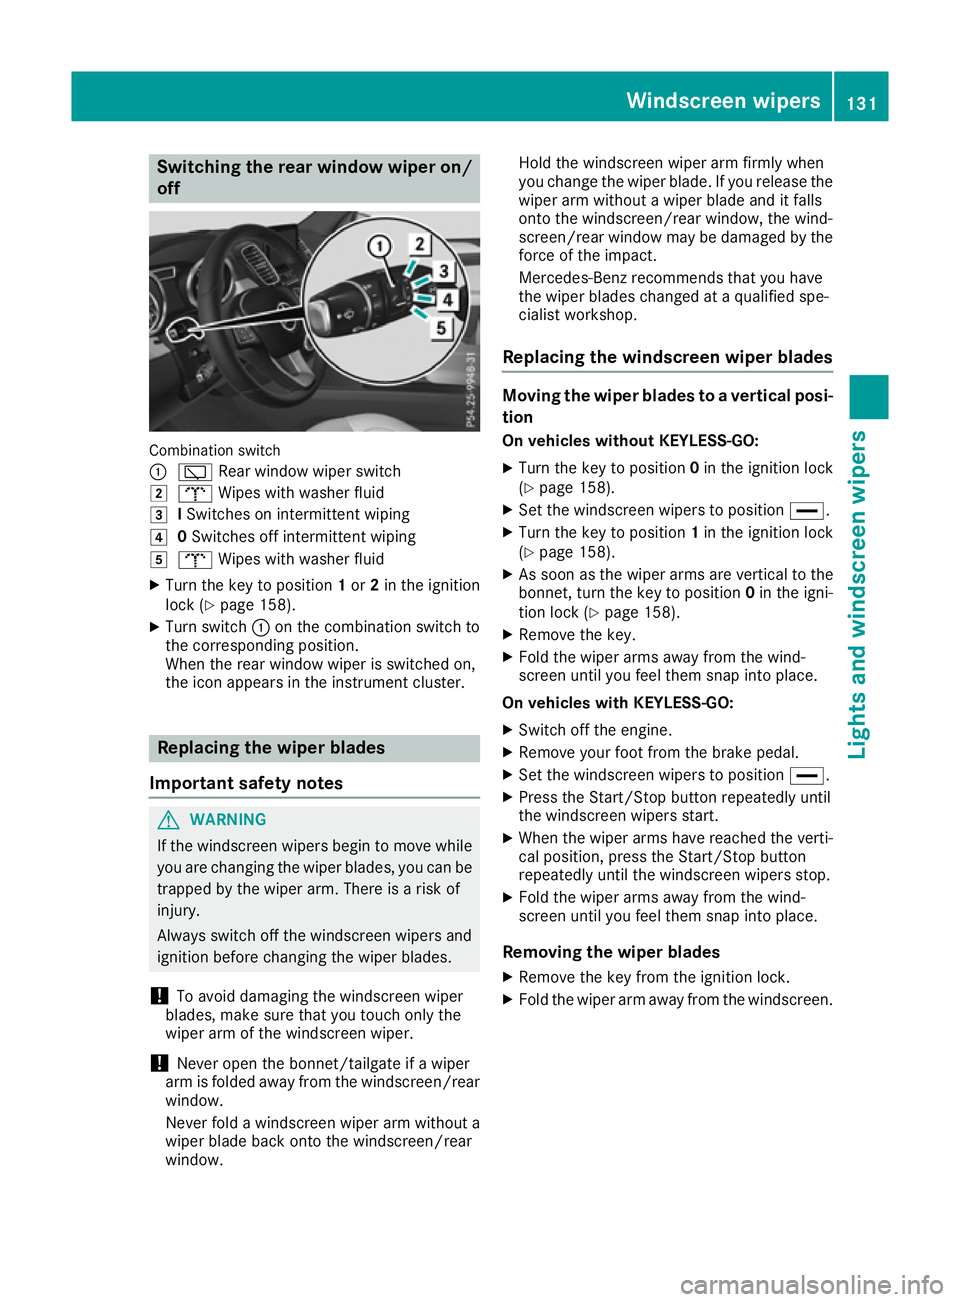
off Combination switch
:
è Rear window wiper switch
2 b Wipes with washer fluid
3 ISwitches on intermittent wiping
4 0Switches off intermittent wiping
5 b Wipes with washer fluid
X Turn the key to position 1or 2in the ignition
lock (Y page 158).
X Turn switch :on the combination switch to
the corresponding position.
When the rear window wiper is switched on,
the icon appears in the instrument cluster. Replacing the wiper blades
Important safety notes G
WARNING
If the windscreen wipers begin to move while
you are changing the wiper blades, you can be trapped by the wiper arm. There is a risk of
injury.
Always switch off the windscreen wipers and
ignition before changing the wiper blades.
! To avoid damaging the windscreen wiper
blades, make sure that you touch only the
wiper arm of the windscreen wiper.
! Never open the bonnet/tailgate if a wiper
arm is folded away from the windscreen/rear
window.
Never fold a windscreen wiper arm without a
wiper blade back onto the windscreen/rear
window. Hold the windscreen wiper arm firmly when
you change the wiper blade. If you release the
wiper arm without a wiper blade and it falls
onto the windscreen/rear window, the wind-
screen/rear window may be damaged by the
force of the impact.
Mercedes-Benz recommends that you have
the wiper blades changed at a qualified spe-
cialist workshop.
Replacing the windscreen wiper blades Moving the wiper blades to a vertical posi-
tion
On vehicles without KEYLESS-GO:
X Turn the key to position 0in the ignition lock
(Y page 158).
X Set the windscreen wipers to position °.
X Turn the key to position 1in the ignition lock
(Y page 158).
X As soon as the wiper arms are vertical to the
bonnet, turn the key to position 0in the igni-
tion lock (Y page 158).
X Remove the key.
X Fold the wiper arms away from the wind-
screen until you feel them snap into place.
On vehicles with KEYLESS-GO:
X Switch off the engine.
X Remove your foot from the brake pedal.
X Set the windscreen wipers to position °.
X Press the Start/Stop button repeatedly until
the windscreen wipers start.
X When the wiper arms have reached the verti-
cal position, press the Start/Stop button
repeatedly until the windscreen wipers stop.
X Fold the wiper arms away from the wind-
screen until you feel them snap into place.
Removing the wiper blades X Remove the key from the ignition lock.
X Fold the wiper arm away from the windscreen. Windscreen wipers
131Lights and windscreen wipers Z
Page 135 of 453
X
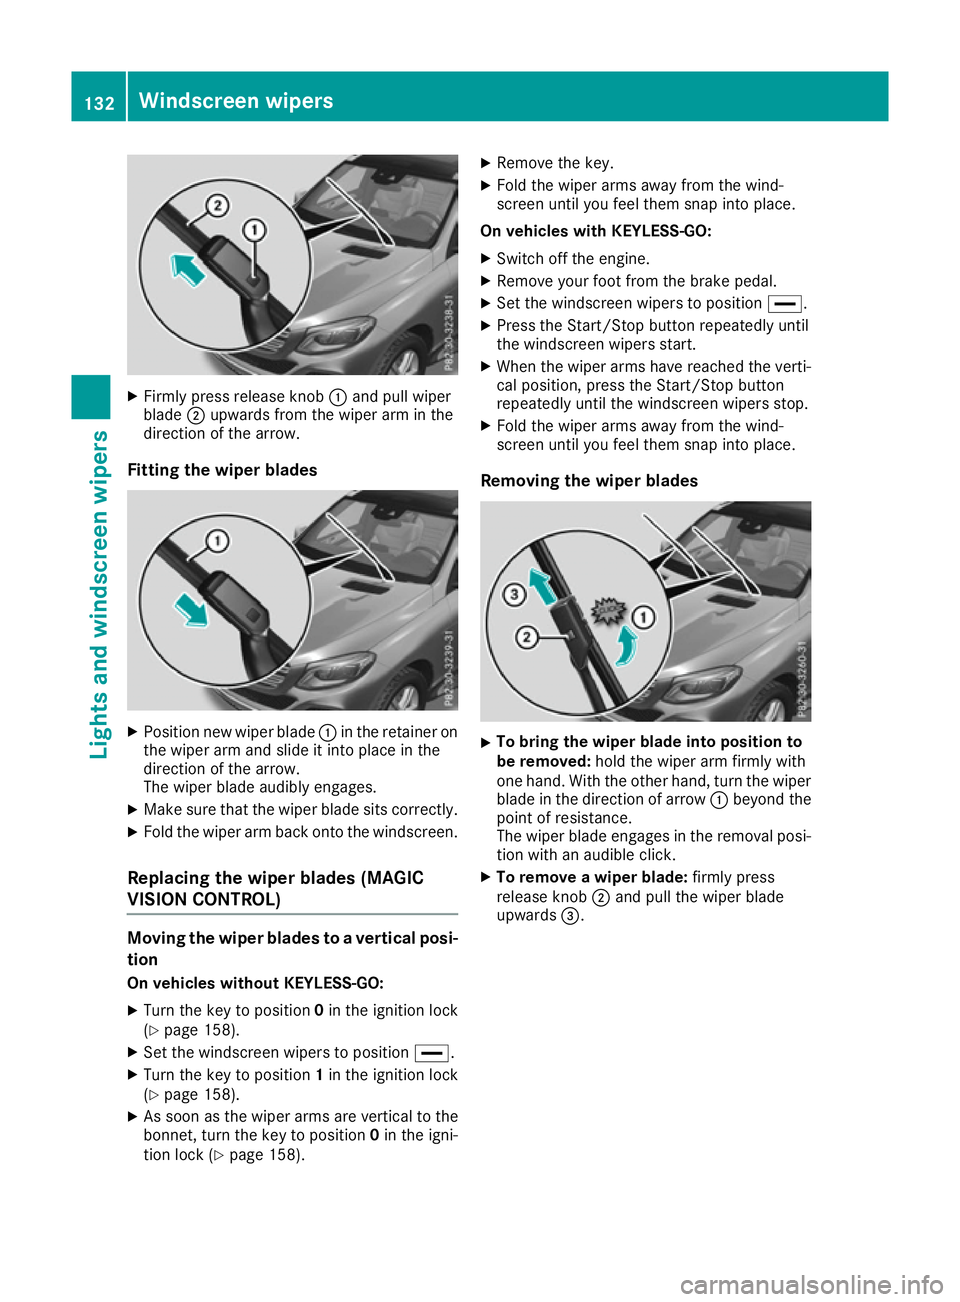
Firmly press release knob :and pull wiper
blade ;upwards from the wiper arm in the
direction of the arrow.
Fitting the wiper blades X
Position new wiper blade :in the retainer on
the wiper arm and slide it into place in the
direction of the arrow.
The wiper blade audibly engages.
X Make sure that the wiper blade sits correctly.
X Fold the wiper arm back onto the windscreen.
Replacing the wiper blades (MAGIC
VISION CONTROL) Moving the wiper blades to a vertical posi-
tion
On vehicles without KEYLESS-GO:
X Turn the key to position 0in the ignition lock
(Y page 158).
X Set the windscreen wipers to position °.
X Turn the key to position 1in the ignition lock
(Y page 158).
X As soon as the wiper arms are vertical to the
bonnet, turn the key to position 0in the igni-
tion lock (Y page 158). X
Remove the key.
X Fold the wiper arms away from the wind-
screen until you feel them snap into place.
On vehicles with KEYLESS-GO:
X Switch off the engine.
X Remove your foot from the brake pedal.
X Set the windscreen wipers to position °.
X Press the Start/Stop button repeatedly until
the windscreen wipers start.
X When the wiper arms have reached the verti-
cal position, press the Start/Stop button
repeatedly until the windscreen wipers stop.
X Fold the wiper arms away from the wind-
screen until you feel them snap into place.
Removing the wiper blades X
To bring the wiper blade into position to
be removed:
hold the wiper arm firmly with
one hand. With the other hand, turn the wiper blade in the direction of arrow :beyond the
point of resistance.
The wiper blade engages in the removal posi-
tion with an audible click.
X To remove a wiper blade: firmly press
release knob ;and pull the wiper blade
upwards =. 132
Windscreen wipersLights and windscreen wipers
Page 157 of 453
Problems with the auxiliary heating/ventilation
Problem
Possible causes/consequences and
M
MSolutions FAIL¨ The signal transmission between the transmitter and the vehicle is
faulty.
X
Change your position in relation to the vehicle, moving closer if
necessary.
X Make another attempt to switch the auxiliary heating or auxiliary
ventilation on or off using the remote control. FAIL The auxiliary heating/ventilation cannot be switched on or has
switched itself off.
The starter battery is not sufficiently charged.
X Charge the starter battery.
X Make another attempt to switch on the auxiliary heating/ventilation
using the remote control. The auxiliary heating cannot be switched on or has switched itself off.
The fuel tank content is below the reserve fuel level.
X Refuel at the nearest filling station.
X Make another attempt to switch on the auxiliary heating/ventilation
using the remote control. The auxiliary heating/ventilation cannot be switched on or has
switched itself off.
The auxiliary heating/ventilation is malfunctioning.
X Have the auxiliary heating/ventilation checked at a qualified spe-
cialist workshop. Adjusting the air vents
Important safety notes
G
WARNING
Very hot or very cold air can flow from the air vents. This could result in burns or frostbite in the immediate vicinity of the air vents. There
is a risk of injury.
Make sure that all vehicle occupants always
maintain a sufficient distance to the air out-
lets. If necessary, redirect the airflow to
another area of the vehicle interior.
In order to ensure the direct flow of fresh air
through the air vents into the vehicle interior,
please observe the following notes:
R keep the air inlet grille on the bonnet and in
the engine compartment on the front- passenger side free of blockages, such as ice,
snow or leaves.
R never cover the vents or ventilation grilles in
the vehicle interior
i For virtually draught-free ventilation, adjust
the sliders of the air vents to the centre posi- tion. 154
Adjusting the air ventsClimate control
Page 165 of 453
The ECO start/stop function switches the
engine off automatically if the vehicle is stopped
under certain conditions.
When pulling away again, the engine starts auto- matically. The ECO start/stop function thereby
helps you to reduce the fuel consumption and
emissions of your vehicle.
Important safety notes G
WARNING
If the engine is switched off automatically and you exit the vehicle, the engine is restarted
automatically. The vehicle may begin moving. There is a risk of accident and injury.
If you wish to exit the vehicle, always turn off
the ignition and secure the vehicle against
rolling away.
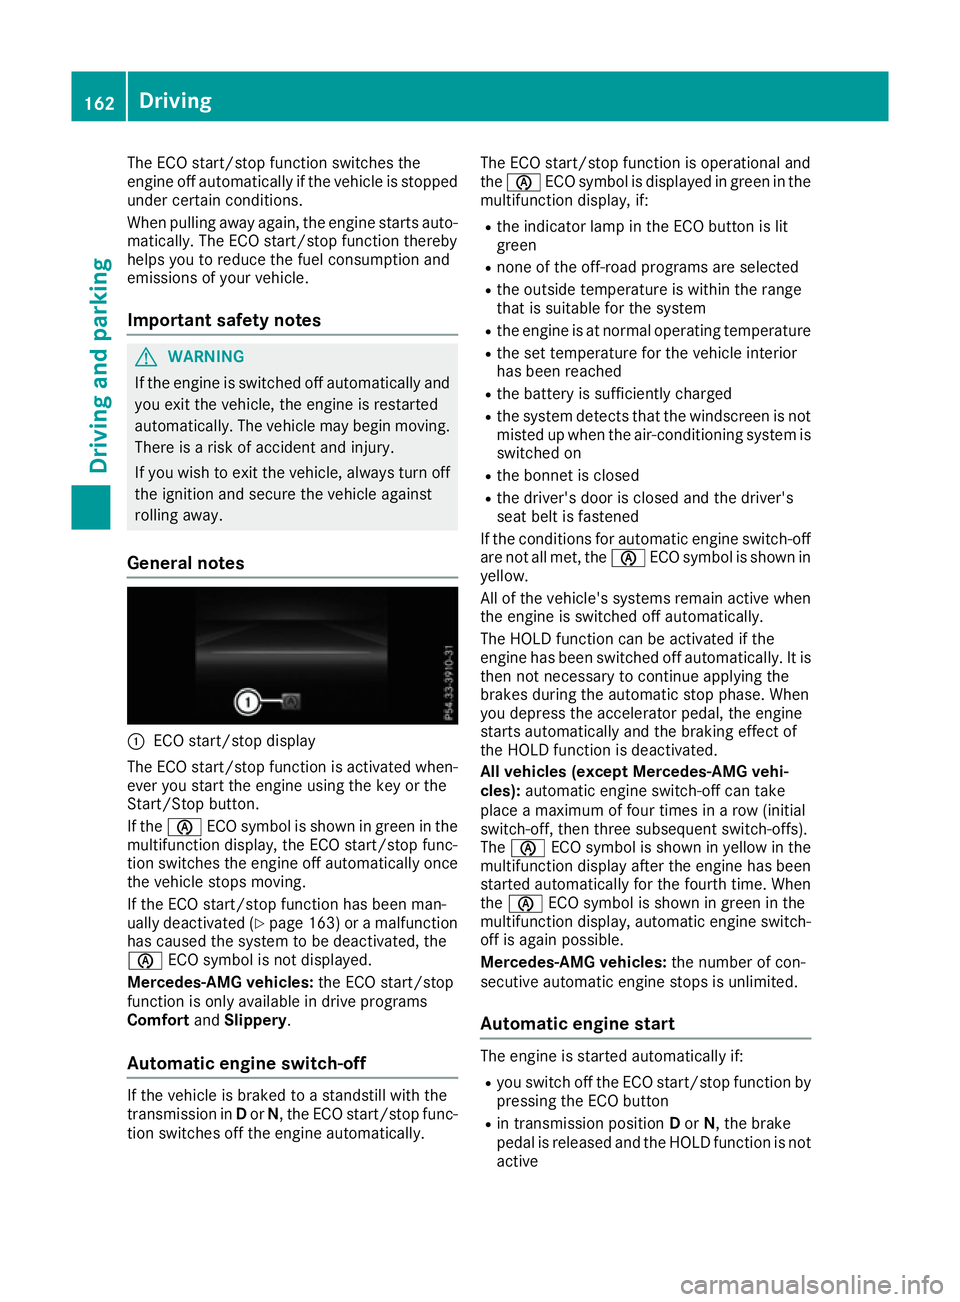
General notes :
ECO start/stop display
The ECO start/stop function is activated when-
ever you start the engine using the key or the
Start/Stop button.
If the è ECO symbol is shown in green in the
multifunction display, the ECO start/stop func-
tion switches the engine off automatically once
the vehicle stops moving.
If the ECO start/stop function has been man-
ually deactivated (Y page 163) or a malfunction
has caused the system to be deactivated, the
è ECO symbol is not displayed.
Mercedes-AMG vehicles: the ECO start/stop
function is only available in drive programs
Comfort andSlippery.
Automatic engine switch-off If the vehicle is braked to a standstill with the
transmission in Dor N, the ECO start/stop func-
tion switches off the engine automatically. The ECO start/stop function is operational and
the
è ECO symbol is displayed in green in the
multifunction display, if:
R the indicator lamp in the ECO button is lit
green
R none of the off-road programs are selected
R the outside temperature is within the range
that is suitable for the system
R the engine is at normal operating temperature
R the set temperature for the vehicle interior
has been reached
R the battery is sufficiently charged
R the system detects that the windscreen is not
misted up when the air-conditioning system is
switched on
R the bonnet is closed
R the driver's door is closed and the driver's
seat belt is fastened
If the conditions for automatic engine switch-off are not all met, the èECO symbol is shown in
yellow.
All of the vehicle's systems remain active when the engine is switched off automatically.
The HOLD function can be activated if the
engine has been switched off automatically. It isthen not necessary to continue applying the
brakes during the automatic stop phase. When
you depress the accelerator pedal, the engine
starts automatically and the braking effect of
the HOLD function is deactivated.
All vehicles (except Mercedes-AMG vehi-
cles): automatic engine switch-off can take
place a maximum of four times in a row (initial
switch-off, then three subsequent switch-offs).
The è ECO symbol is shown in yellow in the
multifunction display after the engine has been
started automatically for the fourth time. When
the è ECO symbol is shown in green in the
multifunction display, automatic engine switch-
off is again possible.
Mercedes-AMG vehicles: the number of con-
secutive automatic engine stops is unlimited.
Automatic engine start The engine is started automatically if:
R
you switch off the ECO start/stop function by
pressing the ECO button
R in transmission position Dor N, the brake
pedal is released and the HOLD function is not active 162
DrivingDriving and parking
Page 272 of 453
Driving on the motorway
When driving on a motorway, switching off the
combustion engine has a particularly positive
effect on fuel consumption and emissions.
If the driver removes his/her foot from the
accelerator pedal in the Comfortdrive program
and a speed of 130 km/h is not exceeded, the
combustion engine is automatically switched
off.
Further information on the automatic engine
switch-off (Y page 269).
ECO start/stop function General notes
The ECO start/stop function switches the com-
bustion engine off automatically when the vehi-
cle stops moving and at speeds below
130 km/h (Y page 269).
All vehicle systems remain active, e.g. the auto-
matic climate control.
The ECO start/stop function is neither available
in the Sport drive program nor during manual
shifting.
Automatic engine switch-off
The internal combustion engine is switched off
automatically if:
R the driver removes his/her foot from the
accelerator in the Comfortdrive program and
a speed of 130 km/h is not exceeded
(Y page 269)
R the internal combustion engine has reached
its operating temperature
R the driver only slightly depresses the accel-
erator pedal in order to, for example, maintain the current speed for a limited distance
R the bonnet is closed and engaged properly
R the high-voltage battery is charged suffi-
ciently
R no malfunctions are present in the hybrid
drive system
The internal combustion engine will not be
switched off automatically, if:
R the self-diagnosis function of the engine man-
agement is active
R there is a malfunction in the hybrid drive sys-
tem R
the climate control of the vehicle requires it
R the high-voltage battery is charging
(Y page 264).
Automatic engine start
The internal combustion engine, which has been automatically switched-off, starts automatically
in certain situations, when:
R the power demand from the driver via the
accelerator pedal is greater than the electric
motor alone can provide
R the driver switches to the Sportdrive pro-
gram or to manual gearshifting
R the charge level of the high-voltage battery
has reached the lower limit
R the driver has selected the CHARGE operating
mode
Overrun mode
In overrun mode, the combustion engine is
switched off and is disconnected from the drive
train. The electric motor:
R generates low thrust, which corresponds to
the overrun mode of an active combustion
engine
R functions as an alternator and produces the
necessary energy for the auxiliary consumers
and charges the high-voltage battery
Overrun mode is available in the Comfortdrive
program at speeds below 130 km/h.
Route-based operating strategy For the route-based operating strategy, the sys-
tem factors in information about the expected
route when route guidance is active.
The information on the route is provided by the
multimedia system and includes the following:
R road categories
R speed limitations
The use of electric energy is automatically opti- mally distributed from the beginning to the end
of the journey, using information about the
route. The distribution is pre-emptive and takes
into consideration:
R the sections of the journey ahead
R the energy consumption on the whole route Plug-in hybrid operation
269Driving and parking Z
Page 285 of 453
The fuel supply is interrupted to protect the
engine when the red band is reached. Outside temperature display
You should pay special attention to road condi-
tions when temperatures are around freezing
point.
Bear in mind that the outside temperature dis-
play indicates the measured air temperature
and not the road surface temperature.
The outside temperature display is in the multi-
function display (Y page 283).
A change in the outside temperature is shown in the multifunction display after a delay. Coolant temperature gauge
G
WARNING
If you open the bonnet while the engine is
overheating or while there is a fire in the
engine compartment, you could come into
contact with hot gases or other leaking ser-
vice products. There is a danger of injury.
Allow an overheating engine to cool down
before opening the bonnet. If there is a fire in the engine compartment, leave the bonnet
closed and notify the fire brigade.
All vehicles except PLUG-IN HYBRID vehicles:
the coolant temperature gauge is in the instru-
ment cluster on the right-hand side (Y page 32).
PLUG-IN HYBRID vehicles: the multifunction dis- play shows the coolant temperature in the
Coolant
Coolant (Ypage 292) submenu.
Under normal operating conditions and with the specified coolant level, the coolant temperature
may rise to 120 †.
At high outside temperatures and when driving
uphill, the coolant temperature may rise to the
end of the scale. Operating the on-board computer
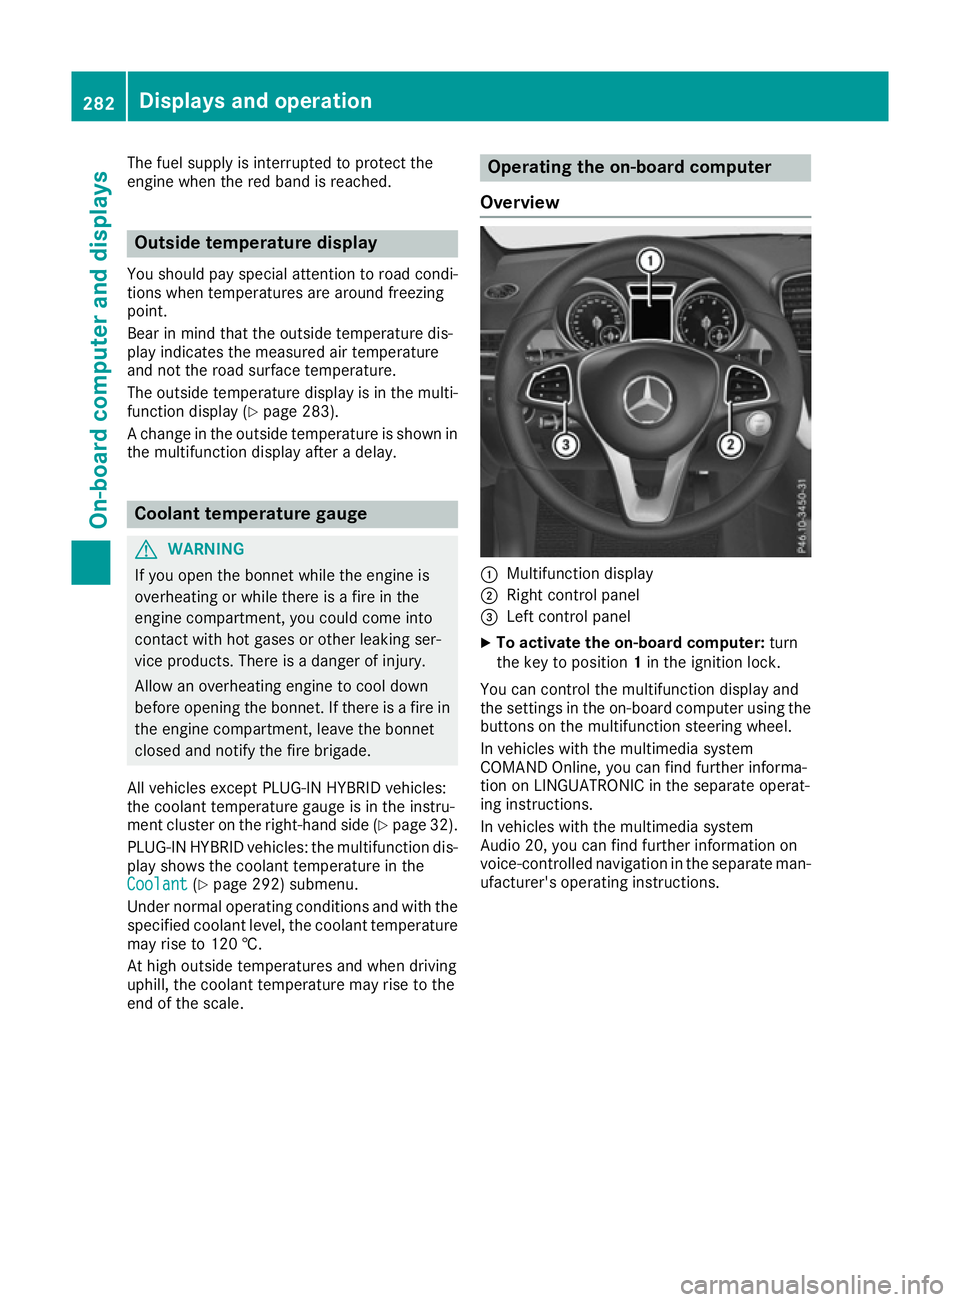
Overview :
Multifunction display
; Right control panel
= Left control panel
X To activate the on-board computer: turn
the key to position 1in the ignition lock.
You can control the multifunction display and
the settings in the on-board computer using the buttons on the multifunction steering wheel.
In vehicles with the multimedia system
COMAND Online, you can find further informa-
tion on LINGUATRONIC in the separate operat-
ing instructions.
In vehicles with the multimedia system
Audio 20, you can find further information on
voice-controlled navigation in the separate man-
ufacturer's operating instructions. 282
Displays and operationOn-board computer and displays
Page 319 of 453
Engine
Display messages
Possible causes/consequences and
M
MSolutions +
Top up coolant See Top up coolant See
Owner's Manual Owner's Manual The coolant level is too low.
! Avoid making long journeys with too little coolant in the engine
cooling system. The engine will otherwise be damaged.
X Top up the coolant, observing the warning notes before doing so
(Y page 376).
If you have to top up the coolant frequently: X Contact a qualified specialist workshop and have the engine cooling
system checked. ? The fan motor is faulty.
X If the coolant temperature is below 120 †, you can continue driving
to the nearest qualified specialist workshop.
X Avoid heavy loads on the engine as you do so, e.g. driving in moun-
tainous terrain and stop-start traffic. ?
Coolant Stop vehi‐ Coolant Stop vehi‐
cle Switch engine cle Switch engine
off off The coolant is too hot.
A warning tone also sounds.
G WARNING
Never drive with an overheated engine. Driving when your engine is
overheated can cause some fluids which may have leaked into the
engine compartment to catch fire.
In addition, steam from an overheated engine can cause serious
burns, which can occur just by opening the bonnet.
There is a risk of injury.
X Stop the vehicle immediately, paying attention to road and traffic
conditions, and switch off the engine.
X Safeguard the vehicle against rolling away (Y page 191).
X Wait until the engine has cooled down.
X Make sure that the air supply to the engine radiator is not blocked,
e.g. by frozen slush.
X Do not start the engine again until the display message goes out and
the coolant temperature is below 120 †. The engine may otherwisebe damaged.
X Pay attention to the coolant temperature display.
If the temperature increases again:
X Consult a qualified specialist workshop immediately.
Under normal operating conditions and with the specified coolant
level, the coolant temperature may rise to 120 †. 316
Display messagesOn-board computer and displays