2015 MERCEDES-BENZ GLE SUV steering
[x] Cancel search: steeringPage 334 of 453
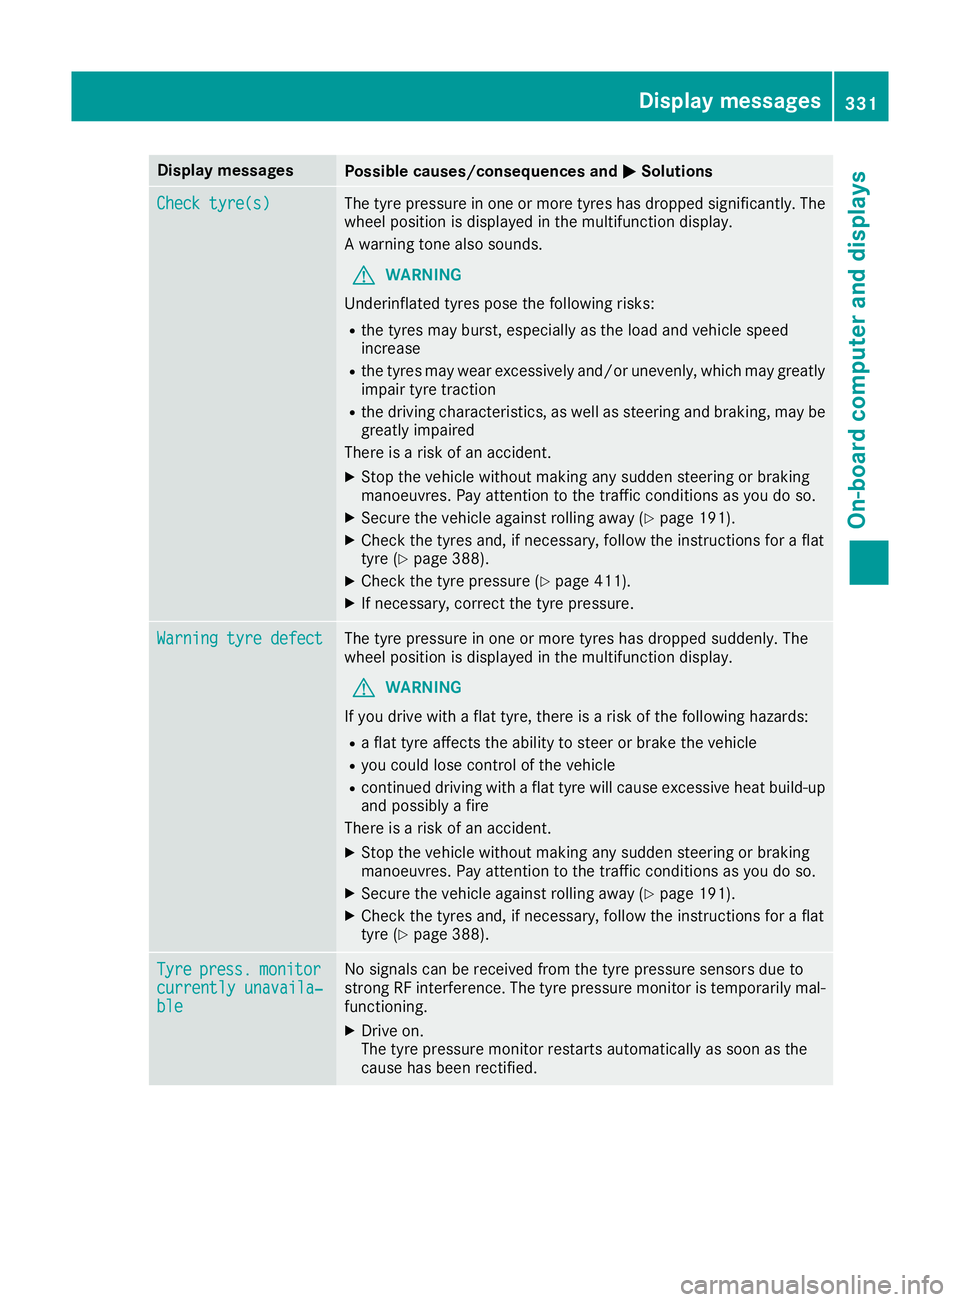
Display messages
Possible causes/consequences and
M
MSolutions Check tyre(s)
Check tyre(s) The tyre pressure in one or more tyres has dropped significantly. The
wheel position is displayed in the multifunction display.
A warning tone also sounds.
G WARNING
Underinflated tyres pose the following risks:
R the tyres may burst, especially as the load and vehicle speed
increase
R the tyres may wear excessively and/or unevenly, which may greatly
impair tyre traction
R the driving characteristics, as well as steering and braking, may be
greatly impaired
There is a risk of an accident.
X Stop the vehicle without making any sudden steering or braking
manoeuvres. Pay attention to the traffic conditions as you do so.
X Secure the vehicle against rolling away (Y page 191).
X Check the tyres and, if necessary, follow the instructions for a flat
tyre (Y page 388).
X Check the tyre pressure (Y page 411).
X If necessary, correct the tyre pressure. Warning tyre defect Warning tyre defect The tyre pressure in one or more tyres has dropped suddenly. The
wheel position is displayed in the multifunction display.
G WARNING
If you drive with a flat tyre, there is a risk of the following hazards: R a flat tyre affects the ability to steer or brake the vehicle
R you could lose control of the vehicle
R continued driving with a flat tyre will cause excessive heat build-up
and possibly a fire
There is a risk of an accident.
X Stop the vehicle without making any sudden steering or braking
manoeuvres. Pay attention to the traffic conditions as you do so.
X Secure the vehicle against rolling away (Y page 191).
X Check the tyres and, if necessary, follow the instructions for a flat
tyre (Y page 388). Tyre Tyre
press.
press. monitor
monitor
currently unavaila‐
currently unavaila‐
ble ble No signals can be received from the tyre pressure sensors due to
strong RF interference. The tyre pressure monitor is temporarily mal-
functioning.
X Drive on.
The tyre pressure monitor restarts automatically as soon as the
cause has been rectified. Display
messages
331On-board computer and displays Z
Page 338 of 453
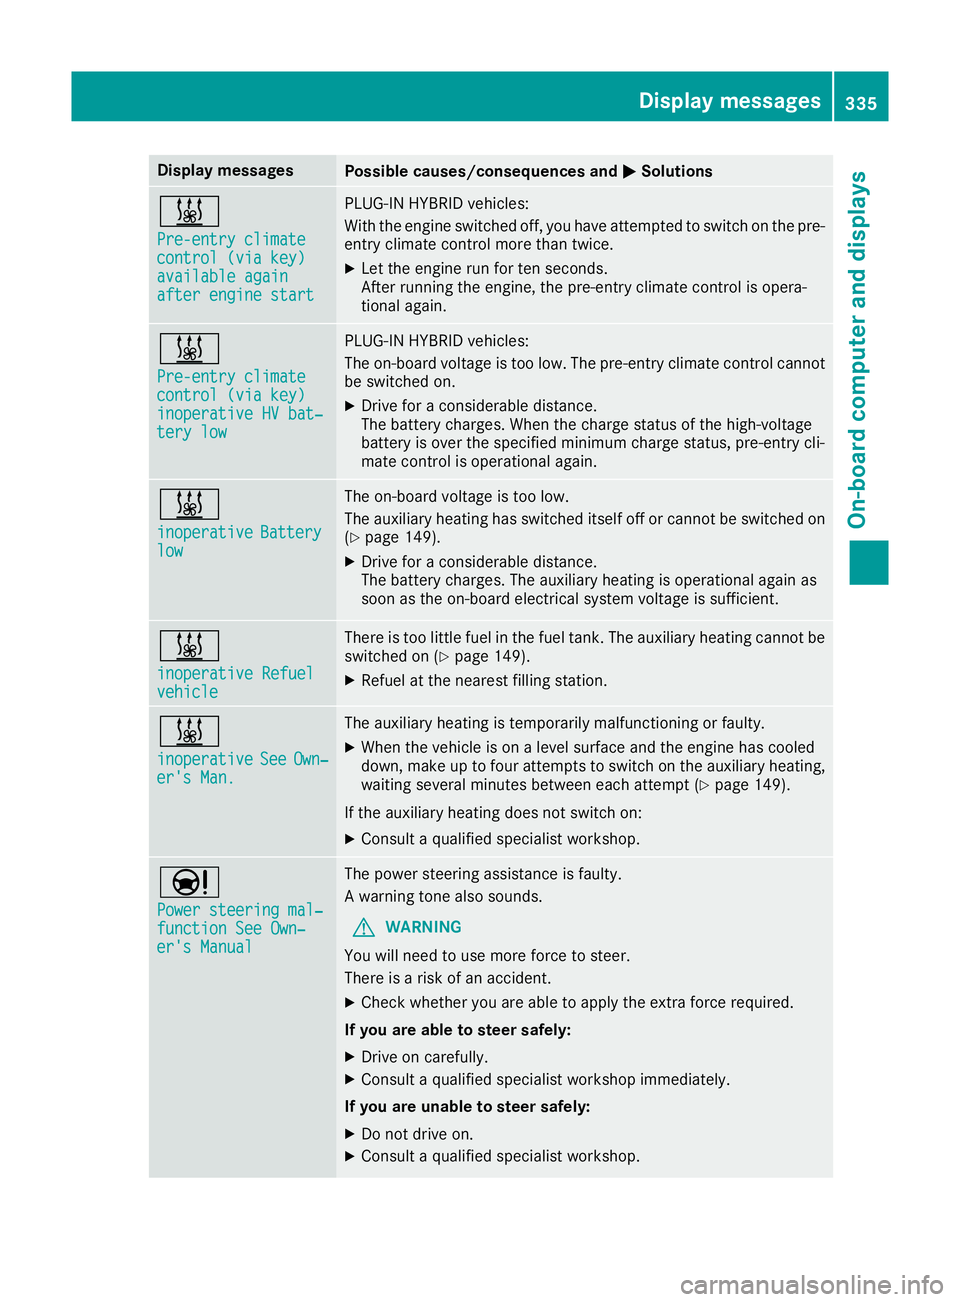
Display messages
Possible causes/consequences and
M
MSolutions &
Pre-entry climate Pre-entry climate
control (via key) control (via key)
available again available again
after engine start after engine start PLUG-IN HYBRID vehicles:
With the engine switched off, you have attempted to switch on the pre-
entry climate control more than twice.
X Let the engine run for ten seconds.
After running the engine, the pre-entry climate control is opera-
tional again. &
Pre-entry climate Pre-entry climate
control (via key) control (via key)
inoperative HV bat‐ inoperative HV bat‐
tery low tery low PLUG-IN HYBRID vehicles:
The on-board voltage is too low. The pre-entry climate control cannot
be switched on.
X Drive for a considerable distance.
The battery charges. When the charge status of the high-voltage
battery is over the specified minimum charge status, pre-entry cli-
mate control is operational again. &
inoperative inoperative
Battery
Battery
low
low The on-board voltage is too low.
The auxiliary heating has switched itself off or cannot be switched on
(Y page 149).
X Drive for a considerable distance.
The battery charges. The auxiliary heating is operational again as
soon as the on-board electrical system voltage is sufficient. &
inoperative Refuel inoperative Refuel
vehicle vehicle There is too little fuel in the fuel tank. The auxiliary heating cannot be
switched on (Y page 149).
X Refuel at the nearest filling station. &
inoperative inoperative
See
SeeOwn‐
Own‐
er's Man.
er's Man. The auxiliary heating is temporarily malfunctioning or faulty.
X When the vehicle is on a level surface and the engine has cooled
down, make up to four attempts to switch on the auxiliary heating,
waiting several minutes between each attempt (Y page 149).
If the auxiliary heating does not switch on: X Consult a qualified specialist workshop. Ð
Power steering mal‐ Power steering mal‐
function See Own‐ function See Own‐
er's Manual er's Manual The power steering assistance is faulty.
A warning tone also sounds.
G WARNING
You will need to use more force to steer.
There is a risk of an accident.
X Check whether you are able to apply the extra force required.
If you are able to steer safely:
X Drive on carefully.
X Consult a qualified specialist workshop immediately.
If you are unable to steer safely:
X Do not drive on.
X Consult a qualified specialist workshop. Display
messages
335On-board computer and displays Z
Page 345 of 453
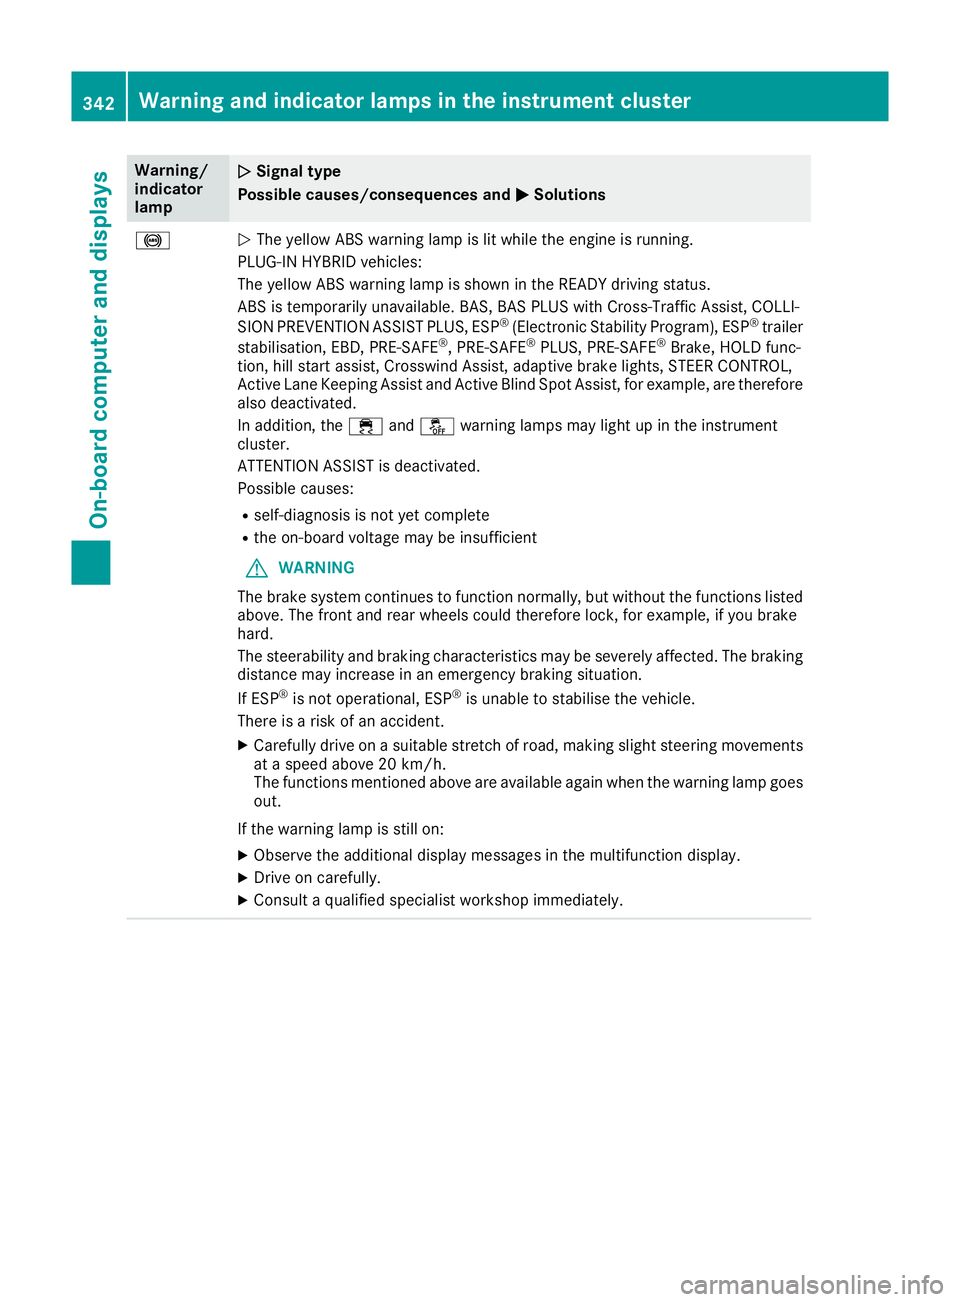
Warning/
indicator
lamp
N N
Signal type
Possible causes/consequences and M
M Solutions !
N
The yellow ABS warning lamp is lit while the engine is running.
PLUG-IN HYBRID vehicles:
The yellow ABS warning lamp is shown in the READY driving status.
ABS is temporarily unavailable. BAS, BAS PLUS with Cross-Traffic Assist, COLLI-
SION PREVENTION ASSIST PLUS, ESP ®
(Electronic Stability Program), ESP ®
trailer
stabilisation, EBD, PRE‑SAFE ®
, PRE‑ SAFE®
PLUS, PRE‑ SAFE®
Brake, HOLD func-
tion, hill start assist, Crosswind Assist, adaptive brake lights, STEER CONTROL,
Active Lane Keeping Assist and Active Blind Spot Assist, for example, are therefore
also deactivated.
In addition, the ÷andå warning lamps may light up in the instrument
cluster.
ATTENTION ASSIST is deactivated.
Possible causes:
R self-diagnosis is not yet complete
R the on-board voltage may be insufficient
G WARNING
The brake system continues to function normally, but without the functions listed above. The front and rear wheels could therefore lock, for example, if you brake
hard.
The steerability and braking characteristics may be severely affected. The braking
distance may increase in an emergency braking situation.
If ESP ®
is not operational, ESP ®
is unable to stabilise the vehicle.
There is a risk of an accident.
X Carefully drive on a suitable stretch of road, making slight steering movements
at a speed above 20 km/h.
The functions mentioned above are available again when the warning lamp goes
out.
If the warning lamp is still on: X Observe the additional display messages in the multifunction display.
X Drive on carefully.
X Consult a qualified specialist workshop immediately. 342
Warning and indicator lamps in the instrument clusterOn-board computer and displays
Page 349 of 453
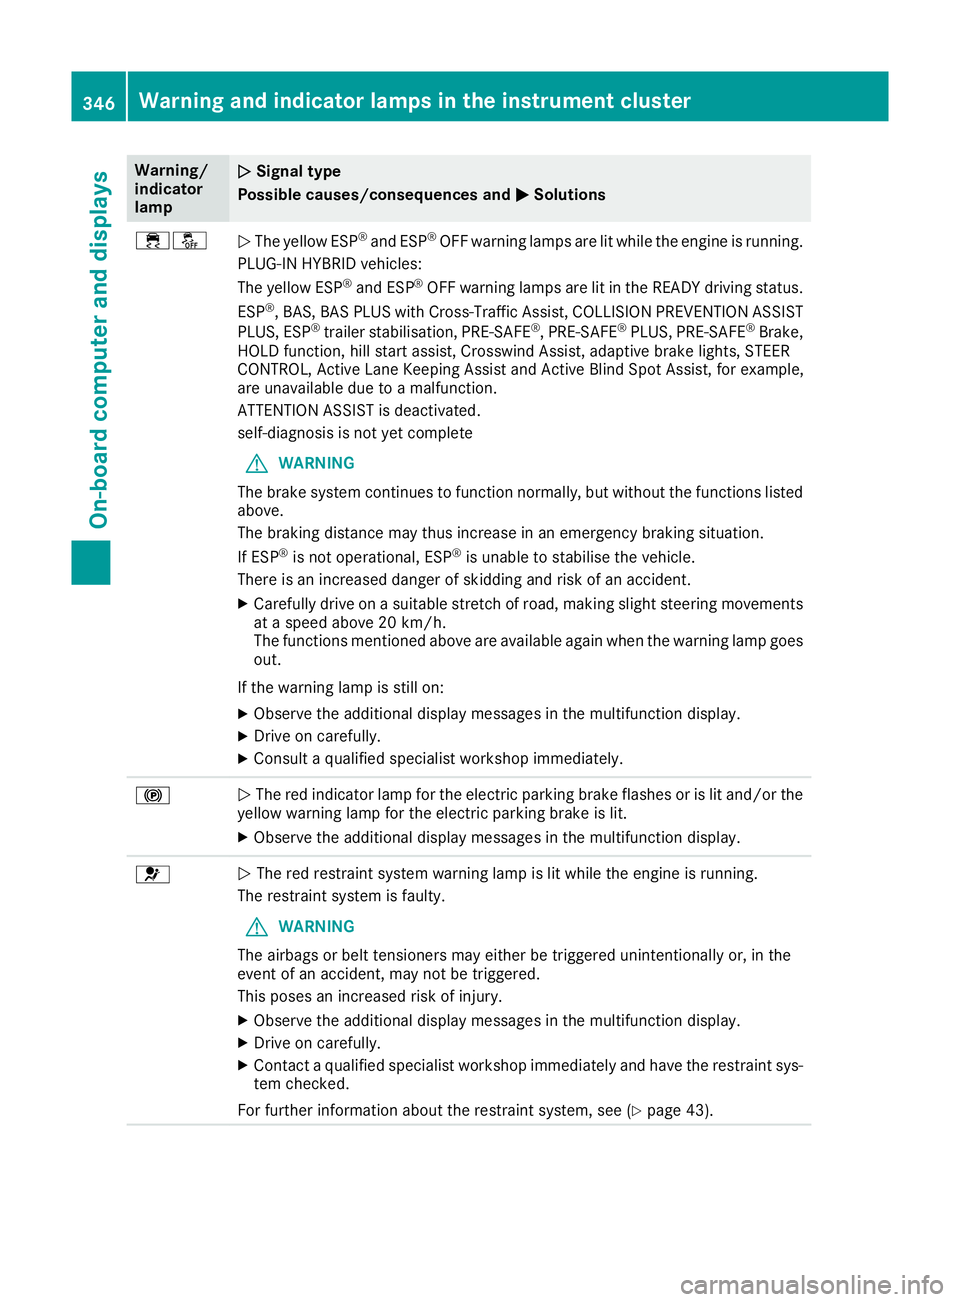
Warning/
indicator
lamp
N N
Signal type
Possible causes/consequences and M
M Solutions ֌
N
The yellow ESP ®
and ESP ®
OFF warning lamps are lit while the engine is running.
PLUG-IN HYBRID vehicles:
The yellow ESP ®
and ESP ®
OFF warning lamps are lit in the READY driving status.
ESP ®
, BAS, BAS PLUS with Cross-Traffic Assist, COLLISION PREVENTION ASSIST
PLUS, ESP ®
trailer stabilisation, PRE‑SAFE ®
, PRE‑SAFE ®
PLUS, PRE‑SAFE ®
Brake,
HOLD function, hill start assist, Crosswind Assist, adaptive brake lights, STEER
CONTROL, Active Lane Keeping Assist and Active Blind Spot Assist, for example,
are unavailable due to a malfunction.
ATTENTION ASSIST is deactivated.
self-diagnosis is not yet complete
G WARNING
The brake system continues to function normally, but without the functions listed above.
The braking distance may thus increase in an emergency braking situation.
If ESP ®
is not operational, ESP ®
is unable to stabilise the vehicle.
There is an increased danger of skidding and risk of an accident.
X Carefully drive on a suitable stretch of road, making slight steering movements
at a speed above 20 km/h.
The functions mentioned above are available again when the warning lamp goes out.
If the warning lamp is still on: X Observe the additional display messages in the multifunction display.
X Drive on carefully.
X Consult a qualified specialist workshop immediately. !
N
The red indicator lamp for the electric parking brake flashes or is lit and/or the
yellow warning lamp for the electric parking brake is lit.
X Observe the additional display messages in the multifunction display. 6
N
The red restraint system warning lamp is lit while the engine is running.
The restraint system is faulty.
G WARNING
The airbags or belt tensioners may either be triggered unintentionally or, in the
event of an accident, may not be triggered.
This poses an increased risk of injury.
X Observe the additional display messages in the multifunction display.
X Drive on carefully.
X Contact a qualified specialist workshop immediately and have the restraint sys-
tem checked.
For further information about the restraint system, see (Y page 43).346
Warning and indicator lamps in the instrument clusterOn-board computer and displays
Page 353 of 453
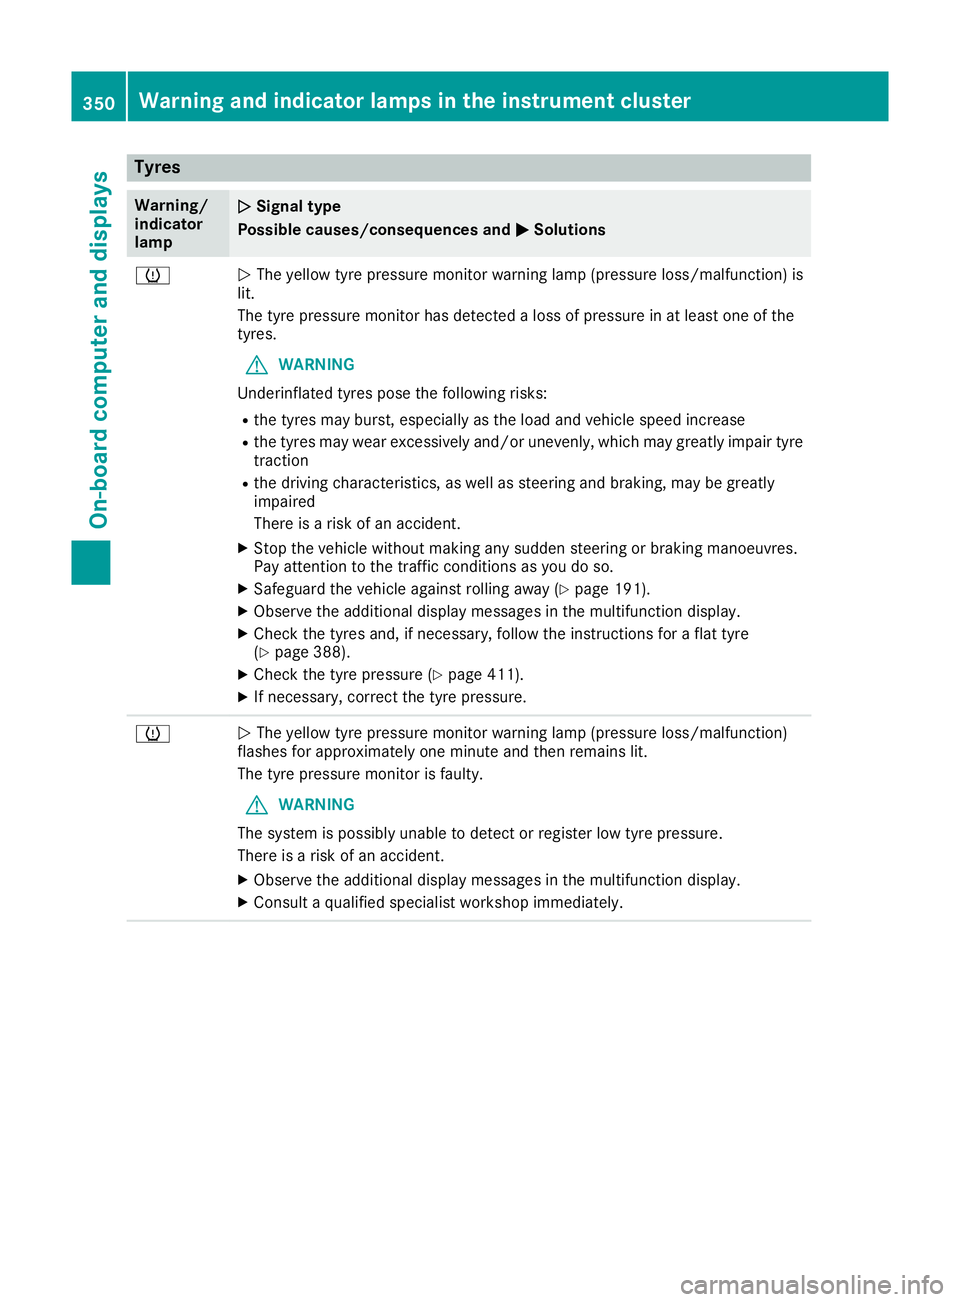
Tyres
Warning/
indicator
lamp
N N
Signal type
Possible causes/consequences and M
MSolutions h
N
The yellow tyre pressure monitor warning lamp (pressure loss/malfunction) is
lit.
The tyre pressure monitor has detected a loss of pressure in at least one of the
tyres.
G WARNING
Underinflated tyres pose the following risks:
R the tyres may burst, especially as the load and vehicle speed increase
R the tyres may wear excessively and/or unevenly, which may greatly impair tyre
traction
R the driving characteristics, as well as steering and braking, may be greatly
impaired
There is a risk of an accident.
X Stop the vehicle without making any sudden steering or braking manoeuvres.
Pay attention to the traffic conditions as you do so.
X Safeguard the vehicle against rolling away (Y page 191).
X Observe the additional display messages in the multifunction display.
X Check the tyres and, if necessary, follow the instructions for a flat tyre
(Y page 388).
X Check the tyre pressure (Y page 411).
X If necessary, correct the tyre pressure. h
N
The yellow tyre pressure monitor warning lamp (pressure loss/malfunction)
flashes for approximately one minute and then remains lit.
The tyre pressure monitor is faulty.
G WARNING
The system is possibly unable to detect or register low tyre pressure.
There is a risk of an accident.
X Observe the additional display messages in the multifunction display.
X Consult a qualified specialist workshop immediately. 350
Warning and indicator lamps in the instrument clusterOn-board computer and displays
Page 363 of 453
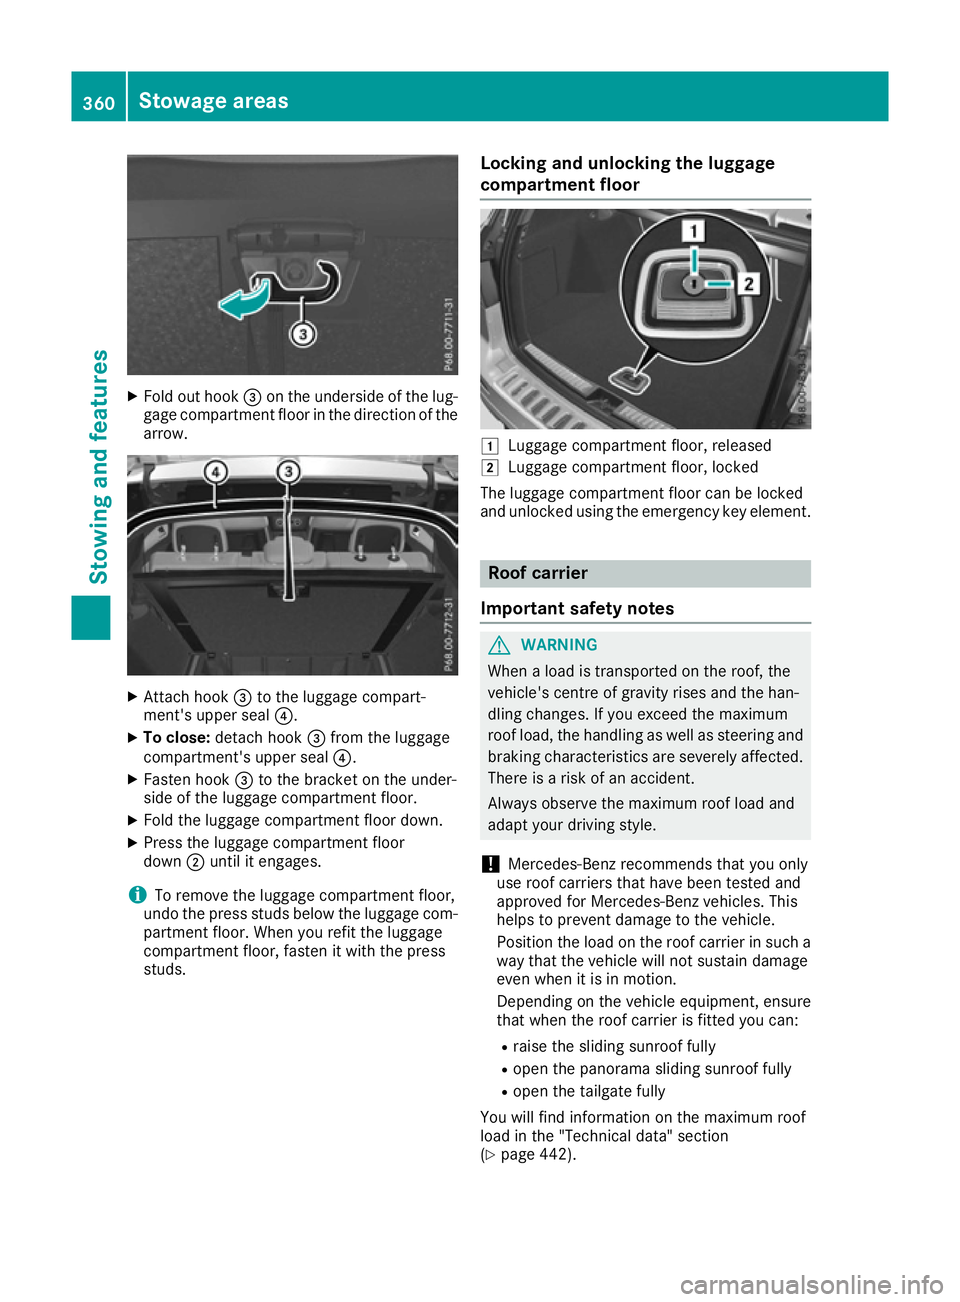
X
Fold out hook =on the underside of the lug-
gage compartment floor in the direction of the arrow. X
Attach hook =to the luggage compart-
ment's upper seal ?.
X To close: detach hook =from the luggage
compartment's upper seal ?.
X Fasten hook =to the bracket on the under-
side of the luggage compartment floor.
X Fold the luggage compartment floor down.
X Press the luggage compartment floor
down ;until it engages.
i To remove the luggage compartment floor,
undo the press studs below the luggage com-
partment floor. When you refit the luggage
compartment floor, fasten it with the press
studs. Locking and unlocking the luggage
compartment floor 1
Luggage compartment floor, released
2 Luggage compartment floor, locked
The luggage compartment floor can be locked
and unlocked using the emergency key element. Roof carrier
Important safety notes G
WARNING
When a load is transported on the roof, the
vehicle's centre of gravity rises and the han-
dling changes. If you exceed the maximum
roof load, the handling as well as steering and braking characteristics are severely affected.
There is a risk of an accident.
Always observe the maximum roof load and
adapt your driving style.
! Mercedes-Benz recommends that you only
use roof carriers that have been tested and
approved for Mercedes-Benz vehicles. This
helps to prevent damage to the vehicle.
Position the load on the roof carrier in such a way that the vehicle will not sustain damage
even when it is in motion.
Depending on the vehicle equipment, ensure
that when the roof carrier is fitted you can:
R raise the sliding sunroof fully
R open the panorama sliding sunroof fully
R open the tailgate fully
You will find information on the maximum roof
load in the "Technical data" section
(Y page 442). 360
Stowage areasStowing and features
Page 369 of 453
In this case, dial the
112emergency number
on your mobile phone.
You can find more information on the Mercedes- Benz emergency call system in the separate
multimedia system operating instructions. Mobile phone
Important safety notes G
WARNING
Operating mobile communications equip-
ment while driving distracts you from paying
attention to traffic conditions. This could also cause you to lose control of the vehicle. There
is a risk of an accident.
Use this device only when the vehicle is sta-
tionary.
You must observe the legal requirements for the country in which you are currently driving when
operating mobile communications equipment in the vehicle.
If it is permitted by law to operate communica-
tions equipment while the vehicle is in motion,
you may only do so if the traffic situation per-
mits. You may otherwise be distracted from the
traffic conditions, cause an accident and injure
yourself and others.
Excessive levels of electromagnetic radiation
may cause damage to your health and to the
health of others. The use of an exterior aerial
takes into consideration the scientific discus-
sion surrounding the possible health risk posed
by electromagnetic fields.
Mercedes-Benz recommends the use of an
approved exterior aerial. This ensures:
R optimal mobile phone reception quality in the
vehicle
R that mutual interference between the vehicle
electronics and mobile phones is minimised
An exterior aerial has the following advantages:
R it conducts the electromagnetic fields gener-
ated by a wireless device to the exterior
R the field strength in the vehicle interior is
lower than in a vehicle that does not have an exterior aerial
Information on retrofitting two-way radios and
mobile phones (RF transmitters) (Y page 433).General notes There are various mobile phone brackets that
may be fitted in your vehicle; in some cases,
these are country-specific.
More information on suitable mobile phones,
mobile phone brackets and on connecting Blue-
tooth ®
-capable mobile phones with the multi-
media system can be obtained:
R at your Mercedes-Benz Service Centre
R on the Internet at http://www.mercedes-
benz.com/connect
The functions and services available when you
use the phone depend on your mobile phone
model and service provider.
Using a mobile phone To connect a mobile phone to the exterior aerial
and charge it, insert it into the mobile phone
bracket.
X Open the telephone compartment
(Y page 352).
X Place the mobile phone bracket into the pre-
installed fitting; see the separate installation
instructions for the mobile phone fitting.
X Insert the mobile phone into the mobile phone
bracket; see the separate installation instruc-
tions for the mobile phone fitting.
i The mobile phone can also be operated
without being in the bracket. However, the
charging function and aerial function are not
available.
In order to use Bluetooth ®
(SAP profile) on your
telephone module, you must first insert the tele-
phone module into the pre-installed fitting. This connects it to the exterior aerial. If you wish to
charge the mobile phone, then you must con-
nect it to a USB port.
Further information on the telephone module
with Bluetooth ®
(SAP profile) can be found in the
Digital Owner's Manual.
Operating the mobile phone You can operate the telephone using the
6
and ~ buttons on the multifunction steering
wheel. You can operate other mobile phone
functions via the on-board computer
(Y page 288).
When you remove the key from the ignition lock, the mobile phone is disconnected from the vehi- 366
FeaturesStowing and features
Page 381 of 453
Depending on the operating conditions of the
vehicle, the remaining time or distance until the
next service due date is displayed.
The letter indicates which service is due. A A
stands for a minor service and B
B for a major ser-
vice. A number or another letter may be dis-
played after the letter.
Only for certain countries: the position after the
letter A
A or B Bindicates any necessary additional
maintenance work to be performed. If you notify a qualified specialist workshop of this display,
you will receive a statement on the associated
costs.
The ASSYST PLUS service interval display does
not take into account any periods of time during which the battery is disconnected.
Maintaining the time-dependent service sched-
ule:
X Note down the service due date displayed in
the multifunction display before disconnect-
ing the battery.
or X After reconnecting the battery, subtract the
battery disconnection periods from the ser-
vice date shown on the display. Hiding service messages
X Press the %ora button on the steering
wheel. Displaying service messages
X Switch the ignition on.
X Press the =or; button on the steering
wheel to select the Serv. Serv.menu.
X Press the 9or: button to select the
ASSYST
ASSYST PLUS
PLUSsubmenu and confirm by press-
ing the abutton.
The service due date appears in the multi-
function display. Information about Service
Resetting the ASSYST PLUS service
interval display !
If the ASSYST PLUS service interval display
has been inadvertently reset, this setting can be corrected at a qualified specialist work-
shop.
Have service work carried out as described in the Service Booklet. This may otherwise lead
to increased wear and damage to the major
assemblies or the vehicle.
A qualified specialist workshop, e.g. a
Mercedes-Benz Dealership, will reset the
ASSYST PLUS service interval display after the
service work has been carried out. You can also
obtain further information on maintenance
work, for example.
Special service requirements The prescribed service interval is based on nor-
mal operation of the vehicle. Service work will
need to be performed more often if the vehicle is
operated under arduous conditions or increased loads, for example:
R regular city driving with frequent intermediate
stops
R if the vehicle is primarily used to travel short
distances
R for frequent operation in mountainous terrain
or on poor road surfaces
R if the engine is often left idling for long periods
In these or similar operating conditions, have,
for example, the air filter, engine oil and oil filter changed more frequently. The tyres must be
checked more frequently if the vehicle is oper-
ated under increased loads. Further informationcan be obtained at a qualified specialist work-
shop, e.g. a Mercedes-Benz Service Centre.
Driving abroad An extensive Mercedes-Benz Service network is
also available in other countries. You can obtain further information from any Mercedes-Benz
Service Centre. Care
General notes
H
Environmental note
Dispose of empty packaging and cleaning
cloths in an environmentally responsible man-
ner. 378
CareMaintenance and care