2015 MERCEDES-BENZ GLE SUV check engine light
[x] Cancel search: check engine lightPage 10 of 453
Overview of systems ......................1
35
Pre-entry climate control at
departure time ............................... 148
Pre-entry climate control via key ... 147
Problem with the rear window
heating .......................................... 145
Problems with cooling with air
dehumidification ............................ 141
Rear control panel ......................... 138
Setting the air distribution ............. 142
Setting the air vents ..................... .154
Setting the airflow ......................... 142
Setting the climate mode (AIR
FLOW) ............................................ 141
Setting the temperature ................ 141
Switching air-recirculation mode
on/off ............................................ 145
Switching on/off ........................... 139
Switching residual heat on/off ...... 146
Switching the rear window heat-
ing on/off ...................................... 144
Switching the ZONE function on/
off ................................................. .143
THERMATIC automatic climate
control (2-zone) ............................ .136
THERMOTRONIC (3-zone) auto-
matic climate control ..................... 138
Coat hooks ......................................... 358
Cockpit
Overview .......................................... 30
see Instrument cluster
Collapsible emergency spare
wheel
see Emergency spare wheel
COLLISION PREVENTION ASSIST
PLUS
Activating/deactivating ................. 291
Display message ............................ 307
Operation/notes .............................. 73
COMAND display
Cleaning ......................................... 384
COMAND Online
Driving dynamics displa y............... 258
Combination switch .......................... 123
Combined luggage cover and net .... 357
Constant headlamp mode
see Daytime driving lights Consumption statistics (on-board
computer)
.......................................... 284
Convenience closing feature .............. 99
Convenience opening feature ............ 99
Convenience opening/closing (air-
recirculation mode) ........................... 145
Coolant (engine)
Checking the level ......................... 376
Display message ............................ 316
Displaying the temperature (on-
board computer) ............................ 292
Important safety notes .................. 441
Temperature (on-board computer, Mercedes-AMG vehicles) ............... 297
Temperature gaug e........................ 282
Warning lamp ................................. 347
Cooling
see Climate control
Copyright ............................................. 29
Cornering light function
Display message ............................ 313
Function/note s............................. 124
Crash-responsive emergency light-
ing ....................................................... 128
Crosswind Assist ................................. 78
Cruise control
Activating ....................................... 204
Activation conditions ..................... 204
Cruise control lever ....................... 203
Deactivating ................................... 205
Display message ............................ 328
Driving system ............................... 203
Important safety notes .................. 203
LIM indicator lamp ......................... 203
Selecting ........................................ 204
Storing and maintaining current
speed ............................................. 204
Cup holder
Centre console .............................. 361
Important safety notes .................. 361
Rear compartment ......................... 362
Temperature controlled ................. 362 D
Dashboard see Instrument cluster Index
7
Page 16 of 453
Instrument cluster lighting
.............. 281
Intelligent Light System
Activating/deactivating ................ .294
Display message ............................ 314
Overview ........................................ 124
Setting the dipped-beam head-
lamps for driving on the right/left .. 294
Interior lighting
Automatic control system .............. 127
Emergency lighting ........................ 128
Manual control ............................... 127
Overview ........................................ 127
Reading lamp ................................. 127
Interior motion sensor
Deactivating ..................................... 83
Function .......................................... .82
Priming ............................................ 82
Switching off .................................... 82
ISOFIX child seat securing system ....60J
Jack Storage location ............................3 87
Using ............................................. 415
Jump starting (engine) ......................397 K
Key Changing the battery ....................... 87
Checking the battery ....................... 87
Convenience closing feature .......... 100
Convenience opening feature .......... 99
Display message ............................ 336
Door central locking/unlocking ....... 85
Emergency key element ................... 86
Important safety notes .................... 84
KEYLESS-GO start function .............. 86
Loss ................................................. 89
Modifying the programming ............. 86
Overview .......................................... 84
Positions (ignition lock) ................. 158
Problem (malfunction) ..................... 89
Starting the engine ........................ 160
Key positions
Key ................................................ 158
KEYLESS GO .................................. 158 KEYLESS-GO
Convenience closing ..................... .100
Deactivation ..................................... 85
Display message ............................ 336
Locking ............................................ 85
Removing the Start/Stop button ... 159
Start function ................................... 86
Start/Stop button .......................... 158
Starting the engine ........................ 160
Unlocking ......................................... 85
Kickdown
Driving tips ................................... .170
Manual gearshifting ....................... 174
Kneebag ............................................... 50 L
Lamps see Warning and indicator lamps
Lane detection (automatic)
see Lane Keeping Assist
Lane Keeping Assist
Activating/deactivating ................. 291
Display message ............................ 325
Function/informatio n.................... 246
see Active Lane Keeping Assist
Lap time (RACETIMER) ...................... 298
Lashing eyelets ................................. 355
Level control (display message) ...... 322
Level control (vehicle with the Off- Road Engineering package)
Basic settings ................................ 217
Function/note s............................. 216
Important safety notes .................. 216
Licence plate lamp (display mes-
sage) ................................................... 314
Light sensor (display message) ....... 315
Lighting
see Lights
Lights
Activating/deactivating the Intel-
ligent Light System ........................ 294
Active light function ....................... 124
Adaptive Highbeam Assist PLUS .... 126
Automatic headlamp mode ............ 122
Cornering light function ................. 124
Dipped-beam headlamp s............... 122
Driving abroad ............................... 121 Index
13
Page 18 of 453
Mercedes-Benz Service Centre
see Qualified specialist workshop
Message memory (on-board com-
puter) .................................................. 300
Mirrors
see Exterior mirrors
see Rear-view mirror
see Vanity mirror (in sun visor)
Mobile phone
Frequencies ................................... 433
Installation ..................................... 433
Menu (on-board computer) ............ 288
Notes/placing in the bracket ......... 366
Transmission output (maximum) .... 433
Modifying the programming (key) ..... 86
MOExtended tyres ............................. 388
Motorway mode ................................ 125
MP3
Operating ....................................... 287
see Separate operating instructions
Multifunction display
Function/notes ............................. 283
Permanent display ......................... 293
Multifunction steering wheel
Operating the on-board computer .. 282
Overview .......................................... 35
Multimedia system
see Separate operating instructions N
Navigation Menu (on-board computer) ............ 286
see separate operating instructions
Notes on running in a new vehicle .. 157O
Occupant safety Airbags ............................................ 48
Automatic front-passenger front
airbag deactivation ......................... .51
Automatic measures after an acci-
dent ................................................. 58
Children in the vehicle ..................... 58
Important safety note s.................... 43
PASSENGER AIRBAG indicator
lamp ................................................. 44 Pets in the vehicle ........................... 70
PRE-SAFE
®
(anticipatory occu-
pant protection) ............................... 57
PRE-SAFE ®
PLUS (anticipatory
occupant protection PLUS) .............. 57
Restraint system introduction .......... 43
Restraint system warning lamp ........ 44
Odometer
see Total distance recorder
see Trip meter
Off-road driving
Approach/departure angle ............ 445
Checklist after driving off-road ...... 200
Checklist before driving off-road .... 200
Fording depth ................................ 444
General information ....................... 199
Important safety notes .................. 199
Maximum gradient climbing abil-
ity .................................................. 445
Travelling uphill .............................. 202
Off-road lights .................................... 125
Off-Road program (vehicles with-
out Off-Road Engineering package)
Function/note s............................. 254
Off-road programs (vehicles with
Off-Road Engineering package)
Function/note s............................. 254
Off-road drive program .................. 254
Offroad Plus drive progra m............ 255
Off-road programs (vehicles with
the Off-Road Engineering package)
Displays in the COMAND display ... 258
Off-road system
4MATIC .......................................... 252
DSR ............................................... 252
LOW RANGE off-road gear ............. 255
Off-road 4ETS .................................. 76
Off-road ABS .................................... 71
Off-road ESP ®
.................................. 77
Off-Road program (vehicles with-
out Off-Road Engineering pack-
age) ............................................... 254
Off-road programs (vehicles with
Off-Road Engineering package) ...... 254
Oil
see Engine oil Index
15
Page 45 of 453
Deactivate the hybrid system manually if:
R the 6 restraint system warning lamp in the
instrument cluster lights up after an accident
R the vehicle is badly damaged, e.g. after an
accident, and the restraint system compo-
nents were not activated
R the vehicle is badly damaged and has to be
towed or transported
X If possible, move the vehicle out of the
danger zone:
shift the automatic transmis-
sion into position N.
X Release the electric parking brake.
X Roll the vehicle to a safe place and park it
safely.
Get assistance from others if necessary.
The vehicle is locked automatically when the
ignition is switched on and the wheels are turn-
ing. There is therefore a risk of being locked out
if the vehicle is being pushed or tested on a
dynamometer.
X Switch the ignition off.
X Shift the automatic transmission to park posi-
tion P.
Apply the electric parking brake
(Y page 192).
Secure the vehicle against rolling away
(Y page 414).
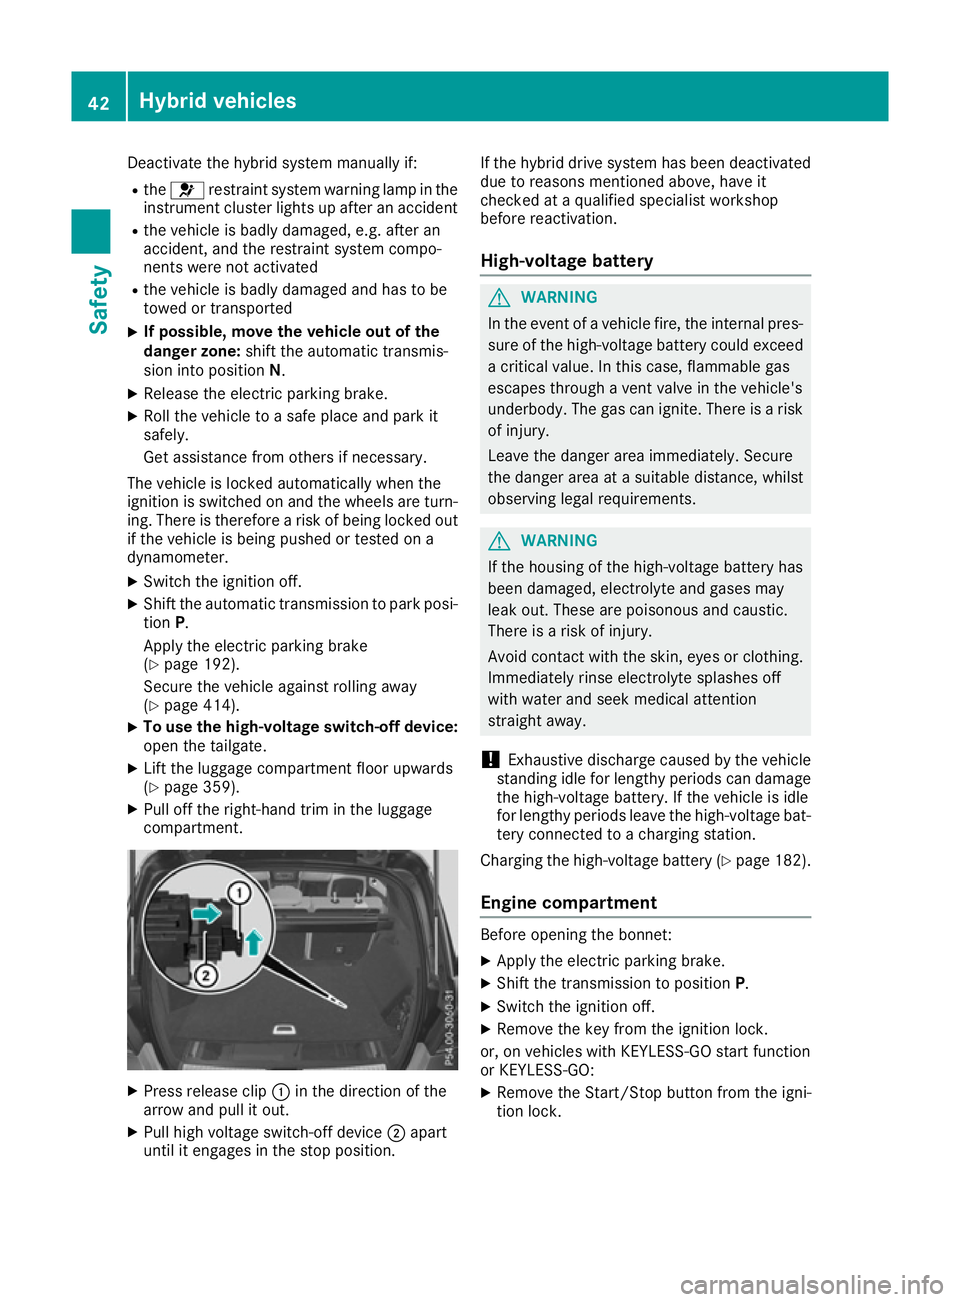
X To use the high-voltage switch-off device:
open the tailgate.
X Lift the luggage compartment floor upwards
(Y page 359).
X Pull off the right-hand trim in the luggage
compartment. X
Press release clip :in the direction of the
arrow and pull it out.
X Pull high voltage switch-off device ;apart
until it engages in the stop position. If the hybrid drive system has been deactivated
due to reasons mentioned above, have it
checked at a qualified specialist workshop
before reactivation.
High-voltage battery G
WARNING
In the event of a vehicle fire, the internal pres- sure of the high-voltage battery could exceeda critical value. In this case, flammable gas
escapes through a vent valve in the vehicle's
underbody. The gas can ignite. There is a risk
of injury.
Leave the danger area immediately. Secure
the danger area at a suitable distance, whilst
observing legal requirements. G
WARNING
If the housing of the high-voltage battery has
been damaged, electrolyte and gases may
leak out. These are poisonous and caustic.
There is a risk of injury.
Avoid contact with the skin, eyes or clothing. Immediately rinse electrolyte splashes off
with water and seek medical attention
straight away.
! Exhaustive discharge caused by the vehicle
standing idle for lengthy periods can damage
the high-voltage battery. If the vehicle is idle
for lengthy periods leave the high-voltage bat- tery connected to a charging station.
Charging the high-voltage battery (Y page 182).
Engine compartment Before opening the bonnet:
X Apply the electric parking brake.
X Shift the transmission to position P.
X Switch the ignition off.
X Remove the key from the ignition lock.
or, on vehicles with KEYLESS-GO start function
or KEYLESS ‑GO:
X Remove the Start/Stop button from the igni-
tion lock. 42
Hybrid vehiclesSafety
Page 47 of 453
unexpectedly, for example. There is an
increased risk of injury, possibly even fatal.
Never modify parts of the restraint system. Do not attempt to modify the wiring as well as
electronic components or their software.
If it is necessary to modify an airbag system to
accommodate a person with disabilities, con-
tact a Mercedes-Benz Service Centre. Restraint system warning lamp
The functions of the restraint system are
checked after the ignition is switched on and at
regular intervals while the engine is running.
Therefore, malfunctions can be detected in
good time.
The 6 restraint system warning lamp in the
instrument cluster lights up when the ignition is switched on. It goes out no later than a few sec-
onds after the vehicle is started. The compo-
nents of the restraint system are in operational
readiness.
A malfunction has occurred if the 6restraint
system warning lamp:
R does not light up after the ignition is switched
on
R does not go out after a few seconds with the
engine running
R lights up again while the engine is running
All vehicles, except hybrid vehicles: G
WARNING
If the restraint system is malfunctioning,
restraint system components may be trig-
gered unintentionally or might not be trig-
gered at all in the event of an accident with a high rate of vehicle deceleration. This can
effect belt tensioners or airbags, for example. There is an increased risk of serious or even
fatal injuries.
Have the restraint system checked and
repaired immediately at a qualified specialist
workshop.
Hybrid vehicles: G
DANGER
If the restraint system is malfunctioning,
restraint system components may be trig-
gered unintentionally or might not be trig-
gered at all in the event of an accident with a high rate of vehicle deceleration. This can
effect belt tensioners or airbags, for example. In addition, the vehicle's high-voltage electri-
cal system may not be deactivated as inten-
ded in the event of an accident. Touching
damaged components of the vehicle's high-
voltage electrical system could result in an
electric shock. There is an increased risk of
injury, possibly even fatal.
Have the restraint system checked and
repaired immediately at a qualified specialist
workshop. After an accident, immediately
switch the ignition off and remove the key
from the ignition lock. PASSENGER AIR BAG indicator lamp
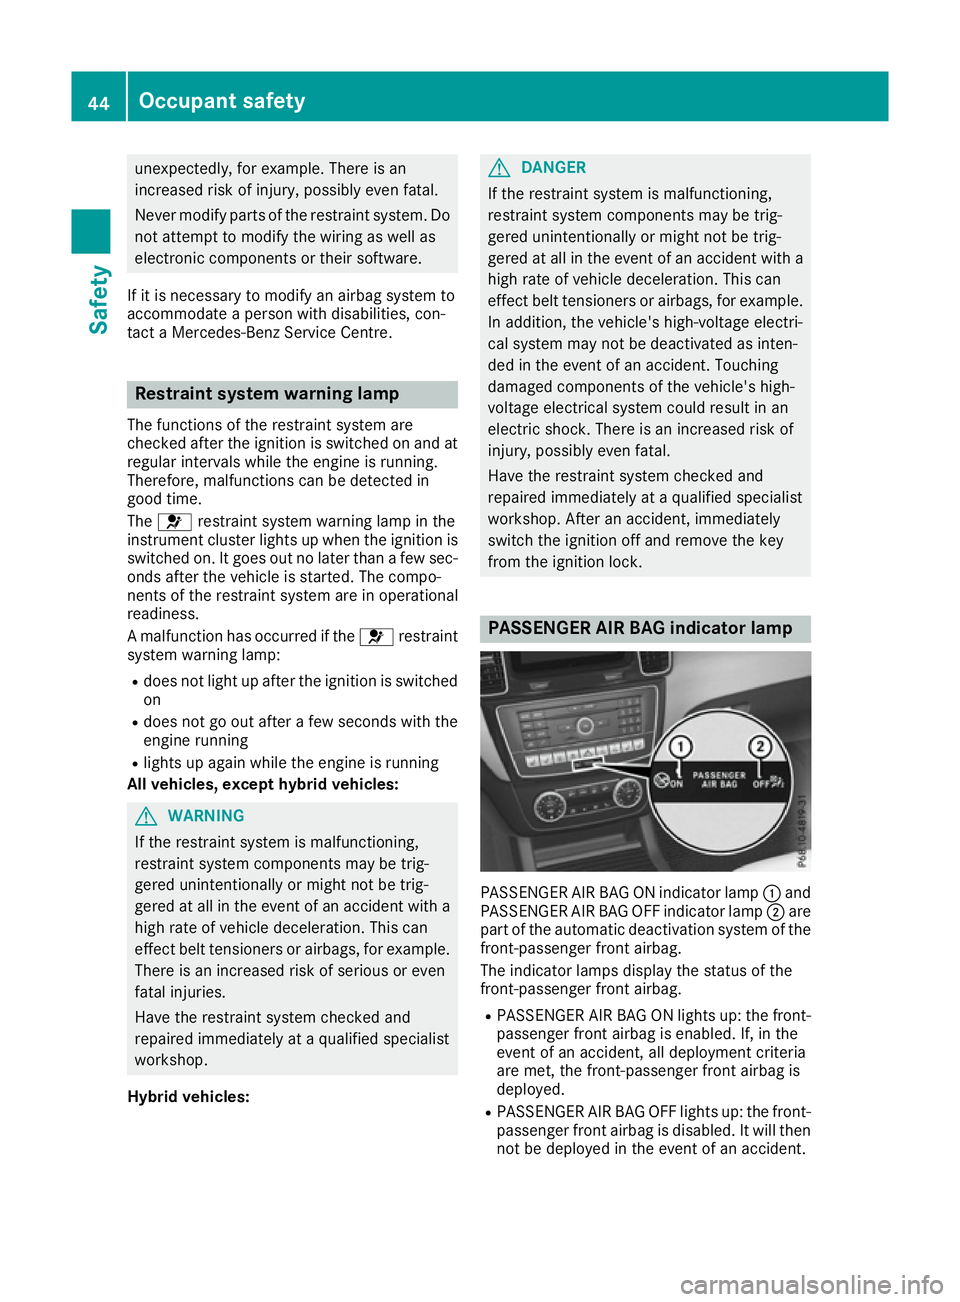
PASSENGER AIR BAG ON indicator lamp
:and
PASSENGER AIR BAG OFF indicator lamp ;are
part of the automatic deactivation system of the front-passenger front airbag.
The indicator lamps display the status of the
front-passenger front airbag.
R PASSENGER AIR BAG ON lights up: the front-
passenger front airbag is enabled. If, in the
event of an accident, all deployment criteria
are met, the front-passenger front airbag is
deployed.
R PASSENGER AIR BAG OFF lights up: the front-
passenger front airbag is disabled. It will then
not be deployed in the event of an accident. 44
Occupant safetySafety
Page 79 of 453
ESP
®
monitors driving stability and traction, i.e.
power transmission between the tyres and the
road surface.
If ESP ®
detects that the vehicle is deviating from
the direction desired by the driver, one or more
wheels are braked to stabilise the vehicle. The
engine output is also modified to keep the vehi- cle on the desired course within physical limits.
ESP ®
assists the driver when pulling away on
wet or slippery roads. ESP ®
can also stabilise
the vehicle during braking.
ETS/4ETS (Electronic Traction System) ETS traction control is part of ESP
®
. On vehicles
with 4MATIC, 4ETS is a component of ESP ®
.
Traction control brakes the drive wheels indi-
vidually if they spin. This enables you to pull
away and accelerate on slippery surfaces, for
example if the road surface is slippery on one
side. In addition, more drive torque is transfer-
red to the wheel or wheels with traction.
Traction control remains active if you deactivate
ESP ®
.
In appropriate driving situations, activate the
off-road programs:
X Vehicles without the Off-Road Engineering
package (Y page 254)
X Vehicles with the Off-Road Engineering pack-
age (Y page 254)
Off-road 4ETS (Electronic Traction Sys-
tem) An ETS system specifically suited to off-road
terrain is activated automatically once an off-
road program is activated:
R Vehicles without the Off-Road Engineering
package (Y page 254)
R Vehicles with the Off-Road Engineering pack-
age (Y page 254)
Important safety notes G
WARNING
If ESP ®
is malfunctioning, ESP ®
is unable to
stabilise the vehicle. In addition, other driving
safety systems are switched off. This increa-
ses the risk of skidding and an accident. Drive on carefully. Have ESP
®
checked at a
qualified specialist workshop.
! Only operate the vehicle for a maximum of
ten seconds on a brake dynamometer. Switch
off the ignition.
Application of the brakes by ESP ®
may oth-
erwise destroy the brake system.
! A function or performance test should only
be carried out on a twin-axle dynamometer.
Before you operate the vehicle on such a
dynamometer, please consult a qualified
workshop. You could otherwise damage the
drive train or the brake system.
When ESP ®
is deactivated, the åESP®
OFF
warning lamp lights up continuously.
If the ÷ warning lamp and the åwarning
lamp are lit continuously, ESP ®
is not available
due to a malfunction.
Observe the information on warning lamps
(Y page 343) and display messages which may
be shown in the instrument cluster
(Y page 301).
i Only use wheels with the recommended tyre
sizes. Only then will ESP ®
function properly.
Characteristics of ESP ® General notes
If the ÷ ESP warning lamp goes out before
beginning the journey, ESP ®
is automatically
active.
If ESP ®
intervenes, the ÷ESP®
warning lamp
flashes in the instrument cluster.
If ESP ®
intervenes:
X Do not deactivate ESP ®
under any circum-
stances.
X When pulling away, only depress the acceler-
ator pedal as far as is necessary.
X Adapt your driving style to suit the prevailing
road and weather conditions.
ECO start/stop function
The ECO start/stop function switches the
engine off automatically if the vehicle stops
moving. When pulling away again, the engine
starts automatically. ESP ®
remains in its previ-
ously selected status. Example:if ESP®
was
deactivated before the engine was switched off, 76
Driving safety systemsSafety
Page 88 of 453
Key functions
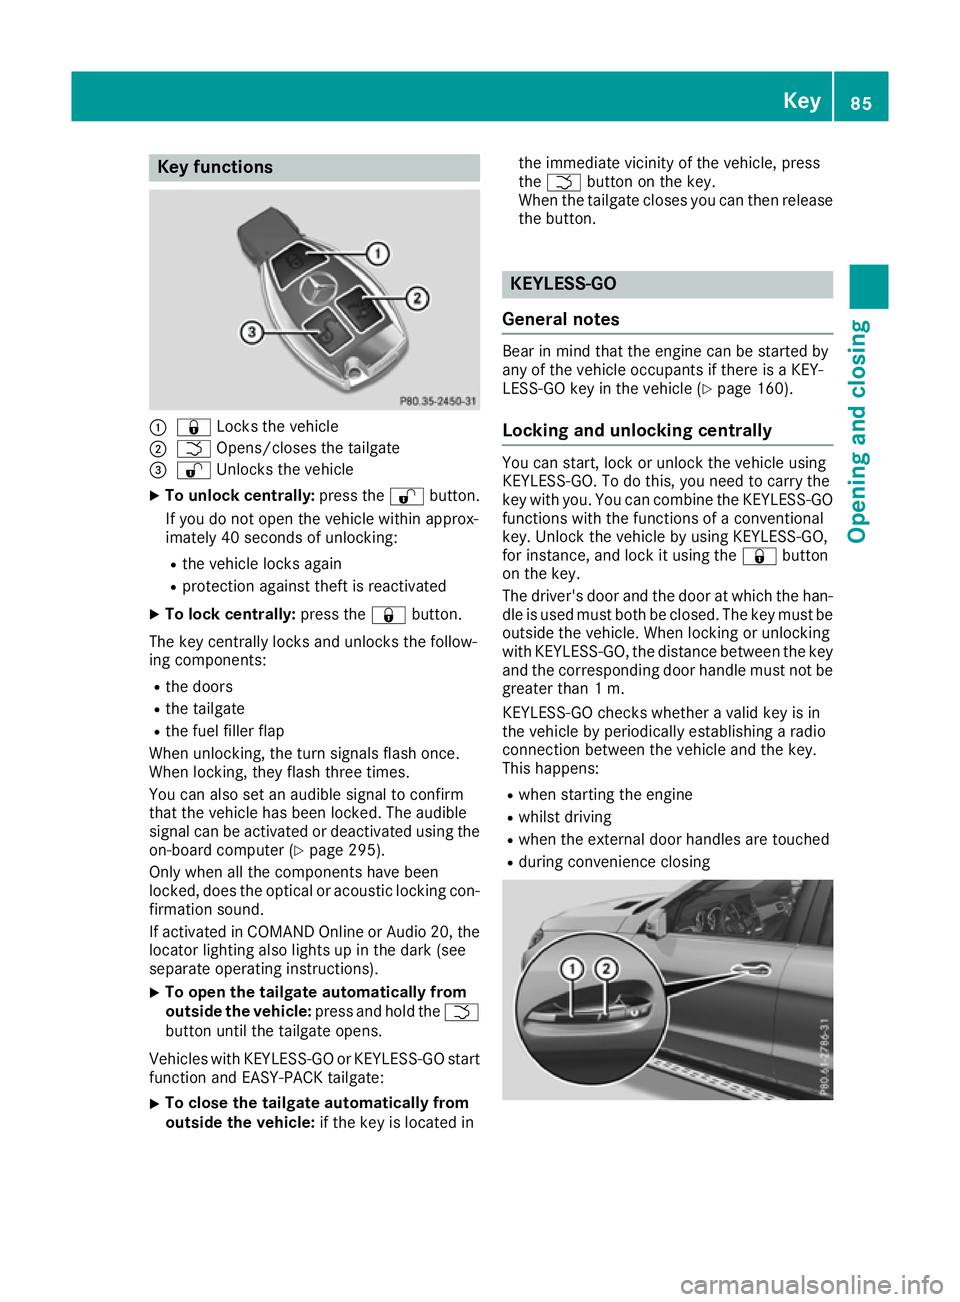
:
& Locks the vehicle
; F Opens/closes the tailgate
= % Unlocks the vehicle
X To unlock centrally: press the%button.
If you do not open the vehicle within approx-
imately 40 seconds of unlocking:
R the vehicle locks again
R protection against theft is reactivated
X To lock centrally: press the&button.
The key centrally locks and unlocks the follow-
ing components: R the doors
R the tailgate
R the fuel filler flap
When unlocking, the turn signals flash once.
When locking, they flash three times.
You can also set an audible signal to confirm
that the vehicle has been locked. The audible
signal can be activated or deactivated using the
on-board computer (Y page 295).
Only when all the components have been
locked, does the optical or acoustic locking con- firmation sound.
If activated in COMAND Online or Audio 20, the
locator lighting also lights up in the dark (see
separate operating instructions).
X To open the tailgate automatically from
outside the vehicle:
press and hold theF
button until the tailgate opens.
Vehicles with KEYLESS-GO or KEYLESS-GO start
function and EASY-PACK tailgate:
X To close the tailgate automatically from
outside the vehicle: if the key is located in the immediate vicinity of the vehicle, press
the
F button on the key.
When the tailgate closes you can then release the button. KEYLESS-GO
General notes Bear in mind that the engine can be started by
any of the vehicle occupants if there is a KEY-
LESS-GO key in the vehicle (Y
page 160).
Locking and unlocking centrally You can start, lock or unlock the vehicle using
KEYLESS-GO. To do this, you need to carry the
key with you. You can combine the KEYLESS-GO functions with the functions of a conventional
key. Unlock the vehicle by using KEYLESS-GO,
for instance, and lock it using the &button
on the key.
The driver's door and the door at which the han- dle is used must both be closed. The key must be
outside the vehicle. When locking or unlocking
with KEYLESS-GO, the distance between the key and the corresponding door handle must not be greater than 1 m.
KEYLESS-GO checks whether a valid key is in
the vehicle by periodically establishing a radio
connection between the vehicle and the key.
This happens:
R when starting the engine
R whilst driving
R when the external door handles are touched
R during convenience closing Key
85Opening and closing Z
Page 89 of 453
X
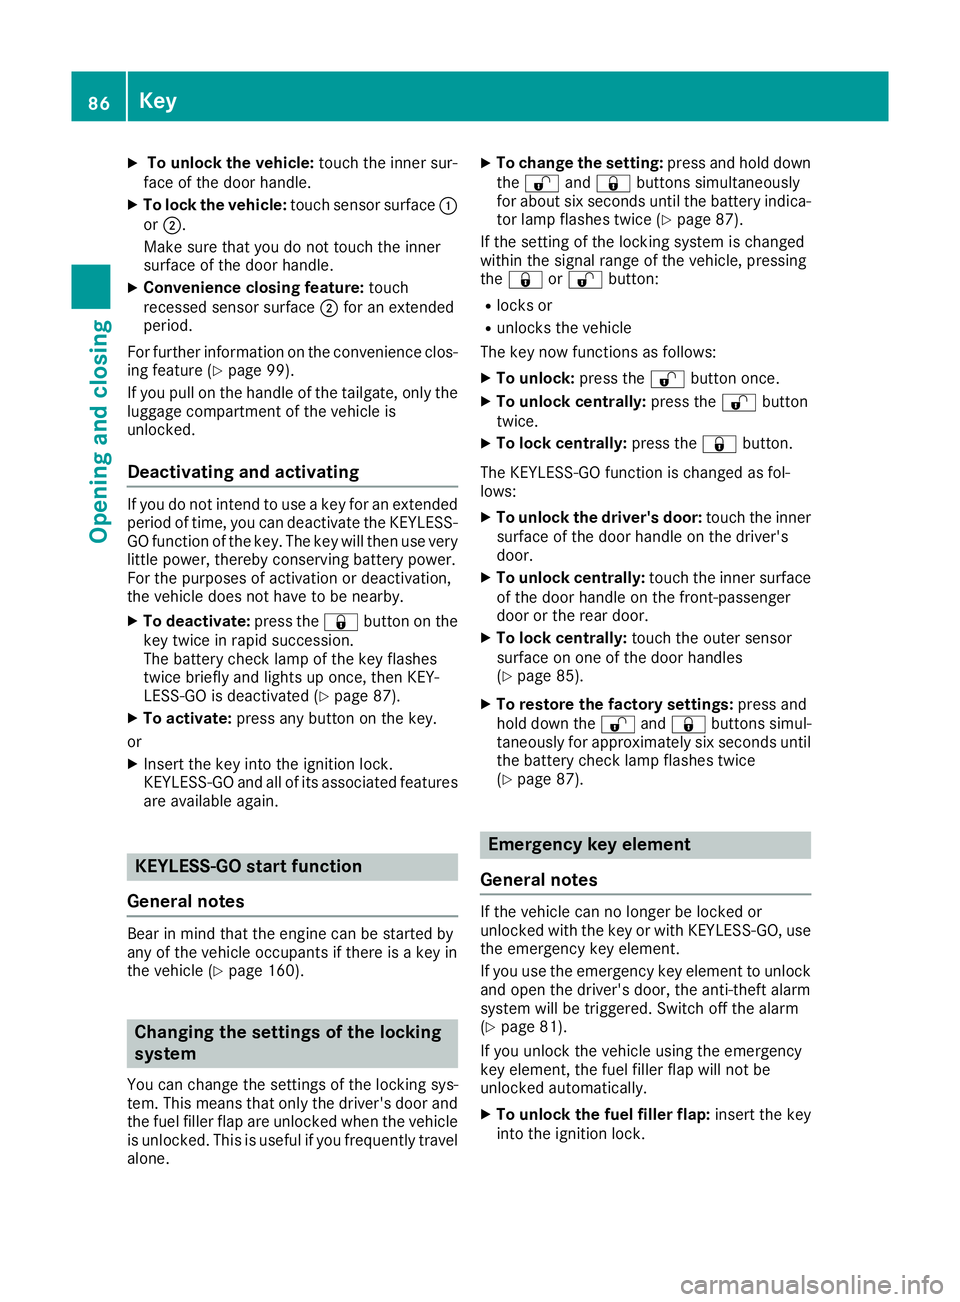
To unlock the vehicle: touch the inner sur-
face of the door handle.
X To lock the vehicle: touch sensor surface :
or ;.
Make sure that you do not touch the inner
surface of the door handle.
X Convenience closing feature: touch
recessed sensor surface ;for an extended
period.
For further information on the convenience clos-
ing feature (Y page 99).
If you pull on the handle of the tailgate, only the
luggage compartment of the vehicle is
unlocked.
Deactivating and activating If you do not intend to use a key for an extended
period of time, you can deactivate the KEYLESS-
GO function of the key. The key will then use very little power, thereby conserving battery power.
For the purposes of activation or deactivation,
the vehicle does not have to be nearby.
X To deactivate: press the&button on the
key twice in rapid succession.
The battery check lamp of the key flashes
twice briefly and lights up once, then KEY-
LESS-GO is deactivated (Y page 87).
X To activate: press any button on the key.
or
X Insert the key into the ignition lock.
KEYLESS-GO and all of its associated features
are available again. KEYLESS-GO start function
General notes Bear in mind that the engine can be started by
any of the vehicle occupants if there is a key in
the vehicle (Y page 160). Changing the settings of the locking
system
You can change the settings of the locking sys-
tem. This means that only the driver's door and
the fuel filler flap are unlocked when the vehicle is unlocked. This is useful if you frequently travel
alone. X
To change the setting: press and hold down
the % and& buttons simultaneously
for about six seconds until the battery indica-
tor lamp flashes twice (Y page 87).
If the setting of the locking system is changed
within the signal range of the vehicle, pressing
the & or% button:
R locks or
R unlocks the vehicle
The key now functions as follows:
X To unlock: press the%button once.
X To unlock centrally: press the%button
twice.
X To lock centrally: press the&button.
The KEYLESS-GO function is changed as fol-
lows:
X To unlock the driver's door: touch the inner
surface of the door handle on the driver's
door.
X To unlock centrally: touch the inner surface
of the door handle on the front-passenger
door or the rear door.
X To lock centrally: touch the outer sensor
surface on one of the door handles
(Y page 85).
X To restore the factory settings: press and
hold down the %and& buttons simul-
taneously for approximately six seconds until the battery check lamp flashes twice
(Y page 87). Emergency key element
General notes If the vehicle can no longer be locked or
unlocked with the key or with KEYLESS-GO, use
the emergency key element.
If you use the emergency key element to unlock
and open the driver's door, the anti-theft alarm
system will be triggered. Switch off the alarm
(Y page 81).
If you unlock the vehicle using the emergency
key element, the fuel filler flap will not be
unlocked automatically.
X To unlock the fuel filler flap: insert the key
into the ignition lock. 86
KeyOpening and closing