2015 MERCEDES-BENZ GLE SUV check engine light
[x] Cancel search: check engine lightPage 93 of 453
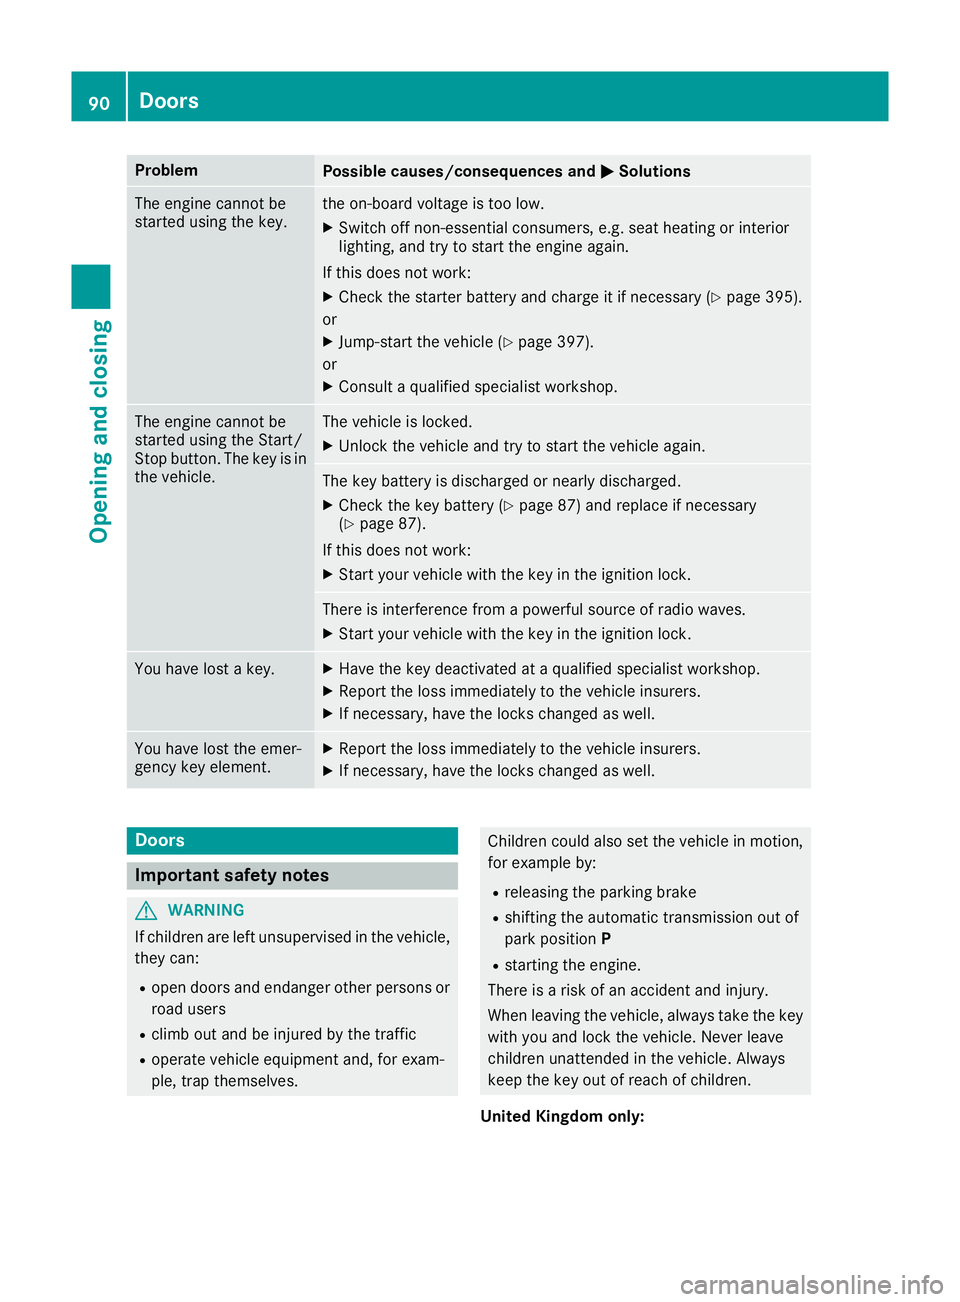
Problem
Possible causes/consequences and
M
MSolutions The engine cannot be
started using the key. the on-board voltage is too low.
X Switch off non-essential consumers, e.g. seat heating or interior
lighting, and try to start the engine again.
If this does not work:
X Check the starter battery and charge it if necessary (Y page 395).
or
X Jump-start the vehicle (Y page 397).
or
X Consult a qualified specialist workshop. The engine cannot be
started using the Start/
Stop button. The key is in
the vehicle. The vehicle is locked.
X Unlock the vehicle and try to start the vehicle again. The key battery is discharged or nearly discharged.
X Check the key battery (Y page 87) and replace if necessary
(Y page 87).
If this does not work: X Start your vehicle with the key in the ignition lock. There is interference from a powerful source of radio waves.
X Start your vehicle with the key in the ignition lock. You have lost a key. X
Have the key deactivated at a qualified specialist workshop.
X Report the loss immediately to the vehicle insurers.
X If necessary, have the locks changed as well. You have lost the emer-
gency key element. X
Report the loss immediately to the vehicle insurers.
X If necessary, have the locks changed as well. Doors
Important safety notes
G
WARNING
If children are left unsupervised in the vehicle, they can:
R open doors and endanger other persons or
road users
R climb out and be injured by the traffic
R operate vehicle equipment and, for exam-
ple, trap themselves. Children could also set the vehicle in motion,
for example by:
R releasing the parking brake
R shifting the automatic transmission out of
park position P
R starting the engine.
There is a risk of an accident and injury.
When leaving the vehicle, always take the key with you and lock the vehicle. Never leave
children unattended in the vehicle. Always
keep the key out of reach of children.
United Kingdom only: 90
DoorsOpening and closing
Page 110 of 453
Useful information
i This Owner's Manual describes all models,
series and optional equipment for your vehi-
cle that were available at the time of going to
press. National variations are possible. Note
that your vehicle may not be equipped with all
of the functions described. This is also the
case for systems and functions relevant to
safety.
i Read the information on qualified specialist
workshops: (Y page 28). Correct driver's seat position
G
WARNING
You could lose control of the vehicle while
driving if you:
R adjust the driver's seat, steering wheel or
mirrors
R fasten the seat belt
There is a risk of an accident.
Adjust the driver's seat, head restraint, steer-
ing wheel and mirrors and fasten your seat
belt before starting the engine. X
Observe the safety guidelines on seat adjust-
ment (Y page 108).
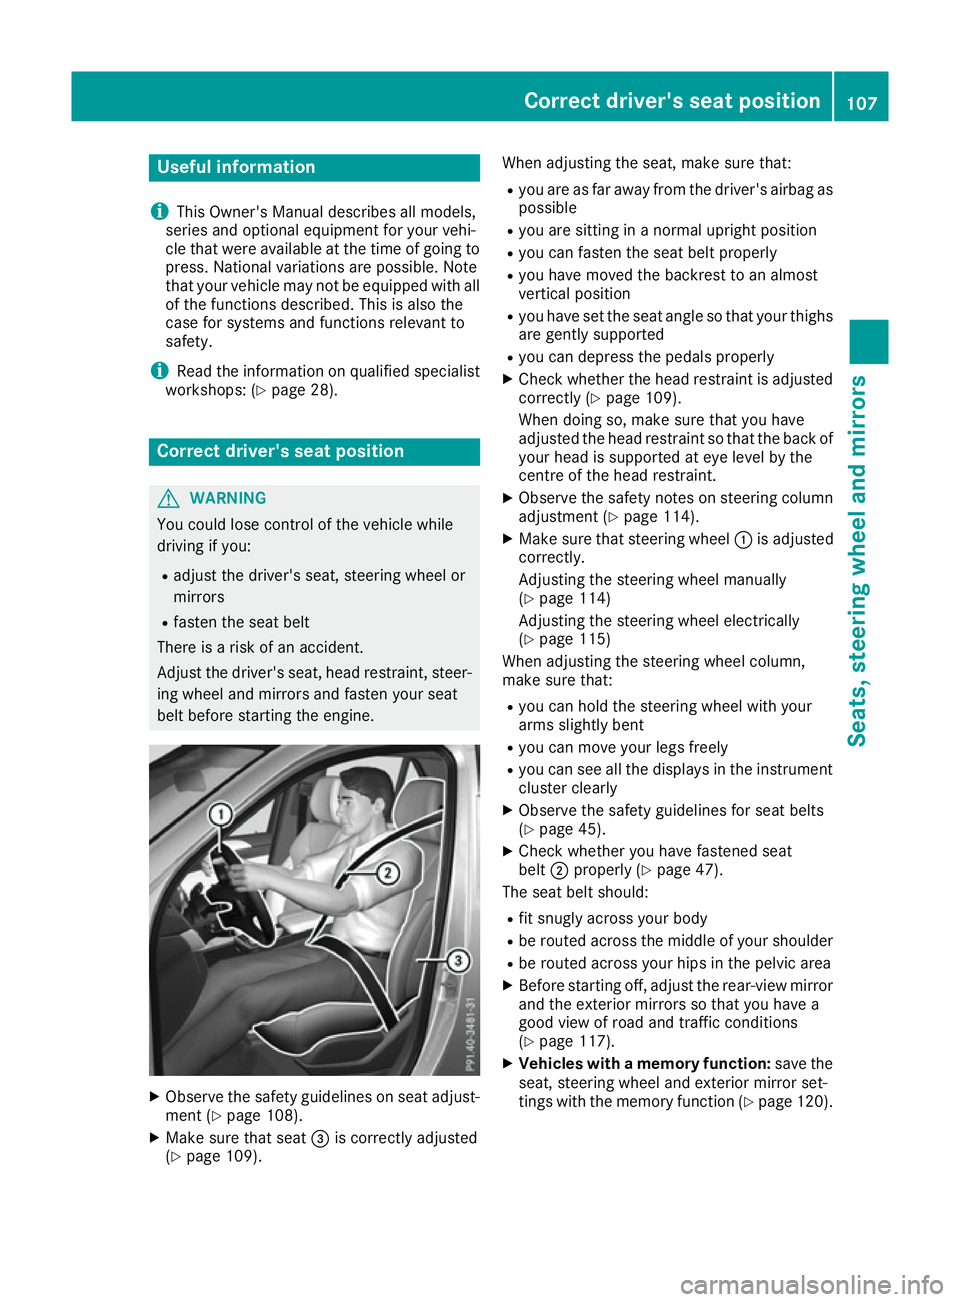
X Make sure that seat =is correctly adjusted
(Y page 109). When adjusting the seat, make sure that:
R you are as far away from the driver's airbag as
possible
R you are sitting in a normal upright position
R you can fasten the seat belt properly
R you have moved the backrest to an almost
vertical position
R you have set the seat angle so that your thighs
are gently supported
R you can depress the pedals properly
X Check whether the head restraint is adjusted
correctly (Y page 109).
When doing so, make sure that you have
adjusted the head restraint so that the back of
your head is supported at eye level by the
centre of the head restraint.
X Observe the safety notes on steering column
adjustment (Y page 114).
X Make sure that steering wheel :is adjusted
correctly.
Adjusting the steering wheel manually
(Y page 114)
Adjusting the steering wheel electrically
(Y page 115)
When adjusting the steering wheel column,
make sure that:
R you can hold the steering wheel with your
arms slightly bent
R you can move your legs freely
R you can see all the displays in the instrument
cluster clearly
X Observe the safety guidelines for seat belts
(Y page 45).
X Check whether you have fastened seat
belt ;properly (Y page 47).
The seat belt should:
R fit snugly across your body
R be routed across the middle of your shoulder
R be routed across your hips in the pelvic area
X Before starting off, adjust the rear-view mirror
and the exterior mirrors so that you have a
good view of road and traffic conditions
(Y page 117).
X Vehicles with a memory function: save the
seat, steering wheel and exterior mirror set-
tings with the memory function (Y page 120). Correct driver's seat position
107Seats, steering wheel and mirrors Z
Page 117 of 453
Problems with the seat ventilation
Problem
Possible causes/consequences and
M
MSolutions The seat ventilation has
switched off prematurely
or cannot be switched
on. The on-board voltage is too low because too many electrical consum-
ers are switched on.
X Switch off electrical consumers that you do not need, such as the
rear window heating or interior lighting.
Once the battery is sufficiently charged, the seat ventilation will
switch back on automatically. Steering wheel
Important safety notes
G
WARNING
You could lose control of the vehicle while
driving if you:
R adjust the driver's seat, steering wheel or
mirrors
R fasten the seat belt
There is a risk of an accident.
Adjust the driver's seat, head restraint, steer-
ing wheel and mirrors and fasten your seat
belt before starting the engine. G
WARNING
Children could become trapped by the steer-
ing wheel if they adjust it. There is a risk of
injury.
When leaving the vehicle, always take the key with you and lock the vehicle. Never leave
children unattended in the vehicle.
The electrically adjustable steering wheel can
still be adjusted when there is no key in the igni-
tion lock. Adjusting the steering wheel man-
ually
G
WARNING
The steering wheel may move unexpectedly if you adjust it while driving. This could cause
you to lose control of the vehicle. There is a
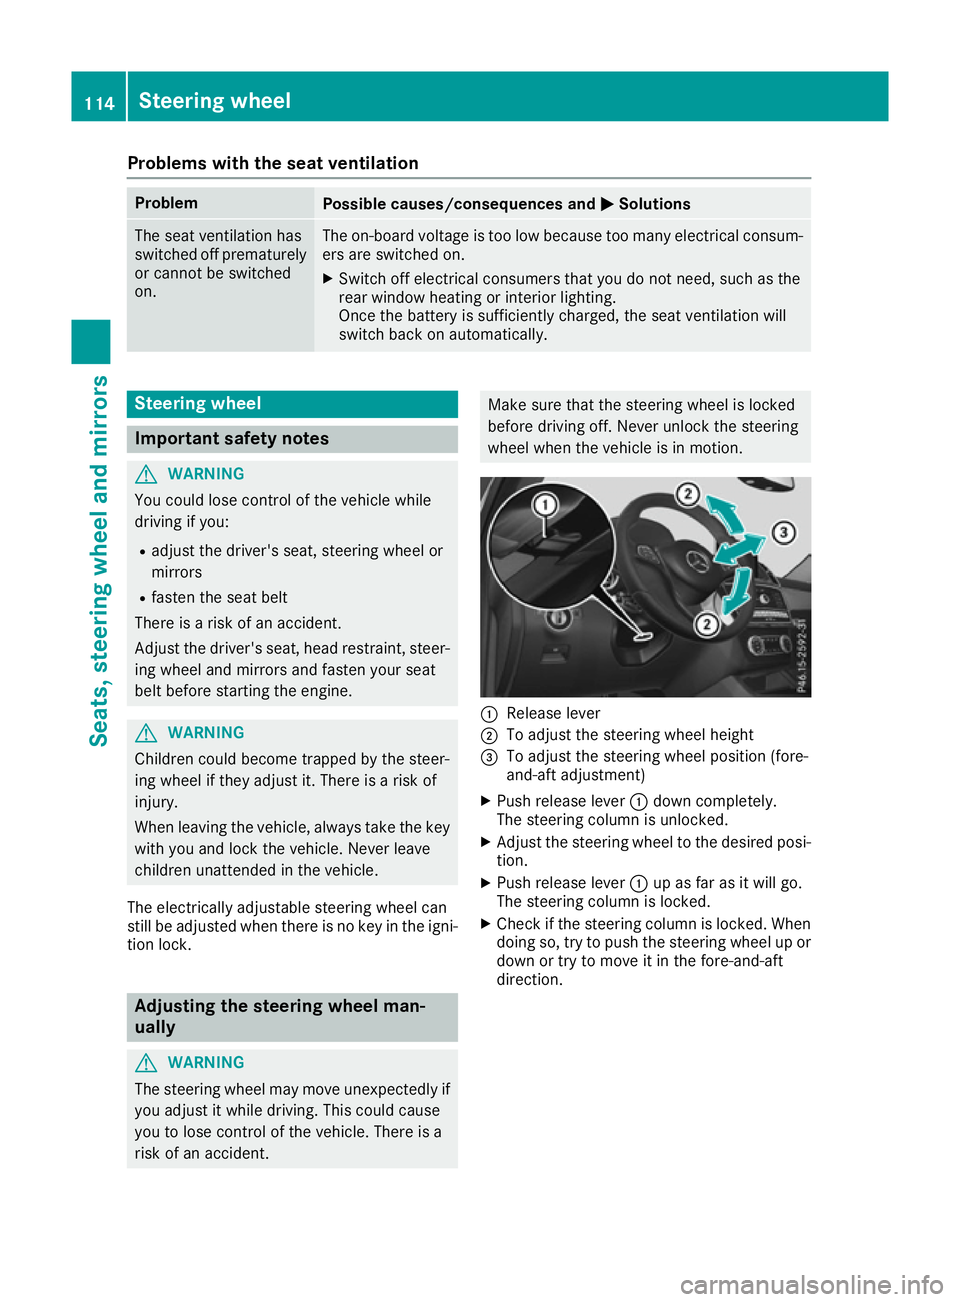
risk of an accident. Make sure that the steering wheel is locked
before driving off. Never unlock the steering
wheel when the vehicle is in motion. :
Release lever
; To adjust the steering wheel height
= To adjust the steering wheel position (fore-
and-aft adjustment)
X Push release lever :down completely.
The steering column is unlocked.
X Adjust the steering wheel to the desired posi-
tion.
X Push release lever :up as far as it will go.
The steering column is locked.
X Check if the steering column is locked. When
doing so, try to push the steering wheel up or
down or try to move it in the fore-and-aft
direction. 114
Steering wheelSeats, steering wheel and mirrors
Page 137 of 453
Problems with the windscreen wipers
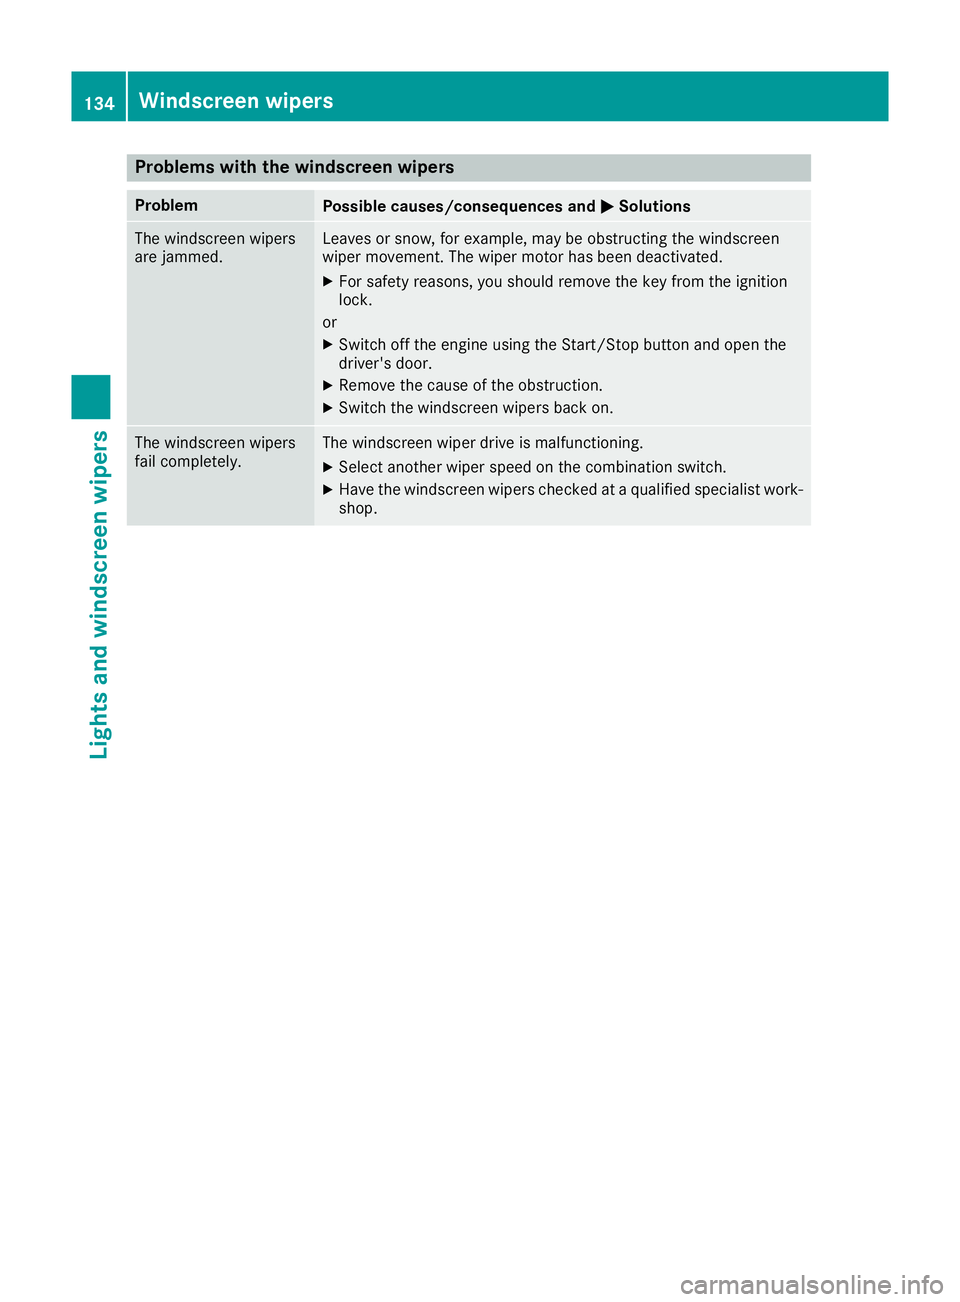
Problem
Possible causes/consequences and
M
MSolutions The windscreen wipers
are jammed. Leaves or snow, for example, may be obstructing the windscreen
wiper movement. The wiper motor has been deactivated.
X For safety reasons, you should remove the key from the ignition
lock.
or X Switch off the engine using the Start/Stop button and open the
driver's door.
X Remove the cause of the obstruction.
X Switch the windscreen wipers back on. The windscreen wipers
fail completely. The windscreen wiper drive is malfunctioning.
X Select another wiper speed on the combination switch.
X Have the windscreen wipers checked at a qualified specialist work-
shop. 134
Windscreen wipersLights and windscreen wipers
Page 163 of 453
Starting the vehicle
Important safety notes G
WARNING
If children are left unsupervised in the vehicle, they can:
R open doors and endanger other persons or
road users
R climb out and be injured by the traffic
R operate vehicle equipment and, for exam-
ple, trap themselves.
Children could also set the vehicle in motion, for example by:
R releasing the parking brake
R shifting the automatic transmission out of
park position P
R starting the engine.
There is a risk of an accident and injury.
When leaving the vehicle, always take the key
with you and lock the vehicle. Never leave
children unattended in the vehicle. Always
keep the key out of reach of children. G
WARNING
Combustion engines emit poisonous exhaust
gases such as carbon monoxide. Inhaling
these exhaust gases leads to poisoning. There is a risk of fatal injury. Therefore never leave
the engine running in enclosed spaces with-
out sufficient ventilation. G
WARNING
Flammable materials introduced through
environmental influence or by animals can
ignite if in contact with the exhaust system or parts of the engine that heat up. There is a risk
of fire.
Carry out regular checks to make sure that
there are no flammable foreign materials in
the engine compartment or in the exhaust
system.
! Do not depress the accelerator when start-
ing the engine. General notes Vehicles with a petrol engine:
the catalytic
converter is preheated for up to 30 seconds
after a cold start. The sound of the engine may
change during this time.
Automatic transmission X
Shift the transmission to position P
(Y page 168).
The transmission position indicator in the
multifunction display shows P(Y page 168).
i You can start the engine in transmission
position Pand N.
Starting procedure with the key X
To start a diesel engine: turn the key to
position 2in the ignition lock (Y page 158).
The % preglow indicator lamp in the instru-
ment cluster lights up.
X Turn the key to position 3in the ignition lock
(Y page 158) and release it as soon as the
engine is running.
i Vehicles with a diesel engine:
you can
start the engine without preglow if the engine
is warm.
Using KEYLESS-GO to start the engine The Start/Stop button can be used to start the
vehicle without inserting the key into the ignition
lock. The key must be in the vehicle and the
Start/Stop button must be inserted in the igni-
tion lock. This mode for starting the engine oper-
ates independently of the ECO start/stop auto- matic engine start function.
X Depress the brake pedal and keep it
depressed.
X Press the Start/Stop button once
(Y page 158).
Vehicles with a petrol engine: the engine
starts.
Vehicles with a diesel engine: preglow is
activated and the engine starts. 160
DrivingDriving and parking
Page 204 of 453
reduce the risk of an accident to yourself and
other road users.
X If the Off-road orOff-road Plus drive pro-
gram is selected: select the Individual,
Sport, Comfort orSlippery drive program
(Y page 166).
X Deactivate the LOW RANGE offroad gear
(Y page 255).
X Deactivate DSR (Y page 252).
X Lower the vehicle level again to a level suita-
ble to the road conditions, e.g. to the normal
level.
X Clean the headlamps and rear lights and
check for damage.
X Clean the front and rear licence plates.
X Clean the wheels and tyres with a water jet
and remove any foreign objects.
X Clean the wheels, wheel arches and the vehi-
cle underside with a water jet; check for any
foreign objects and damage.
X Check whether twigs or other parts of plants
have become trapped. These increase the risk
of fire and can damage fuel pipes, brake
hoses or the rubber bellows of the axle joints
and propeller shafts.
X After the trip, examine without fail the entire
undercarriage, wheels, tyres, brakes, body-
work structure, steering, chassis and exhaust system for damage.
X After driving for extended periods across
sand, mud, gravel, water or in similarly dirty
conditions, have the brake discs, wheels,
brake pads/linings and axle joints checked
and cleaned.
X If you detect strong vibrations after driving
off-road, check for foreign objects in the
wheels and drive train and remove them if
necessary. Foreign objects can disturb the
balance and cause vibrations.
Driving on sand Observe the following rules when driving on
sand:
R Select the Offroaddrive program (vehicles
with Off-Road Engineering package)
(Y page 254).
R Select the Offroaddrive program (vehicles
without Off-Road Engineering package)
(Y page 254).
R Select a higher vehicle level. R
Avoid high engine speeds.
R Use the left-hand steering wheel gearshift
paddle to shift to a lower gear appropriate to the terrain.
R Drive quickly to overcome the rolling resist-
ance. Otherwise, the vehicle could dig itself
into the sand.
R Drive in the tracks of other vehicles if possi-
ble. Make sure that:
- the tyre ruts are not too deep
- the sand is firm enough
- your vehicle has sufficient ground clear-
ance
Tyre ruts and gravel roads !
Check that the ruts are not too deep and
that your vehicle has sufficient clearance.
Otherwise, your vehicle could be damaged or bottom out and get stuck.
Observe the following rules when driving along
ruts in off-road terrain or on roads with loose
gravel: R Select the Offroaddrive program (vehicles
with Off-Road Engineering package)
(Y page 254).
R Select the Offroaddrive program (vehicles
without Off-Road Engineering package)
(Y page 254).
R Select a higher vehicle level.
R Avoid high engine speeds.
R Shift to a lower gear using the left-hand steer-
ing wheel gearshift paddle.
R Drive slowly.
R Where ruts are too deep, drive with the
wheels on one side on the middle section of
turf if possible.
Driving over obstacles !
Obstacles could damage the floor of the
vehicle or components of the chassis. Ask
passengers for guidance when driving over
large obstacles. Any damage to the vehicle
always increases the risk of an accident. Driving tips
201Driving and parking Z
Page 207 of 453
LIM indicator lamp
;on the cruise control lever
indicates which function you have selected:
R LIM indicator lamp ;
;off: cruise control is
selected
R LIM indicator lamp ;
; on: variable SPEED-
TRONIC is selected
When you activate cruise control, the stored
speed is shown in the multifunction display for
five seconds. In addition, the ésymbol
appears in the multifunction display.
Speedometer with segments: when cruise
control is activated, the segments from the
stored speed to the maximum permitted speed
light up.
Selecting cruise control X
Check whether LIM indicator lamp ;is off.
If it is off, cruise control is already selected.
If it is not, press the cruise control lever in the
direction of arrow A.
LIM indicator lamp ;in the cruise control
lever goes out. Cruise control is selected.
Activation conditions To activate cruise control, all of the following
activation conditions must be fulfilled:
R the electric parking brake must be released.
R you are driving faster than 30 km/h.
R ESP ®
must be switched on, but not interven-
ing.
R the transmission must be in position D.
R DSR must be deactivated.
R the Offroad Plus drive program must be deac-
tivated (vehicles with the Off-Road Engineer-
ing package).
R the cruise control function must be selected
(Y page 204).
Storing, maintaining and calling up a
speed Storing and maintaining the speed
X Accelerate the vehicle to the desired speed.
X Briefly press the cruise control lever up :or
down ?.
X Remove your foot from the accelerator pedal.
Cruise control is activated. The vehicle auto-
matically maintains the stored speed. i
Cruise control may be unable to maintain
the stored speed on uphill gradients. The
stored speed is resumed when the gradient
evens out. Cruise control maintains the
stored speed on downhill gradients by auto-
matically braking the vehicle.
Storing or calling up the speed G
WARNING
If you call up a stored speed and this is dif-
ferent from the current speed, the vehicle
accelerates or brakes. If you do not know
what the stored speed is, the vehicle may
accelerate or brake unexpectedly. There is a
risk of an accident.
Take the traffic conditions into account
before calling up the stored speed. If you do
not know what the stored speed is, store the
desired speed again.
X Briefly pull the cruise control lever towards
you =.
X Remove your foot from the accelerator pedal.
Cruise control is on and, when activated for
the first time, accepts the current speed or it
adjusts the vehicle's speed to the speed
stored.
Setting a speed Bear in mind that it may take a brief moment
until the vehicle has accelerated or braked to
the set speed.
X Press the cruise control lever up :for a
higher speed or down ?for a lower speed.
X Keep the cruise control lever pressed until the
desired speed is reached.
X Release the cruise control lever.
The new speed is stored.
X To adjust the set speed in 1 km/h incre-
ments:
briefly press the cruise control lever
up : or down ?to the pressure point.
The last stored speed increases or decreases
in 1 km/h increments.
X To adjust the set speed in 10 km/h incre-
ments: briefly press the cruise control lever
up : or down ?beyond the pressure point.
The last stored speed increases or decreases
in 10 km/h increments. 204
Driving systemsDriving and parking
Page 209 of 453
=
To activate at the current speed/last stored
speed
? To activate or reduce speed
A To switch between cruise control or
DISTRONIC PLUS and variable SPEED-
TRONIC
B To deactivate variable SPEEDTRONIC
With the cruise control lever, you can operate
cruise control or DISTRONIC PLUS and variable
SPEEDTRONIC.
LIM indicator lamp ;on the cruise control lever
indicates which function you have selected:
R LIM indicator lamp ;
; off: cruise control or
DISTRONIC PLUS is selected.
R LIM indicator lamp ; ;on: variable SPEED-
TRONIC is selected.
You can use the cruise control lever to limit the
speed to any speed above 30 km/h while the
engine is running.
Selecting SPEEDTRONIC
If there is a change of drivers, advise the new
driver of the limit speed stored. X Check whether LIM indicator lamp ;is on.
If it is on, variable SPEEDTRONIC is already
selected.
If it is not, press the cruise control lever in the direction of arrow A.
LIM indicator lamp ;in the cruise control
lever is on. Variable SPEEDTRONIC is selec-
ted.
Storing the current speed You can use the cruise control lever to limit the
speed to any speed above 30 km/h while the
engine is running.
X Briefly press the cruise control lever up :or
down ?tippen.
The current speed is stored and shown in the
multifunction display.
Speedometer with segments: the seg-
ments light up from the start of the scale up to
the stored speed limit.
The segments in the multifunction display
light up from the start of the scale up to the
stored speed. Storing the current speed or calling up the
last stored speed G
WARNING
If you call up the stored speed and it is lower
than the current speed, the vehicle deceler-
ates. If you do not know the stored speed, the vehicle could decelerate unexpectedly. There
is a risk of an accident.
Pay attention to the road and traffic condi-
tions before calling up the stored speed. If you do not know the stored speed, store the
desired speed again.
X Briefly pull the cruise control lever towards
you =.
Setting a speed
X To adjust the set speed in 10 km/h incre-
ments: briefly press the cruise control lever
up : beyond the pressure point for a higher
speed, or down ?for a lower speed.
or X Keep the cruise control lever pressed beyond
the pressure point until the desired speed is
set. Press the cruise control lever up :for a
higher speed or down ?for a lower speed.
X To adjust the set speed in 1 km/h incre-
ments:
briefly press the cruise control lever
up : to the pressure point for a higher speed
or down ?for a lower speed.
or X Keep the cruise control lever pressed to the
pressure point until the desired speed is set.
Press the cruise control lever up :for a
higher speed or down ?for a lower speed.
Switching SPEEDTRONIC to passive
If you depress the accelerator pedal beyond the pressure point (kickdown), SPEEDTRONIC is
switched to passive mode. The following mes-
sage appears in the multifunction display:
SPEEDTRONIC passive SPEEDTRONIC passive.
You can then exceed the stored speed. SPEED-
TRONIC is activated again if you:
R drive slower than the stored speed without
kickdown
R set a new speed or
R call up the last speed stored again 206
Driving systemsDriving and parking