2015 MERCEDES-BENZ GLC SUV torque
[x] Cancel search: torquePage 27 of 497
Wheel bolt tightening torque
........... 467
Wheel chock ...................................... 465
Wheels
Changing a wheel .......................... 463
Changing/replacing ....................... 463
Checking ........................................ 455
Cleaning ......................................... 423
Emergency spare wheel ................. 474
Fitting a new wheel ........................ 467
Fitting a wheel .............................. .464
General notes ................................ 468
Important safety notes .................. 454
Information on driving .................... 454
Removing a wheel .......................... 466
Snow chains .................................. 457
Storing .......................................... .464
Tightening torque ........................... 467
Wheel size/tyre size ..................... .468
Windowbag
Display message ............................ 347
Operation ......................................... 56
Windows
Cleaning ......................................... 424
see Side windows
Windscreen
Demisting ...................................... 168
Windscreen washer fluid
see Windscreen washer system
Windscreen washer system
Important safety notes .................. 487
Topping up ..................................... 418
Windscreen wipers
Problem (malfunction) ................... 154
Rear window wiper ........................ 151
Replacing the wiper blades ............ 151
Switching on/off ........................... 150
Winter operation
Important safety notes .................. 456
Radiator cover ............................... 416
Slippery road surfaces ................... 226
Snow chains .................................. 457
Summer tyres ................................ 456
Winter tyres
Limiting the speed (on-board com-
puter) ............................................. 333
M+S tyres ...................................... 456
Wiper blades
Cleaning ......................................... 424 Important safety notes .................. 151
Replacing ....................................... 151
Replacing (on the rear window) ..... 153
Replacing (windscreen) .................. 151
Wooden trim (cleaning instruc-
tions) ................................................. .427 24
Index
Page 88 of 497
If ESP
®
detects that the vehicle is deviating
from the direction desired by the driver, one
or more wheels are braked to stabilise the
vehicle. The engine output is also modified to keep the vehicle on the desired course within
physical limits. ESP ®
assists the driver when
pulling away on wet or slippery roads. ESP ®
can also stabilise the vehicle during braking.
4ETS (Electronic Traction System) i
Observe the "Important safety notes" sec-
tion (Y page 78).
4ETS traction control is part of ESP ®
.
Traction control brakes the drive wheels indi-
vidually if they spin. This enables you to pull
away and accelerate on slippery surfaces, for
example if the road surface is slippery on one
side. In addition, more drive torque is trans-
ferred to the wheel or wheels with traction.
Traction control remains active if you deacti-
vate ESP ®
.
Off-road 4ETS (Electronic Traction Sys-
tem) A 4ETS system specifically suited to off-road
terrain is activated automatically once the off- road program is activated (Y page 250).
Off-road ESP ® An ESP
®
system specifically suited to off-road
terrain is activated automatically once the off-
road program is activated (Y page 250).
The off-road ESP ®
intervenes with a delay if
there is oversteering or understeering, thus
improving traction.
Important safety notes i
Observe the "Important safety notes" sec-
tion (Y page 78). G
WARNING
If ESP ®
is malfunctioning, ESP ®
is unable to
stabilise the vehicle. In addition, other driving safety systems are switched off. This increa-
ses the risk of skidding and an accident.
Drive on carefully. Have ESP
®
checked at a
qualified specialist workshop.
If the å ESP®
OFF warning lamp lights up
continuously, ESP ®
is deactivated.
If the ÷ ESP®
warning lamp lights up con-
tinuously, ESP ®
is not available due to a mal-
function.
Observe the information on warning lamps
(Y page 381) and display messages which
may be shown in the instrument cluster
(Y page 336).
Only use wheels with the recommended tyre
sizes. Only then will ESP ®
function properly.
Characteristics of ESP ® General notes
If the
÷ ESP warning lamp goes out before
beginning the journey, ESP ®
is automatically
active.
If ESP ®
intervenes, the ÷ESP®
warning
lamp flashes in the instrument cluster.
If ESP ®
intervenes:
X Do not deactivate ESP ®
under any circum-
stances.
X When pulling away, only depress the accel-
erator pedal as far as is necessary.
X Adapt your driving style to suit the prevail-
ing road and weather conditions.
ECO start/stop function
The ECO start/stop function switches the
engine off automatically if the vehicle stops
moving. When pulling away again, the engine starts automatically. ESP ®
remains in its pre-
viously selected status. Example:if ESP®
was deactivated before the engine was
switched off, ESP ®
remains deactivated when
the engine is switched on again. Driving safety systems
85Safety Z
Page 89 of 497
Deactivating/activating ESP
®Important safety notes
i Observe the "Important safety notes" sec-
tion (Y page 78).
You can select between the following sta-
tuses of ESP ®
:
R ESP ®
is activated
R ESP ®
is deactivated G
WARNING
If you deactivate ESP ®
, ESP ®
no longer sta-
bilises the vehicle. There is an increased risk
of skidding and an accident.
Only deactivate ESP ®
in the situations descri-
bed in the following.
It may be best to deactivate ESP ®
in the fol-
lowing situations:
R when using snow chains
R in deep snow
R on sand or gravel
R when driving off-road (vehicles without off-
road program)
Activate ESP ®
as soon as the situations
described above no longer apply. ESP ®
will
otherwise not be able to stabilise the vehicle if the vehicle starts to skid or a wheel starts to
spin.
Deactivating/activating ESP ®X
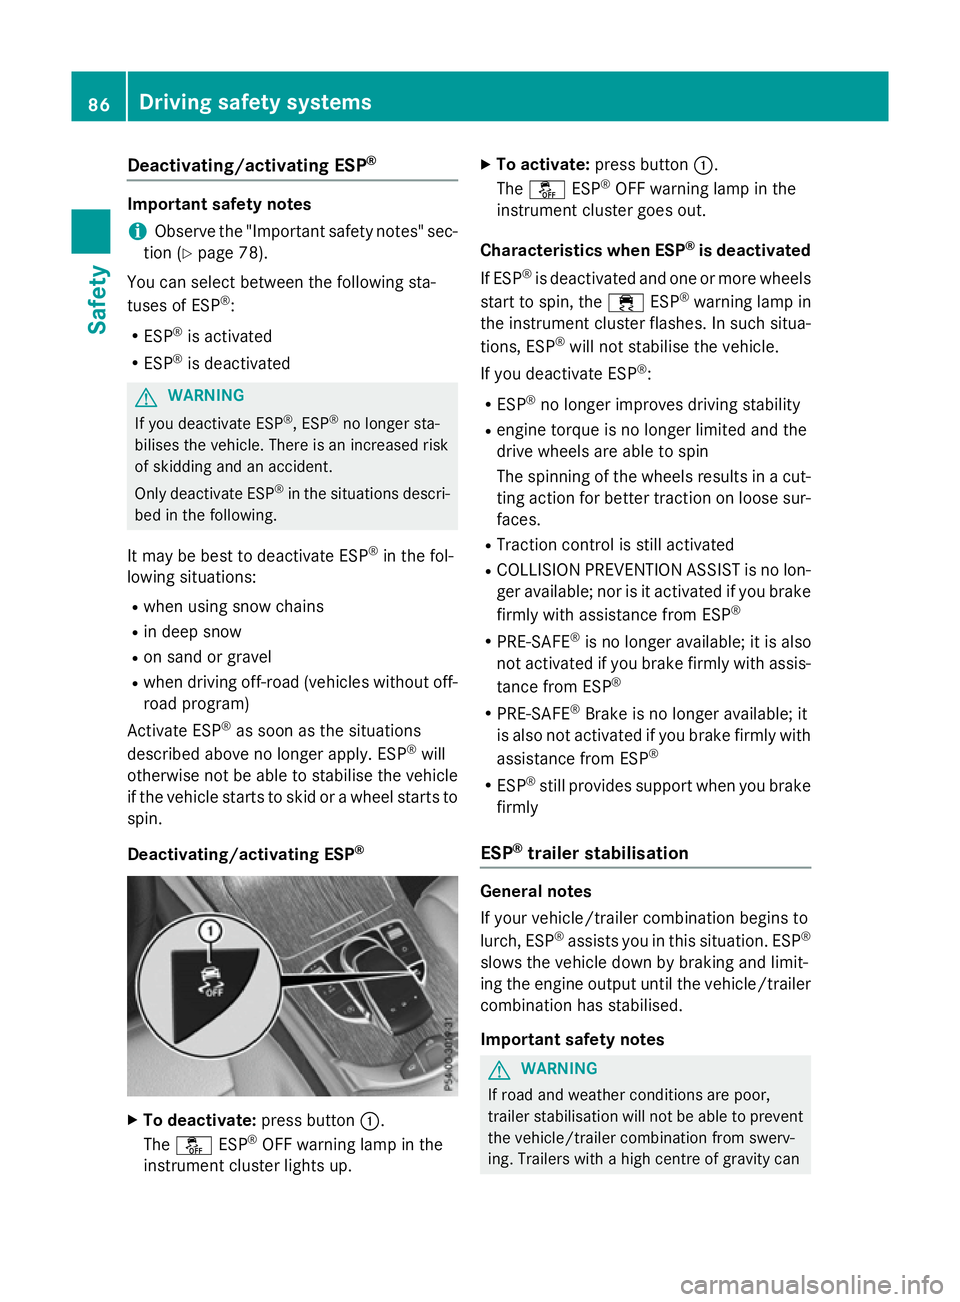
To deactivate: press button:.
The å ESP®
OFF warning lamp in the
instrument cluster lights up. X
To activate: press button :.
The å ESP®
OFF warning lamp in the
instrument cluster goes out.
Characteristics when ESP ®
is deactivated
If ESP ®
is deactivated and one or more wheels
start to spin, the ÷ESP®
warning lamp in
the instrument cluster flashes. In such situa-
tions, ESP ®
will not stabilise the vehicle.
If you deactivate ESP ®
:
R ESP ®
no longer improves driving stability
R engine torque is no longer limited and the
drive wheels are able to spin
The spinning of the wheels results in a cut-
ting action for better traction on loose sur- faces.
R Traction control is still activated
R COLLISION PREVENTION ASSIST is no lon-
ger available; nor is it activated if you brake
firmly with assistance from ESP ®
R PRE-SAFE ®
is no longer available; it is also
not activated if you brake firmly with assis-
tance from ESP ®
R PRE-SAFE ®
Brake is no longer available; it
is also not activated if you brake firmly with
assistance from ESP ®
R ESP ®
still provides support when you brake
firmly
ESP ®
trailer stabilisation General notes
If your vehicle/trailer combination begins to
lurch, ESP
®
assists you in this situation. ESP ®
slows the vehicle down by braking and limit-
ing the engine output until the vehicle/trailer combination has stabilised.
Important safety notes G
WARNING
If road and weather conditions are poor,
trailer stabilisation will not be able to prevent the vehicle/trailer combination from swerv-
ing. Trailers with a high centre of gravity can 86
Driving safety syste
msSafety
Page 292 of 497
Instrument cluster
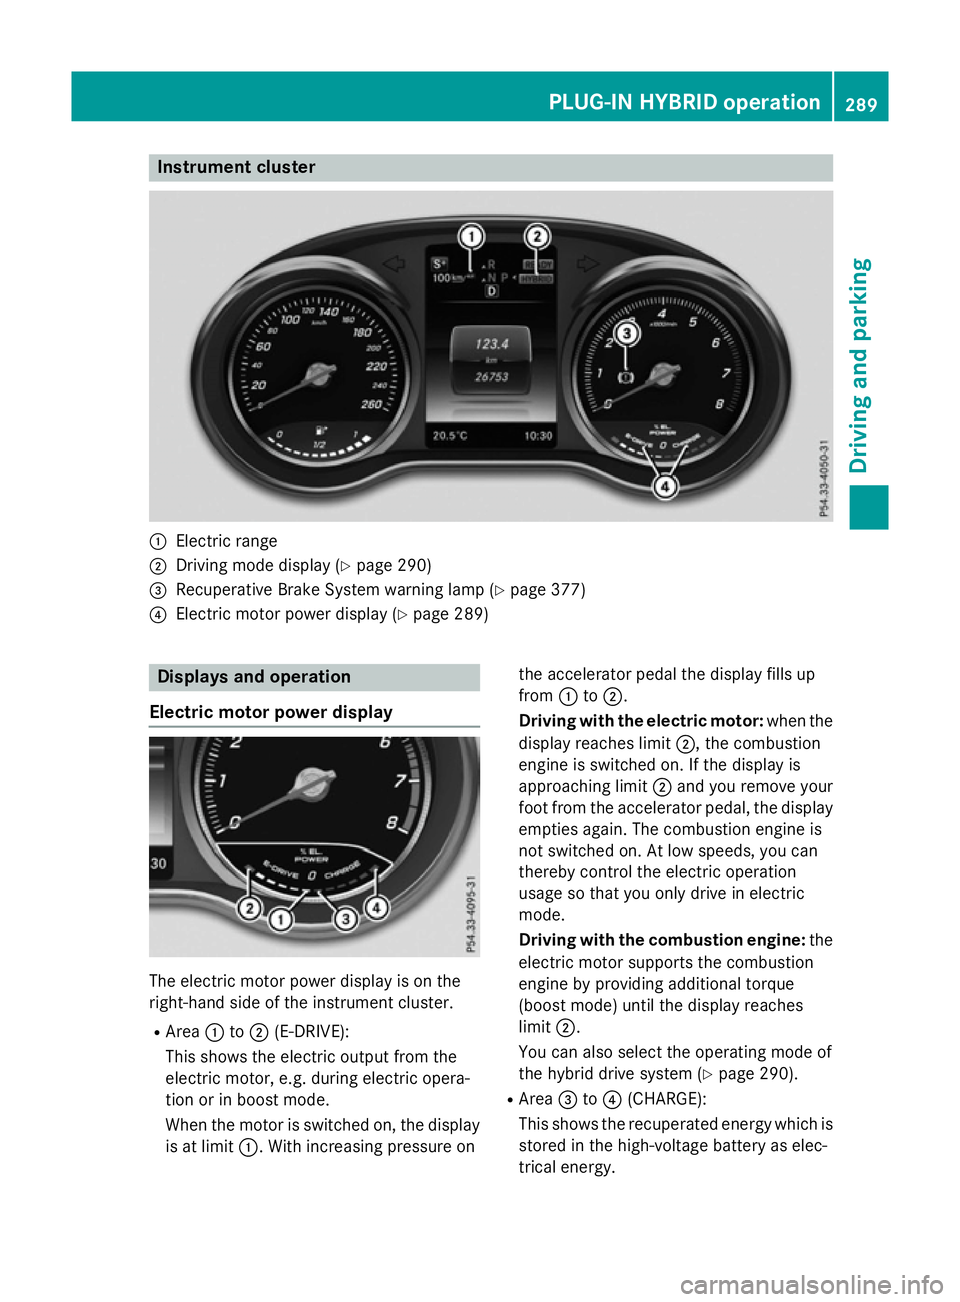
:
Electric range
; Driving mode display (Y page 290)
= Recuperative Brake System warning lamp (Y page 377)
? Electric motor power display (Y page 289)Displays and operation
Electric motor power display The electric motor power display is on the
right-hand side of the instrument cluster.
R Area :to; (E-DRIVE):
This shows the electric output from the
electric motor, e.g. during electric opera-
tion or in boost mode.
When the motor is switched on, the display
is at limit :. With increasing pressure on the accelerator pedal the display fills up
from
:to;.
Driving with the electric motor: when the
display reaches limit ;, the combustion
engine is switched on. If the display is
approaching limit ;and you remove your
foot from the accelerator pedal, the display
empties again. The combustion engine is
not switched on. At low speeds, you can
thereby control the electric operation
usage so that you only drive in electric
mode.
Driving with the combustion engine: the
electric motor supports the combustion
engine by providing additional torque
(boost mode) until the display reaches
limit ;.
You can also select the operating mode of
the hybrid drive system (Y page 290).
R Area =to? (CHARGE):
This shows the recuperated energy which is stored in the high-voltage battery as elec-
trical energy. PLUG
‑IN HYBRID operation
289Driving and parking Z
Page 296 of 497
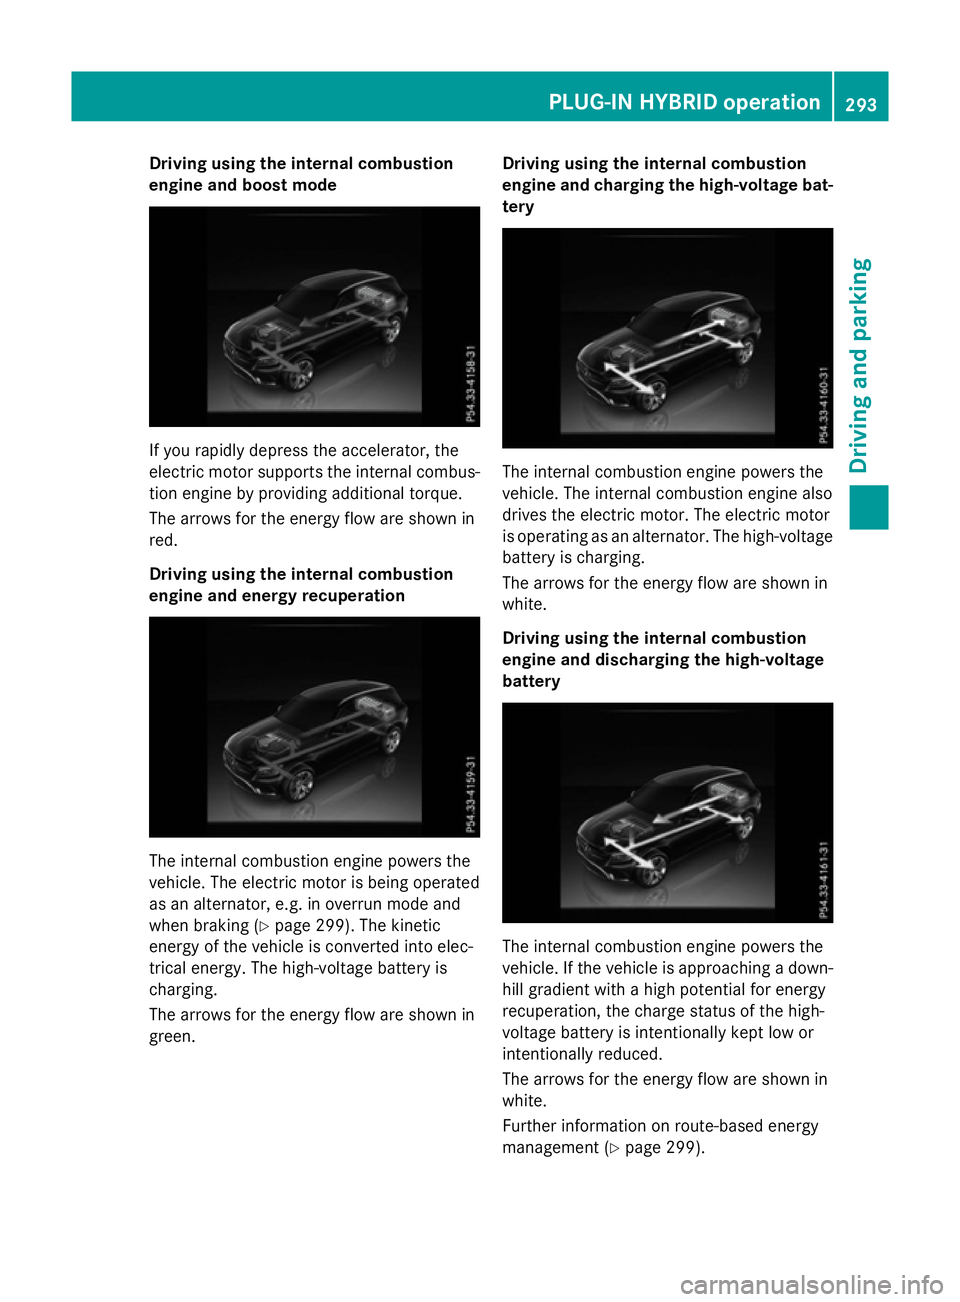
Driving using the internal combustion
engine and boost mode If you rapidly depress the accelerator, the
electric motor supports the internal combus-
tion engine by providing additional torque.
The arrows for the energy flow are shown in
red.
Driving using the internal combustion
engine and energy recuperation The internal combustion engine powers the
vehicle. The electric motor is being operated
as an alternator, e.g. in overrun mode and
when braking (Y page 299). The kinetic
energy of the vehicle is converted into elec-
trical energy. The high-voltage battery is
charging.
The arrows for the energy flow are shown in
green. Driving using the internal combustion
engine and charging the high-voltage bat-
tery The internal combustion engine powers the
vehicle. The internal combustion engine also
drives the electric motor. The electric motor
is operating as an alternator. The high-voltage battery is charging.
The arrows for the energy flow are shown in
white.
Driving using the internal combustion
engine and discharging the high-voltage
battery The internal combustion engine powers the
vehicle. If the vehicle is approaching a down-
hill gradient with a high potential for energy
recuperation, the charge status of the high-
voltage battery is intentionally kept low or
intentionally reduced.
The arrows for the energy flow are shown in
white.
Further information on route-based energy
management (Y page 299). PLUG
‑IN HYBRID operation
293Driving and parking Z
Page 301 of 497
engine by providing additional torque when
the accelerator is depressed rapidly.
Overrun mode or braking
There are three possible operating modes
when the hybrid vehicle is decelerating:
R When coasting and decelerating, energy
recuperation is already taking place
(Y page 287). The electric motor functions
as an alternator and stores the recuperated energy in the high-voltage battery.
R When braking gently, the electric motor
increases the deceleration of the vehicle.
Energy recuperation is increased
(Y page 287). The electric motor functions
as an alternator and stores the recuperated energy in the high-voltage battery.
R During heavy braking, the service brake is
also used to slow down the vehicle. Both
systems work together.
Driving in the city
Energy is recuperated during frequent decel-
eration and stopping in city traffic.
The vehicle can be driven by the electric
motor alone up to a speed of approximately
140 km/h.
The vehicle is driven by the electric motor
alone only when all conditions for the auto-
matic engine switch-off are fulfilled.
Further information on the automatic engine
switch-off (Y page 298).
Driving on inter-urban roads
The following phases are possible when driv-
ing on inter-urban roads:
R rapid acceleration (boost mode)
R constant energy consumption
R energy recuperation
R electric operation mode
Depending on the characteristics of the
route, there may be a lot of recuperated
energy available. This reduces consumption
and emissions. Driving on the motorway
When driving on a motorway, the decrease in
wasted power has a particularly positive
effect on fuel consumption and emissions.
If the driver removes his foot from the accel-
erator pedal in drive program Eand a speed of
160 km/h is not exceeded, the combustion
engine is automatically switched off.
Further information on the automatic engine
switch-off (Y page 298).
ECO start/stop function General notes
The ECO start/stop function switches the
internal combustion engine off automatically
when the vehicle stops moving and at high
speeds (Y page 299).
All vehicle systems remain active, e.g. the
automatic climate control.
The ECO start/stop function is only available in drive programs Cand E. Electric-only oper-
ation is only possible in drive programs Cand
E. Additional information for drive programs
(Y page 295).
Automatic engine switch-off
The internal combustion engine is switched
off automatically if:
R the driver removes his foot from the accel-
erator in drive program Eand a speed of
160 km/h is not exceeded (Y page 299)
R the internal combustion engine has
reached its operating temperature
R the driver's seat belt is fastened and the
driver's door is closed
R the driver only slightly depresses the accel-
erator pedal in order to, for example, main- tain the current speed for a limited distance
R the bonnet is closed and engaged properly
R the high-voltage battery is charged suffi-
ciently
R no malfunctions are present in the hybrid
drive system 298
PLUG‑IN HYBRID operationDriving and parking
Page 470 of 497
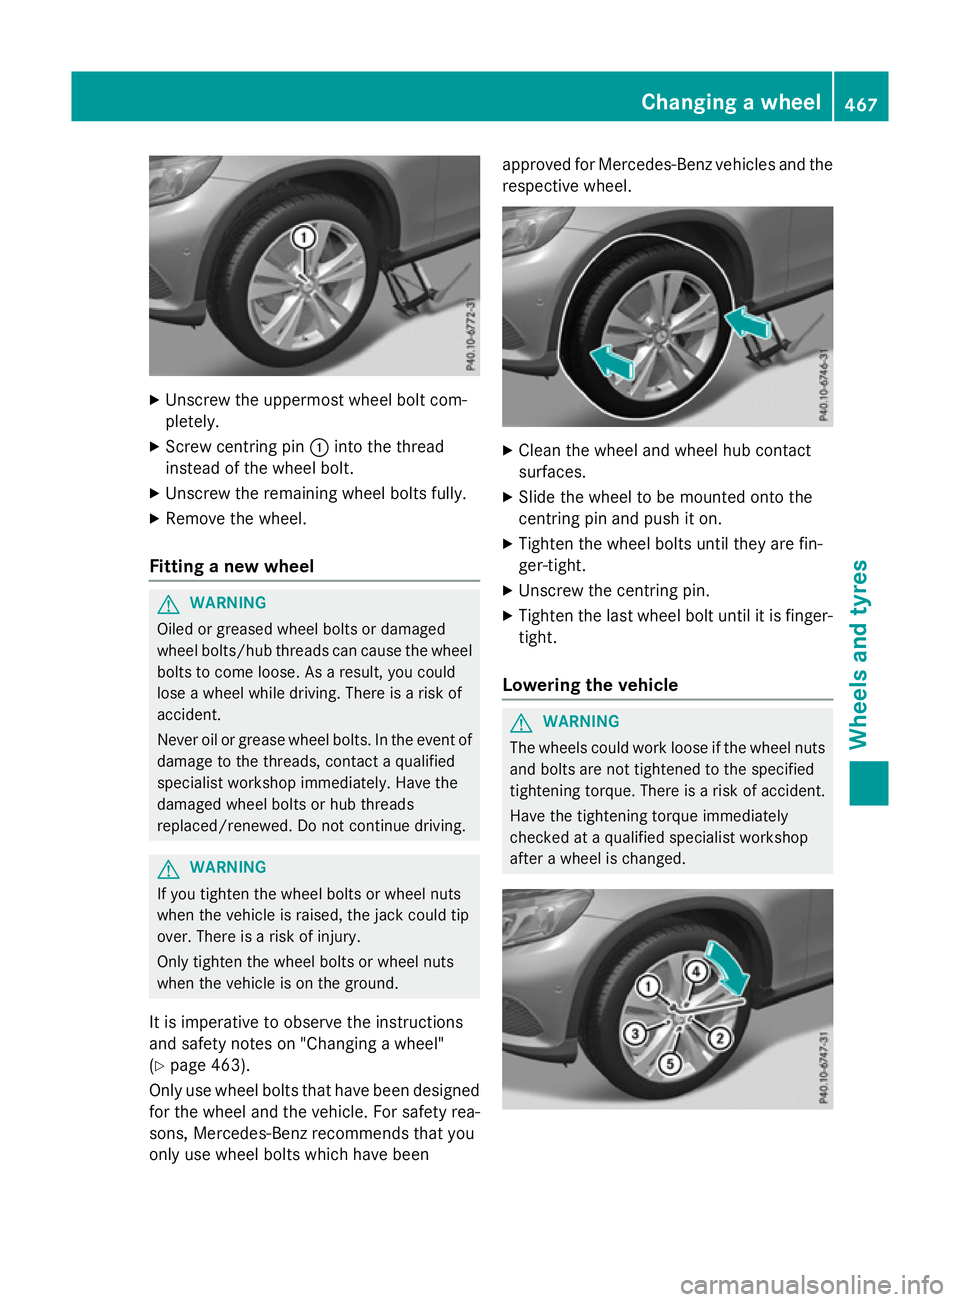
X
Unscrew the uppermost wheel bolt com-
pletely.
X Screw centring pin :into the thread
instead of the wheel bolt.
X Unscrew the remaining wheel bolts fully.
X Remove the wheel.
Fitting a new wheel G
WARNING
Oiled or greased wheel bolts or damaged
wheel bolts/hub threads can cause the wheel bolts to come loose. As a result, you could
lose a wheel while driving. There is a risk of
accident.
Never oil or grease wheel bolts. In the event ofdamage to the threads, contact a qualified
specialist workshop immediately. Have the
damaged wheel bolts or hub threads
replaced/renewed. Do not continue driving. G
WARNING
If you tighten the wheel bolts or wheel nuts
when the vehicle is raised, the jack could tip
over. There is a risk of injury.
Only tighten the wheel bolts or wheel nuts
when the vehicle is on the ground.
It is imperative to observe the instructions
and safety notes on "Changing a wheel"
(Y page 463).
Only use wheel bolts that have been designed
for the wheel and the vehicle. For safety rea-
sons, Mercedes-Benz recommends that you
only use wheel bolts which have been approved for Mercedes-Benz vehicles and the
respective wheel. X
Clean the wheel and wheel hub contact
surfaces.
X Slide the wheel to be mounted onto the
centring pin and push it on.
X Tighten the wheel bolts until they are fin-
ger-tight.
X Unscrew the centring pin.
X Tighten the last wheel bolt until it is finger-
tight.
Lowering the vehicle G
WARNING
The wheels could work loose if the wheel nuts and bolts are not tightened to the specified
tightening torque. There is a risk of accident.
Have the tightening torque immediately
checked at a qualified specialist workshop
after a wheel is changed. Changing a wheel
467Wheels and tyres Z
Page 471 of 497
X
Turn the crank of the jack anti-clockwise
until the vehicle is once again standing
firmly on the ground.
X Place the jack to one side.
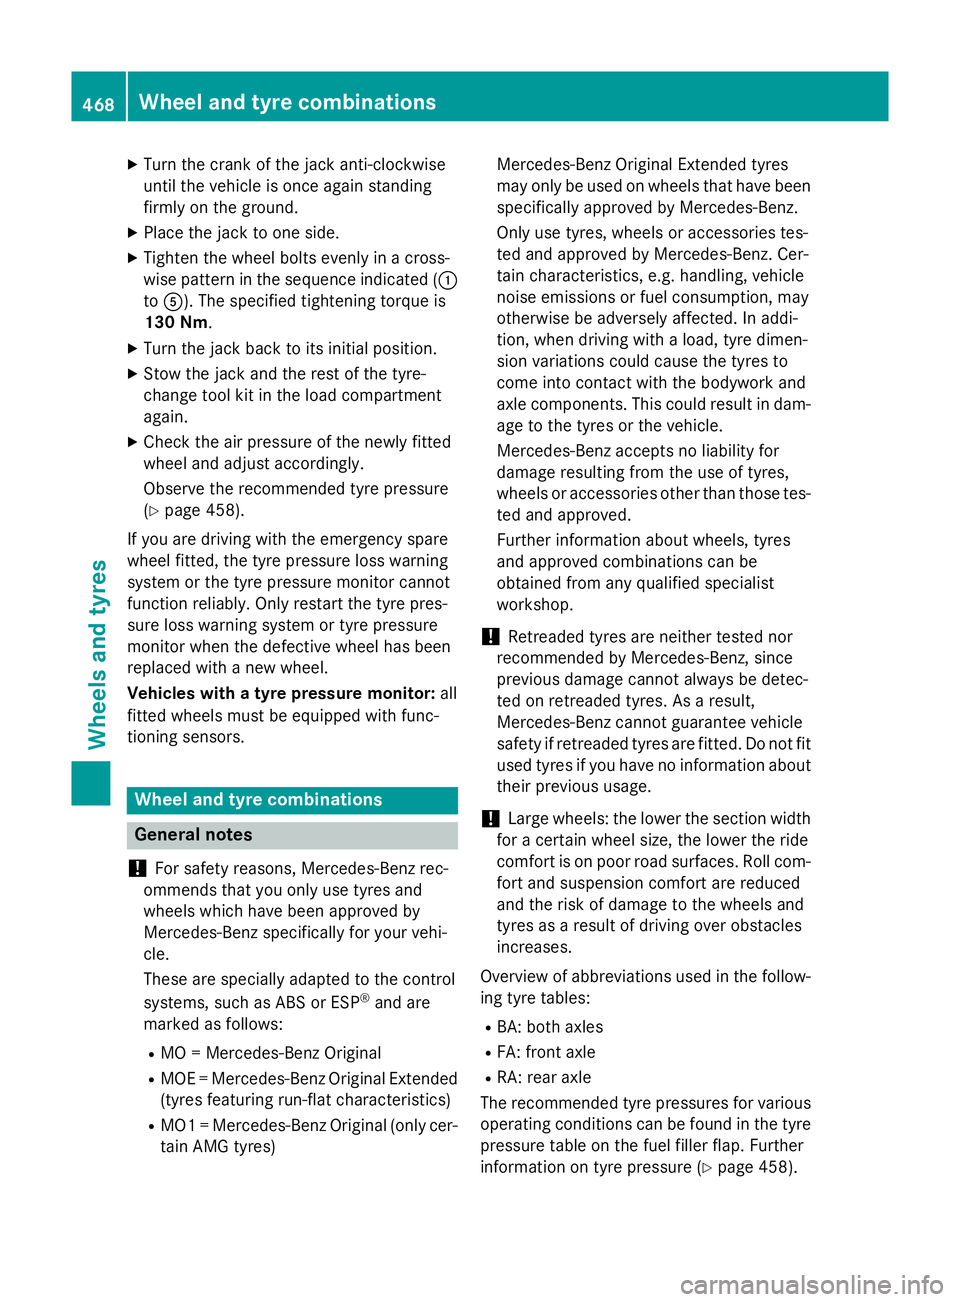
X Tighten the wheel bolts evenly in a cross-
wise pattern in the sequence indicated ( :
to A). The specified tightening torque is
130 Nm.
X Turn the jack back to its initial position.
X Stow the jack and the rest of the tyre-
change tool kit in the load compartment
again.
X Check the air pressure of the newly fitted
wheel and adjust accordingly.
Observe the recommended tyre pressure
(Y page 458).
If you are driving with the emergency spare
wheel fitted, the tyre pressure loss warning
system or the tyre pressure monitor cannot
function reliably. Only restart the tyre pres-
sure loss warning system or tyre pressure
monitor when the defective wheel has been
replaced with a new wheel.
Vehicles with a tyre pressure monitor: all
fitted wheels must be equipped with func-
tioning sensors. Wheel and tyre combinations
General notes
! For safety reasons, Mercedes-Benz rec-
ommends that you only use tyres and
wheels which have been approved by
Mercedes-Benz specifically for your vehi-
cle.
These are specially adapted to the control
systems, such as ABS or ESP ®
and are
marked as follows:
R MO = Mercedes-Benz Original
R MOE = Mercedes-Benz Original Extended
(tyres featuring run-flat characteristics)
R MO1 = Mercedes-Benz Original (only cer-
tain AMG tyres) Mercedes-Benz Original Extended tyres
may only be used on wheels that have been
specifically approved by Mercedes-Benz.
Only use tyres, wheels or accessories tes-
ted and approved by Mercedes-Benz. Cer-
tain characteristics, e.g. handling, vehicle
noise emissions or fuel consumption, may
otherwise be adversely affected. In addi-
tion, when driving with a load, tyre dimen-
sion variations could cause the tyres to
come into contact with the bodywork and
axle components. This could result in dam- age to the tyres or the vehicle.
Mercedes-Benz accepts no liability for
damage resulting from the use of tyres,
wheels or accessories other than those tes-
ted and approved.
Further information about wheels, tyres
and approved combinations can be
obtained from any qualified specialist
workshop.
! Retreaded tyres are neither tested nor
recommended by Mercedes-Benz, since
previous damage cannot always be detec-
ted on retreaded tyres. As a result,
Mercedes-Benz cannot guarantee vehicle
safety if retreaded tyres are fitted. Do not fit
used tyres if you have no information about their previous usage.
! Large wheels: the lower the section width
for a certain wheel size, the lower the ride
comfort is on poor road surfaces. Roll com-
fort and suspension comfort are reduced
and the risk of damage to the wheels and
tyres as a result of driving over obstacles
increases.
Overview of abbreviations used in the follow- ing tyre tables:
R BA: both axles
R FA: front axle
R RA: rear axle
The recommended tyre pressures for various
operating conditions can be found in the tyre pressure table on the fuel filler flap. Further
information on tyre pressure (Y page 458).468
Wheel and tyre combinationsWheels and tyres