2015 MERCEDES-BENZ GLC SUV wheel
[x] Cancel search: wheelPage 180 of 497
When the vehicle is heated, the following
functions are activated as needed:
R Automatic climate control
R Blower
R Seat heating
R Steering wheel heating
R Exterior mirror heating
R Rear window heating
If you have switched on the perfume atomiser or ionisation using Audio 20 or COMAND
Online, these will be activated together with
"Pre-entry climate control at departure time".
Activating the perfume atomiser or ionisation (see separate operating instructions).
Setting the departure time You can set the departure time using the on-
board computer or via the Mercedes connect
me web App. The activation of the "Pre-entry climate control at departure time" function
can be linked to this departure time. Your
vehicle will then be cooled or heated until the desired temperature is reached in time for the
set departure time. "Pre-entry climate control at departure time" will be activated a maxi-
mum of 55 minutes before departure. If the
departure is delayed, the vehicle will be
heated or cooled for a further five minutes.
X To set the departure time: set the depar-
ture time using the on-board computer
(Y page 330). Set the departure time using
the Mercedes connect me web App:
http://www.mercedes.me.
X To activate or deactivate "Pre-entry cli-
mate control at departure time": acti-
vate and deactivate "Pre-entry climate con- trol at departure time" using Audio 20 or
COMAND Online (see separate operating
instructions). Activate or deactivate "Pre-
entry climate control at departure time"
using the Mercedes connect me web App:
http://www.mercedes.me.
When activating the "Pre-entry climate con-
trol at departure time" function: you can
select whether only the driver's area or also the front-passenger area should be heated or
cooled.
The "Pre-entry climate control at departure
time" function is automatically deactivated
when the vehicle is started. The following
functions remain active:
R Seat heating
R Seat ventilation
R Steering wheel heating
R Perfume atomiser
R Ionisation
To deactivate "Pre-entry climate control
at departure time": the activated "Pre-entry
climate control at departure time" can be
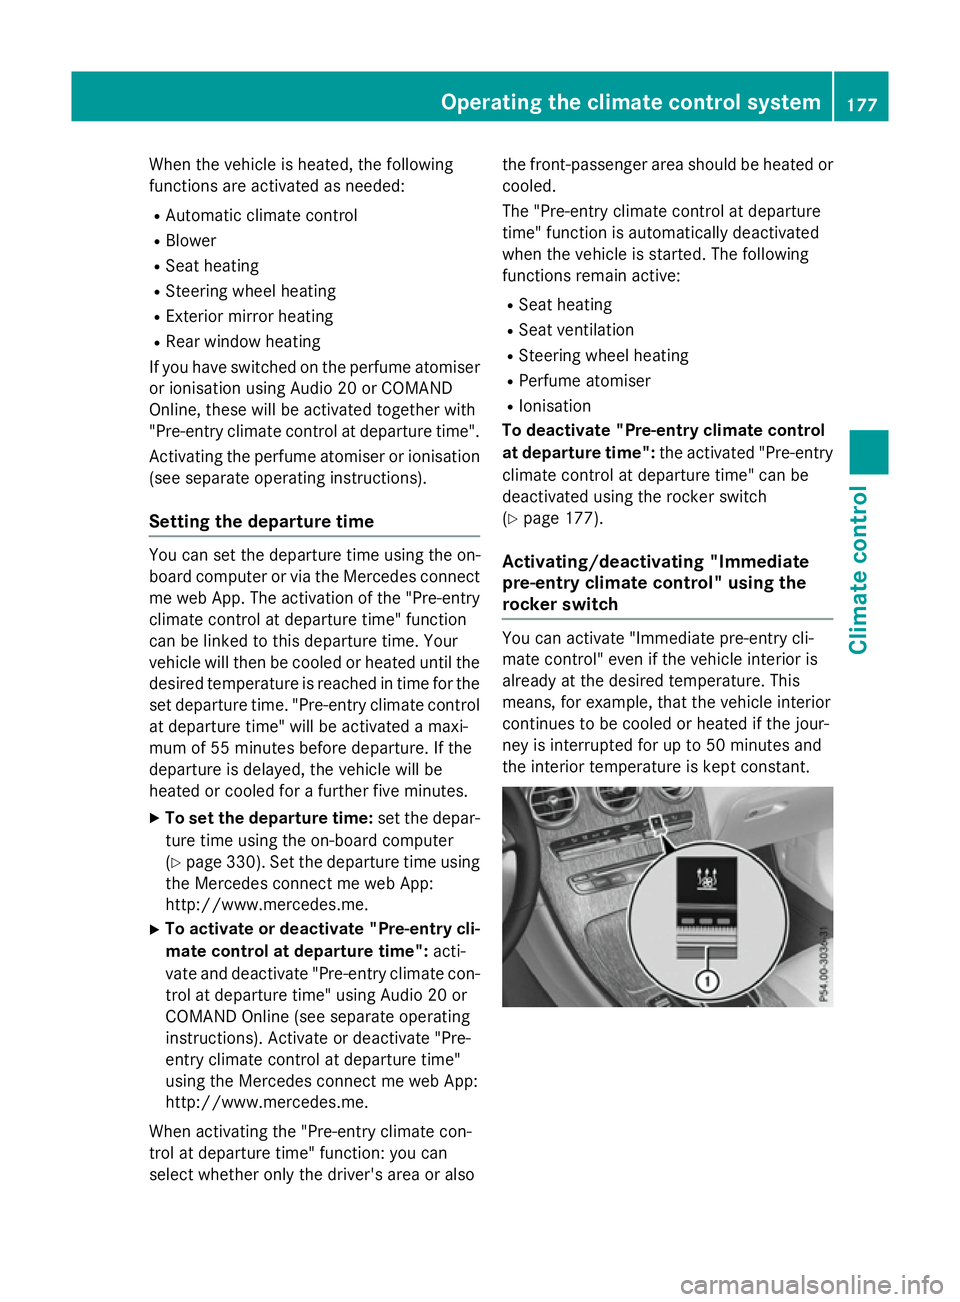
deactivated using the rocker switch
(Y page 177).
Activating/deactivating "Immediate
pre-entry climate control" using the
rocker switch You can activate "Immediate pre-entry cli-
mate control" even if the vehicle interior is
already at the desired temperature. This
means, for example, that the vehicle interior
continues to be cooled or heated if the jour-
ney is interrupted for up to 50 minutes and
the interior temperature is kept constant. Operating the climate control system
177Climate control Z
Page 181 of 497
X
To activate or deactivate "Immediate
pre-entry climate control": press rocker
switch :up or down.
The blue or red indicator lamp above the
rocker switch lights up or goes out.
The colours of the indicator lamps in rocker
switch :have the following meanings:
R blue: cooling activated
R red: heating activated
R yellow: departure time is preselected Auxiliary heating
Important safety notes G
DANGER
If the exhaust pipe is blocked or sufficient
ventilation is not possible, toxic exhaust
fumes can enter the vehicle, especially car-
bon monoxide. This is the case, e.g. in
enclosed spaces, or if the vehicle is stuck in
snow. There is a risk of fatal injuries.
You should switch off the auxiliary heating in
enclosed spaces which do not have an extrac- tion system, e.g. a garage. If the vehicle is
stuck in snow and you must leave the auxiliary
heating running, keep the exhaust pipe and
the area around the vehicle clear of snow. To guarantee a sufficient supply of fresh air, open
a window on the side of the vehicle away from the wind. G
WARNING
When the auxiliary heating is switched on,
parts of the vehicle can become very hot.
Flammable materials such as leaves, grass or twigs may ignite if they come into contact
with:
R hot parts of the exhaust system
R the exhaust gas itself
There is a risk of fire. When the auxiliary heating is switched on,
make sure that:
R no flammable materials come into contact
with hot vehicle components
R the exhaust gas can escape from the
exhaust pipe unhindered
R the exhaust gas does not come into contact
with flammable materials.
The auxiliary heating is fitted under the front
wing on the right-hand side of the vehicle. The emissions outlet is found behind the front
wheel on the right-hand side of the vehicle.
! Operating the auxiliary heating/ventila-
tion draws on the vehicle battery. After you have heated or ventilated the vehicle a
maximum of two times, drive for a longer
distance.
Switch the auxiliary heating on regularly once a month for about ten minutes.
The auxiliary heating heats the air in the vehi-
cle interior to the set temperature. This
occurs without using the heat of the running
engine. The auxiliary heating is operated
directly using the vehicle's fuel. For this rea-
son, the tank content must be at least at
reserve fuel level to ensure that the auxiliary
heating functions.
The auxiliary heating or auxiliary ventilation
automatically adjusts to changes in temper-
ature and weather conditions. For this rea-
son, the auxiliary heating could switch from
ventilation mode to heating mode or from
heating mode to ventilation mode.
The auxiliary heating switches off when the
engine is switched off. The auxiliary ventila-
tion is not active if the engine is running.
The auxiliary heating or auxiliary ventilation
switches off automatically after 50 minutes.
This time limit can be altered. To do this, visit a qualified specialist workshop.
You cannot use the auxiliary ventilation to
cool the vehicle interior to a temperature
lower than the outside temperature. 178
Operating the climate control systemClimate control
Page 187 of 497
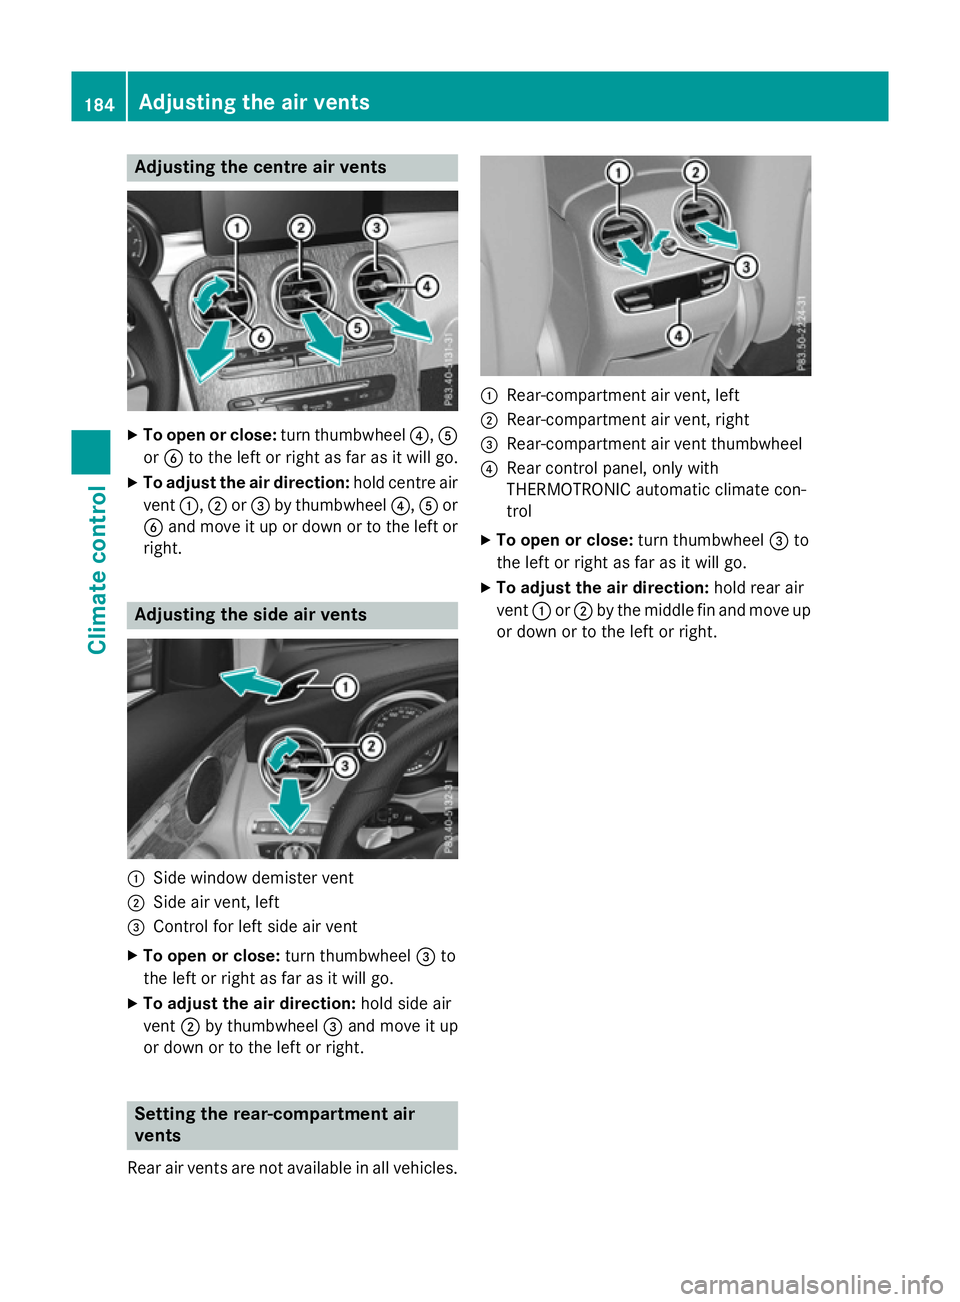
Adjusting the centre air vents
X
To open or close: turn thumbwheel?,A
or B to the left or right as far as it will go.
X To adjust the air direction: hold centre air
vent :,;or= by thumbwheel ?,Aor
B and move it up or down or to the left or
right. Adjusting the side air vents
:
Side window demister vent
; Side air vent, left
= Control for left side air vent
X To open or close: turn thumbwheel=to
the left or right as far as it will go.
X To adjust the air direction: hold side air
vent ;by thumbwheel =and move it up
or down or to the left or right. Setting the rear-compartment air
vents
Rear air vents are not available in all vehicles. :
Rear-compartment air vent, left
; Rear-compartment air vent, right
= Rear-compartment air vent thumbwheel
? Rear control panel, only with
THERMOTRONIC automatic climate con-
trol
X To open or close: turn thumbwheel=to
the left or right as far as it will go.
X To adjust the air direction: hold rear air
vent :or; by the middle fin and move up
or down or to the left or right. 184
Adjusting the air ventsClimate cont
rol
Page 190 of 497
for example, the power steering and the brake
boosting effect. You will require considerably
more effort to steer and brake. There is a risk of an accident.
Do not switch off the ignition while driving. G
WARNING
If the parking brake has not been fully
released when driving, the parking brake can:
R overheat and cause a fire
R lose its hold function.
There is a risk of fire and an accident. Release
the parking brake fully before driving off.
! Do not warm up the engine when the vehi-
cle is stationary. Drive off immediately.
Avoid high engine speeds and driving at full throttle until the engine has reached its
operating temperature.
Only shift the automatic transmission to
the desired drive position when the vehicle is stationary.
Where possible, avoid spinning the drive
wheels when pulling away on slippery
roads. You could otherwise damage the
drive train.
Observe the important safety notes for PLUG-
IN HYBRID vehicles (Y page 44). Key positions
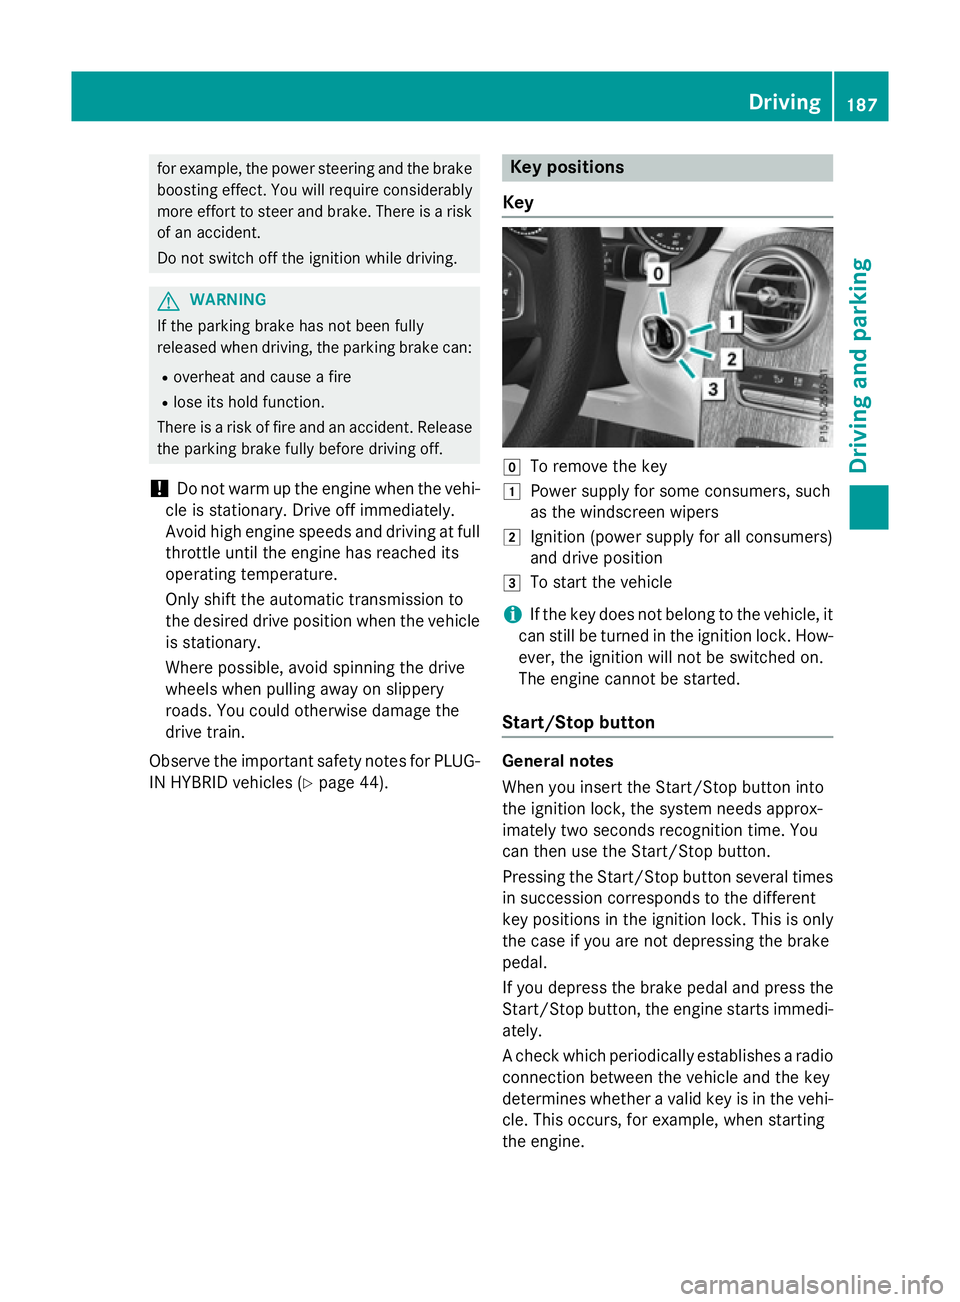
Key g
To remove the key
1 Power supply for some consumers, such
as the windscreen wipers
2 Ignition (power supply for all consumers)
and drive position
3 To start the vehicle
i If the key does not belong to the vehicle, it
can still be turned in the ignition lock. How-
ever, the ignition will not be switched on.
The engine cannot be started.
Start/Stop button General notes
When you insert the Start/Stop button into
the ignition lock, the system needs approx-
imately two seconds recognition time. You
can then use the Start/Stop button.
Pressing the Start/Stop button several times
in succession corresponds to the different
key positions in the ignition lock. This is only
the case if you are not depressing the brake
pedal.
If you depress the brake pedal and press the
Start/Stop button, the engine starts immedi-
ately.
A check which periodically establishes a radio connection between the vehicle and the key
determines whether a valid key is in the vehi-
cle. This occurs, for example, when starting
the engine. Driving
187Driving and parking Z
Page 199 of 497
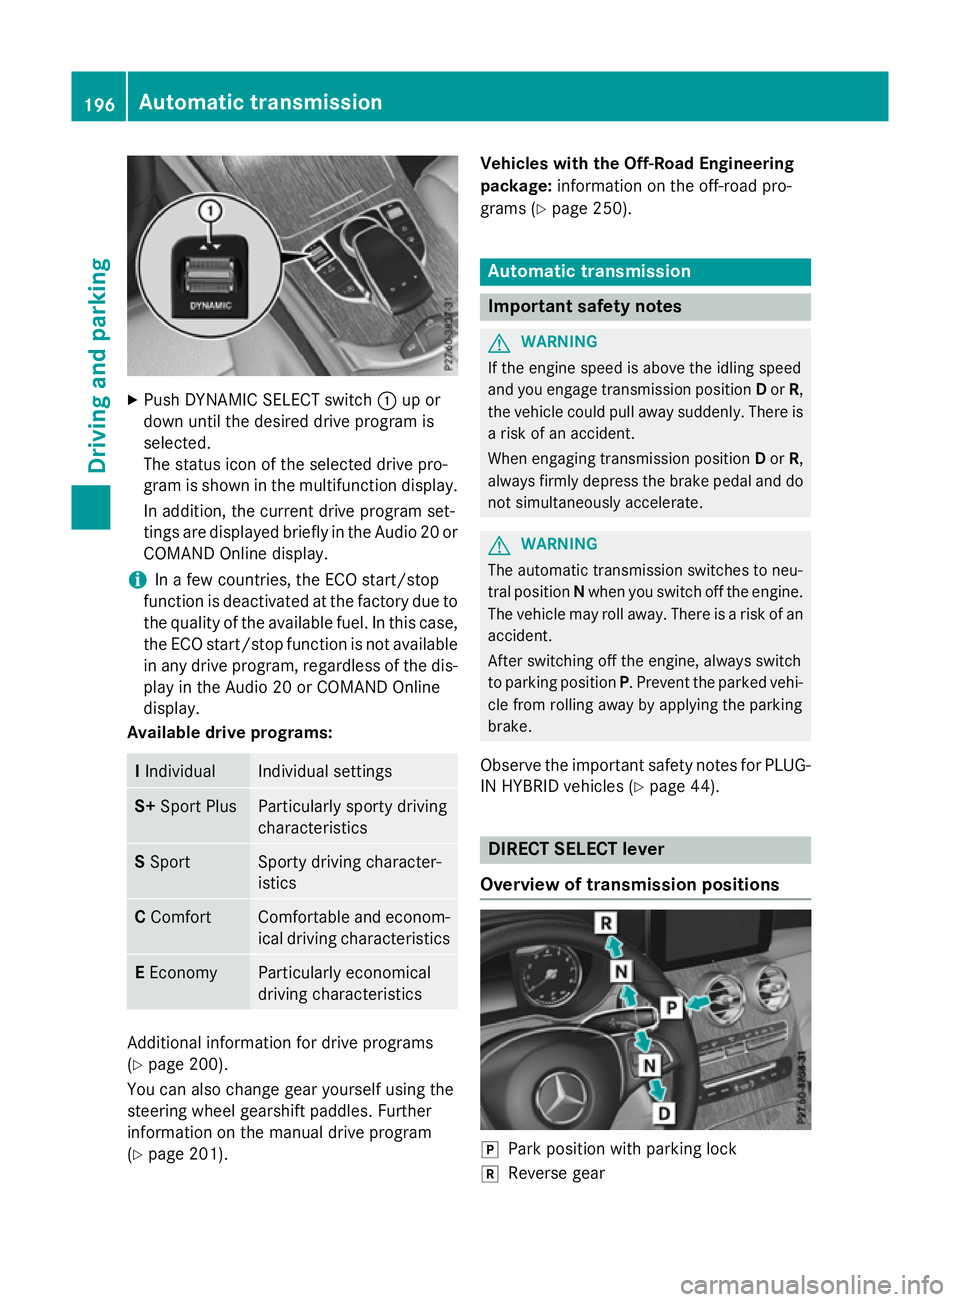
X
Push DYNAMIC SELECT switch :up or
down until the desired drive program is
selected.
The status icon of the selected drive pro-
gram is shown in the multifunction display.
In addition, the current drive program set-
tings are displayed briefly in the Audio 20 or COMAND Online display.
i In a few countries, the ECO start/stop
function is deactivated at the factory due to the quality of the available fuel. In this case,
the ECO start/stop function is not available in any drive program, regardless of the dis-
play in the Audio 20 or COMAND Online
display.
Available drive programs: I
Individual Individual settings
S+
Sport Plus Particularly sporty driving
characteristics
S
Sport Sporty driving character-
istics
C
Comfort Comfortable and econom-
ical driving characteristics E
Economy Particularly economical
driving characteristics
Additional information for drive programs
(Y page 200).
You can also change gear yourself using the
steering wheel gearshift paddles. Further
information on the manual drive program
(Y page 201). Vehicles with the Off-Road Engineering
package:
information on the off-road pro-
grams (Y page 250). Automatic transmission
Important safety notes
G
WARNING
If the engine speed is above the idling speed
and you engage transmission position Dor R,
the vehicle could pull away suddenly. There is a risk of an accident.
When engaging transmission position Dor R,
always firmly depress the brake pedal and do not simultaneously accelerate. G
WARNING
The automatic transmission switches to neu-
tral position Nwhen you switch off the engine.
The vehicle may roll away. There is a risk of an
accident.
After switching off the engine, always switch
to parking position P. Prevent the parked vehi-
cle from rolling away by applying the parking
brake.
Observe the important safety notes for PLUG-
IN HYBRID vehicles (Y page 44). DIRECT SELECT lever
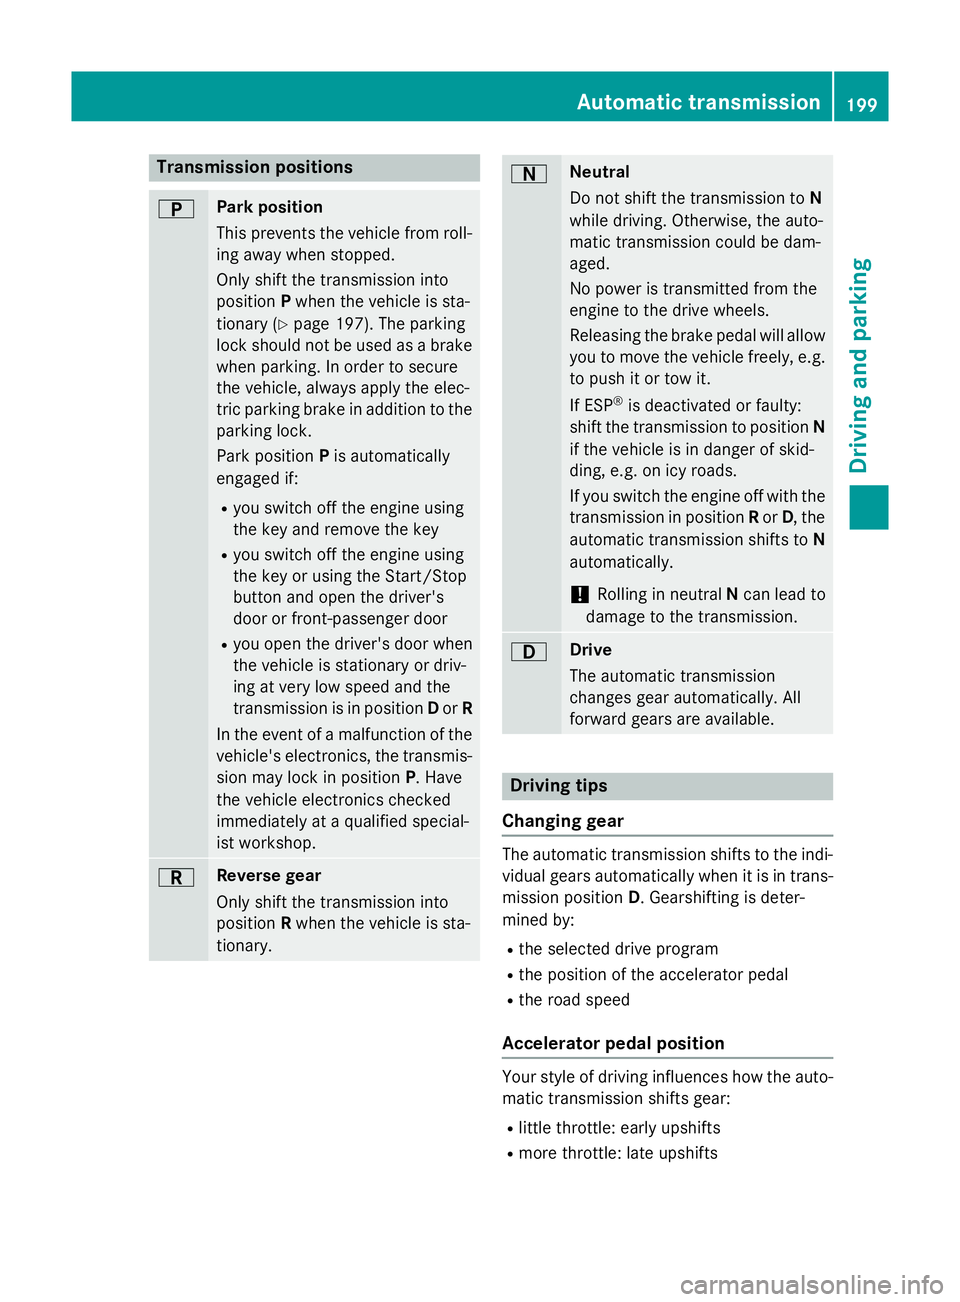
Overview of transmission positions j
Park position with parking lock
k Reverse gear 196
Automatic transmissionDriving and parking
Page 202 of 497
Transmission positions
B Park position
This prevents the vehicle from roll-
ing away when stopped.
Only shift the transmission into
position Pwhen the vehicle is sta-
tionary (Y page 197). The parking
lock should not be used as a brake when parking. In order to secure
the vehicle, always apply the elec-
tric parking brake in addition to the
parking lock.
Park position Pis automatically
engaged if:
R you switch off the engine using
the key and remove the key
R you switch off the engine using
the key or using the Start/Stop
button and open the driver's
door or front-passenger door
R you open the driver's door when
the vehicle is stationary or driv-
ing at very low speed and the
transmission is in position Dor R
In the event of a malfunction of the
vehicle's electronics, the transmis- sion may lock in position P. Have
the vehicle electronics checked
immediately at a qualified special-
ist workshop. C Reverse gear
Only shift the transmission into
position
Rwhen the vehicle is sta-
tionary. A Neutral
Do not shift the transmission to
N
while driving. Otherwise, the auto-
matic transmission could be dam-
aged.
No power is transmitted from the
engine to the drive wheels.
Releasing the brake pedal will allow
you to move the vehicle freely, e.g. to push it or tow it.
If ESP ®
is deactivated or faulty:
shift the transmission to position N
if the vehicle is in danger of skid-
ding, e.g. on icy roads.
If you switch the engine off with the transmission in position Ror D, the
automatic transmission shifts to N
automatically.
! Rolling in neutral
Ncan lead to
damage to the transmission. 7 Drive
The automatic transmission
changes gear automatically. All
forward gears are available. Driving tips
Changing gear The automatic transmission shifts to the indi-
vidual gears automatically when it is in trans-
mission position D. Gearshifting is deter-
mined by:
R the selected drive program
R the position of the accelerator pedal
R the road speed
Accelerator pedal position Your style of driving influences how the auto-
matic transmission shifts gear:
R little throttle: early upshifts
R more throttle: late upshifts Automatic transmission
199Driving and parking Z
Page 203 of 497
Double-clutch function
When shifting down, the double-clutch func-
tion is active regardless of the currently selec-
ted drive program. The double-clutch function reduces load change reactions and is condu-cive to a sporty driving style. The sound gen-
erated by the double-clutch function depends
on the drive program selected.
Kickdown Use kickdown for maximum acceleration:
X Depress the accelerator pedal beyond the
pressure point.
The transmission shifts to a lower gear
depending on the engine speed.
X Ease off the accelerator pedal once the
desired speed is reached.
The automatic transmission shifts back up.
Rocking the vehicle free Rocking the vehicle free by shifting the trans-
mission repeatedly between transmission
positions Dand Rmay help to free the vehicle
if it has become stuck in mud or snow.
The vehicle's engine management restricts
repeated shifting between transmission posi- tions Dand Rup to a maximum speed of
9 km/h.
To shift back and forth between transmission
positions Dand R, move the DIRECT SELECT
lever up and down past the point of resist-
ance.
Towing a trailer Towing a trailer is not possible with all mod-
els. For further information, see
(Y page 303).
X Drive in the middle of the engine speed
range on uphill gradients.
X Manual shifting: depending on the uphill
or downhill gradient, shift into a gear
(Y page 201) in which the engine will run in
the middle of the engine speed range. This also applies if cruise control,
DISTRONIC PLUS or SPEEDTRONIC are
activated. Drive programs
Drive program I (Individual) In drive program
Ithe following properties of
the drive program can be selected:
R the drive (engine and transmission man-
agement)
R the suspension
R the steering
R the availability of the ECO start/stop func-
tion
R the climate control
i To permanently select the gears in drive
program Iusing the steering wheel pad-
dles, select the M(manual) setting for the
drive.
Drive program S+ (Sport Plus) Drive program
S+is characterised by the fol-
lowing:
R the vehicle exhibits particularly sporty driv-
ing characteristics.
R the vehicle pulling away in first gear.
R the automatic transmission shifting up
later.
R As a result of the later automatic transmis-
sion shift points, the fuel consumption pos-sibly being higher.
R the suspension exhibits particularly stiff
springing and damping settings (vehicles
with AIR BODY CONTROL)
R the ECO start/stop function is not availa-
ble. 200
Automatic transmissionDriving and pa
rking
Page 204 of 497
Drive program S (Sport)
Drive program
Sis characterised by the fol-
lowing:
R the vehicle exhibits sporty driving charac-
teristics.
R the vehicle pulling away in first gear.
R the automatic transmission shifting up
later.
R As a result of the later automatic transmis-
sion shift points, the fuel consumption pos- sibly being higher.
R the suspension exhibits stiff springing and
damping settings (vehicles with
AIR BODY CONTROL).
Drive program C (Comfort) Drive program
Cis characterised by the fol-
lowing:
R the vehicle delivers comfortable, economi-
cal driving characteristics.
R the vehicle pulling away more gently in
forward and reverse gears unless the accel-
erator pedal is depressed fully.
R the vehicle having improved driving stabil-
ity, for example on slippery road surfaces.
R optimal fuel consumption resulting from
the automatic transmission shifting up
sooner. The vehicle is driven in the low
engine speed range and the wheels are less likely to spin.
Drive program E (Economy) Drive program
Eis characterised by the fol-
lowing:
R the vehicle exhibits comfortable, economi-
cal driving characteristics.
R the vehicle pulling away more gently in
forward and reverse gears unless the accel-
erator pedal is depressed fully.
R the vehicle having improved driving stabil-
ity, for example on slippery road surfaces.
R optimal fuel consumption resulting from
the automatic transmission shifting up sooner. The vehicle is driven in the low
engine speed range and the wheels are less
likely to spin.
R during deceleration, the engine is discon-
nected from the drive train. The vehicle
uses kinetic energy and consumes less fuel
(overrun mode).
R the performance of the air-conditioning and
heating systems is reduced. Manual gearshifting
General notes You can change gear yourself using the steer-
ing wheel gearshift paddles. The transmissionmust be in position D.
Depending on which gearshift paddle is
pulled, the automatic transmission immedi-
ately shifts into the next gear up or down, if
permitted.
If you activate manual gearshifting, the mul-
tifunction display will show the current gear
instead of transmission position D.
If manual gearshifting is deactivated, the
gears will be selected automatically.
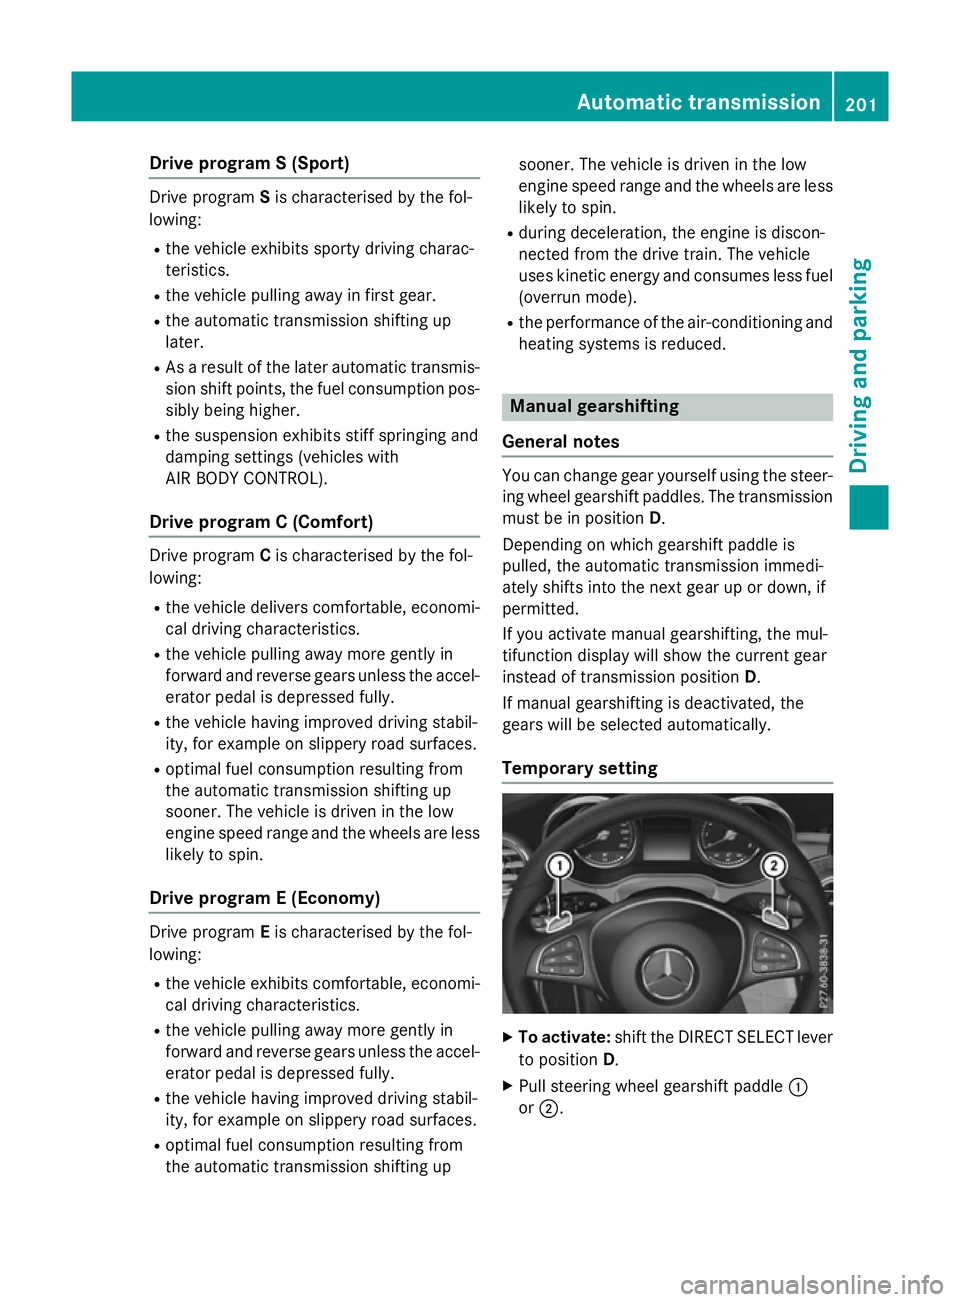
Temporary setting X
To activate: shift the DIRECT SELECT lever
to position D.
X Pull steering wheel gearshift paddle :
or ;. Automatic transmission
201Driving and parking Z