2015 MERCEDES-BENZ GLC SUV engine
[x] Cancel search: enginePage 174 of 497
When opening, make sure that nobody is
touching the side window. If someone
becomes trapped, immediately press
the W switch in the door to stop the move-
ment of the side windows. To continue closing
the side window, pull on the Wswitch.
X Convenience closing feature (vehicles
with a panorama sliding sunroof): press
and hold the grocker switch up or
down until the side windows and the pan-
orama sliding sunroof start to close auto-
matically.
The indicator lamp above the grocker
switch lights up. Air-recirculation mode is
activated.
X Convenience closing feature (vehicles
without a sliding sunroof/panorama
sliding sunroof): press and hold the g
rocker switch up or down until the side win- dows start to close automatically.
The indicator lamp above the grocker
switch lights up. Air-recirculation mode is
activated.
If you open the side windows or the pano-
rama sliding sunroof manually after closing
with the convenience closing feature, they
will remain in this position when opened
using the convenience opening feature.
If parts of the body are in the closing area
during convenience closing, proceed as fol-
lows:
X Press the Wbutton to stop the side win-
dows.
The side windows stop.
X To then open the side windows, press the
W button again.
X Only vehicles with panorama sliding
sunroof: press the 3button to stop the
panorama sliding sunroof.
The panorama sliding sunroof stops.
X To then open the panorama sliding sunroof,
pull back on the 3button. Notes on the automatic reversing feature for:
R the side windows (Y page 110)
R the panorama sliding sunroof
(Y page 114)
X Convenience opening feature (vehicles
with a panorama sliding sunroof): press
and hold the grocker switch up or
down until the side windows and the pan-
orama sliding sunroof start to open auto-
matically.
The indicator lamp above the grocker
switch goes out. Air-recirculation mode is
deactivated.
X Convenience opening feature (vehicles
without a panorama sliding sunroof):
press and hold the grocker switch up
or down until the side windows start to
open automatically.
The indicator lamp above the grocker
switch goes out. Air-recirculation mode is
deactivated. Switching the residual heat on/off
General notes The residual heat function is only available
with THERMOTRONIC automatic climate con- trol and THERMATIC automatic climate con-
trol with auxiliary heating.
When the engine is switched off, it is possible
to make use of the residual heat of the engine to continue heating or ventilating the front
compartment of the vehicle for approximately
30 minutes. The heating or ventilation time
depends on the set interior temperature.
Switching on/off X
Turn the key to position 0in the ignition
lock or remove it (Y page 187).
X To switch on: press the!rocker
switch up or down.
The indicator lamp above the !rocker
switch lights up. Operating the climate control system
171Climate control Z
Page 178 of 497
Activating/deactivating "Pre-entry cli-
mate control via key" Before "Pre-entry climate control via key" can
be activated, you must activate the function
via Audio 20 or COMAND Online (see sepa-
rate operating instructions).
X To activate "Pre-entry climate control
via key": unlock the vehicle with the key or
KEYLESS-GO.
To deactivate "Pre-entry climate control
via key": "Pre-entry climate control via key"
deactivates automatically when the engine is
started.
The following functions remain active after
the engine is started:
R Seat heating (heating)
R Seat ventilation (ventilation)
R Perfume atomiser
R Ionisation
An activated "Pre-entry climate control via
key" function can be deactivated using the
rocker switch (Y page 177). Operating the climate control system
175Climate control Z
Page 179 of 497
Problems with "Pre-entry climate control via key"
Problem
Possible causes/consequences and
M
MSolutions "Pre-entry climate con-
trol via key" cannot be
activated or has been
deactivated. The charge status of the high-voltage battery is under the specified
minimum charge status.
X Start the engine when the vehicle is at a standstill.
The internal combustion engine drives the electric motor. The
electric motor is operating as an alternator. The high-voltage
battery is charging.
Further information on charging the high-voltage battery via: R a mains socket (Y page 213)
R a charging station (Y page 217)
R a wallbox (Y page 216) "Pre-entry climate control via key" has been started more than
twice with the engine switched off.
X Switch on the engine and let it run for more than ten seconds.
X Try again to activate "Pre-entry climate control via key". Pre-entry climate control at time of
departure
Important safety notes G
WARNING
If persons (particularly children) are exposed
to heat or cold for a prolonged period, there is a risk of serious or even fatal injuries. Never
leave persons (particularly children) unatten-
ded in the vehicle.
General notes The "Pre-entry climate control at departure
time" function is only available in PLUG-IN
HYBRID vehicles.
You can use the "Pre-entry climate control at
departure time" function to cool or heat the
vehicle interior if the engine is not running.
The "Pre-entry climate control at departure
time" function can be activated regardless of
whether or not the vehicle is connected to an electric power supply. However, the charge
status of the high-voltage battery must be higher than the specified minimum charge
status.
When the vehicle is connected to an electric
power supply, priority is given to charging the
high-voltage battery to the specified mini-
mum charge. "Pre-entry climate control at
departure time" is only activated subse-
quently.
The running time of the "Pre-entry climate
control at departure time" function may be
reduced if:
R the vehicle is not connected to an electric
power supply and
R the high-voltage battery is not fully charged
With active "Pre-entry climate control at
departure time" the charge status of the high- voltage battery can be reduced, even if the
charge cable connector is connected.
When the vehicle is cooled, the following
functions are activated as needed:
R Automatic climate control
R Blower
R Seat ventilation 176
Operating the climate control systemClimate control
Page 181 of 497
X
To activate or deactivate "Immediate
pre-entry climate control": press rocker
switch :up or down.
The blue or red indicator lamp above the
rocker switch lights up or goes out.
The colours of the indicator lamps in rocker
switch :have the following meanings:
R blue: cooling activated
R red: heating activated
R yellow: departure time is preselected Auxiliary heating
Important safety notes G
DANGER
If the exhaust pipe is blocked or sufficient
ventilation is not possible, toxic exhaust
fumes can enter the vehicle, especially car-
bon monoxide. This is the case, e.g. in
enclosed spaces, or if the vehicle is stuck in
snow. There is a risk of fatal injuries.
You should switch off the auxiliary heating in
enclosed spaces which do not have an extrac- tion system, e.g. a garage. If the vehicle is
stuck in snow and you must leave the auxiliary
heating running, keep the exhaust pipe and
the area around the vehicle clear of snow. To guarantee a sufficient supply of fresh air, open
a window on the side of the vehicle away from the wind. G
WARNING
When the auxiliary heating is switched on,
parts of the vehicle can become very hot.
Flammable materials such as leaves, grass or twigs may ignite if they come into contact
with:
R hot parts of the exhaust system
R the exhaust gas itself
There is a risk of fire. When the auxiliary heating is switched on,
make sure that:
R no flammable materials come into contact
with hot vehicle components
R the exhaust gas can escape from the
exhaust pipe unhindered
R the exhaust gas does not come into contact
with flammable materials.
The auxiliary heating is fitted under the front
wing on the right-hand side of the vehicle. The emissions outlet is found behind the front
wheel on the right-hand side of the vehicle.
! Operating the auxiliary heating/ventila-
tion draws on the vehicle battery. After you have heated or ventilated the vehicle a
maximum of two times, drive for a longer
distance.
Switch the auxiliary heating on regularly once a month for about ten minutes.
The auxiliary heating heats the air in the vehi-
cle interior to the set temperature. This
occurs without using the heat of the running
engine. The auxiliary heating is operated
directly using the vehicle's fuel. For this rea-
son, the tank content must be at least at
reserve fuel level to ensure that the auxiliary
heating functions.
The auxiliary heating or auxiliary ventilation
automatically adjusts to changes in temper-
ature and weather conditions. For this rea-
son, the auxiliary heating could switch from
ventilation mode to heating mode or from
heating mode to ventilation mode.
The auxiliary heating switches off when the
engine is switched off. The auxiliary ventila-
tion is not active if the engine is running.
The auxiliary heating or auxiliary ventilation
switches off automatically after 50 minutes.
This time limit can be altered. To do this, visit a qualified specialist workshop.
You cannot use the auxiliary ventilation to
cool the vehicle interior to a temperature
lower than the outside temperature. 178
Operating the climate control systemClimate control
Page 184 of 497
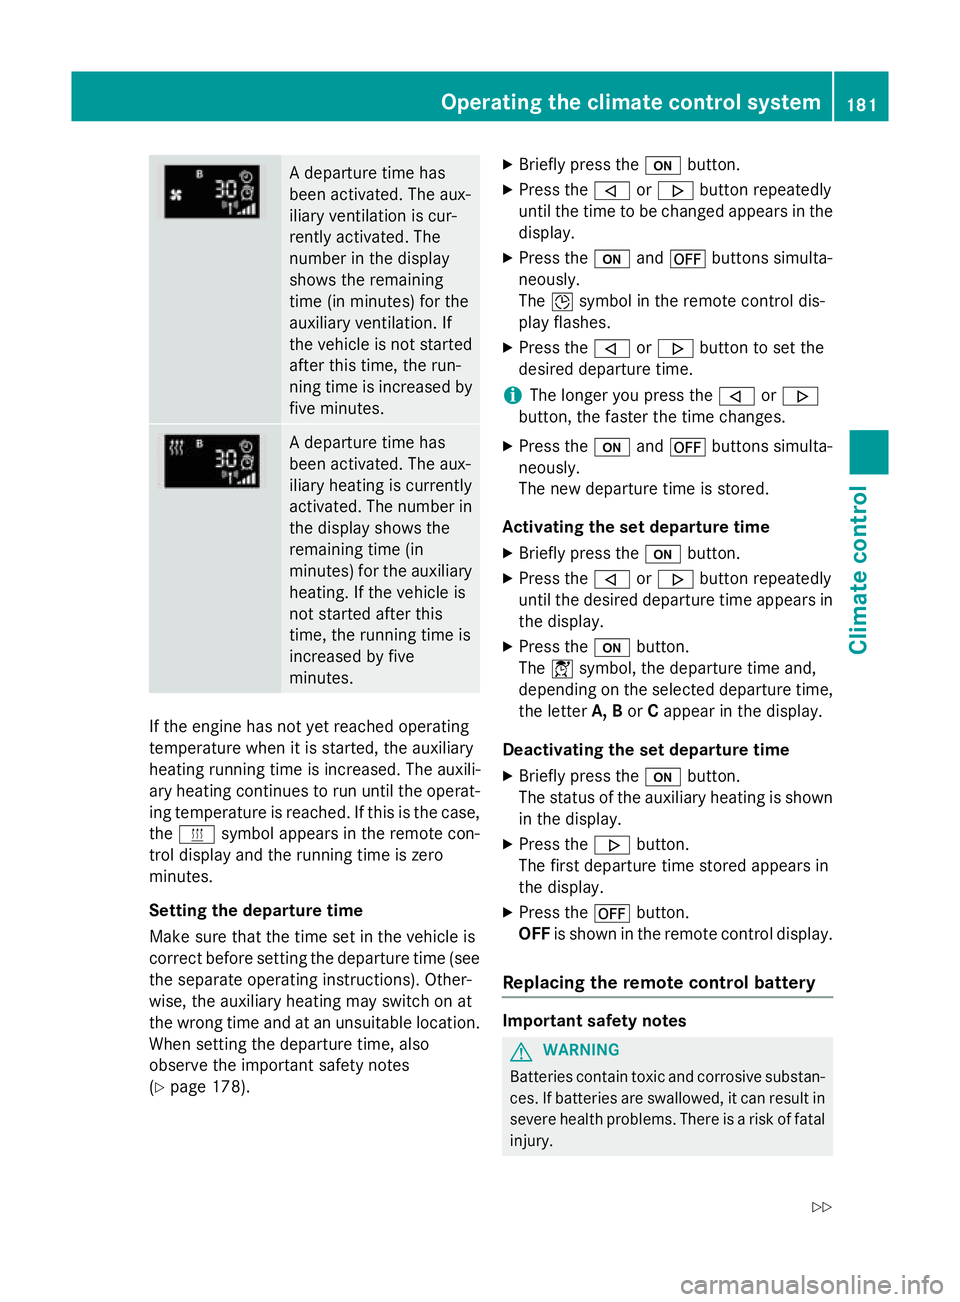
A departure time has
been activated. The aux-
iliary ventilation is cur-
rently activated. The
number in the display
shows the remaining
time (in minutes) for the
auxiliary ventilation. If
the vehicle is not started
after this time, the run-
ning time is increased by
five minutes. A departure time has
been activated. The aux-
iliary heating is currently
activated. The number in
the display shows the
remaining time (in
minutes) for the auxiliary heating. If the vehicle is
not started after this
time, the running time is
increased by five
minutes. If the engine has not yet reached operating
temperature when it is started, the auxiliary
heating running time is increased. The auxili-
ary heating continues to run until the operat- ing temperature is reached. If this is the case,
the y symbol appears in the remote con-
trol display and the running time is zero
minutes.
Setting the departure time
Make sure that the time set in the vehicle is
correct before setting the departure time (see the separate operating instructions). Other-
wise, the auxiliary heating may switch on at
the wrong time and at an unsuitable location.
When setting the departure time, also
observe the important safety notes
(Y page 178). X
Briefly press the ubutton.
X Press the ,or. button repeatedly
until the time to be changed appears in the display.
X Press the uand^ buttons simulta-
neously.
The Îsymbol in the remote control dis-
play flashes.
X Press the ,or. button to set the
desired departure time.
i The longer you press the
,or.
button, the faster the time changes.
X Press the uand^ buttons simulta-
neously.
The new departure time is stored.
Activating the set departure time X Briefly press the ubutton.
X Press the ,or. button repeatedly
until the desired departure time appears in the display.
X Press the ubutton.
The Ísymbol, the departure time and,
depending on the selected departure time, the letter A, BorCappear in the display.
Deactivating the set departure time
X Briefly press the ubutton.
The status of the auxiliary heating is shown in the display.
X Press the .button.
The first departure time stored appears in
the display.
X Press the ^button.
OFF is shown in the remote control display.
Replacing the remote control battery Important safety notes
G
WARNING
Batteries contain toxic and corrosive substan- ces. If batteries are swallowed, it can result in
severe health problems. There is a risk of fatal injury. Operating the climate control system
181Climate control
Z
Page 189 of 497
Useful information
i This Owner's Manual describes all mod-
els, series and optional equipment for your
vehicle that were available at the time of
going to press. National variations are pos- sible. Note that your vehicle may not be
equipped with all of the functions descri-
bed. This is also the case for systems and
functions relevant to safety.
i Read the information on qualified special-
ist workshops: (Y page 28). Running-in notes
Important safety notes
In certain driving and driving safety systems,
the sensors adjust automatically while a cer-
tain distance is being driven after the vehicle has been delivered or after repairs. Full sys-
tem effectiveness is not reached until the end
of this teach-in process.
Brake pads/linings and discs that are either
new or have been replaced only achieve opti- mum braking effect after several hundred kil-
ometres of driving. Compensate for the
reduced braking effect by applying greater
force to the brake pedal. The first 1,500 km
If you treat the engine with sufficient care
from the very start, you will be rewarded with excellent performance for the remainder of
the engine's life.
R Drive at varying road speeds and engine
speeds for the first 1,500 km.
R Avoid overstraining the vehicle during this
period, e.g. driving at full throttle.
R When changing gears manually, change up
in good time, before the rev counter needle
reaches Ôof the way to the red area of the
rev counter. R
Do not shift down a gear manually in order
to brake.
R Try to avoid depressing the accelerator
pedal beyond the point of resistance (kick- down).
After 1,500 km, you may gradually accelerate
the vehicle to full road and engine speeds.
You should also observe these notes on run-
ning-in if the engine or parts of the drive train on your vehicle have been replaced.
Always observe the maximum permissible
speed. Driving
Important safety notes
G
WARNING
Objects in the driver's footwell may restrict
the clearance around the pedals or block a
depressed pedal. This jeopardises the oper-
ating and road safety of the vehicle. There is a risk of an accident.
Stow all objects securely in the vehicle so that
they do not get into the driver's footwell.
Always fit the floormats securely and as pre-
scribed in order to ensure that there is always sufficient room for the pedals. Do not use
loose floormats and do not place several floor-mats on top of one another. G
WARNING
Unsuitable footwear can hinder correct usage of the pedals, e.g.:
R shoes with thick soles
R shoes with high heels
R slippers
There is a risk of an accident.
Wear suitable footwear to ensure correct
usage of the pedals. G
WARNING
If you switch off the ignition while driving,
safety-relevant functions are only available
with limitations, or not at all. This could affect, 186
DrivingDriving and parking
Page 190 of 497
for example, the power steering and the brake
boosting effect. You will require considerably
more effort to steer and brake. There is a risk of an accident.
Do not switch off the ignition while driving. G
WARNING
If the parking brake has not been fully
released when driving, the parking brake can:
R overheat and cause a fire
R lose its hold function.
There is a risk of fire and an accident. Release
the parking brake fully before driving off.
! Do not warm up the engine when the vehi-
cle is stationary. Drive off immediately.
Avoid high engine speeds and driving at full throttle until the engine has reached its
operating temperature.
Only shift the automatic transmission to
the desired drive position when the vehicle is stationary.
Where possible, avoid spinning the drive
wheels when pulling away on slippery
roads. You could otherwise damage the
drive train.
Observe the important safety notes for PLUG-
IN HYBRID vehicles (Y page 44). Key positions
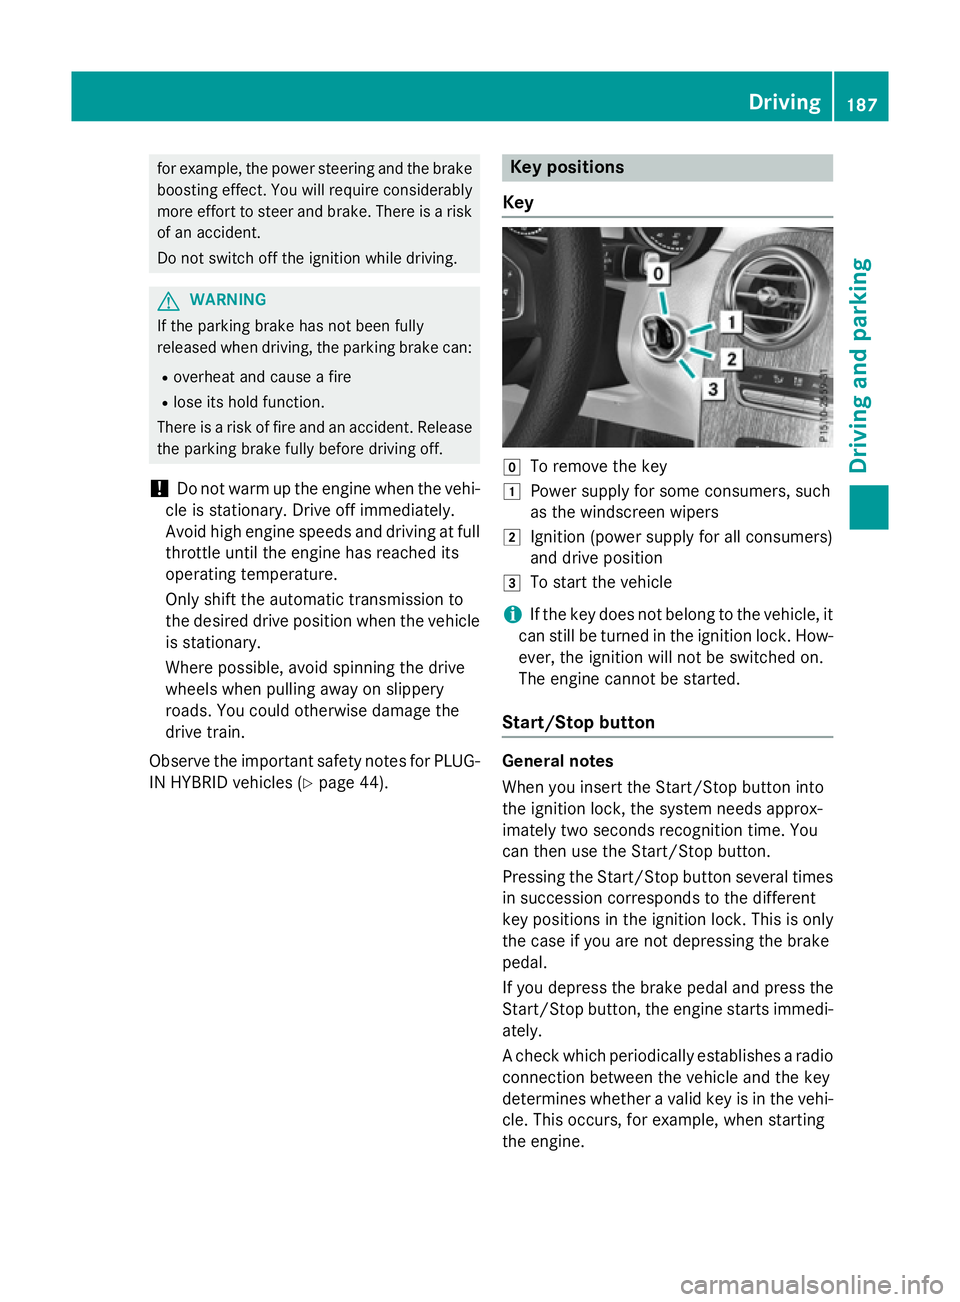
Key g
To remove the key
1 Power supply for some consumers, such
as the windscreen wipers
2 Ignition (power supply for all consumers)
and drive position
3 To start the vehicle
i If the key does not belong to the vehicle, it
can still be turned in the ignition lock. How-
ever, the ignition will not be switched on.
The engine cannot be started.
Start/Stop button General notes
When you insert the Start/Stop button into
the ignition lock, the system needs approx-
imately two seconds recognition time. You
can then use the Start/Stop button.
Pressing the Start/Stop button several times
in succession corresponds to the different
key positions in the ignition lock. This is only
the case if you are not depressing the brake
pedal.
If you depress the brake pedal and press the
Start/Stop button, the engine starts immedi-
ately.
A check which periodically establishes a radio connection between the vehicle and the key
determines whether a valid key is in the vehi-
cle. This occurs, for example, when starting
the engine. Driving
187Driving and parking Z
Page 191 of 497
To start the vehicle without actively using the
key:
R the Start/Stop button must be inserted in
the ignition lock
R the key must be in the vehicle
R the vehicle must not be locked with the key
or KEYLESS-GO (Y page 95)
Do not keep the key:
R with electronic devices, e.g. a mobile
phone or another key
R with metallic objects, e.g. coins or metal
film
R inside metallic objects, e.g. a metal case
This can affect the key's functionality.
If you lock the vehicle with the key's remote
control or with KEYLESS-GO, after a short
time:
R you will not be able to switch on the ignition
with the Start/Stop button
R you will not be able to start the engine with
the Start/Stop button until the vehicle is
unlocked again
If you lock the vehicle centrally using the but- ton on the front door (Y page 101), you can
continue to start the engine with the Start/
Stop button.
The engine can be switched off while the vehi-
cle is in motion by pressing and holding the
Start/Stop button for three seconds. This
function operates independently of the ECO
start/stop automatic engine switch-off func-
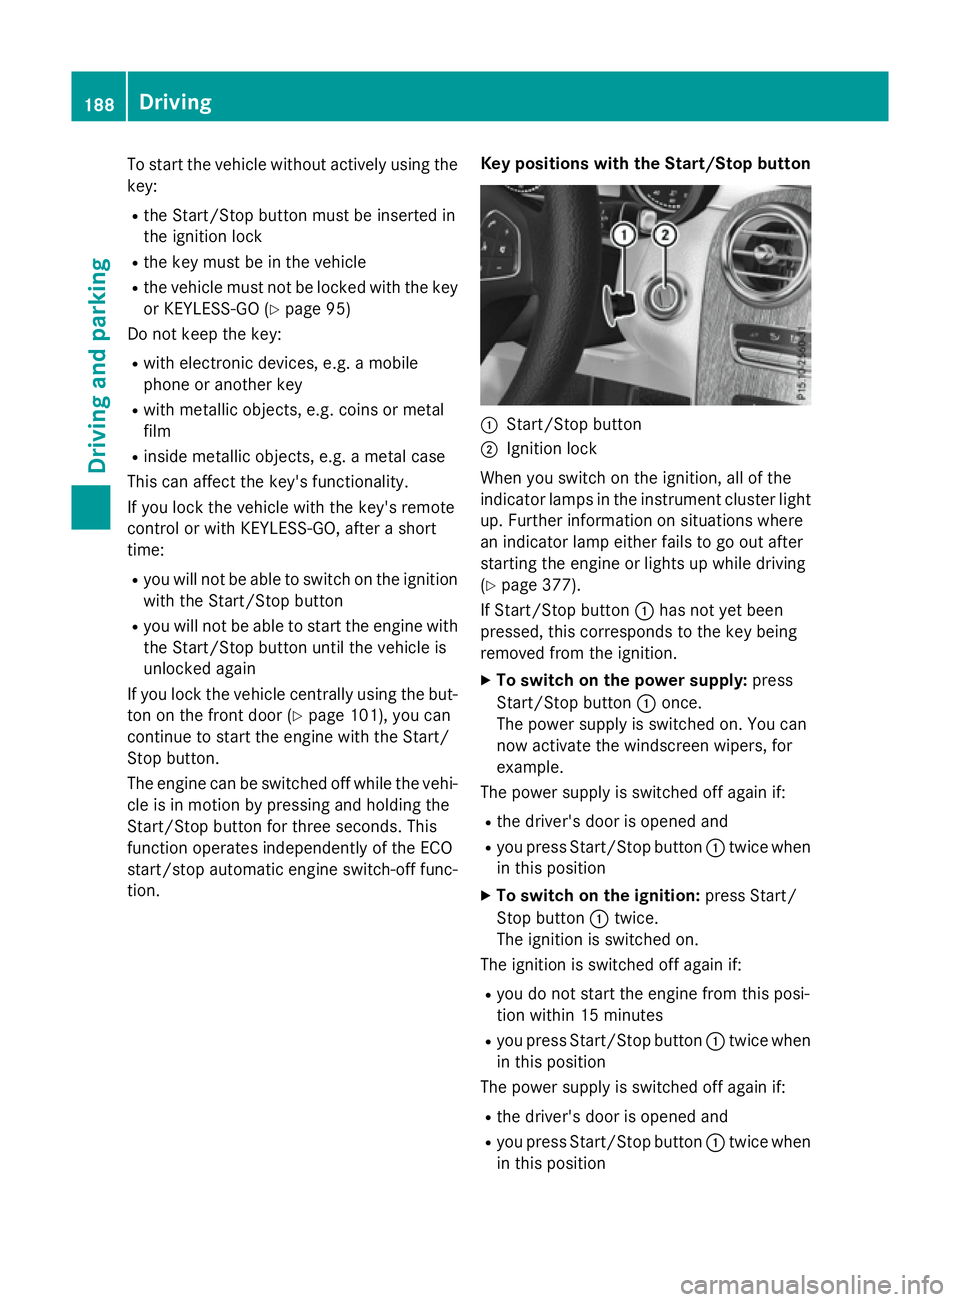
tion. Key positions with the Start/Stop button :
Start/Stop button
; Ignition lock
When you switch on the ignition, all of the
indicator lamps in the instrument cluster light up. Further information on situations where
an indicator lamp either fails to go out after
starting the engine or lights up while driving
(Y page 377).
If Start/Stop button :has not yet been
pressed, this corresponds to the key being
removed from the ignition.
X To switch on the power supply: press
Start/Stop button :once.
The power supply is switched on. You can
now activate the windscreen wipers, for
example.
The power supply is switched off again if:
R the driver's door is opened and
R you press Start/Stop button :twice when
in this position
X To switch on the ignition: press Start/
Stop button :twice.
The ignition is switched on.
The ignition is switched off again if:
R you do not start the engine from this posi-
tion within 15 minutes
R you press Start/Stop button :twice when
in this position
The power supply is switched off again if:
R the driver's door is opened and
R you press Start/Stop button :twice when
in this position 188
DrivingDriving and parking