2015 MERCEDES-BENZ GLC SUV mirror
[x] Cancel search: mirrorPage 283 of 497
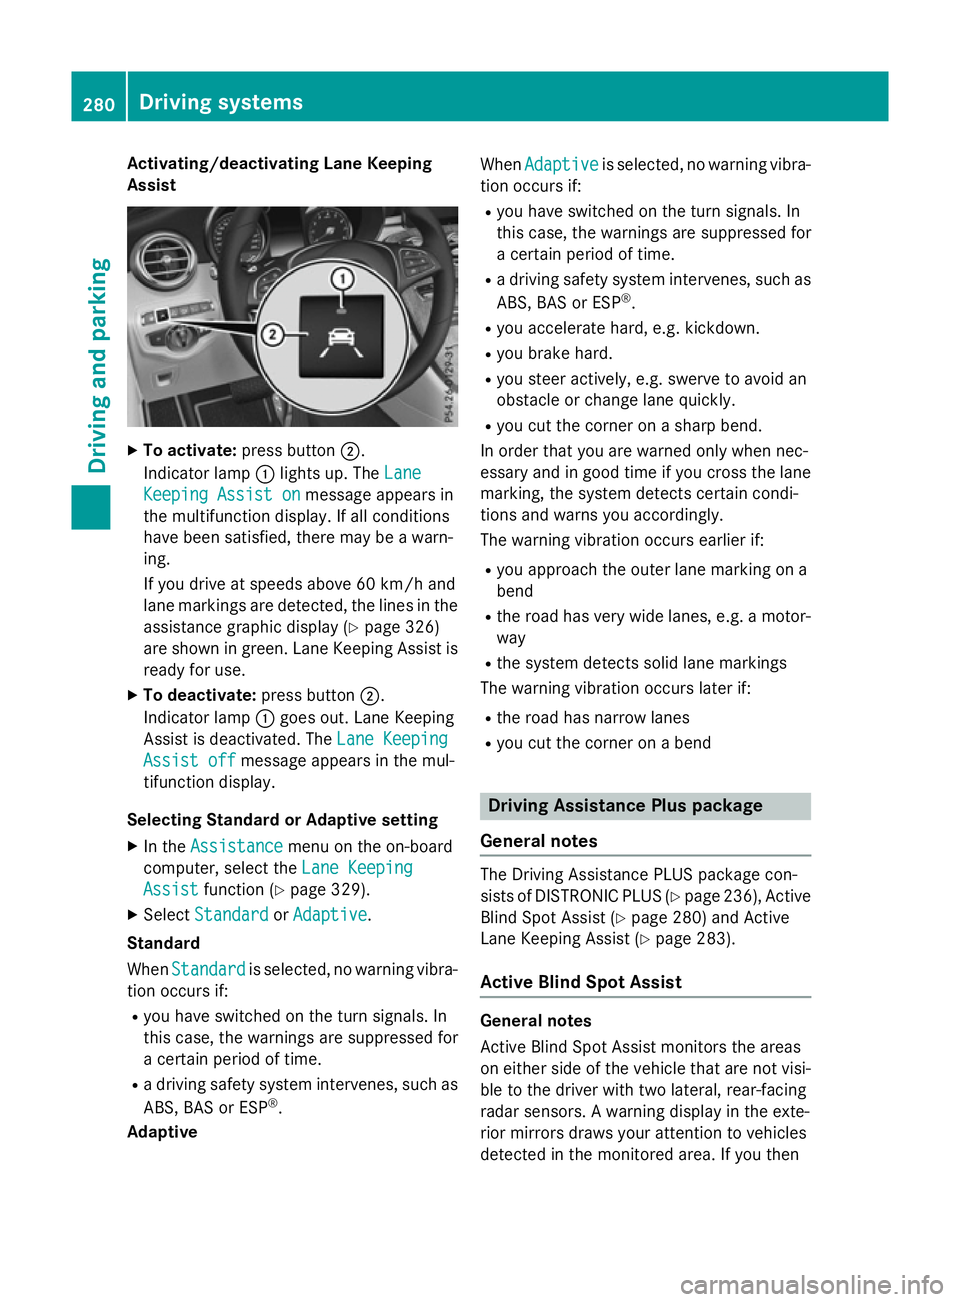
Activating/deactivating Lane Keeping
Assist X
To activate: press button ;.
Indicator lamp :lights up. The Lane
Lane
Keeping Assist on
Keeping Assist on message appears in
the multifunction display. If all conditions
have been satisfied, there may be a warn-
ing.
If you drive at speeds above 60 km/h and
lane markings are detected, the lines in the assistance graphic display (Y page 326)
are shown in green. Lane Keeping Assist is
ready for use.
X To deactivate: press button;.
Indicator lamp :goes out. Lane Keeping
Assist is deactivated. The Lane Keeping
Lane Keeping
Assist off Assist off message appears in the mul-
tifunction display.
Selecting Standard or Adaptive setting
X In the Assistance
Assistance menu on the on-board
computer, select the Lane Keeping
Lane Keeping
Assist
Assist function (Y page 329).
X Select Standard
Standard orAdaptive
Adaptive.
Standard
When Standard Standard is selected, no warning vibra-
tion occurs if:
R you have switched on the turn signals. In
this case, the warnings are suppressed for
a certain period of time.
R a driving safety system intervenes, such as
ABS, BAS or ESP ®
.
Adaptive When
Adaptive
Adaptive is selected, no warning vibra-
tion occurs if:
R you have switched on the turn signals. In
this case, the warnings are suppressed for
a certain period of time.
R a driving safety system intervenes, such as
ABS, BAS or ESP ®
.
R you accelerate hard, e.g. kickdown.
R you brake hard.
R you steer actively, e.g. swerve to avoid an
obstacle or change lane quickly.
R you cut the corner on a sharp bend.
In order that you are warned only when nec-
essary and in good time if you cross the lane marking, the system detects certain condi-
tions and warns you accordingly.
The warning vibration occurs earlier if:
R you approach the outer lane marking on a
bend
R the road has very wide lanes, e.g. a motor-
way
R the system detects solid lane markings
The warning vibration occurs later if:
R the road has narrow lanes
R you cut the corner on a bend Driving Assistance Plus package
General notes The Driving Assistance PLUS package con-
sists of DISTRONIC PLUS (Y
page 236), Active
Blind Spot Assist (Y page 280) and Active
Lane Keeping Assist (Y page 283).
Active Blind Spot Assist General notes
Active Blind Spot Assist monitors the areas
on either side of the vehicle that are not visi-
ble to the driver with two lateral, rear-facing
radar sensors. A warning display in the exte-
rior mirrors draws your attention to vehicles
detected in the monitored area. If you then 280
Driving systemsDriving and pa
rking
Page 286 of 497
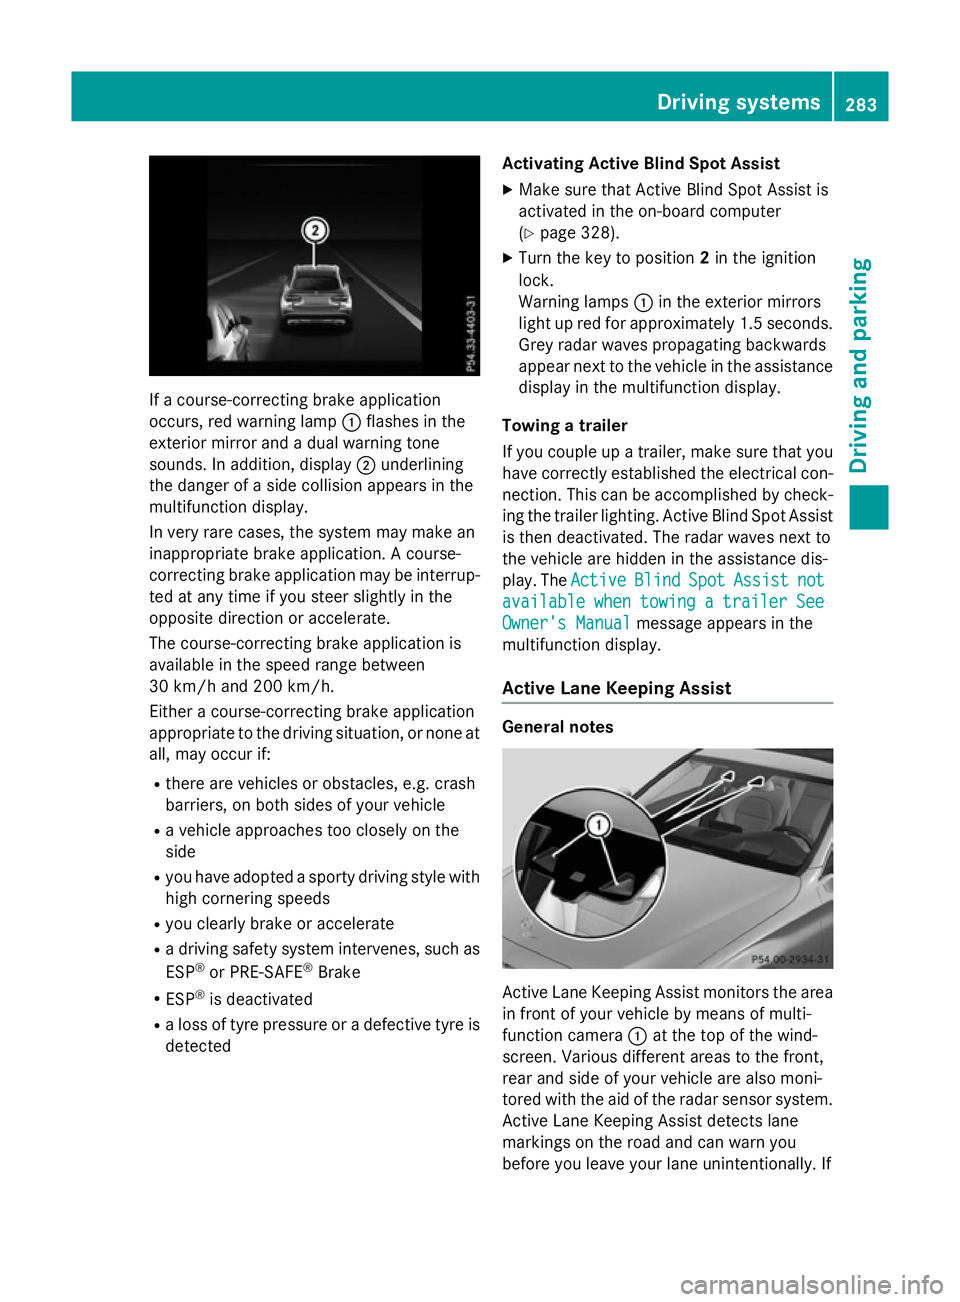
If a course-correcting brake application
occurs, red warning lamp :flashes in the
exterior mirror and a dual warning tone
sounds. In addition, display ;underlining
the danger of a side collision appears in the
multifunction display.
In very rare cases, the system may make an
inappropriate brake application. A course-
correcting brake application may be interrup-
ted at any time if you steer slightly in the
opposite direction or accelerate.
The course-correcting brake application is
available in the speed range between
30 km/h and 200 km/h.
Either a course-correcting brake application
appropriate to the driving situation, or none at all, may occur if:
R there are vehicles or obstacles, e.g. crash
barriers, on both sides of your vehicle
R a vehicle approaches too closely on the
side
R you have adopted a sporty driving style with
high cornering speeds
R you clearly brake or accelerate
R a driving safety system intervenes, such as
ESP ®
or PRE-SAFE ®
Brake
R ESP ®
is deactivated
R a loss of tyre pressure or a defective tyre is
detected Activating Active Blind Spot Assist
X Make sure that Active Blind Spot Assist is
activated in the on-board computer
(Y page 328).
X Turn the key to position 2in the ignition
lock.
Warning lamps :in the exterior mirrors
light up red for approximately 1.5 seconds. Grey radar waves propagating backwards
appear next to the vehicle in the assistance
display in the multifunction display.
Towing a trailer
If you couple up a trailer, make sure that you have correctly established the electrical con-
nection. This can be accomplished by check- ing the trailer lighting. Active Blind Spot Assist
is then deactivated. The radar waves next to
the vehicle are hidden in the assistance dis-
play. The Active
Active Blind BlindSpot
SpotAssist
Assist not
not
available
available when
whentowing
towing a
atrailer
trailer See
See
Owner's Manual
Owner's Manual message appears in the
multifunction display.
Active Lane Keeping Assist General notes
Active Lane Keeping Assist monitors the area
in front of your vehicle by means of multi-
function camera :at the top of the wind-
screen. Various different areas to the front,
rear and side of your vehicle are also moni-
tored with the aid of the radar sensor system. Active Lane Keeping Assist detects lane
markings on the road and can warn you
before you leave your lane unintentionally. If Driving systems
283Driving and parking Z
Page 354 of 497
Display messages
Possible causes/consequences and
M
MSolutions b
Trailer left indi‐ Trailer left indi‐
cator cator
orTrailer
Trailer
right indicator
right indicator The left- or right-hand trailer turn signal lamp is faulty.
X Consult the manufacturer's operating instructions. b
Trailer brake lamp Trailer brake lamp The trailer brake lamp is faulty.
X Consult the manufacturer's operating instructions. b
Rear left indica‐ Rear left indica‐
tor tor
orRear right
Rear right
indicator
indicator The rear left-hand or rear right-hand turn signal is faulty.
X Tail lamps (vehicles with halogen headlamps): replace the
bulb (Y page 146).
X Tail lamps (vehicles with LED headlamps): visit a qualified
specialist workshop. b
Front left indica‐ Front left indica‐
tor tor
orFront right
Front right
indicator
indicator The front left-hand or front right-hand turn signal is faulty.
X Halogen headlamp: replace the bulb (Ypage 146).
X LED headlamps: consult a qualified specialist workshop. b
Left Left
mirror
mirror indica‐
indica‐
tor
tor orRight mir‐
Right mir‐
ror indicator
ror indicator The turn signal in the left-hand or right-hand exterior mirror is
faulty.
X Consult a qualified specialist workshop. b
Left brake lamp Left brake lamp
or
Right brake lamp
Right brake lamp The left- or right-hand brake lamp is faulty.
X Consult a qualified specialist workshop. b
Third brake lamp Third brake lamp The third brake lamp is faulty.
X Consult a qualified specialist workshop. b
Left tail lamp Left tail lamp
or
Right tail lamp
Right tail lamp The left- or right-hand tail lamp is faulty.
X Consult a qualified specialist workshop. b
Left main beam Left main beam
or
Right main beam
Right main beam The left- or right-hand main-beam headlamp is faulty.
X Halogen headlamp: replace the bulb (Ypage 146).
X LED headlamps: consult a qualified specialist workshop. b
Number plate lamp Number plate lamp The left- or right-hand licence plate lamp is faulty.
X Consult a qualified specialist workshop. Display
messages
351On-board computer and displays Z
Page 407 of 497
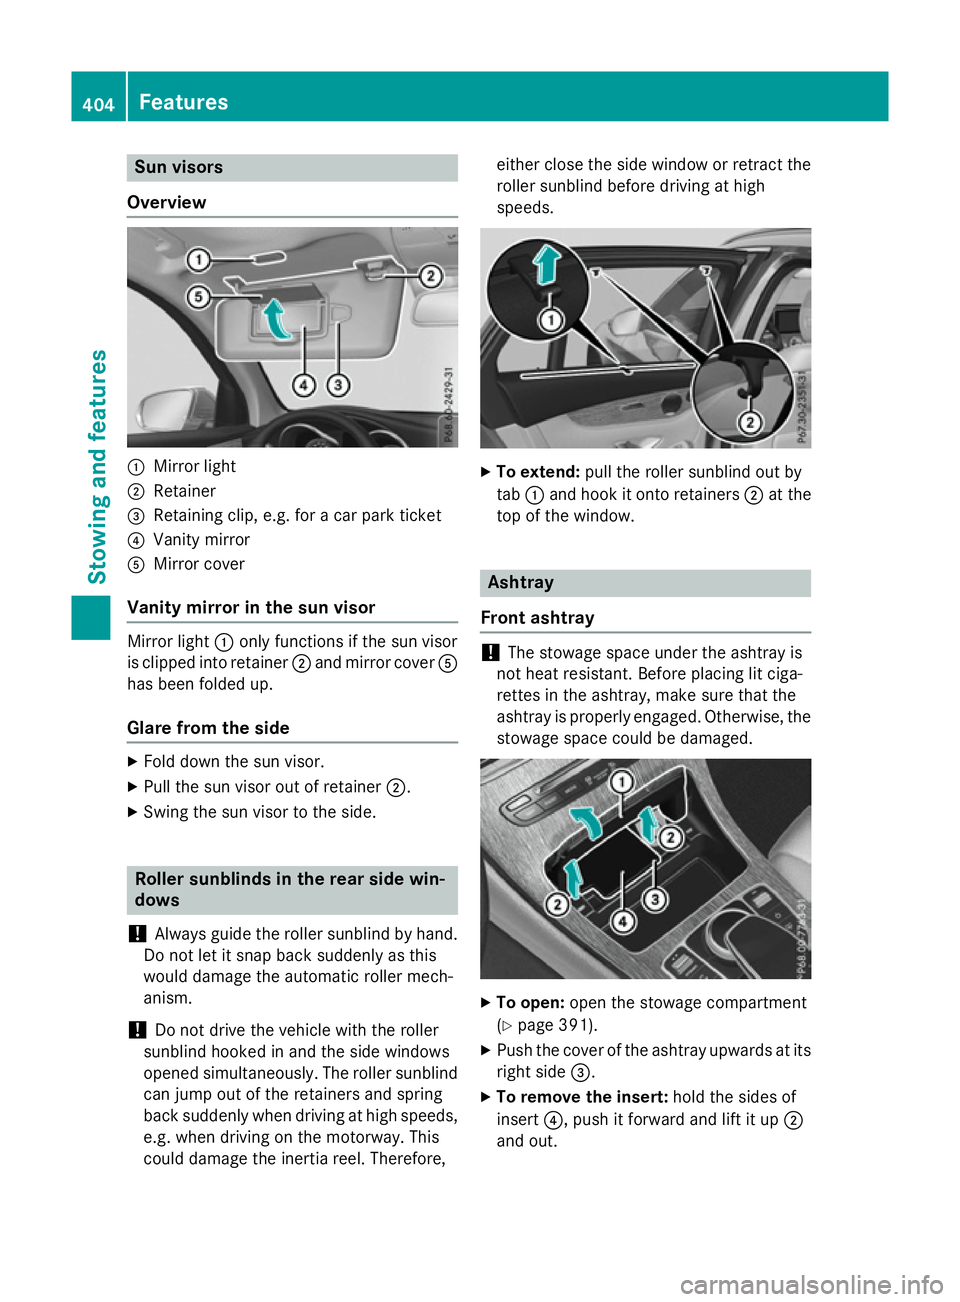
Sun visors
Overview :
Mirror light
; Retainer
= Retaining clip, e.g. for a car park ticket
? Vanity mirror
A Mirror cover
Vanity mirror in the sun visor Mirror light
:only functions if the sun visor
is clipped into retainer ;and mirror cover A
has been folded up.
Glare from the side X
Fold down the sun visor.
X Pull the sun visor out of retainer ;.
X Swing the sun visor to the side. Roller sunblinds in the rear side win-
dows
! Always guide the roller sunblind by hand.
Do not let it snap back suddenly as this
would damage the automatic roller mech-
anism.
! Do not drive the vehicle with the roller
sunblind hooked in and the side windows
opened simultaneously. The roller sunblind can jump out of the retainers and spring
back suddenly when driving at high speeds,
e.g. when driving on the motorway. This
could damage the inertia reel. Therefore, either close the side window or retract the
roller sunblind before driving at high
speeds. X
To extend: pull the roller sunblind out by
tab :and hook it onto retainers ;at the
top of the window. Ashtray
Front ashtray !
The stowage space under the ashtray is
not heat resistant. Before placing lit ciga-
rettes in the ashtray, make sure that the
ashtray is properly engaged. Otherwise, the
stowage space could be damaged. X
To open: open the stowage compartment
(Y page 391).
X Push the cover of the ashtray upwards at its
right side =.
X To remove the insert: hold the sides of
insert ?, push it forward and lift it up ;
and out. 404
FeaturesStowing and features
Page 427 of 497
!
Do not use acidic wheel cleaning products
to remove brake dust. This could damage
wheel bolts and brake components.
! Do not park up the vehicle for an extended
period straight after cleaning it, particularly after having cleaned the wheels with wheel cleaner. Wheel cleaners could cause
increased corrosion of the brake discs and
brake pads/linings. For this reason, you
should drive for a few minutes after clean-
ing. Braking heats the brake discs and the
brake pads/linings, thus drying them. The
vehicle can then be parked up.
Cleaning the windows G
WARNING
If the windscreen wipers are set in motion
when cleaning the windscreen or wiper
blades, you could become trapped. There is a danger of injury.
Always switch off the windscreen wipers and
the ignition before cleaning the windscreen orwiper blades.
! Do not use dry cloths, abrasive products,
solvents or cleaning agents containing sol- vents to clean the inside of the windows. Do
not touch the insides of the windows with
hard objects, e.g. an ice scraper or ring.
There is otherwise a risk of damaging the
windows.
! Clean the water drainage channels of the
windscreen and the rear window at regular
intervals. Deposits such as leaves, petals
and pollen may under certain circumstan-
ces prevent water from draining away. This
can lead to corrosion damage and damage to electronic components.
X Clean the inside and outside of the win-
dows with a damp cloth and a cleaning
agent that is recommended and approved
by Mercedes-Benz. Cleaning the wiper blades G
WARNING
If the windscreen wipers are set in motion
when cleaning the windscreen or wiper
blades, you could become trapped. There is a danger of injury.
Always switch off the windscreen wipers and
the ignition before cleaning the windscreen orwiper blades.
! Do not pull on the wiper blade. Otherwise,
the wiper blade could be damaged.
! Do not clean wiper blades too often and
do not rub them too hard. Otherwise, the
graphite coating could be damaged. This
could cause wiper noise.
! Hold the wiper arm securely when folding
back. The windscreen could be damaged if
the wiper arm hits against it suddenly.
X Fold the wiper arms away from the wind-
screen.
X Clean the wiper blades carefully using a
damp cloth.
X Fold the windscreen wipers back again
before switching on the ignition.
Cleaning the exterior lighting !
Only use cleaning agents or cleaning
cloths that are suitable for plastic lenses.
Unsuitable cleaning agents or cleaning
cloths could scratch or damage the plastic lenses of the exterior lighting.
X Clean the plastic lenses of the exterior
lighting using a wet sponge and a mild
cleaning agent, e.g. Mercedes-Benz car
shampoo or cleaning cloths.
Cleaning the mirror turn signal !
Only use cleaning agents or cleaning
cloths that are suitable for plastic lenses.
Unsuitable cleaning agents or cleaning
cloths could scratch or damage the plastic lenses of the mirror turn signals. 424
CareMaintenance and care
Page 428 of 497
X
Clean the plastic lenses of the mirror turn
signals in the exterior mirror housing using a wet sponge and mild cleaning agent, e.g.
Mercedes-Benz car shampoo or cleaning
cloths.
Cleaning the side running board !
Do not clean the aluminium inserts of the
side running board with alkaline or acidic
cleaners, such as wheel cleaner. Do not use acidic wheel cleaners to remove brake
dust. The aluminium inserts could other-
wise be damaged.
Cleaning the sensors !
If you clean the sensors with a high-pres-
sure cleaner, make sure that you keep a
distance of at least 30 cm between the
vehicle and the high-pressure cleaner noz-
zle. Information about the correct distance is available from the equipment manufac-
turer. X
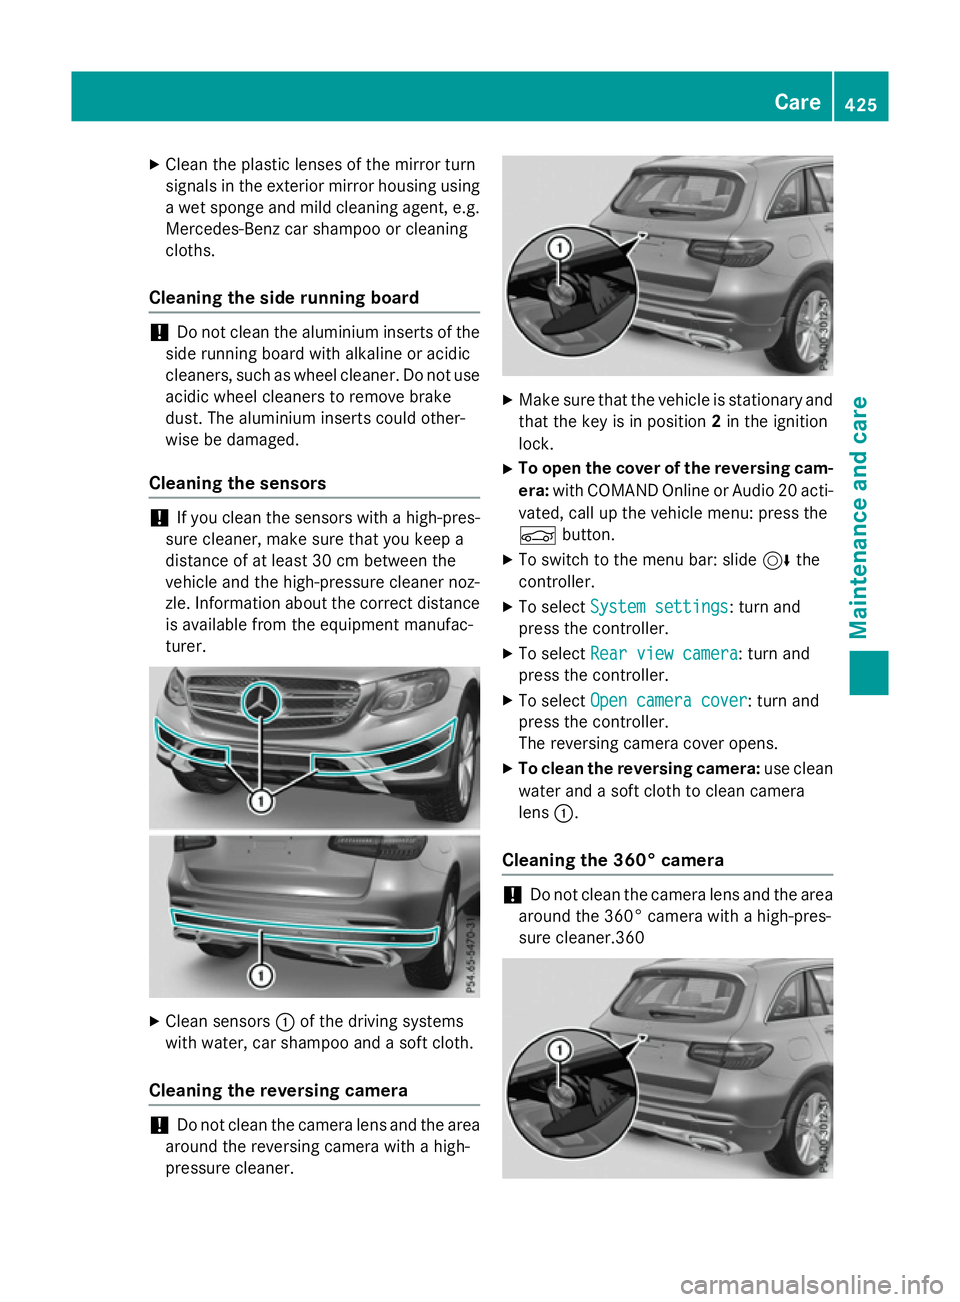
Clean sensors :of the driving systems
with water, car shampoo and a soft cloth.
Cleaning the reversing camera !
Do not clean the camera lens and the area
around the reversing camera with a high-
pressure cleaner. X
Make sure that the vehicle is stationary and
that the key is in position 2in the ignition
lock.
X To open the cover of the reversing cam-
era: with COMAND Online or Audio 20 acti-
vated, call up the vehicle menu: press the
Ñ button.
X To switch to the menu bar: slide 6the
controller.
X To select System settings
System settings: turn and
press the controller.
X To select Rear view camera Rear view camera : turn and
press the controller.
X To select Open camera cover
Open camera cover: turn and
press the controller.
The reversing camera cover opens.
X To clean the reversing camera: use clean
water and a soft cloth to clean camera
lens :.
Cleaning the 360° camera !
Do not clean the camera lens and the area
around the 360° camera with a high-pres-
sure cleaner.360 Care
425Maintenance and care Z
Page 491 of 497
!
Only the washer fluids SummerFit and
WinterFit can be mixed. Otherwise, the
spraying nozzles could become blocked.
Comply with the important safety notes for
service products when handling washer fluid
(Y page 480).
At temperatures above freezing:
X Fill the washer fluid reservoir with a mixture
of water and washer fluid, e.g. MB Sum-
merFit.
Mix 1 part MB SummerFit to 100 parts water.
At temperatures below freezing:
X Fill the washer fluid reservoir with a mixture
of water and washer fluid, e.g. MB Winter-
Fit.
For the correct mixing ratio refer to the
information on the antifreeze reservoir.
i Add washer fluid concentrate, e.g. MB
SummerFit or MB WinterFit, to the washer
fluid all year round. Vehicle data
General notes
Please note that for the specified vehicle
data: R the heights specified may vary as a result
of:
- tyres
- load
- condition of the suspension
- optional equipment
R optional equipment reduces the maximum
payload
R Vehicle-specific weight information can be
found on the vehicle identification plate
(Y page 480).
R only for certain countries: you can find vehi-
cle-specific vehicle data in the COC docu-
ments (CERTIFICATE OF CONFORMITY).
These documents are delivered with your
vehicle. Observe the information relating to level con-
trol:
R AIR BODY CONTROL (Y page 252)
R Off-Road Engineering package
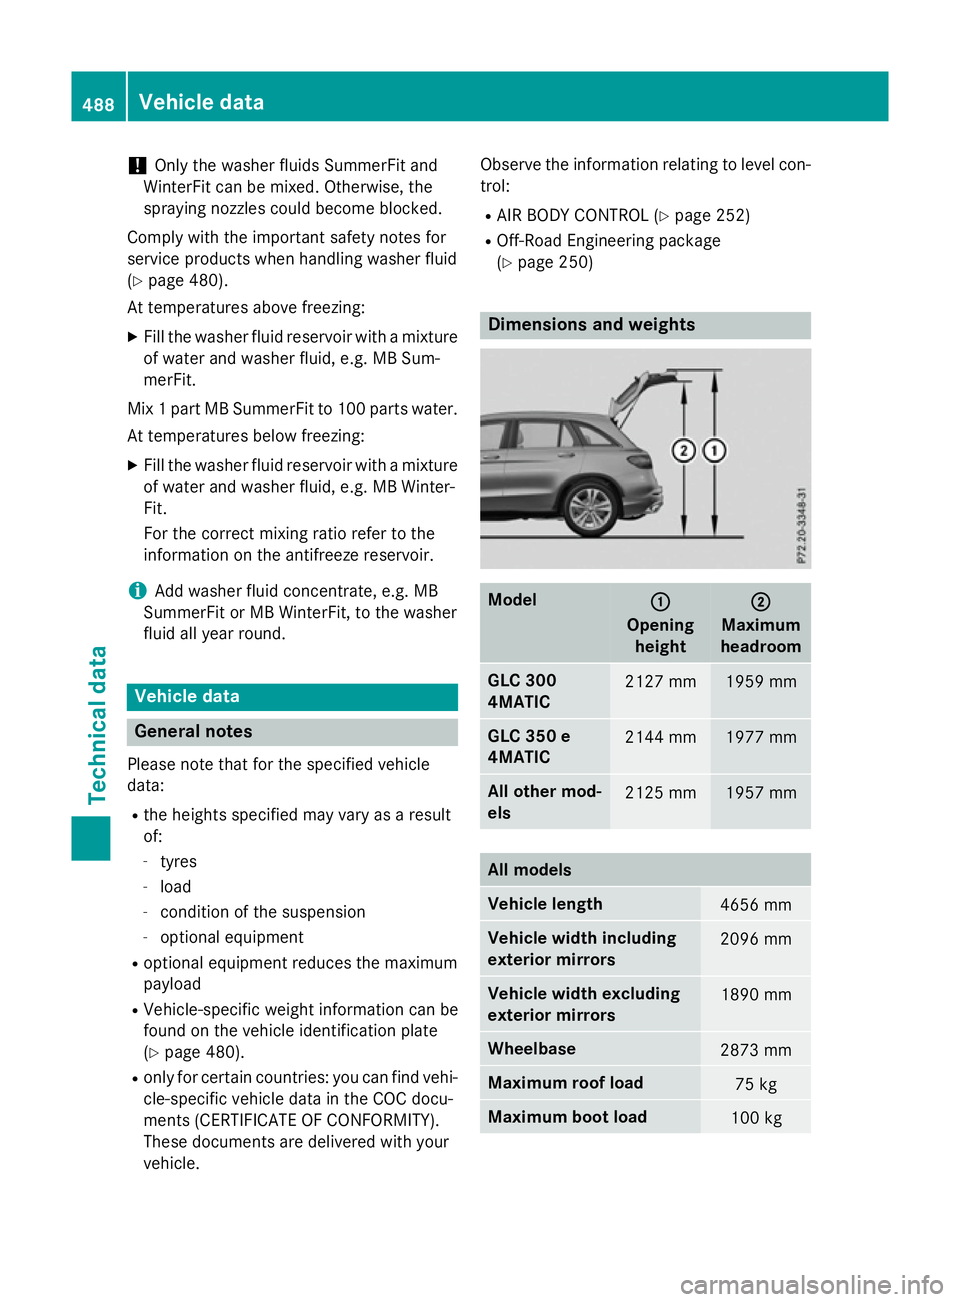
(Y page 250) Dimensions and weights
Model
: :
Opening height ;
;
Maximum
headroom GLC 300
4MATIC
2127 mm 1959 mm
GLC 350 e
4MATIC
2144 mm 1977 mm
All other mod-
els
2125 mm 1957 mm
All models
Vehicle length
4656 mm
Vehicle width including
exterior mirrors
2096 mm
Vehicle width excluding
exterior mirrors
1890 mm
Wheelbase
2873 mm
Maximum roof load
75 kg
Maximum boot load
100 kg488
Vehicle dataTechnical data