2015 MERCEDES-BENZ GLC SUV roof
[x] Cancel search: roofPage 231 of 497
The following driving systems are specially
adapted for driving over easily negotiable off-
road terrain:
R Off-road program (Y page 250)
R Off-road ABS (Y page 79)
R Off-road 4ETS (Y page 85)
R Off-road ESP ®
(Y page 85)
R DSR (Downhill Speed Regulation)
(Y page 248)
Observe the following notes:
R Stop the vehicle before driving off-road. If
necessary, activate the off-road program
(Y page 250).
R To avoid damaging the vehicle, make sure
there is always sufficient ground clearance.
R Make sure that items of luggage and loads
are stowed safely and are well secured
(Y page 396).
R Always keep the engine running and in gear
when driving on a downhill gradient. Acti-
vate DSR (Y page 248).
R Drive slowly and evenly, if necessary at
walking pace.
R Ensure that the wheels are in contact with
the ground at all times.
R Drive with extreme care on unknown off-
road routes where visibility is poor. For
safety reasons, get out of the vehicle first
and survey the off-road route.
R Check the depth of water before fording
rivers and streams.
R Watch out for obstacles.
R Take care when turning on an uphill or
downhill slope or when driving across a
slope. The vehicle could otherwise tip over.
R Always keep the side windows and the pan-
orama sliding sunroof closed during the
journey.
R Do not deviate from marked routes.
Do not use the HOLD function when driving
off-road, on steep uphill or downhill gradients or on slippery or loose surfaces. The HOLD
function cannot hold the vehicle on such sur-
faces. Checklist before driving off-road X
Engine oil level: check the engine oil and
top it up if necessary.
When driving on steep gradients, the oil
level must be sufficiently high to ensure a
correct oil supply in the vehicle.
X Wheels and tyres: check the tyre tread
depth and tyre pressure.
X Check for damage and remove any foreign
objects, e.g. small stones, from the
wheels/tyres.
X Replace any missing valve caps.
X Replace dented or damaged wheels.
X Wheels: dented or bent wheels can lead to
a loss of tyre pressure and damage to the
tyre bead. Before driving off-road, check
the wheels and replace them if necessary.
Checklist after driving off-road !
If you detect damage to the vehicle after
driving off-road, have the vehicle checked
immediately at a qualified specialist work-
shop.
X Deactivate the off-road program
(Y page 250).
X Deactivate DSR (Y page 248).
X Clean the headlamps and rear lights and
check for damage.
X Clean the front and rear licence plates.
X Clean the wheels/tyres with a water jet and
remove any foreign objects.
X Clean the wheels, wheel arches and the
vehicle underside with a water jet; check
for any foreign objects and damage.
X Check whether twigs or other parts of
plants have become trapped. These
increase the risk of fire and can damage
fuel pipes, brake hoses or the rubber bel-
lows of the axle joints and propeller shafts.
X After the trip, examine without fail the
entire undercarriage, wheels, tyres, brakes,
bodywork structure, steering, chassis and
exhaust system for damage. 228
Driving tipsDriving and parking
Page 259 of 497
Rear sensors
Centre Approx. 120 cm
Corners Approx. 80 cm
Minimum distance
Centre Approx. 20 cm
Corners Approx. 15 cm
If there is an obstacle within this range, the
relevant warning displays light up and a warn- ing tone sounds. If the distance falls below
the minimum, the distance may no longer be
shown.
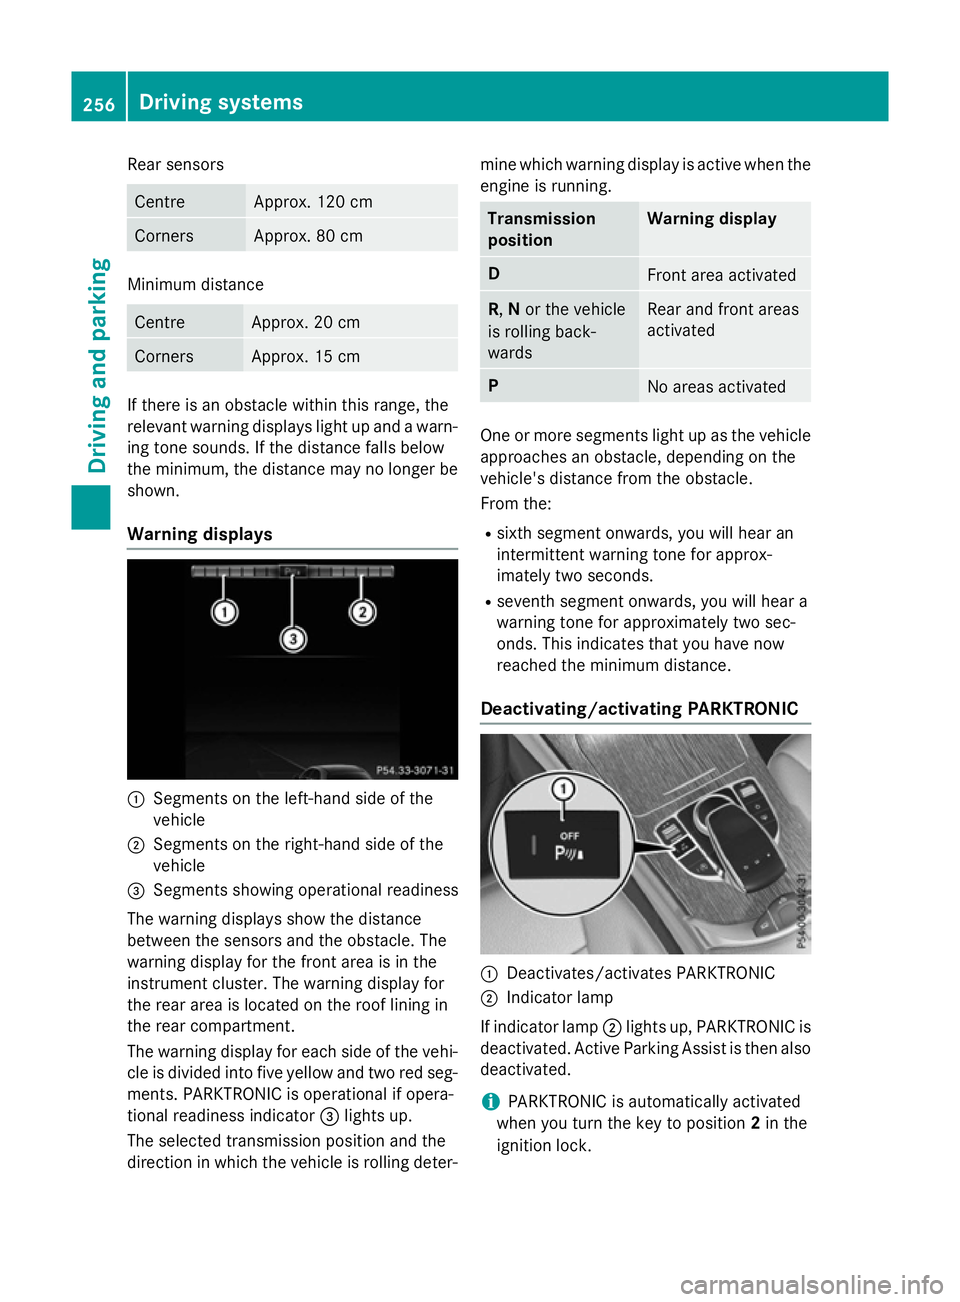
Warning displays :
Segments on the left-hand side of the
vehicle
; Segments on the right-hand side of the
vehicle
= Segments showing operational readiness
The warning displays show the distance
between the sensors and the obstacle. The
warning display for the front area is in the
instrument cluster. The warning display for
the rear area is located on the roof lining in
the rear compartment.
The warning display for each side of the vehi-
cle is divided into five yellow and two red seg- ments. PARKTRONIC is operational if opera-
tional readiness indicator =lights up.
The selected transmission position and the
direction in which the vehicle is rolling deter- mine which warning display is active when the
engine is running. Transmission
position Warning display
D
Front area activated
R,
Nor the vehicle
is rolling back-
wards Rear and front areas
activated
P
No areas activated
One or more segments light up as the vehicle
approaches an obstacle, depending on the
vehicle's distance from the obstacle.
From the:
R sixth segment onwards, you will hear an
intermittent warning tone for approx-
imately two seconds.
R seventh segment onwards, you will hear a
warning tone for approximately two sec-
onds. This indicates that you have now
reached the minimum distance.
Deactivating/activating PARKTRONIC :
Deactivates/activates PARKTRONIC
; Indicator lamp
If indicator lamp ;lights up, PARKTRONIC is
deactivated. Active Parking Assist is then also
deactivated.
i PARKTRONIC is automatically activated
when you turn the key to position 2in the
ignition lock. 256
Driving systemsDriving and pa
rking
Page 405 of 497
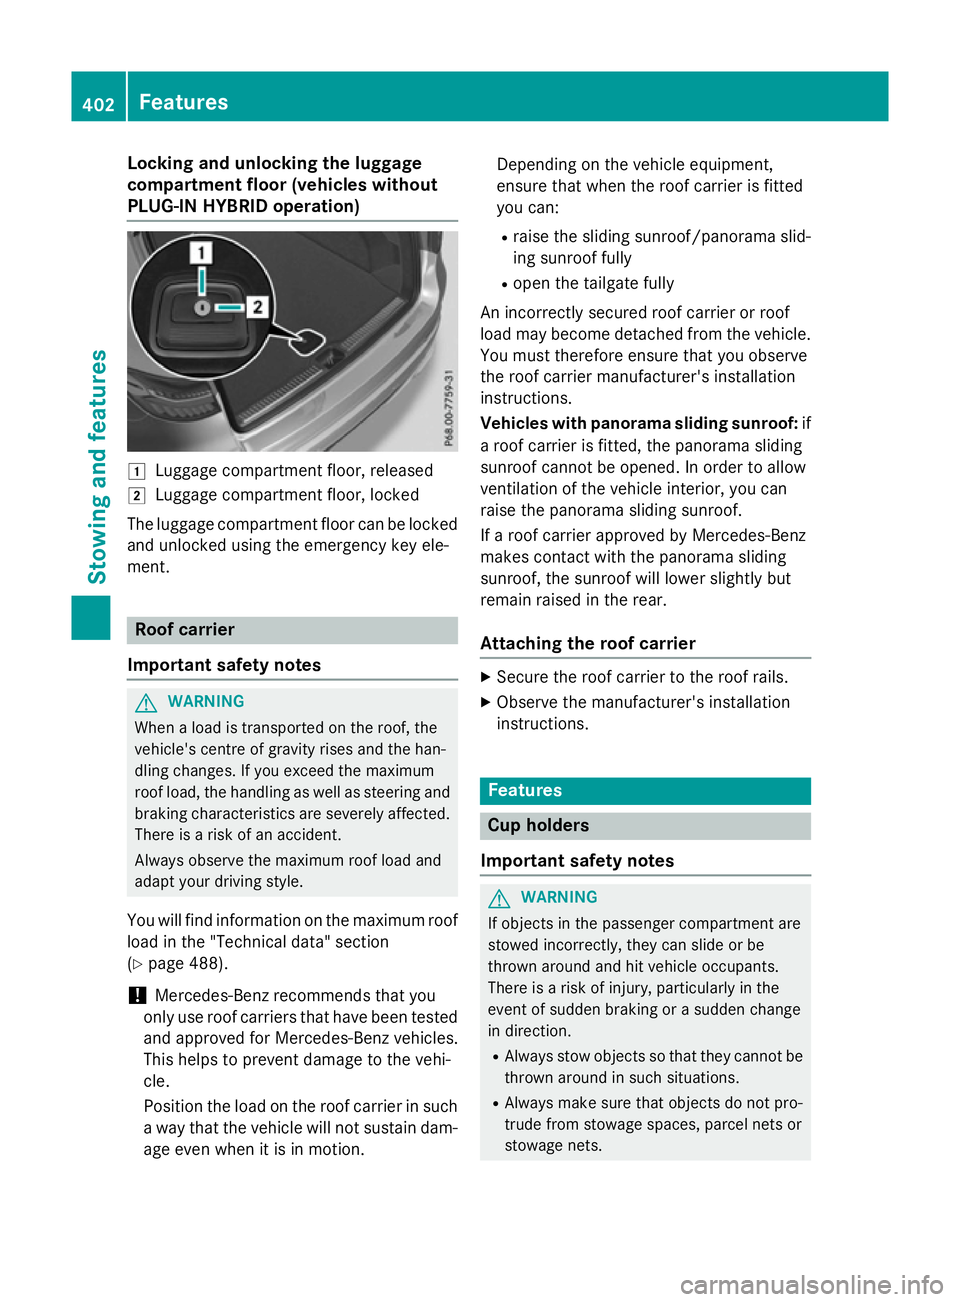
Locking and unlocking the luggage
compartment floor (vehicles without
PLUG-IN HYBRID operation) 1
Luggage compartment floor, released
2 Luggage compartment floor, locked
The luggage compartment floor can be locked
and unlocked using the emergency key ele-
ment. Roof carrier
Important safety notes G
WARNING
When a load is transported on the roof, the
vehicle's centre of gravity rises and the han-
dling changes. If you exceed the maximum
roof load, the handling as well as steering and braking characteristics are severely affected.
There is a risk of an accident.
Always observe the maximum roof load and
adapt your driving style.
You will find information on the maximum roof
load in the "Technical data" section
(Y page 488).
! Mercedes-Benz recommends that you
only use roof carriers that have been tested
and approved for Mercedes-Benz vehicles.
This helps to prevent damage to the vehi-
cle.
Position the load on the roof carrier in such
a way that the vehicle will not sustain dam-
age even when it is in motion. Depending on the vehicle equipment,
ensure that when the roof carrier is fitted
you can:
R raise the sliding sunroof/panorama slid-
ing sunroof fully
R open the tailgate fully
An incorrectly secured roof carrier or roof
load may become detached from the vehicle. You must therefore ensure that you observe
the roof carrier manufacturer's installation
instructions.
Vehicles with panorama sliding sunroof: if
a roof carrier is fitted, the panorama sliding
sunroof cannot be opened. In order to allow
ventilation of the vehicle interior, you can
raise the panorama sliding sunroof.
If a roof carrier approved by Mercedes-Benz
makes contact with the panorama sliding
sunroof, the sunroof will lower slightly but
remain raised in the rear.
Attaching the roof carrier X
Secure the roof carrier to the roof rails.
X Observe the manufacturer's installation
instructions. Features
Cup holders
Important safety notes G
WARNING
If objects in the passenger compartment are
stowed incorrectly, they can slide or be
thrown around and hit vehicle occupants.
There is a risk of injury, particularly in the
event of sudden braking or a sudden change
in direction.
R Always stow objects so that they cannot be
thrown around in such situations.
R Always make sure that objects do not pro-
trude from stowage spaces, parcel nets or
stowage nets. 402
FeaturesStowing and features
Page 424 of 497
To avoid damage to the vehicle, deactivate
DISTRONIC PLUS and the HOLD function in
the following or similar situations:
R when towing away
R in a car wash
! Make sure:
R the side windows and sliding sunroof are
closed completely.
R the blower for the ventilation/heating is
switched off (OFF button is depressed).
R the windscreen wiper switch is at posi-
tion 0
R the 360° camera or reversing camera is
switched off.
The vehicle could otherwise be damaged.
! If the key is within the rear detection
range of KEYLESS-GO, situations such as
the following could lead to the uninten-
tional opening of the boot lid/tailgate:
R using a car wash
R using a high-pressure cleaner
Make sure that the key is at least 3 maway
from the vehicle.
! If the key is within the rear detection
range of KEYLESS-GO, the following situa-
tions, for example, could lead to the unin-
tentional opening of the tailgate:
R using a car wash
R using a high-pressure cleaner
Make sure that the key is at least 3 maway
from the vehicle.
! Make sure that the automatic transmis-
sion is in neutral position Nwhen washing
your vehicle in a tow-through car wash. The
vehicle may otherwise be damaged.
R Operating with the key:
Do not remove the key from the ignition
lock. Do not open the driver's door when
the engine is switched off or at very low
speeds. Otherwise, when in transmission position Dor Rthe automatic transmis- sion will automatically switch to park
position
Pand block the wheels.
R Operating with the Start/Stop button:
Do not open the driver's door when the
engine is switched off or at very low
speeds. Otherwise, when in transmission
position Dor Rthe automatic transmis-
sion will automatically switch to park
position Pand block the wheels.
Observe the following to make sure that the
automatic transmission stays in neutral posi-
tion N:
Operating with the key: X Make sure the ignition is switched on.
X Make sure that the vehicle is stationary.
X Depress the brake pedal and keep it
depressed.
X Select neutral N.
X Release the brake pedal.
X Release the electric parking brake, if nec-
essary.
X Switch off the ignition and leave the key in
the ignition lock.
Operating with the Start/Stop button:
X Make sure the ignition is switched on.
X Make sure that the vehicle is stationary.
X Depress the brake pedal and keep it
depressed.
X Engage park position P.
X Release the brake pedal.
X Remove the Start/Stop button from the
ignition lock (Y page 187).
X Insert the key into the ignition lock.
X Switch on the ignition.
X Depress the brake pedal and keep it
depressed.
X Select neutral N.
X Release the brake pedal.
X Release the electric parking brake, if nec-
essary.
X Switch off the ignition and leave the key in
the ignition lock. Care
421Maintenance and care Z
Page 425 of 497
You can wash the vehicle in an automatic car
wash from the very start.
Wash off excess dirt before cleaning the vehi- cle in an automatic car wash.
After using an automatic car wash, wipe off
wax from the windscreen and the wiper
blades. This will prevent smears and reduce
wiping noises caused by residue on the wind-
screen.
Washing by hand In some countries, washing by hand is only
allowed at specially equipped washing bays.
Observe the legal requirements for each indi- vidual country.
X Do not use hot water and do not wash the
vehicle in direct sunlight.
X Use a soft sponge to clean.
X Use a mild cleaning agent, such as a car
shampoo approved by Mercedes-Benz.
X Thoroughly hose down the vehicle with a
gentle jet of water.
X Do not point the water jet directly towards
the air inlet.
X Use plenty of water and rinse out the
sponge frequently.
X Rinse the vehicle with clean water and dry
thoroughly with a chamois.
X Do not let the cleaning agent dry on the
paintwork.
When using the vehicle in winter, remove all
traces of road salt deposits carefully and as
soon as possible.
High-pressure cleaning equipment G
WARNING
The water jet of circular-jet nozzles (dirt grind- ers) can cause damage not visible from the
outside to tyres or chassis components. Com-
ponents damaged in this way can unexpect-
edly fail. There is a risk of an accident.
Do not use high-pressure cleaners with circu-
lar-jet nozzles to clean the vehicle. Have dam- aged tyres or chassis components replaced
immediately.
! Always maintain a distance of at least
30 cm between the vehicle and the high-
pressure cleaner nozzle. Information about the correct distance is available from the
equipment manufacturer.
Move the high-pressure cleaner nozzle
around when cleaning your vehicle.
Do not aim directly at any of the following:
R tyres
R door gaps, roof gaps, joints etc.
R electrical components
R battery
R connectors
R lights
R seals
R trim elements
R ventilation slots
Damaged seals or electrical components
can lead to leaks or failures.
! If the key is within the rear detection
range of KEYLESS-GO, situations such as
the following could lead to the uninten-
tional opening of the boot lid/tailgate:
R using a car wash
R using a high-pressure cleaner
Make sure that the key is at least 3 maway
from the vehicle.
! If the key is within the rear detection
range of KEYLESS-GO, the following situa-
tions, for example, could lead to the unin-
tentional opening of the tailgate:
R using a car wash
R using a high-pressure cleaner
Make sure that the key is at least 3 maway
from the vehicle.
! Edition 1 special model: parts of your
vehicle are covered with a decorative foil.
Maintain a distance of at least 70 cm
between the foil-wrapped parts of the vehi- 422
CareMaintenance and care
Page 431 of 497
R
unevenness in structure
R marks caused by growth and injury
R subtle colour differences
These are characteristics of leather and not
material faults.
Seat covers from other materials
! Observe the following when cleaning:
R clean artificial leather covers with a cloth
moistened with a solution containing 1% detergent (e.g. washing-up liquid).
R clean cloth covers with a microfibre cloth
moistened with a solution containing 1% detergent (e.g. washing-up liquid). Rub
carefully, and always wipe entire seat
sections to avoid leaving visible lines.
Leave the seat to dry afterwards. Clean-
ing results depend on the type of dirt andhow long it has been there.
R Clean DINAMICA covers with a damp
cloth. Make sure that you wipe entire
seat sections to avoid leaving visible
lines.
Cleaning the seat belts G
WARNING
Seat belts may be severely weakened if
bleached or coloured. This may lead to the
seat belts, for example, tearing or failing in an accident. There is an increased risk of injury,
possibly even fatal.
Never bleach or colour seat belts.
! Do not clean the seat belts using chemical
cleaning agents. Do not dry the seat belts at
temperatures above 80 † or in direct sun-
light.
X Use clean, lukewarm water and soap solu-
tion. Cleaning the roof lining and carpets X
Roof lining: if it is very dirty, use a soft
brush or dry shampoo.
X Carpets: use the carpet and textile clean-
ing agents recommended and approved by
Mercedes-Benz. 428
CareMaintenance and care
Page 459 of 497
requirements can stipulate a specific tyre
type for your vehicle. Furthermore, the use of certain tyre types in certain regions and areas
of operation can be highly beneficial. You can find further information regarding tyres at
specialist tyre retailers, at qualified specialist
workshops or at any Mercedes-Benz Service
Centre.
R Only fit tyres and wheels of the same type
and make.
Exception: it is permissible to fit a different type or make in the event of a flat tyre.
Observe the "MOExtended tyres (tyres with
run-flat characteristics)" section
(Y page 434).
R Only fit tyres of the correct size onto the
wheels.
R Run in new tyres at moderate speeds for
the first 100 km. They only reach their full
performance after this distance.
R Do not drive with tyres which have too little
tread depth. This otherwise significantly
reduces the traction on wet roads (aqua-
planing).
R Replace the tyres after six years at the lat-
est, regardless of wear.
Observe the notes on the emergency spare
wheel (Y page 474). MOExtended tyres (tyres with run-flat
characteristics)
With MOExtended tyres (tyres with run-flat
characteristics), you can continue to drive
your vehicle even if there is a total loss of
pressure in one or more tyres.
MOExtended tyres may only be used in con-
junction with an activated tyre pressure loss
warning system or with an activated tyre pres- sure monitor and on wheels specifically tes-
ted by Mercedes-Benz.
Notes on driving with MOExtended tyres with a flat tyre (Y page 434).
Vehicles with MOExtended tyres are not
equipped with a TIREFIT kit at the factory. It is therefore recommended that you additionally
equip your vehicle with a TIREFIT kit if you fit
tyres that do not feature run-flat characteris- tics, e.g. winter tyres. A TIREFIT kit can be
obtained from a qualified specialist work-
shop. Winter operation
General notes
Have your vehicle winterproofed at a qualified specialist workshop at the onset of winter.
Observe the notes in the "Changing a wheel"
section (Y page 463). Driving with summer tyres
At temperatures below +7 †, summer tyres
lose elasticity and therefore traction and
braking power. Change the tyres on your vehi- cle to M+S tyres. Using summer tyres at very
cold temperatures could cause tears to form, thereby damaging the tyres permanently.
Mercedes-Benz cannot accept responsibility
for this type of damage. G
WARNING
Damaged tyres can cause tyre inflation pres-
sure loss. As a result, you could lose control of your vehicle. There is a risk of accident.
Check the tyres regularly for signs of damageand replace any damaged tyres immediately. M+S tyres
G
WARNING
M+S tyres with a tyre tread depth of less than 4 mm are not suitable for use in winter as they
do not provide sufficient traction. There is a
risk of accident.
M+S tyres with a tread depth of less than
4 mm must be replaced. 456
Winter operationWheels and tyres
Page 462 of 497
does not permit any reliable conclusion about
the tyre pressure. On vehicles fitted with the
electronic tyre pressure monitor, the tyre
pressure can be checked using the on-board
computer.
If possible, only correct tyre pressures when
the tyres are cold.
The tyres are cold:
R if the vehicle has been parked with the tyres
out of direct sunlight for at least three
hours and
R if the vehicle has not been driven further
than 1.6 km
Depending on the ambient temperature, the
vehicle speed and the load on the tyres, the
tyre temperature and thus the tyre pressure
changes by approximately 10 kPa (0.1 bar/
1.5 psi) per 10 †. Take this into account
when checking the pressure of warm tyres.
Only correct the tyre pressure if it is too low
for the current operating conditions.
Driving with tyre pressure that is too high or
too low can:
R shorten the service life of the tyres
R cause increased tyre damage
R have a negative effect on handling charac-
teristics and thus driving safety (e.g. aqua- planing)
The tyre pressure values given for low loads
are minimum values which offer you good ride
comfort characteristics.
However, you can also use the values given
for higher loads. These are permissible and
will not adversely affect the running of the
vehicle. Tyre pressure loss warning system
General notes While the vehicle is in motion, the tyre pres-
sure loss warning system monitors the set
tyre pressure using the rotational speed of
the wheels. This enables the system to detect significant pressure loss in a tyre. If the speed of rotation of a wheel changes as a result of a
loss of pressure, a corresponding warning
message will appear in the multifunction dis-
play.
You can recognise the tyre pressure loss
warning by the Run Flat Indicator
Run Flat Indicator
active active Restart with OK
Restart with OK message which
appears in the Service
Servicemenu of the multi-
function display. Information on the message display can be found in the "Restarting the
tyre pressure loss warning system" section
(Y page 460).
Important safety notes The tyre pressure warning system does not
warn you of an incorrectly set tyre pressure.
Observe the notes on the recommended tyre pressure (Y page 458).
The tyre pressure loss warning does not
replace the need to regularly check the tyre
pressures. An even loss of pressure on sev-
eral tyres at the same time cannot be detec-
ted by the tyre pressure loss warning system. The tyre pressure monitor is not able to warn
you of a sudden loss of pressure, e.g. if the
tyre is penetrated by a foreign object. In the
event of a sudden loss of pressure, bring the
vehicle to a halt by braking carefully. Avoid
abrupt steering manoeuvres.
The function of the tyre pressure loss warning system is limited or delayed if:
R snow chains are fitted to your vehicle's
tyres.
R road conditions are wintry.
R you are driving on sand or gravel.
R you adopt a very sporty driving style (cor-
nering at high speeds or driving with high
rates of acceleration).
R you are towing a very heavy or large trailer.
R you are driving with a heavy load (in the
vehicle or on the roof). Tyre pressure
459Wheels and tyres Z