2015 MERCEDES-BENZ GLC SUV keyless
[x] Cancel search: keylessPage 191 of 497
To start the vehicle without actively using the
key:
R the Start/Stop button must be inserted in
the ignition lock
R the key must be in the vehicle
R the vehicle must not be locked with the key
or KEYLESS-GO (Y page 95)
Do not keep the key:
R with electronic devices, e.g. a mobile
phone or another key
R with metallic objects, e.g. coins or metal
film
R inside metallic objects, e.g. a metal case
This can affect the key's functionality.
If you lock the vehicle with the key's remote
control or with KEYLESS-GO, after a short
time:
R you will not be able to switch on the ignition
with the Start/Stop button
R you will not be able to start the engine with
the Start/Stop button until the vehicle is
unlocked again
If you lock the vehicle centrally using the but- ton on the front door (Y page 101), you can
continue to start the engine with the Start/
Stop button.
The engine can be switched off while the vehi-
cle is in motion by pressing and holding the
Start/Stop button for three seconds. This
function operates independently of the ECO
start/stop automatic engine switch-off func-
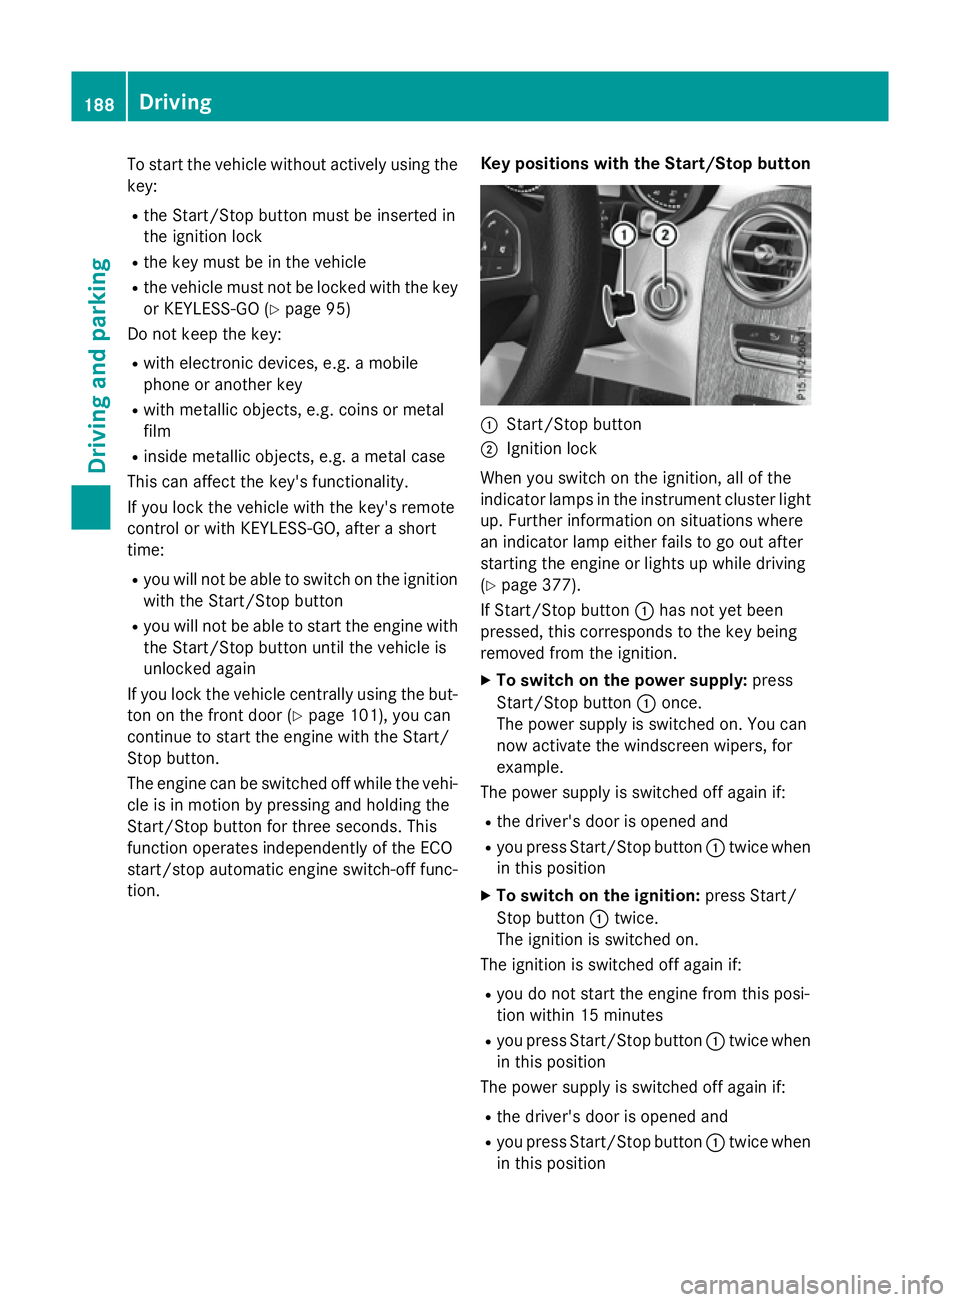
tion. Key positions with the Start/Stop button :
Start/Stop button
; Ignition lock
When you switch on the ignition, all of the
indicator lamps in the instrument cluster light up. Further information on situations where
an indicator lamp either fails to go out after
starting the engine or lights up while driving
(Y page 377).
If Start/Stop button :has not yet been
pressed, this corresponds to the key being
removed from the ignition.
X To switch on the power supply: press
Start/Stop button :once.
The power supply is switched on. You can
now activate the windscreen wipers, for
example.
The power supply is switched off again if:
R the driver's door is opened and
R you press Start/Stop button :twice when
in this position
X To switch on the ignition: press Start/
Stop button :twice.
The ignition is switched on.
The ignition is switched off again if:
R you do not start the engine from this posi-
tion within 15 minutes
R you press Start/Stop button :twice when
in this position
The power supply is switched off again if:
R the driver's door is opened and
R you press Start/Stop button :twice when
in this position 188
DrivingDriving and parking
Page 193 of 497
X
To start a diesel engine : turn the key to
position 2in the ignition lock (Y page 187).
The % preglow indicator lamp in the
instrument cluster lights up.
X Turn the key to position 3in the ignition
lock and release it as soon as the engine is running (Y page 187).
i Vehicles with a diesel engine:
you can
start the engine without preglow if the
engine is warm.
If the engine will not start:
X Remove the key from the ignition lock.
X Reinsert the key into the ignition lock after
waiting for a short period.
X Turn the key to position 2in the ignition
lock (Y page 187).
The indicator lamps in the instrument clus- ter light up (Y page 375).
X Turn the key to position 3in the ignition
lock (Y page 187 )and release it as soon as
the engine is running.
Starting procedure using the Start/
Stop button The Start/Stop button is only available on
vehicles with KEYLESS-GO or the KEYLESS-
GO start function.
The Start/Stop button can be used to start
the vehicle manually without inserting the key
into the ignition lock. The key must be in the
vehicle and the Start/Stop button must be
inserted in the ignition lock. This mode for
starting the engine operates independently of
the ECO start/stop automatic engine start
function.
You can start the engine if a valid key is in the vehicle. Switch off the engine and always take
the key with you when leaving the vehicle,
even if you only leave it for a short time. Pay
attention to the important safety notes. X
Depress the brake pedal and keep it
depressed.
X Press the Start/Stop button once
(Y page 187).
Vehicles with a petrol engine: the engine
starts.
Vehicles with a diesel engine: preglow is
activated and the engine starts. Pulling away
General notes G
WARNING
If the engine speed is above the idling speed
and you engage transmission position Dor R,
the vehicle could pull away suddenly. There is a risk of an accident.
When engaging transmission position Dor R,
always firmly depress the brake pedal and do not simultaneously accelerate.
Depress the accelerator carefully when pull-
ing away.
The vehicle locks centrally once you have
pulled away. The locking knobs in the doors
drop down.
You can open the doors from the inside at any
time.
You can also deactivate the automatic locking feature, see the Digital Owner's Manual.
It is only possible to shift the transmission
from position Pto the desired position if you
depress the brake pedal. Only then is the
parking lock released. If you do not depress
the brake pedal, the DIRECT SELECT lever can still be moved but the parking lock remains
engaged.
i Upshifts take place at higher engine
speeds after a cold start. This helps the
catalytic converter to reach its operating
temperature more quickly.
Information on automatically releasing the
electrical parking brake (Y page 220).190
DrivingDriving an
d parking
Page 208 of 497
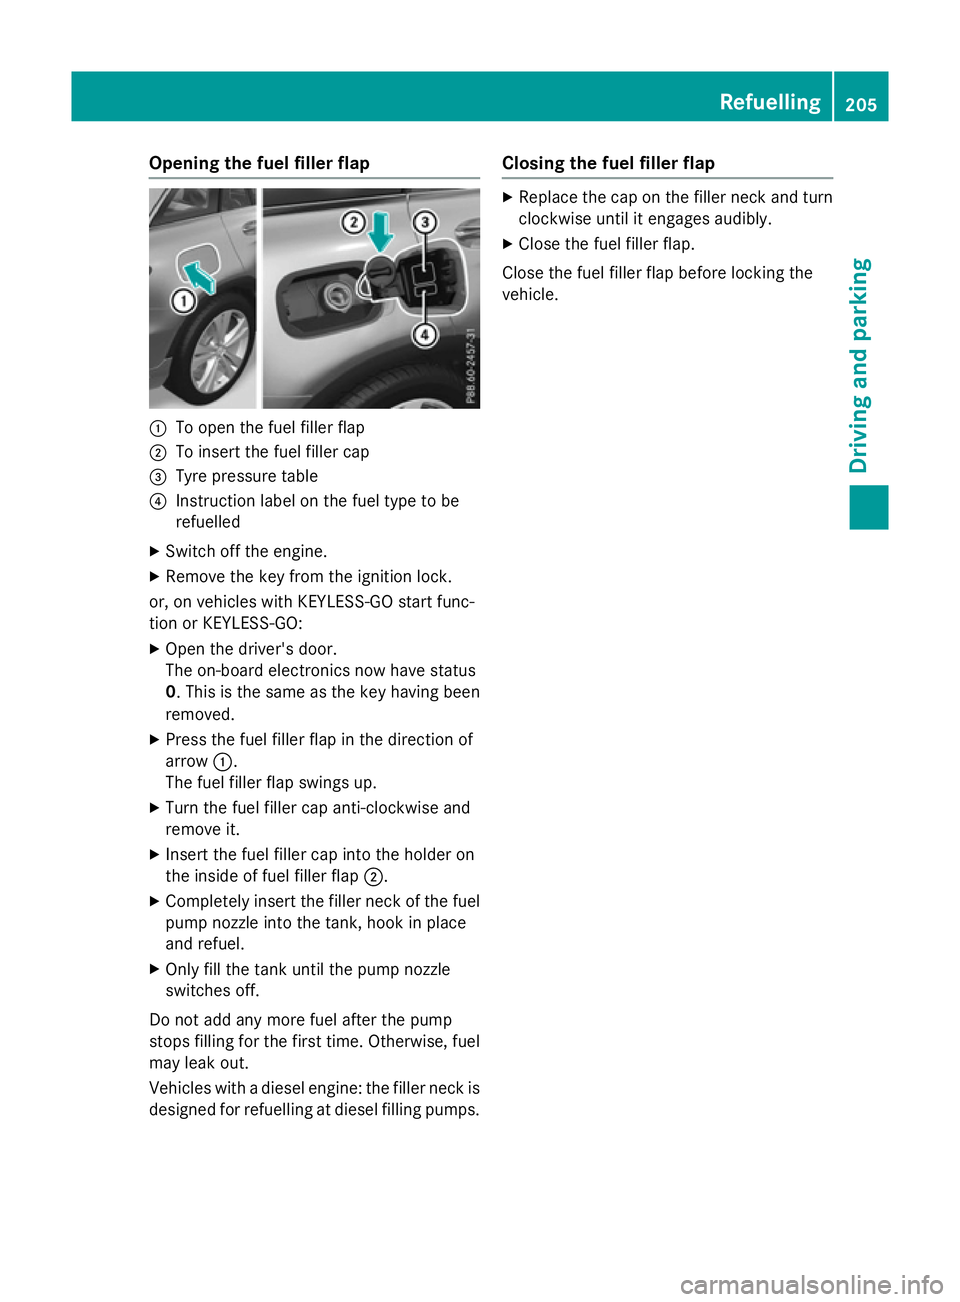
Opening the fuel filler flap
:
To open the fuel filler flap
; To insert the fuel filler cap
= Tyre pressure table
? Instruction label on the fuel type to be
refuelled
X Switch off the engine.
X Remove the key from the ignition lock.
or, on vehicles with KEYLESS-GO start func-
tion or KEYLESS‑ GO:
X Open the driver's door.
The on-board electronics now have status
0. This is the same as the key having been
removed.
X Press the fuel filler flap in the direction of
arrow :.
The fuel filler flap swings up.
X Turn the fuel filler cap anti-clockwise and
remove it.
X Insert the fuel filler cap into the holder on
the inside of fuel filler flap ;.
X Completely insert the filler neck of the fuel
pump nozzle into the tank, hook in place
and refuel.
X Only fill the tank until the pump nozzle
switches off.
Do not add any more fuel after the pump
stops filling for the first time. Otherwise, fuel
may leak out.
Vehicles with a diesel engine: the filler neck is designed for refuelling at diesel filling pumps. Closing the fuel filler flap X
Replace the cap on the filler neck and turn
clockwise until it engages audibly.
X Close the fuel filler flap.
Close the fuel filler flap before locking the
vehicle. Refuelling
205Driving and parking Z
Page 209 of 497
Problems with the fuel and fuel tank
Problem
Possible causes/consequences and
M
MSolutions Fuel is leaking from the
vehicle. G
WARNING
The fuel line or the fuel tank is faulty.
There is a risk of fire or explosion.
X Apply the electric parking brake.
X Switch off the engine.
X Remove the key from the ignition lock.
or, on vehicles with KEYLESS-GO start function or KEYLESS ‑GO:
X Open the driver's door.
The on-board electronics now have status 0. This is the same as
the key having been removed.
X Do not restart the engine under any circumstances.
X Consult a qualified specialist workshop. The engine does not
start. The fuel tank of a vehicle with a diesel engine has been run com-
pletely dry.
X Refuel the vehicle with at least 5 litres of diesel.
X Turn the ignition on for approximately ten seconds
(Y page 187).
X Start the engine continuously for a maximum of ten seconds
until it runs smoothly.
If the engine does not start:
X Turn the ignition on again a maximum of ten seconds
(Y page 187).
X Start the engine again continuously for a maximum of ten sec-
onds until it runs smoothly.
If the engine does not start after three attempts:
X Consult a qualified specialist workshop. The fuel filler flap can-
not be opened. The fuel filler flap is not unlocked.
X Unlock the vehicle (Y page 95). The key battery is discharged or nearly discharged.
X Unlock the vehicle using the emergency key element
(Y page 97). The fuel filler flap is unlocked, but the opening mechanism is jam-
med.
X Consult a qualified specialist workshop. 206
RefuellingDriving and parking
Page 421 of 497
Let the engine cool down before you open the
cap. Wear gloves and eye protection. Open
the cap slowly to release the pressure. X
Park the vehicle on a level surface.
Only check the coolant level if the vehicle is
on a level surface and the engine has
cooled down.
X Turn the key to position 2in the ignition
lock (Y page 187).
or
X On vehicles with KEYLESS-GO, press the
Start/Stop button twice (Y page 187).
X Check the coolant temperature display in
the instrument cluster (Y page 313).
The coolant temperature must be below
70 †.
X Turn the key to position 0(Y page 187).
or
X On vehicles with KEYLESS-GO, pull the
Start/Stop button from the ignition lock
(Y page 187).
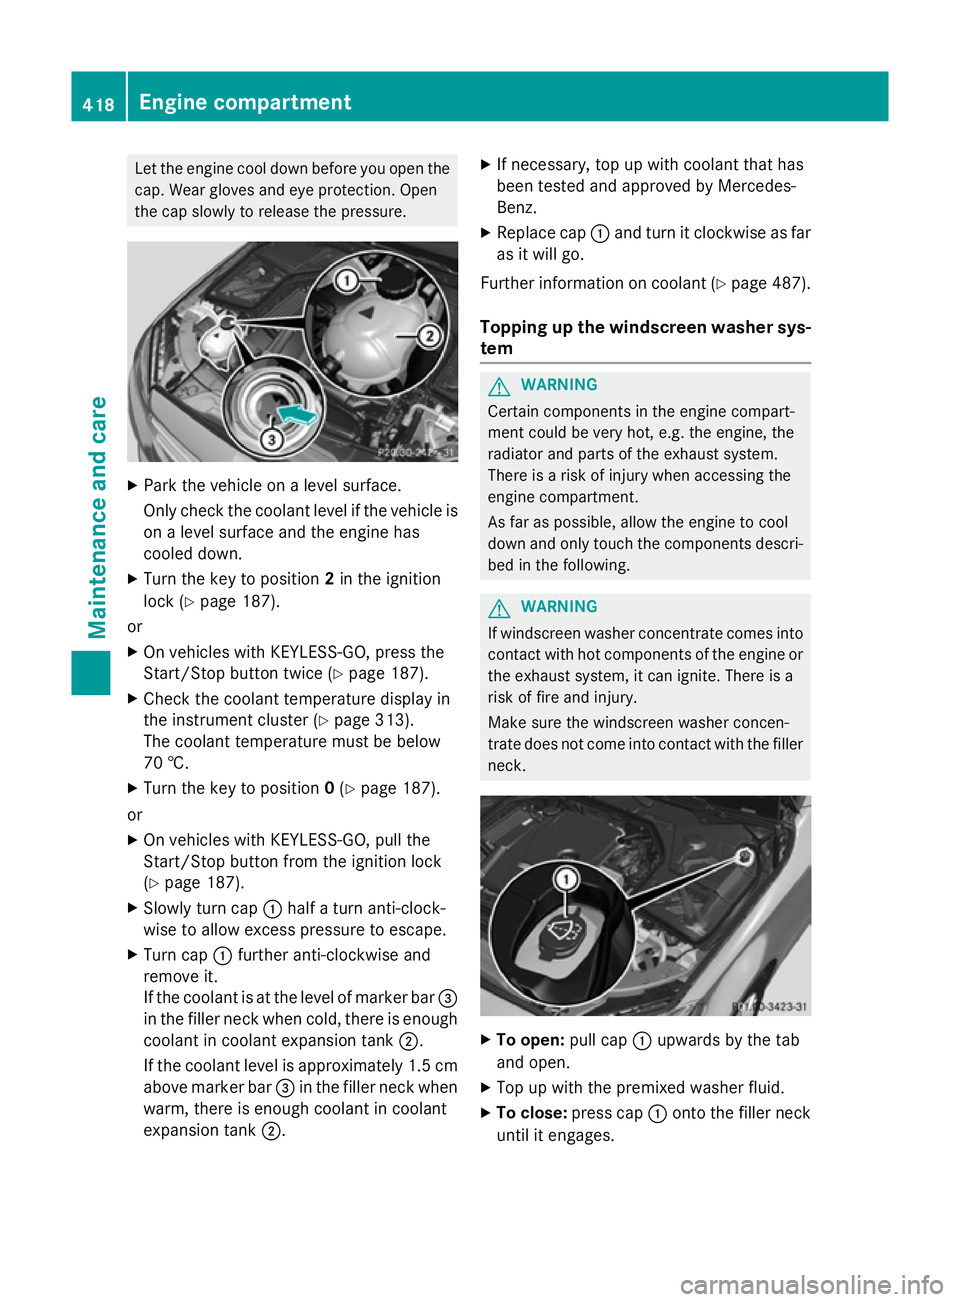
X Slowly turn cap :half a turn anti-clock-
wise to allow excess pressure to escape.
X Turn cap :further anti-clockwise and
remove it.
If the coolant is at the level of marker bar =
in the filler neck when cold, there is enough
coolant in coolant expansion tank ;.
If the coolant level is approximately 1.5 cm above marker bar =in the filler neck when
warm, there is enough coolant in coolant
expansion tank ;. X
If necessary, top up with coolant that has
been tested and approved by Mercedes-
Benz.
X Replace cap :and turn it clockwise as far
as it will go.
Further information on coolant (Y page 487).
Topping up the windscreen washer sys- tem G
WARNING
Certain components in the engine compart-
ment could be very hot, e.g. the engine, the
radiator and parts of the exhaust system.
There is a risk of injury when accessing the
engine compartment.
As far as possible, allow the engine to cool
down and only touch the components descri- bed in the following. G
WARNING
If windscreen washer concentrate comes into contact with hot components of the engine or
the exhaust system, it can ignite. There is a
risk of fire and injury.
Make sure the windscreen washer concen-
trate does not come into contact with the filler neck. X
To open: pull cap:upwards by the tab
and open.
X Top up with the premixed washer fluid.
X To close: press cap :onto the filler neck
until it engages. 418
Engine compartmentMaintenance and care
Page 424 of 497
To avoid damage to the vehicle, deactivate
DISTRONIC PLUS and the HOLD function in
the following or similar situations:
R when towing away
R in a car wash
! Make sure:
R the side windows and sliding sunroof are
closed completely.
R the blower for the ventilation/heating is
switched off (OFF button is depressed).
R the windscreen wiper switch is at posi-
tion 0
R the 360° camera or reversing camera is
switched off.
The vehicle could otherwise be damaged.
! If the key is within the rear detection
range of KEYLESS-GO, situations such as
the following could lead to the uninten-
tional opening of the boot lid/tailgate:
R using a car wash
R using a high-pressure cleaner
Make sure that the key is at least 3 maway
from the vehicle.
! If the key is within the rear detection
range of KEYLESS-GO, the following situa-
tions, for example, could lead to the unin-
tentional opening of the tailgate:
R using a car wash
R using a high-pressure cleaner
Make sure that the key is at least 3 maway
from the vehicle.
! Make sure that the automatic transmis-
sion is in neutral position Nwhen washing
your vehicle in a tow-through car wash. The
vehicle may otherwise be damaged.
R Operating with the key:
Do not remove the key from the ignition
lock. Do not open the driver's door when
the engine is switched off or at very low
speeds. Otherwise, when in transmission position Dor Rthe automatic transmis- sion will automatically switch to park
position
Pand block the wheels.
R Operating with the Start/Stop button:
Do not open the driver's door when the
engine is switched off or at very low
speeds. Otherwise, when in transmission
position Dor Rthe automatic transmis-
sion will automatically switch to park
position Pand block the wheels.
Observe the following to make sure that the
automatic transmission stays in neutral posi-
tion N:
Operating with the key: X Make sure the ignition is switched on.
X Make sure that the vehicle is stationary.
X Depress the brake pedal and keep it
depressed.
X Select neutral N.
X Release the brake pedal.
X Release the electric parking brake, if nec-
essary.
X Switch off the ignition and leave the key in
the ignition lock.
Operating with the Start/Stop button:
X Make sure the ignition is switched on.
X Make sure that the vehicle is stationary.
X Depress the brake pedal and keep it
depressed.
X Engage park position P.
X Release the brake pedal.
X Remove the Start/Stop button from the
ignition lock (Y page 187).
X Insert the key into the ignition lock.
X Switch on the ignition.
X Depress the brake pedal and keep it
depressed.
X Select neutral N.
X Release the brake pedal.
X Release the electric parking brake, if nec-
essary.
X Switch off the ignition and leave the key in
the ignition lock. Care
421Maintenance and care Z
Page 425 of 497
You can wash the vehicle in an automatic car
wash from the very start.
Wash off excess dirt before cleaning the vehi- cle in an automatic car wash.
After using an automatic car wash, wipe off
wax from the windscreen and the wiper
blades. This will prevent smears and reduce
wiping noises caused by residue on the wind-
screen.
Washing by hand In some countries, washing by hand is only
allowed at specially equipped washing bays.
Observe the legal requirements for each indi- vidual country.
X Do not use hot water and do not wash the
vehicle in direct sunlight.
X Use a soft sponge to clean.
X Use a mild cleaning agent, such as a car
shampoo approved by Mercedes-Benz.
X Thoroughly hose down the vehicle with a
gentle jet of water.
X Do not point the water jet directly towards
the air inlet.
X Use plenty of water and rinse out the
sponge frequently.
X Rinse the vehicle with clean water and dry
thoroughly with a chamois.
X Do not let the cleaning agent dry on the
paintwork.
When using the vehicle in winter, remove all
traces of road salt deposits carefully and as
soon as possible.
High-pressure cleaning equipment G
WARNING
The water jet of circular-jet nozzles (dirt grind- ers) can cause damage not visible from the
outside to tyres or chassis components. Com-
ponents damaged in this way can unexpect-
edly fail. There is a risk of an accident.
Do not use high-pressure cleaners with circu-
lar-jet nozzles to clean the vehicle. Have dam- aged tyres or chassis components replaced
immediately.
! Always maintain a distance of at least
30 cm between the vehicle and the high-
pressure cleaner nozzle. Information about the correct distance is available from the
equipment manufacturer.
Move the high-pressure cleaner nozzle
around when cleaning your vehicle.
Do not aim directly at any of the following:
R tyres
R door gaps, roof gaps, joints etc.
R electrical components
R battery
R connectors
R lights
R seals
R trim elements
R ventilation slots
Damaged seals or electrical components
can lead to leaks or failures.
! If the key is within the rear detection
range of KEYLESS-GO, situations such as
the following could lead to the uninten-
tional opening of the boot lid/tailgate:
R using a car wash
R using a high-pressure cleaner
Make sure that the key is at least 3 maway
from the vehicle.
! If the key is within the rear detection
range of KEYLESS-GO, the following situa-
tions, for example, could lead to the unin-
tentional opening of the tailgate:
R using a car wash
R using a high-pressure cleaner
Make sure that the key is at least 3 maway
from the vehicle.
! Edition 1 special model: parts of your
vehicle are covered with a decorative foil.
Maintain a distance of at least 70 cm
between the foil-wrapped parts of the vehi- 422
CareMaintenance and care
Page 436 of 497
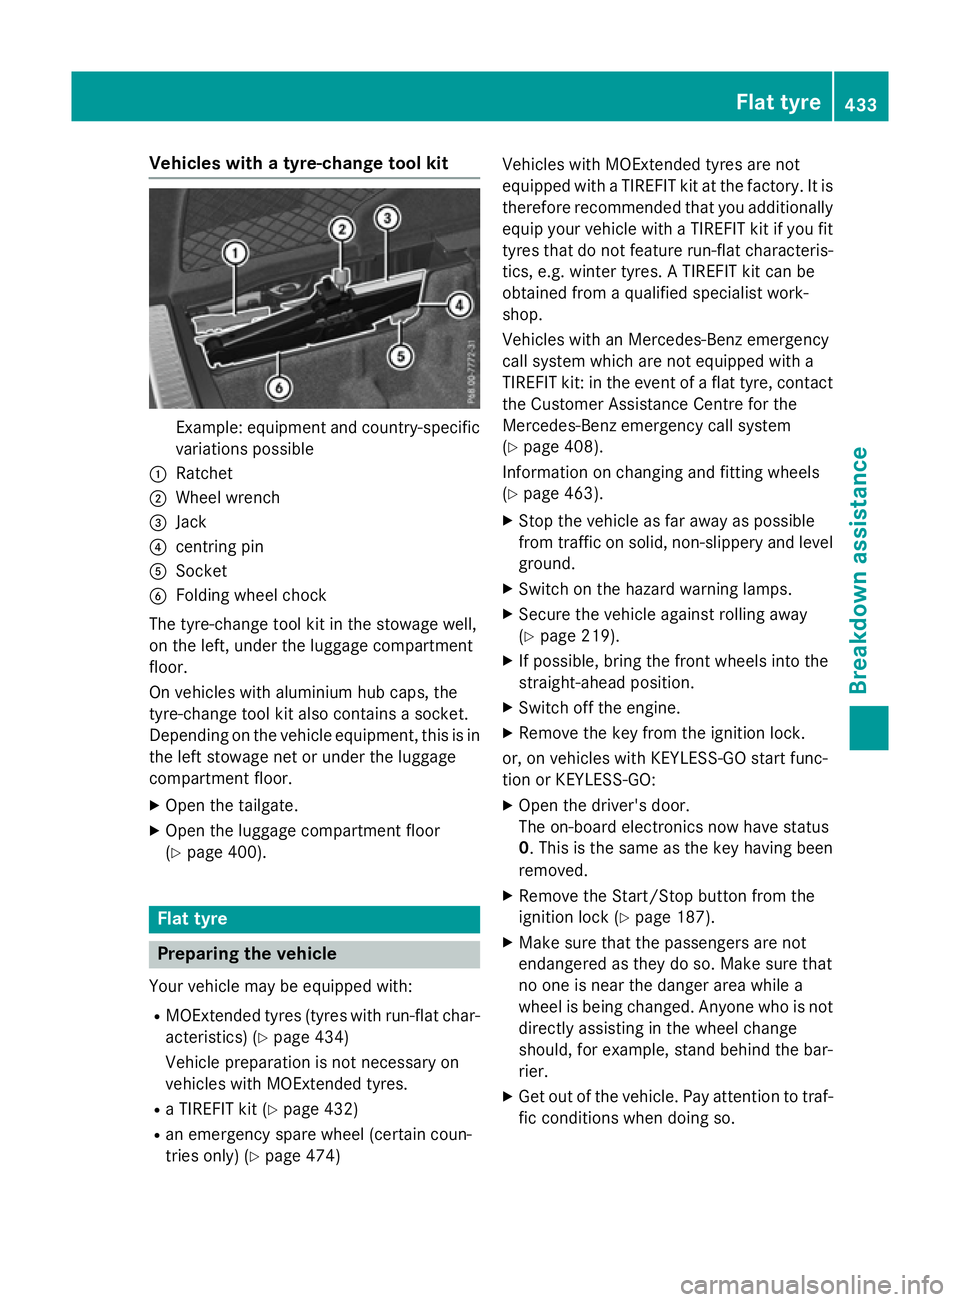
Vehicles with a tyre-change tool kit
Example: equipment and country-specific
variations possible
: Ratchet
; Wheel wrench
= Jack
? centring pin
A Socket
B Folding wheel chock
The tyre-change tool kit in the stowage well,
on the left, under the luggage compartment
floor.
On vehicles with aluminium hub caps, the
tyre-change tool kit also contains a socket.
Depending on the vehicle equipment, this is in the left stowage net or under the luggage
compartment floor.
X Open the tailgate.
X Open the luggage compartment floor
(Y page 400). Flat tyre
Preparing the vehicle
Your vehicle may be equipped with: R MOExtended tyres (tyres with run-flat char-
acteristics) (Y page 434)
Vehicle preparation is not necessary on
vehicles with MOExtended tyres.
R a TIREFIT kit (Y page 432)
R an emergency spare wheel (certain coun-
tries only) (Y page 474) Vehicles with MOExtended tyres are not
equipped with a TIREFIT kit at the factory. It is
therefore recommended that you additionallyequip your vehicle with a TIREFIT kit if you fit tyres that do not feature run-flat characteris-
tics, e.g. winter tyres. A TIREFIT kit can be
obtained from a qualified specialist work-
shop.
Vehicles with an Mercedes-Benz emergency
call system which are not equipped with a
TIREFIT kit: in the event of a flat tyre, contact
the Customer Assistance Centre for the
Mercedes-Benz emergency call system
(Y page 408).
Information on changing and fitting wheels
(Y page 463).
X Stop the vehicle as far away as possible
from traffic on solid, non-slippery and level
ground.
X Switch on the hazard warning lamps.
X Secure the vehicle against rolling away
(Y page 219).
X If possible, bring the front wheels into the
straight-ahead position.
X Switch off the engine.
X Remove the key from the ignition lock.
or, on vehicles with KEYLESS-GO start func-
tion or KEYLESS ‑GO:
X Open the driver's door.
The on-board electronics now have status
0. This is the same as the key having been
removed.
X Remove the Start/Stop button from the
ignition lock (Y page 187).
X Make sure that the passengers are not
endangered as they do so. Make sure that
no one is near the danger area while a
wheel is being changed. Anyone who is not
directly assisting in the wheel change
should, for example, stand behind the bar-
rier.
X Get out of the vehicle. Pay attention to traf-
fic conditions when doing so. Flat tyre
433Breakdown assis tance