2015 MERCEDES-BENZ GLC SUV brake light
[x] Cancel search: brake lightPage 226 of 497
Service Booklet or by the service interval
display.
Fuel consumption also increases when driv-
ing in cold weather, in stop-start traffic, on
short journeys and in hilly terrain. ECO display
The ECO display shows you how economical
your driving style is. The ECO display assists
you in achieving the most economical driving
style for the selected settings and prevailing
conditions. Consumption can be significantly
influenced by your driving style. :
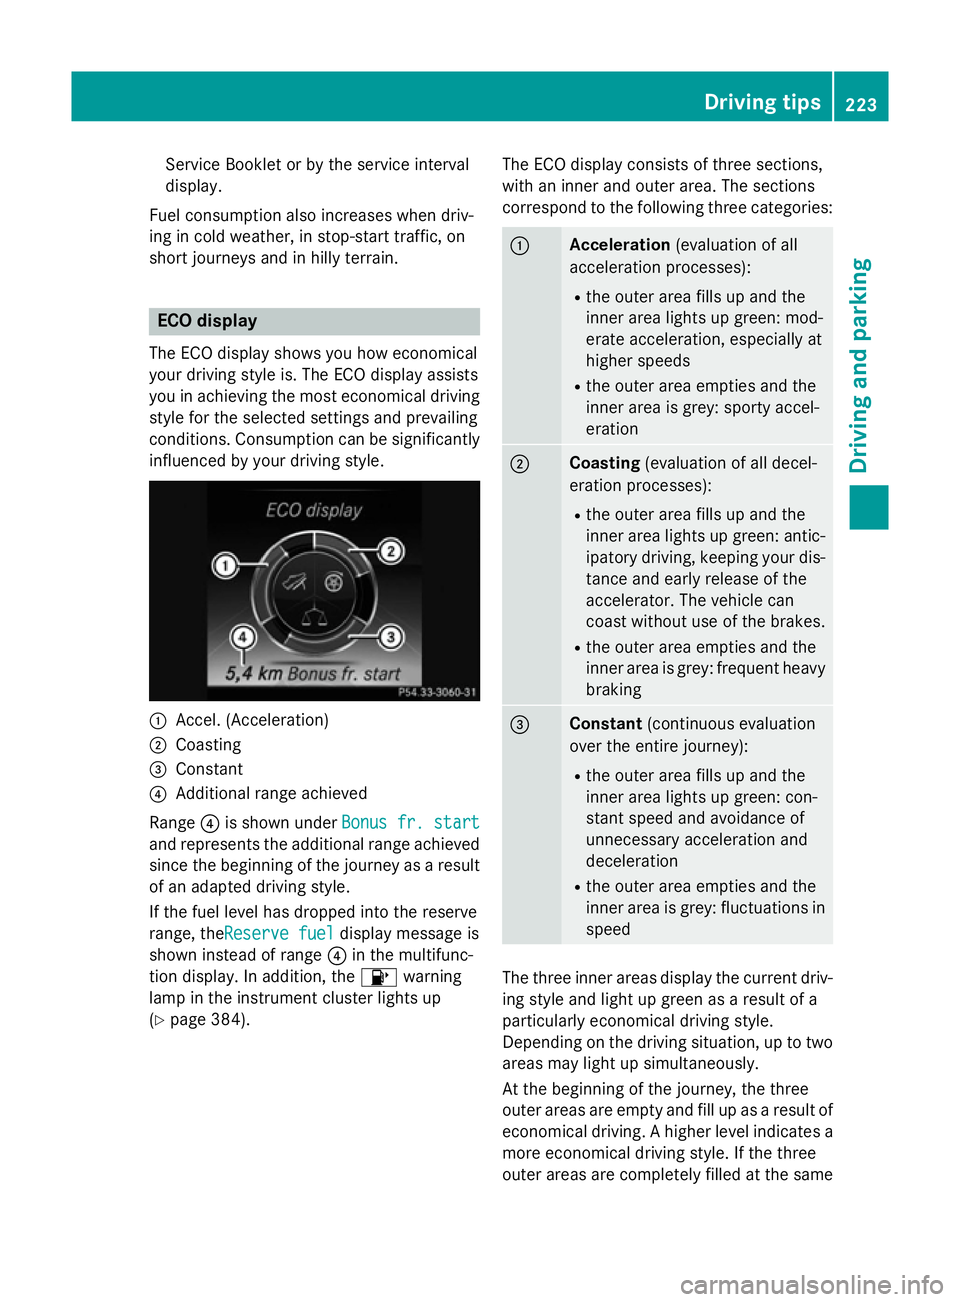
Accel. (Acceleration)
; Coasting
= Constant
? Additional range achieved
Range ?is shown under Bonus fr. start Bonus fr. start
and represents the additional range achieved since the beginning of the journey as a resultof an adapted driving style.
If the fuel level has dropped into the reserve
range, theReserve fuel Reserve fuel display message is
shown instead of range ?in the multifunc-
tion display. In addition, the 8warning
lamp in the instrument cluster lights up
(Y page 384). The ECO display consists of three sections,
with an inner and outer area. The sections
correspond to the following three categories: :
Acceleration
(evaluation of all
acceleration processes):
R the outer area fills up and the
inner area lights up green: mod-
erate acceleration, especially at
higher speeds
R the outer area empties and the
inner area is grey: sporty accel-
eration ;
Coasting
(evaluation of all decel-
eration processes):
R the outer area fills up and the
inner area lights up green: antic-
ipatory driving, keeping your dis- tance and early release of the
accelerator. The vehicle can
coast without use of the brakes.
R the outer area empties and the
inner area is grey: frequent heavy
braking =
Constant
(continuous evaluation
over the entire journey):
R the outer area fills up and the
inner area lights up green: con-
stant speed and avoidance of
unnecessary acceleration and
deceleration
R the outer area empties and the
inner area is grey: fluctuations in
speed The three inner areas display the current driv-
ing style and light up green as a result of a
particularly economical driving style.
Depending on the driving situation, up to two
areas may light up simultaneously.
At the beginning of the journey, the three
outer areas are empty and fill up as a result of economical driving. A higher level indicates a more economical driving style. If the three
outer areas are completely filled at the same Driving tips
223Driving and parking Z
Page 227 of 497
time, the driver has adopted the most eco-
nomical driving style for the selected settings
and prevailing conditions. The ECO display
border lights up.
The ECO display does not indicate the actual fuel consumption. The additionally achieved
range displayed under Bonus fr. start
Bonus fr. start
does not indicate a fixed consumption reduc-
tion.
In addition to driving style, the actual con-
sumption is affected by other factors, such
as:
R load
R tyre pressure
R cold start
R choice of route
R the use of electrical consumers
These factors are not included in the ECO dis-
play.
An economical driving style involves driving at a moderate engine speed.
To achieve a higher value in the categories
"acceleration" and "smooth driving":
R observe the gearshift recommendation
R drive the vehicle in drive program E
On long journeys at a constant speed, e.g. on the motorway, only the outer area for "con-
stant" will change.
The ECO display summarises the driving style
from the start of the journey to its completion. Therefore, there are more marked changes in
the outer areas at the start of a journey. Dur- ing a prolonged driving time, these changes
are smaller. For more marked changes, per-
form a manual reset (Y page 319).
Further information on the ECO display
(Y page 318). Brakes
Important safety notes G
WARNING
If you shift down on a slippery road surface in an attempt to increase the engine's braking
effect, the drive wheels could lose their grip.
This increases the risk of skidding and having
an accident.
Do not shift down for additional engine brak-
ing on a slippery road surface.
Downhill gradients Change into a lower gear in good time on long
and steep downhill gradients. Take particular note of this when driving a laden vehicle and
when towing a trailer.
This also applies if cruise control, DISTRONIC
PLUS or SPEEDTRONIC are activated.
This will use the braking effect of the engine,
so less braking will be required to maintain
vehicle speed. This relieves the load on the
brake system and prevents the brakes from
overheating and wearing too quickly.
Heavy and light loads G
WARNING
The braking system can overheat if you leave your foot on the brake pedal while driving.
This increases the braking distance and could
even cause the braking system to fail. There is
a risk of an accident.
Never use the brake pedal as a footrest. Do
not simultaneously depress both the brake
pedal and the accelerator pedal while driving.
! Depressing the brake pedal constantly
results in excessive and premature wear to
the brake pads.
If heavy demands are made on the brakes, do not park the vehicle immediately. Drive on for
a short while. This allows the airflow to cool
the brakes more quickly. 224
Driving
tipsDriving an d parking
Page 228 of 497
If the brakes have been used only moderately,
you should occasionally test their effective-
ness. To do this, brake more firmly from a
higher speed while paying attention to the
traffic conditions. This improves the grip of
the brakes.
Wet road surfaces If you have driven for a long time in heavy rain
without braking, there may be a delayed reac-
tion from the brakes when braking for the first time. This may also occur after a car wash orafter driving through deep water.
You will have to depress the brake pedal more
firmly. Maintain a greater distance to the vehi-
cle in front.
After driving on a wet road or having the vehi- cle washed, brake firmly while paying atten-
tion to the traffic conditions. This will warm up
the brake discs, thereby drying them more
quickly and protecting them against corro-
sion.
Limited braking performance on salt-
treated roads If you drive on salt-treated roads, a layer of
salt may form on the brake discs and pads.
This can increase the braking distance con-
siderably.
R In order to prevent a layer of salt forming,
apply the brakes occasionally while paying
attention to the traffic conditions.
R Carefully depress the brake pedal at the
end of the journey and when starting the
next journey.
R Maintain a much greater distance to the
vehicle in front.
New brake discs and brake pads/
linings Brake pads/linings and discs that are either
new or have been replaced only achieve opti-
mum braking effect after several hundred kil-
ometres of driving. Compensate for the reduced braking effect by applying greater
force to the brake pedal.
For safety reasons, Mercedes-Benz recom-
mends only fitting the following brake discs
and brake pads/linings:
R brake discs that have been approved by
Mercedes-Benz
R brake pads/linings that have been
approved by Mercedes-Benz or that are of
an equivalent standard of quality
Other brake discs or brake pads/linings can
compromise the safety of your vehicle.
Always replace all brake discs and brake
pads/linings on an axle at the same time.
Always fit new brake pads/linings when
replacing brake discs.
The vehicle is equipped with lightweight
brake discs to which the wheel assembly with
rim and threaded connection is matched.
The use of brake discs other than those
approved by Mercedes-Benz may alter track
width and is subject to approval, if applicable.
Shock-type loads when handling the brake
discs, such as when changing wheels, can
lead to a reduction in comfort when driving
with lightweight brake discs. Avoid shock-
type loads on the lightweight brake discs,
particularly on the brake plate. Driving on wet roads
Aquaplaning If water has accumulated to a certain depth
on the road surface, there is a danger of aqua-
planing occurring, even if:
R you are driving at low speeds
R the tyres have adequate tread depth
For this reason, drive in the following manner in the event of heavy rain or in conditions in
which aquaplaning can occur:
R lower your speed
R avoid tyre ruts Driving tips
225Driving and parking Z
Page 231 of 497
The following driving systems are specially
adapted for driving over easily negotiable off-
road terrain:
R Off-road program (Y page 250)
R Off-road ABS (Y page 79)
R Off-road 4ETS (Y page 85)
R Off-road ESP ®
(Y page 85)
R DSR (Downhill Speed Regulation)
(Y page 248)
Observe the following notes:
R Stop the vehicle before driving off-road. If
necessary, activate the off-road program
(Y page 250).
R To avoid damaging the vehicle, make sure
there is always sufficient ground clearance.
R Make sure that items of luggage and loads
are stowed safely and are well secured
(Y page 396).
R Always keep the engine running and in gear
when driving on a downhill gradient. Acti-
vate DSR (Y page 248).
R Drive slowly and evenly, if necessary at
walking pace.
R Ensure that the wheels are in contact with
the ground at all times.
R Drive with extreme care on unknown off-
road routes where visibility is poor. For
safety reasons, get out of the vehicle first
and survey the off-road route.
R Check the depth of water before fording
rivers and streams.
R Watch out for obstacles.
R Take care when turning on an uphill or
downhill slope or when driving across a
slope. The vehicle could otherwise tip over.
R Always keep the side windows and the pan-
orama sliding sunroof closed during the
journey.
R Do not deviate from marked routes.
Do not use the HOLD function when driving
off-road, on steep uphill or downhill gradients or on slippery or loose surfaces. The HOLD
function cannot hold the vehicle on such sur-
faces. Checklist before driving off-road X
Engine oil level: check the engine oil and
top it up if necessary.
When driving on steep gradients, the oil
level must be sufficiently high to ensure a
correct oil supply in the vehicle.
X Wheels and tyres: check the tyre tread
depth and tyre pressure.
X Check for damage and remove any foreign
objects, e.g. small stones, from the
wheels/tyres.
X Replace any missing valve caps.
X Replace dented or damaged wheels.
X Wheels: dented or bent wheels can lead to
a loss of tyre pressure and damage to the
tyre bead. Before driving off-road, check
the wheels and replace them if necessary.
Checklist after driving off-road !
If you detect damage to the vehicle after
driving off-road, have the vehicle checked
immediately at a qualified specialist work-
shop.
X Deactivate the off-road program
(Y page 250).
X Deactivate DSR (Y page 248).
X Clean the headlamps and rear lights and
check for damage.
X Clean the front and rear licence plates.
X Clean the wheels/tyres with a water jet and
remove any foreign objects.
X Clean the wheels, wheel arches and the
vehicle underside with a water jet; check
for any foreign objects and damage.
X Check whether twigs or other parts of
plants have become trapped. These
increase the risk of fire and can damage
fuel pipes, brake hoses or the rubber bel-
lows of the axle joints and propeller shafts.
X After the trip, examine without fail the
entire undercarriage, wheels, tyres, brakes,
bodywork structure, steering, chassis and
exhaust system for damage. 228
Driving tipsDriving and parking
Page 233 of 497
Hill start assist will aid you when pulling away
on a hill. For further information about hill
start assist, see (Y page 191).
Do not shift into transmission position N
when driving off-road. You could lose control
of the vehicle if you attempt to brake the
vehicle using the service brake. If the gradient
is too steep for your vehicle, back up in
reverse gear.
Always observe the approach/departure
angle values (Y page 489).
Maximum gradient-climbing capability Always observe the maximum gradient climb-
ing ability values (Y page 489).
Hilltops When driving up an uphill gradient, slightly
reduce pressure on the accelerator immedi-
ately before reaching the brow of the hill.
Make use of the vehicle's own impetus to
travel over the brow.
This style of driving prevents:
R the vehicle from lifting off the ground on the
brow of a hill
R the vehicle from travelling too quickly down
the other side
Driving downhill R
Drive slowly.
R Do not drive at an angle down steep
inclines. Steer into the line of fall and drive with the front wheels aligned straight. Oth-erwise, the vehicle could slip sideways, tip
and overturn.
R Before tackling steep downhill gradients,
use the left-hand steering wheel gearshift
paddle to shift to a lower gear.
R Activate DSR. If this is not sufficient, brake
gently. When doing so, make sure that the
vehicle is facing in the direction of the line
of fall.
R Check that the brakes are working normally
after a long downhill stretch. Off-road ABS is activated when the off-road
program is selected.
At speeds below 30 km/h the front wheels
lock cyclically during braking. The digging-in
effect achieved in the process reduces the
stopping distance when driving off-road. The
steerability of the vehicle is considerably
reduced if the wheels lock.
Driving systems
Mercedes-Benz Intelligent Drive
Mercedes-Benz Intelligent Drive stands for
innovative driver assistance and safety sys-
tems which enhance comfort and support the
driver in critical situations. With these intelli-
gent co-ordinated systems Mercedes-Benz
has set a milestone on the path towards
autonomous driving.
Mercedes-Benz Intelligent Drive embraces all elements of active and passive safety in one
well thought-out system – for the safety of the vehicle occupants and that of other road
users.
Further information on driving safety systems (Y page 78). Cruise control
General notes Cruise control maintains a constant road
speed for you. It brakes automatically in order to avoid exceeding the set speed. Change into
a lower gear in good time on long and steep
downhill gradients. Take particular note of
this when driving a laden vehicle and when
towing a trailer. By doing so, you will make
use of the braking effect of the engine. This
relieves the load on the brake system and
prevents the brakes from overheating and
wearing too quickly.
Use cruise control only if road and traffic con- ditions are appropriate for maintaining a
steady speed for a prolonged period. You canstore any road speed above 30 km/h. 230
Driving systemsDriving and parking
Page 239 of 497
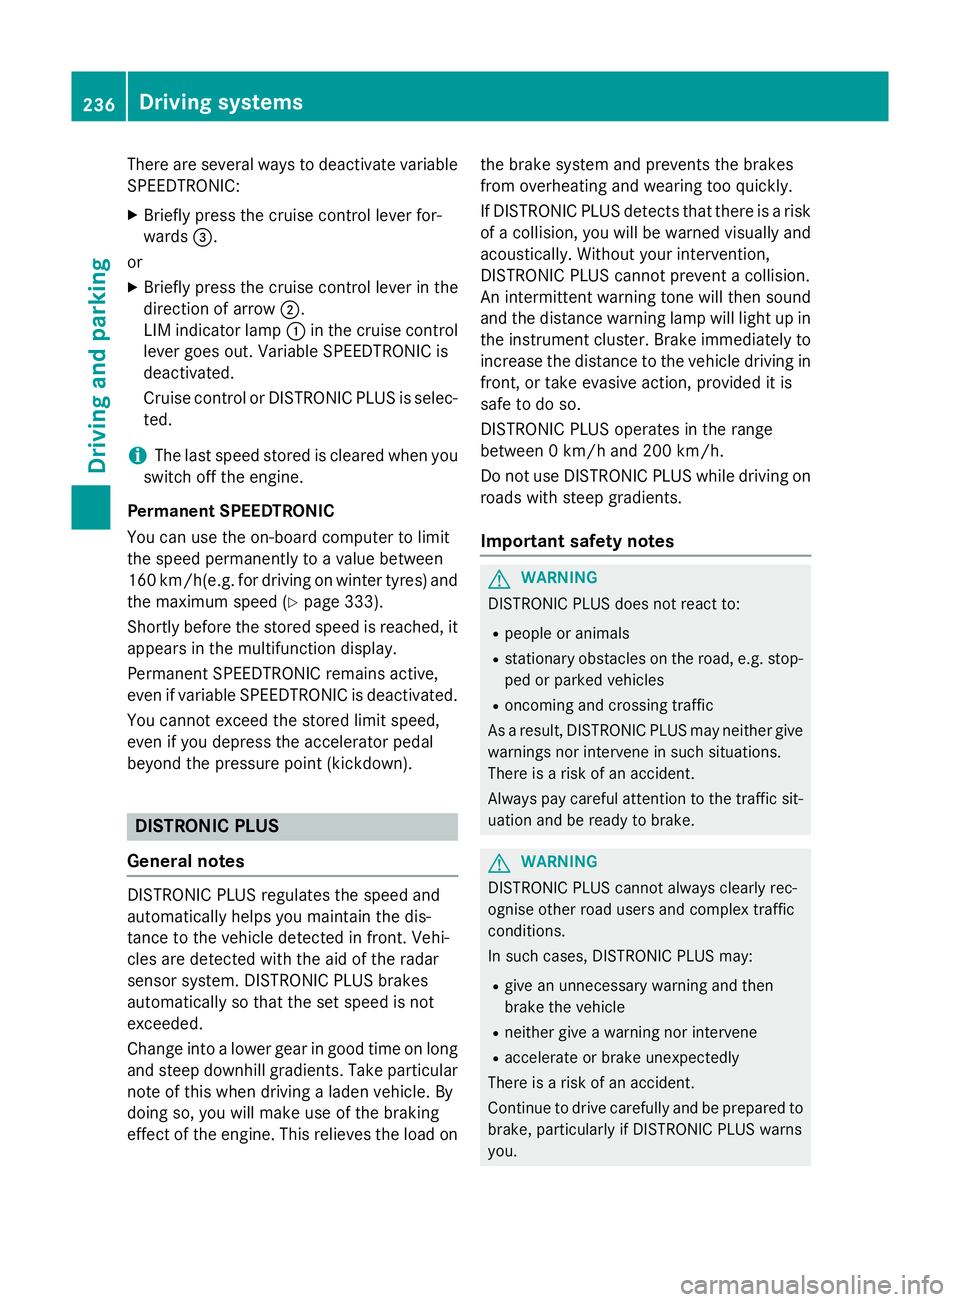
There are several ways to deactivate variable
SPEEDTRONIC:
X Briefly press the cruise control lever for-
wards =.
or X Briefly press the cruise control lever in the
direction of arrow ;.
LIM indicator lamp :in the cruise control
lever goes out. Variable SPEEDTRONIC is
deactivated.
Cruise control or DISTRONIC PLUS is selec-
ted.
i The last speed stored is cleared when you
switch off the engine.
Permanent SPEEDTRONIC
You can use the on-board computer to limit
the speed permanently to a value between
160 km/h(e.g. for driving on winter tyres) and the maximum speed (Y page 333).
Shortly before the stored speed is reached, it
appears in the multifunction display.
Permanent SPEEDTRONIC remains active,
even if variable SPEEDTRONIC is deactivated.
You cannot exceed the stored limit speed,
even if you depress the accelerator pedal
beyond the pressure point (kickdown). DISTRONIC PLUS
General notes DISTRONIC PLUS regulates the speed and
automatically helps you maintain the dis-
tance to the vehicle detected in front. Vehi-
cles are detected with the aid of the radar
sensor system. DISTRONIC PLUS brakes
automatically so that the set speed is not
exceeded.
Change into a lower gear in good time on long
and steep downhill gradients. Take particular note of this when driving a laden vehicle. By
doing so, you will make use of the braking
effect of the engine. This relieves the load on the brake system and prevents the brakes
from overheating and wearing too quickly.
If DISTRONIC PLUS detects that there is a risk
of a collision, you will be warned visually and acoustically. Without your intervention,
DISTRONIC PLUS cannot prevent a collision.
An intermittent warning tone will then sound
and the distance warning lamp will light up in
the instrument cluster. Brake immediately to
increase the distance to the vehicle driving in
front, or take evasive action, provided it is
safe to do so.
DISTRONIC PLUS operates in the range
between 0 km/h and 200 km/h.
Do not use DISTRONIC PLUS while driving on roads with steep gradients.
Important safety notes G
WARNING
DISTRONIC PLUS does not react to:
R people or animals
R stationary obstacles on the road, e.g. stop-
ped or parked vehicles
R oncoming and crossing traffic
As a result, DISTRONIC PLUS may neither give
warnings nor intervene in such situations.
There is a risk of an accident.
Always pay careful attention to the traffic sit- uation and be ready to brake. G
WARNING
DISTRONIC PLUS cannot always clearly rec-
ognise other road users and complex traffic
conditions.
In such cases, DISTRONIC PLUS may:
R give an unnecessary warning and then
brake the vehicle
R neither give a warning nor intervene
R accelerate or brake unexpectedly
There is a risk of an accident.
Continue to drive carefully and be prepared to
brake, particularly if DISTRONIC PLUS warns
you. 236
Driving systemsDriving an
d parking
Page 246 of 497
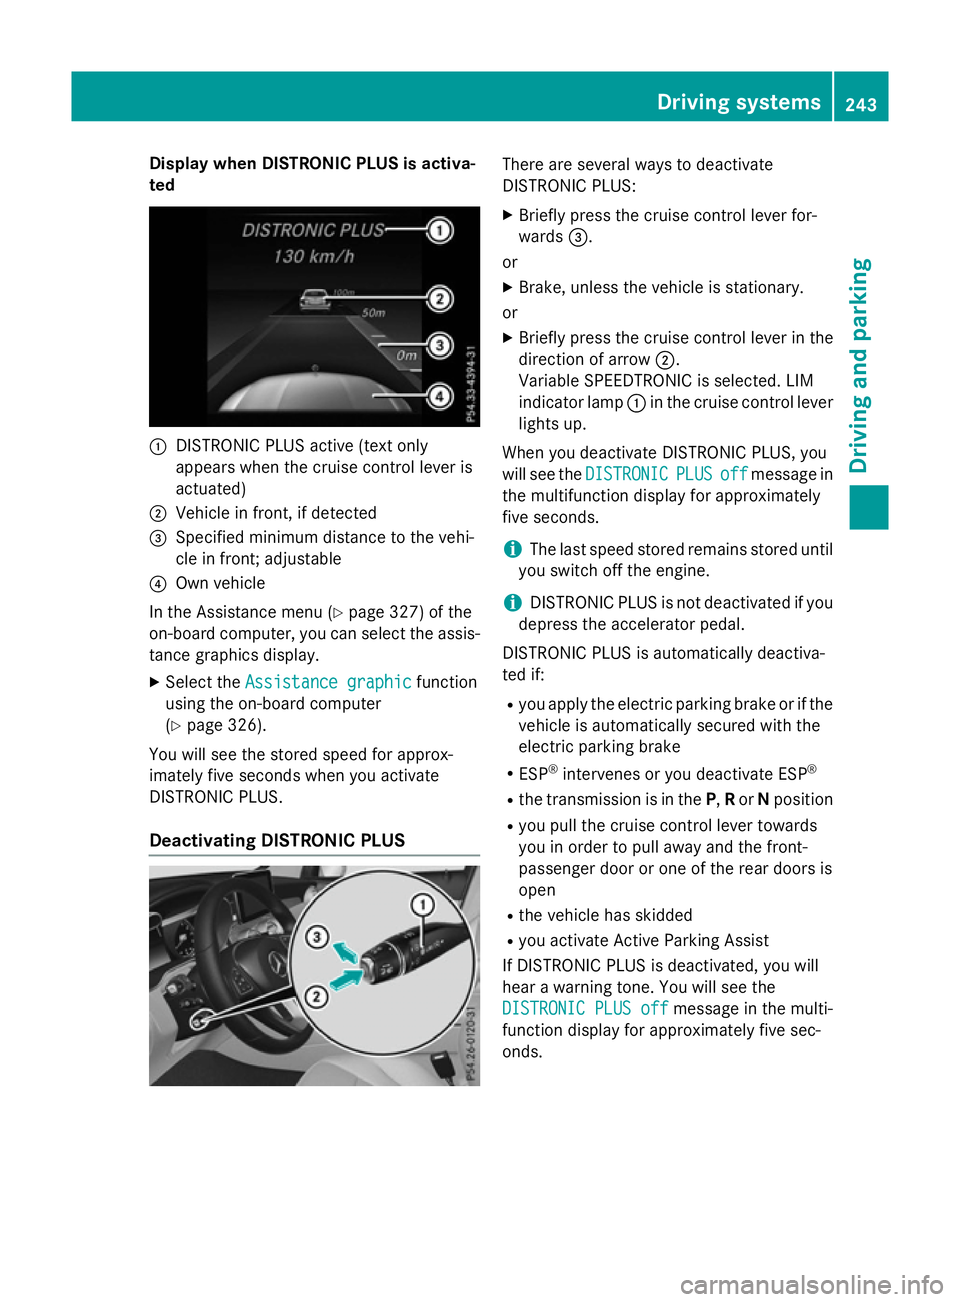
Display when DISTRONIC PLUS is activa-
ted :
DISTRONIC PLUS active (text only
appears when the cruise control lever is
actuated)
; Vehicle in front, if detected
= Specified minimum distance to the vehi-
cle in front; adjustable
? Own vehicle
In the Assistance menu (Y page 327) of the
on-board computer, you can select the assis-
tance graphics display.
X Select the Assistance graphic
Assistance graphic function
using the on-board computer
(Y page 326).
You will see the stored speed for approx-
imately five seconds when you activate
DISTRONIC PLUS.
Deactivating DISTRONIC PLUS There are several ways to deactivate
DISTRONIC PLUS:
X Briefly press the cruise control lever for-
wards =.
or
X Brake, unless the vehicle is stationary.
or
X Briefly press the cruise control lever in the
direction of arrow ;.
Variable SPEEDTRONIC is selected. LIM
indicator lamp :in the cruise control lever
lights up.
When you deactivate DISTRONIC PLUS, you
will see the DISTRONIC DISTRONIC PLUS
PLUSoff
offmessage in
the multifunction display for approximately
five seconds.
i The last speed stored remains stored until
you switch off the engine.
i DISTRONIC PLUS is not deactivated if you
depress the accelerator pedal.
DISTRONIC PLUS is automatically deactiva-
ted if:
R you apply the electric parking brake or if the
vehicle is automatically secured with the
electric parking brake
R ESP ®
intervenes or you deactivate ESP ®
R the transmission is in the P,Ror Nposition
R you pull the cruise control lever towards
you in order to pull away and the front-
passenger door or one of the rear doors is
open
R the vehicle has skidded
R you activate Active Parking Assist
If DISTRONIC PLUS is deactivated, you will
hear a warning tone. You will see the
DISTRONIC PLUS off
DISTRONIC PLUS off message in the multi-
function display for approximately five sec-
onds. Driving syste
ms
243Driving an d parking Z
Page 248 of 497
DISTRONIC PLUS does not brake for obsta-
cles or stationary vehicles. If, for example, the
detected vehicle turns a corner and reveals
an obstacle or stationary vehicle, DISTRONIC PLUS will not brake for these.
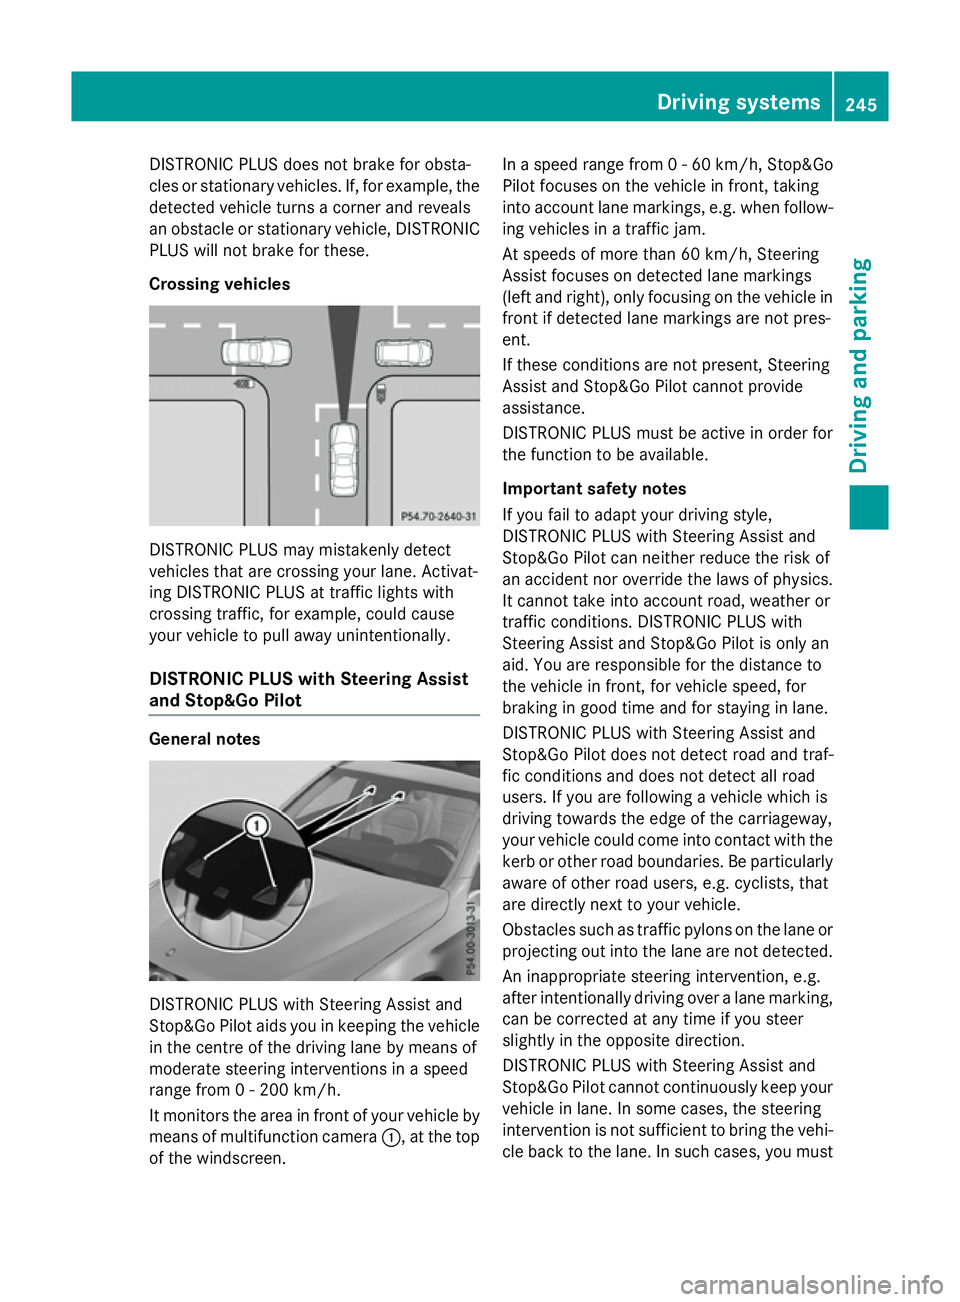
Crossing vehicles DISTRONIC PLUS may mistakenly detect
vehicles that are crossing your lane. Activat-
ing DISTRONIC PLUS at traffic lights with
crossing traffic, for example, could cause
your vehicle to pull away unintentionally.
DISTRONIC PLUS with Steering Assist
and Stop&Go Pilot General notes
DISTRONIC PLUS with Steering Assist and
Stop&Go Pilot aids you in keeping the vehicle in the centre of the driving lane by means of
moderate steering interventions in a speed
range from 0 - 200 km/h.
It monitors the area in front of your vehicle by means of multifunction camera :, at the top
of the windscreen. In a speed range from 0 - 60 km/h, Stop&Go
Pilot focuses on the vehicle in front, taking
into account lane markings, e.g. when follow-
ing vehicles in a traffic jam.
At speeds of more than 60 km/h, Steering
Assist focuses on detected lane markings
(left and right), only focusing on the vehicle in
front if detected lane markings are not pres-
ent.
If these conditions are not present, Steering
Assist and Stop&Go Pilot cannot provide
assistance.
DISTRONIC PLUS must be active in order for
the function to be available.
Important safety notes
If you fail to adapt your driving style,
DISTRONIC PLUS with Steering Assist and
Stop&Go Pilot can neither reduce the risk of
an accident nor override the laws of physics. It cannot take into account road, weather or
traffic conditions. DISTRONIC PLUS with
Steering Assist and Stop&Go Pilot is only an
aid. You are responsible for the distance to
the vehicle in front, for vehicle speed, for
braking in good time and for staying in lane.
DISTRONIC PLUS with Steering Assist and
Stop&Go Pilot does not detect road and traf-
fic conditions and does not detect all road
users. If you are following a vehicle which is
driving towards the edge of the carriageway,
your vehicle could come into contact with the
kerb or other road boundaries. Be particularly aware of other road users, e.g. cyclists, that
are directly next to your vehicle.
Obstacles such as traffic pylons on the lane or
projecting out into the lane are not detected.
An inappropriate steering intervention, e.g.
after intentionally driving over a lane marking,
can be corrected at any time if you steer
slightly in the opposite direction.
DISTRONIC PLUS with Steering Assist and
Stop&Go Pilot cannot continuously keep your vehicle in lane. In some cases, the steering
intervention is not sufficient to bring the vehi-
cle back to the lane. In such cases, you must Driving systems
245Driving and parking Z