2015 MERCEDES-BENZ GLC SUV open bonnet
[x] Cancel search: open bonnetPage 419 of 497

Closing the bonnet
X
Lower the bonnet and let it fall from a
height of approximately 20 cm.
X Check that the bonnet has engaged prop-
erly.
If the bonnet can be raised slightly, it is not
properly engaged. Open it again and close
it with a little more force. Radiator
Do not cover up the radiator. Do not use ther-
mal mats, insect protection covers or any-
thing similar. Doing so can cause the Onboard Diagnostics System to display inaccurate val-
ues. Some of these values are legally required
and must always be correct. Engine oil
General notes Depending on your driving style, the vehicle
consumes up to 0.8 litres of oil per 1000 km.
The oil consumption may be higher than this
when the vehicle is new or if you frequently
drive at high engine speeds.
Depending on the engine, the oil dipstick may
be installed at a different location.
When checking the oil level:
R park the vehicle on a level surface
R the engine should be switched off for
approximately five minutes if the engine is
at normal operating temperature
R if the engine is not at normal operating
temperature, e.g. if the engine was only
started briefly, wait approximately
30 minutes before carrying out the meas-
urement Checking the oil level using the oil dip-
stick G
WARNING
Certain components in the engine compart-
ment could be very hot, e.g. the engine, the
radiator and parts of the exhaust system.
There is a risk of injury when accessing the
engine compartment.
As far as possible, allow the engine to cool
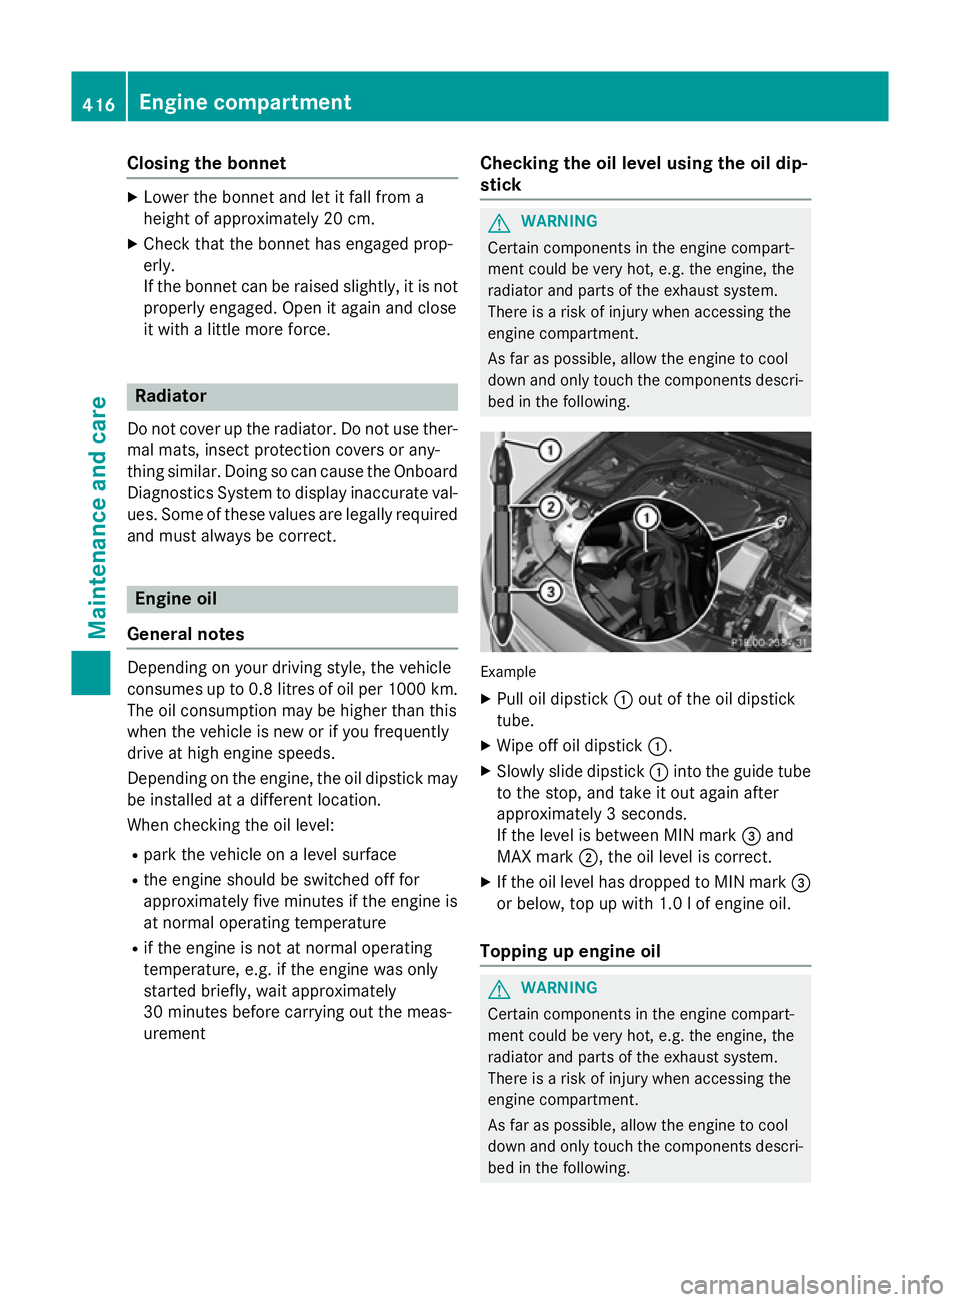
down and only touch the components descri- bed in the following. Example
X Pull oil dipstick :out of the oil dipstick
tube.
X Wipe off oil dipstick :.
X Slowly slide dipstick :into the guide tube
to the stop, and take it out again after
approximately 3 seconds.
If the level is between MIN mark =and
MAX mark ;, the oil level is correct.
X If the oil level has dropped to MIN mark =
or below, top up with 1.0 l of engine oil.
Topping up engine oil G
WARNING
Certain components in the engine compart-
ment could be very hot, e.g. the engine, the
radiator and parts of the exhaust system.
There is a risk of injury when accessing the
engine compartment.
As far as possible, allow the engine to cool
down and only touch the components descri- bed in the following. 416
Engine compartmentMaintenance and care
Page 444 of 497

Avoid contact with the skin, eyes or clothing.
Immediately rinse electrolyte splashes off
with water and seek medical attention
straight away.
! Exhaustive discharge caused by the vehi-
cle standing idle for lengthy periods can
damage the high-voltage battery. If the
vehicle is idle for lengthy periods leave the
high-voltage battery connected to a charg-
ing station.
Consult a Mercedes-Benz Service Centre if
you wish to leave your vehicle parked up for a
long period of time. Charging the 12 V battery
Vehicles with a lithium-ion battery:
! Only use battery chargers with a maxi-
mum charging voltage of 14.4 V.
All ot her vehicles G
WARNING
During charging and jump-starting, explosive
gases can escape from the battery. There is a risk of an explosion.
Particularly avoid fire, naked flames, creating
sparks and smoking. Ensure there is sufficient
ventilation while charging and jump-starting.
Do not lean over a battery. G
WARNING
Battery acid is caustic. There is a risk of injury. Avoid contact with the skin, eyes or clothing.
Do not breathe in any battery gases. Do not
lean over the battery. Keep the batteries out
of the reach of children. Immediately rinse off
battery acid thoroughly with plenty of clean
water and seek medical attention at once. G
WARNING
A discharged battery can freeze at tempera-
tures below freezing point. When jump-start-
ing the vehicle or charging the battery, gases can escape from the battery. There is a risk of
an explosion.
Allow the frozen battery to thaw out before
charging it or jump-starting.
! Only use battery chargers with a maxi-
mum charging voltage of 14.8 V.
All ve hicles:
! Only charge the battery using the jump-
start connection point.
The jump-starting connection point is in the
engine compartment (Y page 443).
X Open the bonnet.
X Connect the battery charger to the positive
terminal and earth point in the same order
as when connecting the donor battery in
the jump-starting procedure (Y page 443).
Keep away from fire and open flames. Do not lean over the battery. Never charge the bat-
tery if it is still fitted to the vehicle, unless you
use a battery charger which has been tested
and approved by Mercedes-Benz. A battery
charger unit specially adapted for Mercedes- Benz vehicles and tested and approved by
Mercedes-Benz is available as an accessory.
This device permits charging of the battery in
position. Contact a Mercedes-Benz Service
Centre for information and availability. Read
the battery charger's operating instructions
before charging the battery.
All vehicles except vehicles with a lith-
ium-ion battery: if the indicator/warning
lamps in the instrument cluster do not light up at low temperatures, it is very likely that the
discharged battery has frozen. In this case
you may neither jump-start the vehicle nor
charge the battery. The service life of a bat-
tery that has been thawed may be reduced.
The starting characteristics may be impaired,
especially at low temperatures. Have the
thawed battery checked at a qualified spe-
cialist workshop.
Vehicles with a lithium-ion battery: at low
temperatures, do not charge a battery which
has been removed using a battery charger. Battery (vehicle)
441Breakdown assistance Z
Page 447 of 497

Do not use a rapid charging device to start the vehicle. If your vehicle's battery is discharged,
the engine can be jump-started from another vehicle or from a second battery using jump
leads. Observe the following points:
R The battery is not accessible in all vehicles. If the other vehicle's battery is not accessible,
jump-start the vehicle using a second battery or a jump-starting device.
R Vehicles with a petrol engine: only jump-start the vehicle when the engine and exhaust
system are cold.
R Jump-starting may only be performed using batteries with a nominal voltage of 12 V.
R Only use jump leads that have a sufficient cross-section and insulated terminal clamps.
R If the battery is fully discharged, leave the battery that is being used to jump-start connected
for a few minutes before attempting to start. This charges the empty battery a little.
R Make sure that the two vehicles do not touch.
Make sure that:
R the jump leads are not damaged.
R non-insulated parts of the terminal clamps do not come into contact with other metal parts
while the jump leads are connected to the battery.
R the jump leads cannot come into contact with parts which can move when the engine is
running, such as the V-belt pulley or the fan.
X Secure the vehicle by applying the electric parking brake.
X Shift the transmission to position P.
X Make sure the ignition is switched off (Y page 187). All indicator lamps in the instrument
cluster must be off. When using the key, turn the key to position 0in the ignition lock and
remove it (Y page 187).
X Switch off all electrical consumers, e.g. rear window heating, lighting etc.
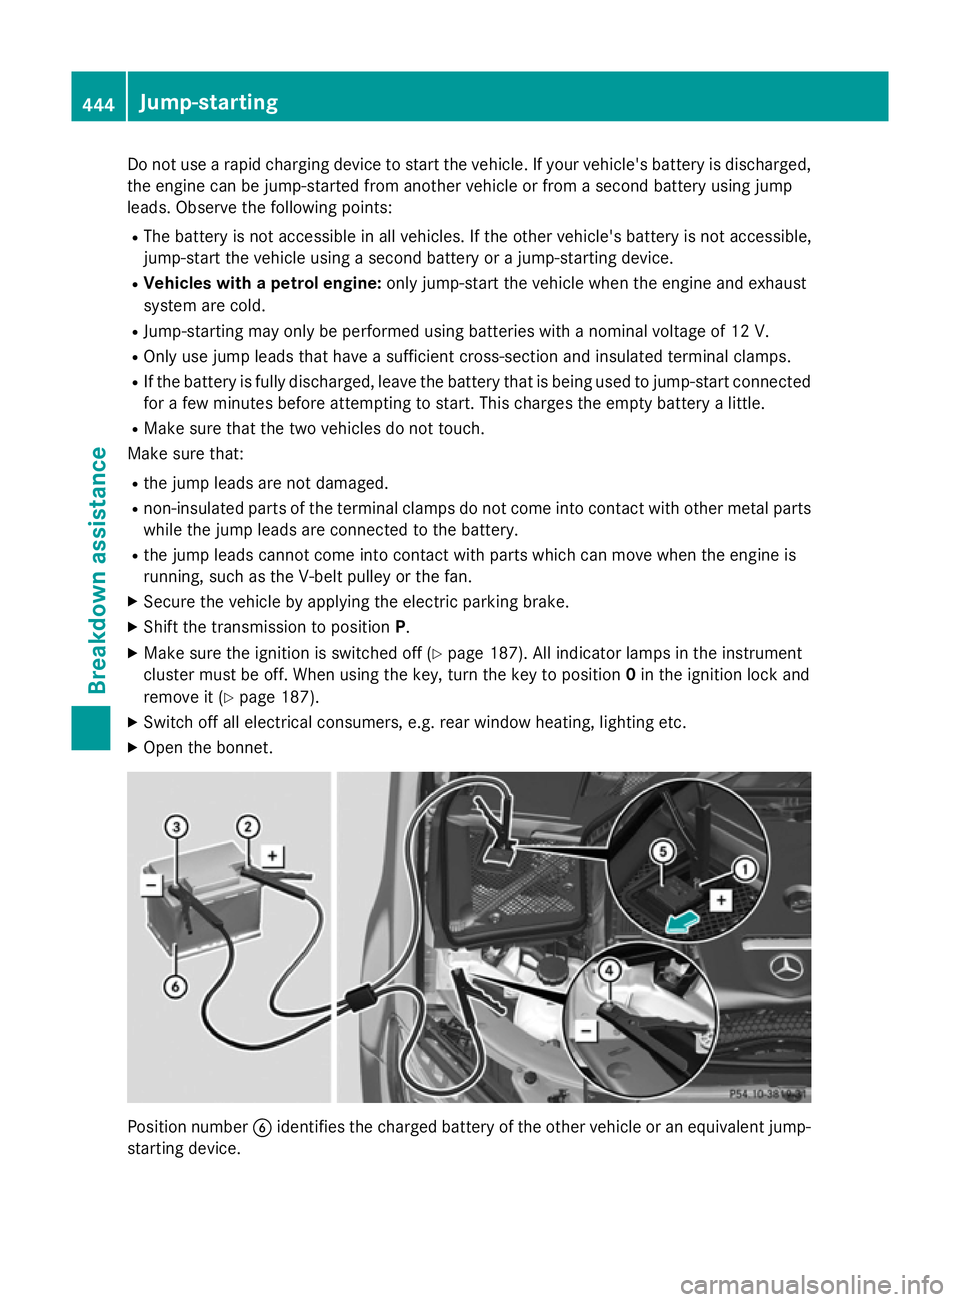
X Open the bonnet. Position number
Bidentifies the charged battery of the other vehicle or an equivalent jump-
starting device. 444
Jump-startingBreakdown assistance
Page 453 of 497

!
When closing the cover, make sure that it
is lying correctly on the fuse box. Moisture
seeping in or dirt could otherwise impair
the operation of the fuses. X
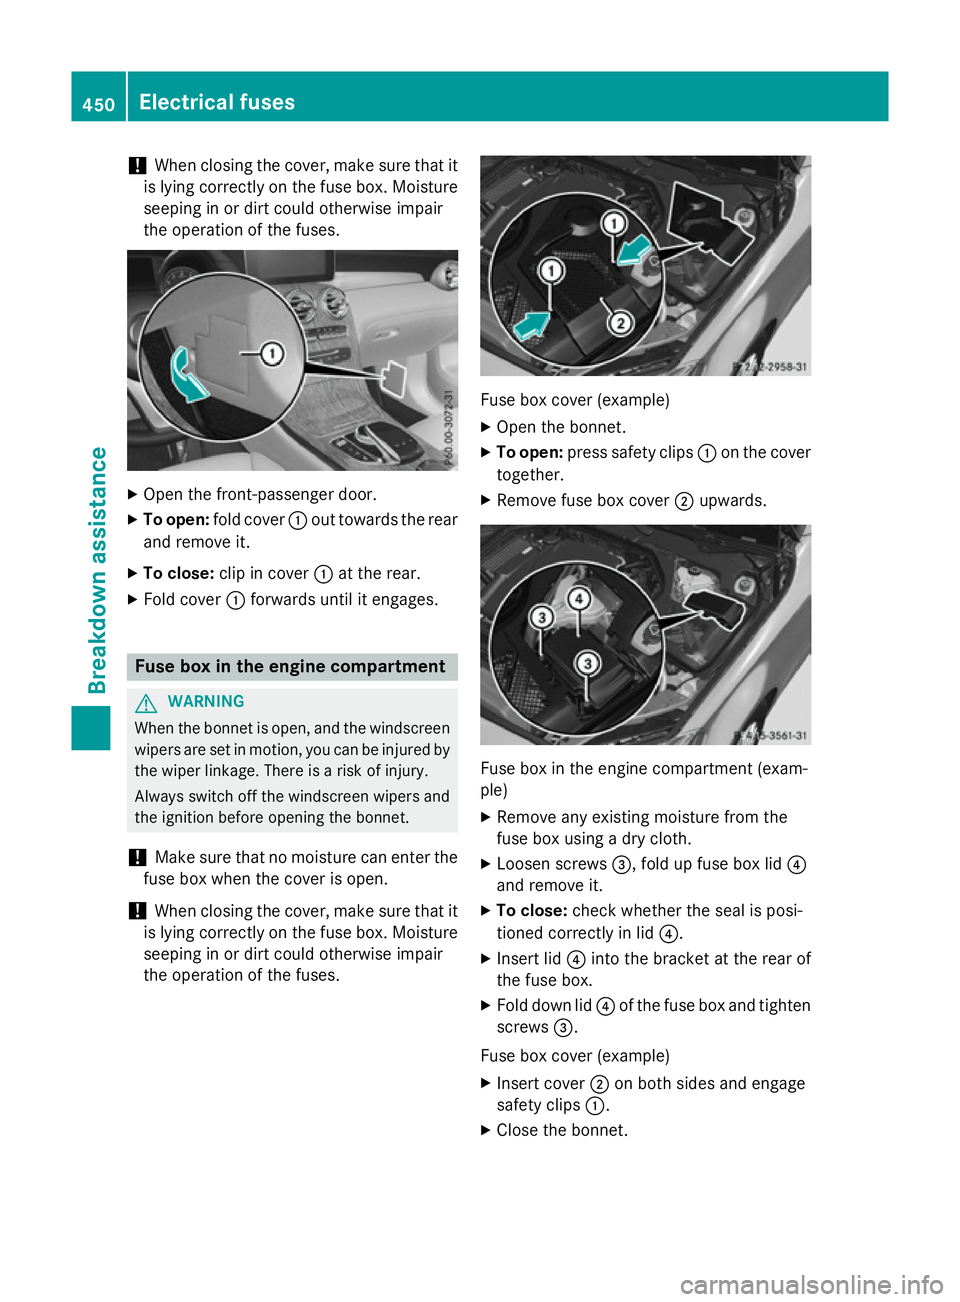
Open the front-passenger door.
X To open: fold cover :out towards the rear
and remove it.
X To close: clip in cover :at the rear.
X Fold cover :forwards until it engages. Fuse box in the engine compartment
G
WARNING
When the bonnet is open, and the windscreen wipers are set in motion, you can be injured by
the wiper linkage. There is a risk of injury.
Always switch off the windscreen wipers and
the ignition before opening the bonnet.
! Make sure that no moisture can enter the
fuse box when the cover is open.
! When closing the cover, make sure that it
is lying correctly on the fuse box. Moisture
seeping in or dirt could otherwise impair
the operation of the fuses. Fuse box cover (example)
X Open the bonnet.
X To open: press safety clips :on the cover
together.
X Remove fuse box cover ;upwards. Fuse box in the engine compartment (exam-
ple)
X Remove any existing moisture from the
fuse box using a dry cloth.
X Loosen screws =, fold up fuse box lid ?
and remove it.
X To close: check whether the seal is posi-
tioned correctly in lid ?.
X Insert lid ?into the bracket at the rear of
the fuse box.
X Fold down lid ?of the fuse box and tighten
screws =.
Fuse box cover (example)
X Insert cover ;on both sides and engage
safety clips :.
X Close the bonnet. 450
Electrical fusesBreakdown assistance