2015 MERCEDES-BENZ GLC SUV headlamp
[x] Cancel search: headlampPage 151 of 497
X
Insert the new bulb into bulb holder ;.
X Insert bulb holder ;into the groove with
the lug at the top.
X Push bulb holder ;down until it engages
audibly.
X Press on housing cover :and turn it to the
right.
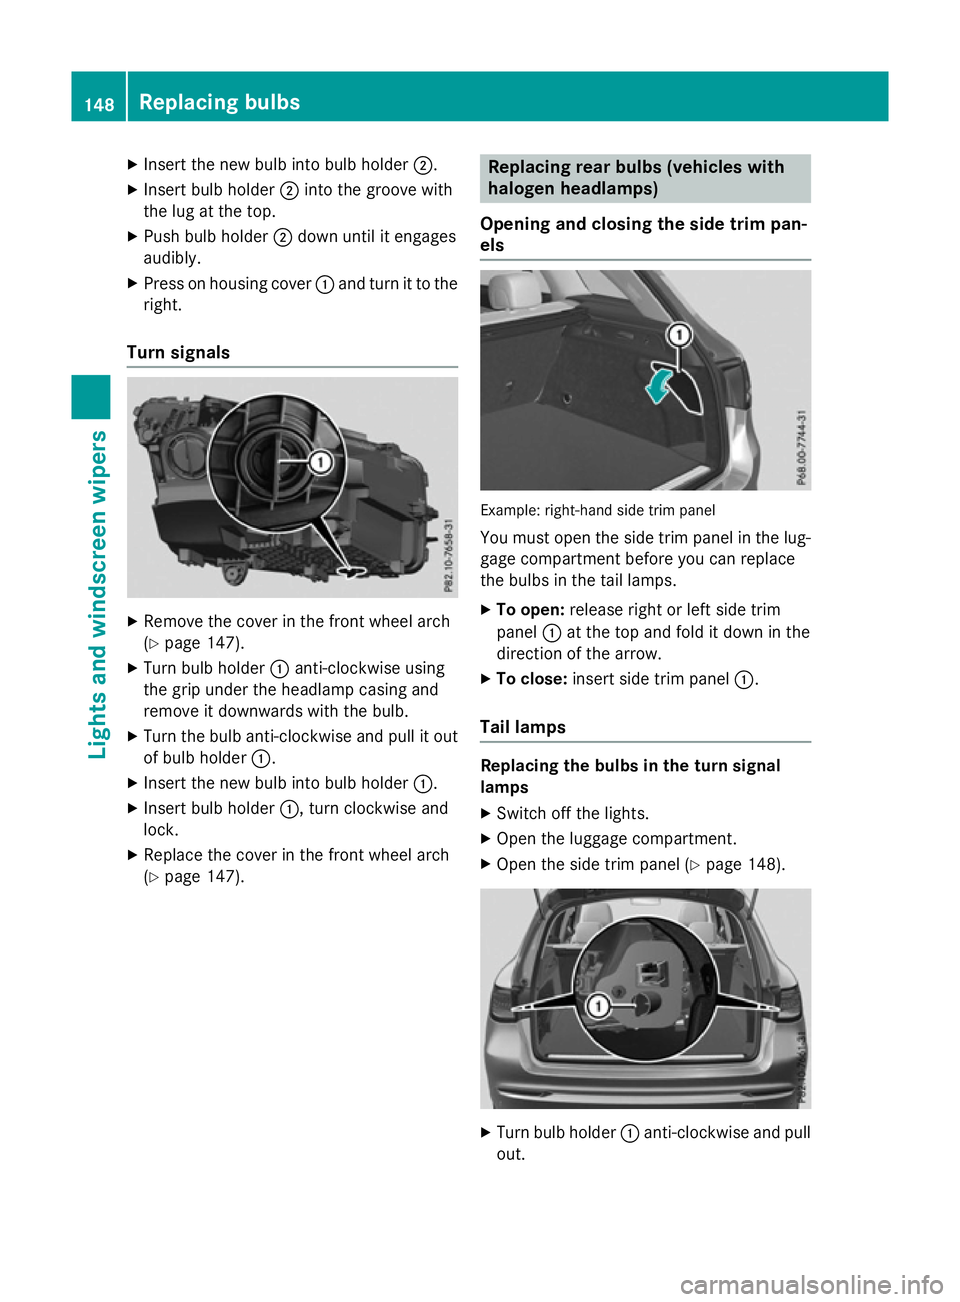
Turn signals X
Remove the cover in the front wheel arch
(Y page 147).
X Turn bulb holder :anti-clockwise using
the grip under the headlamp casing and
remove it downwards with the bulb.
X Turn the bulb anti-clockwise and pull it out
of bulb holder :.
X Insert the new bulb into bulb holder :.
X Insert bulb holder :, turn clockwise and
lock.
X Replace the cover in the front wheel arch
(Y page 147). Replacing rear bulbs (vehicles with
halogen headlamps)
Opening and closing the side trim pan-
els Example: right-hand side trim panel
You must open the side trim panel in the lug-gage compartment before you can replace
the bulbs in the tail lamps.
X To open: release right or left side trim
panel :at the top and fold it down in the
direction of the arrow.
X To close: insert side trim panel :.
Tail lamps Replacing the bulbs in the turn signal
lamps
X Switch off the lights.
X Open the luggage compartment.
X Open the side trim panel (Y page 148). X
Turn bulb holder :anti-clockwise and pull
out. 148
Replacing bulbsLights and windscreen wipers
Page 231 of 497
The following driving systems are specially
adapted for driving over easily negotiable off-
road terrain:
R Off-road program (Y page 250)
R Off-road ABS (Y page 79)
R Off-road 4ETS (Y page 85)
R Off-road ESP ®
(Y page 85)
R DSR (Downhill Speed Regulation)
(Y page 248)
Observe the following notes:
R Stop the vehicle before driving off-road. If
necessary, activate the off-road program
(Y page 250).
R To avoid damaging the vehicle, make sure
there is always sufficient ground clearance.
R Make sure that items of luggage and loads
are stowed safely and are well secured
(Y page 396).
R Always keep the engine running and in gear
when driving on a downhill gradient. Acti-
vate DSR (Y page 248).
R Drive slowly and evenly, if necessary at
walking pace.
R Ensure that the wheels are in contact with
the ground at all times.
R Drive with extreme care on unknown off-
road routes where visibility is poor. For
safety reasons, get out of the vehicle first
and survey the off-road route.
R Check the depth of water before fording
rivers and streams.
R Watch out for obstacles.
R Take care when turning on an uphill or
downhill slope or when driving across a
slope. The vehicle could otherwise tip over.
R Always keep the side windows and the pan-
orama sliding sunroof closed during the
journey.
R Do not deviate from marked routes.
Do not use the HOLD function when driving
off-road, on steep uphill or downhill gradients or on slippery or loose surfaces. The HOLD
function cannot hold the vehicle on such sur-
faces. Checklist before driving off-road X
Engine oil level: check the engine oil and
top it up if necessary.
When driving on steep gradients, the oil
level must be sufficiently high to ensure a
correct oil supply in the vehicle.
X Wheels and tyres: check the tyre tread
depth and tyre pressure.
X Check for damage and remove any foreign
objects, e.g. small stones, from the
wheels/tyres.
X Replace any missing valve caps.
X Replace dented or damaged wheels.
X Wheels: dented or bent wheels can lead to
a loss of tyre pressure and damage to the
tyre bead. Before driving off-road, check
the wheels and replace them if necessary.
Checklist after driving off-road !
If you detect damage to the vehicle after
driving off-road, have the vehicle checked
immediately at a qualified specialist work-
shop.
X Deactivate the off-road program
(Y page 250).
X Deactivate DSR (Y page 248).
X Clean the headlamps and rear lights and
check for damage.
X Clean the front and rear licence plates.
X Clean the wheels/tyres with a water jet and
remove any foreign objects.
X Clean the wheels, wheel arches and the
vehicle underside with a water jet; check
for any foreign objects and damage.
X Check whether twigs or other parts of
plants have become trapped. These
increase the risk of fire and can damage
fuel pipes, brake hoses or the rubber bel-
lows of the axle joints and propeller shafts.
X After the trip, examine without fail the
entire undercarriage, wheels, tyres, brakes,
bodywork structure, steering, chassis and
exhaust system for damage. 228
Driving tipsDriving and parking
Page 335 of 497
and the
Lsymbol in the multifunction
display are shown in white.
X Press the abutton to save the setting.
If you switch on the Intelligent Light
Intelligent Light
System
System function, the following functions are
activated:
R Motorway mode
R Active light function
R Cornering light function
R Extended range foglamps
R Off-road lights
If you set the dipped-beam headlamps for
driving on the right/left, the multifunction
display shows the Inactive for left-
Inactive for left-
side traffic side traffic orInactive for right-
Inactive for right-
side traffic
side traffic display message in the
Lights
Lights submenu instead of the Intelli‐
Intelli‐
gent Light System
gent Light System function (Ypage 332).
This display message will only appear if the
setting for driving on the left/right is set
opposite to your vehicle's country version.
Further information on the Intelligent Light
System (Y page 141).
Setting the dipped-beam headlamps for
driving on the left/right
This function is only available on vehicles with
the Intelligent Light System.
You can use this function to switch between
symmetrical and asymmetrical dipped beam
(Y page 138).
X Press òon the steering wheel to open
the menu list.
X Press the :or9 button on the steer-
ing wheel to select the Settings Settingsmenu.
X Confirm by pressing aon the steering
wheel.
X Use : or9 to select the Lights
Lights
submenu.
X Press ato confirm. X
Using :or9, select the Dipped
Dipped
beams Setting for
beams Setting for function.
You will see the selected setting, right-
right-
side traffic
side traffic orleft-side traffic
left-side traffic.
X Press the abutton to save the setting.
If you change the setting, conversion does
not take place until the next time the vehi-
cle is stationary.
If you set the dipped-beam headlamps for
driving on the right/left, then motorway
mode and the extended range foglamps are
unavailable. These are only deactivated if the setting for driving on the left/right is set
opposite to your vehicle's country version.
A qualified specialist workshop can set the
dipped-beam headlamps for driving on the
left/right.
Instrument cluster submenu Selecting the distance unit
The
Display Display unit
unitSpeed-/odometer
Speed-/odometer func-
tion allows you to choose whether certain
displays appear in kilometres or miles in the
multifunction display.
X Press òon the steering wheel to open
the menu list.
X Press the :or9 button on the steer-
ing wheel to select the Settings Settingsmenu.
X Confirm by pressing aon the steering
wheel.
X Use : or9 to select the Instru‐
Instru‐
ment cluster
ment cluster submenu.
X Press ato confirm.
X Press :or9 to select the Display
Display
unit Speed-/odometer
unit Speed-/odometer function.
The current setting km
kmorMiles
Miles appears.
X Press the abutton to save the setting.
The selected unit of measurement for dis-
tance applies to the:
R digital speedometer in the Trip Tripmenu
R total distance recorder and the trip meter
R trip computer
R current consumption and the range 332
Menus and submenusOn-board computer and displays
Page 353 of 497
Display messages
Possible causes/consequences and
M
MSolutions system has disabled the front-passenger front airbag
(Y
page 57)
R the Front-passenger airbag enabled See Owner's Front-passenger airbag enabled See Owner's
Manual
Manual orFront-passenger
Front-passenger airbag
airbag disabled
disabled See
SeeOwn‐
Own‐
er's Manual
er's Manual display messages must not appear in the mul-
tifunction display
X Wait for a period of at least 60 seconds until the necessary sys-
tem checks have been completed.
X Make sure that the display messages do not appear in the mul-
tifunction display.
If these conditions are met, the front-passenger seat can be occu- pied again. Whether the PASSENGER AIR BAG OFF or ON indicator
lamp remains lit or goes out depends on how the automatic front- passenger front airbag deactivation system classifies the occu-
pant.
If the conditions are not met, the system is not operating correctly.
X Consult a qualified specialist workshop immediately.
Further information on the automatic front-passenger front airbag deactivation feature (Y page 56).lights
i Vehicles with LED light bulbs in the light clusters:
The display message for the corresponding lamp only appears when all of the LEDs in the
lamp have failed. Display messages
Possible causes/consequences and
M MSolutions b
Left cornering Left cornering
light light
orRight cor‐
Right cor‐
nering light
nering light The left- or right-hand cornering light is faulty.
X Consult a qualified specialist workshop. b
Left dipped beam Left dipped beam
or
Right dipped Right dipped
beam beam The left- or right-hand dipped-beam headlamp is faulty.
X Halogen headlamp: replace the bulb (Ypage 146).
X LED headlamps: consult a qualified specialist workshop. b
Trailer left tail Trailer left tail
lamp lamp
orTrailer Trailer
right tail lamp right tail lamp The left- or right-hand trailer tail lamp is faulty.
X Consult the manufacturer's operating instructions. 350
Display
messagesOn-board computer and displays
Page 354 of 497
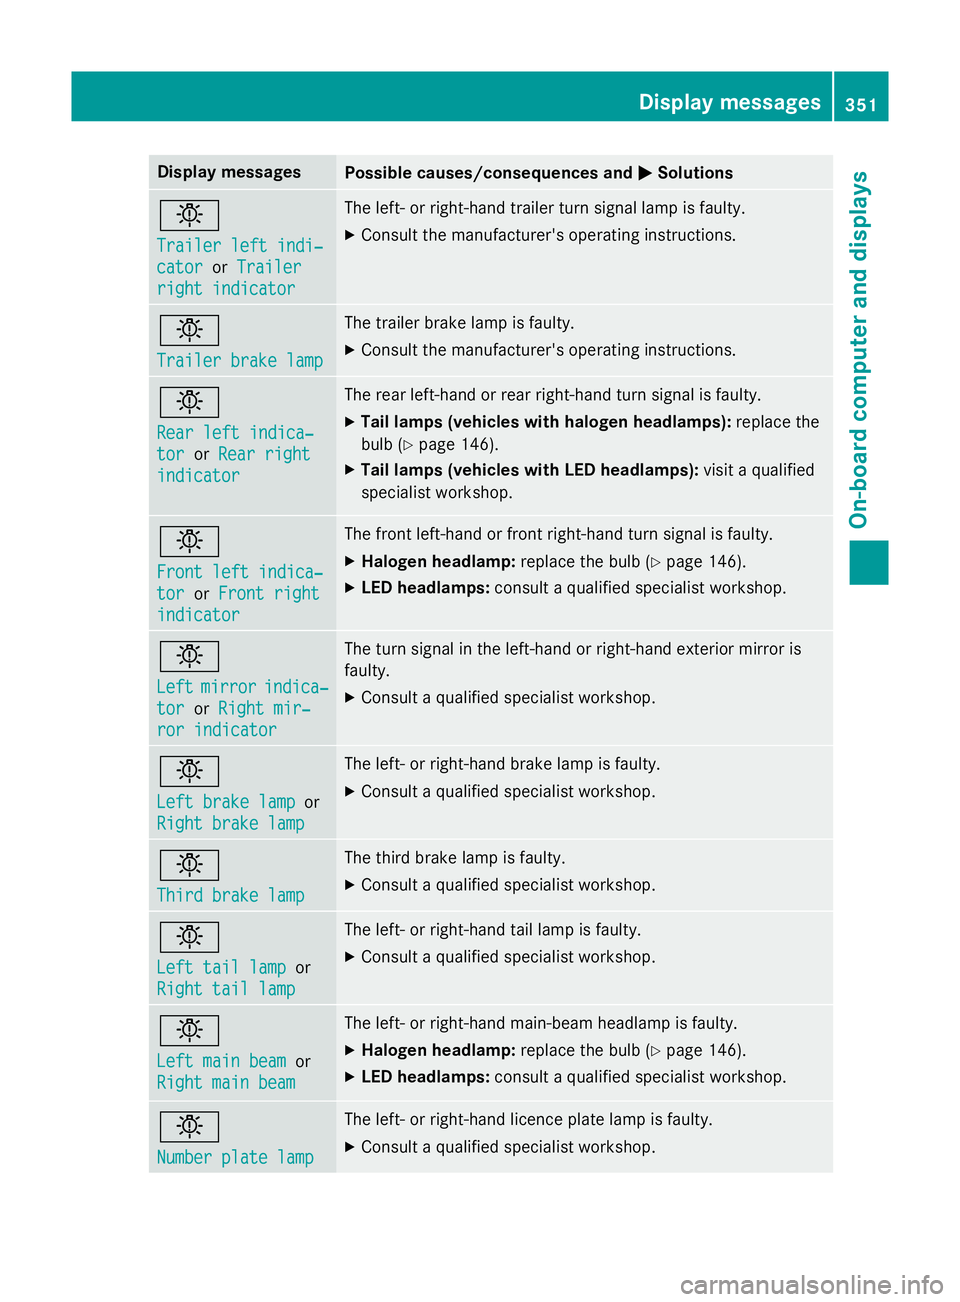
Display messages
Possible causes/consequences and
M
MSolutions b
Trailer left indi‐ Trailer left indi‐
cator cator
orTrailer
Trailer
right indicator
right indicator The left- or right-hand trailer turn signal lamp is faulty.
X Consult the manufacturer's operating instructions. b
Trailer brake lamp Trailer brake lamp The trailer brake lamp is faulty.
X Consult the manufacturer's operating instructions. b
Rear left indica‐ Rear left indica‐
tor tor
orRear right
Rear right
indicator
indicator The rear left-hand or rear right-hand turn signal is faulty.
X Tail lamps (vehicles with halogen headlamps): replace the
bulb (Y page 146).
X Tail lamps (vehicles with LED headlamps): visit a qualified
specialist workshop. b
Front left indica‐ Front left indica‐
tor tor
orFront right
Front right
indicator
indicator The front left-hand or front right-hand turn signal is faulty.
X Halogen headlamp: replace the bulb (Ypage 146).
X LED headlamps: consult a qualified specialist workshop. b
Left Left
mirror
mirror indica‐
indica‐
tor
tor orRight mir‐
Right mir‐
ror indicator
ror indicator The turn signal in the left-hand or right-hand exterior mirror is
faulty.
X Consult a qualified specialist workshop. b
Left brake lamp Left brake lamp
or
Right brake lamp
Right brake lamp The left- or right-hand brake lamp is faulty.
X Consult a qualified specialist workshop. b
Third brake lamp Third brake lamp The third brake lamp is faulty.
X Consult a qualified specialist workshop. b
Left tail lamp Left tail lamp
or
Right tail lamp
Right tail lamp The left- or right-hand tail lamp is faulty.
X Consult a qualified specialist workshop. b
Left main beam Left main beam
or
Right main beam
Right main beam The left- or right-hand main-beam headlamp is faulty.
X Halogen headlamp: replace the bulb (Ypage 146).
X LED headlamps: consult a qualified specialist workshop. b
Number plate lamp Number plate lamp The left- or right-hand licence plate lamp is faulty.
X Consult a qualified specialist workshop. Display
messages
351On-board computer and displays Z
Page 356 of 497
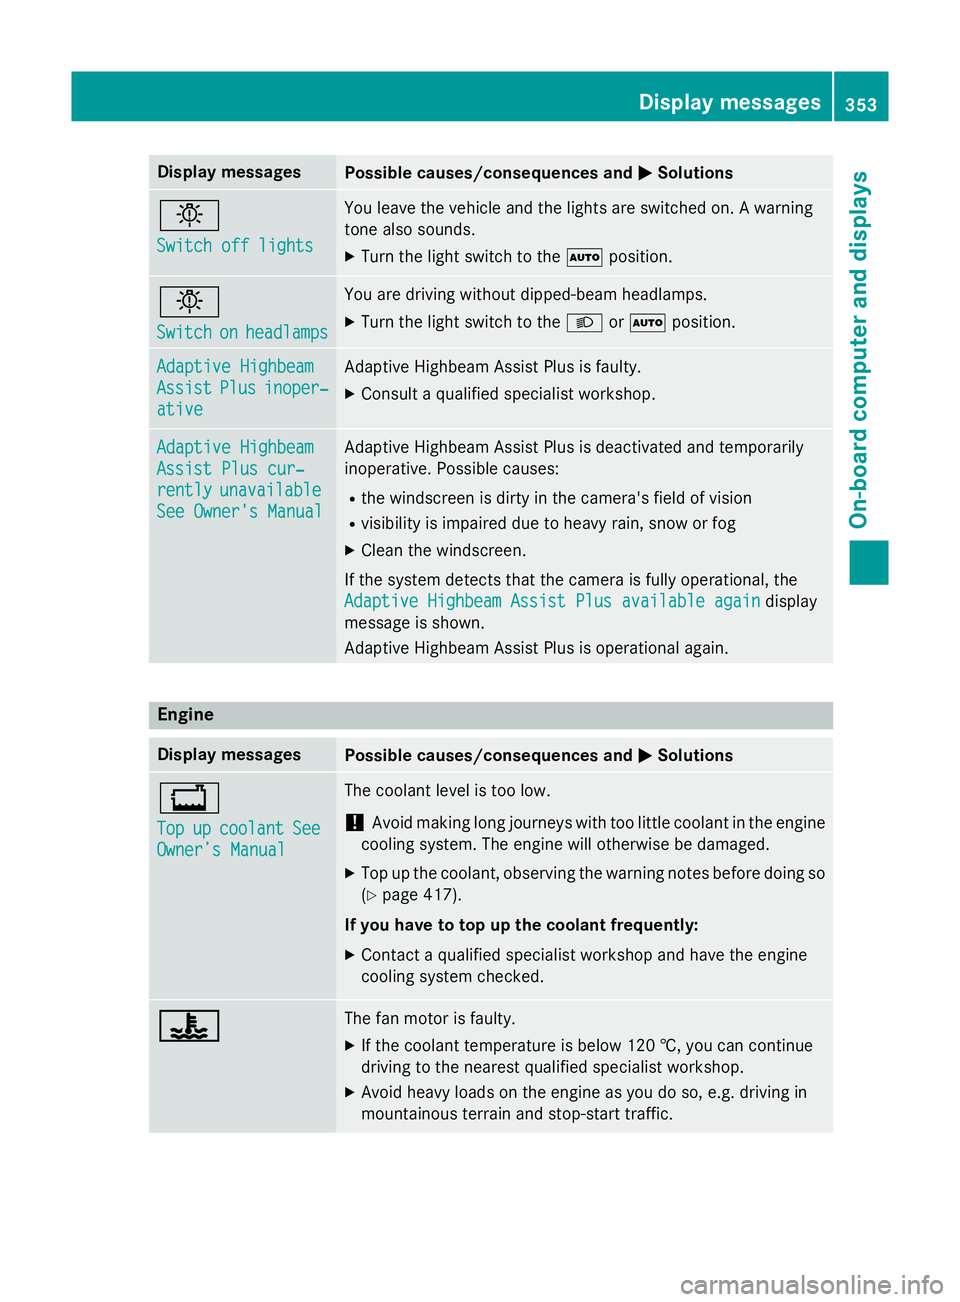
Display messages
Possible causes/consequences and
M
MSolutions b
Switch off lights Switch off lights You leave the vehicle and the lights are switched on. A warning
tone also sounds.
X Turn the light switch to the Ãposition. b
Switch Switch
on
onheadlamps
headlamps You are driving without dipped-beam headlamps.
X
Turn the light switch to the Lorà position. Adaptive Highbeam Adaptive Highbeam
Assist Assist
Plus
Plusinoper‐
inoper‐
ative
ative Adaptive Highbeam Assist Plus is faulty.
X Consult a qualified specialist workshop. Adaptive Highbeam
Adaptive Highbeam
Assist Plus cur‐ Assist Plus cur‐
rently rently
unavailable
unavailable
See Owner's Manual
See Owner's Manual Adaptive Highbeam Assist Plus is deactivated and temporarily
inoperative. Possible causes:
R the windscreen is dirty in the camera's field of vision
R visibility is impaired due to heavy rain, snow or fog
X Clean the windscreen.
If the system detects that the camera is fully operational, the
Adaptive Highbeam Assist Plus available again
Adaptive Highbeam Assist Plus available again display
message is shown.
Adaptive Highbeam Assist Plus is operational again. Engine
Display messages
Possible causes/consequences and
M MSolutions +
Top Top
up
upcoolant
coolant See
See
Owner’s Manual
Owner’s Manual The coolant level is too low.
! Avoid making long journeys with too little coolant in the engine
cooling system. The engine will otherwise be damaged.
X Top up the coolant, observing the warning notes before doing so
(Y page 417).
If you have to top up the coolant frequently:
X Contact a qualified specialist workshop and have the engine
cooling system checked. ? ? The fan motor is faulty.
X If the coolant temperature is below 120 †, you can continue
driving to the nearest qualified specialist workshop.
X Avoid heavy loads on the engine as you do so, e.g. driving in
mountainous terrain and stop-start traffic. Display
messages
353On-board computer and displays Z
Page 490 of 497
Coolant
Important safety notes G
WARNING
If antifreeze comes into contact with hot com- ponents in the engine compartment, it may
ignite. There is a risk of fire and injury.
Let the engine cool down before you top up
the antifreeze. Make sure that antifreeze is
not spilled next to the filler neck. Thoroughly
clean the antifreeze from components before
starting the engine.
! Only add coolant that has been premixed
with the desired antifreeze protection. You
could otherwise damage the engine.
Further information on coolants can be
found in the Mercedes-Benz Specifications for Service Products, MB Specifications for Service Products 310.1, e.g. on the Inter-
net at http://bevo.mercedes-benz.co m.
Or contact a qualified specialist workshop.
! Always use a suitable coolant mixture,
even in countries where high temperatures prevail.
Otherwise, the engine cooling system is not
sufficiently protected from corrosion and
overheating.
i Have the coolant regularly replaced at a
qualified specialist workshop and the
replacement confirmed in the Service
Booklet.
Comply with the important safety precautions for service products when handling coolant
(Y page 480).
The coolant is a mixture of water and anti-
freeze/corrosion inhibitor. It is responsible
for the following:
R anti-corrosion protection
R antifreeze protection
R raising the boiling point
If antifreeze/corrosion inhibitor is present in
the correct concentration, the boiling point of the coolant during operation will be approx-
imately 130 †.
The antifreeze/corrosion inhibitor concentra-
tion in the engine cooling system should:
R be at least 50%. This will protect the engine
cooling system against freezing down to
approximately -37 †.
R not exceed 55% (antifreeze protection
down to -45 †). Heat will otherwise not be
dissipated as effectively.
Mercedes-Benz recommends an antifreeze/
corrosion inhibitor concentrate in accord-
ance with MB Specifications for Service Prod-
ucts 310.1.
i When the vehicle is first delivered, it is fil-
led with a coolant mixture that ensures
adequate antifreeze and corrosion protec-
tion.
i The coolant is checked at every mainte-
nance interval at a qualified specialist
workshop. Windscreen washer system
Important safety notes G
WARNING
If windscreen washer concentrate comes into contact with hot components of the engine or
the exhaust system, it can ignite. There is a
risk of fire and injury.
Make sure the windscreen washer concen-
trate does not come into contact with the filler neck.
! Only use washer fluid that is suitable for
plastic lamp lenses, e.g. MB SummerFit or
MB WinterFit. Unsuitable washer fluid
could damage the plastic lenses of the
headlamps.
! Do not use distilled or de-ionised water in
the washer fluid reservoir. Otherwise, the
level sensor may be damaged. Service products and capacities
487Technical data Z