2015 MERCEDES-BENZ GLC SUV manual transmission
[x] Cancel search: manual transmissionPage 203 of 497
Double-clutch function
When shifting down, the double-clutch func-
tion is active regardless of the currently selec-
ted drive program. The double-clutch function reduces load change reactions and is condu-cive to a sporty driving style. The sound gen-
erated by the double-clutch function depends
on the drive program selected.
Kickdown Use kickdown for maximum acceleration:
X Depress the accelerator pedal beyond the
pressure point.
The transmission shifts to a lower gear
depending on the engine speed.
X Ease off the accelerator pedal once the
desired speed is reached.
The automatic transmission shifts back up.
Rocking the vehicle free Rocking the vehicle free by shifting the trans-
mission repeatedly between transmission
positions Dand Rmay help to free the vehicle
if it has become stuck in mud or snow.
The vehicle's engine management restricts
repeated shifting between transmission posi- tions Dand Rup to a maximum speed of
9 km/h.
To shift back and forth between transmission
positions Dand R, move the DIRECT SELECT
lever up and down past the point of resist-
ance.
Towing a trailer Towing a trailer is not possible with all mod-
els. For further information, see
(Y page 303).
X Drive in the middle of the engine speed
range on uphill gradients.
X Manual shifting: depending on the uphill
or downhill gradient, shift into a gear
(Y page 201) in which the engine will run in
the middle of the engine speed range. This also applies if cruise control,
DISTRONIC PLUS or SPEEDTRONIC are
activated. Drive programs
Drive program I (Individual) In drive program
Ithe following properties of
the drive program can be selected:
R the drive (engine and transmission man-
agement)
R the suspension
R the steering
R the availability of the ECO start/stop func-
tion
R the climate control
i To permanently select the gears in drive
program Iusing the steering wheel pad-
dles, select the M(manual) setting for the
drive.
Drive program S+ (Sport Plus) Drive program
S+is characterised by the fol-
lowing:
R the vehicle exhibits particularly sporty driv-
ing characteristics.
R the vehicle pulling away in first gear.
R the automatic transmission shifting up
later.
R As a result of the later automatic transmis-
sion shift points, the fuel consumption pos-sibly being higher.
R the suspension exhibits particularly stiff
springing and damping settings (vehicles
with AIR BODY CONTROL)
R the ECO start/stop function is not availa-
ble. 200
Automatic transmissionDriving and pa
rking
Page 204 of 497
Drive program S (Sport)
Drive program
Sis characterised by the fol-
lowing:
R the vehicle exhibits sporty driving charac-
teristics.
R the vehicle pulling away in first gear.
R the automatic transmission shifting up
later.
R As a result of the later automatic transmis-
sion shift points, the fuel consumption pos- sibly being higher.
R the suspension exhibits stiff springing and
damping settings (vehicles with
AIR BODY CONTROL).
Drive program C (Comfort) Drive program
Cis characterised by the fol-
lowing:
R the vehicle delivers comfortable, economi-
cal driving characteristics.
R the vehicle pulling away more gently in
forward and reverse gears unless the accel-
erator pedal is depressed fully.
R the vehicle having improved driving stabil-
ity, for example on slippery road surfaces.
R optimal fuel consumption resulting from
the automatic transmission shifting up
sooner. The vehicle is driven in the low
engine speed range and the wheels are less likely to spin.
Drive program E (Economy) Drive program
Eis characterised by the fol-
lowing:
R the vehicle exhibits comfortable, economi-
cal driving characteristics.
R the vehicle pulling away more gently in
forward and reverse gears unless the accel-
erator pedal is depressed fully.
R the vehicle having improved driving stabil-
ity, for example on slippery road surfaces.
R optimal fuel consumption resulting from
the automatic transmission shifting up sooner. The vehicle is driven in the low
engine speed range and the wheels are less
likely to spin.
R during deceleration, the engine is discon-
nected from the drive train. The vehicle
uses kinetic energy and consumes less fuel
(overrun mode).
R the performance of the air-conditioning and
heating systems is reduced. Manual gearshifting
General notes You can change gear yourself using the steer-
ing wheel gearshift paddles. The transmissionmust be in position D.
Depending on which gearshift paddle is
pulled, the automatic transmission immedi-
ately shifts into the next gear up or down, if
permitted.
If you activate manual gearshifting, the mul-
tifunction display will show the current gear
instead of transmission position D.
If manual gearshifting is deactivated, the
gears will be selected automatically.
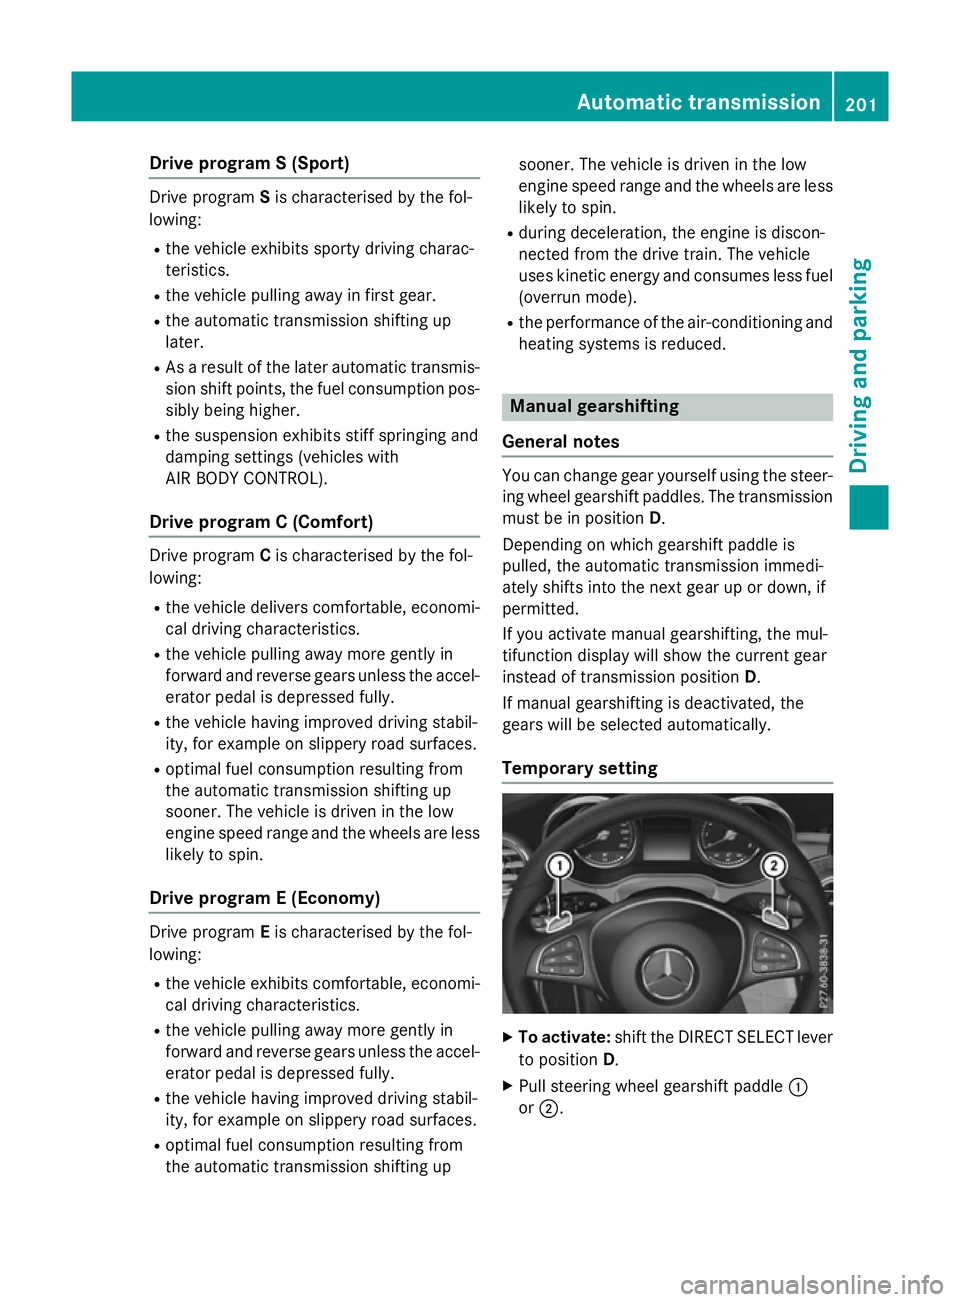
Temporary setting X
To activate: shift the DIRECT SELECT lever
to position D.
X Pull steering wheel gearshift paddle :
or ;. Automatic transmission
201Driving and parking Z
Page 205 of 497
Further information on activating manual
gearshifting on PLUG-IN HYBRID vehicles
(Y page 296).
Temporary setting will be active for a certain
amount of time. Under certain conditions the minimum amount of time is extended, e.g. in
the case of lateral acceleration, during an
overrun phase or when driving on steep ter-
rain.
X To deactivate: pull steering wheel gear-
shift paddle ;and hold it in place.
or
X Use the DIRECT SELECT lever to shift the
transmission position.
or
X Use the DYNAMIC SELECT switch to
change the drive program.
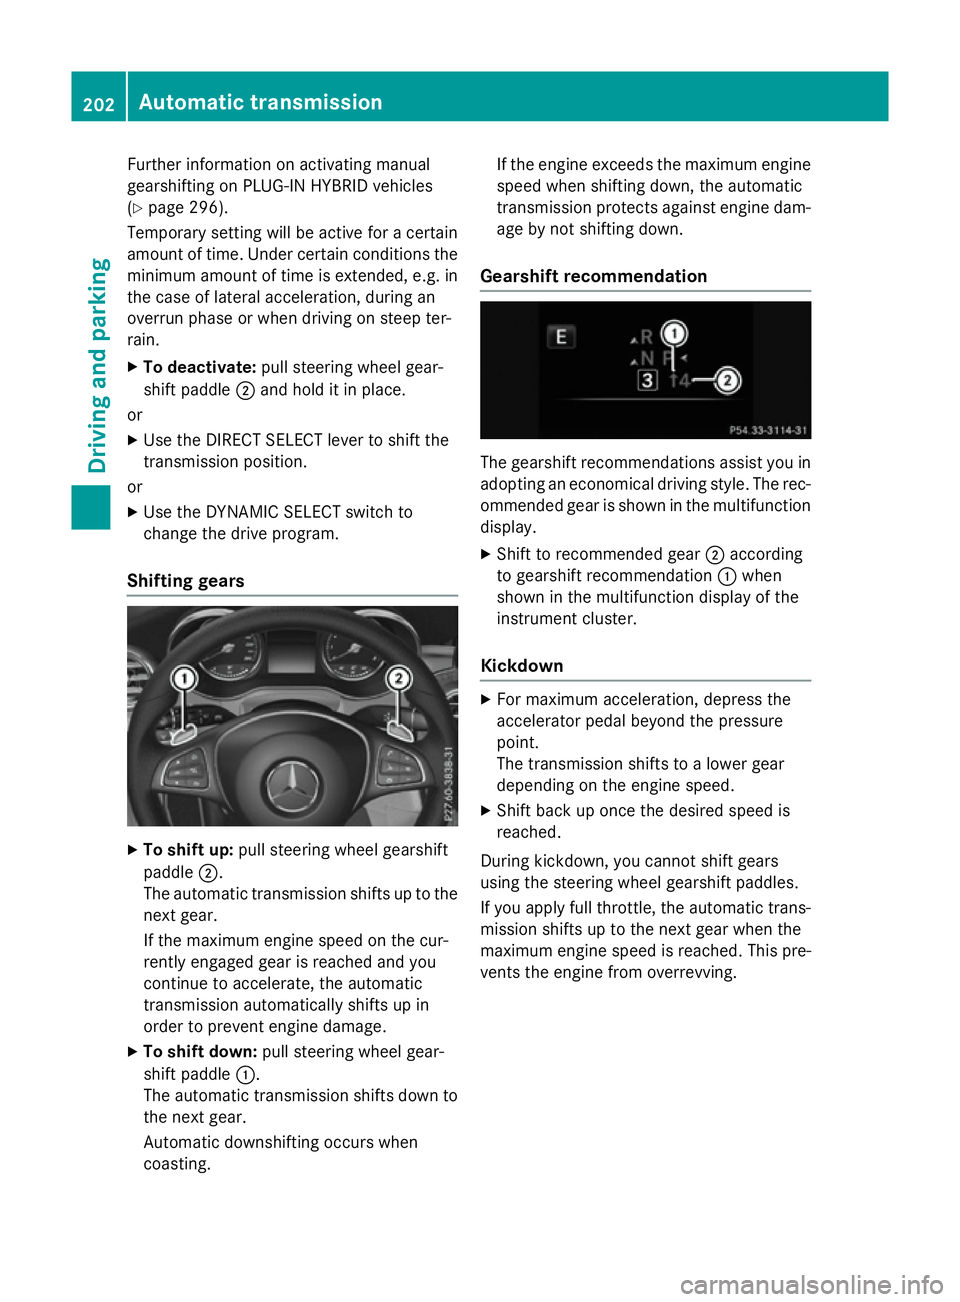
Shifting gears X
To shift up: pull steering wheel gearshift
paddle ;.
The automatic transmission shifts up to the next gear.
If the maximum engine speed on the cur-
rently engaged gear is reached and you
continue to accelerate, the automatic
transmission automatically shifts up in
order to prevent engine damage.
X To shift down: pull steering wheel gear-
shift paddle :.
The automatic transmission shifts down to the next gear.
Automatic downshifting occurs when
coasting. If the engine exceeds the maximum engine
speed when shifting down, the automatic
transmission protects against engine dam-
age by not shifting down.
Gearshift recommendation The gearshift recommendations assist you in
adopting an economical driving style. The rec- ommended gear is shown in the multifunction
display.
X Shift to recommended gear ;according
to gearshift recommendation :when
shown in the multifunction display of the
instrument cluster.
Kickdown X
For maximum acceleration, depress the
accelerator pedal beyond the pressure
point.
The transmission shifts to a lower gear
depending on the engine speed.
X Shift back up once the desired speed is
reached.
During kickdown, you cannot shift gears
using the steering wheel gearshift paddles.
If you apply full throttle, the automatic trans- mission shifts up to the next gear when the
maximum engine speed is reached. This pre-
vents the engine from overrevving. 202
Automatic transmissionDriving and parking
Page 224 of 497
In addition, they may operate vehicle equip-
ment and become trapped. There is a risk of
an accident and injury.
When leaving the vehicle, always take the key with you and lock the vehicle. Never leave
children unattended in the vehicle.
The function of the electric parking brake is
dependent on the on-board voltage. If the on-
board voltage is low or if there is a malfunc-
tion in the system, it may not be possible to
apply the released parking brake.
X If this is the case, only park the vehicle on
level ground and secure it to prevent it from
rolling away.
X Shift the automatic transmission to posi-
tion P.
It may not be possible to release an applied
parking brake if the on-board voltage is low or if there is a malfunction in the system. Con-
tact a qualified specialist workshop.
The electric parking brake carries out a func-
tion check at regular intervals when the
engine is switched off. Noises that occur are
normal.
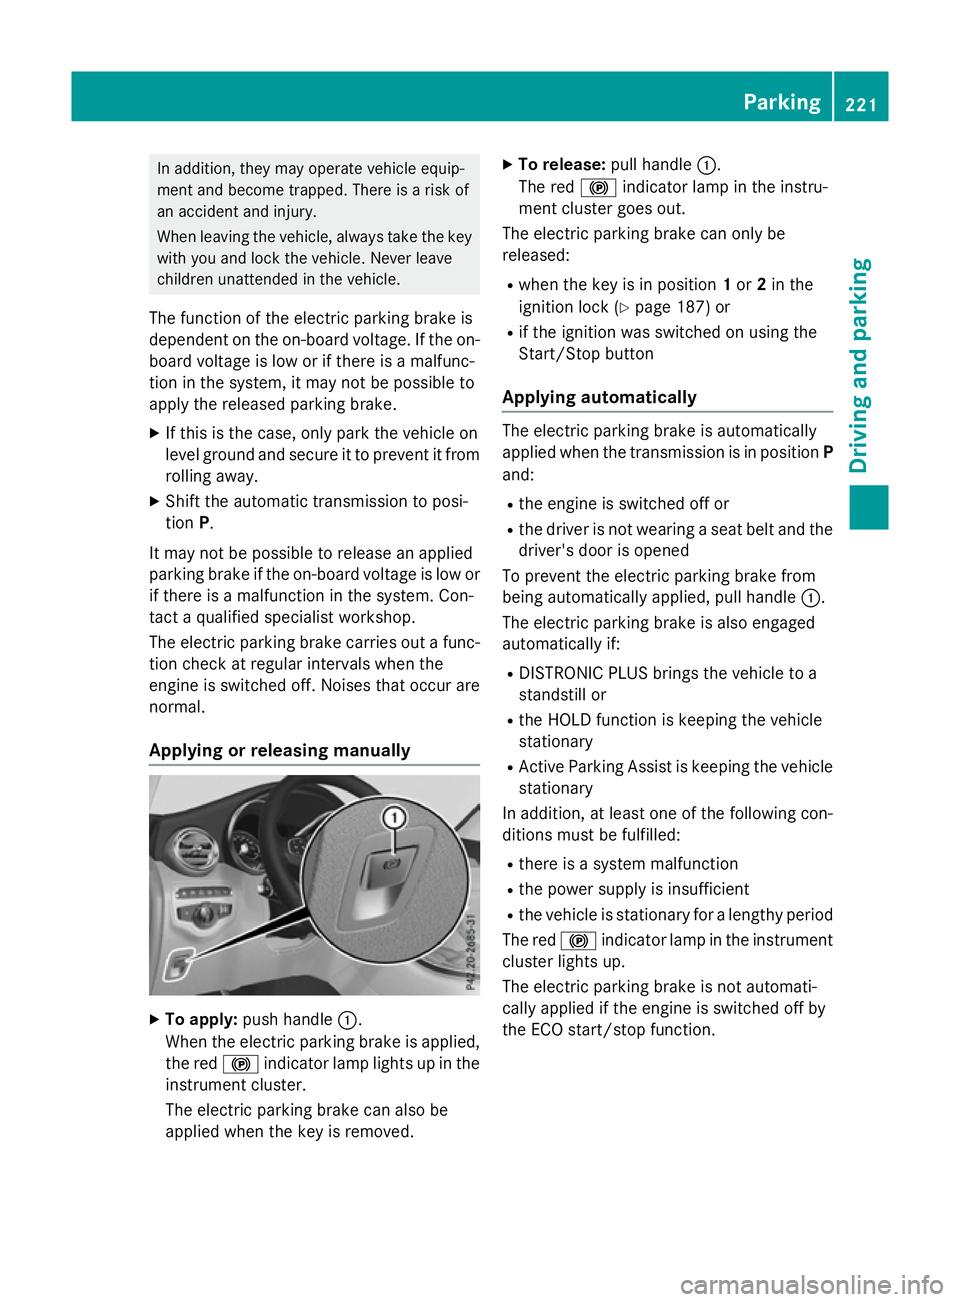
Applying or releasing manually X
To apply: push handle :.
When the electric parking brake is applied, the red !indicator lamp lights up in the
instrument cluster.
The electric parking brake can also be
applied when the key is removed. X
To release: pull handle:.
The red !indicator lamp in the instru-
ment cluster goes out.
The electric parking brake can only be
released:
R when the key is in position 1or 2in the
ignition lock (Y page 187) or
R if the ignition was switched on using the
Start/Stop button
Applying automatically The electric parking brake is automatically
applied when the transmission is in position
P
and:
R the engine is switched off or
R the driver is not wearing a seat belt and the
driver's door is opened
To prevent the electric parking brake from
being automatically applied, pull handle :.
The electric parking brake is also engaged
automatically if:
R DISTRONIC PLUS brings the vehicle to a
standstill or
R the HOLD function is keeping the vehicle
stationary
R Active Parking Assist is keeping the vehicle
stationary
In addition, at least one of the following con-
ditions must be fulfilled:
R there is a system malfunction
R the power supply is insufficient
R the vehicle is stationary for a lengthy period
The red !indicator lamp in the instrument
cluster lights up.
The electric parking brake is not automati-
cally applied if the engine is switched off by
the ECO start/stop function. Parking
221Driving and parking Z
Page 254 of 497
ESP
®
and 4ETS programs especially adapted
to slippery surfaces are also activated for
maximum stability.
For more information on driving with snow
chains see "Winter operation" (Y page 457).
Off-road program, Off-road
You can select the Off-roadoff-road program
for easily negotiable terrain, e.g. dirt roads,
gravel and sand.
The Off-road off-road program has the fol-
lowing characteristics:
R the steering, drive and suspension are
adapted for comfort
R the transmission is adapted for off-road
driving
R the vehicle is raised by 15 mm compared to
the normal level
The Off-road off-road program assists you
when driving in easily negotiable off-road ter-
rain. The engine’s performance characteris-
tics and the gearshifting characteristics of the automatic transmission are adapted for this
purpose. ABS, ESP ®
and 4ETS programs
especially adapted to off-road driving are also
activated.
Off-road program, Rocking free (vehicles
with AIR BODY CONTROL)
You can select the Rocking freeoff-road pro-
gram to free the vehicle from especially diffi- cult off-road terrain at low speeds.
The Rocking free off-road program has the
following characteristics:
R the steering, drive and suspension are
adapted for comfort
R the transmission is adapted for off-road
driving
R the vehicle is raised by 50 mm compared to
the normal level (vehicles with AIR BODY
CONTROL)
ABS, ESP ®
and 4ETS programs especially
adapted to off-road driving are also activated.
The Rocking free off-road program can be
selected up to a speed of 20 km/h. If you are driving in the
Rocking freeoff-road
program at speeds above 20 km/h
R the vehicle switches to the off-road pro-
gram Off-road
R the vehicle is lowered by 35 mm
Information about driving off-road
(Y page 226).
Off-road program, Gradient
You can use the Gradientoff-road program to
overcome steep terrain.
The Gradient off-road program has the fol-
lowing characteristics:
R the steering, drive and suspension are
adapted for comfort
R the transmission is adapted for off-road
driving
R manual gearshifting is activated
(Y page 201)
R the vehicle is raised by 15 mm compared to
the normal level
R DSR is activated (Y page 248)
ABS, ESP ®
and 4ETS programs especially
adapted to gradients are also activated.
Off-road program, Trailer
Select the Traileroff-road program when
towing a trailer.
The Trailer off-road program has the follow-
ing characteristics:
R the steering, drive and suspension are
adapted for comfort
R the transmission is adapted for off-road
driving
R the vehicle is adjusted to normal level (vehi-
cles with AIR BODY CONTROL)
R the ECO start/stop function is available
(Y page 191)
ESP ®
specially adapted for trailer operation is
also activated. Driving systems
251Driving and parking Z
Page 266 of 497
Activating/deactivating the reversing
camera X
To activate: make sure that the key is in
position 2in the ignition lock.
X Make sure that the Activation by R
Activation by R
gear
gear function is selected in Audio 20 or
COMAND Online (see the Digital Owner's
Manual).
X Engage reverse gear.
The reversing camera flap opens. The area
behind the vehicle is shown with guide lines
in the Audio 20 or COMAND Online display.
The image from the reversing camera is
available throughout the manoeuvring
process.
X To change the function mode for vehi-
cles with trailer tow hitch: using the
Audio 20 or COMAND Online controller,
select symbol :for the "Reverse parking"
function or symbol ;for "Coupling up a
trailer".
The symbol of the selected function is high-
lighted.
To deactivate: the reversing camera deacti-
vates if you shift the transmission to Por after
driving forwards a short distance. Messages in the Audio 20 or COMAND
Online display The reversing camera may show a distorted
view of obstacles or show them incorrectly or
not at all. Obstacles are not shown by the
reversing camera in the following locations:
R very close to the rear bumper
R under the rear bumper
R in the area immediately above the boot lid
handle or tailgate handle
! Objects not at ground level may appear to
be further away than they actually are, e.g.:
R the bumper of a parked vehicle
R the drawbar of a trailer
R the ball coupling of a trailer tow hitch
R the rear section of an HGV
R a slanted post
Use the guidelines only for orientation.
Approach objects no further than the bot-
tom-most guideline. :
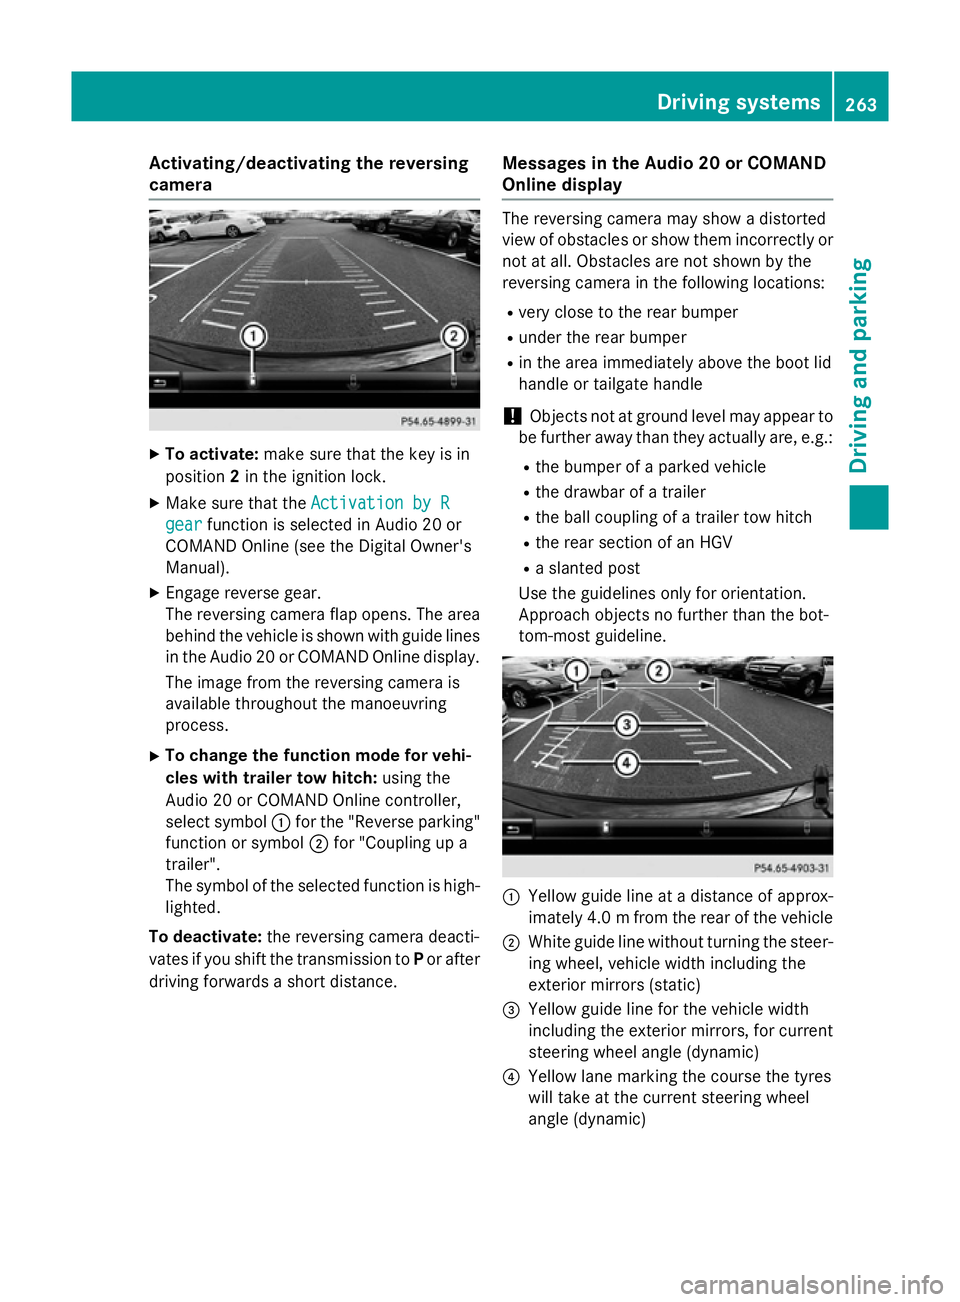
Yellow guide line at a distance of approx-
imately 4.0 mfrom the rear of the vehicle
; White guide line without turning the steer-
ing wheel, vehicle width including the
exterior mirrors (static)
= Yellow guide line for the vehicle width
including the exterior mirrors, for current
steering wheel angle (dynamic)
? Yellow lane marking the course the tyres
will take at the current steering wheel
angle (dynamic) Driving systems
263Driving and parking Z
Page 270 of 497
Object detection
The reversing camera helps detect moving
and stationary objects. If an object (person,
vehicle or other obstacle) is detected, this
object is marked with a bar. Objects located
some distance away from the vehicle are
marked with a yellow bar. If the distance to
the object is very small, the bar is displayed in
red.
Object detection only works in wide-angle
mode.
In order to use the function, it must be
switched on in Audio 20 or COMAND Online
(see the Digital Owner's Manual). 360° camera
General notes The 360° camera is a camera system that
consists of four cameras.
The system evaluates images from the fol-
lowing cameras:
R reversing camera
R front camera
R two side cameras in the exterior mirrors
The cameras cover the immediate surround-
ings of the vehicle. The system assists you,
e.g. when parking or at exits with reduced
visibility.
You can show pictures from the 360° camera in full-screen mode or in seven different split-
screen views on the Audio 20 or COMAND
display. A split-screen view also includes a
top view of the vehicle. This view is calculated
from the data supplied by the installed cam-
eras (virtual camera).
The seven split-screen views are:
R top view and image from the reversing cam-
era (130° viewing angle)
R top view and image from the front camera
(130° viewing angle without displaying the
maximum steering wheel angle)
R top view and enlarged rear view R
top view and enlarged front view
R top view and trailer view (vehicles with
trailer tow hitch)
R top view and images from the rear-facing
side cameras (rear wheel view)
R top view and images from the forward-
facing side cameras (front wheel view)
When the function is active and you shift the
transmission from Dor Rto N, the guide lines
in the Audio 20 or COMAND display are hid-
den.
When you change between transmission
positions Dand R, you see the previously
selected front or rear view.
Distances measured by PARKTRONIC will
also be optically displayed:
R as red or yellow brackets around the vehi-
cle symbol in top view in split-screen mode
or
R at the bottom right as red or yellow brack-
ets around the vehicle symbol in full-screen
mode
The line thickness and colour of the brackets show how far the vehicle is from an object.
R yellow brackets with thin lines:
PARKTRONIC is active
R yellow brackets with normal lines: an
object is present in close range of the vehi-
cle
R red line: an object is present in the imme-
diate close range of the vehicle
Important safety notes The 360° camera is only an aid and may show
a distorted view of obstacles, show them
incorrectly or not at all. The 360° camera is
not a substitute for attentive driving.
The responsibility for safe manoeuvring and
parking remains with you. Make sure that
there are no persons, animals or objects in
range while manoeuvring and parking.
You are always responsible for safety, and
must always pay attention to your surround-
ings when parking and manoeuvring. This Driving systems
267Driving and parking Z
Page 271 of 497
applies to the areas behind, in front of and
beside the vehicle. You could otherwise
endanger yourself and others.
The 360° camera will not function or will
function only in a limited manner:
R if the doors are open
R if the exterior mirrors are folded in
R if the boot lid or tailgate is open
R in heavy rain, snow or fog
R at night or in very dark places
R if the cameras are exposed to very bright
light
R if the area is lit by fluorescent bulbs or LED
lighting (the display may flicker)
R if the camera lenses mist up, e.g. when
driving into a heated garage in winter, caus- ing a rapid change in temperature
R if the camera lenses are dirty or covered
R if the vehicle components in which the
cameras are fitted are damaged. In this
event, have the camera position and setting
checked at a qualified specialist workshop.
Do not use the 360° camera under such cir-
cumstances. You could otherwise injure oth-
ers or damage objects when parking the vehi- cle.
The guide lines in the COMAND display show
the distances to your vehicle. The distances
only apply to road level.
In trailer mode, the guide lines are shown at
the level of the trailer tow hitch.
The camera in the rear area is protected by
means of a flap. This flap opens when the
360° camera is activated. Observe the notes on cleaning (Y page 425). For technical rea-
sons, the flap may remain open briefly after
the 360° camera has been deactivated.
On vehicles with height-adjustable suspen-
sion, due to the technical conditions, leaving
the standard height can result in:
R inaccuracies in the guide lines
R inaccuracies in the display of generated
images (top view) Activation conditions The 360° camera image can be displayed if:
R Audio 20 or COMAND Online is switched on
(see the Digital Owner's Manual)
R the 360° camera 360° camera function is switched on
i If you are driving faster than at a moderate
speed and switch on the 360° camera, a
warning message appears.
The warning message disappears if:
R you are again driving at a moderate
speed. The 360° camera is then activa-
ted.
R the message is confirmed with the %
button.
Switching the 360° camera on/off
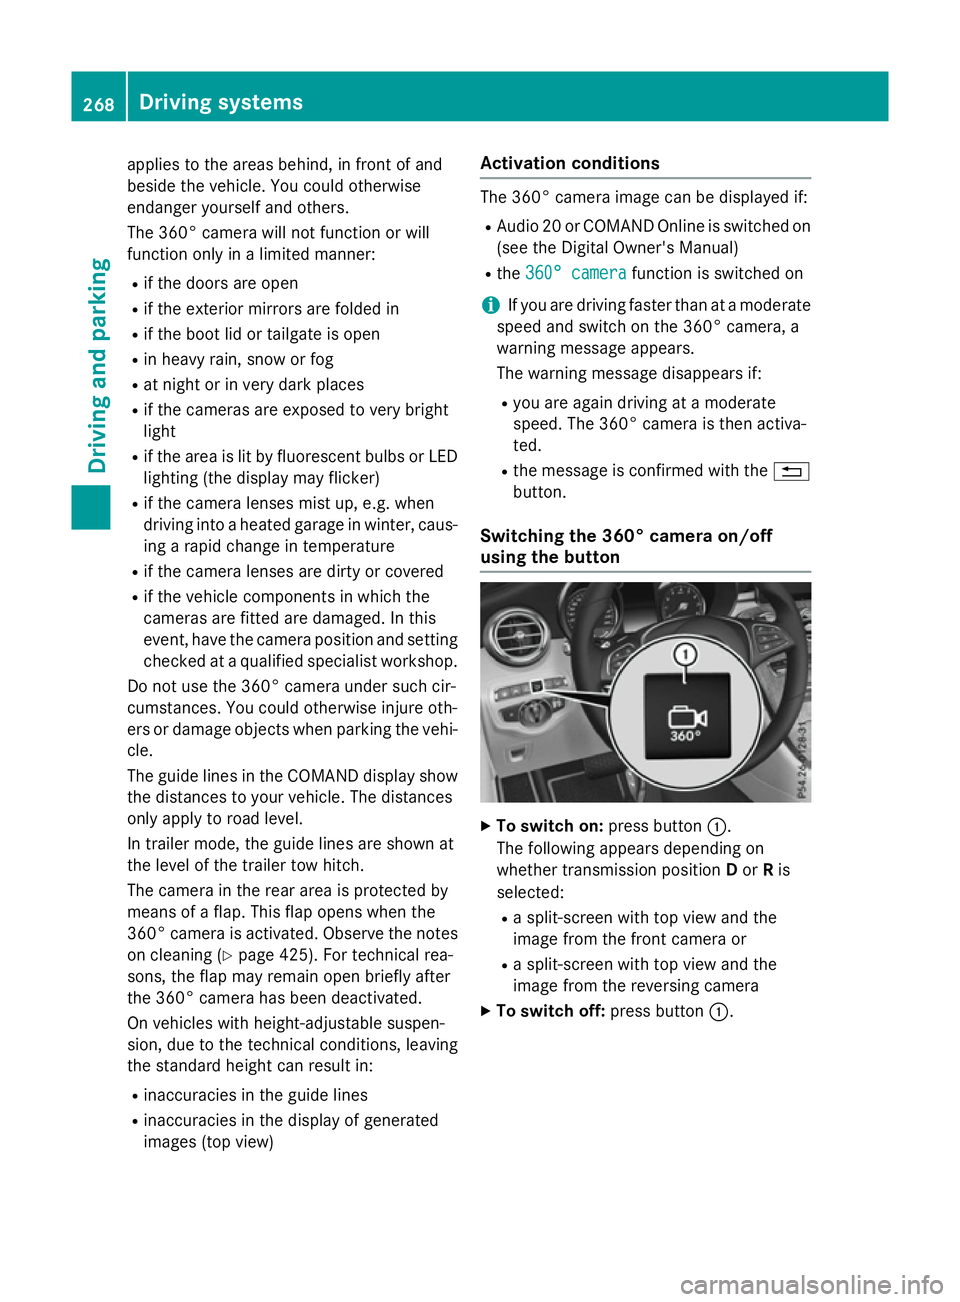
using the button X
To switch on: press button:.
The following appears depending on
whether transmission position Dor Ris
selected:
R a split-screen with top view and the
image from the front camera or
R a split-screen with top view and the
image from the reversing camera
X To switch off: press button:.268
Driving systemsDriving and parking