2015 MERCEDES-BENZ GLC SUV wheel
[x] Cancel search: wheelPage 430 of 497
X
Before cleaning the display, make sure that
it is switched off and has cooled down.
X Clean the display surface using a commer-
cially available microfibre cloth and
TFT/LCD display cleaner.
X Dry the display surface using a dry micro-
fibre cloth.
Cleaning the plastic trim G
WARNING
Care products and cleaning agents containing solvents can cause surfaces in the cockpit to
become porous. This could result in plastic
parts breaking away when the airbags are
deployed. There is a danger of injury.
Do not use care products and cleaning agents containing solvents to clean the cockpit.
! Do not affix the following to plastic surfa-
ces:
R stickers
R films
R scented oil bottles or similar items
You could otherwise damage the plastic.
! Do not allow cosmetics, insect repellent
or sunscreen to come in contact with the
plastic trim. This maintains the high-quality look of the surfaces.
X Wipe the plastic trim with a damp, lint-free
cloth, e.g. a microfibre cloth.
X Heavy soiling: use car care and cleaning
products recommended and approved by
Mercedes-Benz.
The surface may change colour tempora-
rily. Wait until the surface is dry again.
Cleaning the steering wheel and gear or selector lever X
Thoroughly wipe with a damp cloth or use
leather care agents that have been recom-
mended and approved by Mercedes-Benz. Cleaning wooden trim and trim ele-
ments !
Do not use solvent-based cleaning agents
such as tar remover, wheel cleaners, pol-
ishes or waxes. There is otherwise a risk of damaging the surface.
X Wipe the wooden trim and trim elements
with a damp, lint-free cloth, e.g. a microfi-
bre cloth.
X Trim elements with piano black finish:
clean with a soft, damp cloth and a com-
mercially available soap solution.
X Heavy soiling: use care and cleaning prod-
ucts recommended and approved by
Mercedes-Benz.
Cleaning the seat covers General notes
! Do not use a microfibre cloth to clean
covers made out of real leather, artificial
leather or DINAMICA. If used frequently,
this can damage the cover.
Note that regular care is essential to make
sure that the appearance and comfort of the
covers are retained over time.
Genuine leather seat covers
! To retain the natural appearance of the
leather, observe the following cleaning
instructions:
R Clean genuine leather covers carefully
with a damp cloth and then wipe the cov-
ers down with a dry cloth.
R Make sure that the leather does not
become soaked. It may otherwise
become rough and cracked.
R Only use leather care agents that have
been tested and approved by Mercedes-
Benz. You can obtain these from a quali- fied specialist workshop.
Leather is a natural product.
It has natural surface properties, e.g.: Care
427Maintenance and care Z
Page 435 of 497
Fire extinguisher
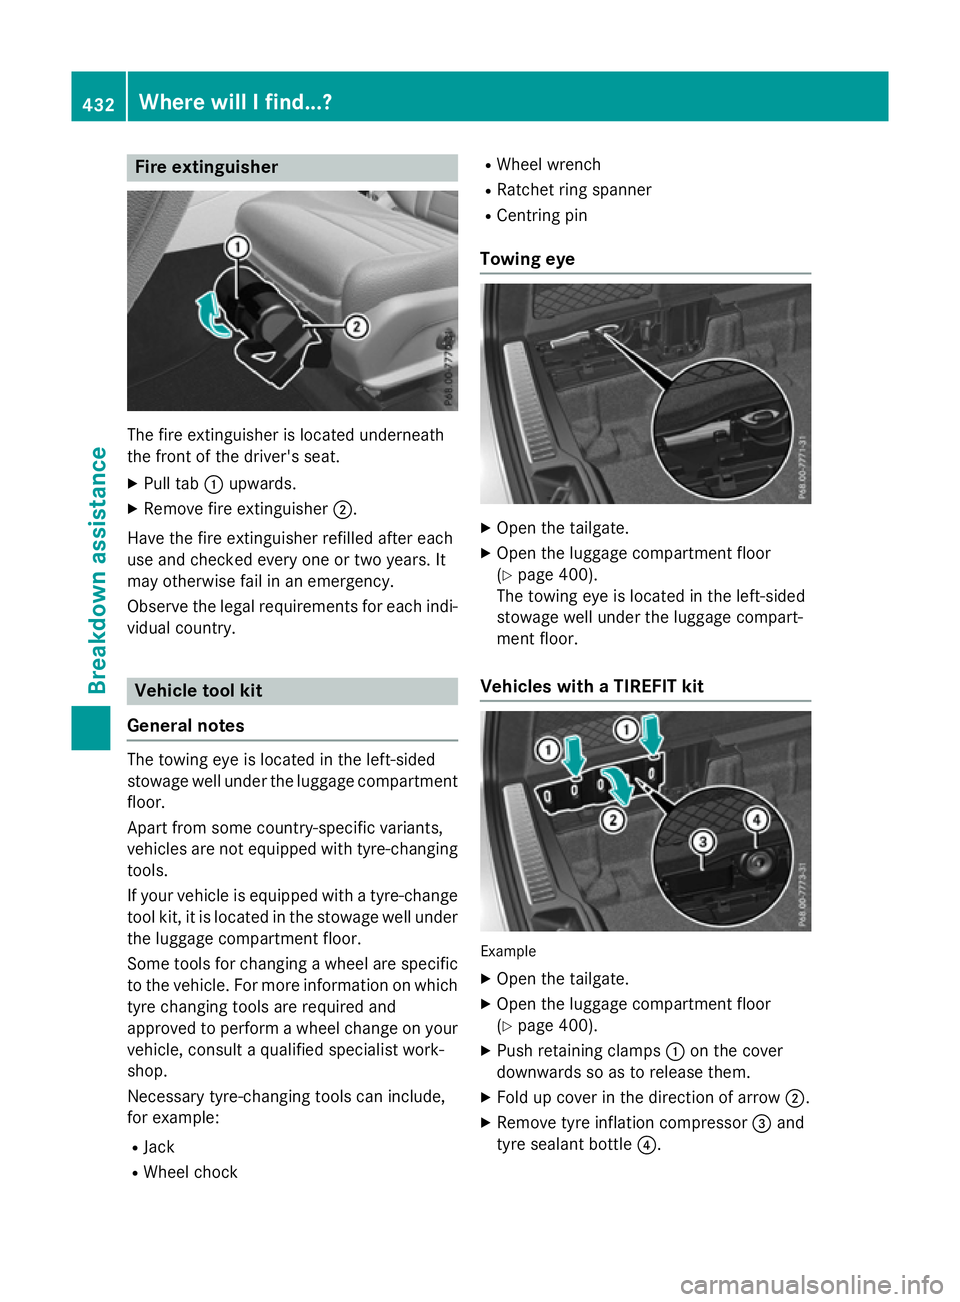
The fire extinguisher is located underneath
the front of the driver's seat.
X Pull tab :upwards.
X Remove fire extinguisher ;.
Have the fire extinguisher refilled after each
use and checked every one or two years. It
may otherwise fail in an emergency.
Observe the legal requirements for each indi- vidual country. Vehicle tool kit
General notes The towing eye is located in the left-sided
stowage well under the luggage compartment
floor.
Apart from some country-specific variants,
vehicles are not equipped with tyre-changing tools.
If your vehicle is equipped with a tyre-change
tool kit, it is located in the stowage well under the luggage compartment floor.
Some tools for changing a wheel are specific
to the vehicle. For more information on which tyre changing tools are required and
approved to perform a wheel change on your
vehicle, consult a qualified specialist work-
shop.
Necessary tyre-changing tools can include,
for example:
R Jack
R Wheel chock R
Wheel wrench
R Ratchet ring spanner
R Centring pin
Towing eye X
Open the tailgate.
X Open the luggage compartment floor
(Y page 400).
The towing eye is located in the left-sided
stowage well under the luggage compart-
ment floor.
Vehicles with a TIREFIT kit Example
X Open the tailgate.
X Open the luggage compartment floor
(Y page 400).
X Push retaining clamps :on the cover
downwards so as to release them.
X Fold up cover in the direction of arrow ;.
X Remove tyre inflation compressor =and
tyre sealant bottle ?.432
Where will I find...?Breakdown assistance
Page 436 of 497
Vehicles with a tyre-change tool kit
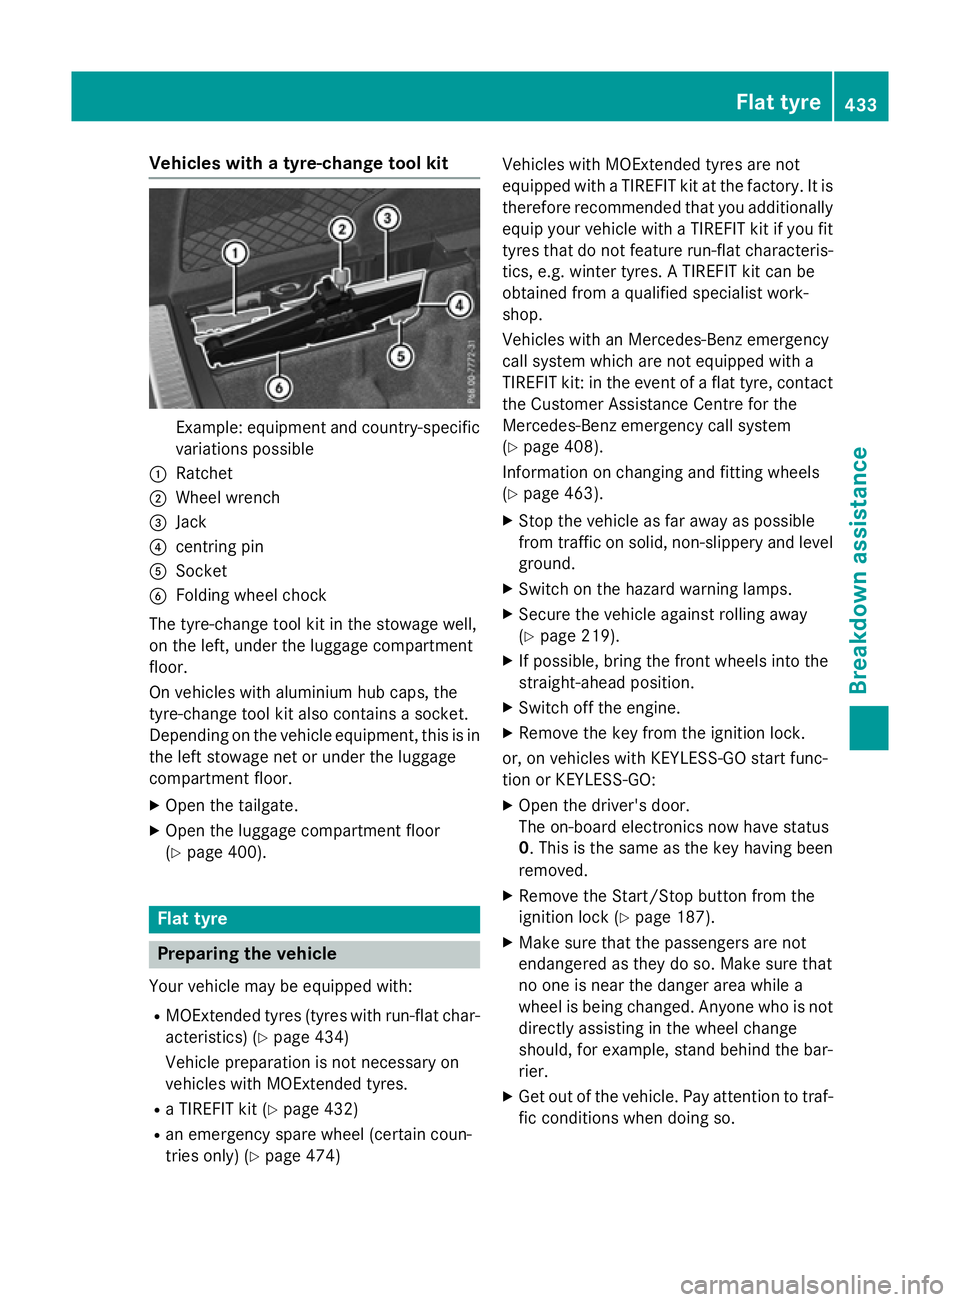
Example: equipment and country-specific
variations possible
: Ratchet
; Wheel wrench
= Jack
? centring pin
A Socket
B Folding wheel chock
The tyre-change tool kit in the stowage well,
on the left, under the luggage compartment
floor.
On vehicles with aluminium hub caps, the
tyre-change tool kit also contains a socket.
Depending on the vehicle equipment, this is in the left stowage net or under the luggage
compartment floor.
X Open the tailgate.
X Open the luggage compartment floor
(Y page 400). Flat tyre
Preparing the vehicle
Your vehicle may be equipped with: R MOExtended tyres (tyres with run-flat char-
acteristics) (Y page 434)
Vehicle preparation is not necessary on
vehicles with MOExtended tyres.
R a TIREFIT kit (Y page 432)
R an emergency spare wheel (certain coun-
tries only) (Y page 474) Vehicles with MOExtended tyres are not
equipped with a TIREFIT kit at the factory. It is
therefore recommended that you additionallyequip your vehicle with a TIREFIT kit if you fit tyres that do not feature run-flat characteris-
tics, e.g. winter tyres. A TIREFIT kit can be
obtained from a qualified specialist work-
shop.
Vehicles with an Mercedes-Benz emergency
call system which are not equipped with a
TIREFIT kit: in the event of a flat tyre, contact
the Customer Assistance Centre for the
Mercedes-Benz emergency call system
(Y page 408).
Information on changing and fitting wheels
(Y page 463).
X Stop the vehicle as far away as possible
from traffic on solid, non-slippery and level
ground.
X Switch on the hazard warning lamps.
X Secure the vehicle against rolling away
(Y page 219).
X If possible, bring the front wheels into the
straight-ahead position.
X Switch off the engine.
X Remove the key from the ignition lock.
or, on vehicles with KEYLESS-GO start func-
tion or KEYLESS ‑GO:
X Open the driver's door.
The on-board electronics now have status
0. This is the same as the key having been
removed.
X Remove the Start/Stop button from the
ignition lock (Y page 187).
X Make sure that the passengers are not
endangered as they do so. Make sure that
no one is near the danger area while a
wheel is being changed. Anyone who is not
directly assisting in the wheel change
should, for example, stand behind the bar-
rier.
X Get out of the vehicle. Pay attention to traf-
fic conditions when doing so. Flat tyre
433Breakdown assis tance
Page 438 of 497
After driving in emergency mode, have the
wheel rims checked at a qualified specialist
workshop with regard to their further use. The faulty tyre must be replaced. TIREFIT kit
Important safety notes TIREFIT is a tyre sealant.
You can use TIREFIT to seal punctures of up to
4 mm, particularly those in the tyre tread. You
can use TIREFIT at outside temperatures
down to Ò20 †. G
WARNING
In the following situations, the tyre sealant is
unable to provide sufficient breakdown assis- tance, as it is unable to seal the tyre properly:
R there are cuts or punctures in the tyre
larger than those mentioned above.
R the wheel rim is damaged.
R you have driven at very low tyre pressures
or on a flat tyre.
There is a risk of an accident.
Do not drive any further. Contact a qualified
specialist workshop. G
WARNING
The tyre sealant is harmful and causes irrita-
tion. It must not come into contact with your
skin, eyes or clothing or be swallowed. Do not inhale TIREFIT fumes. Keep tyre sealant away
from children. There is a risk of injury.
If you come into contact with the tyre sealant,
observe the following:
R Rinse off the tyre sealant from your skin
immediately with water.
R If the tyre sealant comes into contact with
your eyes, immediately rinse them thor-
oughly with clean water.
R If tyre sealant is swallowed, immediately
rinse your mouth out thoroughly and drink
plenty of water. Do not induce vomiting,
and seek medical attention immediately. R
Immediately change out of clothing which
has come into contact with tyre sealant.
R If an allergic reaction occurs, seek medical
attention immediately.
! Do not operate the tyre inflation com-
pressor for longer than eight minutes at a
time without a break. It may otherwise
overheat.
The tyre inflation compressor can be oper-
ated again once it has cooled down.
Comply with the manufacturer's safety
instructions on the sticker on the tyre infla-
tion compressor.
Using the TIREFIT kit X
Do not remove any foreign objects which
have penetrated the tyre, e.g. screws or
nails.
X Remove the tyre sealant bottle, the accom-
panying TIREFIT sticker and the tyre infla-
tion compressor from the stowage well
underneath the luggage compartment floor
(Y page 432).
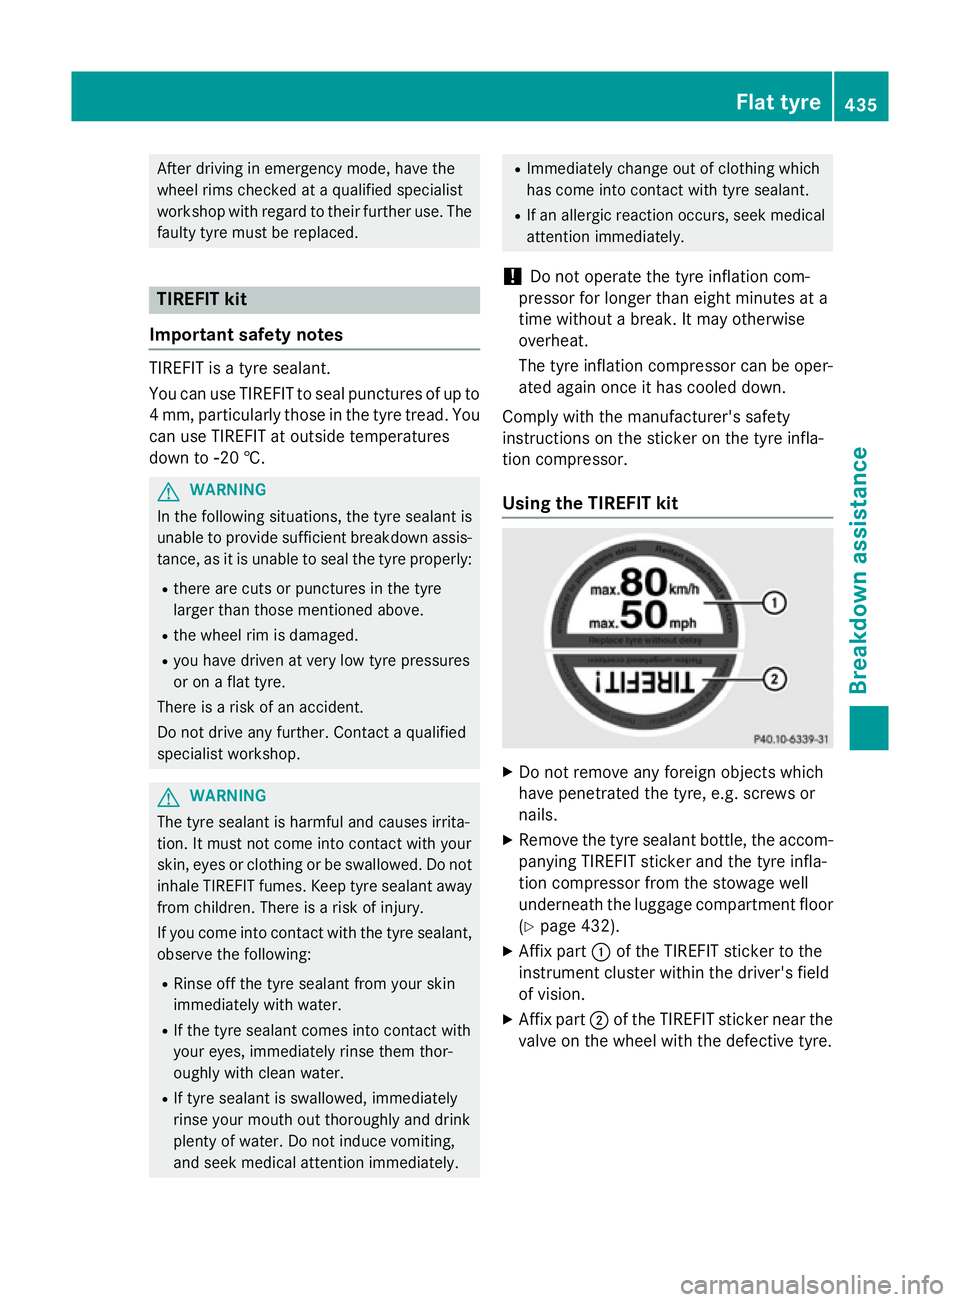
X Affix part :of the TIREFIT sticker to the
instrument cluster within the driver's field
of vision.
X Affix part ;of the TIREFIT sticker near the
valve on the wheel with the defective tyre. Flat tyre
435Breakdown assis tance Z
Page 448 of 497
X
Slide cover Aof positive terminal :in the direction of the arrow.
X Connect positive terminal :on your vehicle to positive terminal ;of donor battery B
using the jump lead. Always begin with positive terminal :on your own vehicle first.
X Start the engine of the donor vehicle and run it at idling speed.
X Connect negative terminal =of donor battery Bto earth point ?of your vehicle using the
jump lead, connecting the jump lead to donor battery Bfirst.
X Start the engine.
X Before disconnecting the jump leads, let the engines run for several minutes.
X First, remove the jump leads from earth point ?and negative terminal =, then from pos-
itive clamp :and positive terminal ;. Begin each time at the contacts on your own vehicle
first.
X Close cover Aof positive clamp :after removing the jump leads.
X Have the battery checked at a qualified specialist workshop.
PLUG-IN HYBRID vehicles: if your vehicle has been jump-started, it may not be possible to
use the electric drive for approximately 30 minutes.
Jump-starting is not considered to be a normal operating condition.
i Jump-starting cables and further information regarding jump starting can be obtained at
any qualified specialist workshop. Towing away and tow-starting
Important safety notes
G
WARNING
Safety relevant functions are restricted or no
longer available if:
R the engine is not running
R the brake system or power steering is mal-
functioning
R there is a malfunction in the voltage supply
or the vehicle's electrical system
When your vehicle is towed away or towed
started, you may require considerably more
effort to steer and brake. There is a risk of an
accident.
In such cases use a rigid towing bar. Before
being towed away or tow started, make sure
the steering moves freely. G
WARNING
If the steering wheel lock is engaged, the vehi- cle can no longer be steered. There is a risk of
an accident. Always switch on the ignition when towing
with a tow rope or a towing bar.
G
WARNING
When towing or tow-starting another vehicle
and its weight is greater than the permissible gross weight of your vehicle, the:
R towing eye may be torn off
R car/trailer combination may swerve or
even overturn
There is a risk of an accident.
When towing or tow-starting another vehicle,
its weight should not be greater than the per- missible gross weight of your vehicle.
Details on the permissible gross vehicle
weight of your vehicle can be found on the
vehicle identification plate (Y page 480). Towing away and tow-starting
445Breakdown assistance Z
Page 451 of 497
Transporting the vehicle
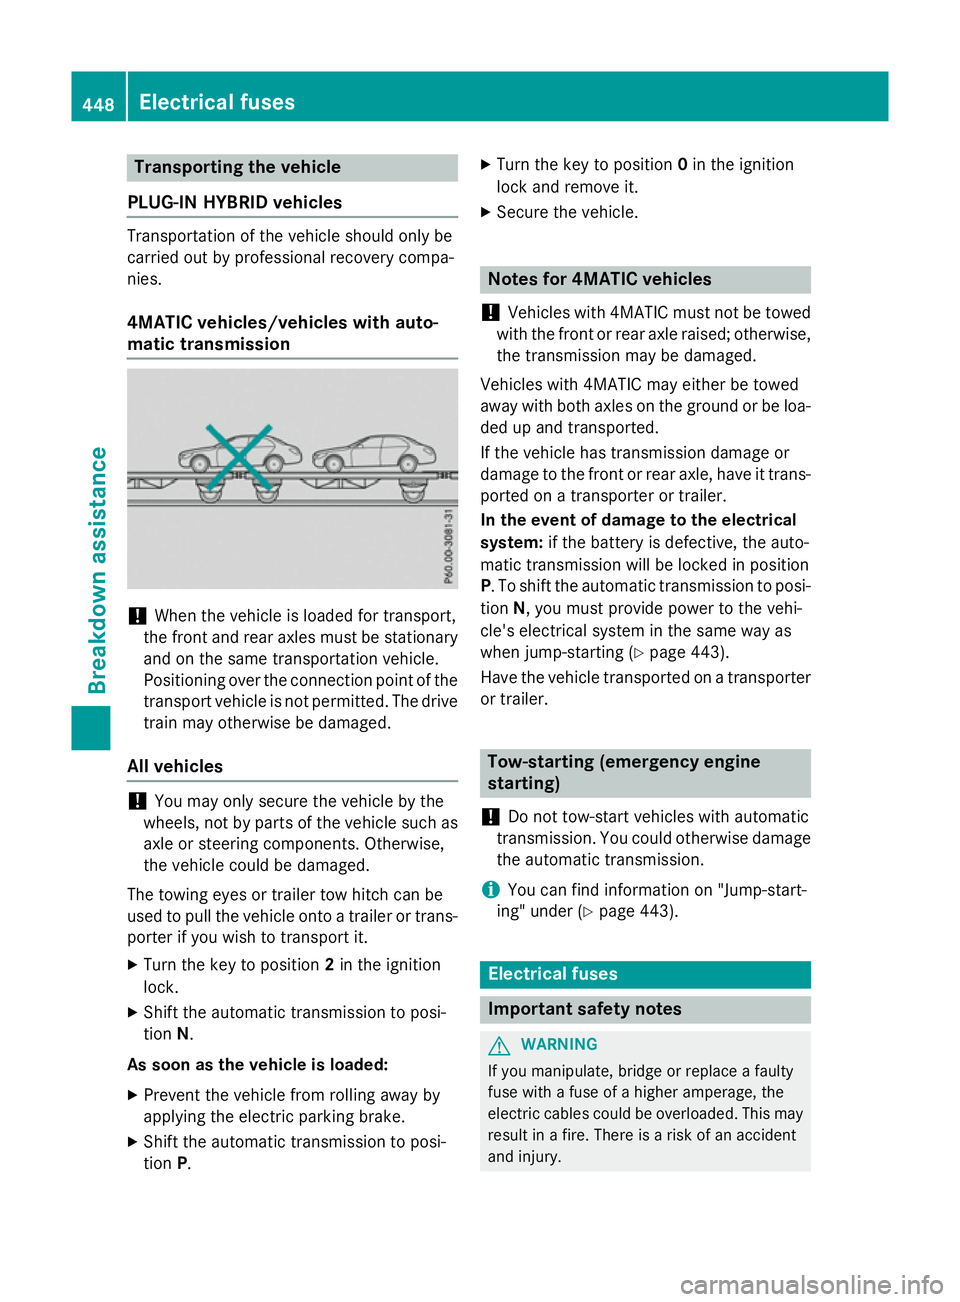
PLUG-IN HYBRID vehicles Transportation of the vehicle should only be
carried out by professional recovery compa-
nies.
4MATIC vehicles/vehicles with auto-
matic transmission !
When the vehicle is loaded for transport,
the front and rear axles must be stationary
and on the same transportation vehicle.
Positioning over the connection point of the transport vehicle is not permitted. The drive
train may otherwise be damaged.
All vehicles !
You may only secure the vehicle by the
wheels, not by parts of the vehicle such as
axle or steering components. Otherwise,
the vehicle could be damaged.
The towing eyes or trailer tow hitch can be
used to pull the vehicle onto a trailer or trans-
porter if you wish to transport it.
X Turn the key to position 2in the ignition
lock.
X Shift the automatic transmission to posi-
tion N.
As soon as the vehicle is loaded: X Prevent the vehicle from rolling away by
applying the electric parking brake.
X Shift the automatic transmission to posi-
tion P. X
Turn the key to position 0in the ignition
lock and remove it.
X Secure the vehicle. Notes for 4MATIC vehicles
! Vehicles with 4MATIC must not be towed
with the front or rear axle raised; otherwise,
the transmission may be damaged.
Vehicles with 4MATIC may either be towed
away with both axles on the ground or be loa- ded up and transported.
If the vehicle has transmission damage or
damage to the front or rear axle, have it trans-
ported on a transporter or trailer.
In the event of damage to the electrical
system: if the battery is defective, the auto-
matic transmission will be locked in position
P. To shift the automatic transmission to posi-
tion N, you must provide power to the vehi-
cle's electrical system in the same way as
when jump-starting (Y page 443).
Have the vehicle transported on a transporter
or trailer. Tow-starting (emergency engine
starting)
! Do not tow-start vehicles with automatic
transmission. You could otherwise damage the automatic transmission.
i You can find information on "Jump-start-
ing" under (Y page 443). Electrical fuses
Important safety notes
G
WARNING
If you manipulate, bridge or replace a faulty
fuse with a fuse of a higher amperage, the
electric cables could be overloaded. This may result in a fire. There is a risk of an accident
and injury. 448
Electrical fusesBreakdown assistance
Page 456 of 497
Useful information
............................454
Important safety notes .....................454
Operation ........................................... 454
Winter operation ............................... 456
Tyre pressure .................................... 458
Changing a wheel .............................. 463
Wheel and tyre combinations ..........468
Emergency spare wheel ...................474 453Wheels and tyres
Page 457 of 497
Useful information
i This Owner's Manual describes all mod-
els, series and optional equipment for your
vehicle that were available at the time of
going to press. National variations are pos- sible. Note that your vehicle may not be
equipped with all of the functions descri-
bed. This is also the case for systems and
functions relevant to safety.
i Read the information on qualified special-
ist workshops: (Y page 28). Important safety notes
G
WARNING
If wheels and tyres of the wrong size are used, the wheel brakes or suspension components
may be damaged. There is a risk of an acci-
dent.
Always replace wheels and tyres with those
that fulfil the specifications of the original
part.
When replacing wheels, make sure to fit the
correct:
R designation
R type
When replacing tyres, make sure to fit the
correct:
R designation
R manufacturer
R type G
WARNING
A flat tyre severely impairs the driving, steer-
ing and braking characteristics of the vehicle.
There is a risk of accident.
Tyres without run-flat characteristics:
R do not drive with a flat tyre.
R immediately replace the flat tyre with your
emergency spare wheel or spare wheel, or
consult a qualified specialist workshop. Tyres with run-flat characteristics:
R pay attention to the information and warn-
ing notices on MOExtended tyres (tyres
with run-flat characteristics).
Accessories that are not approved for your
vehicle by Mercedes-Benz or are not being
used correctly can impair the operating
safety.
Before purchasing and using non-approved
accessories, visit a qualified specialist work-
shop and enquire about:
R suitability
R legal stipulations
R factory recommendations
Information on the sizes and types of wheels
and tyres for your vehicle can be found under
"Wheel/tyre combinations" (Y page 468).
Information on tyre pressure can be found:
R in the tyre pressure table in the fuel filler
flap (Y page 205)
R under "Tyre pressure" (Y page 458)
Modification work on the brake system and
wheels is not permitted. The use of spacers or
brake dust shields is not permitted. This inva- lidates the general operating permit for the
vehicle.
i Further information on wheels and tyres
can be obtained at any qualified specialist
workshop. Operation
Information on driving
Check the tyre pressures when the vehicle is
heavily laden and adjust prior to a trip.
While driving, pay attention to vibrations,
noises and unusual handling characteristics,
e.g. pulling to one side. This may indicate that the wheels or tyres are damaged. If you sus-
pect that a tyre is defective, reduce your
speed immediately. Stop the vehicle as soon
as possible to check the wheels and tyres fordamage. Hidden tyre damage could also be 454
OperationWheels and tyres