2015 MERCEDES-BENZ G-CLASS SUV warning light
[x] Cancel search: warning lightPage 168 of 274
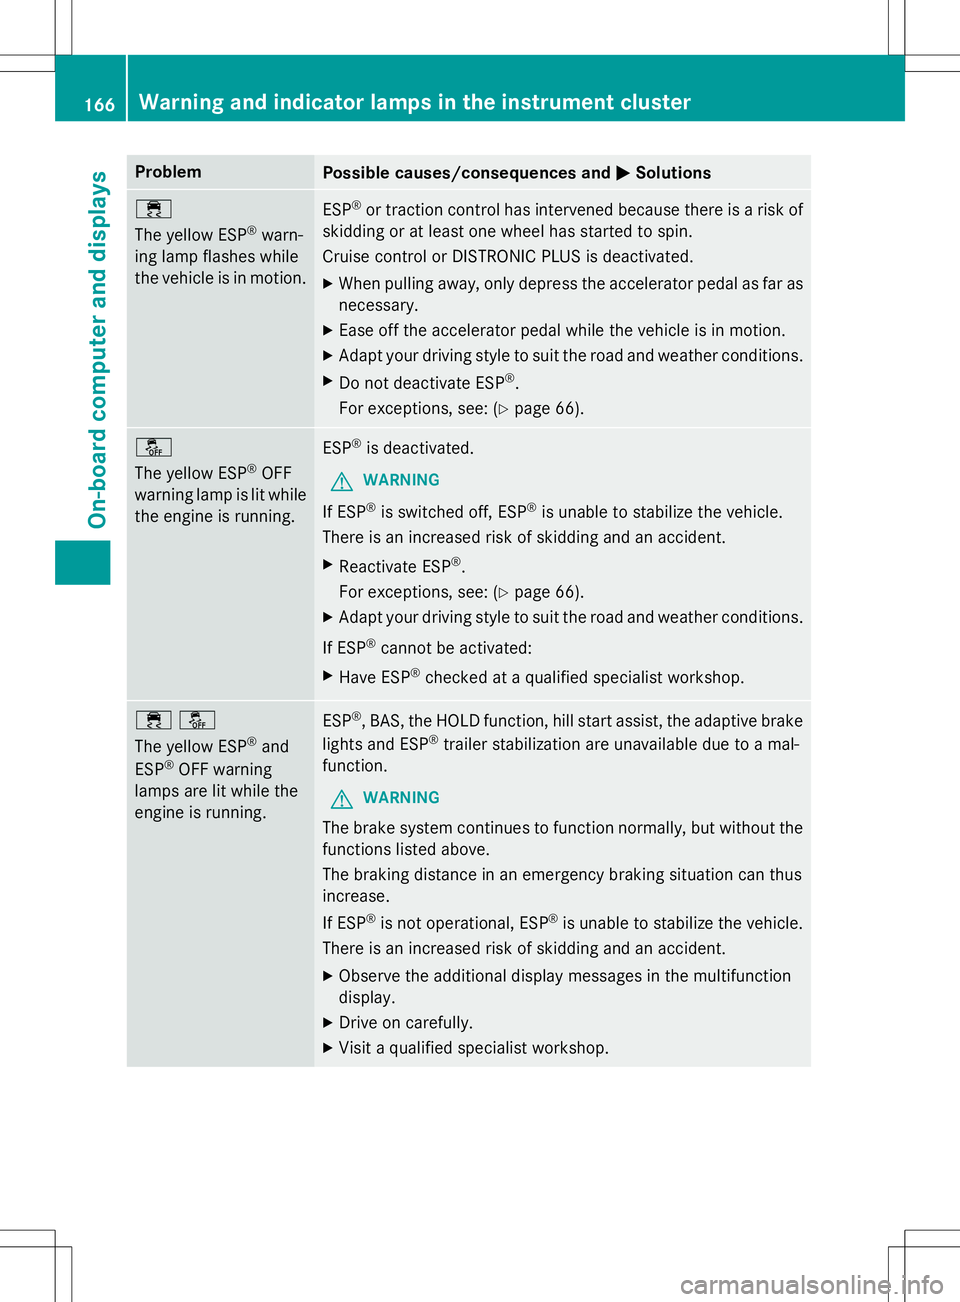
ProblemPossible causes/consequences andMSolutions
÷
The yellow ESP®
warn-
ing lamp flashes while
the vehicle is in motion.ESP ®
or traction control has intervened because there is a risk of
skidding or at least one wheel has started to spin.
Cruise control or DISTRONIC PLUS is deactivated.
X When pulling away, only depress the accelerator pedal as far as
necessary.
X Ease off the accelerator pedal while the vehicle is in motion.
X Adapt your driving style to suit the road and weather conditions.
X Do not deactivate ESP ®
.
For exceptions, see: ( Ypage 66).
å
The yellow ESP ®
OFF
warning lamp is lit while the engine is running.ESP ®
is deactivated.
GWARNING
If ESP ®
is switched off, ESP ®
is unable to stabilize the vehicle.
There is an increased risk of skidding and an accident.
X Reactivate ESP ®
.
For exceptions, see: ( Ypage 66).
X Adapt your driving style to suit the road and weather conditions.
If ESP ®
cannot be activated:
X Have ESP ®
checked at a qualified specialist workshop.
֌
The yellow ESP ®
and
ESP ®
OFF warning
lamps are lit while the
engine is running.ESP ®
, BAS, the HOLD function, hill start assist, the adaptive brake
lights and ESP ®
trailer stabilization are unavailable due to a mal-
function.
GWARNING
The brake system continues to function normally, but without the functions listed above.
The braking distance in an emergency braking situation can thus increase.
If ESP ®
is not operational, ESP ®
is unable to stabilize the vehicle.
There is an increased risk of skidding and an accident.
X Observe the additional display messages in the multifunction
display.
X Drive on carefully.
X Visit a qualified specialist workshop.
166Warning and indicator lamps in the instrument cluster
On-board computer and displays
Page 169 of 274
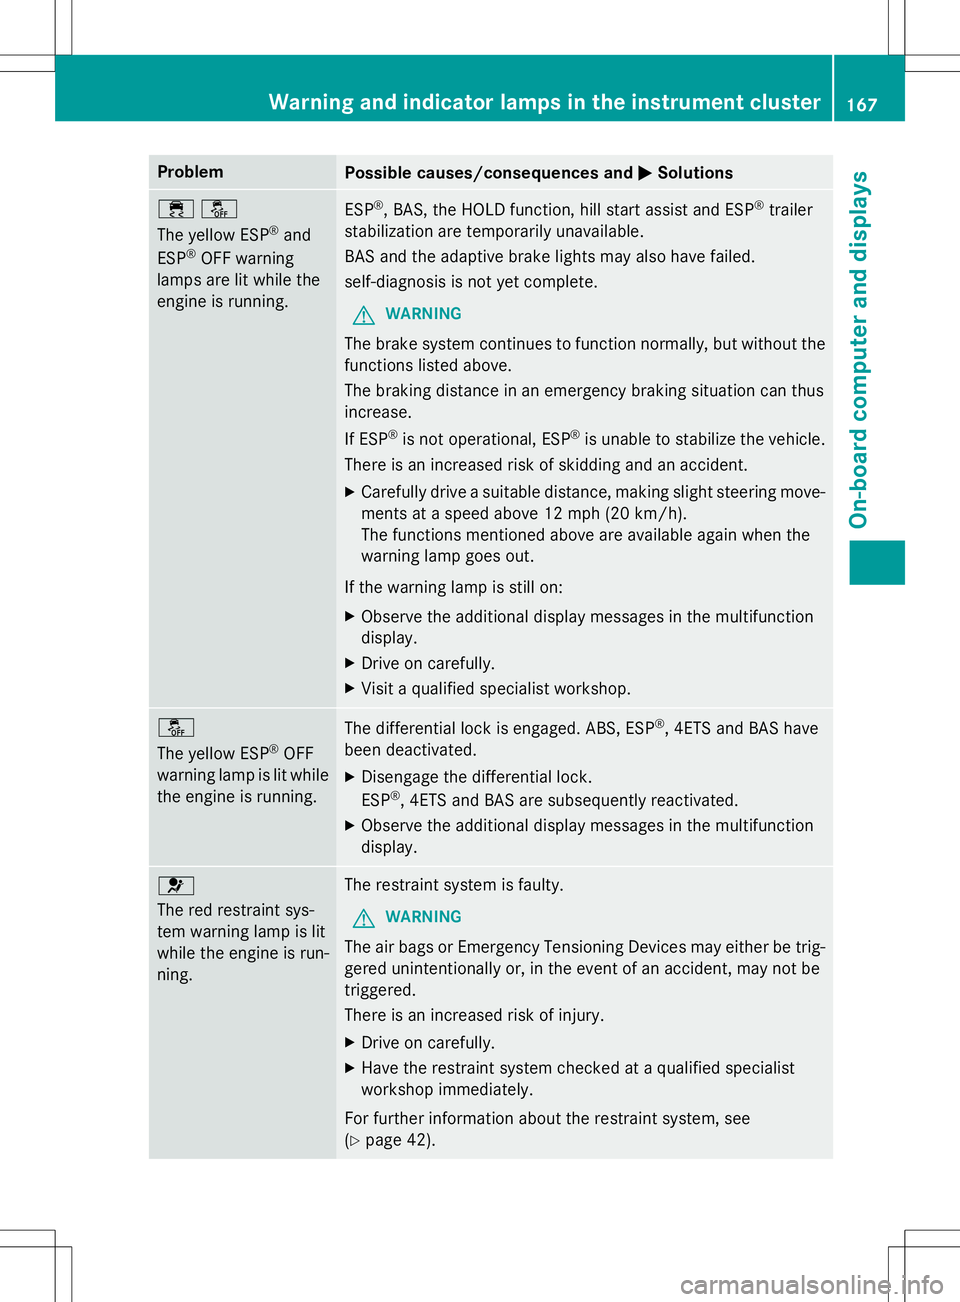
ProblemPossible causes/consequences andMSolutions
֌
The yellow ESP®
and
ESP ®
OFF warning
lamps are lit while the
engine is running.ESP ®
, BAS, the HOLD function, hill start assist and ESP ®
trailer
stabilization are temporarily unavailable.
BAS and the adaptive brake lights may also have failed.
self-diagnosis is not yet complete.
GWARNING
The brake system continues to function normally, but without the functions listed above.
The braking distance in an emergency braking situation can thus increase.
If ESP ®
is not operational, ESP ®
is unable to stabilize the vehicle.
There is an increased risk of skidding and an accident.
X Carefully drive a suitable distance, making slight steering move-
ments at a speed above 12 mph (20 km/h).
The functions mentioned above are available again when the
warning lamp goes out.
If the warning lamp is still on:
X Observe the additional display messages in the multifunction
display.
X Drive on carefully.
X Visit a qualified specialist workshop.
å
The yellow ESP ®
OFF
warning lamp is lit while the engine is running.The differential lock is engaged. ABS, ESP ®
, 4ETS and BAS have
been deactivated. X Disengage the differential lock. ESP ®
, 4ETS and BAS are subsequently reactivated.
X Observe the additional display messages in the multifunction
display.
6
The red restraint sys-
tem warning lamp is lit
while the engine is run-ning.The restraint system is faulty.
GWARNING
The air bags or Emergency Tensioning Devices may either be trig-
gered unintentionally or, in the event of an accident, may not be triggered.
There is an increased risk of injury.
X Drive on carefully.
X Have the restraint system checked at a qualified specialist
workshop immediately.
For further information about the restraint system, see( Y page 42).
Warning and indicator lamps in the instrument cluster167
On-board computer and displays
Z
Page 171 of 274
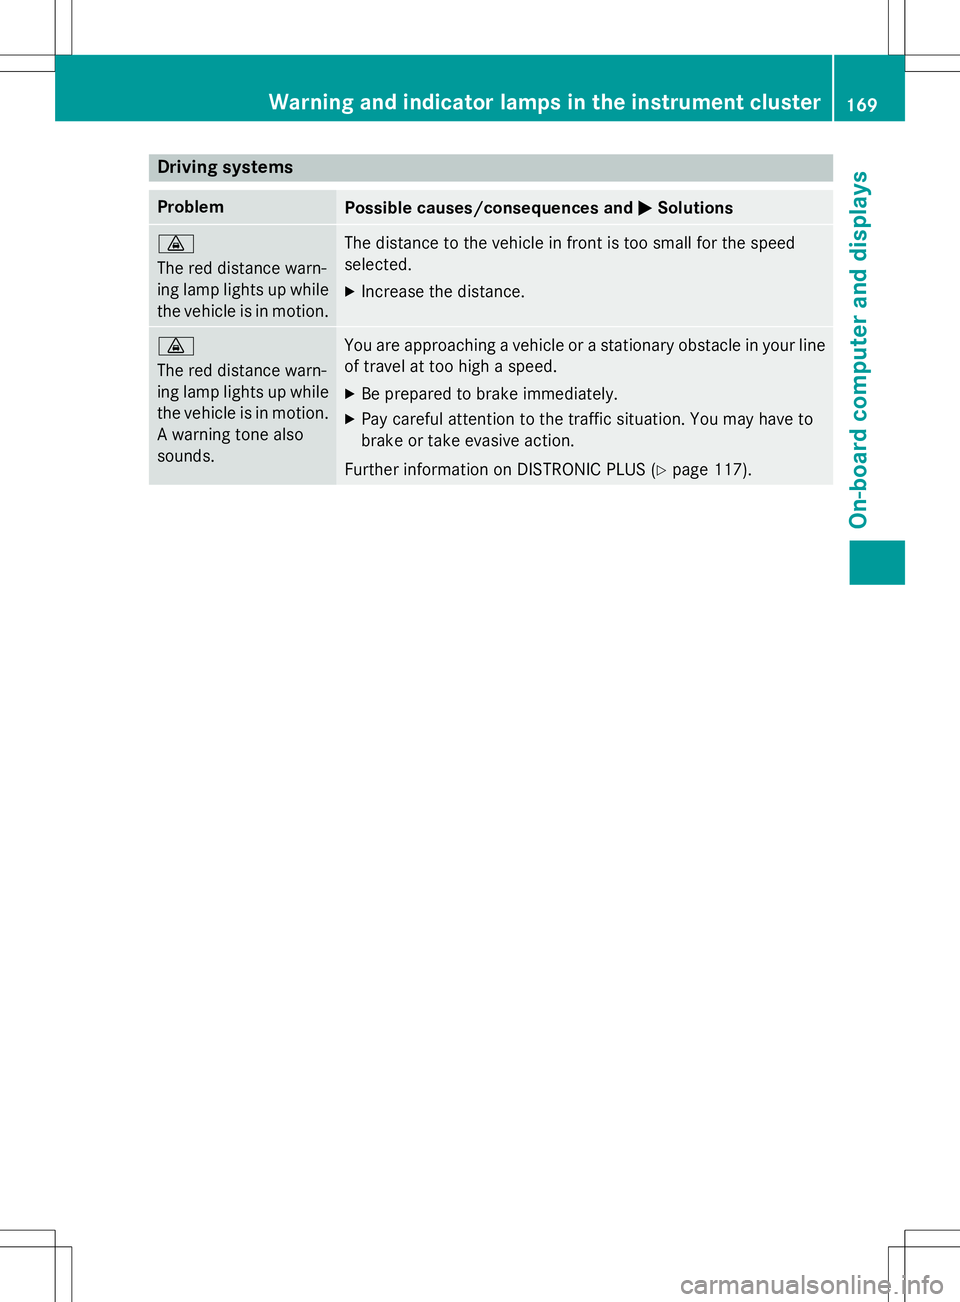
Driving systems
ProblemPossible causes/consequences andMSolutions
·
The red distance warn-
ing lamp lights up while
the vehicle is in motion.The distance to the vehicle in front is too small for the speed
selected.
X Increase the distance.
·
The red distance warn-
ing lamp lights up while
the vehicle is in motion. A warning tone also
sounds.You are approaching a vehicle or a stationary obstacle in your lineof travel at too high a speed.
X Be prepared to brake immediately.
X Pay careful attention to the traffic situation. You may have to
brake or take evasive action.
Further information on DISTRONIC PLUS ( Ypage 117).
Wa rning and indi cator lamps in the instrument cluster169
On-board computer and displays
Z
Page 174 of 274

Useful information
iThese operating instructions describe all
the standard and optional equipment of
your COMAND system, as available at the
time of going to print. Country-specific dif- ferences are possible. Please note that
your COMAND system may not be equip-
ped with all the features described. This
also applies to safety-related systems and
functions.
iRead the information on qualified special-
ist workshops: ( Ypage 28).
General notes
The COMAND section in these operating
instructions describes the basic principles for
operation. More information can be found in
the Digital Operator's Manual.
Important safety notes
GWARNING
Modifications to electronic components, their
software as well as wiring can impair their
function and/or the function of other net-
worked components. In particular, systems
relevant to safety could also be affected. As a
result, these may no longer function as inten-
ded and/or jeopardize the operating safety of
the vehicle. There is an increased risk of an
accident and injury.
Never tamper with the wiring as well as elec-
tronic components or their software. You
should have all work to electrical and elec-
tronic equipment carried out at a qualified
specialist workshop.
If you make any changes to the vehicle elec-
tronics, the general operating permit is ren-
dered invalid.
GWARNING
If you operate information systems and com-
munication equipment integrated in the vehi- cle while driving, you will be distracted from
traffic conditions. You could also lose controlof the vehicle. There is a risk of an accident.
Only operate the equipment when the traffic
situation permits. If you are not sure that this
is possible, park the vehicle paying attention
to traffic conditions and operate the equip-
ment when the vehicle is stationary.
You must observe the legal requirements for
the country in which you are currently driving when operating COMAND.
COMAND calculates the route to the destina-
tion without taking account of the following,
for example:
R traffic lights
R stop and yield signs
R merging lanes
R parking or stopping in a no parking/no
stopping zone
R other road and traffic rules and regulations
R narrow bridges
COMAND can give incorrect navigation com-
mands if the actual street/traffic situation
does not correspond with the digital map's
data. Digital maps do not cover all areas nor
all routes in an area. For example, a route may have been diverted or the direction of a one-
way street may have changed.
For this reason, you must always observe
road and traffic rules and regulations during
your journey. Road and traffic rules and reg-
ulations always have priority over the sys-
tem's driving recommendations.
Navigation announcements are intended to
direct you while driving without diverting your
attention from the road and driving.
Please always use this feature instead of con-
sulting the map display for directions. Look-
ing at the icons or map display can distract
you from traffic conditions and driving, and
increase the risk of an accident.
172Important safety notes
COMAND
Page 198 of 274
Do not tamper with or repair cargo tie-down
points, cargo tie-down rings or tie downs.
Have maintenance work as well as modifica-
tions, installations and conversions carried
out at a qualified specialist workshop(Y page 28).
Observe the following notes on securing
loads:
R Secure the load using the cargo tie-down
rings.
R Do not use elastic straps or nets to secure
a load, as these are only intended as an
anti-slip protection for light loads.
R Do not route tie-downs across sharp edges
or corners.
R Pad sharp edges for protection.
R Only use tie downs that have been checked
in accordance with applicable standards,
e.g. lashing nets or lashing straps.
R Fill the spaces between the load and the
cargo compartment walls and the wheel
housing in a form-locking way. Only use
dimensionally stable transportation aids
for this, such as chocks, wooden fixings or
padding.
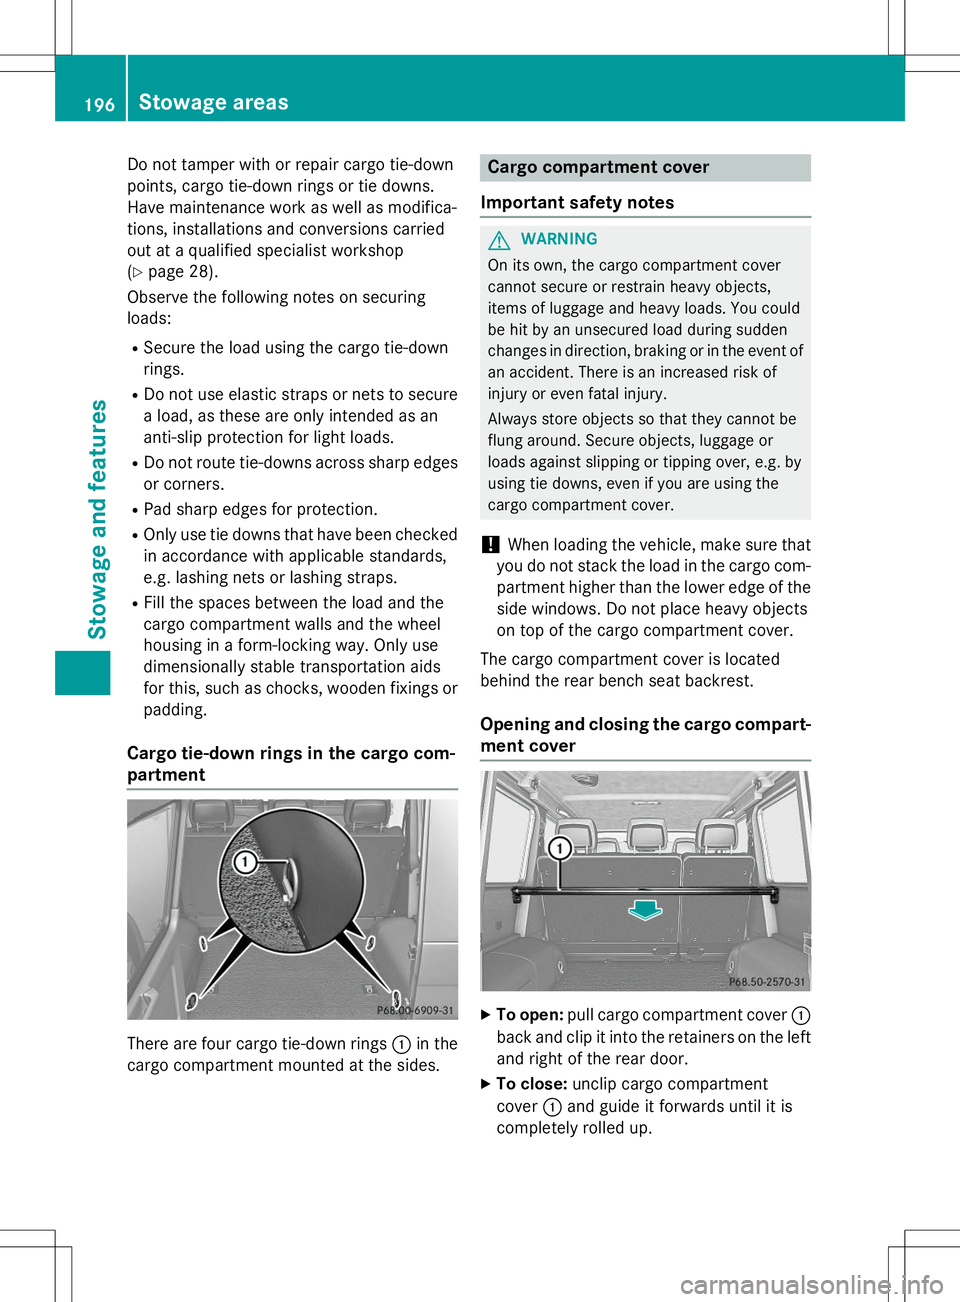
Cargo tie-down rings in the cargo com-
partment
There are four cargo tie-down rings :in the
cargo compartment mounted at the sides.
Cargo compartment cover
Important safety notes
GWARNING
On its own, the cargo compartment cover
cannot secure or restrain heavy objects,
items of luggage and heavy loads. You could
be hit by an unsecured load during sudden
changes in direction, braking or in the event of an accident. There is an increased risk of
injury or even fatal injury.
Always store objects so that they cannot be
flung around. Secure objects, luggage or
loads against slipping or tipping over, e.g. by
using tie downs, even if you are using the
cargo compartment cover.
!When loading the vehicle, make sure that
you do not stack the load in the cargo com-
partment higher than the lower edge of the side windows. Do not place heavy objects
on top of the cargo compartment cover.
The cargo compartment cover is located
behind the rear bench seat backrest.
Opening and closing the cargo compart-
ment cover
X To open: pull cargo compartment cover :
back and clip it into the retainers on the left and right of the rear door.
X To close: unclip cargo compartment
cover :and guide it forwards until it is
completely rolled up.
196Sto wage areas
Stowage an d features
Page 199 of 274
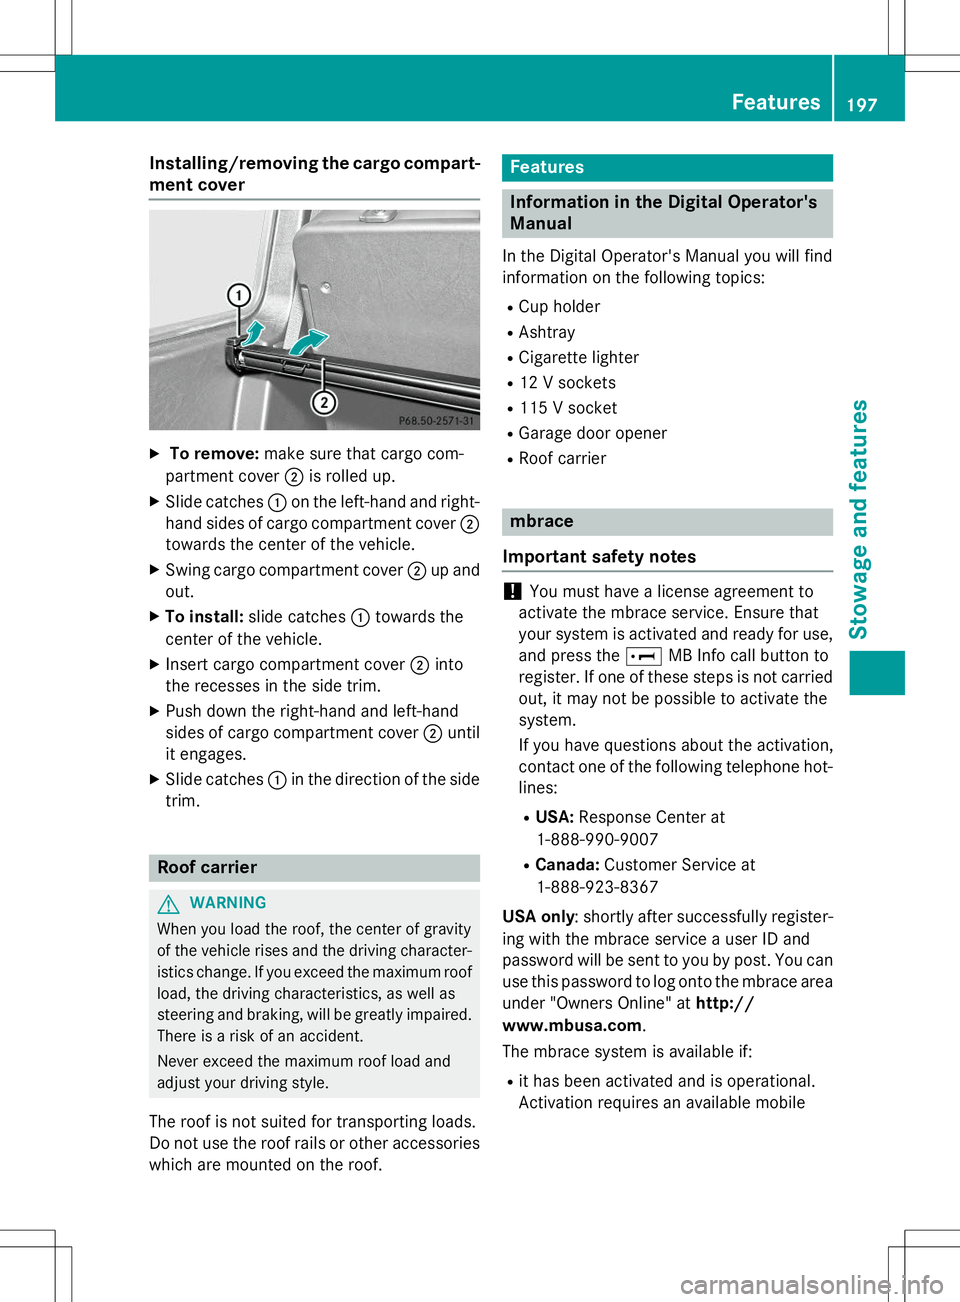
Installing/removing the cargo compart-
ment cover
X To remove: make sure that cargo com-
partment cover ;is rolled up.
X Slide catches :on the left-hand and right-
hand sides of cargo compartment cover ;
towards the center of the vehicle.
X Swing cargo compartment cover ;up and
out.
X To install: slide catches :towards the
center of the vehicle.
X Insert cargo compartment cover ;into
the recesses in the side trim.
X Push down the right-hand and left-hand
sides of cargo compartment cover ;until
it engages.
X Slide catches :in the direction of the side
trim.
Roof carrier
GWARNING
When you load the roof, the center of gravity
of the vehicle rises and the driving character- istics change. If you exceed the maximum roof
load, the driving characteristics, as well as
steering and braking, will be greatly impaired.There is a risk of an accident.
Never exceed the maximum roof load and
adjust your driving style.
The roof is not suited for transporting loads.
Do not use the roof rails or other accessories
which are mounted on the roof.
Features
Information in the Digital Operator's
Manual
In the Digital Operator's Manual you will find
information on the following topics: R Cup holder
R Ashtray
R Cigarette lighter
R 12 V sockets
R 115 V socket
R Garage door opener
R Roof carrier
mbrace
Important safety notes
!You must have a license agreement to
activate the mbrace service. Ensure that
your system is activated and ready for use,
and press the EMB Info call button to
register. If one of these steps is not carried out, it may not be possible to activate the
system.
If you have questions about the activation,
contact one of the following telephone hot-lines:
R USA: Response Center at
1-888-990-9007
R Canada: Customer Service at
1-888-923-8367
USA only : shortly after successfully register-
ing with the mbrace service a user ID and
password will be sent to you by post. You can use this password to log onto the mbrace area
under "Owners Online" at http://
www.mbusa.com .
The mbrace system is available if:
R it has been activated and is operational.
Activation requires an available mobile
Features197
Stowage and featu res
Z
Page 200 of 274
phone network, a valid SIM card and a sub-scription to a security service.
R the battery is sufficiently charged.
R the corresponding mobile phone network is
available for transmitting data to the Cus-
tomer Center.
iDetermining the location of the vehicle on
a map is only possible if there is sufficient
GPS reception and the vehicle position can
be forwarded to the Customer Center.
The mbrace system
To adjust the volume during an mbrace call,
proceed as follows:
X Press the WorX button on the mul-
tifunction steering wheel.
or
X Use the COMAND volume control.
The mbrace system provides three different
services:
R Automatic and manual emergency call
R Roadside Assistance call
R MB Info call
USA only: you can find more information and
a description of all available features under
"Owners Online" at http://
www.mbusa.com .
System self-test
GWARNING
A malfunction in the system has been detec-
ted if one of the following conditions occurs:
R the indicator lamp in the SOS button does
not light up during the system self-diagno-sis.
R the indicator lamp in the ºRoadside
Assistance button does not light up during
the system self-diagnosis.
R the indicator lamp in the Einformation
button does not light up during the system
self-diagnosis.
R the indicator lamp in the SOS button, º
Roadside Assistance button or Einfor-
mation button continues to be lit red after
the system self-diagnosis.
R the
TeleAidinoperativeorTeleAid
not activatedmessage appears on the
multifunction display after the system self-
diagnosis.
If a malfunction is indicated as outlined above,
the system may not operate as expected. In
the event of an emergency, assistance must
be summoned by other means.
Have the system checked at the nearest
authorized Mercedes-Benz Center or contact
the following service hotlines:
R USA: Response Center at
1-888-990-9007
R Canada: Customer Service at
1-888-923-8367
After you have switched on the ignition, the
system carries out a self-diagnosis.
Emergency call
Important safety notes
GWARNING
If the indicator lamp in the SOS button is
flashing continuously and there was no voice
connection to the Response Center estab-
lished, then the mbrace system could not ini- tiate an emergency call (e.g. the relevant cel-
lular phone network is not available).
The message
Call Failedappears in the
multifunction display for approximately
10 seconds.
Should this occur, assistance must be sum-
moned by other means.
!You must have a license agreement to
activate the mbrace service. Ensure that
your system is activated and ready for use, and press the EMB Info call button to
register. If one of these steps is not carried
out, it may not be possible to activate thesystem.
198Features
Stowage and features
Page 207 of 274
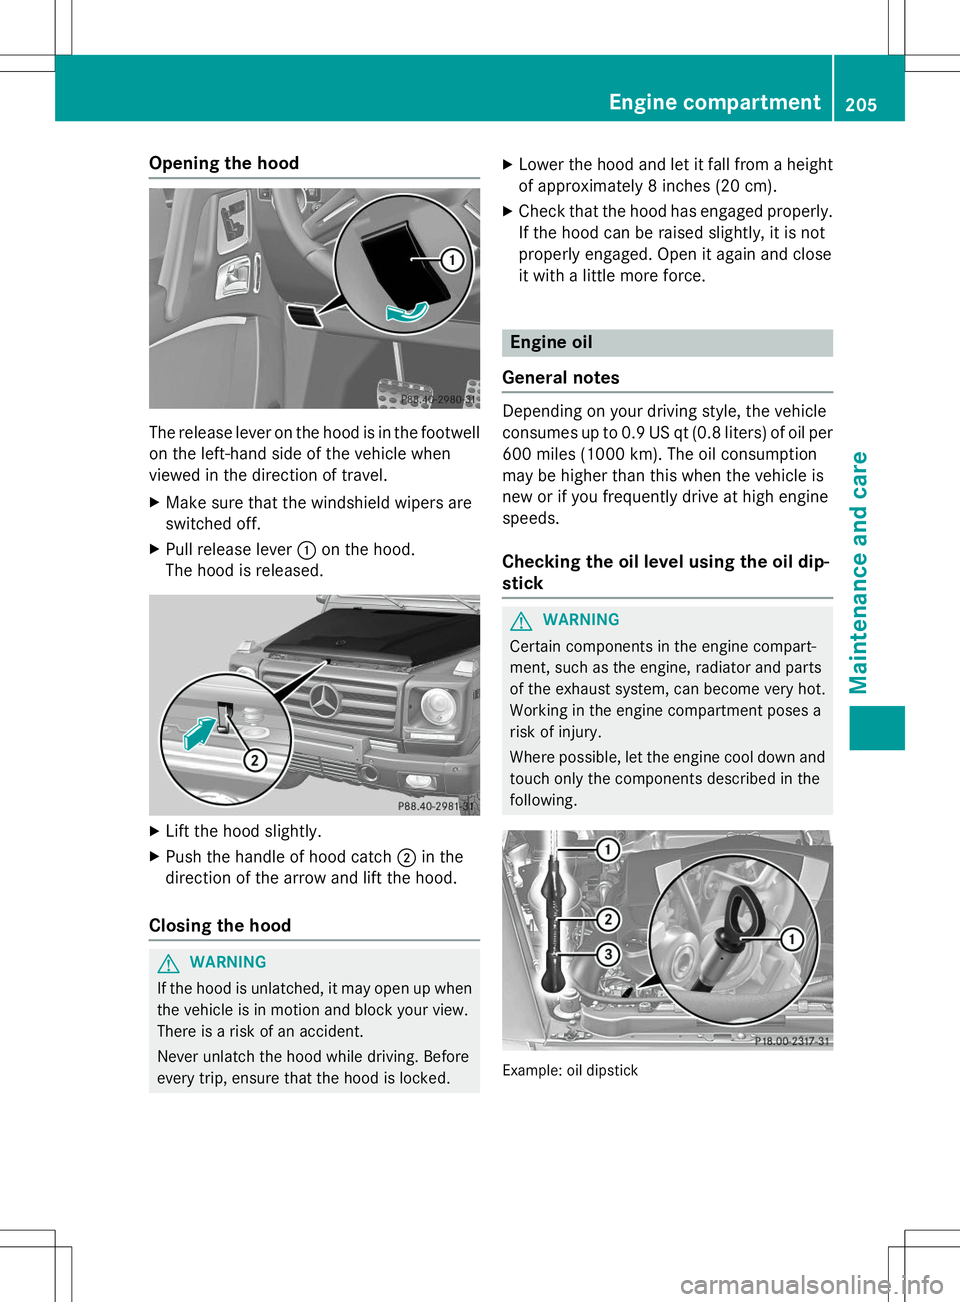
Opening the hood
The release lever on the hood is in the footwellon the left-hand side of the vehicle when
viewed in the direction of travel.
X Make sure that the windshield wipers are
switched off.
X Pull release lever :on the hood.
The hood is released.
X Lift the hood slightly.
X Push the handle of hood catch ;in the
direction of the arrow and lift the hood.
Closing the hood
GWARNING
If the hood is unlatched, it may open up when the vehicle is in motion and block your view.
There is a risk of an accident.
Never unlatch the hood while driving. Before
every trip, ensure that the hood is locked. X
Lower the hood and let it fall from a height
of approximately 8 inches (20 cm).
X Check that the hood has engaged properly.
If the hood can be raised slightly, it is not
properly engaged. Open it again and close
it with a little more force.
Engine oil
General notes
Depending on your driving style, the vehicle
consumes up to 0.9 US qt (0.8 liters) of oil per 600 miles (1000 km). The oil consumption
may be higher than this when the vehicle is
new or if you frequently drive at high enginespeeds.
Checking the oil level using the oil dip-stick
GWARNING
Certain components in the engine compart-
ment, such as the engine, radiator and parts
of the exhaust system, can become very hot.
Working in the engine compartment poses a
risk of injury.
Where possible, let the engine cool down and touch only the components described in the following.
Example: oil dipstick
Engine compartment205
Maintenance and care
Z