2015 MERCEDES-BENZ G-CLASS SUV warning light
[x] Cancel search: warning lightPage 79 of 274

Side windows
Important safety notes
GWARNING
While closing the side windows, body parts inthe closing area could become trapped. There is a risk of injury.
When closing make sure that no parts of the
body are in the closing area. If somebody
becomes trapped, release the switch or press
the switch to open the side window again.
GWARNING
While opening the side windows, body parts
could become trapped between the side win- dow and the door frame as the side window
moves. There is a risk of injury.
Make sure that nobody touches the side win-
dow during the opening procedure. If some-
body becomes trapped, release the switch or pull the switch to close the side window again.
Information in the Digital Operator's Manual
In the Digital Operator's Manual you will find
information on the following topics:
R Opening and closing the side windows
R Opening and closing all side windows
Problems with the side windows
GWARNING
Closing the side windows with increased force
or without the anti-entrapment feature could
lead to serious or even fatal injury. Make sure
that nobody can become trapped when clos-
ing the side windows.
Problem: a side window cannot be closed because objects are trapped between the
side window and the door frame.
X Remove the objects.
X Close the side window. Problem: a side window cannot be closed
and you cannot see the cause.
If a side window is obstructed during closing
and reopens again slightly:
X Immediately after the window blocks, pull
the corresponding switch again until the
side window has closed.
If a side window is obstructed again during
closing and reopens again slightly: X Immediately after the window blocks, pull
the corresponding switch again until the
side window has closed.
iIf a side window no longer opens or closes
due to a malfunction, contact a qualified
specialist workshop.
Sliding sunroof
Important safety notes
!
Only open the sliding sunroof if it is free of
snow and ice. Otherwise, malfunctions may
occur.
Do not allow anything to protrude from the sliding sunroof. Otherwise, the seals could
be damaged.
!If the sliding sunroof still cannot be
opened or closed as a result of a malfunc-
tion, contact a qualified specialist work-shop.
!The weather can change abruptly. It could
start to rain or snow. Make sure that the
sliding sunroof is closed when you leave the
vehicle. The vehicle electronics can be
damaged if water enters the vehicle inte-rior.
iResonance noises can occur in addition to
the usual airflow noises when the sliding
sunroof is open. They are caused by minor
pressure fluctuations in the vehicle interior.
Change the position of the sliding sunroof
or open a side window slightly to reduce or
eliminate these noises.
Sliding sunroof77
Opening and closing
Z
Page 92 of 274

Useful information
iThis Operator's Manual describes all
models and all standard and optional equip- ment of your vehicle available at the time of
publication of the Operator's Manual.
Country-specific differences are possible.
Please note that your vehicle may not be
equipped with all features described. This
also applies to safety-related systems and
functions.
iRead the information on qualified special-
ist workshops: ( Ypage 28).
Exterior lighting
Important safety notes
For reasons of safety, Mercedes-Benz recom-
mends that you drive with the lights switched
on even during the daytime. In some coun-
tries, operation of the headlamps varies due
to legal requirements and self-imposed obli-
gations.
Driving abroad
Conversion to symmetrical low beam
Switch the headlamps to symmetrical low
beam in countries in which traffic drives on
the opposite side of the road from the country where the vehicle is registered. This prevents
glare to oncoming traffic. When using sym-
metrical lights, the edge of the road is not lit
as widely and as far ahead as normal.
Have the headlamps converted at a qualified
specialist workshop as close to the border as
possible before driving in these countries.
Conversion to asymmetrical low beam
after returning
Have the headlamps converted back to asym- metrical low-beam headlamps at a qualified
specialist workshop as soon as possible after
crossing the border again.
Information in the Digital Operator's
Manual
In the Digital Operator's Manual you will find
information on the following topics: R Hazard warning lamps
R Headlamp cleaning system
R Headlamps fogged up on the inside
Light switch
Operation
!Switch off the parking lamps and low-
beam headlamps when you leave the vehi-
cle. This prevents the battery from dis-
charging.
!If the battery has been excessively dis-
charged, the parking lamps or standing
lamps are automatically switched off to
enable the next engine start. Always park
your vehicle safely and sufficiently lit
according to legal standards. Avoid the
continuous use of the Tparking lamps
for several hours. If possible, switch on theX right or the Wleft standing lamp.
1WLeft-hand standing lamps
2XRight-hand standing lamps
3 TParking lamps, side marker lamps,
license plate and instrument cluster
lighting
4 ÃAutomatic headlamp mode/
daytime running lamps
5LLow-beam/high-beam headlamps
90Exterior lighting
Lights and windshield wipers
Page 93 of 274

If you hear a warning tone when you leave the
vehicle, the lights may still be switched on.X Turn the light switch to Ã.
The turn signals, high-beam headlamps and
the high-beam flasher are operated using the combination switch ( Ypage 92).
The exterior lighting (except the parking/
standing lamps) switches off automatically if
you:
R remove the SmartKey from the ignition lock
R open the driver's door with the SmartKey in
position 0
Low-beam headlamps
X
To switch on the low-beam headlamps:
turn the SmartKey in the ignition lock to
position 2or start the engine.
X Turn the light switch to L.
The L indicator lamp in the instrument
cluster lights up.
Fog lamps (except AMG vehicles)
GWARNING
When the light switch is set to Ã, the low-
beam headlamps may not be switched on
automatically if there is fog, snow or other
causes of poor visibility due to the weather
conditions such as spray. There is a risk of anaccident.
In such situations, turn the light switch to L .
The automatic headlamp feature is only an
aid. The driver is responsible for the vehicle's lighting at all times. X To switch on the fog lamps: turn the
SmartKey in the ignition lock to position 2
or start the engine.
X Turn the light switch to T,L or
à . X
Press the Nbutton.
The green Nindicator lamp in the instru-
ment cluster lights up.
X To switch off the fog lamps: press the
N button.
The green Nindicator lamp in the instru-
ment cluster goes out.
Only vehicles with front fog lamps have the
fog lamps function.
Rear fog lamp
X To switch on the rear fog lamp: turn the
SmartKey in the ignition lock to position 2
or start the engine.
X Turn the light switch to Lorà .
X Press the Rbutton.
The yellow Rindicator lamp in the
instrument cluster lights up.
X To switch off the rear fog lamp: press the
R button.
The yellow Rindicator lamp in the
instrument cluster goes out.
Parking lamps
X To switch on: turn the light switch to T.
Standing lamps
Switching on the standing lamps ensures the
corresponding side of the vehicle is illumina- ted.
X To switch on the standing lamps: the
SmartKey is not inserted in the ignition lock
or it is in position 0(Y page 103).
X Turn the light switch to W(left-hand side
of the vehicle) or X(right-hand side of
the vehicle).
Exterior lighting91
Lights and windshield wipers
Z
Page 94 of 274

Combination switch
:High-beam headlamps
;Turn signal, right
=High-beam flasher
?Turn signal, left
In the Digital Operator's Manual you will find
information on the following topics: R Turn signals
R High-beam headlamps
R High-beam flasher
Cornering light function
The cornering light function improves the illu-
mination of the road over a wide angle in the direction you are turning, enabling better vis-
ibility in tight bends, for example. The corner- ing light function can only be activated if the
low-beam headlamps are switched on and the
fog lamps are switched off.
Active: if you are driving at speeds below
25 mph (40 km/ h)and switch on the turn
signal or turn the steering wheel. Not active:
if you are driving at speeds above
25 mph (40 km/h) or switch off the turn sig-
nal or turn the steering wheel to the straight-
ahead position.
The cornering lamp may remain lit for a short
time, but is automatically switched off after
no more than three minutes.
Interior lighting
An overview of the interior lighting and the
overhead control panel can be found in the
"At a glance" section.
In the Digital Operator's Manual you will find
information on the following topics: R Automatic interior lighting control
R Manual interior lighting control
R Courtesy lighting in the front doors
Replacing bulbs
Important safety notes
GDANGER
Xenon bulbs carry a high voltage. You can get
an electric shock if you remove the cover of
the Xenon bulb and touch the electrical con-
tacts. There is a risk of fatal injury.
Never touch the parts or the electrical con-
tacts of the Xenon bulb. Always have work on
the Xenon bulbs carried out at a qualified spe-
cialist workshop.
GWARNING
Bulbs, lamps and connectors can get very hot when operating. If you change a bulb, you
could burn yourself on these components.
There is a risk of injury.
Allow these components to cool down beforechanging a bulb.
Do not use a bulb that has been dropped or if
its glass tube has been scratched.
92Replacing bulbs
Lights and windshield wipers
Page 98 of 274

Replacing the wiper blades
Important safety notes
GWARNING
If the windshield wipers begin to move while
you are changing the wiper blades, you could be trapped by the wiper arm. There is a risk of
injury.
Always switch off the windshield wipers and
ignition before changing the wiper blades.
Removing the wiper blades
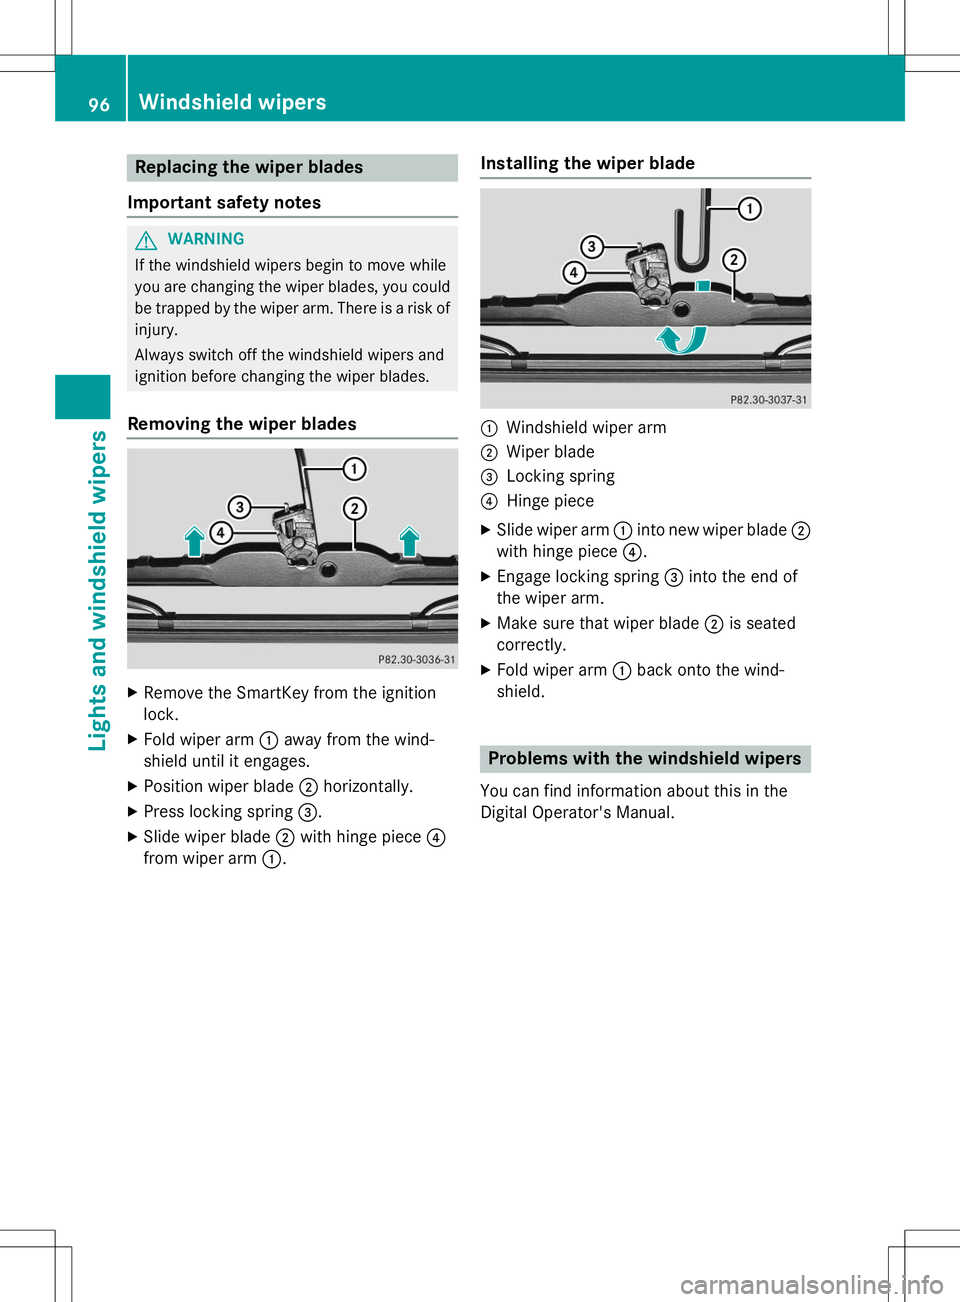
X Remove the SmartKey from the ignition
lock.
X Fold wiper arm :away from the wind-
shield until it engages.
X Position wiper blade ;horizontally.
X Press locking spring =.
X Slide wiper blade ;with hinge piece ?
from wiper arm :.
Installing the wiper blade
:Windshield wiper arm
;Wiper blade
=Locking spring
?Hinge piece
X Slide wiper arm :into new wiper blade ;
with hinge piece ?.
X Engage locking spring =into the end of
the wiper arm.
X Make sure that wiper blade ;is seated
correctly.
X Fold wiper arm :back onto the wind-
shield.
Problems with the windshield wipers
You can find information about this in the
Digital Operator's Manual.
96Windshield wipers
Lights and windshield wipers
Page 105 of 274

the driver's footwell. Install the floormats
securely and as specified in order to ensure
sufficient clearance for the pedals. Do not useloose floormats and do not place floormats ontop of one another.
GWARNING
Unsuitable footwear can hinder correct usage of the pedals, e.g.:
R shoes with thick soles
R shoes with high heels
R slippers
There is a risk of an accident.
Wear suitable footwear to ensure correct
usage of the pedals.
GWARNING
If you switch off the ignition while driving,
safety-relevant functions are only available
with limitations, or not at all. This could affect, for example, the power steering and the brake
boosting effect. You will require considerably
more effort to steer and brake. There is a risk
of an accident.
Do not switch off the ignition while driving.
GWARNING
If the parking brake has not been fully
released when driving, the parking brake can:
R overheat and cause a fire
R lose its hold function.
There is a risk of fire and an accident. Release
the parking brake fully before driving off.
!Warm up the engine quickly. Do not use
the engine's full performance until it has
reached operating temperature.
Only shift the automatic transmission to
the desired drive position when the vehicle
is stationary.
Where possible, avoid spinning the drive
wheels when pulling away on slippery
roads. You could otherwise damage the
drive train.
!Avoid high engine speeds when the
engine is cold. The engine's service life
could otherwise be significantly shortened.
Do not use the engine's full performance
until it has reached operating temperature.
!AMG vehicles: at low engine oil temper-
atures below 68 ‡ (+20 †), the maximum
engine speed is restricted in order to pro-
tect the engine. To protect the engine and
maintain smooth engine operation, avoid
driving at full throttle when the engine is
cold.
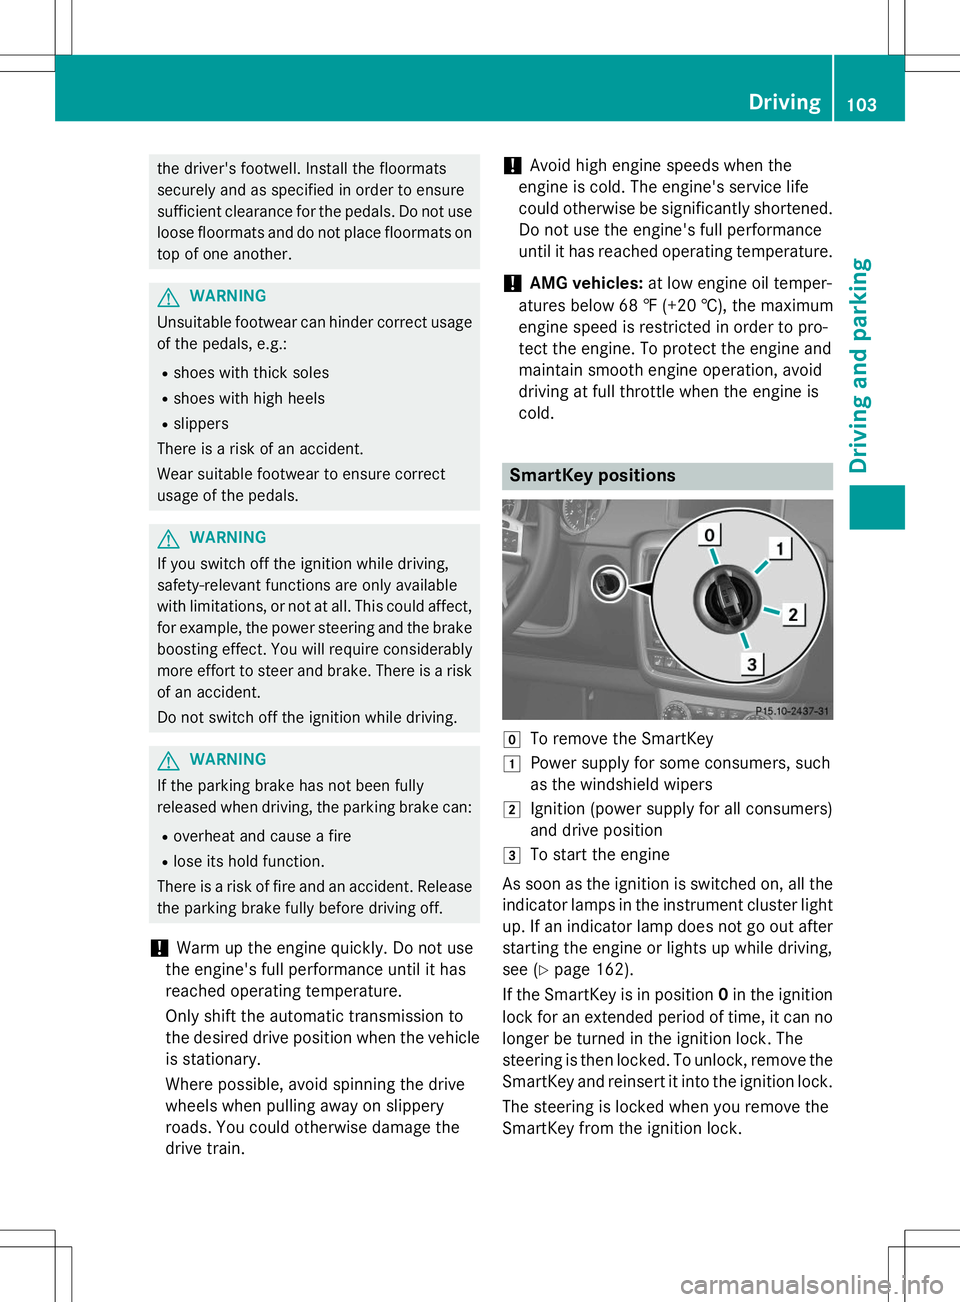
SmartKey positions
gTo remove the SmartKey
1Power supply for some consumers, such
as the windshield wipers
2Ignition (power supply for all consumers)
and drive position
3To start the engine
As soon as the ignition is switched on, all the
indicator lamps in the instrument cluster light up. If an indicator lamp does not go out after
starting the engine or lights up while driving,
see ( Ypage 162).
If the SmartKey is in position 0in the ignition
lock for an extended period of time, it can no
longer be turned in the ignition lock. The
steering is then locked. To unlock, remove the SmartKey and reinsert it into the ignition lock.
The steering is locked when you remove the
SmartKey from the ignition lock.
Driving103
Driving an d parking
Z
Page 110 of 274

GWARNING
Fuel is poisonous and hazardous to health.
There is a risk of injury.
You must make sure that fuel does not comeinto contact with your skin, eyes or clothing
and that it is not swallowed. Do not inhale fuel
vapors. Keep fuel away from children.
If you or others come into contact with fuel,
observe the following:
R Wash away fuel from skin immediately
using soap and water.
R If fuel comes into contact with your eyes,
immediately rinse them thoroughly with
clean water. Seek medical assistance with-
out delay.
R If fuel is swallowed, seek medical assis-
tance without delay. Do not induce vomit-ing.
R Immediately change out of clothing which
has come into contact with fuel.
!Do not use diesel to refuel vehicles with a
gasoline engine. Even small amounts of the wrong fuel result in damage to the fuel sys-
tem and engine.
!Do not switch on the ignition if you acci-
dentally refuel with the wrong fuel. Other-
wise, the fuel will enter the fuel lines. Notify
a qualified specialist workshop and have
the fuel tank and fuel lines drained com-
pletely.
!Overfilling the fuel tank could damage the
fuel system.
!Take care not to spill any fuel on painted
surfaces. You could otherwise damage the
paintwork.
!Use a filter when refueling from a fuel can.
Otherwise, the fuel lines and/or injection
system could be blocked by particles from
the fuel can.
If you overfill the fuel tank, pressure may build
up in the fuel tank. This could cause fuel to
spray out when the fuel pump nozzle is
removed. There is a risk of injury. The fuel tank is full when the fuel pump nozzle first
switches off. End the refueling process.
For further information on fuel and fuel quality
( Y page 259).
Refueling
Vehicles with a fuel filler flap
Example: G 550 fuel filler cap :
To open the fuel filler flap
;Tire pressure table
=Fuel type
?To insert the fuel filler cap
When you open or close the vehicle with the
SmartKey, the fuel filler flap is automatically
unlocked or locked.
The position of the fuel filler cap is displayed 8 in the instrument cluster. The arrow
next to the filling pump indicates the side of
the vehicle. The fuel filler flap is located to the rear on the right.
Opening the fuel filler cap
X Switch the engine off.
iWhen the engine is running and the fuel
filler flap is open, the yellow reserve fuel
warning lamp and the =(USA only)
or ; (Canada only) Check Engine warn-
ing lamp may light up.
Further information about warning and indi-
cator lamps in the instrument cluster can
be found in the Digital Operator's Manual.
108Refueling
Driving and parking
Page 113 of 274

GWARNING
If you switch off the ignition while driving,
safety-relevant functions are only available
with limitations, or not at all. This could affect,for example, the power steering and the brake
boosting effect. You will require considerably
more effort to steer and brake. There is a risk
of an accident.
Do not switch off the ignition while driving.
Switching off the engine
Important safety notes
GWARNING
If you switch off the ignition while driving,
safety-relevant functions are only available
with limitations, or not at all. This could affect, for example, the power steering and the brake
boosting effect. You will require considerably
more effort to steer and brake. There is a risk
of an accident.
Do not switch off the ignition while driving.
GWARNING
The automatic transmission switches to neu-
tral position Nwhen you switch off the engine.
The vehicle may roll away. There is a risk of an
accident.
After switching off the engine, always switch
to parking position P. Prevent the parked vehi-
cle from rolling away by applying the parkingbrake.
Information in the Digital Operator'sManual
A description of how to switch off the engine
can be found in the Digital Operator's Manual.
Parking brake
GWARNING
If you must brake the vehicle with the parking brake, the braking distance is considerably
longer and the wheels could lock. There is anincreased danger of skidding and accidents.
Only use the parking brake to brake the vehi-cle when the service brake is faulty. Do not
apply the parking brake too firmly. If the
wheels lock, release the parking brake until
the wheels begin turning again.
GWARNING
If you leave children unsupervised in the vehi- cle, they could set it in motion by, for example:
R release the parking brake.
R shift the automatic transmission out of the
parking position P.
R start the engine.
In addition, they may operate vehicle equip-
ment and become trapped. There is a risk of
an accident and injury.
When leaving the vehicle, always take the
SmartKey with you and lock the vehicle. Never
leave children unsupervised in the vehicle.
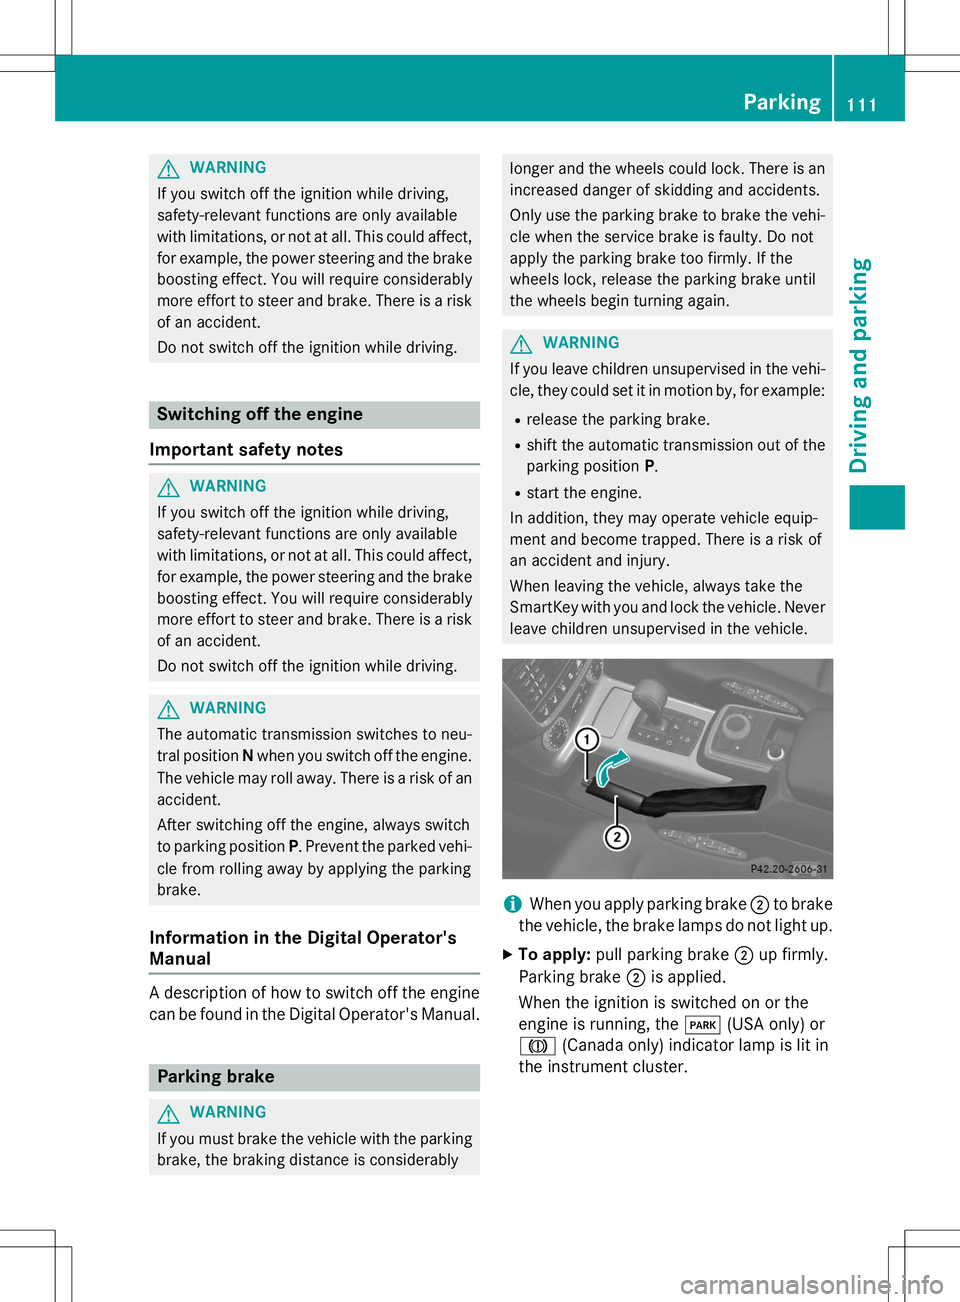
iWhen you apply parking brake ;to brake
the vehicle, the brake lamps do not light up.
X To apply: pull parking brake ;up firmly.
Parking brake ;is applied.
When the ignition is switched on or the
engine is running, the F(USA only) or
J (Canada only) indicator lamp is lit in
the instrument cluster.
Parking111
Driving and parking
Z