2015 MERCEDES-BENZ G-CLASS SUV display
[x] Cancel search: displayPage 108 of 274

The vehicle may roll away. There is a risk of anaccident.
After switching off the engine, always switch
to parking position P. Prevent the parked vehi-
cle from rolling away by applying the parkingbrake.
iBear in mind that the power transmission
between the engine and the transmission is interrupted when the engine is switched
off. For this reason, shift the automatic
transmission to Pwhen the engine is
switched off and the vehicle is at a stand-
still. Apply the parking brake to prevent the vehicle from rolling away.
Selector lever
Overview of transmission positions
!If the engine speed is too high or if the
vehicle is rolling, do not shift the transmis-
sion directly from Dto R, from Rto Dor
directly to P.
Do not open the driver's door while the
vehicle is in motion. At low speeds in trans-
mission position Dor R, park position Pis
otherwise engaged automatically.
The transmission could be damaged.
Selector lever j
Park position
kReverse gear
iNeutral
hDrive In the Digital Operator's Manual you will find
information on the following topics: R
Engaging park position P
R Engaging reverse gear R
R Engaging neutral N
R Neutral Nin the ECO start/stop function
(AMG vehicles)
R Shifting to transmission position D
R Transmission position Din the ECO start/
stop function (AMG vehicles)
Transmission position and drive pro-
gram display
!If the transmission position display in the
multifunction display is not working, you
should pull away carefully to check whether the desired transmission position is
engaged. Select transmission position D.
Do not restrict the shift range.
:Transmission position
;Drive program
Current transmission position :and current
drive program ;appear in the multifunction
display.
The current position of the selector lever is
shown by the indicators next to the selectorlever.
The indicators light up when the SmartKey is inserted into the ignition lock. The indicators go out when the SmartKey is removed from
the ignition lock.
When the selector lever is in position D, you
can influence the gearshifts made by the
automatic transmission by:
R restricting the shift range
R changing gear yourself
106Automatic transmission
Driving and parking
Page 109 of 274

Information in the Digital Operator's
Manual
In the Digital Operator's Manual you will find
information on the following topics: RTransmission position and drive program
display
R Transmission positions
R Changing gear
R Driving tips
R Program selector button
R Steering wheel paddle shifters
R Automatic drive program
R Manual drive program
R Shift ranges
R Problems with the transmission
Manual drive program
General information
The manual drive program is only available on AMG vehicles . In manual drive program M,
you can permanently change gear yourself by
using the steering wheel paddle shifters. The
transmission must be in position D. The gear
currently selected and engaged is shown in
the multifunction display.
Manual drive program Mdiffers from drive
programs Eand Swith regard to spontaneity,
responsiveness and smoothness of gear
changes.
Switching on the manual drive program
X Shift the transmission to position D.
X Press the program selector button repeat-
edly until Mappears in the multifunction
display, see Digital Operator's Manual.
Upshifting
!In manual drive program M, the automatic
transmission does not shift up automati-
cally even when the engine limiting speed
for the current gear is reached. When the engine limiting speed is reached, the fuel
supply is cut to prevent the engine from
overrevving. Always make sure that the
engine speed does not reach the red area of
the tachometer. There is otherwise a risk of
engine damage.
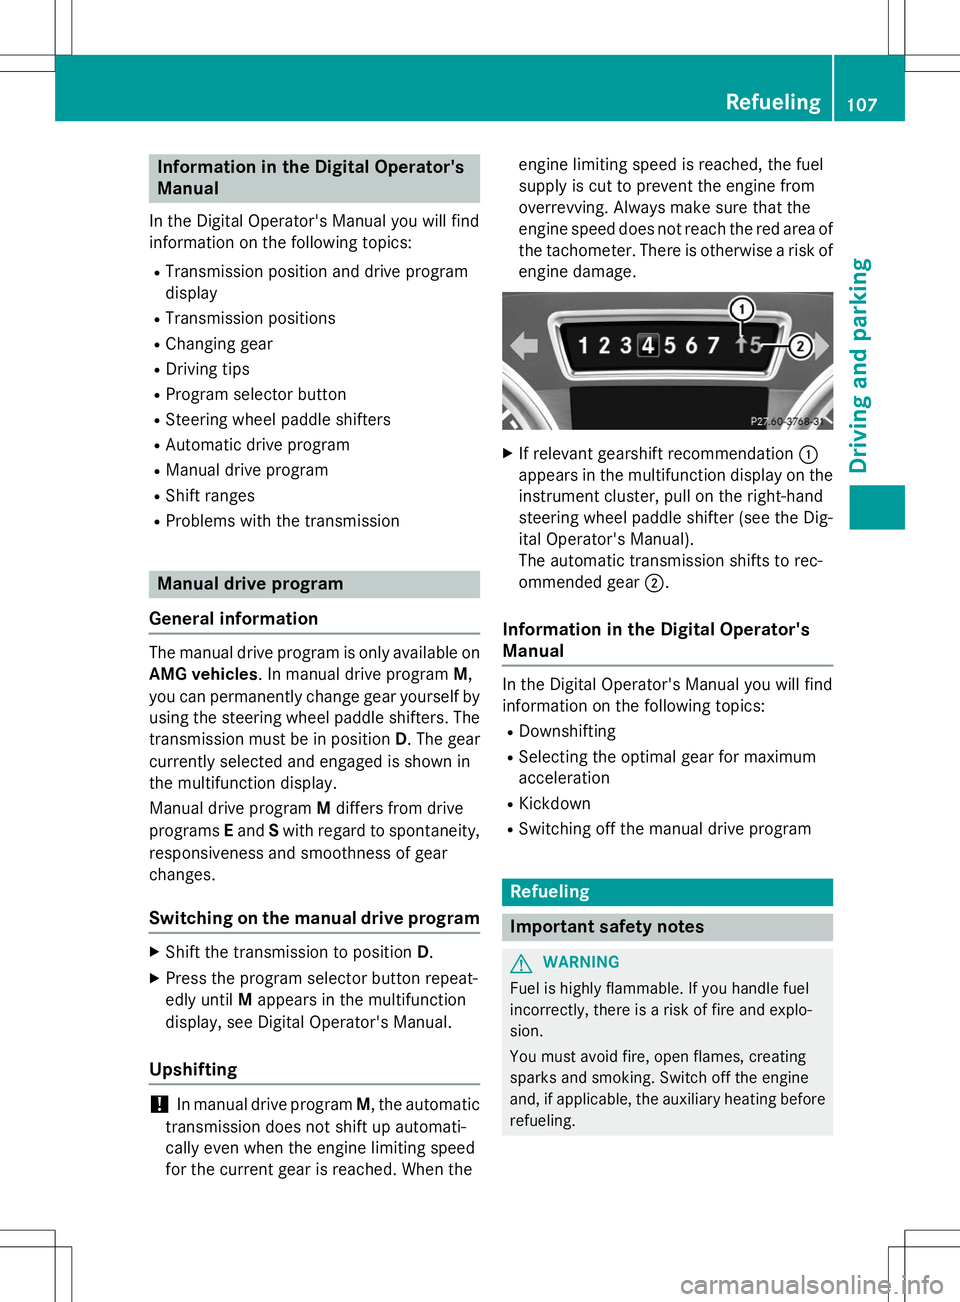
X If relevant gearshift recommendation :
appears in the multifunction display on the instrument cluster, pull on the right-hand
steering wheel paddle shifter (see the Dig-
ital Operator's Manual).
The automatic transmission shifts to rec-
ommended gear ;.
Information in the Digital Operator's
Manual
In the Digital Operator's Manual you will find
information on the following topics:
R Downshifting
R Selecting the optimal gear for maximum
acceleration
R Kickdown
R Switching off the manual drive program
Refueling
Important safety notes
GWARNING
Fuel is highly flammable. If you handle fuel
incorrectly, there is a risk of fire and explo-
sion.
You must avoid fire, open flames, creating
sparks and smoking. Switch off the engine
and, if applicable, the auxiliary heating before
refueling.
Refueling107
Driving and pa rking
Z
Page 110 of 274

GWARNING
Fuel is poisonous and hazardous to health.
There is a risk of injury.
You must make sure that fuel does not comeinto contact with your skin, eyes or clothing
and that it is not swallowed. Do not inhale fuel
vapors. Keep fuel away from children.
If you or others come into contact with fuel,
observe the following:
R Wash away fuel from skin immediately
using soap and water.
R If fuel comes into contact with your eyes,
immediately rinse them thoroughly with
clean water. Seek medical assistance with-
out delay.
R If fuel is swallowed, seek medical assis-
tance without delay. Do not induce vomit-ing.
R Immediately change out of clothing which
has come into contact with fuel.
!Do not use diesel to refuel vehicles with a
gasoline engine. Even small amounts of the wrong fuel result in damage to the fuel sys-
tem and engine.
!Do not switch on the ignition if you acci-
dentally refuel with the wrong fuel. Other-
wise, the fuel will enter the fuel lines. Notify
a qualified specialist workshop and have
the fuel tank and fuel lines drained com-
pletely.
!Overfilling the fuel tank could damage the
fuel system.
!Take care not to spill any fuel on painted
surfaces. You could otherwise damage the
paintwork.
!Use a filter when refueling from a fuel can.
Otherwise, the fuel lines and/or injection
system could be blocked by particles from
the fuel can.
If you overfill the fuel tank, pressure may build
up in the fuel tank. This could cause fuel to
spray out when the fuel pump nozzle is
removed. There is a risk of injury. The fuel tank is full when the fuel pump nozzle first
switches off. End the refueling process.
For further information on fuel and fuel quality
( Y page 259).
Refueling
Vehicles with a fuel filler flap
Example: G 550 fuel filler cap :
To open the fuel filler flap
;Tire pressure table
=Fuel type
?To insert the fuel filler cap
When you open or close the vehicle with the
SmartKey, the fuel filler flap is automatically
unlocked or locked.
The position of the fuel filler cap is displayed 8 in the instrument cluster. The arrow
next to the filling pump indicates the side of
the vehicle. The fuel filler flap is located to the rear on the right.
Opening the fuel filler cap
X Switch the engine off.
iWhen the engine is running and the fuel
filler flap is open, the yellow reserve fuel
warning lamp and the =(USA only)
or ; (Canada only) Check Engine warn-
ing lamp may light up.
Further information about warning and indi-
cator lamps in the instrument cluster can
be found in the Digital Operator's Manual.
108Refueling
Driving and parking
Page 115 of 274

Do not place your foot under the brake pedal.Keep the area under the brake pedal free from
obstructions.
If you fail to adapt your driving style, cruise
control can neither reduce the risk of acci-
dent nor override the laws of physics. Cruise
control cannot take account of road, weather and traffic conditions. Cruise control is only
an aid. You are responsible for the distance to
the vehicle in front, for vehicle speed and for braking in good time. Adjust your driving style to the traffic conditions. Only engage cruise
control when the current road, weather and
traffic conditions permit it to be done safely.
Drive carefully and maintain a suitable dis-
tance to the vehicle in front.
Do not use cruise control: R in traffic conditions that do not allow you to
drive at a constant speed, e.g. heavy traffic,
on winding roads or off-road
R on slippery road surfaces. Braking or accel-
erating could cause the drive wheels to lose
traction and the vehicle could then skid
R when there is poor visibility, e.g. due to fog,
heavy rain or snow
General notes
Cruise control maintains a constant road
speed for you. On long and steep downhill
gradients, especially if the vehicle is laden,
you must select shift range 1,2 or 3in good
time. By doing so, you will make use of the
braking effect of the engine. This relieves the load on the brake system and prevents the
brakes from overheating and wearing too
quickly.
Use cruise control only if road and traffic con-
ditions make it appropriate to maintain a
steady speed for a prolonged period. You can store any road speed above 20 mph
(30 km/h).
iCruise control should not be activated
when driving off-road.
Cruise control lever
:To activate or increase speed
;LIM indicator lamp
=To activate at the current speed/last
stored speed
?To activate or reduce speed
ATo switch between cruise control and var-
iable SPEEDTRONIC
BTo deactivate cruise control
You can operate cruise control and variable
SPEEDTRONIC with the cruise control lever.
When you activate cruise control, the stored
speed is shown in the multifunction display
for five seconds.
The LIM indicator lamp on the cruise control
lever indicates which system you have selec- ted:
R LIM indicator lamp off: cruise control is
selected.
R LIM indicator lamp on: variable SPEED-
TRONIC is selected.
Activation conditions
To activate cruise control, all of the following
activation conditions must be fulfilled:
R the parking brake must be released.
R you are driving faster than 20 mph
(30 km/h).
R ESP ®
must be active, but not intervening.
R the transmission must be in position D.
Driving systems113
Driving an d parking
Z
Page 118 of 274

ATo switch between cruise control and var-
iable SPEEDTRONIC
BTo deactivate variable SPEEDTRONIC
You can operate cruise control and variable
SPEEDTRONIC with the cruise control lever.
The LIM indicator lamp on the cruise control
lever indicates which system you have selec-
ted:
R LIM indicator lamp off: cruise control is
selected.
R LIM indicator lamp on: variable SPEED-
TRONIC is selected.
You can use the cruise control lever to limit
the speed to any speed above 30 km/ hwhile
the engine is running.
Selecting variable SPEEDTRONIC
If you fail to adapt your driving style, SPEED-
TRONIC can neither reduce the risk of acci-
dent nor override the laws of physics. SPEED-
TRONIC cannot take account of road, weather
and traffic conditions. SPEEDTRONIC is only
an aid. You are responsible for the distance to the vehicle in front, for vehicle speed, for
braking in good time and for staying in lane.
Only engage SPEEDTRONIC when the currentroad, weather and traffic conditions permit it
to be done safely. Drive carefully and main-
tain a suitable distance to the vehicle in front.
X Check whether LIM indicator lamp ;is on.
If it is on, variable SPEEDTRONIC is already selected.
If it is not, press the cruise control lever in
the direction of arrow A.
LIM indicator lamp ;in the cruise control
lever lights up. Variable SPEEDTRONIC isselected.
Storing the current speed
You can use the cruise control lever to limit
the speed to any speed above 18 mph while
the engine is running. X
Briefly press the cruise control lever up :
or down ?.
The current speed is stored and shown in
the multifunction display.
iOn downhill gradients, the speed can be
exceeded despite variable SPEEDTRONIC.
In this case, you will hear a warning tone
and the
Limit Exceededmessage will
appear in the multifunction display. If nec-
essary, apply the brakes yourself.
Calling up the last speed stored
Calling up the last speed stored
If you fail to adapt your driving style, SPEED-
TRONIC can neither reduce the risk of acci-
dent nor override the laws of physics. SPEED-
TRONIC cannot take account of road, weather
and traffic conditions. SPEEDTRONIC is only
an aid. You are responsible for the distance to the vehicle in front, for vehicle speed, for
braking in good time and for staying in your
lane. Only activate SPEEDTRONIC when the
prevailing road, weather and traffic condi-
tions permit. Drive carefully and maintain a
suitable distance to the vehicle in front.
X Briefly pull the cruise control lever towards
you =.
iIf you call up the stored speed and your
current speed is higher, you will hear a
warning tone. The
Limit Exceededmes-
sage appears in the multifunction display.
iIf no speed is stored, variable SPEED-
TRONIC stores the current speed and main-
tains it.
116Driving systems
Driving and parking
Page 121 of 274

iCanada only: This device complies with
RSS-210 of Industry Canada. Operation is
subject to the following two conditions:
1. This device may not cause harmful inter- ference, and
2. This device must accept any interference
received, including interference that may
cause undesired operation of the device.
Removal, tampering, or altering of the
device will void any warranties, and is not
permitted. Do not tamper with, alter, or use
in any non-approved way.
Any unauthorized modification to this
device could void the user's authority to
operate the equipment.
Information in the Digital Operator's
Manual
In the Digital Operator's Manual you will find
information on the following topics: R Setting a speed
R Setting the specified minimum distance
R DISTRONIC PLUS displays in the instru-
ment cluster
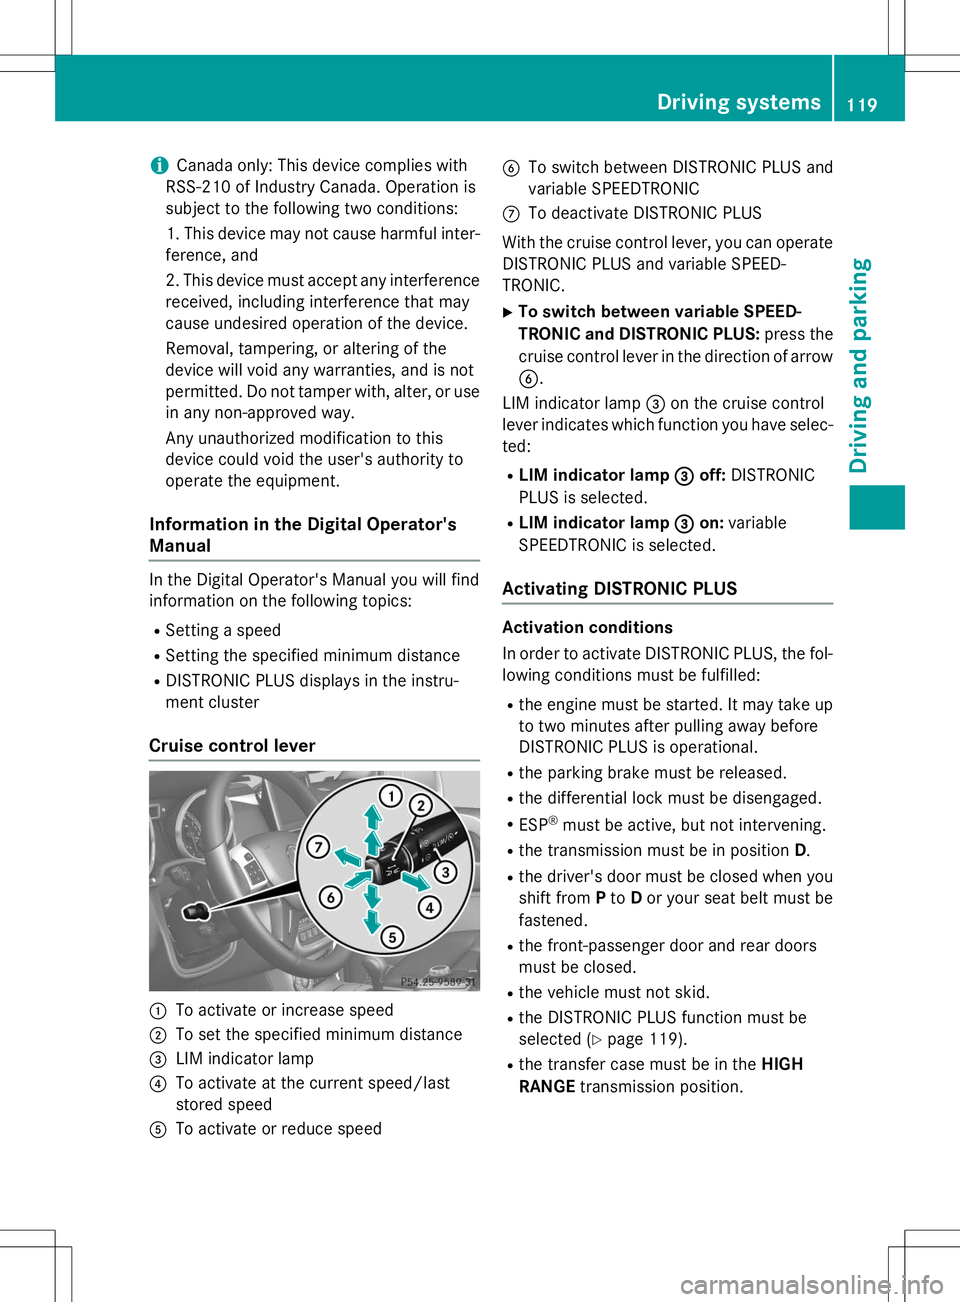
Cruise control lever
:To activate or increase speed
;To set the specified minimum distance
=LIM indicator lamp
?To activate at the current speed/last
stored speed
ATo activate or reduce speed
BTo switch between DISTRONIC PLUS and
variable SPEEDTRONIC
CTo deactivate DISTRONIC PLUS
With the cruise control lever, you can operate
DISTRONIC PLUS and variable SPEED-
TRONIC. X To switch between variable SPEED-
TRONIC and DISTRONIC PLUS: press the
cruise control lever in the direction of arrow B .
LIM indicator lamp =on the cruise control
lever indicates which function you have selec-
ted:
R LIM indicator lamp =
off:DISTRONIC
PLUS is selected.
R LIM indicator lamp =
on:variable
SPEEDTRONIC is selected.
Activating DISTRONIC PLUS
Activation conditions
In order to activate DISTRONIC PLUS, the fol- lowing conditions must be fulfilled:
R the engine must be started. It may take up
to two minutes after pulling away before
DISTRONIC PLUS is operational.
R the parking brake must be released.
R the differential lock must be disengaged.
R ESP ®
must be active, but not intervening.
R the transmission must be in position D.
R the driver's door must be closed when you
shift from Pto Dor your seat belt must be
fastened.
R the front-passenger door and rear doors
must be closed.
R the vehicle must not skid.
R the DISTRONIC PLUS function must be
selected ( Ypage 119).
R the transfer case must be in the HIGH
RANGE transmission position.
Driving systems119
Driving and pa rking
Z
Page 124 of 274

On steep uphill or downhill inclines or if there
is a malfunction, the transmission may also
automatically be shifted into positionP.
Deactivating DISTRONIC PLUS
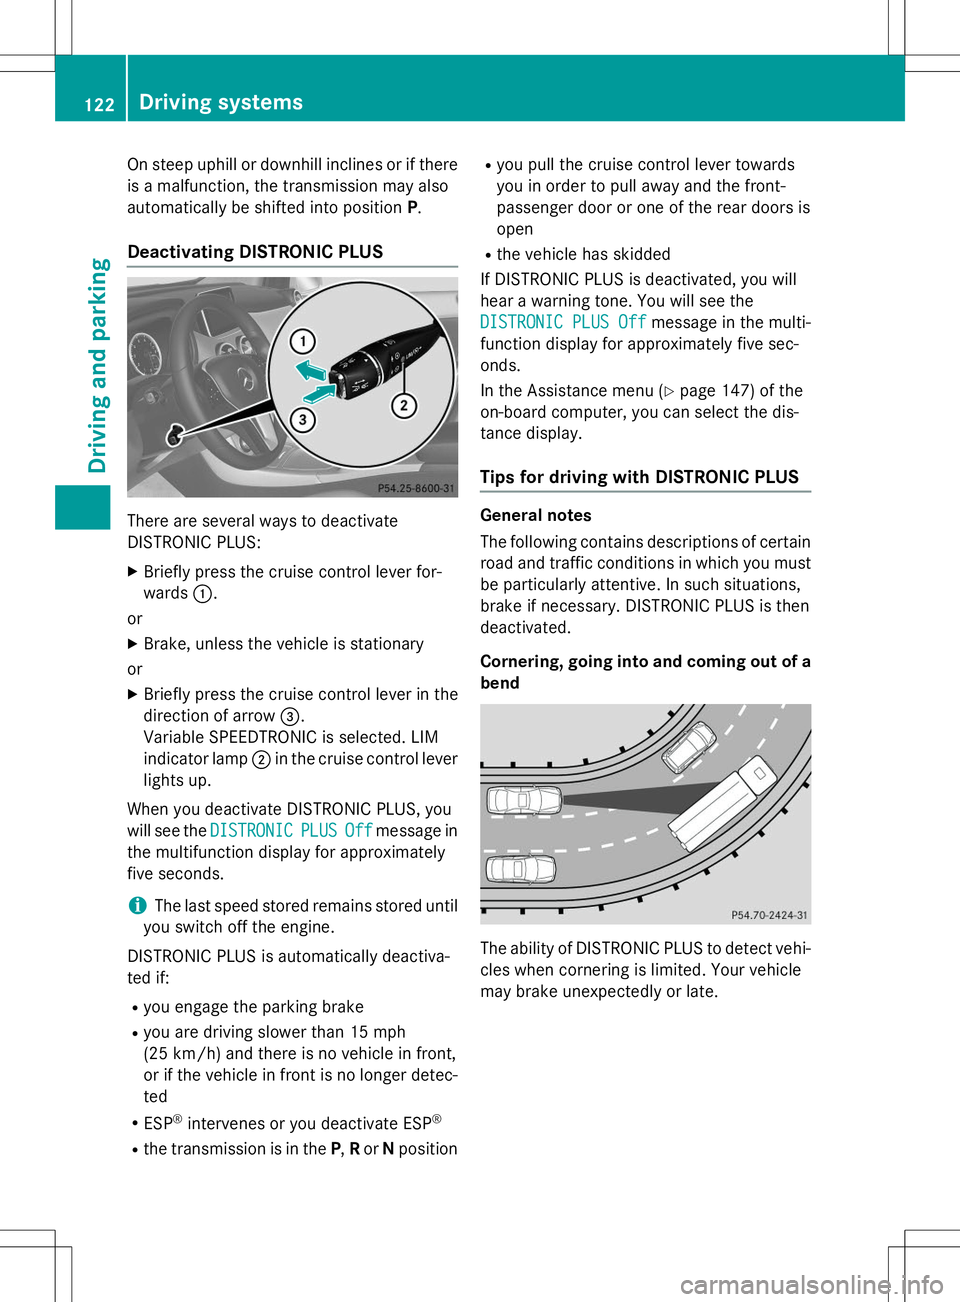
There are several ways to deactivate
DISTRONIC PLUS:
X Briefly press the cruise control lever for-wards :.
or
X Brake, unless the vehicle is stationary
or X Briefly press the cruise control lever in the
direction of arrow =.
Variable SPEEDTRONIC is selected. LIM
indicator lamp ;in the cruise control lever
lights up.
When you deactivate DISTRONIC PLUS, you
will see the
DISTRONICPLUSOffmessage in
the multifunction display for approximately
five seconds.
iThe last speed stored remains stored until
you switch off the engine.
DISTRONIC PLUS is automatically deactiva-
ted if:
R you engage the parking brake
R you are driving slower than 15 mph
(25 km/h) and there is no vehicle in front,
or if the vehicle in front is no longer detec-
ted
R ESP ®
intervenes or you deactivate ESP ®
R the transmission is in the P,R or Nposition R
you pull the cruise control lever towards
you in order to pull away and the front-
passenger door or one of the rear doors isopen
R the vehicle has skidded
If DISTRONIC PLUS is deactivated, you will
hear a warning tone. You will see the
DISTRONIC PLUS Offmessage in the multi-
function display for approximately five sec- onds.
In the Assistance menu ( Ypage 147) of the
on-board computer, you can select the dis-
tance display.
Tips for driving with DISTRONIC PLUS
General notes
The following contains descriptions of certain
road and traffic conditions in which you must be particularly attentive. In such situations,
brake if necessary. DISTRONIC PLUS is thendeactivated.
Cornering, going into and coming out of a
bend
The ability of DISTRONIC PLUS to detect vehi- cles when cornering is limited. Your vehicle
may brake unexpectedly or late.
122Driving systems
Driving and parking
Page 126 of 274

Blind Spot Assist
Important safety notes
GWARNING
Blind Spot Assist does not react to: R vehicles overtaken too closely on the side,
placing them in the blind spot area
R vehicles which approach with a large speed
differential and overtake your vehicle
As a result, Blind Spot Assist may not give
warnings in such situations. There is a risk of an accident.
Always observe the traffic conditions care-
fully, and maintain a safe lateral distance.
GWARNING
Blind Spot Assist does not react to:
R vehicles overtaken too closely on the side,
placing them in the blind spot area
R vehicles being overtaken at a speed differ-
ence of more than 7.5 mph (12 km/h)
R vehicles which approach with a large speed
differential and overtake your vehicle
As a result, Blind Spot Assist may not give
warnings in such situations. There is a risk of
an accident.
Always observe the traffic conditions care-
fully, and maintain a safe lateral distance.
Blind Spot Assist is only an aid. It may fail to
detect some vehicles and is no substitute for
attentive driving.
In particular, the detection of obstacles can
be impaired if:
R there is dirt on the sensors or anything else
covering the sensors
R visibility is poor, e.g. due to fog, heavy rain
or snow
R there is a narrow vehicle traveling in front,
e.g. a motorcycle or bicycle
R the road has very wide lanes
R the road has narrow lanes R
you are not driving in the middle of the lane
R there are barriers or other road boundaries
iUSA only:
This device has been approved by the FCC as a "Vehicular Radar System". The radar
sensor is intended for use in an automotive
radar system only. Removing, tampering
with, or altering the device will void any
warranties, and is not permitted by the
FCC. Do not tamper with, alter, or use in
any non-approved way.
Any unauthorized modification to this
device could void the user’s authority to
operate the equipment.
General notes
Blind Spot Assist uses a radar sensor system
to monitor both the left and right sides of your
vehicle. It supports you from a speed of
approximately 20 mph (30 km/h). A warning
display in the exterior mirrors draws your
attention to vehicles detected in the moni-
tored area. If you then switch on the corre-
sponding turn signal to change lanes, you will also receive a visual and audible collision
warning. For this purpose, Blind Spot Assist
uses sensors in the rear bumper.
Monitoring range of the sensors
124Driving systems
Driving an d parking