2015 MERCEDES-BENZ G-CLASS SUV ESP
[x] Cancel search: ESPPage 93 of 274

If you hear a warning tone when you leave the
vehicle, the lights may still be switched on.X Turn the light switch to Ã.
The turn signals, high-beam headlamps and
the high-beam flasher are operated using the combination switch ( Ypage 92).
The exterior lighting (except the parking/
standing lamps) switches off automatically if
you:
R remove the SmartKey from the ignition lock
R open the driver's door with the SmartKey in
position 0
Low-beam headlamps
X
To switch on the low-beam headlamps:
turn the SmartKey in the ignition lock to
position 2or start the engine.
X Turn the light switch to L.
The L indicator lamp in the instrument
cluster lights up.
Fog lamps (except AMG vehicles)
GWARNING
When the light switch is set to Ã, the low-
beam headlamps may not be switched on
automatically if there is fog, snow or other
causes of poor visibility due to the weather
conditions such as spray. There is a risk of anaccident.
In such situations, turn the light switch to L .
The automatic headlamp feature is only an
aid. The driver is responsible for the vehicle's lighting at all times. X To switch on the fog lamps: turn the
SmartKey in the ignition lock to position 2
or start the engine.
X Turn the light switch to T,L or
à . X
Press the Nbutton.
The green Nindicator lamp in the instru-
ment cluster lights up.
X To switch off the fog lamps: press the
N button.
The green Nindicator lamp in the instru-
ment cluster goes out.
Only vehicles with front fog lamps have the
fog lamps function.
Rear fog lamp
X To switch on the rear fog lamp: turn the
SmartKey in the ignition lock to position 2
or start the engine.
X Turn the light switch to Lorà .
X Press the Rbutton.
The yellow Rindicator lamp in the
instrument cluster lights up.
X To switch off the rear fog lamp: press the
R button.
The yellow Rindicator lamp in the
instrument cluster goes out.
Parking lamps
X To switch on: turn the light switch to T.
Standing lamps
Switching on the standing lamps ensures the
corresponding side of the vehicle is illumina- ted.
X To switch on the standing lamps: the
SmartKey is not inserted in the ignition lock
or it is in position 0(Y page 103).
X Turn the light switch to W(left-hand side
of the vehicle) or X(right-hand side of
the vehicle).
Exterior lighting91
Lights and windshield wipers
Z
Page 97 of 274

XLightly press bulb ?, turn it counter-clock-
wise and pull it out.
X Insert the new bulb and, applying slight
pressure, turn it clockwise until it engages.
X Insert the bulb holder into housing ;.
X Attach dust cover =.
X Insert housing ;.
X Replace and tighten screws :.
Windshield wipers
Switching the windshield wipers
on/off
If the wiper blades are worn, the windshield
will no longer be wiped properly. This could
prevent you from observing the traffic condi-
tions, thereby causing an accident.
Combination switch 1
$ Windshield wipers off
2ÄIntermittent wipe, low (rain sensor
set to low sensitivity)
3Å Intermittent wipe, high (rain sensor
set to high sensitivity)
4° Continuous wipe, slow
5¯Continuous wipe, fast
BíSingle wipe
CîTo wipe with washer fluid
X Switch on the ignition.
X Turn the combination switch to the corre-
sponding position.
In the ÄorÅ position, the appropriate
wiping frequency is set automatically accord-
ing to the intensity of the rain. In the Å
position, the rain sensor is more sensitive
than in the Äposition, causing the wind-
shield wipers to wipe more frequently.
Switching the rear window wiper on/ off
Combination switch :
è Switch
2bWipes with washer fluid
3ISwitches on intermittent wiping
40 Switches off intermittent wiping
5b Wipes with washer fluid
X Turn the SmartKey to position 1or 2in the
ignition lock.
X Turn switch :on the combination switch
to the corresponding position.
When the rear window wiper is switched on,
the icon appears in the instrument cluster.
iThe rear window wiper comes on auto-
matically if you shift the selector lever to R
while the windshield wiper are on.
Windshield wipers95
Lights and windshield wipers
Z
Page 104 of 274
Useful information
iThis Operator's Manual describes all
models and all standard and optional equip- ment of your vehicle available at the time of
publication of the Operator's Manual.
Country-specific differences are possible.
Please note that your vehicle may not be
equipped with all features described. This
also applies to safety-related systems and
functions.
iRead the information on qualified special-
ist workshops: ( Ypage 28).
Notes on breaking-in a new vehicle
Important safety notes
New and replaced brake pads and discs only
reach their optimum braking effect after sev-
eral hundred kilometers of driving. Compen-
sate for this by applying greater force to the
brake pedal.
The first 1000 miles (1500 km)
The more you look after the engine when it is
new, the more satisfied you will be with its
performance in the future. R You should therefore drive at varying vehi-
cle and engine speeds for the first
1,000 miles (1,500 km).
R Avoid heavy loads, e.g. driving at full throt-
tle, during this period.
R Change gear in good time, before the tach-
ometer needle is Ôof the way to the red
area of the tachometer.
R Do not manually shift to a lower gear to
brake the vehicle.
R Try to avoid depressing the accelerator
pedal beyond the point of resistance (kick-
down).
R Only select shift ranges 3,2 or 1when driv-
ing slowly, e.g. in mountainous terrain. After 1,000 miles (1,500 km), you can
increase the engine speed gradually and bring
the vehicle to full speed.
Additional breaking-in notes for AMG vehi- cles:
R Do not drive faster than 85 mph
(140 km/h) for the first 1,000 miles
(1,500 km).
R Only allow the engine to reach a maximum
engine speed of 4,500 rpm briefly.
R Change gear in good time.
R Avoid driving off-road before the differen-
tial oil change at 2,000 miles (3,000 km).
R Ideally, for the first 1,000 miles (1,500 km),
drive in program C.
iYou should also observe these breaking-
in notes if the engine or parts of the drive
train on your vehicle have been replaced.
iAlways observe the respective speed lim-
its.
AMG vehicles with self-locking rear
axle differential
Change the oil after a breaking-in period of
2,000 miles (3,000 km) to improve protection
of the differential. This oil change prolongs
the service life of the differential. Have the oil change carried out at a qualified specialist
workshop. Mercedes-Benz recommends that
you use an authorized Mercedes-Benz Center for this purpose.
Driving
Important safety notes
GWARNING
Objects in the driver's footwell can restrict thepedal travel or obstruct a depressed pedal.
The operating and road safety of the vehicle is
jeopardized. There is a risk of an accident.
Make sure that all objects in the vehicle are
stowed correctly, and that they cannot enter
102Driving
Driving and parking
Page 107 of 274
!If a warning tone sounds and the
Release Park. BrakeRelease Park. Brakemessage appears
in the multifunction display, the parking
brake is still applied. Release the parkingbrake.
X Depress the brake pedal and keep itdepressed.
X Shift the automatic transmission to posi-tion Dor R.
iBefore driving off, wait until the gear
change is fully completed.
X Release the parking brake ( Ypage 111).
X Release the brake pedal.
X Carefully depress the accelerator pedal.
iIt is only possible to shift the automatic
transmission from position Pto a different
position if you depress the brake pedal.
Only then is the selector lever lock
released.
iThe vehicle locks centrally once you have
pulled away. The locking knobs in the doors
drop down.
You can open the doors from the inside at
any time.
You can also deactivate the automatic lock- ing feature ( Ypage 147).
iUpshifts take place at higher engine
speeds after a cold start. This helps the
catalytic converter to reach its operating
temperature more quickly.
Hill start assist
GWARNING
After a short time, hill start assist will no lon-
ger brake your vehicle and it could roll away.
There is a risk of an accident and injury.
Therefore, quickly move your foot from the
brake pedal to the accelerator pedal. Never
leave the vehicle when it is held by hill startassist.
Hill start assist helps you when pulling away
forwards or in reverse on an uphill gradient. It holds the vehicle for a short time after you
have removed your foot from the brake pedal.
This gives you enough time to move your footfrom the brake pedal to the accelerator pedal
and to depress it before the vehicle begins to
roll.
X Take your foot off the brake pedal.
iOnce you have taken your foot off the
brake pedal, the vehicle is held for around
one second.
X Pull away.
Hill start assist will not function if: R you are pulling away on a level road or on a
downhill gradient.
R the transmission is in position N.
R the parking brake is applied.
R ESP ®
is malfunctioning.
ECO start/stop function (AMG vehi-
cles)
In the Digital Operator's Manual, you will find
general notes on and information about: R Deactivating/activating the ECO start/
stop function
R Automatic engine switch-off/engine start
Automatic transmission
Important safety notes
GWARNING
If the engine speed is above the idling speed
and you engage transmission position Dor R,
the vehicle could pull away suddenly. There is a risk of an accident.
When engaging transmission position Dor R,
always firmly depress the brake pedal and do not simultaneously accelerate.
GWARNING
The automatic transmission switches to neu-
tral position Nwhen you switch off the engine.
Automatic transmission105
Driving and parking
Z
Page 109 of 274
Information in the Digital Operator's
Manual
In the Digital Operator's Manual you will find
information on the following topics: RTransmission position and drive program
display
R Transmission positions
R Changing gear
R Driving tips
R Program selector button
R Steering wheel paddle shifters
R Automatic drive program
R Manual drive program
R Shift ranges
R Problems with the transmission
Manual drive program
General information
The manual drive program is only available on AMG vehicles . In manual drive program M,
you can permanently change gear yourself by
using the steering wheel paddle shifters. The
transmission must be in position D. The gear
currently selected and engaged is shown in
the multifunction display.
Manual drive program Mdiffers from drive
programs Eand Swith regard to spontaneity,
responsiveness and smoothness of gear
changes.
Switching on the manual drive program
X Shift the transmission to position D.
X Press the program selector button repeat-
edly until Mappears in the multifunction
display, see Digital Operator's Manual.
Upshifting
!In manual drive program M, the automatic
transmission does not shift up automati-
cally even when the engine limiting speed
for the current gear is reached. When the engine limiting speed is reached, the fuel
supply is cut to prevent the engine from
overrevving. Always make sure that the
engine speed does not reach the red area of
the tachometer. There is otherwise a risk of
engine damage.
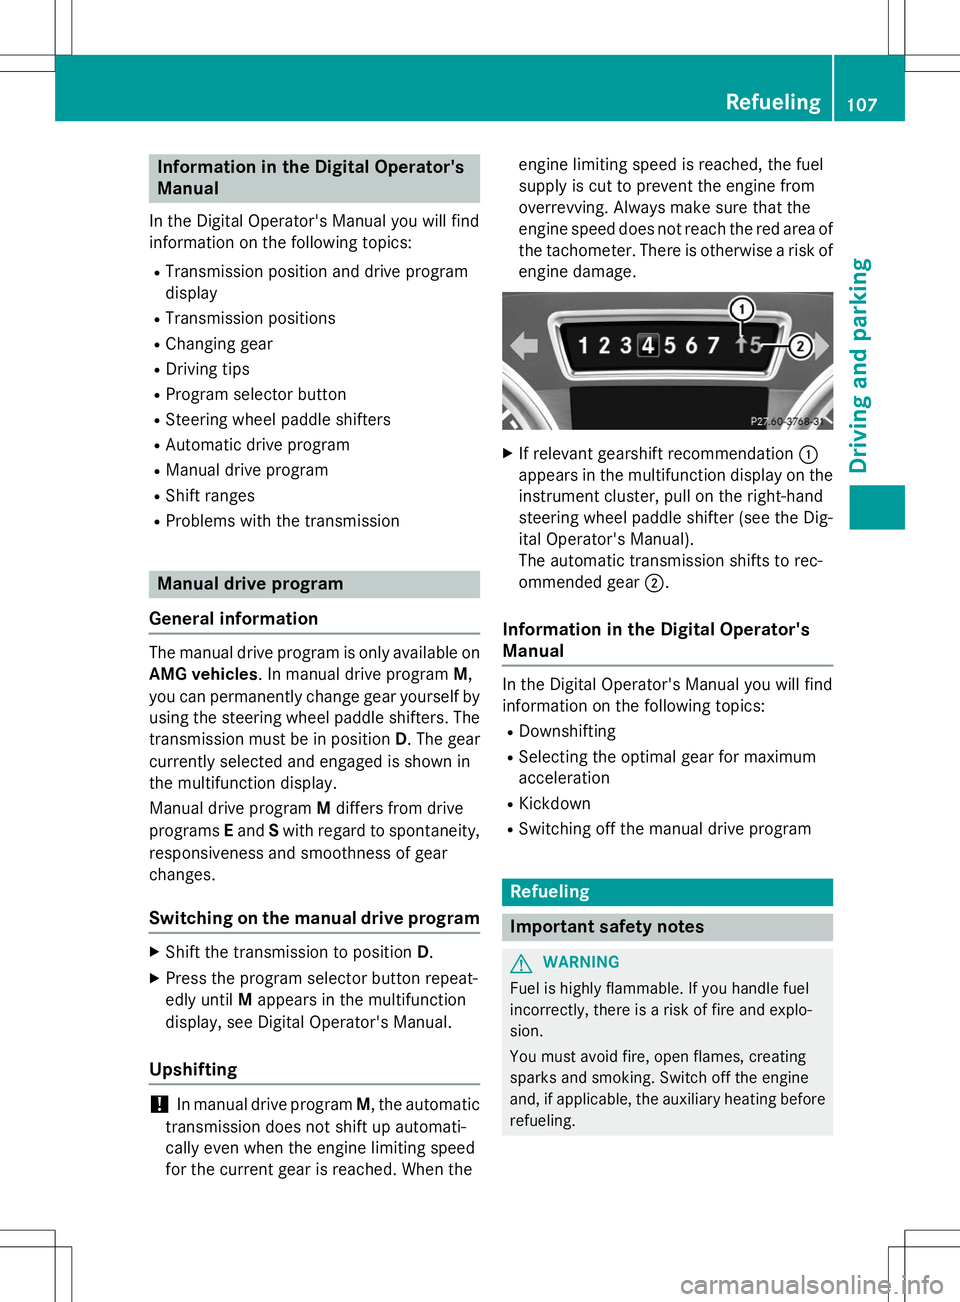
X If relevant gearshift recommendation :
appears in the multifunction display on the instrument cluster, pull on the right-hand
steering wheel paddle shifter (see the Dig-
ital Operator's Manual).
The automatic transmission shifts to rec-
ommended gear ;.
Information in the Digital Operator's
Manual
In the Digital Operator's Manual you will find
information on the following topics:
R Downshifting
R Selecting the optimal gear for maximum
acceleration
R Kickdown
R Switching off the manual drive program
Refueling
Important safety notes
GWARNING
Fuel is highly flammable. If you handle fuel
incorrectly, there is a risk of fire and explo-
sion.
You must avoid fire, open flames, creating
sparks and smoking. Switch off the engine
and, if applicable, the auxiliary heating before
refueling.
Refueling107
Driving and pa rking
Z
Page 115 of 274

Do not place your foot under the brake pedal.Keep the area under the brake pedal free from
obstructions.
If you fail to adapt your driving style, cruise
control can neither reduce the risk of acci-
dent nor override the laws of physics. Cruise
control cannot take account of road, weather and traffic conditions. Cruise control is only
an aid. You are responsible for the distance to
the vehicle in front, for vehicle speed and for braking in good time. Adjust your driving style to the traffic conditions. Only engage cruise
control when the current road, weather and
traffic conditions permit it to be done safely.
Drive carefully and maintain a suitable dis-
tance to the vehicle in front.
Do not use cruise control: R in traffic conditions that do not allow you to
drive at a constant speed, e.g. heavy traffic,
on winding roads or off-road
R on slippery road surfaces. Braking or accel-
erating could cause the drive wheels to lose
traction and the vehicle could then skid
R when there is poor visibility, e.g. due to fog,
heavy rain or snow
General notes
Cruise control maintains a constant road
speed for you. On long and steep downhill
gradients, especially if the vehicle is laden,
you must select shift range 1,2 or 3in good
time. By doing so, you will make use of the
braking effect of the engine. This relieves the load on the brake system and prevents the
brakes from overheating and wearing too
quickly.
Use cruise control only if road and traffic con-
ditions make it appropriate to maintain a
steady speed for a prolonged period. You can store any road speed above 20 mph
(30 km/h).
iCruise control should not be activated
when driving off-road.
Cruise control lever
:To activate or increase speed
;LIM indicator lamp
=To activate at the current speed/last
stored speed
?To activate or reduce speed
ATo switch between cruise control and var-
iable SPEEDTRONIC
BTo deactivate cruise control
You can operate cruise control and variable
SPEEDTRONIC with the cruise control lever.
When you activate cruise control, the stored
speed is shown in the multifunction display
for five seconds.
The LIM indicator lamp on the cruise control
lever indicates which system you have selec- ted:
R LIM indicator lamp off: cruise control is
selected.
R LIM indicator lamp on: variable SPEED-
TRONIC is selected.
Activation conditions
To activate cruise control, all of the following
activation conditions must be fulfilled:
R the parking brake must be released.
R you are driving faster than 20 mph
(30 km/h).
R ESP ®
must be active, but not intervening.
R the transmission must be in position D.
Driving systems113
Driving an d parking
Z
Page 117 of 274
Deactivating cruise control
There are several ways to deactivate cruise
control:X Briefly press the cruise control lever for-
wards B.
or X Brake.
or X Briefly press the cruise control lever in the
direction of arrow A.
Variable SPEEDTRONIC is selected. LIM
indicator lamp ;in the cruise control lever
lights up.
Cruise control is automatically deactivated if: R you apply the parking brake
R you are driving at less than 20 mph
(30 km/ h)
R ESP ®
intervenes or you deactivate ESP ®
R you shift the transmission to position N
while driving
iThe last speed stored is cleared when you
switch off the engine.
SPEEDTRONIC
Important safety notes
GWARNING
If you rest your foot on the brake pedal while
driving, the braking system can overheat. This increases the stopping distance and can even
cause the braking system to fail. There is a
risk of an accident.
Never use the brake pedal as a footrest. Never
depress the brake pedal and the accelerator
pedal at the same time.
!Depressing the brake pedal constantly
results in excessive and premature wear to
the brake pads.
If you fail to adapt your driving style, SPEED-
TRONIC can neither reduce the risk of acci-
dent nor override the laws of physics. SPEED- TRONIC cannot take account of road, weather
and traffic conditions. SPEEDTRONIC is only
an aid. You are responsible for the distance to
the vehicle in front, for vehicle speed, for
braking in good time and for staying in lane.
Only engage SPEEDTRONIC when the current road, weather and traffic conditions permit it
to be done safely. Drive carefully and main-
tain a suitable distance to the vehicle in front.
General notes
SPEEDTRONIC brakes automatically so that
you do not exceed the set speed. On long andsteep downhill gradients, especially if the
vehicle is laden or towing a trailer, you must
select shift range 1,2 or 3in good time. By
doing so, you will make use of the braking
effect of the engine, which relieves the load
on the brake system and prevents the brakes
from overheating and wearing too quickly. If
you need additional braking, depress the
brake pedal repeatedly rather than continu-
ously.
iThe speed indicated in the speedometer
may differ slightly from the limit speed
stored.
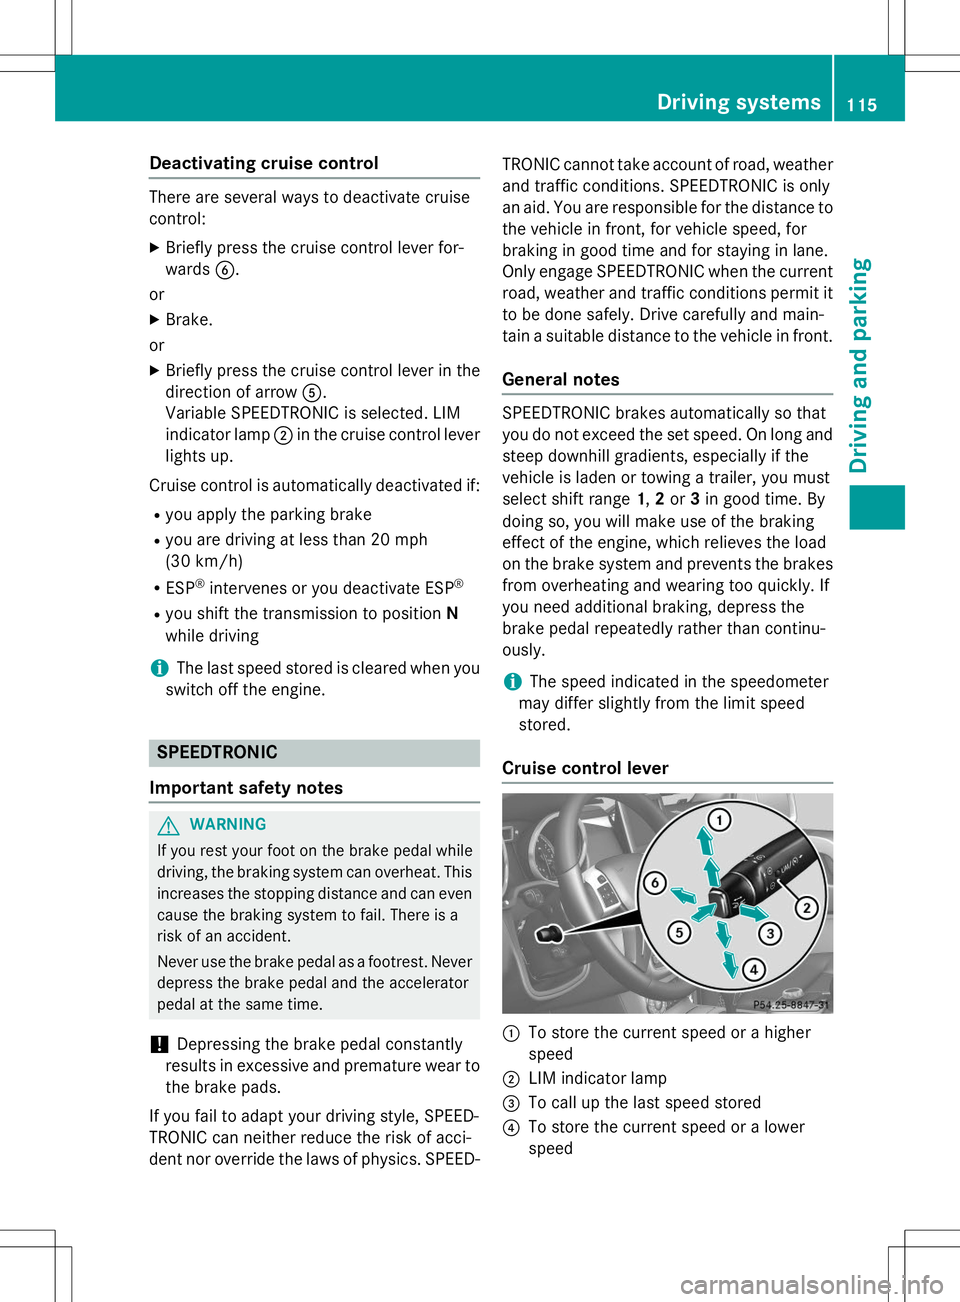
Cruise control lever
:To store the current speed or a higher
speed
;LIM indicator lamp
=To call up the last speed stored
?To store the current speed or a lower
speed
Driving systems115
Driving an d parking
Z
Page 118 of 274
ATo switch between cruise control and var-
iable SPEEDTRONIC
BTo deactivate variable SPEEDTRONIC
You can operate cruise control and variable
SPEEDTRONIC with the cruise control lever.
The LIM indicator lamp on the cruise control
lever indicates which system you have selec-
ted:
R LIM indicator lamp off: cruise control is
selected.
R LIM indicator lamp on: variable SPEED-
TRONIC is selected.
You can use the cruise control lever to limit
the speed to any speed above 30 km/ hwhile
the engine is running.
Selecting variable SPEEDTRONIC
If you fail to adapt your driving style, SPEED-
TRONIC can neither reduce the risk of acci-
dent nor override the laws of physics. SPEED-
TRONIC cannot take account of road, weather
and traffic conditions. SPEEDTRONIC is only
an aid. You are responsible for the distance to the vehicle in front, for vehicle speed, for
braking in good time and for staying in lane.
Only engage SPEEDTRONIC when the currentroad, weather and traffic conditions permit it
to be done safely. Drive carefully and main-
tain a suitable distance to the vehicle in front.
X Check whether LIM indicator lamp ;is on.
If it is on, variable SPEEDTRONIC is already selected.
If it is not, press the cruise control lever in
the direction of arrow A.
LIM indicator lamp ;in the cruise control
lever lights up. Variable SPEEDTRONIC isselected.
Storing the current speed
You can use the cruise control lever to limit
the speed to any speed above 18 mph while
the engine is running. X
Briefly press the cruise control lever up :
or down ?.
The current speed is stored and shown in
the multifunction display.
iOn downhill gradients, the speed can be
exceeded despite variable SPEEDTRONIC.
In this case, you will hear a warning tone
and the
Limit Exceededmessage will
appear in the multifunction display. If nec-
essary, apply the brakes yourself.
Calling up the last speed stored
Calling up the last speed stored
If you fail to adapt your driving style, SPEED-
TRONIC can neither reduce the risk of acci-
dent nor override the laws of physics. SPEED-
TRONIC cannot take account of road, weather
and traffic conditions. SPEEDTRONIC is only
an aid. You are responsible for the distance to the vehicle in front, for vehicle speed, for
braking in good time and for staying in your
lane. Only activate SPEEDTRONIC when the
prevailing road, weather and traffic condi-
tions permit. Drive carefully and maintain a
suitable distance to the vehicle in front.
X Briefly pull the cruise control lever towards
you =.
iIf you call up the stored speed and your
current speed is higher, you will hear a
warning tone. The
Limit Exceededmes-
sage appears in the multifunction display.
iIf no speed is stored, variable SPEED-
TRONIC stores the current speed and main-
tains it.
116Driving systems
Driving and parking