2015 MERCEDES-BENZ G-CLASS SUV fuel
[x] Cancel search: fuelPage 35 of 274

Instrument cluster
Displays and controls
FunctionPage
:Speedometer with segments146
;Multifunction display146
=Tachometer146
?Coolant temperature display146
AFuel gage
BInstrument cluster lighting control146
Instrument cluster33
At a glance
Page 36 of 274

Warning and indicator lamps
FunctionPage
:LLow-beam head-
lamps
91
;÷ ESP®165
=K
High-beam head-
lamps
92
?J Brakes (yellow)162
A·Distance warning169
B#! Turn signals92
ChTire pressure monitor170
D6 Restraint system42
EüSeat belt161
FunctionPage
F?Coolant168
GRRear fog lamp91
HOFront fog lamps91
I;Check Engine~
J8 Reserve fuel~
KåESP®
OFF165
L! ABS163
MBrakes (red)
$(USA only)
J(Canada only)162
34Instrument cluster
At a glance
Page 57 of 274

Automatic measures after an acci-
dent
Immediately after an accident, the following
measures are implemented, depending on
the type and severity of the impact:R the hazard warning lamps are activated
R the emergency lighting is activated
R the vehicle doors are unlocked
R the front side windows are lowered
R the electrically adjustable steering wheel is
raised
R the engine is switched off and the fuel sup-
ply is cut off
R vehicles with mbrace: automatic emer-
gency call
Children in the vehicle
Important safety notes
Accident statistics show that children
secured in the rear seats are safer than chil-
dren secured in the front seats. For this rea-
son, Mercedes-Benz strongly advises that you
install a child restraint system on a rear seat.
Children are generally better protected there.
If a child younger than twelve years and under
5 ft (1.50 m)in height is traveling in the vehi-
cle:
R always secure this child in a restraint sys-
tem approved for Mercedes-Benz vehicles.
The child restraint system must be appro-
priate to the age, weight and size of thechild.
R be sure to observe the instructions and
safety notes in this section in addition to
the child restraint system manufacturer's
installation instructions.
GWARNING
If you leave children unsupervised in the vehi-
cle, they could set it in motion by, for example:
R release the parking brake.
R shift the automatic transmission out of the
parking position P.
R start the engine.
In addition, they may operate vehicle equip-
ment and become trapped. There is a risk of
an accident and injury.
When leaving the vehicle, always take the
SmartKey with you and lock the vehicle. Never
leave children unsupervised in the vehicle.
GWARNING
If persons, particularly children are subjected to prolonged exposure to extreme heat or
cold, there is a risk of injury, possibly even
fatal. Never leave children unattended in the
vehicle.
GWARNING
If the child restraint system is subjected to
direct sunlight, parts may get very hot. Chil-
dren may burn themselves on these parts,
particularly on the metal parts of the child
restraint system. There is a risk of injury.
If you leave the vehicle, taking the child with
you, always ensure that the child restraint
system is not exposed to direct sunlight. Pro-tect it with a blanket, for example. If the child
restraint system has been exposed to direct
sunlight, let it cool down before securing the
child in it. Never leave children unattended inthe vehicle.
Always make sure that all vehicle occupants
are positioned properly in their seats and
have correctly fastened their seat belts. Take
particular care with children.
Please take note of the safety notes on seat
belts ( Ypage 44) and the notes on their cor-
rect use ( Ypage 45).
A booster seat may be necessary to achieve
proper seat belt positioning for children over
Children in the vehicle55
Safety
Z
Page 75 of 274

The SmartKey centrally locks/unlocks:R the doors
R the rear door
R the fuel filler flap
iThe turn signals flash once when unlock-
ing and three times when locking.
You can also set an audible signal to confirm that the vehicle has been locked. The audiblesignal can be activated and deactivated using
the on-board computer ( Ypage 147).
When it is dark, the surround lighting also
comes on if it is activated in the on-board
computer ( Ypage 147).
Changing the settings of the locking system
You can find information about this in the
Digital Operator's Manual.
Mechanical key
General notes
If the vehicle can no longer be unlocked with
the SmartKey, use the mechanical key.
If you use the mechanical key to unlock and
open the driver's door or the rear door, the
anti-theft alarm system will be triggered( Y page 69).
X To end the alarm: insert the SmartKey into
the ignition lock.
Removing the mechanical key
X Push release catch :in the direction of
the arrow and at the same time remove
mechanical key ;from the SmartKey.
SmartKey battery
Important safety notes
GWARNING
Batteries contain toxic and corrosive substan- ces. If batteries are swallowed, it can result in
severe health problems. There is a risk of fatal injury.
Keep batteries out of the reach of children. If
a battery is swallowed, seek medical attention immediately.
The SmartKey batteries contain perchlorate
material, which may require special handling
and regard for the environment. Check your
national disposal guidelines. In California, see
www.dtsc.ca.gov/HazardousWaste/
Perchlorate/index.cfm .
Mercedes-Benz recommends that you have
the batteries replaced at a qualified specialist workshop.
SmartKey73
Opening and closing
Z
Page 103 of 274

Useful information............................102
Notes on breaking-in a new vehi- cle ....................................................... 102
Driving ............................................... 102
Automatic transmission ...................105
Refueling ............................................ 107
Parking ............................................... 110
Driving tips ........................................ 112
Driving systems ................................ 112
Off-road driving systems ..................132
Towing a trailer ................................. 137
101
Driving and parking
Page 109 of 274

Information in the Digital Operator's
Manual
In the Digital Operator's Manual you will find
information on the following topics: RTransmission position and drive program
display
R Transmission positions
R Changing gear
R Driving tips
R Program selector button
R Steering wheel paddle shifters
R Automatic drive program
R Manual drive program
R Shift ranges
R Problems with the transmission
Manual drive program
General information
The manual drive program is only available on AMG vehicles . In manual drive program M,
you can permanently change gear yourself by
using the steering wheel paddle shifters. The
transmission must be in position D. The gear
currently selected and engaged is shown in
the multifunction display.
Manual drive program Mdiffers from drive
programs Eand Swith regard to spontaneity,
responsiveness and smoothness of gear
changes.
Switching on the manual drive program
X Shift the transmission to position D.
X Press the program selector button repeat-
edly until Mappears in the multifunction
display, see Digital Operator's Manual.
Upshifting
!In manual drive program M, the automatic
transmission does not shift up automati-
cally even when the engine limiting speed
for the current gear is reached. When the engine limiting speed is reached, the fuel
supply is cut to prevent the engine from
overrevving. Always make sure that the
engine speed does not reach the red area of
the tachometer. There is otherwise a risk of
engine damage.
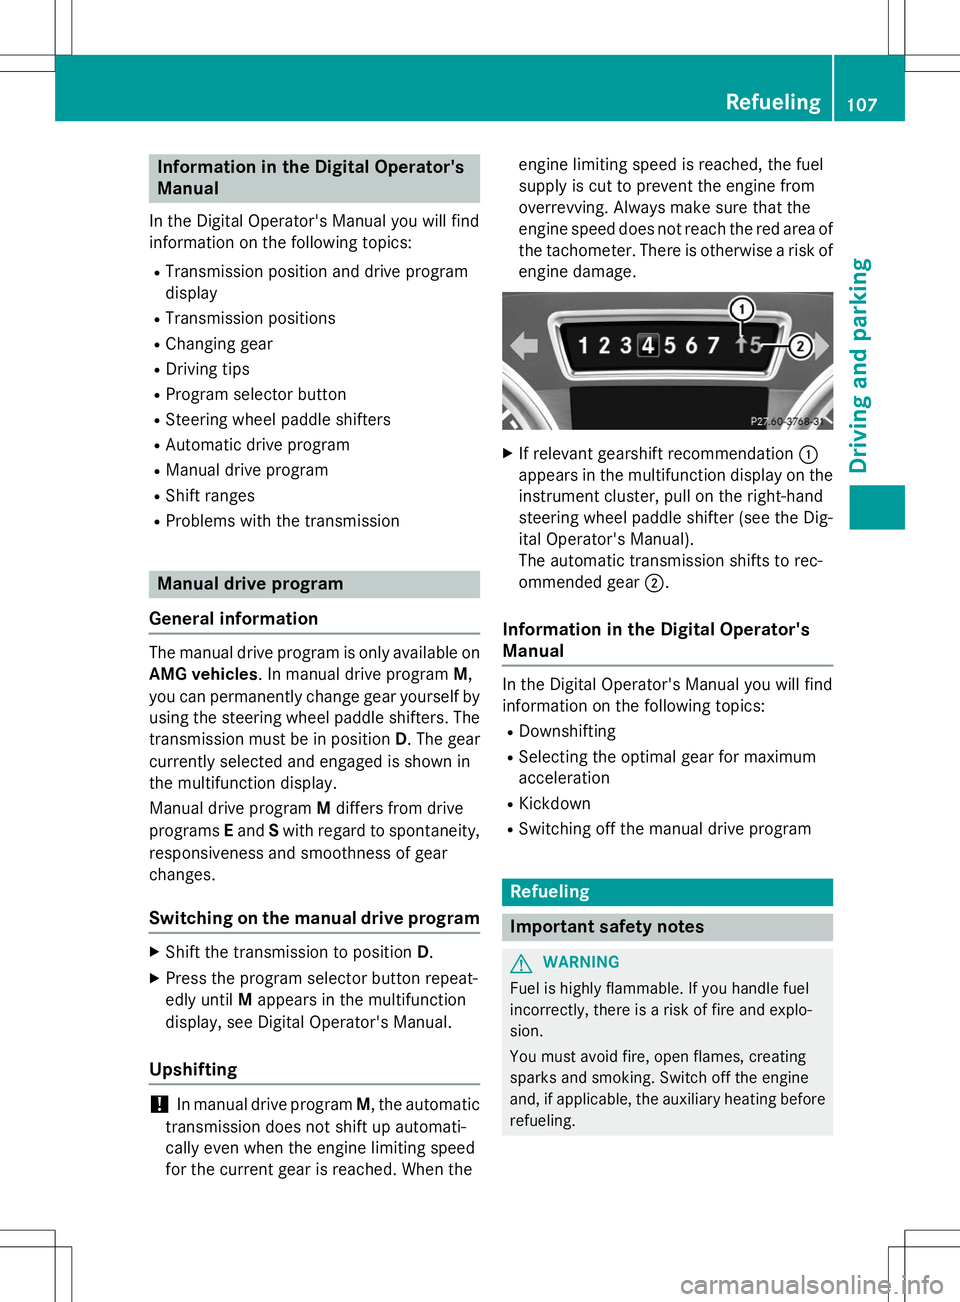
X If relevant gearshift recommendation :
appears in the multifunction display on the instrument cluster, pull on the right-hand
steering wheel paddle shifter (see the Dig-
ital Operator's Manual).
The automatic transmission shifts to rec-
ommended gear ;.
Information in the Digital Operator's
Manual
In the Digital Operator's Manual you will find
information on the following topics:
R Downshifting
R Selecting the optimal gear for maximum
acceleration
R Kickdown
R Switching off the manual drive program
Refueling
Important safety notes
GWARNING
Fuel is highly flammable. If you handle fuel
incorrectly, there is a risk of fire and explo-
sion.
You must avoid fire, open flames, creating
sparks and smoking. Switch off the engine
and, if applicable, the auxiliary heating before
refueling.
Refueling107
Driving and pa rking
Z
Page 110 of 274

GWARNING
Fuel is poisonous and hazardous to health.
There is a risk of injury.
You must make sure that fuel does not comeinto contact with your skin, eyes or clothing
and that it is not swallowed. Do not inhale fuel
vapors. Keep fuel away from children.
If you or others come into contact with fuel,
observe the following:
R Wash away fuel from skin immediately
using soap and water.
R If fuel comes into contact with your eyes,
immediately rinse them thoroughly with
clean water. Seek medical assistance with-
out delay.
R If fuel is swallowed, seek medical assis-
tance without delay. Do not induce vomit-ing.
R Immediately change out of clothing which
has come into contact with fuel.
!Do not use diesel to refuel vehicles with a
gasoline engine. Even small amounts of the wrong fuel result in damage to the fuel sys-
tem and engine.
!Do not switch on the ignition if you acci-
dentally refuel with the wrong fuel. Other-
wise, the fuel will enter the fuel lines. Notify
a qualified specialist workshop and have
the fuel tank and fuel lines drained com-
pletely.
!Overfilling the fuel tank could damage the
fuel system.
!Take care not to spill any fuel on painted
surfaces. You could otherwise damage the
paintwork.
!Use a filter when refueling from a fuel can.
Otherwise, the fuel lines and/or injection
system could be blocked by particles from
the fuel can.
If you overfill the fuel tank, pressure may build
up in the fuel tank. This could cause fuel to
spray out when the fuel pump nozzle is
removed. There is a risk of injury. The fuel tank is full when the fuel pump nozzle first
switches off. End the refueling process.
For further information on fuel and fuel quality
( Y page 259).
Refueling
Vehicles with a fuel filler flap
Example: G 550 fuel filler cap :
To open the fuel filler flap
;Tire pressure table
=Fuel type
?To insert the fuel filler cap
When you open or close the vehicle with the
SmartKey, the fuel filler flap is automatically
unlocked or locked.
The position of the fuel filler cap is displayed 8 in the instrument cluster. The arrow
next to the filling pump indicates the side of
the vehicle. The fuel filler flap is located to the rear on the right.
Opening the fuel filler cap
X Switch the engine off.
iWhen the engine is running and the fuel
filler flap is open, the yellow reserve fuel
warning lamp and the =(USA only)
or ; (Canada only) Check Engine warn-
ing lamp may light up.
Further information about warning and indi-
cator lamps in the instrument cluster can
be found in the Digital Operator's Manual.
108Refueling
Driving and parking
Page 111 of 274

XRemove the SmartKey from the ignition
lock.
X Turn the fuel filler cap counterclockwise
and remove it.
X Insert the fuel filler cap into the holder
bracket on the inside of filler flap ?.
Refueling
X
Completely insert the filler neck of the fuel
pump nozzle into the tank and refuel.
iDo not add any more fuel after the pump
stops filling for the first time. Otherwise,
fuel may leak out.
Closing
X Replace the fuel filler cap and turn it clock-
wise. The fuel filler cap audibly engages.
X Close the fuel filler flap.
iClose the fuel filler flap before locking the
vehicle. A locking pin otherwise prevents
the fuel filler flap from closing after the
vehicle has been locked.
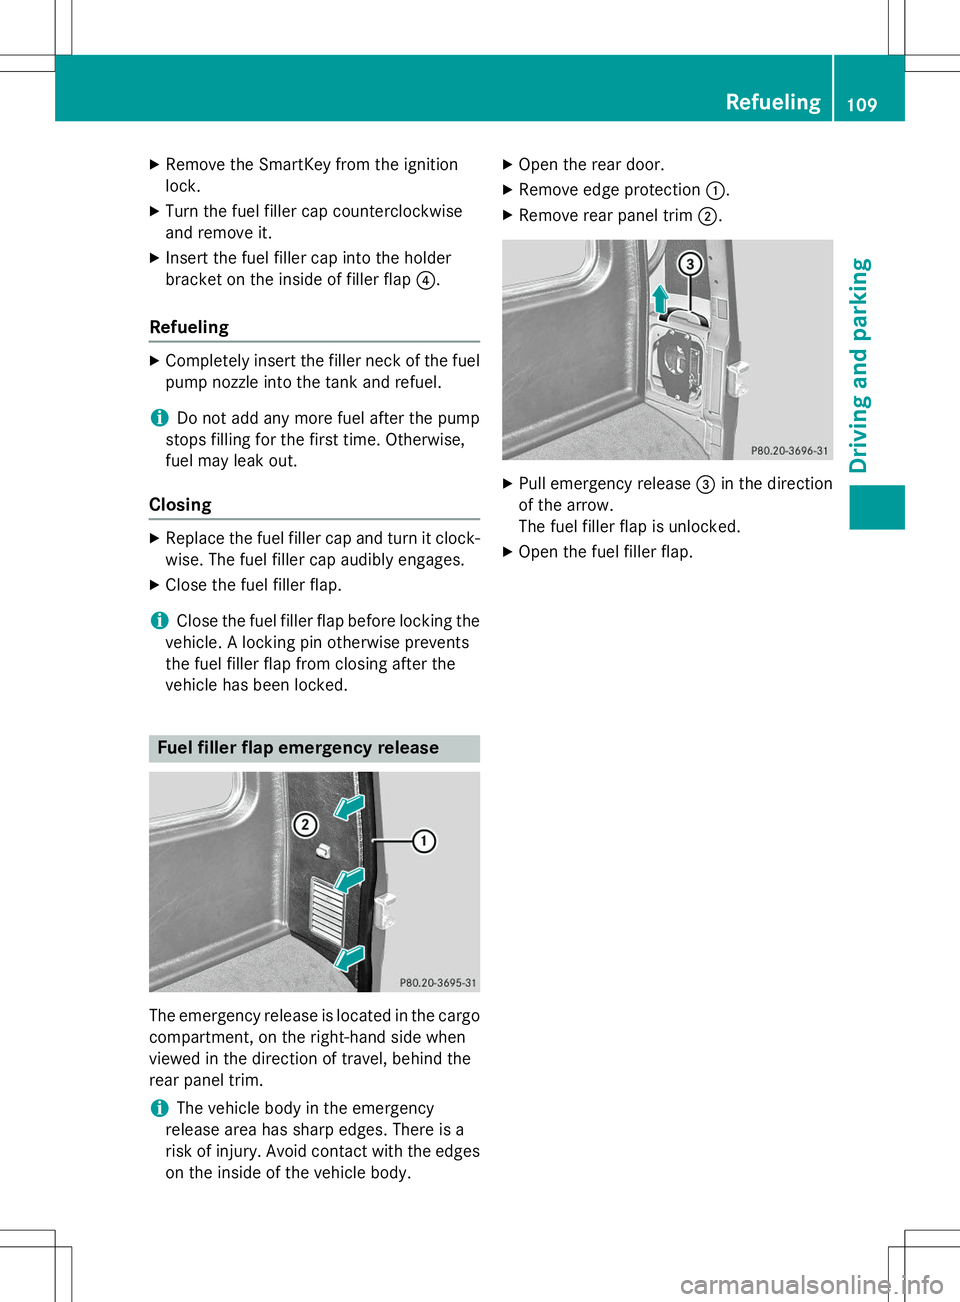
Fuel filler flap emergency release
The emergency release is located in the cargo
compartment, on the right-hand side when
viewed in the direction of travel, behind the
rear panel trim.
iThe vehicle body in the emergency
release area has sharp edges. There is a
risk of injury. Avoid contact with the edges on the inside of the vehicle body. X
Open the rear door.
X Remove edge protection :.
X Remove rear panel trim ;.
X
Pull emergency release =in the direction
of the arrow.
The fuel filler flap is unlocked.
X Open the fuel filler flap.
Refueling109
Driving and pa rking
Z