2015 MERCEDES-BENZ E-CLASS SALOON remove seats
[x] Cancel search: remove seatsPage 27 of 497

Protection of the environment
General notes
H
Environmental note
Daimler's declared policy is one of compre-
hensive environmental protection.
Our objectives are to use the natural resour-
ces which form the basis of our existence on
this planet sparingly and in amanner which
takes the requirements of both nature and
humanity into consideration.
You too can help to protect the environment
by operating your vehicle in an environmen-
tally-responsible manner.
Fuel consumption and the rate of engine,
transmission, brake and tyre wear depend on
the following factors:
R operating condition sofyour vehicle
R your personal driving style
You can influence both factors. Therefore,
please bear the following in mind:
Operating conditions:
R avoid short trips, as these increase fuel
consumption.
R observe the correct tyre pressure.
R do not carry any unnecessary weight in the
vehicle.
R remove the roof rack once you no longer
need it.
R ar egularly serviced vehicle will contribute
to environmental protection. You should
therefore adhere to the service intervals.
R all maintenance work should be carried out
at aq ualified specialist workshop.
Personal driving style:
R do not depress the accelerator pedal when
startingt he engine.
R do not warm up the engine when the vehicle
is stationary.
R drive carefully and maintain asafe distance
from the vehicle in front.
R avoid frequent, sudden acceleration and
braking. R
change gear in good time and use each gear
only up to Ôof its maximum engine speed.
R switch off the engine in stationary traffic.
R monitor the vehicle's fuel consumption. Returning an end-of-life vehicle
EU countries only:
Mercedes-Benz will take back your old vehicle to dispose of it in an environmentally-respon-sible manner in accordance with the Euro-
pean Union (EU) End of Life Vehicles Direc-
tive.
There is anetwork of return points and dis-
assembly plants available. You can return
your vehicle to these plants free of charge.
This makes avaluable contribution to the
recycling process and the conservation of
resources.
For further information on recycling old vehi- cles, recovery and the terms of the policy,
visit the Mercedes-Benz homepage. Genuine Mercedes-Benz parts
H
Environmental note
Daimler AG also suppliesr econditioned
assemblies and parts which are of the same
quality as new parts. For these, the same war-
ranty appliesasf or new parts.
! Airbags and seat belt tensioners, as well
as control units and sensors for these
restraint systems, may be installed in the
following areas of your vehicle:
R doors
R door pillars
R door sills
R seats
R dashboard
R instrumen tcluster
R centre console 24
Introduction
Page 64 of 497
X
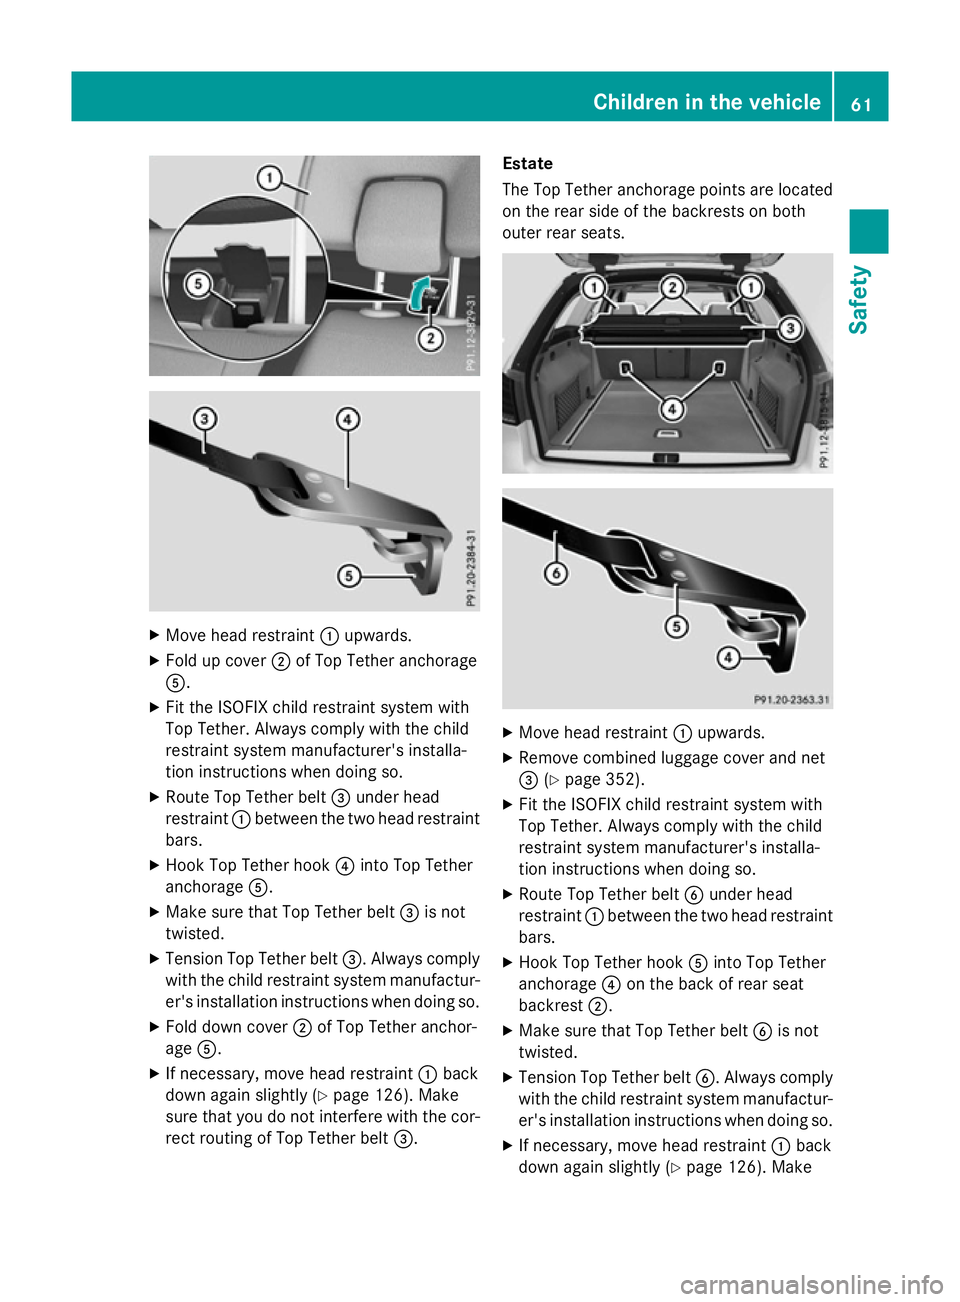
Move head restraint :upwards.
X Fold up cover ;of Top Tether anchorage
A.
X Fit the ISOFIXc hild restraint system with
Top Tether. Always comply with the child
restraint system manufacturer's installa-
tion instructions when doing so.
X Route Top Tether belt =under head
restraint :between the two head restraint
bars.
X Hook Top Tether hook ?into Top Tether
anchorage A.
X Make sure that Top Tether belt =is not
twisted.
X Tension Top Tether belt =.Always comply
with the child restraint system manufactur- er's installation instructions when doing so.
X Fold down cover ;of Top Tether anchor-
age A.
X If necessary, move head restraint :back
down again slightly (Y page 126). Make
sure that you do not interfere with the cor-
rect routing of Top Tether belt =.Estate
The Top Tether anchorage points are located
on the rear side of the backrests on both
outer rear seats. X
Move head restraint :upwards.
X Remove combined luggage cover and net
= (Ypage 352).
X Fit the ISOFIXc hild restraint system with
Top Tether. Always comply with the child
restraint system manufacturer's installa-
tion instructions when doing so.
X Route Top Tether belt Bunder head
restraint :between the two head restraint
bars.
X Hook Top Tether hook Ainto Top Tether
anchorage ?on the back of rear seat
backrest ;.
X Make sure that Top Tether belt Bis not
twisted.
X Tension Top Tether belt B.Always comply
with the child restraint system manufactur- er's installation instructions when doing so.
X If necessary, move head restraint :back
down again slightly (Y page 126). Make Children in the vehicle
61Safety Z
Page 75 of 497
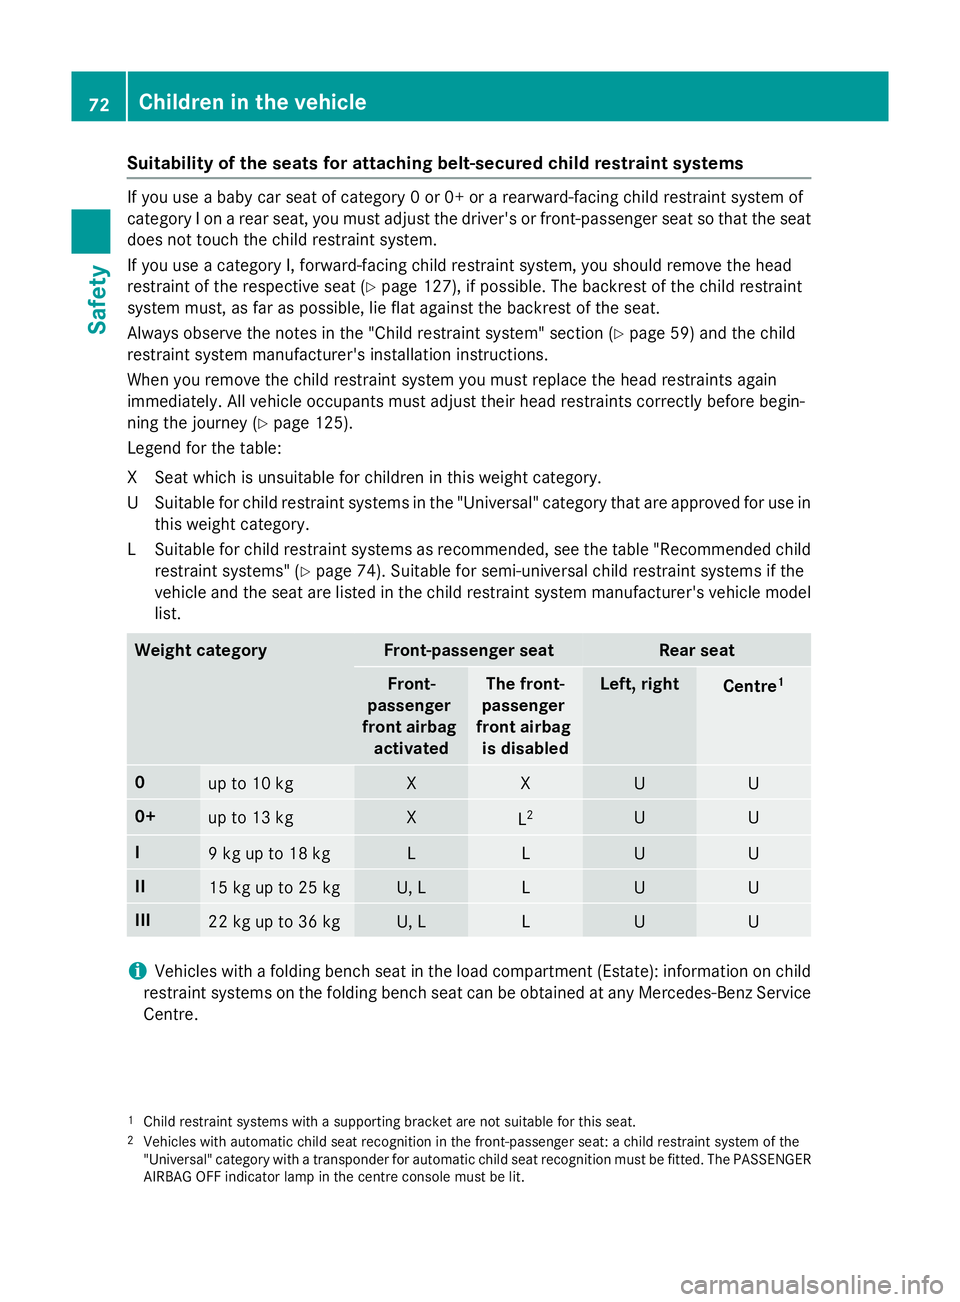
Suitability of the seats for attaching belt-secured child restraint systems
If you use
ababy car seat of category 0or0+orarearward-facing child restraint system of
category Ionarear seat, you must adjust the driver's or front-passenger seat so that the seat
does not touch the child restraint system.
If you use acategory I, forward-facing child restraint system, you should remove the head
restraint of the respective seat (Y page 127), if possible. The backrest of the child restraint
system must, as far as possible, lie flat against the backrest of the seat.
Always observe the notes in the "Childr estraint system" section (Ypage 59) and the child
restraint system manufacturer's installation instructions.
When you remove the child restraint system you must replace the head restraint sagain
immediately. All vehicle occupants must adjust their head restraint scorrectly before begin-
ning the journey (Y page 125).
Legend for the table:
XS eat which is unsuitable for children in this weight category.
US uitable for child restraint systems in th e"Universal" categor ytha tare approve dfor use in
this weigh tcategory.
LS uitable for child restraint systems as recommended, see th etable "Recommended child
restraint systems "(Ypage 74). Suitable for semi-universal child restraint systems if the
vehicl eand th eseat are listed in th echild restraint system manufacturer' svehicl emodel
list. Weight category Front-passenger seat Rea
rseat Front-
passenger
front airbag activated Th
ef ront-
passenger
front airbag is disabled Left
,right Centre
1 0
up to 10 kg X X U U
0+
up to 13 kg X
L
2 U U
I
9kgupt
o18kg L L U U
II
15 kg up to 25 kg U, L L U U
III
22 kg up to 36 kg U, L L U U
i
Vehicles wit
hafoldin gbench seat in th eload compartmen t(Estate): information on child
restraint systems on th efoldin gbench seat can be obtaine datany Mercedes-Ben zService
Centre.
1 Child restrain tsystems wit hasupporting bracke tare no tsuitable for this seat.
2 Vehicles wit hautomatic child seat recognition in th efront-pa ssenger seat :achild restrain tsystem of the
"Universal" categor ywithat ransponder for automatic child seat recognition mus tbefitted. The PASSENGER
AIRBA GOFFindicator lamp in th ecentr econsol emustbel it. 72
Children in th
evehicleSafety
Page 76 of 497
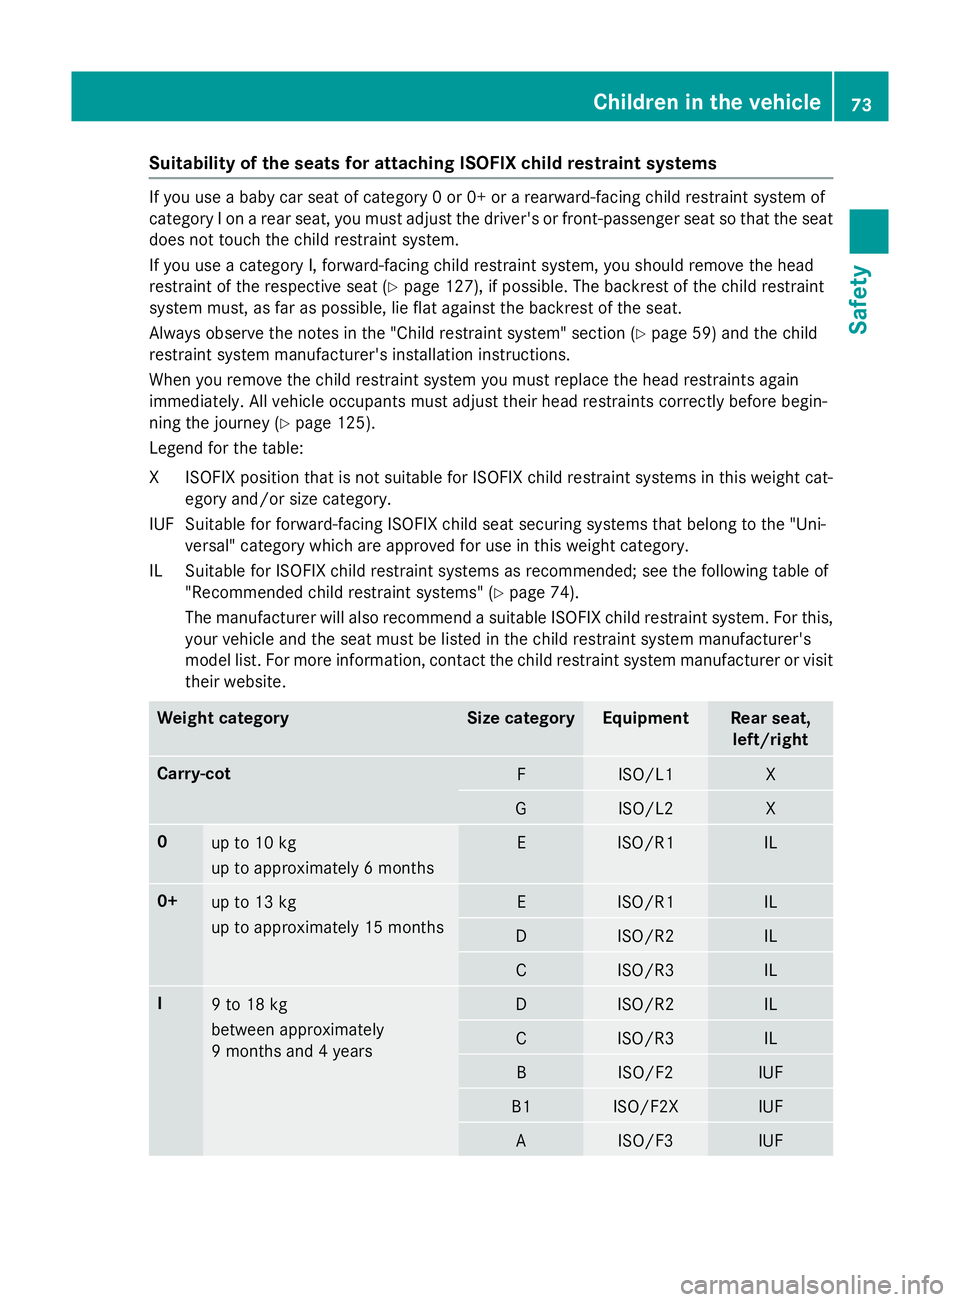
Suitability of the seats for attaching ISOFIXc
hild restraint systemsIf you use
ababy car seat of category 0or0+orarearward-facing child restraint system of
category Ionarear seat, you must adjust the driver's or front-passenger seat so that the seat
does not touch the child restraint system.
If you use acategory I, forward-facing child restraint system, you should remove the head
restraint of the respective seat (Y page 127), if possible. The backrest of the child restraint
system must, as far as possible, lie flat against the backrest of the seat.
Always observe the notes in the "Childr estraint system" section (Ypage 59) and the child
restraint system manufacturer's installation instructions.
When you remove the child restraint system you must replace the head restraint sagain
immediately. All vehicle occupants must adjust their head restraint scorrectly before begin-
ning the journey (Y page 125).
Legend for the table:
XI SOFIX position tha tisn ot suitabl efor ISOFIX child restraint systems in this weight cat-
egory and/or size category.
IUF Suitable for forward-facing ISOFIX child sea tsecuring systems tha tbelong to the "Uni-
versal "categor ywhich are approved for us einthis weight category.
IL Suitable for ISOFIX child restraint systems as recommended ;see the following table of
"Recommended child restraint systems "(Ypage 74).
The manufacturer will also recommend asuitabl eISOFIX child restraint system. For this,
your vehicl eand the sea tmustb elisted in the child restraint system manufacturer's
model list. For more information, contact the child restraint system manufacturer or visit
thei rwebsite. Weight category Siz
ec ategory Equipment Rear seat,
left/right Carry-cot
F ISO/L1 X
G ISO/L2 X
0
up to 10 kg
up to approximatel
y6months E ISO/R1 IL
0+
up to 13 kg
up to approximatel
y15m onths E ISO/R1 IL
D ISO/R2 IL
C ISO/R3 IL
I
9t
o18kg
between approximately
9m onths and 4years D ISO/R2 IL
C ISO/R3 IL
B ISO/F2 IUF
B1 ISO/F2X IUF
A ISO/F3 IUFChildre
ninthe vehicle
73Safety Z
Page 127 of 497
seat cushions, e.g. knives, nails or tools.
The seats should only be occupied by
passengers, if possible.
R when the seat heating is in operation, do
not cover the seats with insulating mate-
rials, e.g. blankets, coats, bags, seat cov- ers, child seats or booster seats.
! Make sure that there are no objects in the
footwell under or behind the seats when
moving the seats back. There is arisk that
the seats and/or the objects could be dam- aged.
i The head restraints in the front seats are
fitted with the NECK-PRO system
(Y page 55). For this reason, it is not pos-
sible to remove the head restraints from
the front seats.
Vehicles without the through-loading fea-
ture: the head restraints cannot be
removed from the rear-compartment
seats.
For more information, contact aqualified
specialist workshop.
i Further related subjects:
R Through-loading facility in the rear bench
seat (Saloon)
R EASY-PACK through-loading facility in
the rear bench seat (Estate)
(Y page 349) Adjusting the seats manually and
electrically
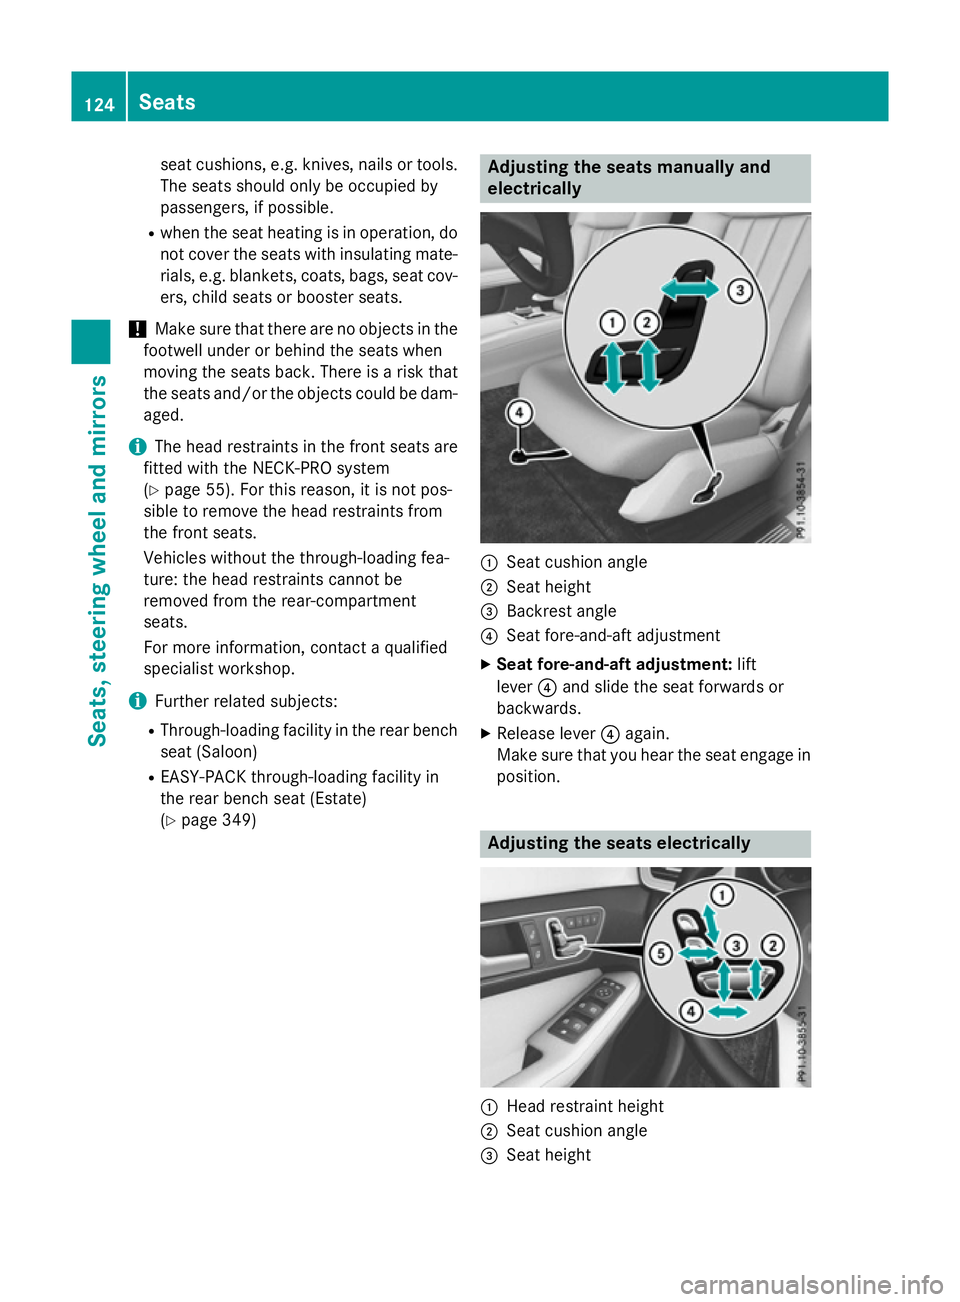
:
Seat cushion angle
; Seat height
= Backrest angle
? Seat fore-and-aft adjustment
X Seat fore-and-aft adjustment: lift
lever ?and slide the seat forwards or
backwards.
X Release lever ?again.
Make sure that you hear the seat engage in
position. Adjusting the seats electrically
:
Head restraint height
; Seat cushion angle
= Seat height 124
SeatsSeats, steering wheela
nd mirrors
Page 130 of 497
X
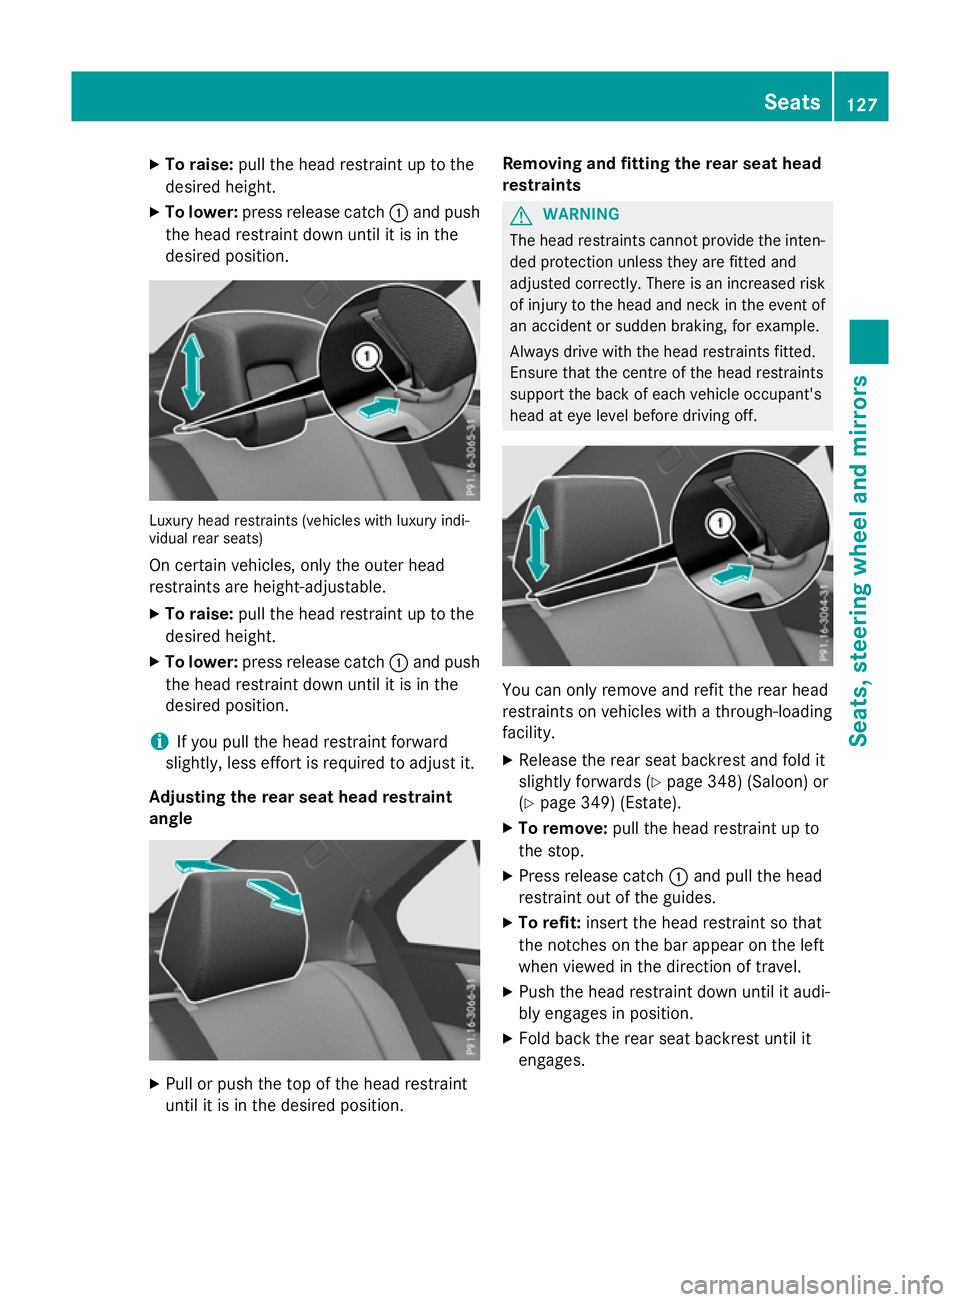
To raise: pull the hea drestraint up to the
desired height.
X To lower: press release catch :and push
the hea drestraint down unti litisinthe
desired position. Luxur
yheadr estraints (vehicle swithl uxuryi ndi-
vidua lrea rs eats)
On certain vehicles, onl ythe outer head
restraints ar eheight-adjustable.
X To raise: pull the hea drestraint up to the
desired height.
X To lower: press release catch :and push
the hea drestraint down unti litisinthe
desired position.
i If yo
upullt he hea drestraint forward
slightly, less effort is required to adjus tit.
Adjusting the rear seat hea drestraint
angle X
Pull or push the top of the hea drestraint
unti litisint he desired position. Removing and fitting the rear seat head
restraints G
WARNING
The hea drestraints canno tprovid ethe inten-
de dp rotection unless they ar efitte dand
adjusted correctly. There is an increased risk of injury to the hea dand neck in the event of
an accident or sudden braking ,for example.
Alway sdrive with the hea drestraints fitted.
Ensure tha tthe centre of the hea drestraints
support the back of each vehicl eoccupant's
hea date yelevel before driving off. Yo
uc an onl yremove and refit the rea rhead
restraints on vehicles with athrough-loading
facility.
X Releas ethe rea rseatb ackres tand fol dit
slightl yforwards (Y page 348)(Saloon) or
(Y page 349 )(Estate).
X To remove: pull the headrestraint up to
the stop.
X Press release catch :and pull the head
restraint ou tofthe guides.
X To refit: insert the hea drestraint so that
the notche sonthe barappea ront he left
when viewe dinthe direction of travel.
X Push the hea drestraint down unti litaudi-
bl ye ngages in position.
X Fol db ackt he rea rseatb ackres tuntilit
engages. Seats
127Seats, steering wheel andmirrors Z
Page 132 of 497
The combined luggage cover and net must be
fitted if you are using the folding bench seat
(Y page 352).
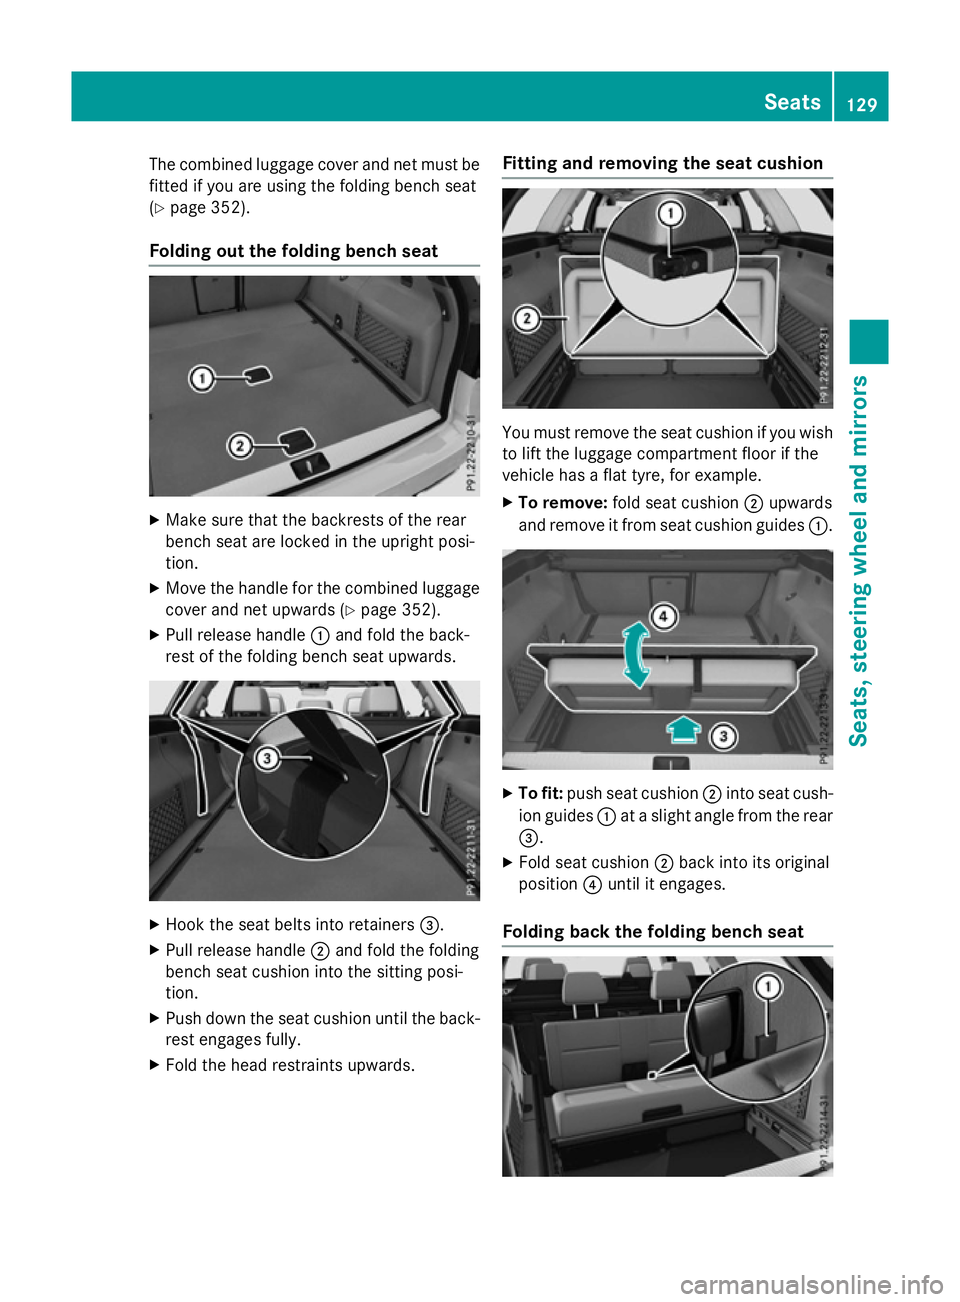
Folding out the folding bench seat X
Make sure that the backrest softhe rear
bench seat are locked in the upright posi-
tion.
X Move the handle for the combined luggage
cover and net upwards (Y page 352).
X Pull release handle :and fold the back-
rest of the folding bench seat upwards. X
Hook the seat belts into retainers =.
X Pull release handle ;and fold the folding
bench seat cushion into the sitting posi-
tion.
X Push down the seat cushion until the back-
rest engages fully.
X Fold the head restraints upwards. Fitting and removing the seat cushion
You must remove the seat cushion if you wish
to lift the luggage compartment floor if the
vehicle has aflat tyre, for example.
X To remove: fold seat cushion ;upwards
and remove it from seat cushion guides :. X
To fit: push seat cushion ;into seat cush-
ion guides :atas light angle from the rear
=.
X Fold seat cushion ;back into its original
position ?until it engages.
Folding back the folding bench seat Seats
129Seats, steering wheel and mirrors Z
Page 137 of 497
Adjusting th
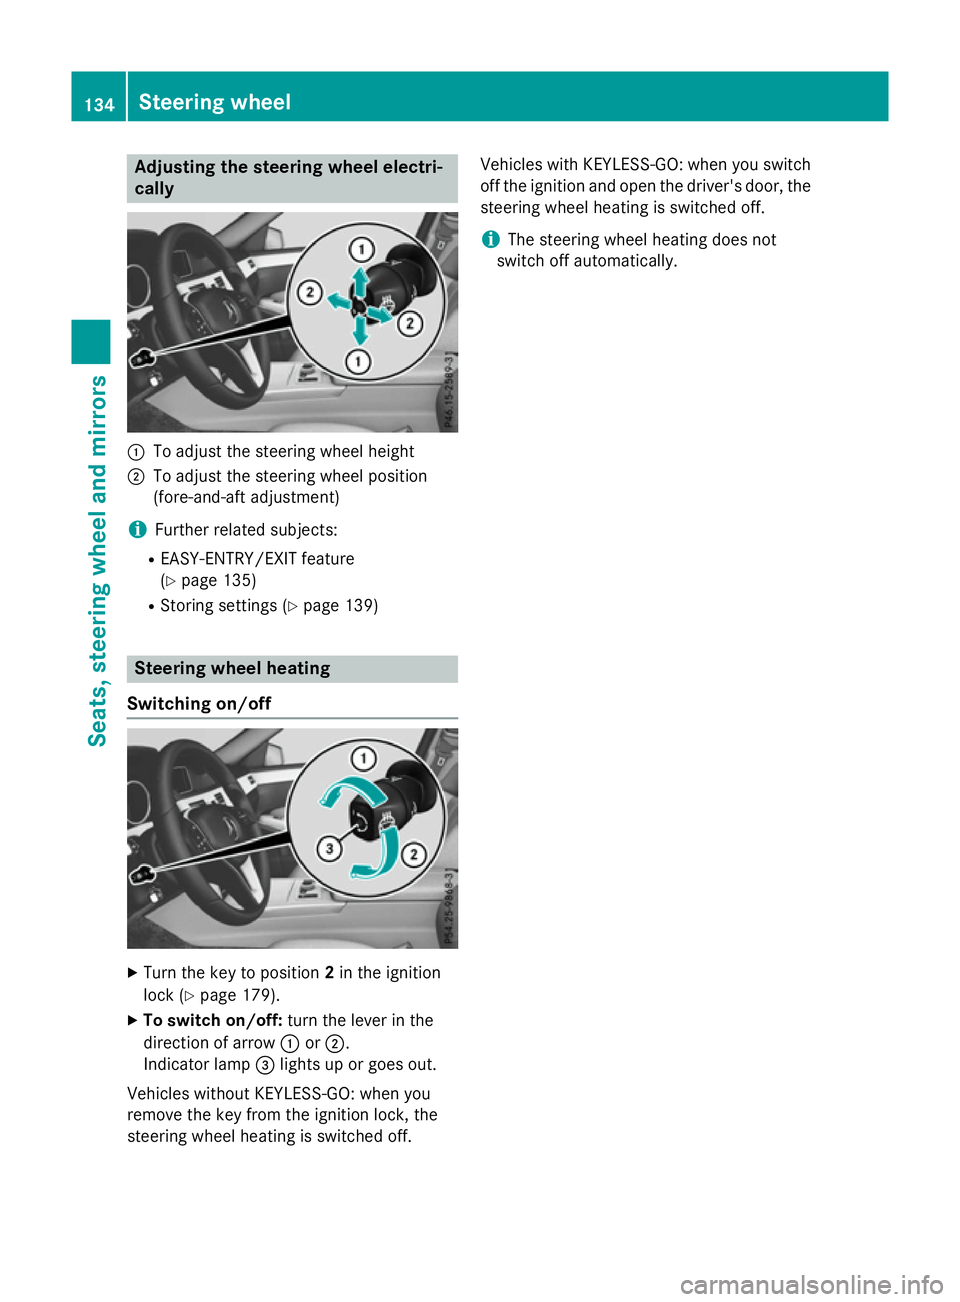
esteering wheel electri-
cally :
To adjust th esteering whee lheight
; To adjust th esteering whee lposition
(fore-and-af tadjustment)
i Further relate dsubjects:
R EASY-ENTRY/EXIT feature
(Y page 135)
R Storing setting s(Ypage 139) Steering wheel heating
Switchin gon/off X
Turn th ekeyto position 2in th eignition
loc k(Ypage 179).
X To switch on/off: turnthe lever in the
direction of arrow :or;.
Indicato rlamp =lights up or goes out.
Vehicles without KEYLESS-GO :when you
remove th ekeyfrom th eignition lock, the
steering whee lheating is switched off. Vehicles wit
hKEYLESS-GO :when you switch
off th eignition and open th edriver' sdoor ,the
steering whee lheating is switched off.
i The steering whee
lheating does not
switch off automatically. 134
Steering wheelSeats
,steering wheel and mirrors