2015 MERCEDES-BENZ E-CLASS ESTATE weight
[x] Cancel search: weightPage 78 of 497
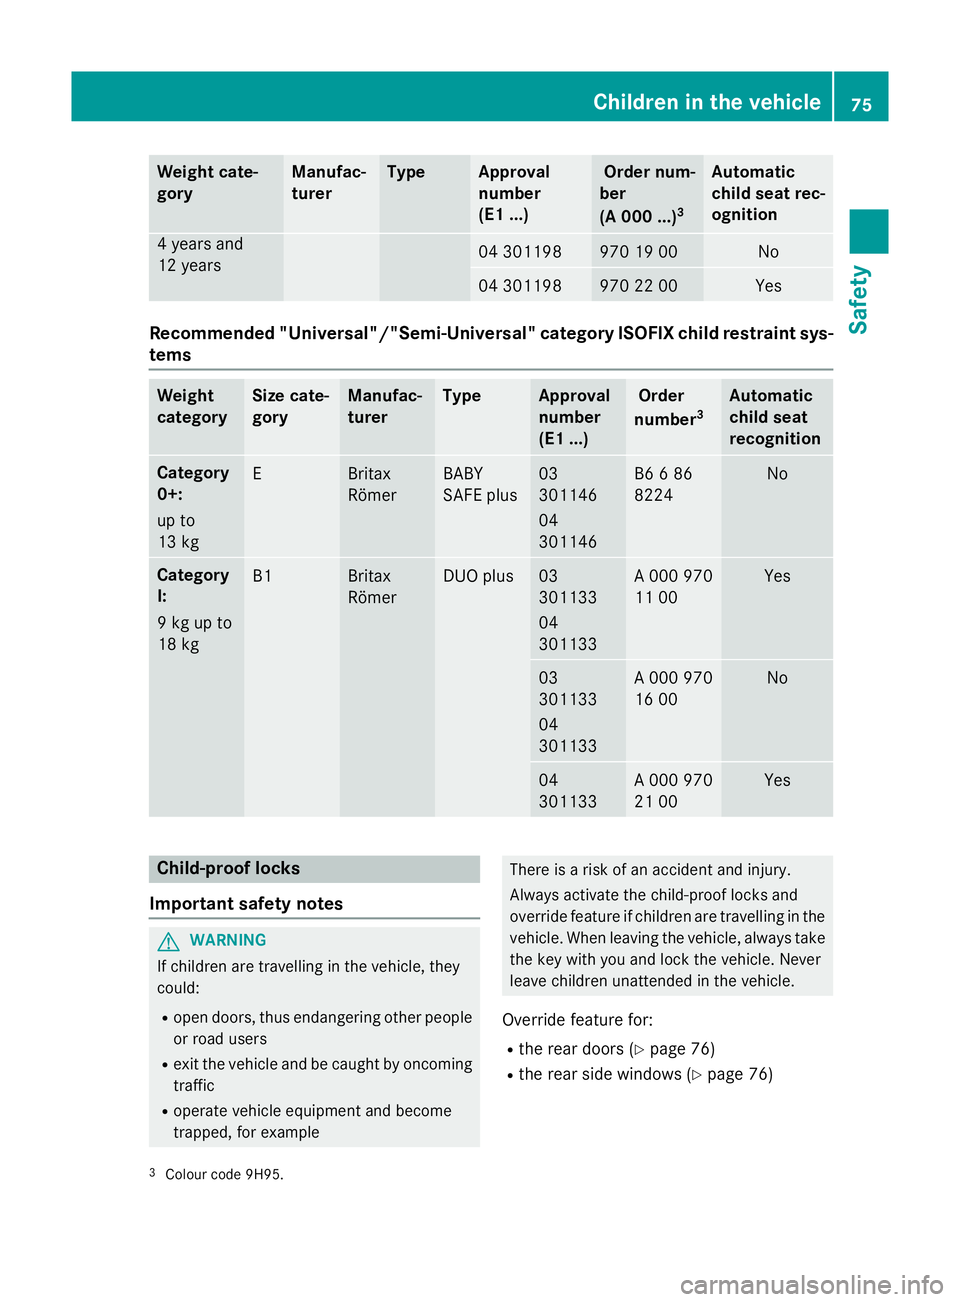
Weight cate-
gory Manufac-
turer Type Approval
number
(E1 ...) Order num-
ber
(A 000 ...) 3 Automatic
chil
dseat rec-
ognition 4y
ears and
12 years 04 301198 970 19 00 No
04 301198 970 22 00 Yes
Recommended "Universal"/"Semi-Universal" category ISOFIXc
hildr estraint sys-
tems Weight
category Size cate-
gory Manufac-
turer Type Approval
number
(E1 ...) Order
number 3 Automatic
chil
dseat
recognition Category
0+:
up to
13 kg
E Britax
Römer BABY
SAFE plus 03
301146
04
301146 B6
686
8224 No
Category
I:
9kgupto
18 kg
B1 Britax
Römer DUO plus 03
301133
04
301133 A0
00 970
11 00 Yes
03
301133
04
301133 A0
00 970
16 00 No
04
301133 A0
00 970
21 00 Yes
Child-proof locks
Important safety notes G
WARNING
If children are travelling in the vehicle, they
could:
R open doors, thus endangering other people
or road users
R exit the vehicl eand be caught by oncoming
traffic
R operate vehicl eequipment and become
trapped, for example There is
arisk of an accident and injury.
Always activate the child-proof locks and
override feature if children are travelling in the vehicle. When leaving the vehicle, alwayst ake
the key with you and lock the vehicle. Never
leave children unattende dinthe vehicle.
Overrid efeature for:
R the rear doors (Y page76)
R the rear side windows (Y page76)
3 Colour code 9H95. Children in the vehicle
75Safety Z
Page 269 of 497
Activatin
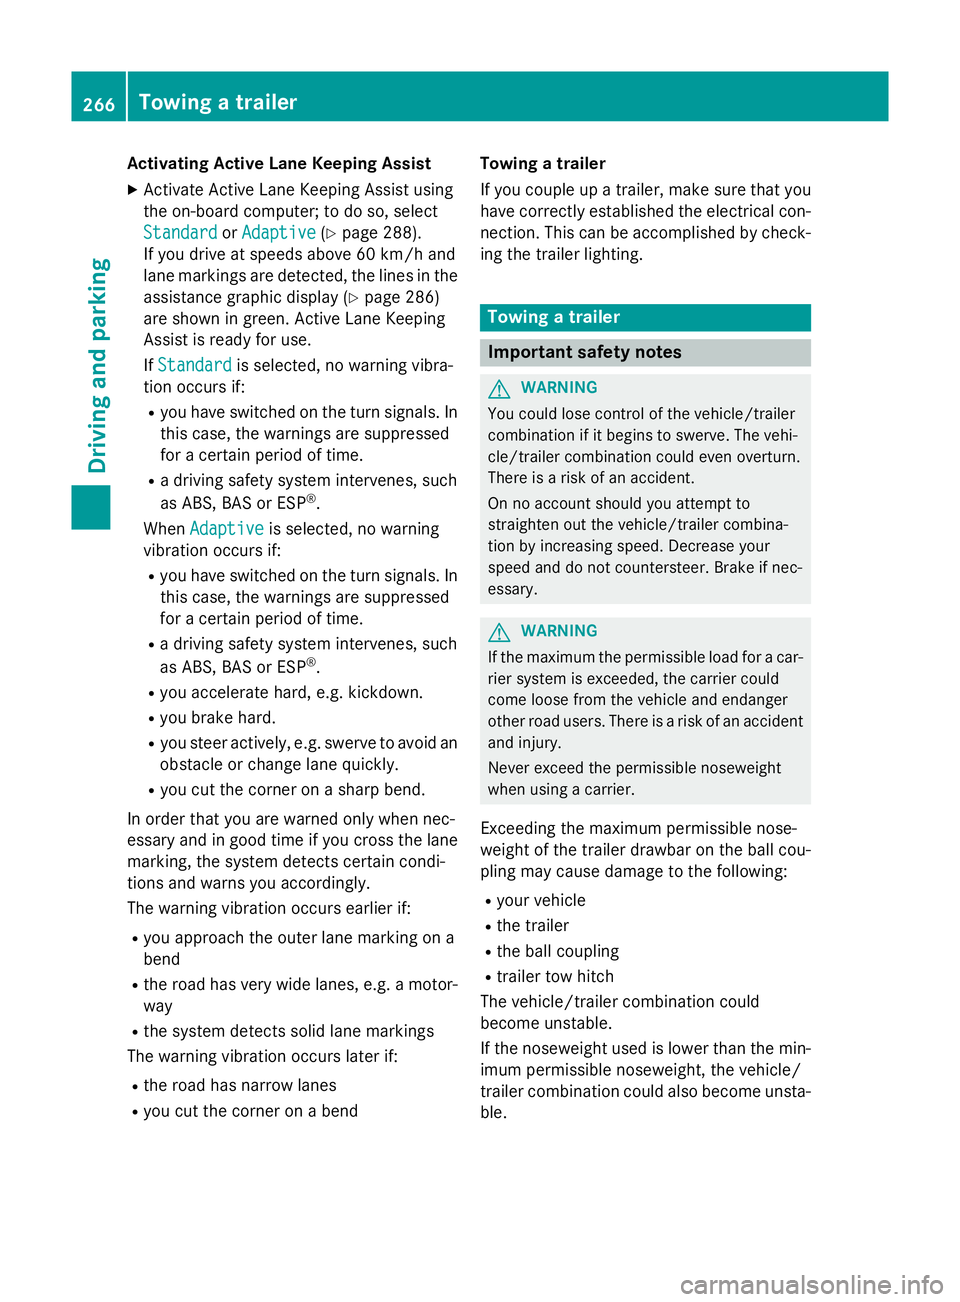
gActive Lane Keeping Assist
X Activat eActiv eLaneK eepin gAssist using
th eo n-bo ard computer; to do so, select
Standard
Standard orAdaptive
Adaptive (Ypage 288).
If you driv eatspeeds abov e60km/ hand
lane markings are detected, th elines in the
assistance graphic display (Y page 286)
are shown in green .ActiveL aneK eeping
Assist is read yfor use.
If Standard
Standard is selected, no warning vibra-
tion occur sif:
R you have switched on th eturns ignals. In
this case, th ewarning sare suppressed
for acertai nperiod of time.
R ad riving safet ysystem intervenes, such
as ABS, BA SorESP®
.
When Adaptive
Adaptive is selected, no warning
vibration occur sif:
R you have switched on th eturns ignals. In
this case, th ewarning sare suppressed
for acertai nperiod of time.
R ad riving safet ysystem intervenes, such
as ABS, BA SorESP®
.
R you accelerate hard ,e.g.k ickdown.
R you brak ehard.
R you steer actively, e.g. swerve to avoi dan
obstacle or chang elane quickly.
R you cut th ecorner onashar pbend.
In order that you are warned only when nec-
essary and in good time if you cross th elane
marking, th esystem detect scertai ncondi-
tion sand warn syou accordingly.
The warning vibration occur searlier if:
R you approac hthe outer lane markin gona
bend
R ther oad has ver ywide lanes, e.g. amotor-
way
R thes ystem detect ssolid lane markings
The warning vibration occur slater if:
R ther oad has narrow lanes
R you cut th ecorner onabend Towing
atrailer
If you couple up atrailer ,makes ure that you
have correctly established th eelectrical con-
nection .This can be accomplished by check-
ing th etrailer lighting. Towin
gatrailer Important safety notes
G
WARNING
You could lose control of th evehicle/trailer
combination if it begins to swerve. The vehi-
cle/traile rcom bination could eve noverturn.
Ther eisar iskofana ccident.
On no accoun tshould you attemp tto
straighten out th evehicle/traile rcom bina-
tio nbyi ncreasing speed. Decrease your
spee dand do no tcountersteer. Brake if nec-
essary. G
WARNING
If th emaximum th epermissible load for acar-
rier system is exceeded, th ecarrier could
come loos efromt hevehicl eand endanger
other road users. Ther eisariskofana ccident
and injury.
Never excee dthe permissible noseweight
when usin gacarrier.
Exceedin gthe maximum permissible nose-
weigh tofthetrailer drawbar on th eball cou-
plin gm ay caus edamag etothefollowing:
R your vehicle
R thet railer
R theb all coupling
R trailer to whitch
The vehicle/traile rcom bination could
become unstable.
If th enoseweight used is lower than th emin-
imum permissible noseweight ,the vehicle/
trailer combination could also become unsta- ble. 266
Towin
gatrailerDriving and pa rking
Page 270 of 497
To avoid hazardous situations:
R make sure to check the noseweight before
each journey
R use adrawbar noseweight as close as pos-
sible to the maximum noseweight
R do not exceed the maximum permissible
noseweight
R do not use anoseweight lower than the
minimum noseweight
When reversin gthe vehicle towards the
trailer, make sure there is nobody between
the trailer and the vehicle.
Couple and uncouple the trailer carefully. If
you do not couple the trailer to the towing
vehicle correctly, the trailer could become
detached.
Make sure that the following values are not
exceeded:
R the permissible trailer drawbar noseweight
R the permissible trailer load
R the permissible rear axle load of the towing
vehicle
R the maximum permissible gross vehicle
weight of both the towing vehicle and the
trailer
You will find the applicable permissible val-
ues, which must not be exceeded, in the vehi-
cle documents.
You will find the values approved by the man- ufacturer on the vehicle identification plates
and those for the towing vehicle under "Tech-
nical data" (Y page 484).
When towing atrailer, your vehicle's handling
characteristics will be different in comparison to when driving without atrailer.
The vehicle/trailer combination:
R is heavier
R is restricted in its acceleration and gradi-
ent-climbin gcapability
R has an increased braking distance
R is affected more by stron gcrosswinds
R demands more sensitive steering
R has alarger turnin gcircle This can impair the vehicle's handling char-
acteristics. Adapt your driving style accord-
ingly. Maintain
asafe distance. Drive care-
fully.
When towing atrailer, alway sadjust your
speed to the curren troad and weather con-
ditions. Do not exceed the maximum permis- sible speed for your vehicle/trailer combina-
tion. Notes on towing
atrailer
General notes Trailer towing is not permissible on the fol-
lowing models:
R E2 20 BlueTEC BlueEFFICIENCY Edition
R E1 80
R E63A MG
R E63A MG S-MODEL
R E63A MG 4MATIC
R E63A MG S-MODEL4 MATIC
i When towing
atrailer, set the tyre pres-
sure on the rear axle of the towing vehicle
for am aximum load; see the tyre pressure
table in the fuel filler flap (Y page 420).
Please notet hat when towing atrailer,
PARKTRONIC (Y page 235), Active Parking
Assist (Y page 239) and Blind Spot Assist
(Y page 257) are only available with limita-
tions, or not at all.
i On vehicles without level control, the
height of the ball coupling will alter accord-
ing to the load placed on the vehicle. If nec- essary, use atrailer with aheight-adjusta-
ble drawbar.
You will find fitting dimensions and loads
under "Technical data" (Y page 482).
Driving tips i
Observe the notes on ESP ®
trailer stabi-
lisation (Y page 86). Towing
atrailer
267Driving and parking Z
Page 345 of 497
Useful information
i This Owner's Manual describes all mod-
els, series and optional equipment for your
vehicle that were available at the time of
going to press. National variation sare pos-
sible. Not ethat your vehicle may not be
equipped with all of the function sdescri-
bed. This is also the case for system sand
function srelevan ttosafety.
i Read the information on qualified special-
ist workshops: (Y page 27). Stowage areas
Loading guidelines
G
WARNING
If objects, luggage or loads are not secured or not secured sufficiently, they could slip, tip
over or be flung around and thereby hit vehicle
occupants .There is arisk of injury, especially
when brakin gorabruptly changing directions.
Always stor eobjects so that they cannot be
flung around. Secure objects, luggage or
loads against slipping or tippin gbefore the
journey. G
WARNING
Combustion engines emit poisonous exhaust
gases such as carbon monoxide. Exhaust
gases can enter the vehicle interior if the boot
lid/tailgat eisopen when the engin eisrun-
ning, especially if the vehicle is in motion.
There is arisk of poisoning.
Always switc hoff the engin ebefore opening
the boot lid/tailgate. Never drive with the
boot lid/tailgat eopen. G
WARNING
The exhaust tail pipe and tail pipe trim can
becom every hot. If you come int ocontact
with thes eparts of the vehicle, you could burn
yourself. There is arisk of injury. Always be particularly careful around the
exhaust tail pipe and the tail pipe trim .Allow
thes ecomponents to cool down before touch-
ing them.
The handling characteristic sofaladen vehi-
cle are dependen tonthe distribution of the
load within the vehicle. For this reason ,you
should observ ethe following notes when
transporting aload:
R neve rexceed the maximum permissible
gross vehicle weight or the permissible axle loads for the vehicle (includin goccupants).
R the boot/luggage compartment is the pre-
ferred place to stor eobjects.
R position heavy loads as far forwards as pos-
sible and as low down in the boot/luggagecompartment as possible.
R the load must not protrude above the upper
edge of the seat backrests.
R always place the load against the rear or
fron tseat backrests .Make sure that the
seat backrests are securely locked into
place.
R always place the load behind unoccupied
seats if possible.
R use the lashing eyelets and the luggage
net stot ransport loads and luggage.
R only use lashing eyelets and fastenin gcom-
ponents that are suitable for the weight and size of the load.
R when transporting objects in the luggage
compartment,t he combined luggage cover
and net must always be installed (luggage
compartment cove rand safet ynet).
R secure the load with sufficiently strong and
wear-resistan tlashing material. Pad sharp
edges for protection.
i Load restraint
sare available at any quali-
fied specialist workshop, e.g. aMercedes-
Ben zService Centre. 342
Stowage areasStowing and features
Page 359 of 497
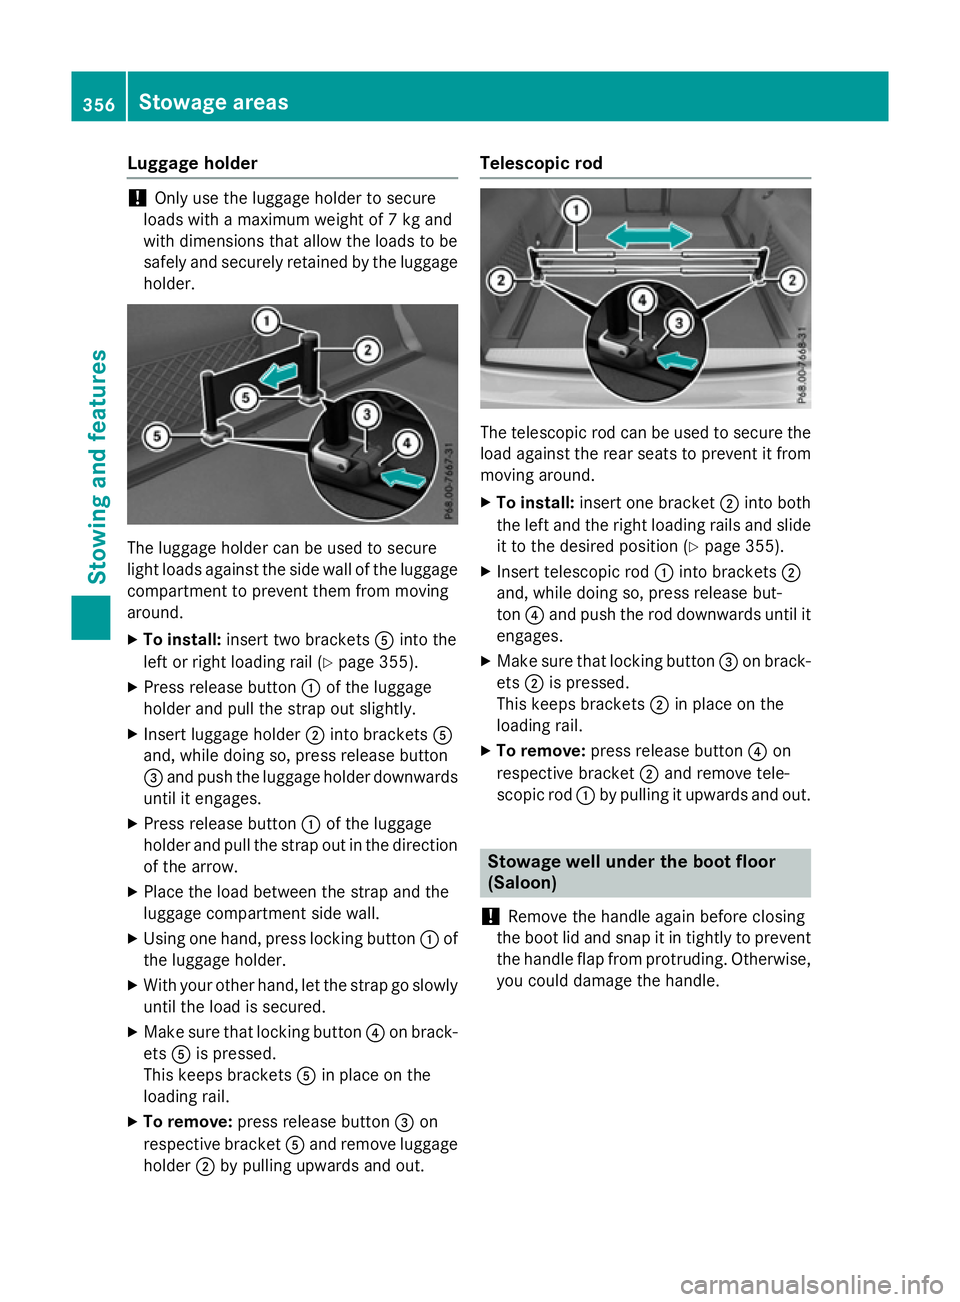
Luggage holder
!
Only use th
eluggage holde rtosecure
loads with amaximum weight of 7kgand
with dimension sthata llow th eloads to be
safely and securely retained by th eluggage
holder. The luggage holde
rcan be used to secure
light loads against th eside wall of th eluggage
compartmen ttoprevent them from moving
around.
X To install: insert two brackets Aintot he
left or righ tloadin grail (Y page 355).
X Pres sreleas ebutton :of th eluggage
holde rand pull th estrap out slightly.
X Inser tluggage holder ;intob rackets A
and, while doin gso, pres sreleas ebutton
= and push th eluggage holde rdownwards
until it engages.
X Pres sreleas ebutton :of th eluggage
holde rand pull th estrap out in th edirection
of th earrow.
X Place th eload between th estrap and the
luggage compartmen tside wall.
X Usin gone hand, pres slocking button :of
th el uggage holder.
X Wit hyour other hand, let th estrap go slowly
until th eload is secured.
X Mak esure that locking button ?on brack-
ets Ais pressed.
This keeps brackets Ain place on the
loadin grail.
X To remove: pressreleas ebutton =on
respectiv ebracket Aand remove luggage
holder ;by pullin gupwards and out. Telescopic rod
The telescopic rod can be used to secure the
load agains tthe rear seat stoprevent it from
moving around.
X To install: insert onebracket ;intob oth
th el eft and th erigh tloadin grails and slide
it to th edesired position (Y page 355).
X Inser ttelescopic rod :intob rackets ;
and, while doin gso, pres sreleas ebut-
ton ?and push th erod downwards until it
engages.
X Mak esure that locking button =on brack-
ets ;is pressed.
This keeps brackets ;in place on the
loadin grail.
X To remove: pressreleas ebutton ?on
respectiv ebracket ;and remove tele-
scopic rod :by pullin gitupwards and out. Stowage well under th
eboot floor
(Saloon)
! Remov
ethe handle again before closing
th eb oot lid and snap it in tightly to prevent
th eh andle flap from protruding. Otherwise,
you could damage th ehandle. 356
Stowage areasStowing and features
Page 364 of 497
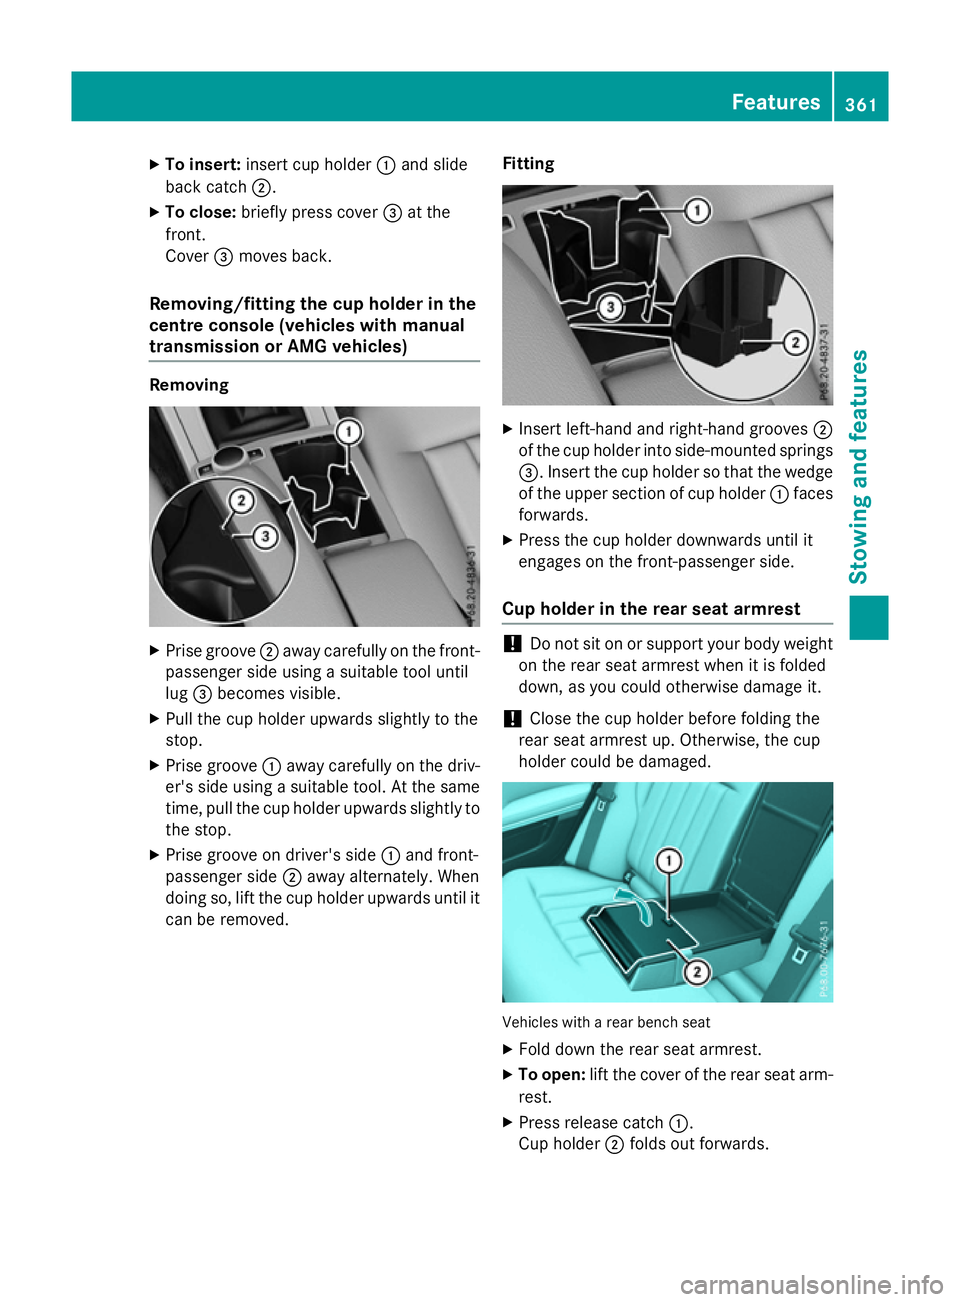
X
To insert: insert cup holder :and slide
back catch ;.
X To close: brieflypress cover =at the
front.
Cover =moves back.
Removing/fitting the cu pholder in the
centre consol e(vehicles with manual
transmission or AM Gvehicles) Removing
X
Prise groove ;away carefull yonthe front-
passenge rsideu sing asuitabl etool until
lug =become svisible.
X Pull the cup holde rupwar ds slightl ytothe
stop.
X Prise groove :away carefull yonthe driv-
er' ss ideu sing asuitabl etool .Att he same
time ,pullthe cup holde rupwar ds slightl yto
the stop.
X Prise groove on driver's side :and front-
passenge rside ;away alternately. When
doing so, lift the cup holde rupwar ds unti lit
can be removed. Fitting X
Insert left-hand and right-hand grooves ;
of the cup holde rinto side-mounted springs
=.I nsert the cup holde rsothatthe wedge
of the uppe rsectio nofc up holder :faces
forwards.
X Press the cup holde rdow nwards unti lit
engages on the front-passenger side.
Cu ph older in the rear seat armrest !
Do not si
tonorsupport your body weight
on the rea rseata rm rest when it is folded
down, as yo ucould otherwise damage it.
! Close the cup holde
rbefore folding the
rea rseata rm rest up .Otherwise, the cup
holde rcould be damaged. Vehicles with
arearb ench seat
X Fol dd ownthe rea rseata rm rest.
X To open: lift the cove rofthe rea rsea ta rm-
rest.
X Press release catch :.
Cu ph older ;folds ou tforwards. Features
361Stowing an dfeatures Z
Page 410 of 497
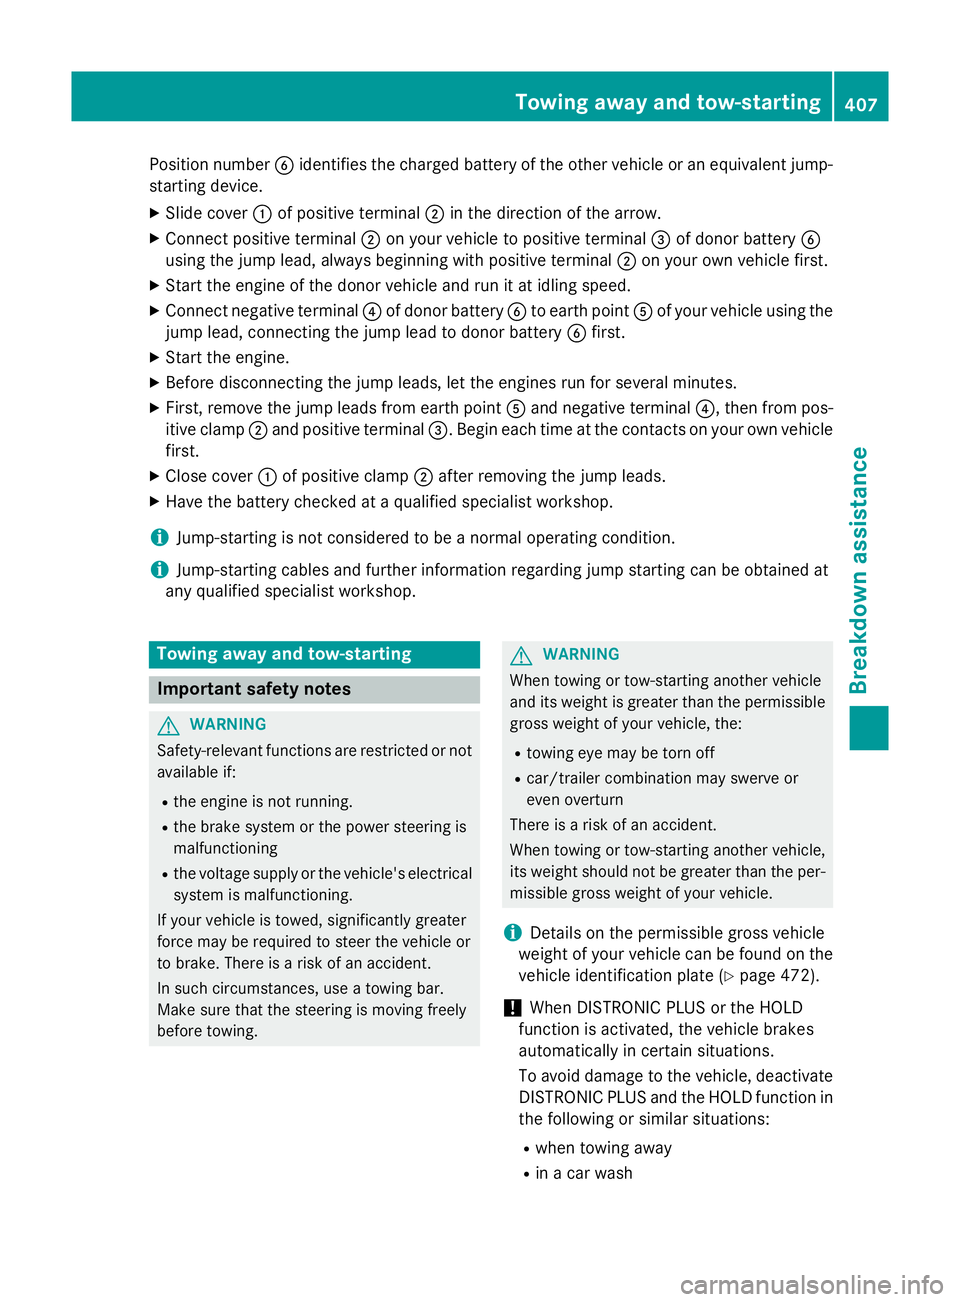
Position number
Bidentifies the charged batter yofthe other vehicle or an equivalent jump-
starting device.
X Slide cover :of positive terminal ;in the direction of the arrow.
X Connec tpositive terminal ;on your vehicle to positive terminal =of donor battery B
using the jump lead, alway sbeginnin gwith positive terminal ;on your own vehicle first.
X Start the engine of the donor vehicle and run it at idling speed.
X Connec tnegative terminal ?of donor battery Bto earth point Aof your vehicle using the
jump lead, connectin gthe jump lead to donor battery Bfirst.
X Start the engine.
X Before disconnectin gthe jump leads, let the engines run for several minutes.
X First ,remove the jump leads from earth point Aand negative terminal ?,then from pos-
itive clamp ;and positive terminal =.Begin each time at the contacts on your own vehicle
first.
X Close cover :of positive clamp ;after removin gthe jump leads.
X Have the batter ychecked at aqualified specialist workshop.
i Jump-starting is not considered to be
anormal operating condition.
i Jump-starting cables and further information regarding jump starting can be obtained at
any qualified specialist workshop. Towing away and tow-starting
Important safety notes
G
WARNING
Safety-relevant functions are restricted or not
availabl eif:
R the engine is not running.
R the brake system or the power steerin gis
malfunctioning
R the voltage supply or the vehicle's electrical
system is malfunctioning.
If your vehicle is towed, significantly greater
force may be required to steer the vehicle or
to brake. There is arisk of an accident.
In such circumstances, use atowing bar.
Make sure that the steerin gismoving freely
before towing. G
WARNING
When towing or tow-starting another vehicle
and its weight is greater than the permissible gross weight of your vehicle, the:
R towing eye may be torn off
R car/trailer combination may swerve or
even overturn
There is arisk of an accident.
When towing or tow-starting another vehicle,
its weight should not be greater than the per- missible gross weight of your vehicle.
i Details on the permissible gross vehicle
weight of your vehicle can be found on the
vehicle identification plate (Y page 472).
! When DISTRONIC PLUS or the HOLD
function is activated, the vehicle brakes
automatically in certain situations.
To avoid damage to the vehicle, deactivate
DISTRONIC PLUS and the HOLD function in the following or similar situations:
R when towing away
R in ac ar wash Towing away and tow-starting
407Breakdown assistance Z
Page 411 of 497
!
Only secure the tow cable or tow bar to
the towing eyes or, if available,tot he trailer
tow hitch. You could otherwise damage the
vehicle.
! Observe the following points when towing
with atow rope:
R Secure the tow rope on the same side on
both vehicles.
R Make sure that the tow rope is not longer
than legally permitted. Mark the tow rope
in the middle, e.g. with awhite cloth
(30 x30c m).This will make other road
users aware that avehicle is being
towed.
R Only secure the tow cable to the towing
eyes or, if available,tot he trailer tow
hitch.
R Observe the brake lamps of the towing
vehicle while driving. Alwaysm aintain a
distance adistance so that the tow rope
does not sag.
R Do not use steel cables or chains to tow
your vehicle. You could otherwise dam-
age the vehicle.
! Do not use the towing eye for recovery,
this could damage the vehicle. If in doubt,
recover the vehicle with acrane.
! Pull aways
moothly when towing awayor
tow-starting avehicle. If the tractive power
is too high, the vehicles could be damaged.
! To tow vehicles with KEYLESS-GO, use
the key instead of the Start/Stop button.
The automatic transmission may otherwise switch to position Pwhen you open the
driver's or front-passenger door which
could damage the transmission.
! You may tow the vehicle for
amaximum of
50km. Atowing speed of 50 km/h must not
be exceeded.
For towing distances over 50 km, the entire
vehicle must be lifted up and transported.
! If you tow or tow-start another vehicle, its
weight must not exceed the maximum per- missible gross vehicle weight of your vehi-
cle.
HYBRID vehicles :make sure that you read
the "HYBRID" Supplement included in the
vehicle literature. You could otherwise fail to
recognise dangers, e.g. due to high voltage.
Observe the legal requirements for the rele-
vant countries when towing and tow-starting.
It is better to have the vehicle transported
than to have it towed.
If the vehicle has suffered transmission dam- age, have it transported on atransporter or
trailer.
When towing awayav ehicle with an auto-
matic transmission, the transmission must be
in position N.
The battery must be connected and charged.
Otherwise, you:
R cannot turn the key to position 2in the
ignition lock
R cannot shift the transmission to position N
on vehicles with automatic transmission
In the event of damage to the electrical
system
If the battery is defective, the automatic
transmission will be locked in position P.To
shift the automatic transmission to position
N,y ou must provide power to the vehicle's
electrical system in the same way as when
jump-starting (Y page 405).
Have the vehicle transported on atransporter
or trailer.
i Deactivate the automatic locking feature
before the vehicle is towed away
(Y page 102). You could otherwise be
locked out when pushing or towing the
vehicle.
i Deactivate tow-away protection before
the vehicle is towed away( Ypage 90).408
Towing away and tow-startingBreakdown assistance