2015 MERCEDES-BENZ E-CLASS ESTATE height
[x] Cancel search: heightPage 128 of 497
?
Sea tfore-and-aft adjustment
A Backrest angle
i Vehicles with memory function: if PRE-
SAFE ®
is activate dand the front-passenger
sea tisinanu nfavourable position, it is
move dtoab etter position.
i Yo
uc an store the sea tsettings using the
memory function (Y page 139).
i Vehicles with the through-loading feature
and memory function: if yo ufoldd owna
rea rseatb ackrest, the respective front
sea tism ovedforward sslightl yifneces-
sary.
i Vehicles with memory function: when the
sea tism ovedforward sorbackwards ,the
headrest is move dupordowna utomati-
cally. Adjustin
gthe hea drestraints
Important safety notes G
WARNING
Yo uc ould lose contro lofthe vehicl ewhile
driving if you:
R adjus tthe driver' sseat, steering wheel or
mirrors
R fasten the sea tbelt
There is ariskofana ccident.
Adjust the driver' sseat, hea drestraint, steer-
ing wheel and mirrors and fasten your seat
belt before starting the engine. G
WARNING
The hea drestraints canno tprovid ethe inten-
de dp rotectio nunless they are fitte dand
adjusted correctly .There is an increased risk
of injury to the hea dand neck in the event of
an accident or sudden braking, for example.
Alway sdrive with the hea drestraints fitted.
Ensur ethatthe centre of the hea drestraints
support the back of each vehicl eoccupant's
hea date yelevel before driving off. Do not interchange the hea
drestraints of the
front and rea rseats. Otherwise, yo uwilln ot
be able to adjus tthe height and angle of the
hea drestraints to the correct position.
Adjust the hea drestraint fore-and-aft posi-
tion so tha titisasc lose as possible to the
back of your head.
Observe the important safety notes regarding the seats (Y page 123).
Adjustin gthe hea drestraints manually Adjustin
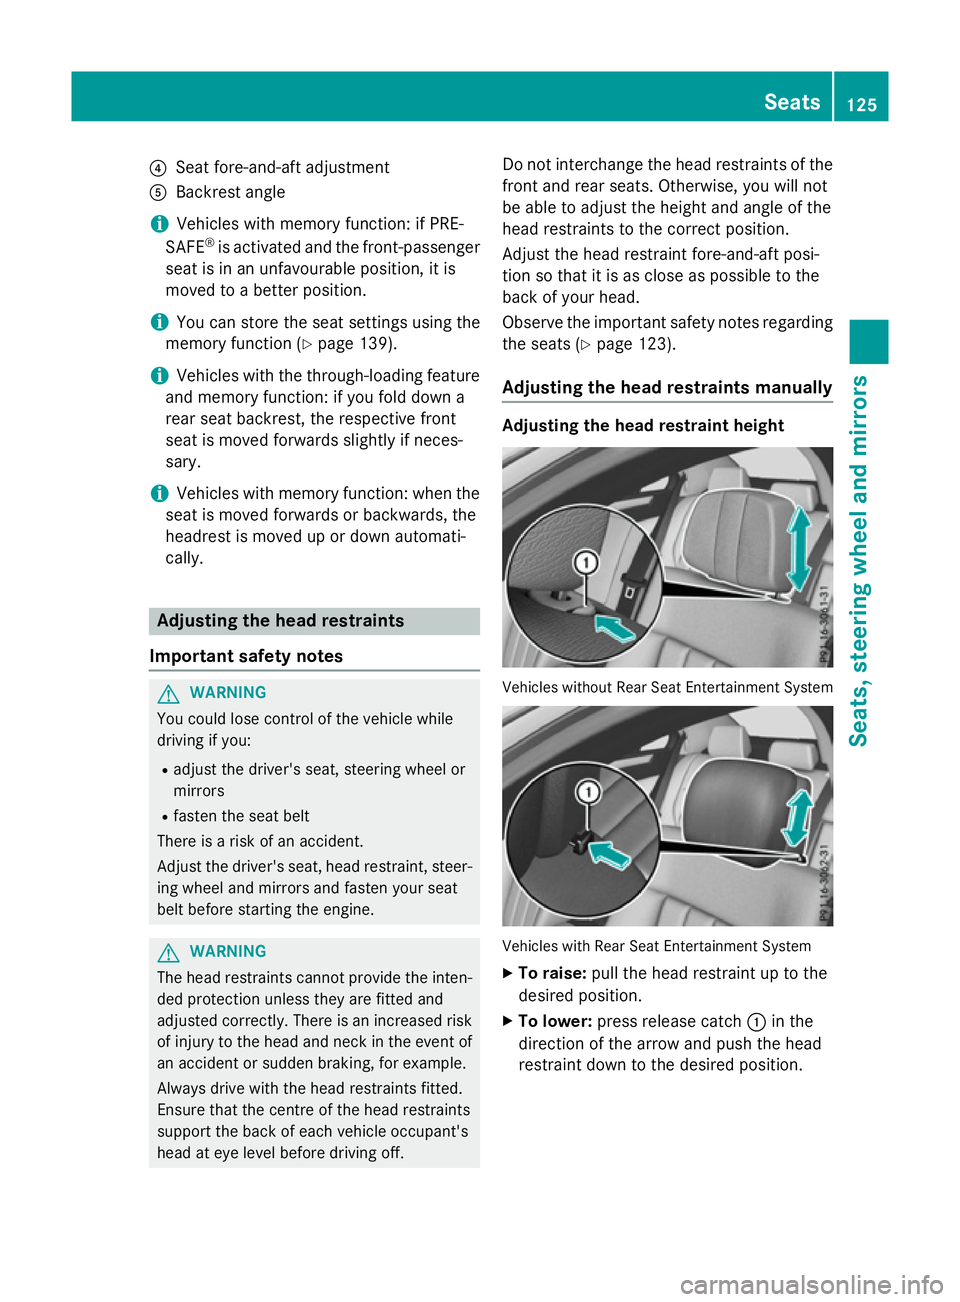
gthe hea drestrain theight Vehicles withou
tRearS eatE ntertainment System Vehicles with Rear Sea
tEntertainment System
X To raise: pull the hea drestraint up to the
desired position.
X To lower: press release catch :in the
direction of the arrow and push the head
restraint dow ntothe desired position. Seats
125Seats, steering whee land mirrors Z
Page 129 of 497
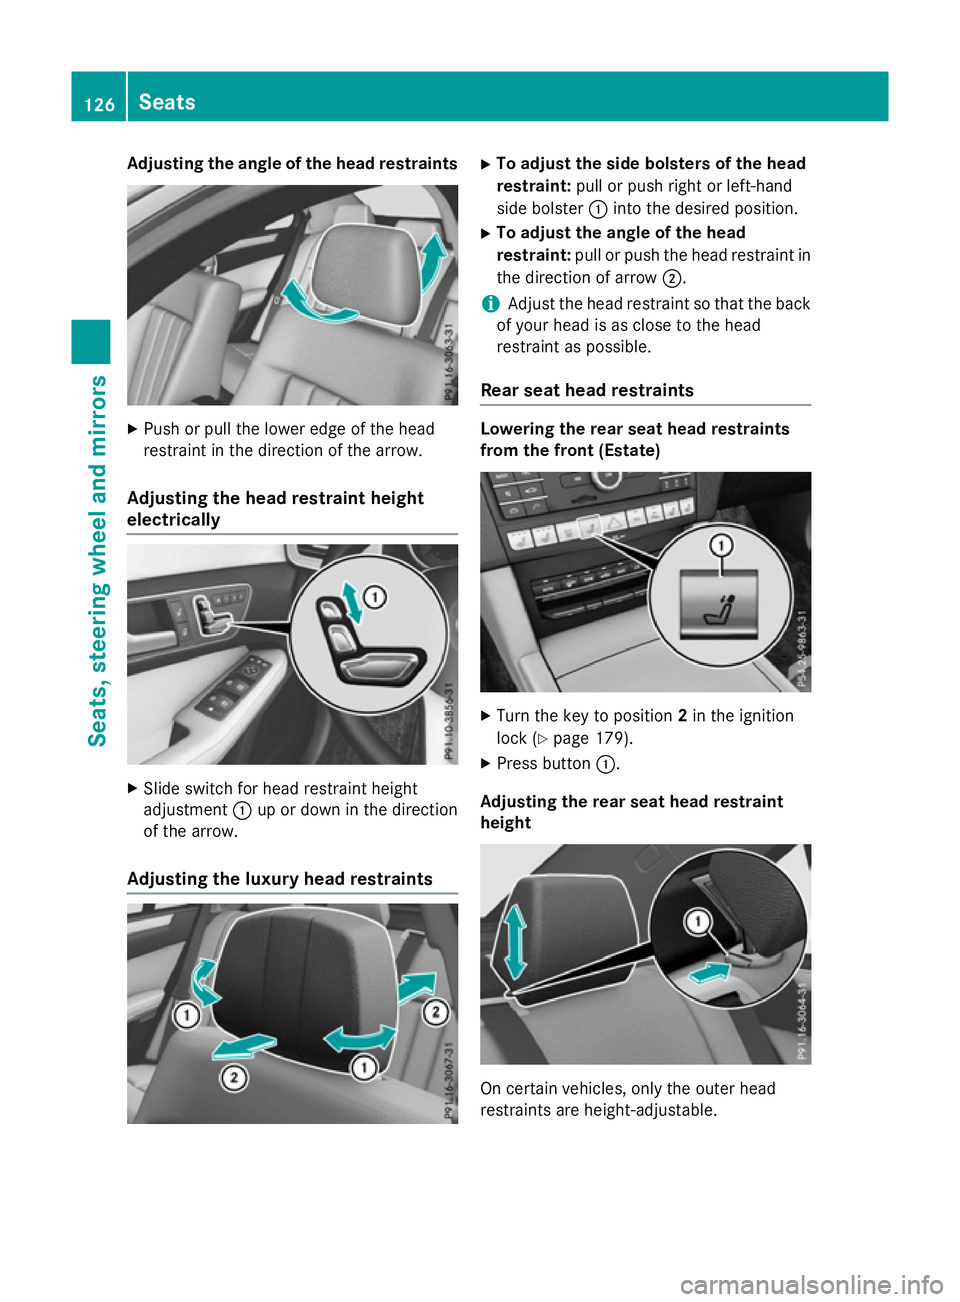
Adjusting th
eangle of th eheadr estraints X
Push or pull th elower edge of th ehead
restraint in th edirection of th earrow.
Adjusting th eheadr estrain theight
electrically X
Slide switch for head restraint height
adjustment :up or down in th edirection
of th earrow.
Adjusting th eluxur yheadr estraints X
To adjust th esideb olsters of th ehead
restraint: pull or push right or left-hand
side bolster :intot he desired position.
X To adjust th eangle of th ehead
restraint: pull or push th ehead restraint in
th ed irection of arrow ;.
i Adjus
tthe head restraint so that th eback
of your head is as close to th ehead
restraint as possible.
Rea rseat hea drestraints Lowering th
erears eat hea drestraints
from th efront (Estate) X
Turn th ekeyto position 2in th eignition
loc k(Ypage 179).
X Press button :.
Adjusting th erears eat hea drestraint
height On certai
nvehicles, only th eouter head
restraint sare height-adjustable. 126
SeatsSeats, steering wheel and
mirrors
Page 130 of 497
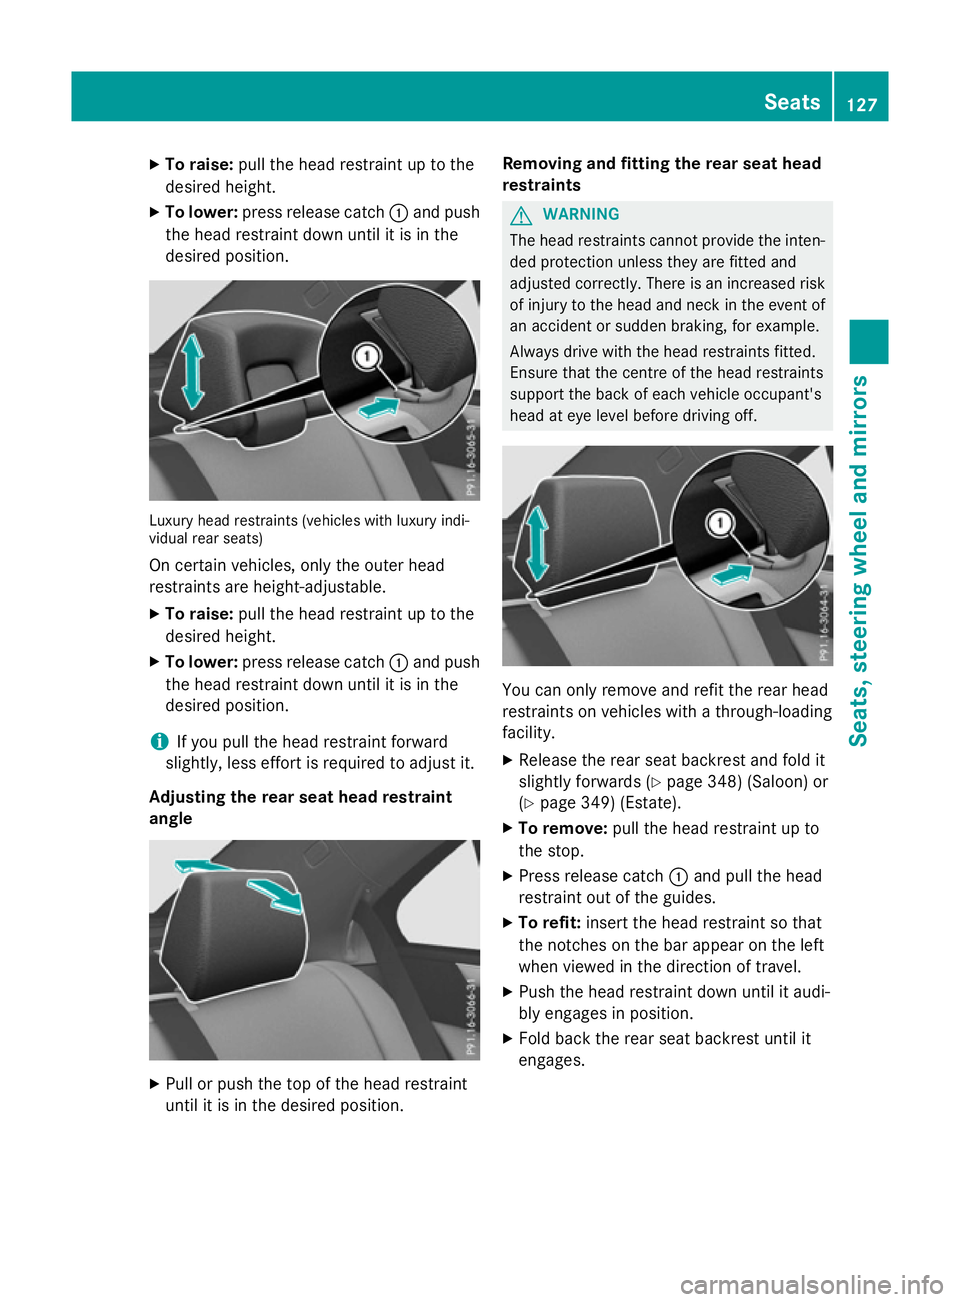
X
To raise: pull the hea drestraint up to the
desired height.
X To lower: press release catch :and push
the hea drestraint down unti litisinthe
desired position. Luxur
yheadr estraints (vehicle swithl uxuryi ndi-
vidua lrea rs eats)
On certain vehicles, onl ythe outer head
restraints ar eheight-adjustable.
X To raise: pull the hea drestraint up to the
desired height.
X To lower: press release catch :and push
the hea drestraint down unti litisinthe
desired position.
i If yo
upullt he hea drestraint forward
slightly, less effort is required to adjus tit.
Adjusting the rear seat hea drestraint
angle X
Pull or push the top of the hea drestraint
unti litisint he desired position. Removing and fitting the rear seat head
restraints G
WARNING
The hea drestraints canno tprovid ethe inten-
de dp rotection unless they ar efitte dand
adjusted correctly. There is an increased risk of injury to the hea dand neck in the event of
an accident or sudden braking ,for example.
Alway sdrive with the hea drestraints fitted.
Ensure tha tthe centre of the hea drestraints
support the back of each vehicl eoccupant's
hea date yelevel before driving off. Yo
uc an onl yremove and refit the rea rhead
restraints on vehicles with athrough-loading
facility.
X Releas ethe rea rseatb ackres tand fol dit
slightl yforwards (Y page 348)(Saloon) or
(Y page 349 )(Estate).
X To remove: pull the headrestraint up to
the stop.
X Press release catch :and pull the head
restraint ou tofthe guides.
X To refit: insert the hea drestraint so that
the notche sonthe barappea ront he left
when viewe dinthe direction of travel.
X Push the hea drestraint down unti litaudi-
bl ye ngages in position.
X Fol db ackt he rea rseatb ackres tuntilit
engages. Seats
127Seats, steering wheel andmirrors Z
Page 136 of 497
Problems with the seat ventilation
Problem
Possible causes/consequences and
M
MSolutions The seat ventilation has
switched off prema-
turely or cannot be
switched on. The on-board voltage is too low because too many electrical con-
sumers are switched on.
X Switch off electrical consumers that you do not need, such as
the rear window heating or interior lighting.
Once the battery is sufficiently charged, the seat ventilation will
switch back on automatically. Steering wheel
Important safety notes
G
WARNING
You could lose control of the vehicle while
driving if you:
R adjust the driver's seat, steering wheel or
mirrors
R fasten the seat belt
There is arisk of an accident.
Adjust the driver's seat, head restraint ,steer-
ing wheel and mirrors and fasten your seat
belt before startingt he engine. G
WARNING
Children could become trapped by the steer-
ing wheel if they adjust it. There is arisk of
injury.
When leaving the vehicle, always take the key with you and lock the vehicle. Never leave
children unattended in the vehicle.
The electrically adjustable steering wheel can
still be adjusted when there is no key in the
ignition lock. Adjusting the steering wheel man-
ually
G
WARNING
The steering wheel may move unexpectedly if you adjust it while driving. This could cause you to lose control of the vehicle. There is a
risk of an accident.
Make sure that the steering wheel is locked
before driving off. Never unlock the steering
wheel when the vehicle is in motion.
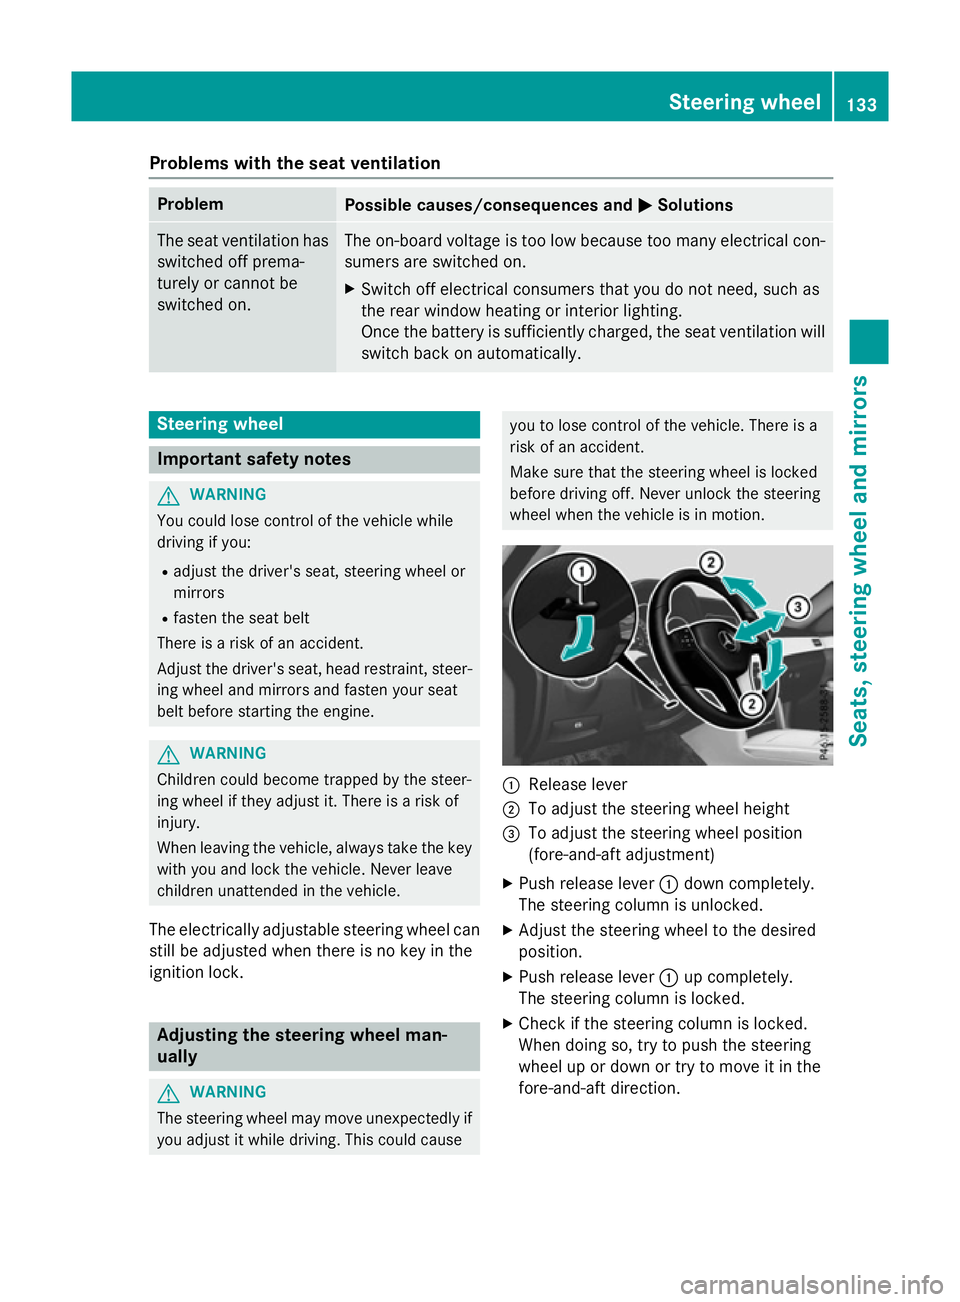
:
Release lever
; To adjust the steering wheel height
= To adjust the steering wheel position
(fore-and-aft adjustment)
X Push release lever :down completely.
The steering column is unlocked.
X Adjust the steering wheel to the desired
position.
X Push release lever :up completely.
The steering column is locked.
X Check if the steering column is locked.
When doing so, try to push the steering
wheel up or down or try to move it in the
fore-and-aft direction. Steering wheel
133Seats, steering wheela nd mirrors Z
Page 137 of 497
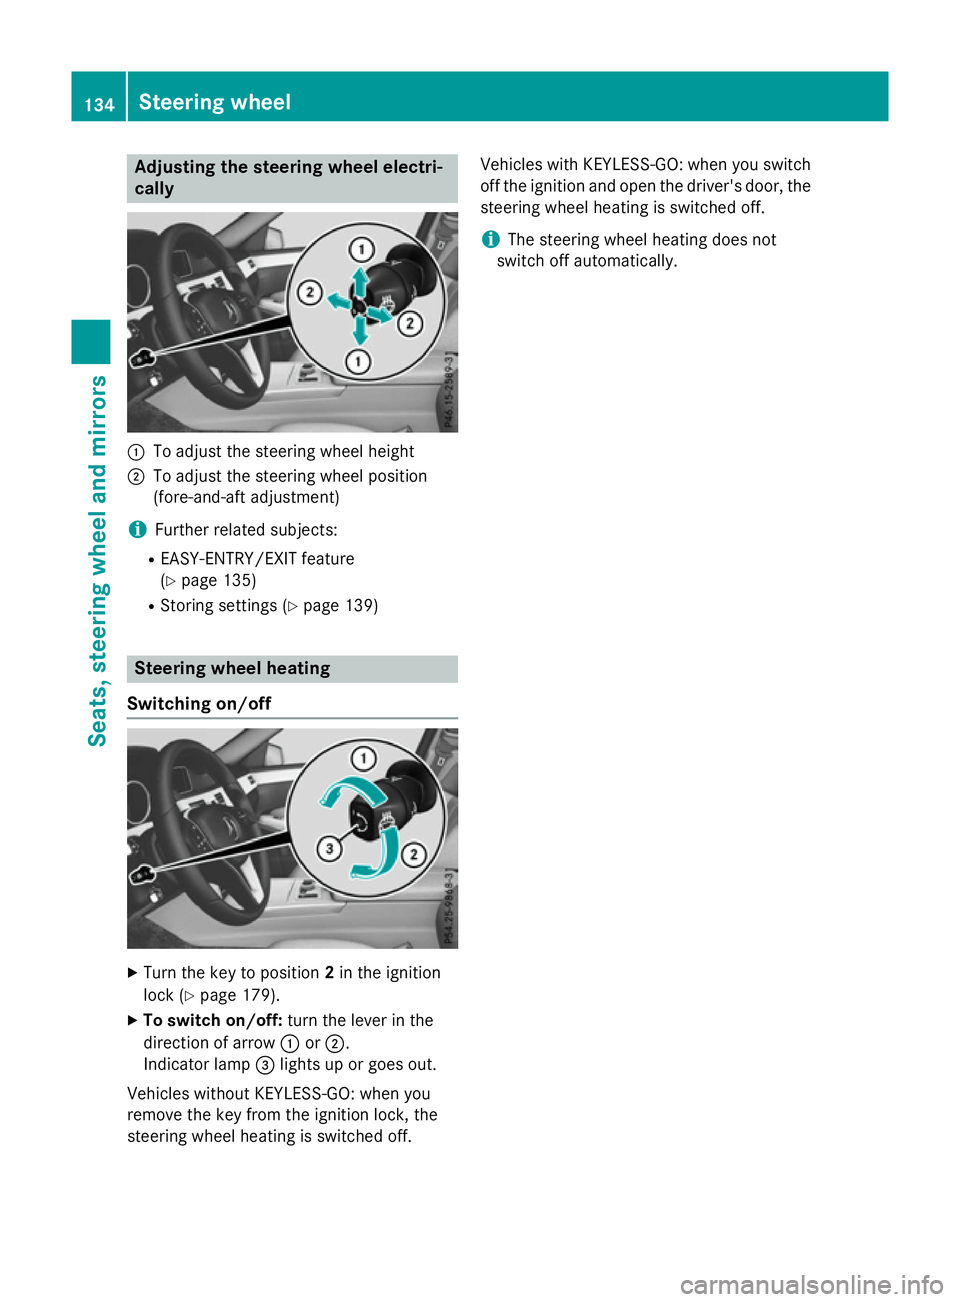
Adjusting th
esteering wheel electri-
cally :
To adjust th esteering whee lheight
; To adjust th esteering whee lposition
(fore-and-af tadjustment)
i Further relate dsubjects:
R EASY-ENTRY/EXIT feature
(Y page 135)
R Storing setting s(Ypage 139) Steering wheel heating
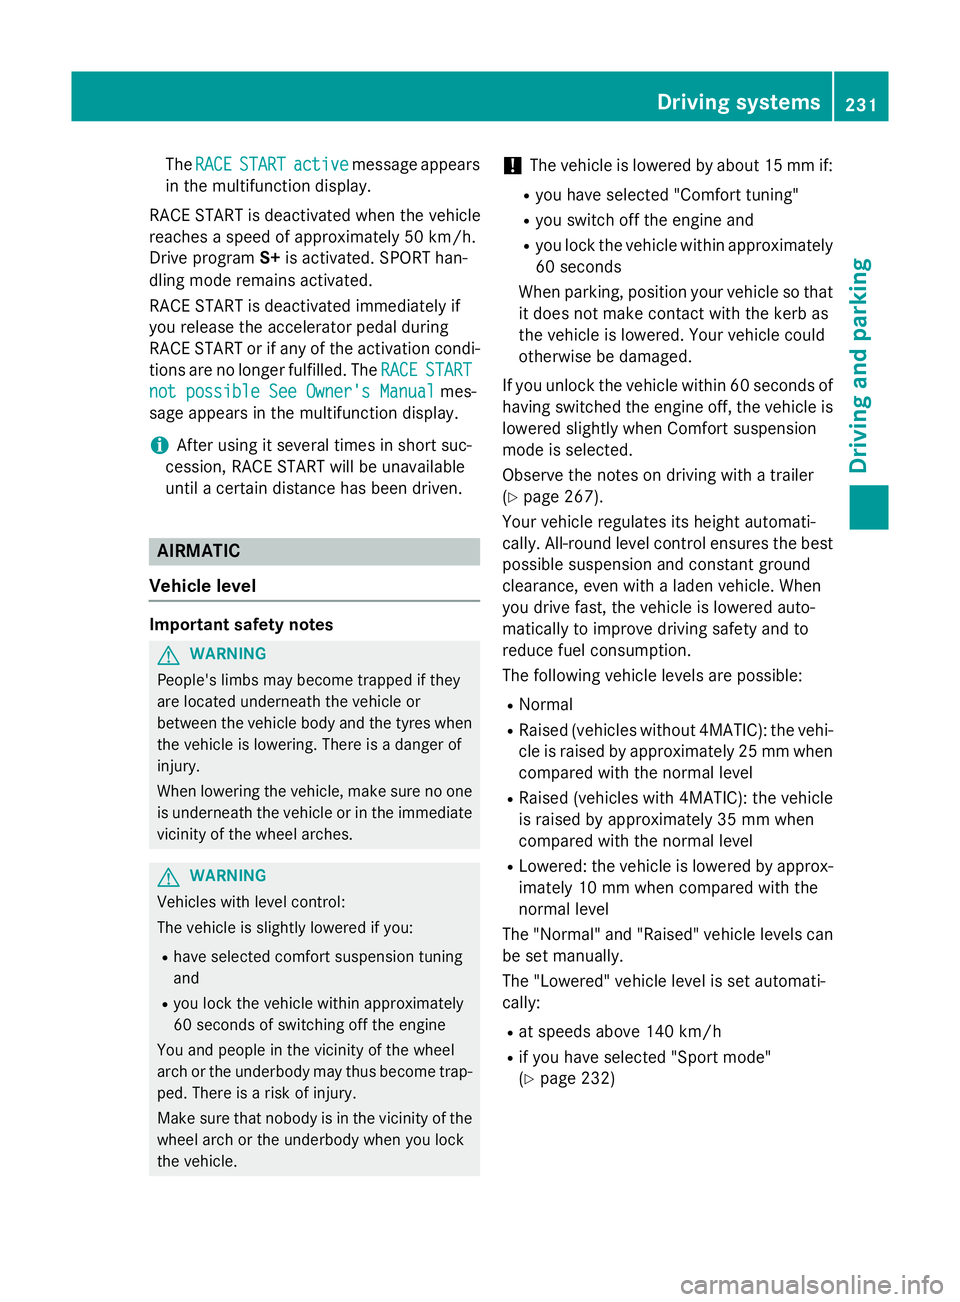
Switchin gon/off X
Turn th ekeyto position 2in th eignition
loc k(Ypage 179).
X To switch on/off: turnthe lever in the
direction of arrow :or;.
Indicato rlamp =lights up or goes out.
Vehicles without KEYLESS-GO :when you
remove th ekeyfrom th eignition lock, the
steering whee lheating is switched off. Vehicles wit
hKEYLESS-GO :when you switch
off th eignition and open th edriver' sdoor ,the
steering whee lheating is switched off.
i The steering whee
lheating does not
switch off automatically. 134
Steering wheelSeats
,steering wheel and mirrors
Page 234 of 497
The
RACE
RACE START
START active
active message appears
in the multifunction display.
RACE START is deactivated when the vehicle
reaches aspeed of approximately 50 km/h.
Drive program S+is activated. SPORT han-
dling mode remains activated.
RACE START is deactivated immediately if
you release the accelerator pedal during
RACE START or if any of the activation condi-
tions are no longer fulfilled. The RACE RACESTART
START
not possible See Owner's Manual
not possible See Owner's Manual mes-
sage appears in the multifunction display.
i After using it several times in short suc-
cession, RACE START will be unavailable
until acertain distanc ehas been driven. AIRMATIC
Vehicle level Important safety notes
G
WARNING
People's limbs may become trapped if they
are located underneat hthe vehicle or
between the vehicle body and the tyres when the vehicle is lowering. There is adanger of
injury.
When lowering the vehicle, make sure no one
is underneat hthe vehicle or in the immediate
vicinit yofthe wheel arches. G
WARNING
Vehicles with level control:
The vehicle is slightly lowered if you:
R have selected comfor tsuspension tuning
and
R you lock the vehicle within approximately
60 seconds of switchin goff the engine
You and people in the vicinit yofthe wheel
arch or the underbody may thus become trap- ped. There is arisk of injury.
Make sure that nobody is in the vicinit yofthe
wheel arch or the underbody when you lock
the vehicle. !
The vehicle is lowered by about 15 mm if:
R you have selected "Comfort tuning"
R you switch off the engine and
R you lock the vehicle within approximately
60 seconds
When parking, position your vehicle so that it does not make contact with the kerb as
the vehicle is lowered. Your vehicle could
otherwise be damaged.
If you unlock the vehicle within 60 seconds of
having switched the engine off, the vehicle is
lowered slightly when Comfort suspension
mode is selected.
Observe the notes on driving with atrailer
(Y page 267).
Your vehicle regulates its height automati-
cally. All-roun dlevel control ensures the best
possible suspension and constant ground
clearance, even with aladen vehicle. When
you drive fast, the vehicle is lowered auto-
matically to improve driving safety and to
reduce fuel consumption.
The following vehicle levels are possible:
R Normal
R Raised (vehicles without 4MATIC): the vehi-
cle is raised by approximately 25 mm when compared with the normal level
R Raised (vehicles with 4MATIC): the vehicle
is raised by approximately 35 mm when
compared with the normal level
R Lowered: the vehicle is lowered by approx-
imately 10 mm when compared with the
normal level
The "Normal" and "Raised" vehicle levels can be set manually.
The "Lowered" vehicle level is set automati-
cally:
R at speeds above 140 km/h
R if you have selected "Sport mode"
(Y page 232) Driving systems
231Driving and parking Z
Page 235 of 497
Setting the vehicle level
Select the "Normal" settingf
or normal road
surfaces and "Raised" for driving with snow
chains or on particularly poor road surfaces.
Your selection remains stored even if you
remove the key from the ignition lock.
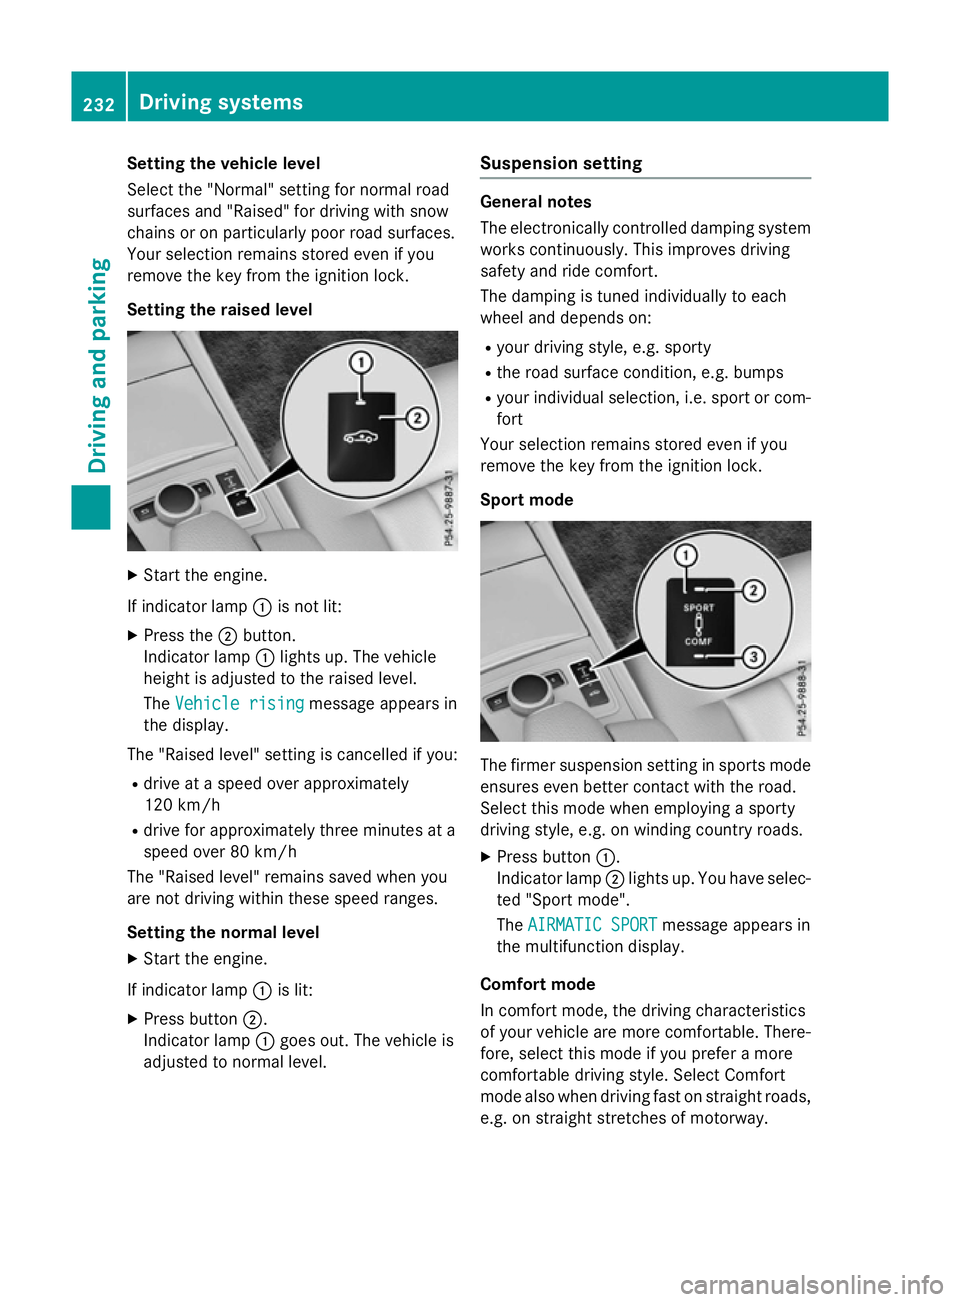
Setting the raised level X
Start the engine.
If indicator lamp :is not lit:
X Press the ;button.
Indicator lamp :lights up. The vehicle
height is adjusted to the raised level.
The Vehicle rising Vehicle rising message appears in
the display.
The "Raised level" settingisc ancelled if you:
R drive at aspeed over approximately
120 km/h
R drive for approximately three minutes at a
speed over 80 km/h
The "Raised level" remains saved when you
are not driving within these speed ranges.
Setting the normal level
X Start the engine.
If indicator lamp :is lit:
X Press button ;.
Indicator lamp :goes out. The vehicle is
adjusted to normal level. Suspension setting General notes
The electronically controlled damping system
works continuously.T his improves driving
safety and ride comfort.
The damping is tuned individually to each
wheel and depends on:
R your driving style, e.g. sporty
R the road surface condition ,e.g. bumps
R your individual selection, i.e. sport or com-
fort
Your selection remains stored even if you
remove the key from the ignition lock.
Sport mode The firmer suspension settingins
ports mode
ensures even better contact with the road.
Select this mode when employing asporty
driving style, e.g. on winding countryr oads.
X Press button :.
Indicator lamp ;lights up. You have selec-
ted "Sport mode".
The AIRMATIC SPORT AIRMATIC SPORT message appears in
the multifunction display.
Comfort mode
In comfort mode, the driving characteristics
of your vehicle are more comfortable. There-
fore, select this mode if you prefer amore
comfortable driving style. Select Comfort
mode also when driving fast on straight roads,
e.g. on straight stretches of motorway. 232
Driving systemsDriving and parking
Page 243 of 497
Parking tips:
R on narrow roads, drive as closely as possi-
ble past the parking space.
R parking spaces that are littered or over-
grown might be identified or measured
incorrectly.
R parking spaces that are partially occupied
by trailer drawbars might not be identified
as such or be measured incorrectly.
R snowfall or heavy rain may lead to aparking
space being measured inaccurately.
R pay attention to the PARKTRONIC
(Y page 237) warning messages during the
parking procedure.
R you can intervene in the steerin gprocedure
to correc titatany time. Active Parking
Assist will then be cancelled.
R when transportin gaload which protrudes
from your vehicle, you should not use
Active Parking Assist.
R never use Active Parking Assist when snow
chains are fitted.
R make sure that the tyre pressures are
alway scorrect. This has adirect influence
on the parking characteristics of the vehi-
cle.
Use Active Parking Assist for parking spaces
that are:
R parallel or at right angles to the direction of
travel
R on straight roads, not bends
R on the same level as the road, e.g. not on
the pavement
Detecting parking spaces Objects located above the height range of
Active Parking Assist will not be detected
when the parking space is measured. These
are not taken into account when the parking
procedure is calculated, e.g. overhanging
loads, tail sections or loading ramps of goods
vehicles. G
WARNING
If there are object sabove the detection range:
R Active Park Assist may steer too early
R the vehicle may not stop in fron tofthese
objects.
This could cause acollision. There is arisk of
an accident.
If object sare located above the detection
range, stop and switch off Active Parking
Assist.
For further information on the detection
range (Y page 236).
Active Parking Assist does not assist you
parking in spaces at right angles to the direc-
tion of travel if:
R two parking spaces are located directly
next to one another
R the parking space is directly next to alow
obstacle such as alow kerb
R you forward park
Active Parking Assist does not assist you
parking in spaces that are parallel or at right
angles to the direction of travel if:
R the parking space is on akerb
R the system reads the parking space as
being blocked, for example by foliage or
grass paving blocks
R the area is too small for the vehicle to
manoeuvre into
R the parking space is bordered by an obsta-
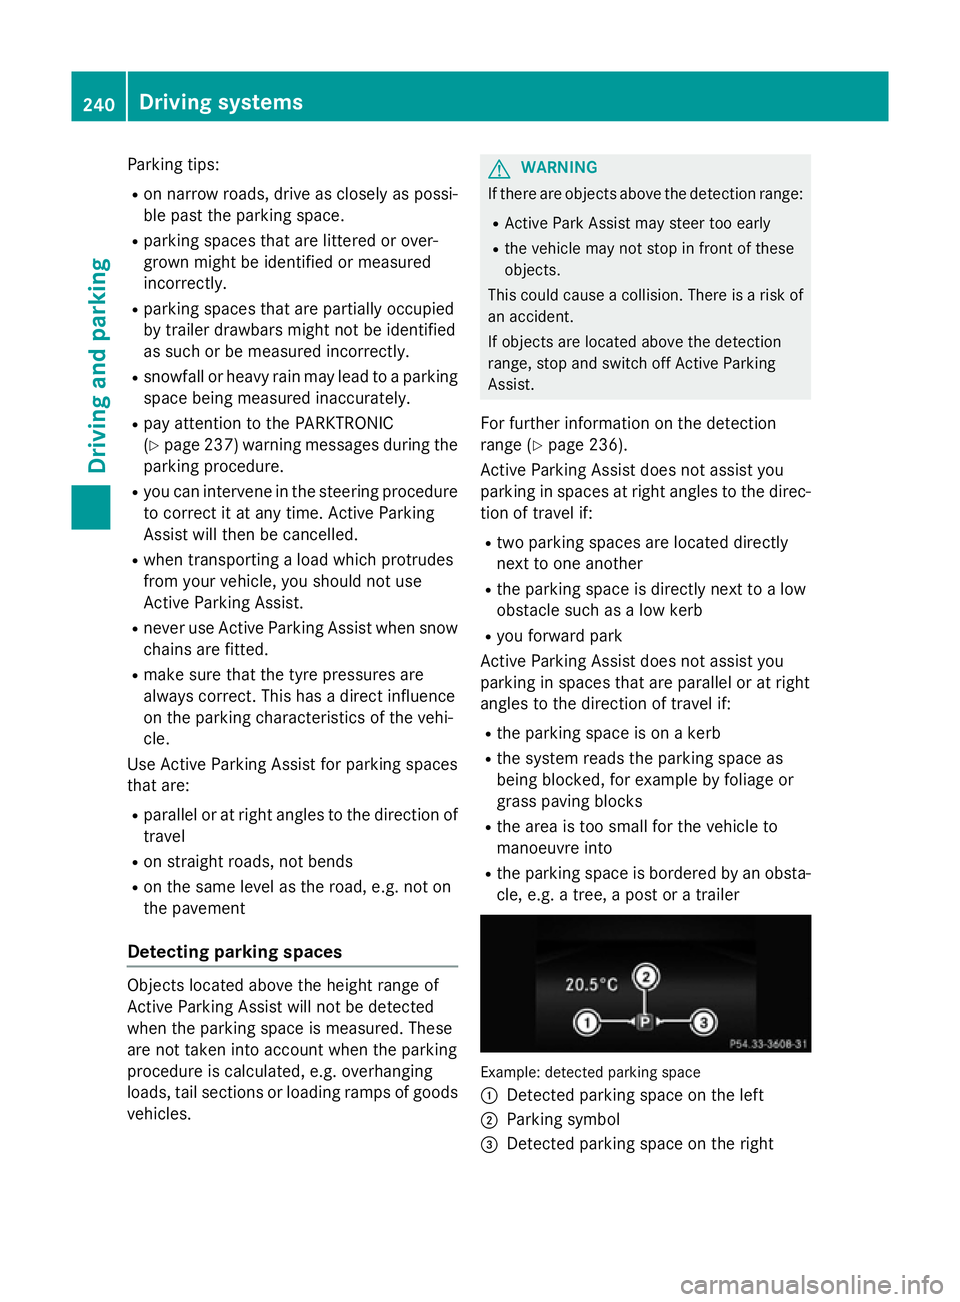
cle, e.g. atree, apost or atrailer Example: detected parking space
:
Detected parking space on the left
; Parking symbol
= Detected parking space on the right 240
Driving systemsDriving and parking