2015 MERCEDES-BENZ E-CLASS COUPE manual transmission
[x] Cancel search: manual transmissionPage 183 of 345
X
To exit a parking space using Active Park-
ing Assist: press theabutton on the mul-
tifunction steering wheel.
The Park Assist active Accelerate
Park Assist active Accelerate
and brake Observe surroundings and brake Observe surroundings mes-
sage appears in the multifunction display.
X Release the multifunction steering wheel.
X Pull away, being ready to brake at all times. Do
not exceed a maximum speed of approx-
imately 10 km/h when exiting a parking
space. Otherwise, Active Parking Assist will
be cancelled.
X Vehicles with manual transmission: stop,
at the latest when PARKTRONIC sounds the
continuous warning tone.
X Vehicles with manual transmission:
engage first gear or reverse gear when the
vehicle is stationary, depending on the mes-
sage or requirement.
Vehicles with automatic transmission:
shift the transmission to position Dor Rwhen
the vehicle is stationary, depending on the
message or requirement.
Active Parking Assist immediately steers in
the other direction. The Park Assist Park Assist
active
active Accelerate
Accelerate and
andbrake
brake Observe
Observe
surroundings
surroundings message appears in the mul-
tifunction display.
i You will achieve the best results by waiting
for the steering procedure to complete before
pulling away.
If you reverse after activation, the steering
wheel is moved to the straight-ahead posi-
tion.
X Drive forwards and reverse as prompted by
the PARKTRONIC warning displays, several
times if necessary.
X Vehicles with manual transmission: stop
as soon as PARKTRONIC sounds the contin-
uous warning tone, if not before.
Once you have exited the parking space com-
pletely, the steering wheel is moved to the
straight-ahead position. You hear a tone and the
Park Park Assist
Assist switched
switched off
offmessage appears
in the multifunction display. You will then have
to steer and merge into traffic on your own.
PARKTRONIC is still available. You can take over the steering before the vehicle has exited the
parking space completely. This is useful, for
example when you recognise that it is already
possible to pull out of the parking space. Cancelling Active Parking Assist You can cancel Active Parking Assist at any
time.
X Stop the movement of the multifunction
steering wheel or steer yourself.
Active Parking Assist will be cancelled at
once. The Park Assist cancelled
Park Assist cancelled mes-
sage appears in the multifunction display and you hear a tone.
or
X Press the PARKTRONIC button on the centre
console (Y page 174).
PARKTRONIC is switched off and Active Park-
ing Assist is immediately cancelled. The
Park Assist cancelled Park Assist cancelled message appears
in the multifunction display and you hear a
tone.
Active Parking Assist is cancelled automatically
if:
R the transmission is shifted too early
R transmission position Pis selected
R parking using Active Parking Assist is no lon-
ger possible
R you are driving faster than 10 km/h
R a wheel spins and ESP ®
intervenes or fails. In
such cases the ÷warning lamp lights up in
the instrument cluster.
A warning tone sounds. The parking symbol dis-
appears and the multifunction display shows the
Park Assist cancelled
Park Assist cancelled message.
When Active Parking Assist is cancelled, you
must steer and brake again yourself.
Vehicles with automatic transmission: if a
system malfunction occurs, the vehicle is
braked to a standstill. To drive on, depress the
accelerator pedal again.
Towing a trailer For vehicles with a trailer tow hitch, the mini-
mum length for parking spaces is slightly
increased.
If you have attached a trailer to your vehicle, you
should not use Active Parking Assist. Once the
electrical connection is established between
your vehicle and the trailer, Active Parking
Assist is no longer available. PARKTRONIC is
deactivated for the rear area. 180
Driving systemsDriving an
d parking
Page 211 of 345

Back button
% Press briefly:
R Back
R Switches off voice-operated con-
trol for navigation or LINGUA-
TRONIC
R Hides display messages or calls up
the last Trip Tripmenu function used
R Exits the telephone book/redial
memory % Press and hold:
R
Calls up the standard display in the
Trip Trip menu Multifunction display
:
Text field
; Menu bar
= Drive program
? Transmission position
A Permanent display: outside temperature or
speed
X To display menu bar ;:press the =
or ; button on the steering wheel.
If you do not press the buttons any longer,
menu bar ;is faded out after a few seconds.
Text field :shows the selected menu or sub-
menu as well as display messages.
Possible displays in the multifunction dis-
play:
R ZGearshift recommendation for manual
transmission (Y page 140) or for automatic
transmission (shifting manually)
(Y page 144)
R j Active Parking Assist (Y page 176)
R ¯ Cruise control (Y page 156) R
È SPEEDTRONIC (Y page 158)
R _ Adaptive Highbeam Assist Plus
(Y page 109)
R ¤ ECO start/stop function (Y page 135)
R ë HOLD function (Y page 170)
R 120 km/h!
120 km/h! Maximum permissible speed
exceeded (only for certain countries) Menus and submenus
Menu overview
Press the =or; button on the steering
wheel to call up the menu bar and select a menu.
Operating the on-board computer (Y page 207).
Depending on the equipment fitted in the vehi-
cle, you can call up the following menus:
R Trip Trip menu (Y page 208)
R Navi
Navi menu (navigation instructions)
(Y page 210)
R Audio
Audio menu (Y page 211)
R Tel
Tel menu (telephone) (Y page 212)
R Assist.
Assist. menu (assistance) (Y page 213)
R Serv.
Serv. menu (Y page 215)
R Settings
Settings menu (settings) (Y page 216)
The displays are dependent on the multimedia
system. This is why the displays for the Audio
Audio,
Navi
Navi andTel
Tel menus may differ slightly to those
in your vehicle. Trip menu
Standard display X
Press and hold the %button on the steer-
ing wheel until the Trip
Tripmenu with trip
meter :and total distance recorder ;
appears. 208
Menus and submenusOn-board computer and displays
Page 212 of 345
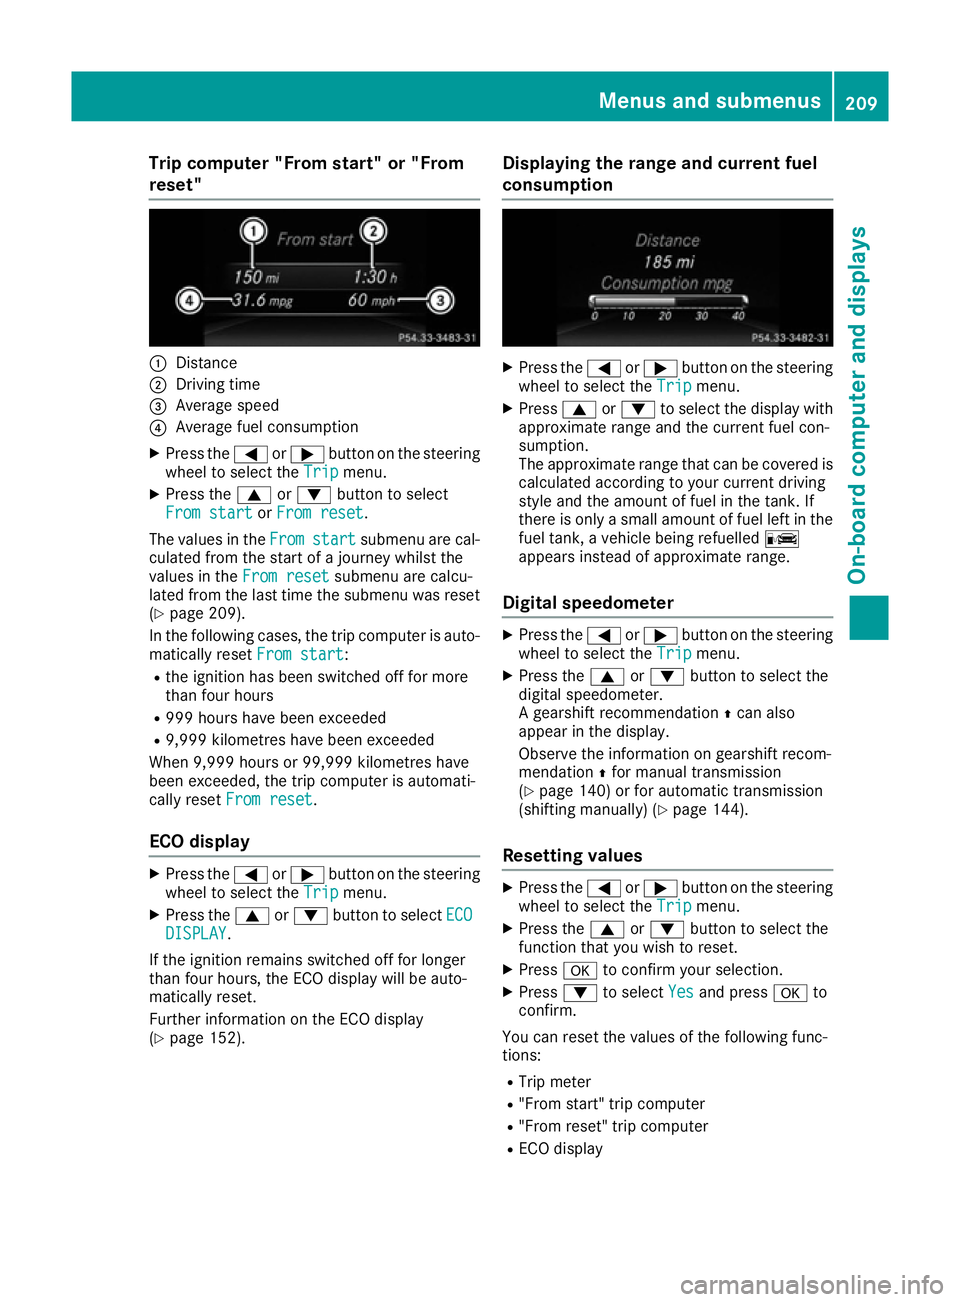
Trip computer "From start" or "From
reset" :
Distance
; Driving time
= Average speed
? Average fuel consumption
X Press the =or; button on the steering
wheel to select the Trip
Tripmenu.
X Press the 9or: button to select
From start
From start orFrom reset
From reset.
The values in the From
Fromstart
start submenu are cal-
culated from the start of a journey whilst the
values in the From reset
From reset submenu are calcu-
lated from the last time the submenu was reset
(Y page 209).
In the following cases, the trip computer is auto-
matically reset From start
From start:
R the ignition has been switched off for more
than four hours
R 999 hours have been exceeded
R 9,999 kilometres have been exceeded
When 9,999 hours or 99,999 kilometres have
been exceeded, the trip computer is automati-
cally reset From reset
From reset.
ECO display X
Press the =or; button on the steering
wheel to select the Trip
Tripmenu.
X Press the 9or: button to select ECO
ECO
DISPLAY
DISPLAY.
If the ignition remains switched off for longer
than four hours, the ECO display will be auto-
matically reset.
Further information on the ECO display
(Y page 152). Displaying the range and current fuel
consumption X
Press the =or; button on the steering
wheel to select the Trip Tripmenu.
X Press 9or: to select the display with
approximate range and the current fuel con-
sumption.
The approximate range that can be covered is calculated according to your current driving
style and the amount of fuel in the tank. If
there is only a small amount of fuel left in the
fuel tank, a vehicle being refuelled C
appears instead of approximate range.
Digital speedometer X
Press the =or; button on the steering
wheel to select the Trip Tripmenu.
X Press the 9or: button to select the
digital speedometer.
A gearshift recommendation Zcan also
appear in the display.
Observe the information on gearshift recom-
mendation Zfor manual transmission
(Y page 140) or for automatic transmission
(shifting manually) (Y page 144).
Resetting values X
Press the =or; button on the steering
wheel to select the Trip Tripmenu.
X Press the 9or: button to select the
function that you wish to reset.
X Press ato confirm your selection.
X Press :to select Yes
Yesand press ato
confirm.
You can reset the values of the following func-
tions: R Trip meter
R "From start" trip computer
R "From reset" trip computer
R ECO display Menus and submenus
209On-board computer and displays Z
Page 219 of 345
R
Checking the tyre pressure electronically
(Y page 318)
R Calling up the service due date
(Y page 288) Settings menu
Introduction Depending on the equipment fitted in the vehi-
cle, In the
Settings Settings menu you have the follow-
ing options:
R Changing the instrument cluster settings
(Y page 216)
R Changing the light settings (Y page 216)
R Changing the vehicle settings (Y page 218)
R Changing the heating settings (Y page 219)
R Changing the convenience settings
(Y page 220)
R Restoring the factory settings (Y page 221)
Instrument cluster Selecting the distance unit
The Display unit Speed-/odometer: Display unit Speed-/odometer: func-
tion allows you to choose whether certain dis-
plays appear in kilometres or miles in the mul-
tifunction display.
X Press the =or; button on the steering
wheel to select the Settings Settingsmenu.
X Press the :or9 button to select the
Instrument cluster
Instrument cluster submenu.
X Press ato confirm.
X Press the :or9 button to select the
Display unit Speed-/odometer
Display unit Speed-/odometer function.
You will see the selected setting: km
kmormiles
miles.
X Press the abutton to save the setting.
The selected unit of measurement for distance
applies to the:
R the digital speedometer in the Trip
Trip menu
R the total distance recorder and trip meter
R the trip computer
R the current consumption and the range
R the navigation instructions in the Navi
Navi menu
R cruise control
R SPEEDTRONIC
R DISTRONIC PLUS
R ASSYST PLUS service interval display Switching the additional speedometer
on/off
Vehicles for the United Kingdom: this function is unavailable.
Only vehicles with manual transmission have
this function.
If the additional speedometer is switched on,
the speed is shown in the status bar of the mul- tifunction display instead of the outside tem-
perature.
The speed display is inverse to your speedome-
ter.
X Press the =or; button on the steering
wheel to select the Sett. Sett.menu.
X Press the :or9 button to select the
Instrument cluster
Instrument cluster submenu.
X Press ato confirm.
X Press the :or9 button to select the
Dig. speedo [mph]:
Dig. speedo [mph]: orDig. speedo
Dig. speedo
[km/h]:
[km/h]: function.
You will see the selected setting: on
onoroff
off .
X Press the abutton to save the setting.
Selecting permanent display
Vehicles for the United Kingdom: this function is unavailable.
The Permanent display: Permanent display: function allows you
to choose whether the multifunction display
always shows the outside temperature or the
speed.
The speed display is inverse to your speedome-
ter.
X Press the =or; button on the steering
wheel to select the Settings Settingsmenu.
X Press the :or9 button to select the
Instrument cluster
Instrument cluster submenu.
X Press ato confirm.
X Press the :or9 button to select the
Permanent display:
Permanent display: function.
The current setting, outside temperature
outside temperature
or Addit. speedo [mph]:
Addit. speedo [mph]: , appears.
X Press the abutton to save the setting.
Lights Setting the brightness for the instrument
cluster lighting and switches
The lighting in the instrument cluster, in the dis- plays and the controls in the vehicle interior can 216
Menus and submenusOn-board computer and displays
Page 269 of 345

Glove compartment
X
To open: pull handle :and open glove com-
partment flap ;.
X To close: fold glove compartment flap ;
upwards until it engages.
i The glove compartment can be ventilated
(Y page 129). The glove compartment can only be locked and
unlocked using the emergency key element.
X To lock: insert the emergency key element
into the lock and turn it 90° clockwise to
position 2.
X To unlock: insert the emergency key element
into the lock and turn it 90° anti-clockwise to
position 1. Stowage compartments in the centre
console Front stowage compartment (vehicles with
DIRECT SELECT lever)
X To open: slide the cover forwards by han-
dle :in the direction of the arrow until it
engages.
X To close: briefly press the front of handle :. Rear stowage compartment (vehicles with
DIRECT SELECT lever)
X Briefly press trim ;in the direction of the
arrow.
Cover :swings upwards. Vehicles with manual transmission266
Stowage areasStowing and features
Page 270 of 345

X
To open: slide cover :back.
Stowage compartment/telephone
compartment under the armrest Vehicles with manual transmission
X To open: press left-hand button ;or right-
hand button :.
The stowage compartment opens. Vehicles with DIRECT SELECT lever
X To open: press left-hand button ;or right-
hand button :.
The stowage compartment opens.
i Coupé: instead of a soft top switch, an addi-
tional stowage compartment can be found in
front of the armrest.
Depending on the vehicle's equipment, the fol-
lowing may be in the stowage space:
R a multimedia connector unit with an SD card
slot and 2 USB ports (Media Interface), e.g. for
use with an iPod ®
, iPhone ®
or MP3 player; see
the separate operating instructions
R a mobile phone bracket (Y page 275)Stowage compartment under the front
seats G
WARNING
If you exceed the maximum permitted load of the stowage compartment, the cover is
unable to restrain the objects. Objects may be
thrown out of the stowage compartment and
hit vehicle occupants as a result. There is a
risk of injury, particularly in the event of sud-
den braking or a sudden change in direction.
Always observe the maximum load of the
stowage compartment. Stow and secure
heavy objects in the boot.
The maximum permissible load of the stowage
compartment is 1.5 kg. X
To open: pull handle :up and fold cover ;
forwards.
i On vehicles with a fire extinguisher instead
of a stowage compartment, the fire extin-
guisher is installed under the driver's seat. Stowage nets
Stowage nets are located in the front-passenger footwell and on the left-hand side of the boot.
Observe the loading guidelines (Y page 265)
and the safety notes regarding stowage spaces
(Y page 265). Stowage areas
267Stowing an d features Z
Page 273 of 345
Roof carrier
Important safety notes G
WARNING
When a load is transported on the roof, the
vehicle's centre of gravity rises and the han-
dling changes. If you exceed the maximum
roof load, the handling as well as steering and braking characteristics are severely affected.
There is a risk of an accident.
Always observe the maximum roof load and
adapt your driving style.
! Mercedes-Benz recommends that you only
use roof carriers that have been tested and
approved for Mercedes-Benz vehicles. This
helps to prevent damage to the vehicle.
Position the load on the roof carrier in such a way that the vehicle will not sustain damage
even when it is in motion.
Depending on the vehicle equipment, ensure
that when the roof carrier is fitted you can:
R open the panorama sliding sunroof fully
R open the boot lid fully
! To avoid damaging or scratching the covers,
do not use metallic or hard objects to open
them.
You will find information on the maximum roof
load in the "Technical data" section
(Y page 335).
An incorrectly secured roof carrier or roof load
may become detached from the vehicle. You
must therefore ensure that you observe the roof
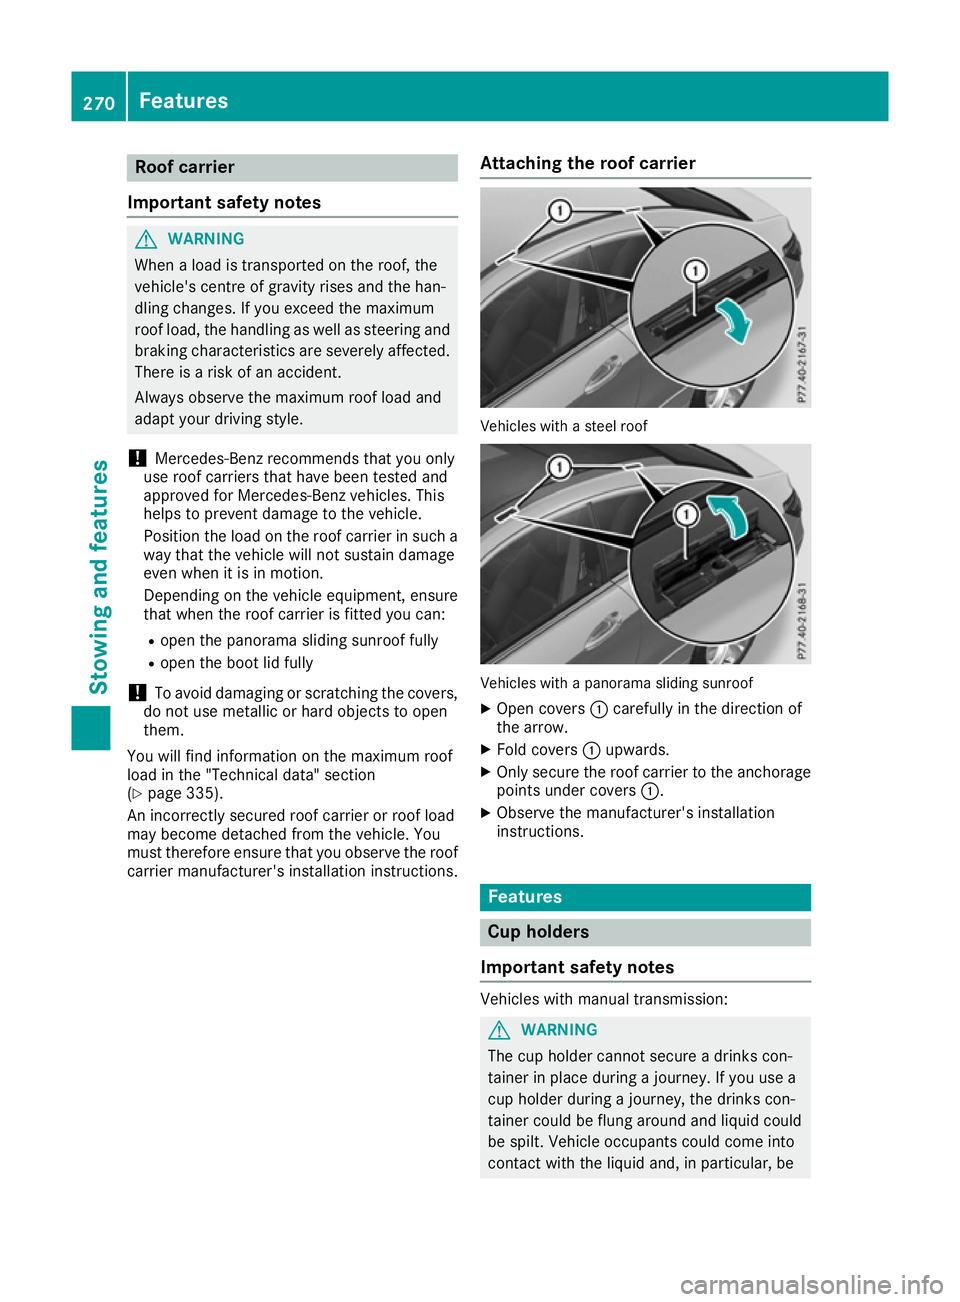
carrier manufacturer's installation instructions. Attaching the roof carrier Vehicles with a steel roof
Vehicles with a panorama sliding sunroof
X Open covers :carefully in the direction of
the arrow.
X Fold covers :upwards.
X Only secure the roof carrier to the anchorage
points under covers :.
X Observe the manufacturer's installation
instructions. Features
Cup holders
Important safety notes Vehicles with manual transmission:
G
WARNING
The cup holder cannot secure a drinks con-
tainer in place during a journey. If you use a
cup holder during a journey, the drinks con-
tainer could be flung around and liquid could
be spilt. Vehicle occupants could come into
contact with the liquid and, in particular, be 270
FeaturesStowing and features
Page 274 of 345
scalded by hot liquid. You could be distracted
from the traffic situation and lose control of
the vehicle. There is a risk of an accident and
injury.
Only use the cup holder when the vehicle is
stationary. Only place containers of a suitable size in the cup holder. Seal the container, in
particular when it contains hot liquid.
! Only use the cup holders for containers of
the right size and which have lids. The drinks
could otherwise spill. G
WARNING
If objects in the passenger compartment are
stowed incorrectly, they can slide or be
thrown around and hit vehicle occupants. In
addition, cupholders, open stowage spaces
and mobile phone brackets cannot always
retain all objects they contain. There is a risk of injury, particularly in the event of sudden
braking or a sudden change in direction.
R Always stow objects so that they cannot be
thrown around in such situations.
R Always make sure that objects do not pro-
trude from stowage spaces, parcel nets or
stowage nets.
R Close the lockable stowage spaces before
starting a journey.
R Always stow and secure heavy, hard, poin-
ted, sharp-edged, fragile or bulky objects in
the boot.
! Do not expose drinks bottles in the cup
holder in the centre console to continuous,
strong and direct sunlight. The passenger
compartment in the area of the centre con-
sole can otherwise be damaged by the con-
centrated and reflected sunlight.
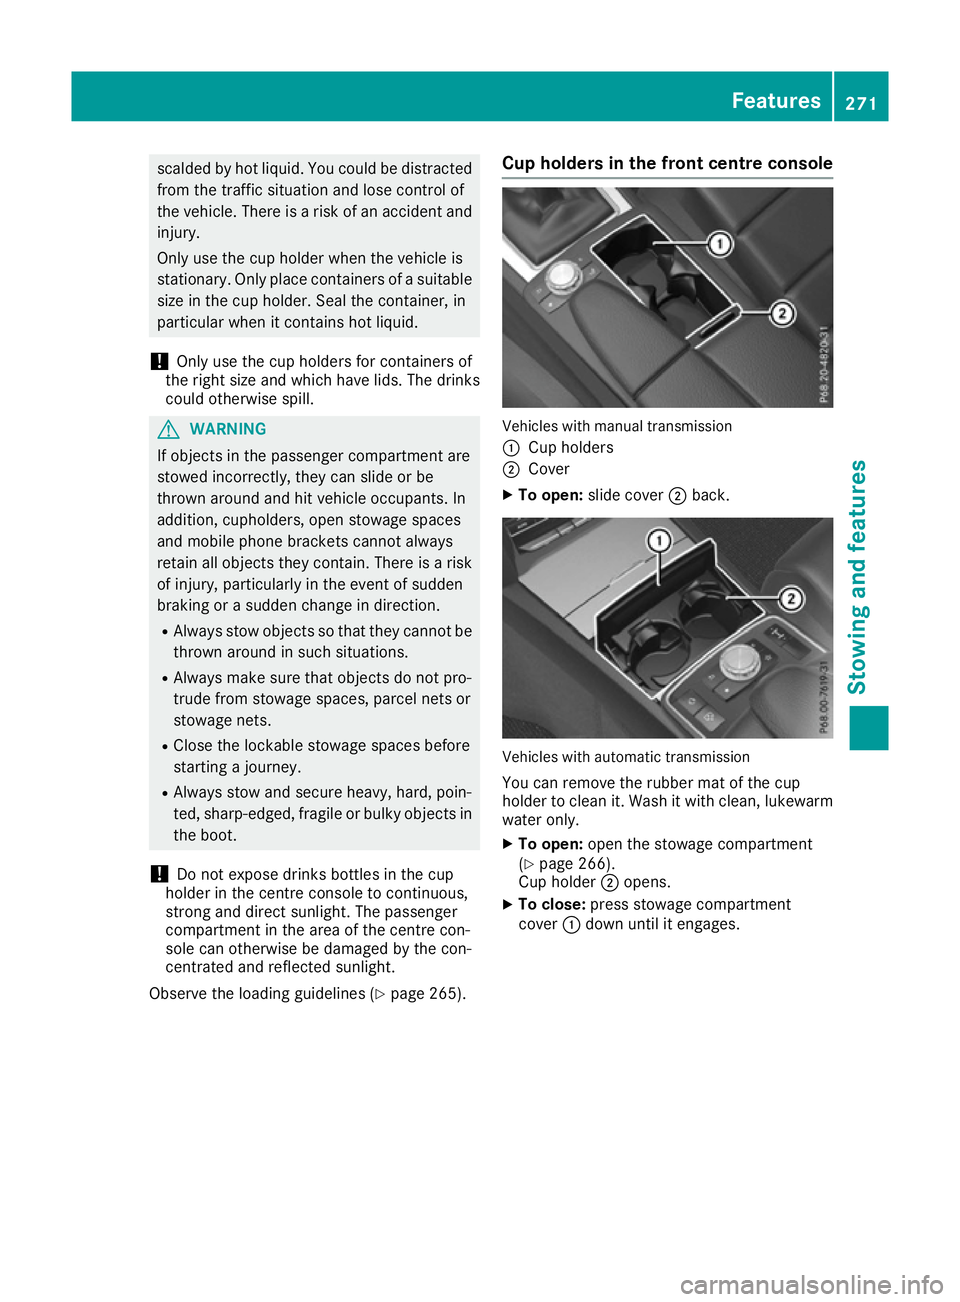
Observe the loading guidelines (Y page 265).Cup holders in the front centre console Vehicles with manual transmission
:
Cup holders
; Cover
X To open: slide cover ;back. Vehicles with automatic transmission
You can remove the rubber mat of the cup
holder to clean it. Wash it with clean, lukewarm
water only.
X To open: open the stowage compartment
(Y page 266).
Cup holder ;opens.
X To close: press stowage compartment
cover :down until it engages. Features
271Stowing and features Z